Blog

  • 10 Kawaii Polymer Clay Ideas Using Only Basic Tools

    10 Kawaii Polymer Clay Ideas Using Only Basic Tools

    Kawaii polymer clay modeling provides an accessible, expressive medium for crafters seeking to produce miniature sculptural art without investing in specialized studio machinery. The Japanese concept of kawaii centers on innocence, rounded proportions, simplified anatomical contours, and gentle pastel hues that evoke emotional warmth. This comprehensive tutorial details ten unique kawaii polymer clay ideas achievable using exclusively basic household tools, such as toothpicks, metal rulers, clean craft blades, and smooth glass surfaces. Readers will learn the essential mechanical fundamentals of clay conditioning, seamless joint fusion, color formulation, miniature facial embroidery, and controlled oven curing. Crafting miniature figures from oven-bake clay eliminates the intimidation factor of traditional pottery or complex metal jewelry smithing, giving makers total creative agency over scale, character design, and surface finish. In addition to creating delightful desk companions and charming pocket charms, mastering these simple sculpting techniques develops tactile agility and spatial awareness that readily apply to functional home decor, customized planner organization accessories, and personalized gift packaging. By learning to harness basic household implements to texture, indent, and shape pliable clay masses, decorators of any experience level can achieve clean, boutique-grade results. The upcoming sections provide preparation guidelines, required basic tool inventories, ten detailed two-paragraph instructional project breakdowns, and practical project planning strategies.

    Why This Idea Is Trending or Useful

    Miniature clay figures continue to capture widespread popularity across digital creative communities and Pinterest ideas due to their high visual charm, small physical footprint, and practical utility. Modern living spaces frequently emphasize minimalist style aesthetics, where tiny, whimsical sculptures introduce personality and warmth to floating wall shelves, computer monitors, and tiered vanity trays without generating physical clutter. The functional appeal of kawaii polymer clay modeling lies in its immediate versatility: completed miniatures can be converted into functional refrigerator magnets, decorative pushpins, planner bookmarks, or phone charms using inexpensive hardware. As a rewarding DIY creative project, miniature sculpting requires no dedicated studio space, functioning cleanly at a kitchen table or small study desk. Because these kawaii projects rely on fundamental geometric forms like spheres, teardrops, and flattened discs shaped simply by hand, this medium serves as an exceptionally beginner friendly entry point into three-dimensional arts. Crafting small figures also delivers dependable budget ideas, as a few two-ounce blocks of clay yield dozens of coordinated charms at minimal unit cost. Furthermore, these cheerful, durable objects provide satisfying handmade gifts that brighten everyday office routines and study desks.

    Materials and Preparation

    Disciplined material preparation and thoughtful workstation organization form the essential foundation for producing pristine, lint-free polymer clay miniatures using everyday tools. The primary medium consists of artist-grade oven-bake polymer clay in primary hues, opaque white, and translucent formulations, allowing makers to custom-mix gentle pastel tones. The required basic tool kit eliminates specialized clay apparatus, utilizing accessible household items: a smooth ceramic floor tile or glass cutting board as a non-porous work surface, wooden toothpicks for detailing and piercing, an untextured metal ruler for measuring and straight cuts, a single-edge razor blade, and a smooth glass jar to serve as an acrylic roller alternative. For facial details, procure dark brown or black clay, liquid polymer clay to serve as an invisible bakeable adhesive, and dry chalk pastels for blush shading. Preparation begins by wiping down the work tile, metal tools, and hands with ninety-one percent isopropyl alcohol to eliminate surface oils and airborne dust particles. Condition the clay thoroughly by hand-kneading small segments between your palms until the mass becomes soft, pliable, and free of perimeter cracking when bent. Calibrate your household oven with an independent, freestanding oven thermometer to verify temperature accuracy before baking, ensuring pale pastel figures do not scorch.

    1. Smiling Strawberry Milk Carton Desk Charm
    1

    Step-by-Step Guide

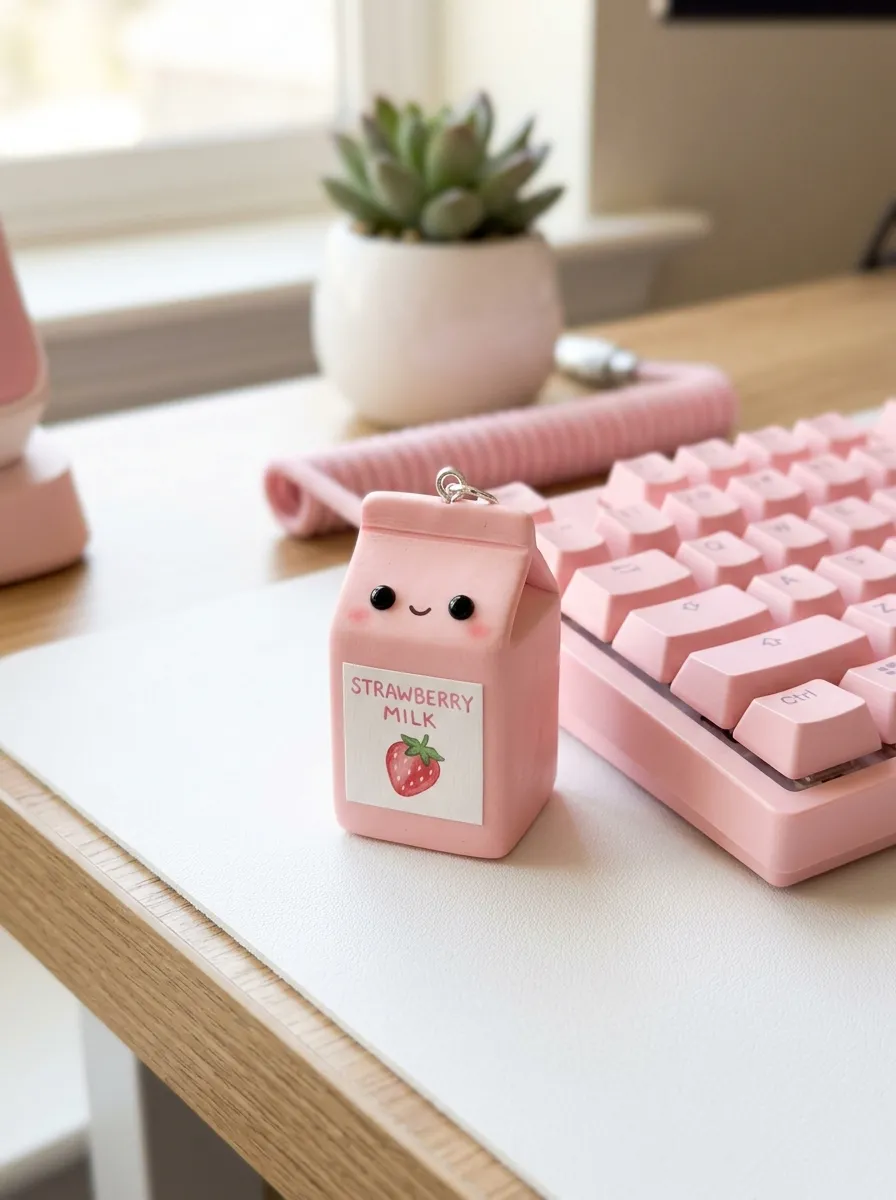
    The miniature strawberry milk carton captures classic kawaii stationery aesthetics through crisp architectural geometry, soft pastel pink tones, and cheerful anthropomorphic detailing. This project features a clean, rectangular prism body sculpted from pastel strawberry-pink clay, topped with an angled gable roof that mimics commercial paper beverage cartons. A tiny white label panel applied to the front torso displays a miniature red strawberry motif, framed by wide-set black eyes and a sweet open smile. The sharp planar edges of the milk carton contrast with the soft, rounded features of the face, creating a balanced silhouette that sits upright on any flat surface. Sized at approximately one inch in height, this compact figure serves as an adorable desk companion, planner weight, or mechanical keyboard accent. The self-contained cubic shape makes it remarkably durable, containing no fragile protruding limbs that might break off during everyday handling.
    To construct the milk carton, condition two ounces of light pink clay, formed by blending opaque white with a pinche of saturated red clay. Roll the conditioned pink clay into a thick, uniform cube measuring twenty millimeters on each side, using the flat side of a metal ruler pressed against your ceramic work tile to establish crisp, right-angled corners. To form the pitched roof, use your thumb and forefinger to pinch the top quarter of the cube into an elongated triangular gable, pressing a wooden toothpick horizontally along the top ridge to create the sealed carton seam. Roll a paper-thin sheet of white clay, cutting a neat square with your craft blade and adhering it to the front face with a smear of liquid clay. Roll two microscopic spheres of black clay for the eyes and a tiny curved filament for the smile, pressing them flush into the white panel using a blunt toothpick point. Bake the figure upright on your ceramic tile for thirty-five minutes at the temperature indicated on the clay packaging.

    2. Chubby Sleeping Cloud with Rosy Pastel Cheeks
    2

    Execution Process

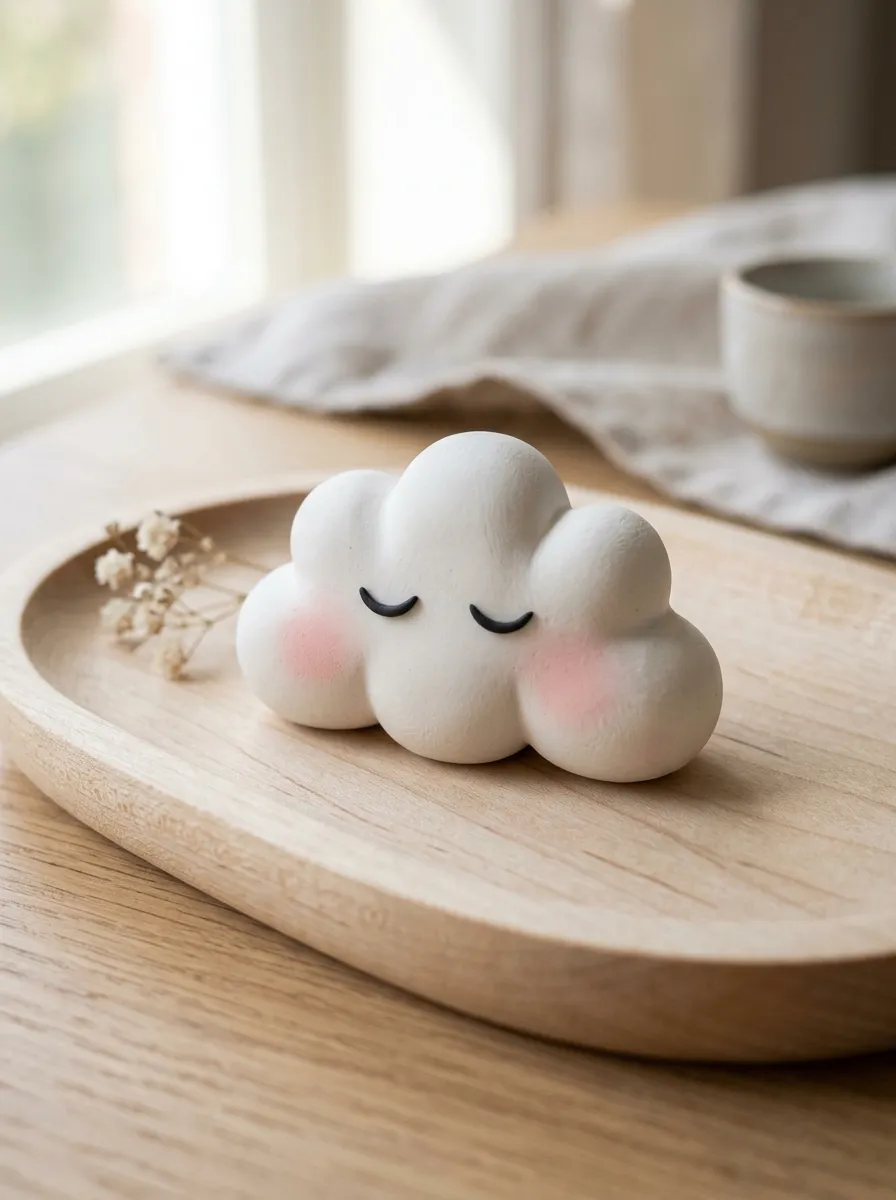
    The chubby sleeping cloud design embodies calming minimalism, organic curves, and dreamy nursery aesthetics through soft, pillowy contours. This sculpture features an undulating, lobe-shaped cloud body sculpted from opaque white or pale sky-blue clay, resting flat on its underside with a gentle forward tilt. The character’s face showcases two delicate curved arcs that represent peaceful sleeping eyelids, paired with soft, blended pink blush marks on the outer lobes. The absence of complex appendages or intricate parts makes this figure exceptionally sturdy, functioning reliably as a worry stone, paperweight, or decorative computer monitor topper. The smooth, matte texture of the cloud provides tactile satisfaction when handled, while the serene facial expression introduces a peaceful, reassuring presence to study spaces and bedside tables. Its low profile prevents accidental tipping, ensuring it rests securely on wooden floating shelves or inside shallow organization trays.
    Begin by conditioning an ounce of pure white polymer clay until completely soft, rolling the entire mass into a smooth, crack-free sphere between your palms. Gently press the sphere down onto your ceramic tile to create a flat, stable bottom plane, leaving the upper surface domed and rounded. Use the rounded side of a clean wooden toothpick or the barrel of a smooth pen to press gentle vertical indentations along the perimeter of the dome, creating five rounded, puffy cloud lobes of varied sizes. Smooth away all tool marks and seam lines using a light fingertip touch moistened with a drop of isopropyl alcohol. Roll two hair-thin threads of black clay, curling each into an upturned crescent to form sleeping eyelids, and position them symmetrically on the central lobe using the tip of a toothpick. Scrape a small amount of pink chalk pastel into powder with your craft blade, using a dry cotton swab to dust gentle blush circles onto the outer cheeks before baking the cloud for thirty minutes.

    3. Plump Honey Pot Bear with Drizzling Amber Glaze

    3

    How to Create

    Combining sweet animal figures with food miniatures produces an engaging, storybook character that highlights varied surface finishes and layered dimensional clay work. This project features a chubby, spherical teddy bear head and paws peeking over the rim of an earthen honey crock. Sculpted in warm caramel and golden-ochre clay, the honey pot displays subtle horizontal grooving that mimics wheel-thrown pottery, while the bear’s rounded ears and muzzle project curious innocence. The standout feature is a thick, glossy drip of golden honey cascading over the pot rim, crafted from translucent yellow clay that catches ambient light. The contrast between the matte, earthen clay of the pot and the shiny honey drip adds visual richness without requiring expensive glazes. This whimsical figurine functions delightfully as a decorative pencil holder mascot, tier-tray ornament, or miniature garden accent.
    To assemble the honey pot bear, roll a walnut-sized ball of golden-ochre clay into a squat cylinder, pressing your thumb into the top center to form a hollow bowl cavity with thick, sturdy walls. Roll a ball of warm caramel-brown clay to fit snugly inside the pot opening to form the bear’s head, adding two small pinched spheres for ears and an unbleached cream oval for the snout. Use the dull tip of a toothpick to press two eye sockets into the face, inserting microscopic black clay spheres, and add an inverted triangular nose. Shape two small tear-shaped paws in caramel clay, hooking them over the outer lip of the pot as if the bear is climbing inside. To create the honey drizzle, blend translucent clay with a tiny speck of yellow and orange clay, stretching the mixture into soft, teardrop drips that drape naturally over the pot rim and down the front wall. Cure the assembled figure on your tile for forty minutes, allowing it to cool slowly inside the oven.

    4. Sprouting Avocado Pal with Textured Seed Belly
    4

    Step-by-Step Guide

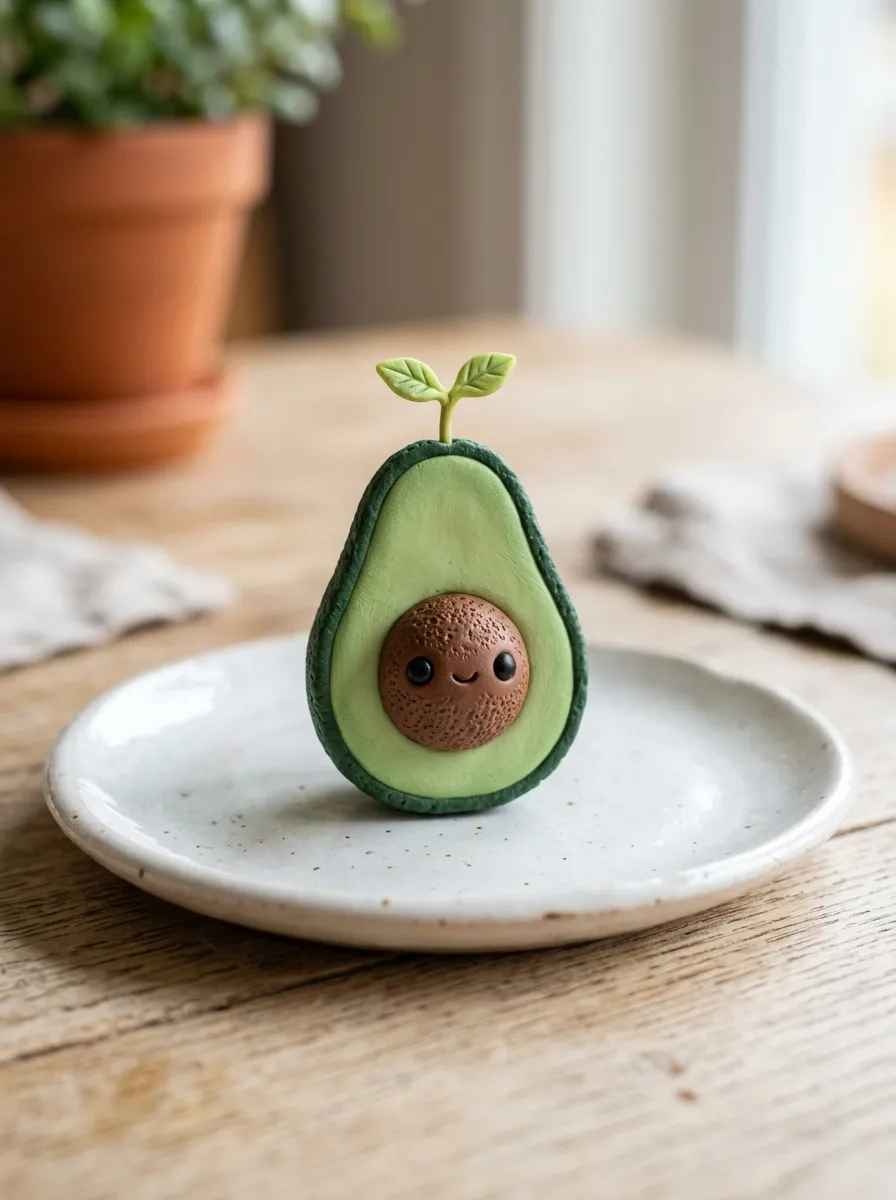
    The sprouting avocado character translates popular healthy lifestyle motifs into a playful, smiling botanical friend through simple layering and contrasting surface textures. This design incorporates a pear-shaped avocado half sculpted in light meadow-green clay, framed by a dark forest-green skin rind and centered around a prominent, rounded brown seed belly. Emerging from the top of the brown pit is a tiny, bright green two-leaf sprout, adding a whimsical gardening detail that draws the eye upward. The defining characteristic of this piece is the textural contrast between the smooth, buttery surface of the fruit flesh and the deeply stippled, pitted texture of the central seed. Wide-set black eyes and tiny pink blush spots positioned directly on the brown pit give the character an endearing, surprised expression that charms plant lovers and foodies alike.
    To create the avocado pal, roll light green clay into a smooth pear shape measuring twenty-five millimeters in length, pressing it flat against your work tile until it measures five millimeters thick. Roll a long, thin coil of dark forest-green clay, wrapping it around the outer perimeter of the pear shape to create the protective skin rind, smoothing the outer seam flat with your metal ruler. Roll a separate sphere of warm chocolate-brown clay, flattening the underside and pressing it firmly into the lower center of the light green flesh to form the seed. Use the pointed tip of a wooden toothpick to gently stipple the entire surface of the brown seed, creating a rough, organic pit texture. Embed two tiny black clay dots for eyes and a smiling mouth into the seed face, brushing the cheeks with pink pastel dust. Form two miniature tear-shaped leaves from bright lime-green clay, anchoring them to the top of the pit using a drop of liquid clay before baking the piece for thirty-five minutes.

    5. Petite Strawberry Tartlet with Fluted Pastry Crust
    5

    Execution Process

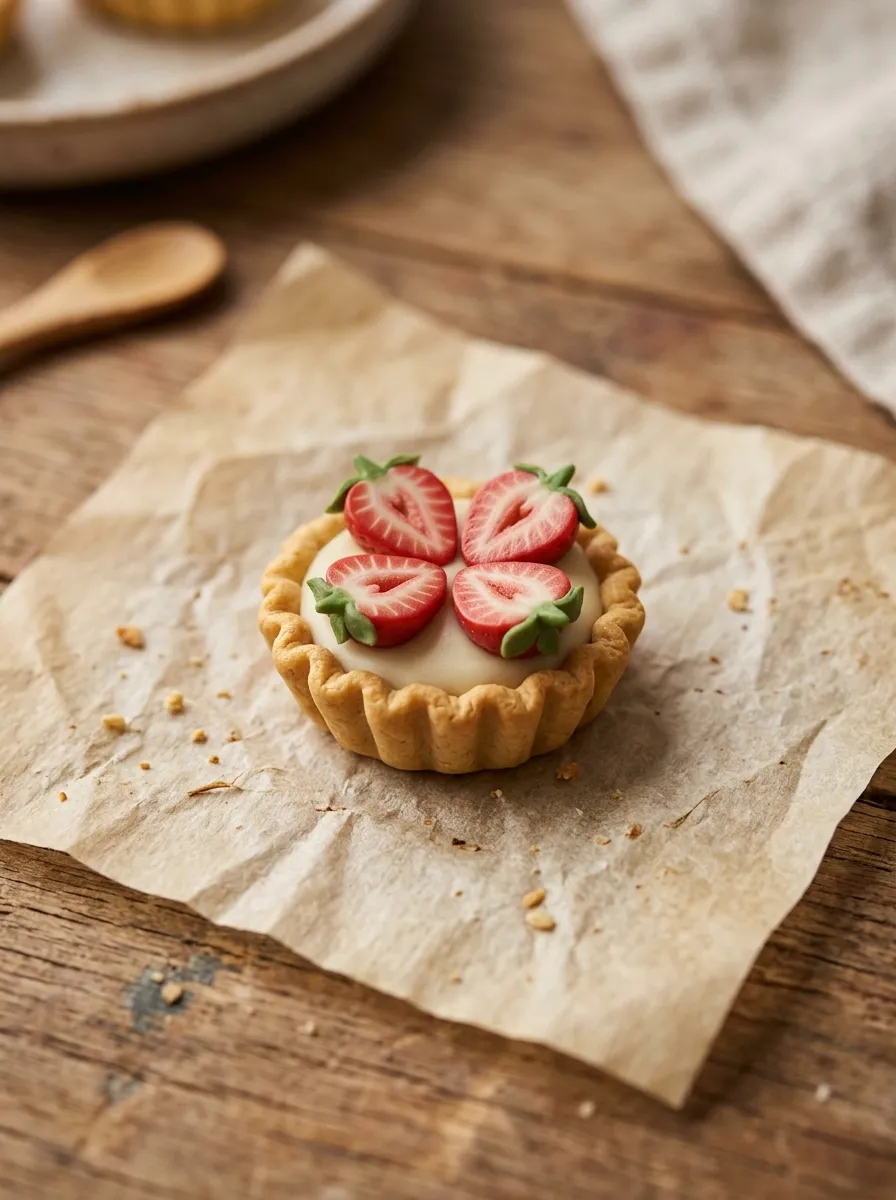
    Miniature patisserie charms celebrate the detailed craftsmanship of French pastry through crisp textures, fruit sculpting, and faux confectionary finishes. This project features a circular tartlet crust with fluted, crimped edges sculpted from warm pastry-tan clay, filled with an ivory cream base and topped with four sliced strawberry halves. The fluted edge of the crust introduces sharp geometric ridges, while the vibrant crimson strawberries provide a bold pop of color. The tiny strawberries feature hand-indented seed dimples and pale cream internal flesh rings, capturing authentic fruit anatomy at a miniature scale. The compact, flat-bottomed pastry format makes it an exceptional base for functional accessories, such as a sturdy magnetic refrigerator clip or a decorative pushpin for cork memo boards. The durable, interlocking construction ensures the small fruit toppings stay firmly attached through frequent handling.
    Begin by mixing white, translucent, and a pinch of raw sienna clay to achieve a realistic, unbaked pastry dough color. Roll the dough clay into a ball, pressing it into a flat disc measuring twenty millimeters wide and four millimeters thick on your tile. Use the flat edge of a toothpick to press evenly spaced vertical indentations around the outer rim of the disc, crimping the clay upward to create a traditional fluted tart shell. Fill the center hollow with a flat disc of cream-colored clay to represent pastry cream. To make the strawberries, shape four tiny cones from translucent red clay, using a craft blade to slice each cone in half lengthwise. Press the pointed tip of a toothpick into the red outer skin of each strawberry half to produce authentic seed dimples. Arrange the strawberry slices in a tight, overlapping spiral inside the cream center, pressing their bases into the soft clay. Bake the completed tartlet on your tile for thirty-five minutes, allowing the piece to cool completely before handling.

    6. Cheerful Toadstool Mushroom with White Appliqué Spots
    6

    How to Create

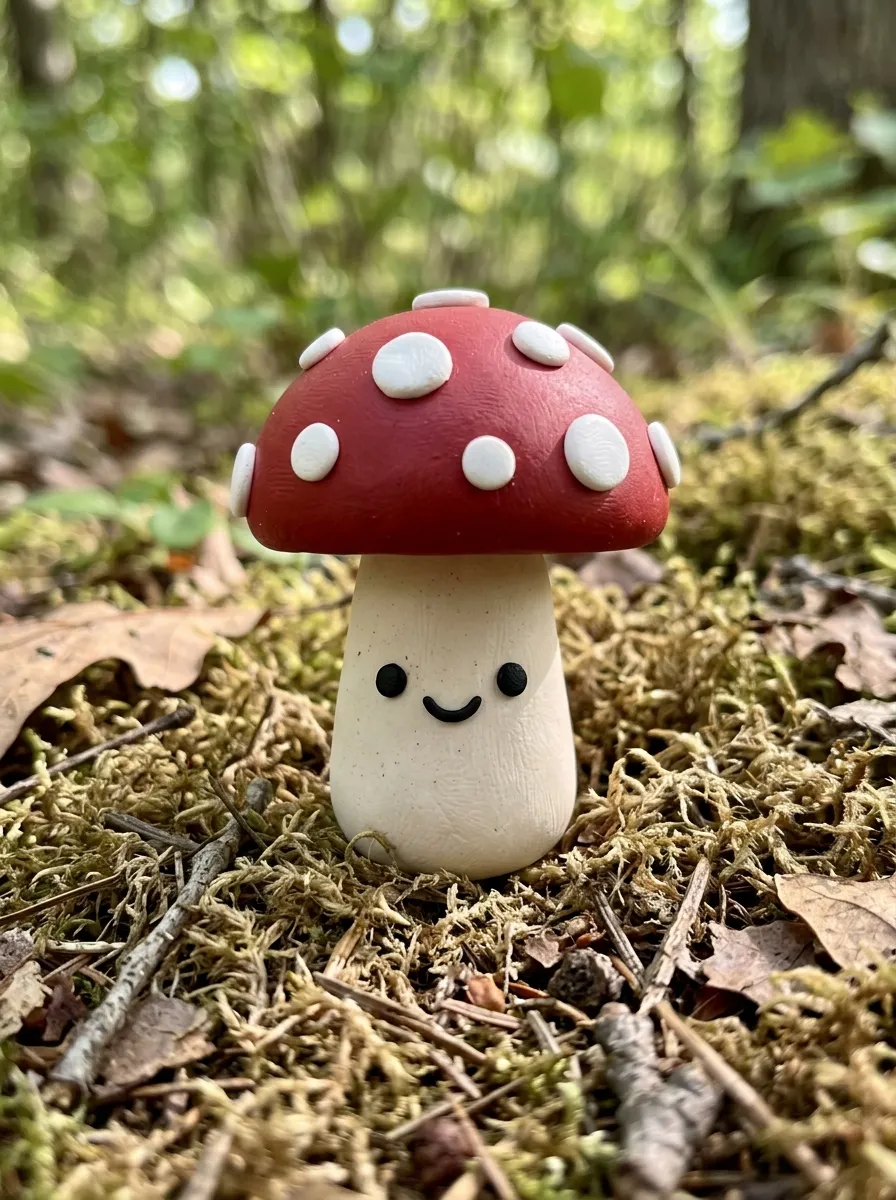
    Storybook woodland motifs bring folklore nostalgia, rich forest palettes, and friendly character styling to miniature clay crafting. This project features an upright woodland mushroom displaying a stout, unbleached cream stem and a plump, domed scarlet-red cap adorned with raised white polka dots. The smiling face is sculpted directly onto the thick stem, featuring wide-set black bead eyes and a tiny open mouth that radiates cheerful optimism. The broad, flat base of the stem gives the figurine exceptional physical balance, allowing it to stand independently inside terrariums, on plant pot soil, or along computer monitor stands. The contrast between the bright red cap and the neutral ivory stem establishes strong visual clarity, making the tiny sculpture immediately recognizable from across a room. The simple, unsegmented geometry contains no delicate extremities, ensuring it withstands everyday desktop bumps.
    To construct the toadstool mushroom, roll a portion of unbleached cream clay into a smooth cylinder measuring fifteen millimeters wide, tapering the top slightly to form a stable trunk stem. Press the bottom edge down onto your work tile to create a broad, completely flat resting foot. For the cap, roll an equal-sized ball of vibrant scarlet-red clay, flattening the bottom while shaping the top into a smooth, rounded half-sphere using the palms of your hands. Use the tip of a toothpick to hollow out a shallow depression in the underside of the red cap, applying a drop of liquid clay before seating the cap firmly onto the tapered stem. Roll several tiny, irregular spheres of white clay, flattening them into thin discs between your fingertips and pressing them onto the red dome as natural toadstool spots. Use your toothpick to indent two eye sockets into the cream stem, inserting black clay beads, and bake the upright mushroom for forty minutes.

    7. Pastel Boba Milk Tea Cup with Floating Tapioca Pearls
    7

    Step-by-Step Guide

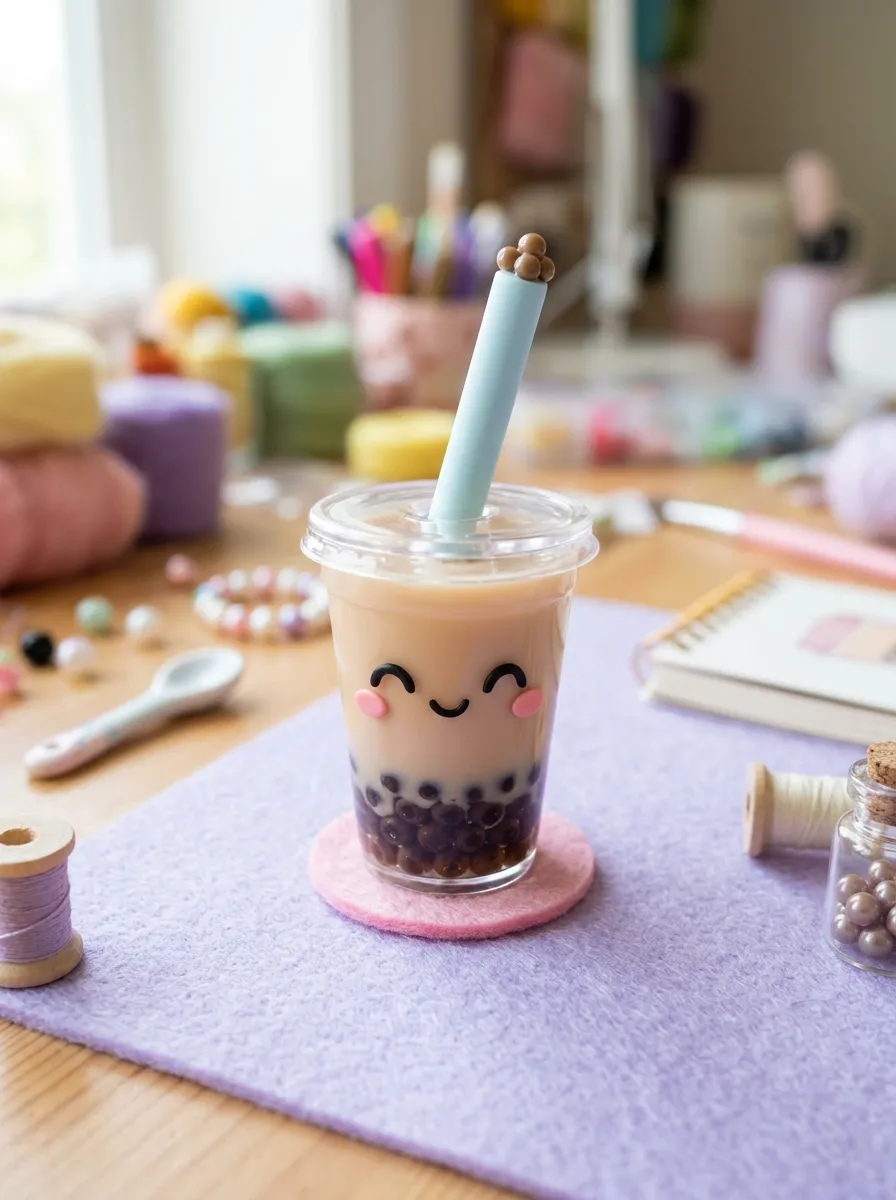
    Boba tea iconography represents a defining staple of modern kawaii food illustration, celebrating pastel cafe drinks, oversized drinking straws, and playful textural toppings. This design incorporates a tapered cylindrical cup sculpted in translucent milk-tea beige or pastel taro purple, topped with a domed clear lid and a wide, slanted drinking straw. Resting along the bottom third of the translucent cup is a cluster of glossy, dark brown tapioca pearls, visible through the beverage body. The clean, straight vertical lines of the drink cup provide a modern silhouette that contrasts with the rounded boba pearls clustered below. The smiling face applied to the front of the cup gives the beverage a lively personality that resonates with cafe enthusiasts, students, and collectors. Its sturdy, flat-bottomed cylindrical form makes it an ideal charm to mount onto keychains or planner bookmark clips.
    To create the boba cup, condition translucent clay mixed with a tiny speck of raw umber to produce an authentic iced milk-tea shade. Roll the clay into a smooth cylinder measuring twenty-five millimeters tall, rolling it gently against your tile with a metal ruler tilted at an angle to create a slight downward taper. Roll twelve to fifteen microscopic spheres of dark chocolate-brown clay to serve as tapioca pearls, pressing them in a dense cluster around the lower outer circumference of the cup. To form the domed lid, roll a half-sphere of translucent white clay, pressing a flat disc beneath it to form the rim and adhering it to the cup top with liquid clay. Cut a short, eight-millimeter length of plastic coffee stirrer or a rolled cylinder of pastel clay to serve as the wide boba straw, inserting it diagonally through the center of the dome lid. Add two tiny black clay eyes and blushing cheeks to the cup torso, curing the piece upright on your tile for thirty-five minutes.

    8. Cozy Sleeping Kitty Curled on a Ceramic Saucer
    8

    Execution Process

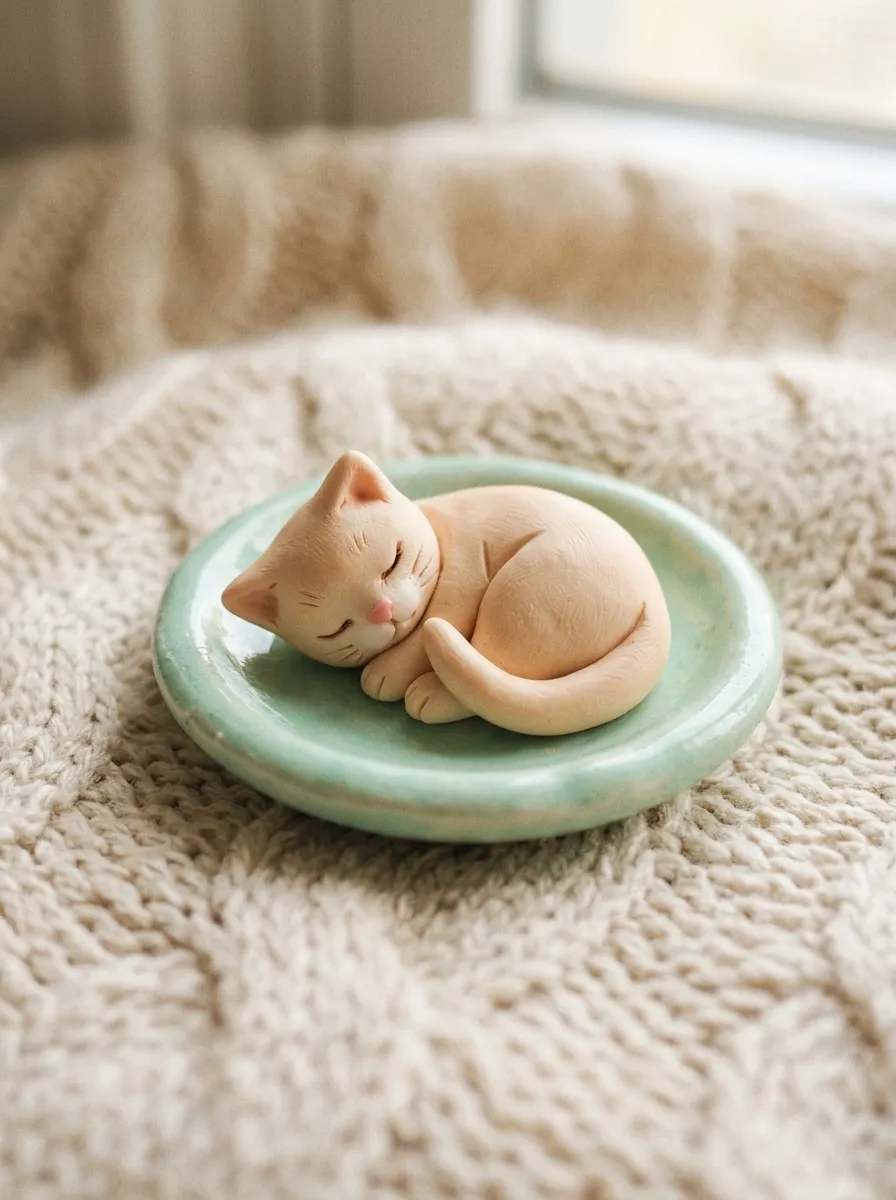
    Sleeping animal sculptures capture peaceful domestic tranquility, tactile curves, and gentle feline anatomy through rounded, flowing shapes. This project showcases a compact, sleeping kitten curled into a tight crescent circle, resting atop a separately sculpted pastel ceramic saucer. Sculpted in soft peach, warm cream, or gentle gray clay, the cat features two pointed ears folded back, a curved tail wrapped snugly around its paws, and delicate hand-embroidered sleeping whiskers. The accompanying round saucer base provides a broad, stable footprint that protects the delicate ears and tail from snagging or snapping. The circular composition creates a self-contained, harmonious desktop ornament that introduces calming energy to office workspaces and nightstands. The lack of open negative space between the limbs and body maximizes structural strength, ensuring the piece stays intact through years of handling.
    Begin by conditioning an ounce of soft pastel clay for the saucer base, rolling it into a flat, smooth disc measuring twenty-five millimeters in diameter and three millimeters thick. Use the back of a smooth metal spoon or the rounded end of a thick marker to gently press the center of the disc downward, creating a slightly raised outer dish rim. For the sleeping cat, roll warm cream-colored clay into a smooth, tapered oval, curving the elongated mass into a tight circular donut shape with no central hole. Gently shape the thicker end into a resting feline head, pinching two tiny triangular ears from the clay mass with your fingertips. Wrap the tapered tail end smoothly around the body, pressing the seams flush with a toothpick. Use your craft blade to slice three microscopic whiskers and sleeping eye curves on the face using dark brown clay threads. Seat the curled cat into the saucer hollow, securing the contact point with liquid clay, and bake for forty minutes.

    9. Smiling Onigiri Rice Ball with Crisp Nori Wrap
    9

    How to Create

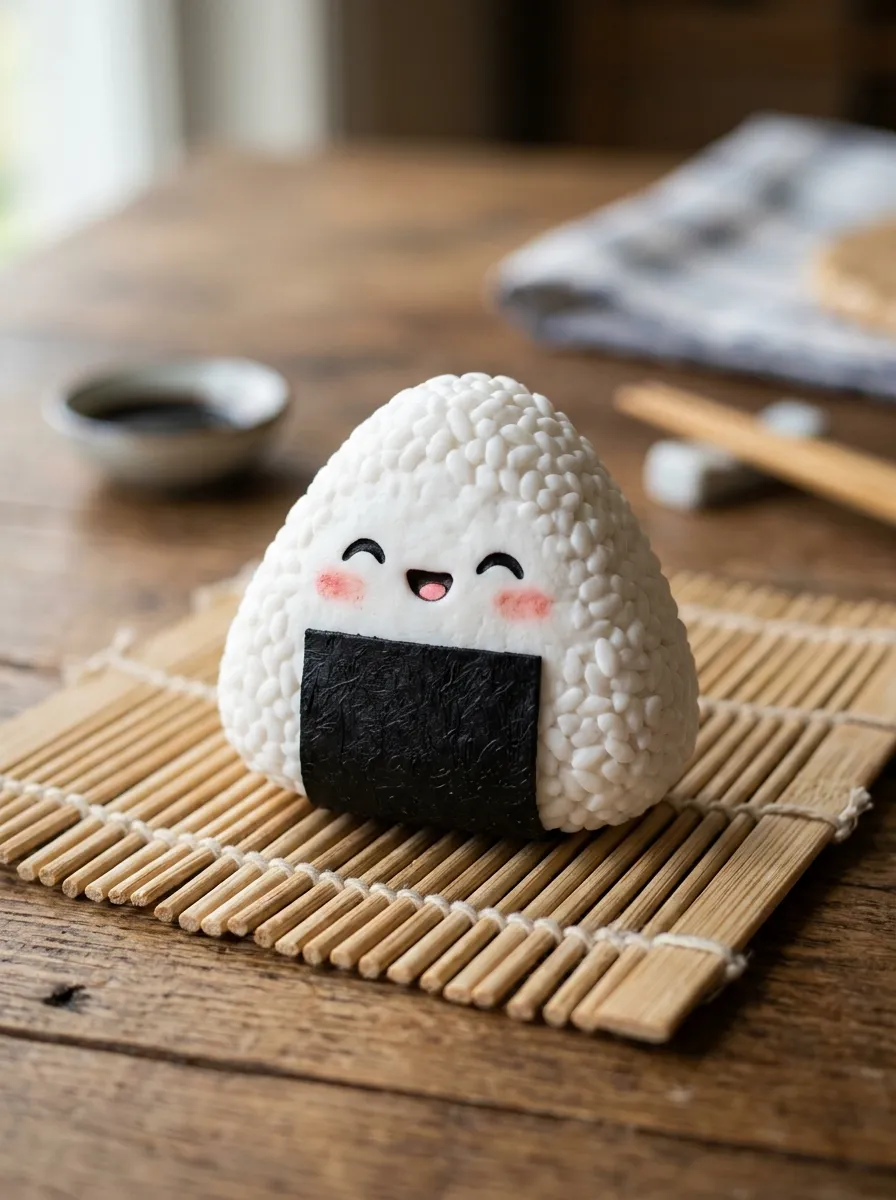
    Traditional Japanese culinary shapes offer minimalist geometry, clean monochromatic contrast, and joyful graphic character within miniature sculpture. This project features a plump, triangular onigiri rice ball sculpted from textured white clay, wrapped along its base with a wide band of matte black nori seaweed. Positioned directly on the white rice face is a sweet kawaii expression, featuring smiling curved eyes, pink blush marks, and a tiny open mouth. The crisp triangle with rounded corners provides an iconic silhouette that captures the comforting simplicity of home-cooked bento lunches. The defining textural feature is the lightly stippled surface of the white clay, which realistically replicates individual grains of steamed short-grain rice. This compact, durable charm makes a wonderful zipper pull, lunchbox tag, or culinary-themed refrigerator magnet that brings everyday cheer to kitchens and workspaces.
    To craft the onigiri charm, condition two ounces of opaque white polymer clay, rolling the mass into a smooth sphere before flattening it gently between your palms to a thickness of eight millimeters. Use the flat edge of your metal ruler to press the sides of the clay ball into an equilateral triangle, softening the three sharp points with your fingertips until the contours become rounded and plump. Take a wooden toothpick and gently tap the pointed end repeatedly across the entire white surface to produce a realistic, pebbled rice texture, avoiding the central face area. Roll a thin sheet of jet-black clay, using your craft blade and ruler to slice a neat rectangular strip measuring eight millimeters wide and twenty-five millimeters long. Wrap the black strip around the lower base of the white rice triangle to form the nori sheet, pressing it flat against the textured clay. Embed two black clay threads for eyes and dust pink pastel onto the cheeks before baking the onigiri for thirty minutes.

    10. Floating Narwhal Whale with Golden Swirl Horn

    10

    Step-by-Step Guide

    Whimsical marine creatures introduce aquatic fantasy, soft pastel gradients, and playful storytelling to miniature clay collections. This project features an adorable floating narwhal sculpted in soft pastel mint or baby-blue clay, characterized by a rounded bean-shaped body, tiny side flippers, and a perky horizontal tail fluke. The centerpiece of the sculpture is a slender, spiraled unicorn tusk mounted to the forehead, crafted from metallic gold clay or highlighted with gold mica powder. The hydrodynamic, rounded contours give the figure a friendly, approachable appearance that feels comfortable in the palm of your hand. Wide-set black bead eyes and a gentle curved smile complete the magical sea creature’s face. Sized at roughly an inch and a half in length, this charming aquatic figurine functions beautifully as a desk companion, decorative paperweight, or hanging mobile accent.
    To construct the narwhal, roll conditioned pastel mint clay into a smooth egg shape, narrowing the tapered end into a slender tail and flattening the tip into two rounded horizontal flukes using your thumb. Attach two tiny paddle-shaped flippers to the lower sides of the body, smoothing the seam lines seamlessly into the torso using the rounded shaft of a toothpick. For the narwhal horn, roll a tiny thread of metallic gold clay into a pointed coil, twisting the wire-like thread gently between your fingers to produce a spiral tusk texture. Use a pin tool to create a small pilot hole in the narwhal’s forehead, applying a tiny drop of liquid clay before seating the gold horn firmly into the socket. Indent two shallow eye sockets on either side of the forehead with a toothpick, inserting tiny black clay spheres to form the eyes. Place the narwhal onto a crumpled bed of parchment paper to support its rounded belly without creating flat spots, and bake for thirty-five minutes.

    Common Beginner Mistakes and How to Avoid Them

    The most critical technical error when sculpting polymer clay miniatures using basic household tools is failing to maintain clean, lint-free working conditions. Because kawaii designs rely heavily on pristine white, cream, and soft pastel clays, stray airborne dust particles, dark clothing fibers, and skin oils show up immediately on light surfaces. Prevent this contamination by wiping your tile, tools, and hands with ninety-one percent isopropyl alcohol before touching light clays, and roll a small scrap ball of light-colored clay across your work surface to collect lingering debris before starting. Another frequent mistake is applying excessive, uneven pressure when cutting shapes with utility blades, which drags the clay and deforms crisp geometric angles. Always chill your shaped clay pieces in the refrigerator for fifteen minutes before making fine cuts, and use a sharp, clean carbon steel blade pressed straight down in a single decisive motion rather than sawing back and forth. Beginners also frequently overlook oven temperature calibration, trusting built-in stove dials that often run hot and scorch delicate pastel pigments into brittle, discolored messes. Always position an independent, freestanding oven thermometer directly next to your baking tile, and tent a sheet of folded aluminum foil over your sculptures to shield them from direct heating elements. Finally, avoid joining clay components with light surface contact alone; always smooth seams thoroughly with a toothpick or use a drop of bakeable liquid clay to ensure parts do not separate after baking.

    Practical Tips for Better Results

    Achieving boutique-grade, professional finishes on polymer clay miniatures using everyday tools relies on disciplined smoothing habits and precise post-bake refinements. To eliminate fingerprints and tool indentations on raw clay figures without sanding, dip a soft-bristled artist paintbrush lightly into isopropyl alcohol and stroke the wet bristles gently across the clay surface; the alcohol dissolves surface imperfections, leaving a smooth, satin finish before baking. When shaping tiny, symmetrical facial components like eyes or blush circles, roll a microscopic clay coil and slice identical lengths with a razor blade before rolling them into spheres, ensuring both eyes have matching volumes. Utilize a flat ceramic floor tile as both your primary sculpting mat and your oven baking tray; this eliminates the risky process of peeling delicate raw clay sculptures off your table, preventing distorted bases and squished appendages. When applying chalk pastel blush to cheeks, always apply the dry pigment onto the raw clay before baking using a soft, dry cotton swab; the heat of the oven locks the pigment permanently into the curing clay without requiring sticky post-bake sealants. Finally, let your cured figures cool completely inside the turned-off oven with the door closed; allowing the clay to cool slowly prevents thermal shock and ensures maximum structural flexibility and strength.

    Styling, Presentation, or Organization Ideas

    Integrating miniature kawaii clay figures into your everyday living environment introduces cheerful personality, creative craftsmanship, and playful warmth to diverse spaces. Arrange your completed clay creations on tiered wooden display shelves, inside small glass shadow boxes, or nestled beside potted succulent gardens on sunlit windowsills to create charming, personalized vignettes. For study and office spaces, convert your miniature figures into functional desk organization tools by embedding strong neodymium disc magnets into their backs before baking, transforming them into cheerful memo holders for magnetic whiteboards and metal filing cabinets. If presenting these handmade sculptures as gifts, place each figure inside a clear acrylic display dome or a miniature kraft paper jewelry box lined with shredded crinkle paper, tying the exterior with natural cotton baker’s twine and a hand-stamped cardstock gift tag. You can also mount small figures onto metal paperclip slides or pushpins using high-strength two-part epoxy, creating delightful custom planner accessories that make daily scheduling feel joyful. When photographing your clay art for digital mood boards or inspiration portfolios, utilize soft morning window daylight, neutral linen backdrops, and simple wooden props to highlight the fine handcrafted textures, gentle pastel tones, and clean sculptural lines.

    Budget or Time Planning

    Executing a collection of kawaii polymer clay miniatures requires minimal financial investment and structured time management to maximize creative productivity. Minimize startup expenses by purchasing large economy blocks of foundational white and translucent clay, custom-mixing an infinite spectrum of soft pastel shades by blending microscopic pinches of saturated primary colors into the neutral bases. Rather than purchasing expensive sculpting kits, look around your home for functional shaping tools: use sewing needles for micro detailing, clean bottle caps as circular cutters, and smooth glass tumblers as rolling pins. Structure your creative workflow into three focused operational phases: dedicate the first session to conditioning clay, blending custom pastel palettes, and rolling basic foundational shapes; use a second uninterrupted block for assembling details, sculpting facial features, and adding pastel blush; and reserve a final session for batch baking, cooling, and hardware assembly. Simple single-form figures like the sleeping cloud or onigiri require approximately twenty to thirty minutes of active sculpting, making them ideal high-efficiency weekend projects. Store unused conditioned clay wrapped tightly in clean wax paper inside airtight polypropylene plastic containers, shielding the material from heat and airborne dust to ensure it remains soft and ready for future crafting sessions.

    Creative Expansion and Advanced Inspiration

    Once you have mastered foundational hand-shaping and basic tool mechanics, explore creative variations to expand your clay art across wider practical applications. Translate your miniature characters into functional wearable jewelry by inserting stainless steel eye pins into the top crowns before baking, turning the figures into charming dangle earrings, charm bracelet accents, or personalized zipper pulls. You can also experiment with incorporating mixed-media elements into your clay art, such as dusting cured pieces with iridescent cosmetic mica powders, embedding tiny glass seed beads, or applying selective coats of high-gloss UV resin over eyes and fruit glazes to create dynamic contrasts between matte and glossy surfaces. Consider designing complete themed miniature collections, such as a cohesive breakfast cafe set featuring matching toast, coffee mugs, and pastry characters unified by identical pastel color palettes and smiling facial aesthetics. Document your custom clay mixing ratios, successful baking durations, and dimensional sketches in a dedicated studio notebook, establishing a valuable personal reference archive that streamlines future creative projects and ensures consistent, beautiful results across every handmade collection.
  • 10 Spring Polymer Clay Jewelry Ideas

    10 Spring Polymer Clay Jewelry Ideas

    Spring polymer clay jewelry provides a vibrant avenue for personal artistic expression, home studio crafting, and modern seasonal style. Discovering fresh Pinterest ideas for spring accessories allows creators to translate organic botanical textures, pastel palettes, and minimalist lines into wearable art. This guide outlines fundamental assembly methods, precise temperature management, and modern design principles required to build durable, beautiful accessories. Readers will learn how to condition clay properly, cut consistent shapes, construct balanced color palettes, and assemble sturdy findings with confidence. Embracing this creative project offers practical utility because it enables the production of high-value custom pieces using compact work areas and straightforward materials. Polymer clay cures into a durable, featherlight medium that withstands daily wear without adding uncomfortable weight to earlobes or chains. By understanding core forming techniques, correct baking protocols, and finishing methods, crafters can produce professional accessories that rival boutique collections. The detailed guides provided below bridge the gap between creative visual inspiration and actionable studio craftsmanship, giving both new makers and experienced artisans the precise technical blueprints needed to bring ten distinctive seasonal jewelry designs to life with consistent success.

    Why This Idea Is Trending or Useful

    Spring polymer clay jewelry continues to dominate digital inspiration boards because it combines accessible DIY fabrication with contemporary fashion appeal. The medium possesses exceptional practical value, offering an inexpensive entry point into three-dimensional accessory design without requiring commercial metalworking machinery or expensive kilns. Modern design relevance leans toward organic earthiness, soft floral tones, and sculptural geometric shapes, all of which are easily achieved through oven-bake modeling compounds. A beginner-friendly polymer clay tutorial eliminates the intimidating technical learning curve often associated with traditional silversmithing or resin casting. The tactile appeal of conditioning, rolling, sculpting, and assembling miniature objects satisfies the growing interest in hands-on handmade crafting. Furthermore, these easy project workflows require minimal home decor space, converting any clean kitchen counter or desk into an efficient micro-studio. Trending ideas consistently emphasize seasonal renewal through delicate pastels, daisy appliques, and clean terrazzo patterns that coordinate effortlessly with transitional seasonal wardrobes. Because clay can be blended into unlimited custom shades and cut into endlessly adaptable silhouettes, makers enjoy unmatched creative freedom while maintaining absolute control over material safety, structural strength, and design aesthetics.

    Materials and Preparation

    Thorough planning and proper materials selection establish the foundation for durable, polished polymer clay jewelry pieces. Essential items include oven-bake polymer clay blocks, an acrylic rolling pin or dedicated clay conditioning machine, non-porous ceramic work tiles, and high-carbon steel tissue blades. Component shaping requires precision shape cutters, micro needle tools for scoring, silicone sculpting shapers, and fine drill bits for neat post-bake holes. Metal jewelry findings must feature hypoallergenic stainless steel or brass compositions, including jump rings, earring posts, flat-pad ear wires, and robust mechanical clasps. Surface preparation starts by wiping every tool, tile, and rolling pin with isopropyl alcohol to remove static dust particles and oily residues. Pre-wash hands thoroughly or wear lightweight nitrile gloves to protect light clay colors from discoloration, lint, and fingerprints. Accurate oven temperature control requires an independent internal oven thermometer, as standard residential ovens exhibit internal heat fluctuations that can scorch delicate clays. Cover ceramic baking tiles with clean baking parchment to eliminate unwanted shiny surface spots on curing clay reverses. Planning layout templates on graph paper ensures proportional sizing and structural balance before any material cutting begins.

    Idea 1: Pastel Daisy Stud Earrings

    1

    How to Make

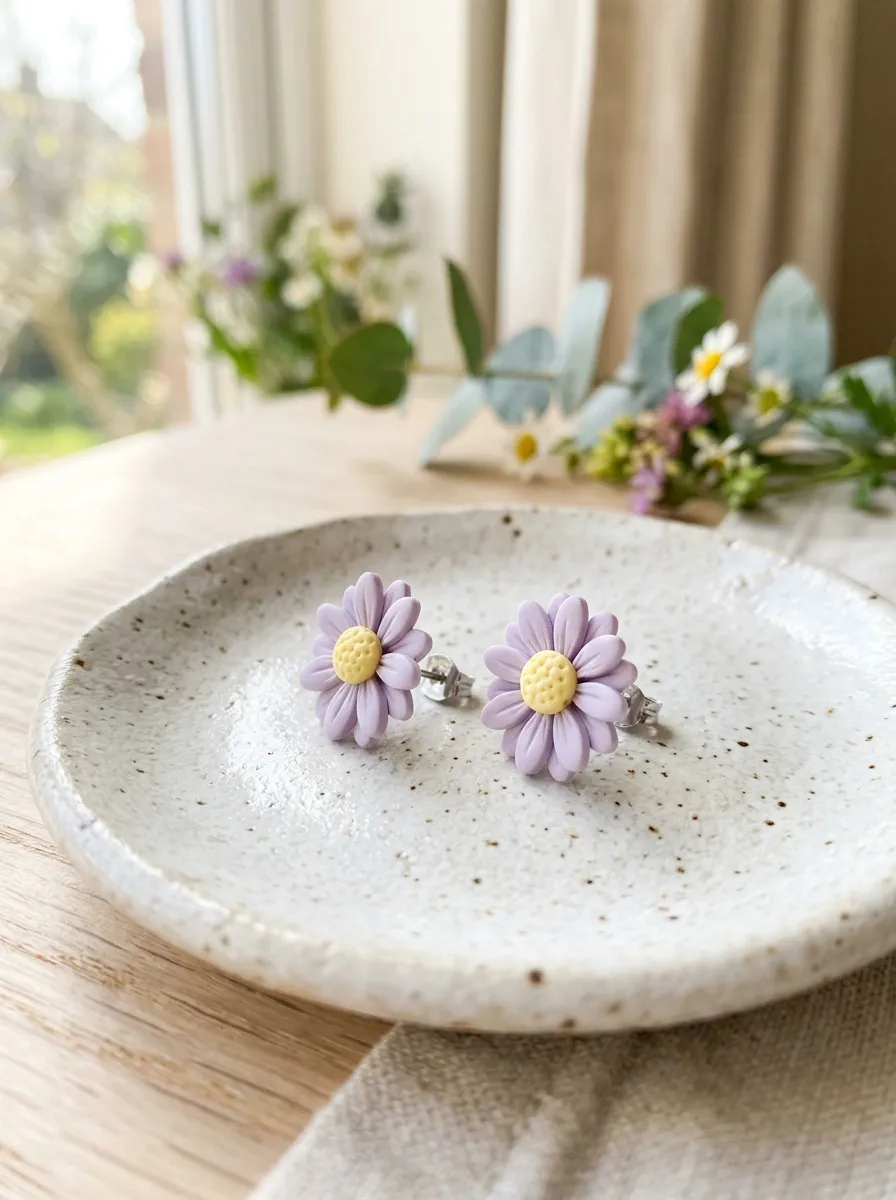
    Pastel daisy studs capture the soft, delicate atmosphere of early spring through miniature sculptural botanical forms. This beginner-friendly design centers around a rounded, pale yellow stamen ring surrounded by five to six slender petal accents finished in muted lavender or mint. The visual impact depends upon low-relief depth, where each petal overlaps slightly to establish natural movement rather than flat symmetry. In modern design aesthetics, pastel tones soften the graphic outline of the floral motif, making the finished studs suitable for both casual daily routines and elevated seasonal gatherings. The low physical profile prevents snagging on clothing or hair strands, which enhances overall physical comfort and functional durability during all-day wear. Selecting high-density polymer clay ensures that miniature petal edges retain their sharp definition without slouching or spreading out during oven curing cycles. Crafting uniform pairs develops essential fine-motor dexterity, especially when conditioning miniature elements, shaping balanced components, and maintaining proportional visual harmony between both ears.
    Begin by conditioning pale lavender clay and warm cream clay until pliable, smooth, and free of internal micro-fissures. Roll the pastel lavender clay into an even three-millimeter slab across a glossy ceramic tile using depth guide rings on an acrylic roller. Press a miniature teardrop or petal cutter repeatedly into the slab to produce twelve identical leaf segments, dedicating six segments to each earring. Form two tiny, equal balls of cream clay to serve as stamen centers, gently flattening them into two-millimeter discs directly upon a parchment-lined baking tile. Position the six teardrop petals radially outward from beneath each flattened disc, pressing joint seams gently with a silicone round-tip shaper to fuse the uncured clay contacts firmly. Bake the completed floral forms on their tile at 130 degrees Celsius for thirty-five minutes to achieve maximum material flexibility and strength. Once the pieces cool completely to room temperature, abrade the back surfaces lightly using four-hundred-grit sandpaper, apply a droplet of industrial craft adhesive, and seat hypoallergenic surgical steel studs securely onto the textured backings.

    Idea 2: Terracotta Speckled Arch Dangles

    2

    Step-by-Step Guide

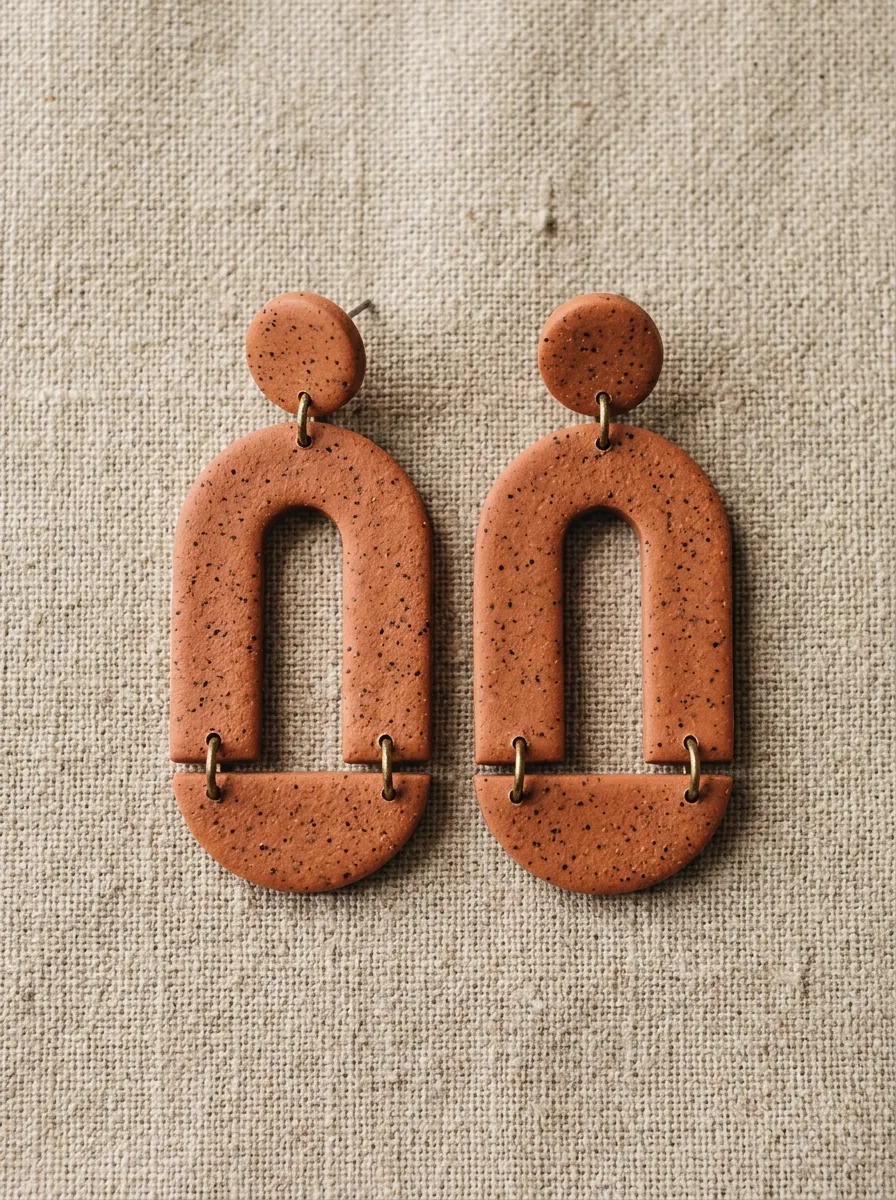
    Terracotta speckled arch dangles offer a grounded, earthy aesthetic that bridges modern architectural silhouettes with warm rustic textures. The design utilizes a dual-tier geometric structure consisting of a miniature circular stud connector linked to an elongated hollow arch drop element. Warm terracotta tones recall raw earthenware pottery, while distributed dark specks introduce visual interest without the visual clutter of complicated illustrative patterns. This minimalist style emphasizes structural balance, clean perpendicular edges, and fluid physical movement as the drop component swings gently from jump rings. The arch cutouts reduce overall product weight significantly, permitting larger visual dimensions without creating excess tension or earlobe pulling. Terracotta colors harmonize effortlessly with natural fiber spring garments, linen apparel, and neutral capsule wardrobes. Developing this piece provides valuable experience in cutting hollow geometric components cleanly, mastering multi-piece vertical balance, and achieving smooth, uniform perimeter edges that highlight sharp artisan craftsmanship.
    Condition rich terracotta clay thoroughly, then incorporate a pinch of dried culinary herbs, fine craft sand, or pre-baked cured black clay shavings into the mass to introduce an organic speckled pattern. Roll the speckled clay into an even slab measuring two and a half millimeters in thickness. Position a nested arch cutter set firmly atop the clay, cutting the external arch boundary and interior negative space simultaneously to preserve straight alignment. Cut two small circular studs measuring ten millimeters in diameter from the leftover slab to serve as upper connection anchors. Using a one-millimeter needle probe, pierce clean hanging holes three millimeters away from the bottom center of each stud and along the top apex of each arch drop. Transfer the pieces directly on their working parchment to an oven preheated to 130 degrees Celsius, curing for forty minutes to ensure dense structural cross-linking. After the baked clay cools completely, open five-millimeter brass jump rings horizontally using two pairs of flat-nose pliers, loop them through the aligned connection holes, and close them tightly with a firm flush seam.

    Idea 3: Marbled Botanical Teardrop Pendants

    3

    How to Create

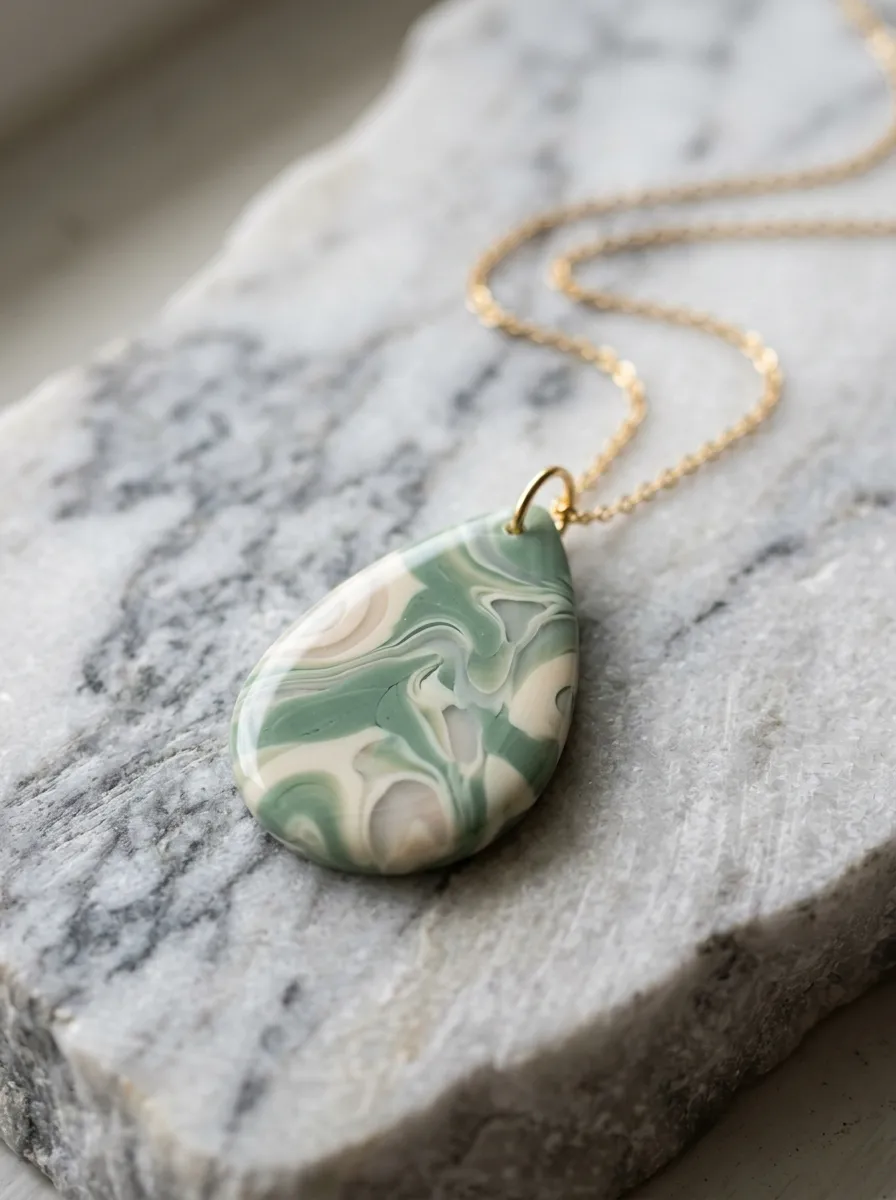
    Marbled botanical teardrop pendants merge the swirling fluid beauty of organic stone formations with modern spring accessory design. This concept highlights a flowing blend of sage green, ivory white, and translucent clay, evoking the appearance of carved jade or swirling spring moss. The smooth teardrop silhouette offers a timeless, flattering contour that sits neatly along collarbones when suspended from delicate fine cable chains. Marbling techniques ensure that every individual pendant cut from the prepared block displays entirely unique veining arrangements while maintaining consistent collective color harmony. The gentle incorporation of translucent clay layers provides optical depth, allowing ambient lighting to filter slightly beneath the outer surfaces of the piece. This creative project teaches crafters how to avoid muddying opposing pigments during rolling operations, establishing a repeatable method for achieving sophisticated mineral finishes using budget ideas and accessible materials.
    Form one medium snake of sage green clay, two thick snakes of ivory clay, and one thin snake of translucent clay, keeping all four strands identical in length. Twist the assembled strands together tightly into a single spiraled rope, fold the rope in half lengthwise, and roll it smooth against the work surface. Repeat this twisting and folding operation three times until distinct ribbon patterns emerge without blurring into a uniform solid color. Compress the twisted mass into a compact brick shape, then slice thin veneers horizontally across the cross-section with an ultra-thin tissue blade. Lay the sliced patterned sheets side by side over a plain backing slab, smoothing them into a seamless two-millimeter layer with an acrylic roller. Cut precise teardrop forms using sharp stainless steel craft cutters, then pierce a hole through the narrow upper tip. Bake the teardrops at 130 degrees Celsius for thirty-five minutes, cool completely, and wet-sand the faces sequentially from four-hundred-grit to two-thousand-grit sandpaper for a glassy stone-smooth finish.

    Idea 4: Pressed Flora Textured Drops

    4

    Execution Process

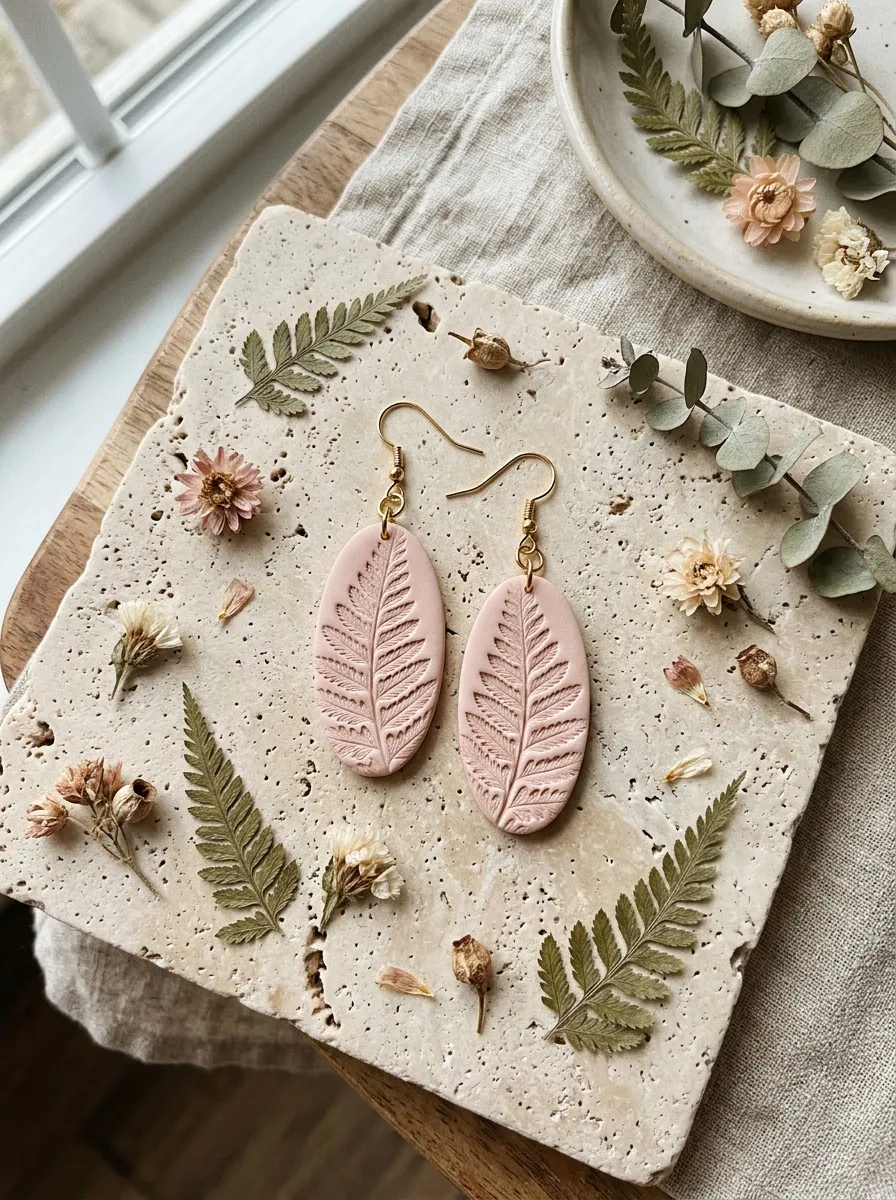
    Pressed flora textured drops combine tactile surface relief with crisp modernist geometric contours, bringing natural garden aesthetics into contemporary wearable fashion. This design applies genuine natural botanical textures, such as delicate fern fronds, evergreen leaflets, or dried blossom veins, directly into the soft clay surface before cutting. The crisp geometric perimeter of an elongated rectangle or oval contrasts sharply with the delicate organic impressions preserved inside the silhouette. Applying a subtle chalk pastel dusting or acrylic wash across the raised ridges after stamping accentuates the structural contours of the plant biology. This approach delivers a sophisticated handmade aesthetic that celebrates physical touch and organic material fidelity. The resulting earrings serve as lightweight statement pieces that pair effortlessly with seasonal spring dresses, outdoor gatherings, and casual minimalist attire. Mastering this technique expands the artisan’s repertoire by transforming backyard foliage into reusable structural design stamps for sustainable jewelry creation.
    Select robust, fresh leaf specimens with prominent underside vein structures, cleansing them gently to eliminate dirt or residual moisture. Roll an even slab of soft blush or porcelain-white polymer clay to a depth of three millimeters on a clean glass working surface. Lay the selected leaf specimens face-down across the conditioned clay slab, then roll an acrylic pin across the botanical material with steady, downward pressure to embed the patterns. Carefully lift the plant elements away using fine tweezers to expose clean, unblemished structural veins without distorting the surrounding material. Position elongated oval cutters over the most visually dynamic textured regions, depressing the cutting edges firmly into the slab. Punch small connection holes at the top edges using an open metal punch or leather needle tool. Bake the cut pieces for thirty-five minutes at 130 degrees Celsius, allow them to reach room temperature, and thread them onto gold-plated hypoallergenic French wire hooks using secure micro jump rings.

    Idea 5: Abstract Pastel Geo-Cluster Statement Drops

    5

    Setup Method

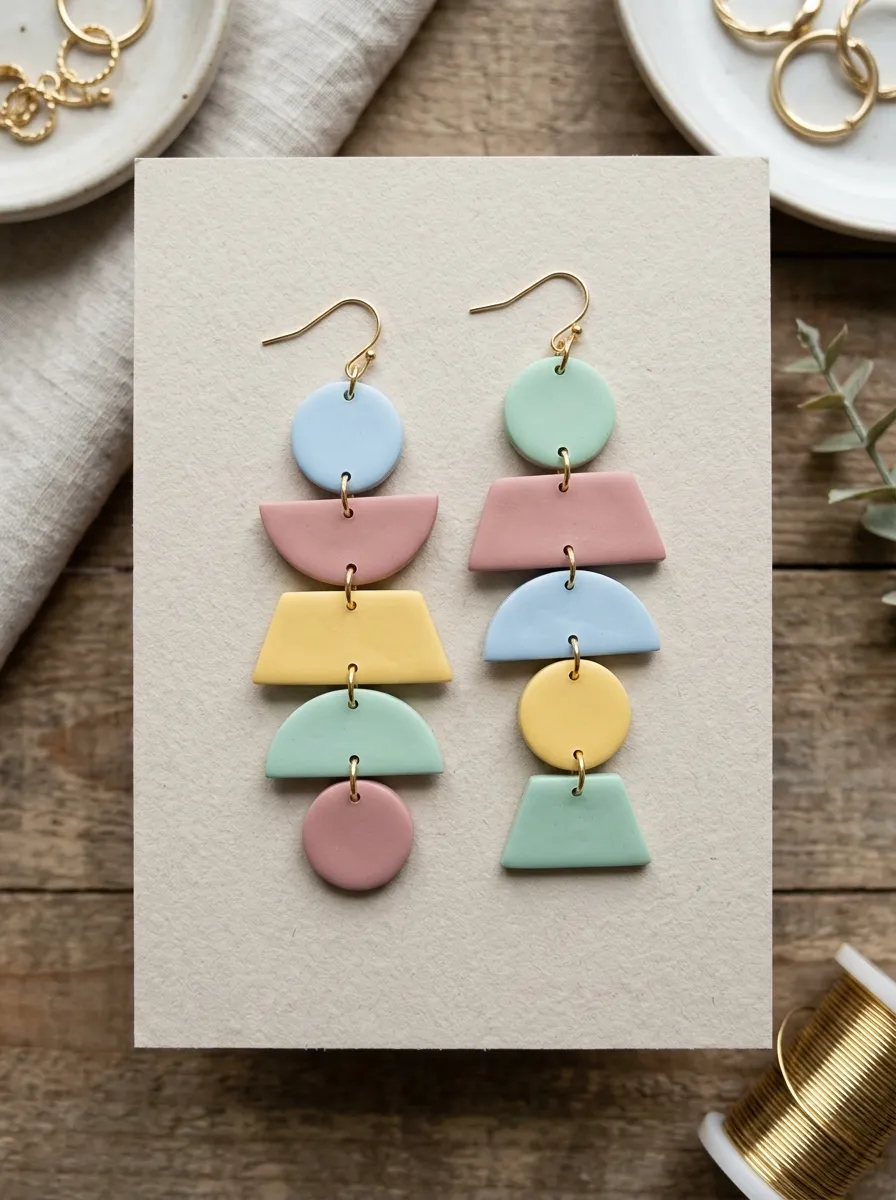
    Abstract pastel geo-cluster statement drops embody modern design via the asymmetrical union of distinct pastel geometric modules. This dynamic project integrates circular, semicircular, and trapezoidal segments linked flexibly through small metallic rings to produce captivating physical movement during wear. The color strategy utilizes contrasting seasonal tones, including buttercup yellow, pale sky blue, dusty rose, and muted sage, providing balance through varied shape sizes and shared muted saturation. Cluster earrings celebrate playful mid-century modern artistic movements while adhering strictly to comfortable ergonomics. Because each component remains thin and individually suspended, the earrings remain delightfully light despite offering generous visual scale. Crafting dynamic clusters challenges makers to analyze visual weight distributions, balance connection pivot points, and build modular templates that prevent pieces from catching or flipping awkwardly when worn.
    Plan the dimensional layout by drafting matching cardboard stencils of complementary shapes: one small top circle, a central floating half-moon bar, and two hanging trapezoid droplets. Roll separate conditioned sheets of dusty rose, sky blue, and butter yellow clay to an exact two-millimeter thickness using plastic rolling guides. Cut out the individual geometric components cleanly using precision craft stencils or micro shape cutters, maintaining smooth, unragged boundaries. Lay the pieces flat on a ceramic baking tile in their intended relational positions, measuring precise two-millimeter margins from perimeter edges to punch dual connecting holes with a needle point. Bake the separated elements flat under an inverted foil tent at 130 degrees Celsius for forty minutes to prevent thermal scorch marks on pastel pigments. After cooling, polish all perimeter edges using eight-hundred-grit wet sandpaper, link the descending geometric levels using four-millimeter split jump rings, and attach a hypoallergenic ear post behind each upper circle with strong epoxy.

    Idea 6: Gilded Edge Lily of the Valley Drops

    6

    How to Make

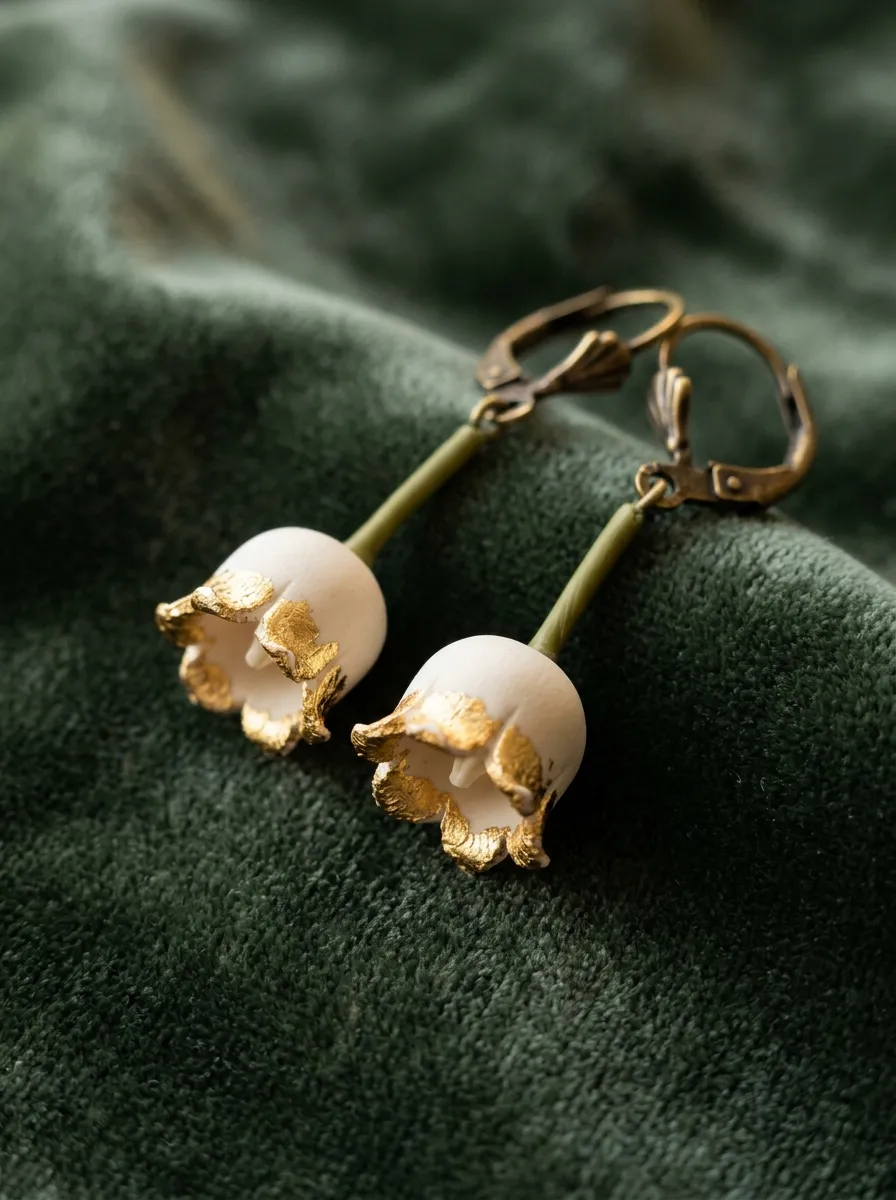
    Gilded edge Lily of the Valley drops honor one of spring’s most iconic floral blooms through sculptural, multi-dimensional modeling. This design features drooping bell-shaped ivory petals accented by ultra-thin metallic gold leaf borders applied carefully along the rim surfaces. The physical configuration evokes vintage botanical book illustrations, translating historic naturalism into modern accessory decoration. The hollow bell formation provides depth, creating engaging light and shadow interactions around the wearer’s jawline. By keeping the petal walls thin and delicate, the three-dimensional blossoms maintain a lightweight profile that moves naturally without pulling on the ear. Applying metallic leaf accents along the uneven scalloped rims introduces a refined luxury element that balances the rustic simplicity of matte polymer clay. Producing these drops deepens a crafter’s skill in hollow-form shaping, multi-part assembly, and metallic leaf leafing techniques without relying on messy cast-resin procedures.
    Condition soft ivory polymer clay alongside an olive green accent block for leaf stems, ensuring optimal elasticity before manual forming begins. Roll out small clay discs measuring fifteen millimeters in diameter and one millimeter in thickness, then cut five shallow, symmetrical triangular notches along the perimeter of each disc. Drape each notched circle over a smooth wooden bead or round ball tool, pinching the notched edges together gently to fuse a hollow bell-shaped flower blossom. Use a craft brush to apply leafing adhesive around the scalloped petal rims, pressing small sheets of genuine imitation gold leaf against the sticky margins before peeling away the excess backing. Roll a slender thread of olive clay into a delicate stem, threading it up through the crown of the blossom with a looping wire armature. Bake the suspended botanical forms at 130 degrees Celsius for thirty-five minutes, allow them to cure fully, and connect the integrated wire loop directly to secure brass lever-back ear clasps.

    Idea 7: Ribbed Ribbon Minimalist Huggies

    7

    Step-by-Step Guide

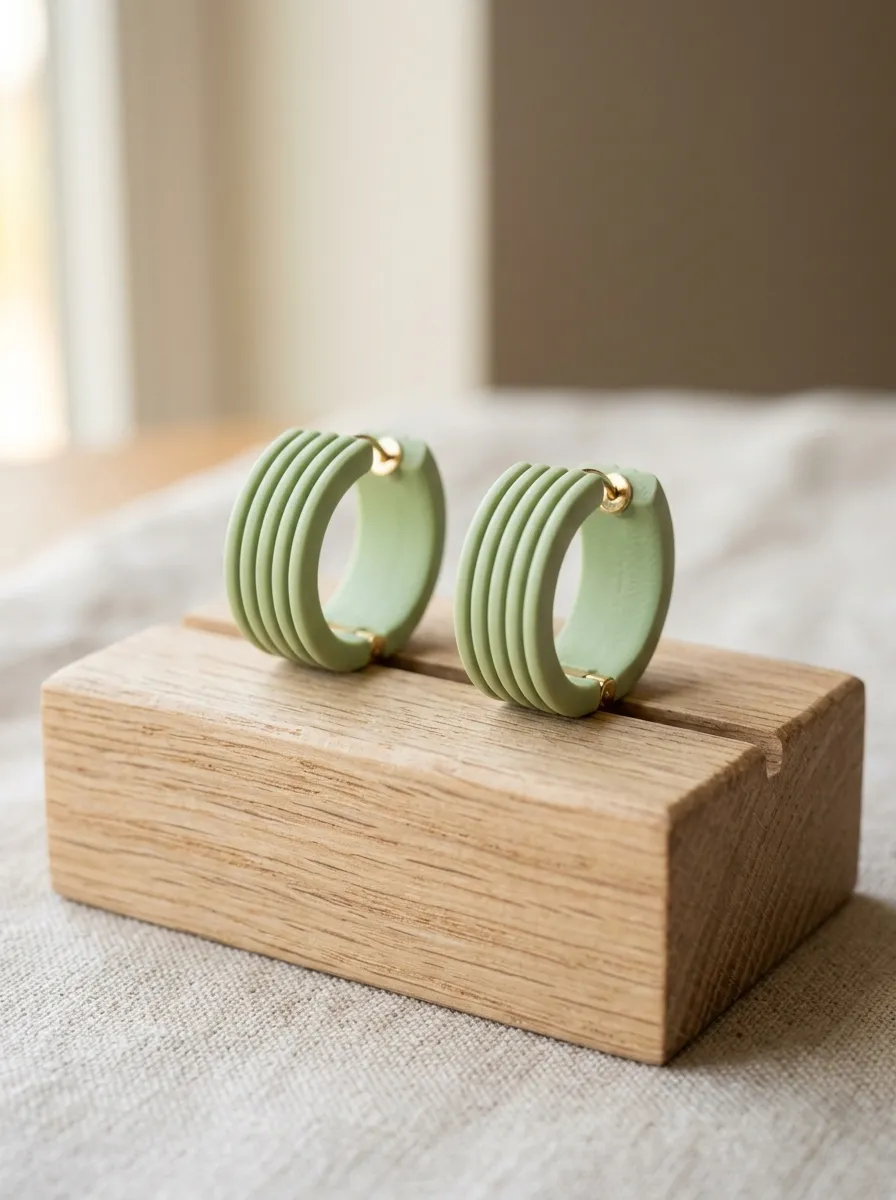
    Ribbed ribbon minimalist huggies present a clean, tactile update on traditional hoop earrings, celebrating modern architectural curves and linear regularity. This design utilizes a gently folded strip of polymer clay featuring parallel dimensional ridges along its exterior face, wrapped snugly around a classic hoop silhouette. The textured ribbing captures ambient shadows gracefully, lending structural sophistication to simple monocolor palettes such as lilac, ecru, or soft pistachio. Its understated visual profile aligns perfectly with minimalist style preferences, serving as an everyday staple that transitions seamlessly into formal spaces. The absence of complex color blends highlights surface precision, edge parallel lines, and immaculate baking execution. Crafting these textured huggies teaches makers how to emboss mechanical lines evenly across malleable clay slabs, slice true parallel ribbons with steel rulers, and cure curved forms without flattening internal contours.
    Condition the chosen clay pigment and flatten it into a three-millimeter-thick rectangular slab on a static-free glass tile. Impress regular parallel grooves into the surface using a multi-line texture comb or the blunt back edge of a metal ruler spaced two millimeters apart. Using a sharp razor blade and an acrylic drafting square, slice the textured slab into long ribbons measuring eight millimeters wide and forty millimeters long. Carefully curve each ribbed ribbon around a smooth, heat-resistant metal cylinder, such as an oven-safe aluminum dowel or glass test tube, overlapping the ends slightly to establish a rounded oval hoop profile. Inspect the curved components on the cylinder to ensure the parallel linear ridges maintain uniform spacing without stretching or widening at the stress curves. Bake the pieces while mounted on the heat-resistant cylinder at 130 degrees Celsius for forty minutes, allowing the shape to set permanently. Once cool, remove the loops and adhere flat stainless steel huggie hoop findings along the inner untextured face using metal-bonding epoxy.

    Idea 8: Retro Inlaid Mod Flower Studs

    8

    How to Create

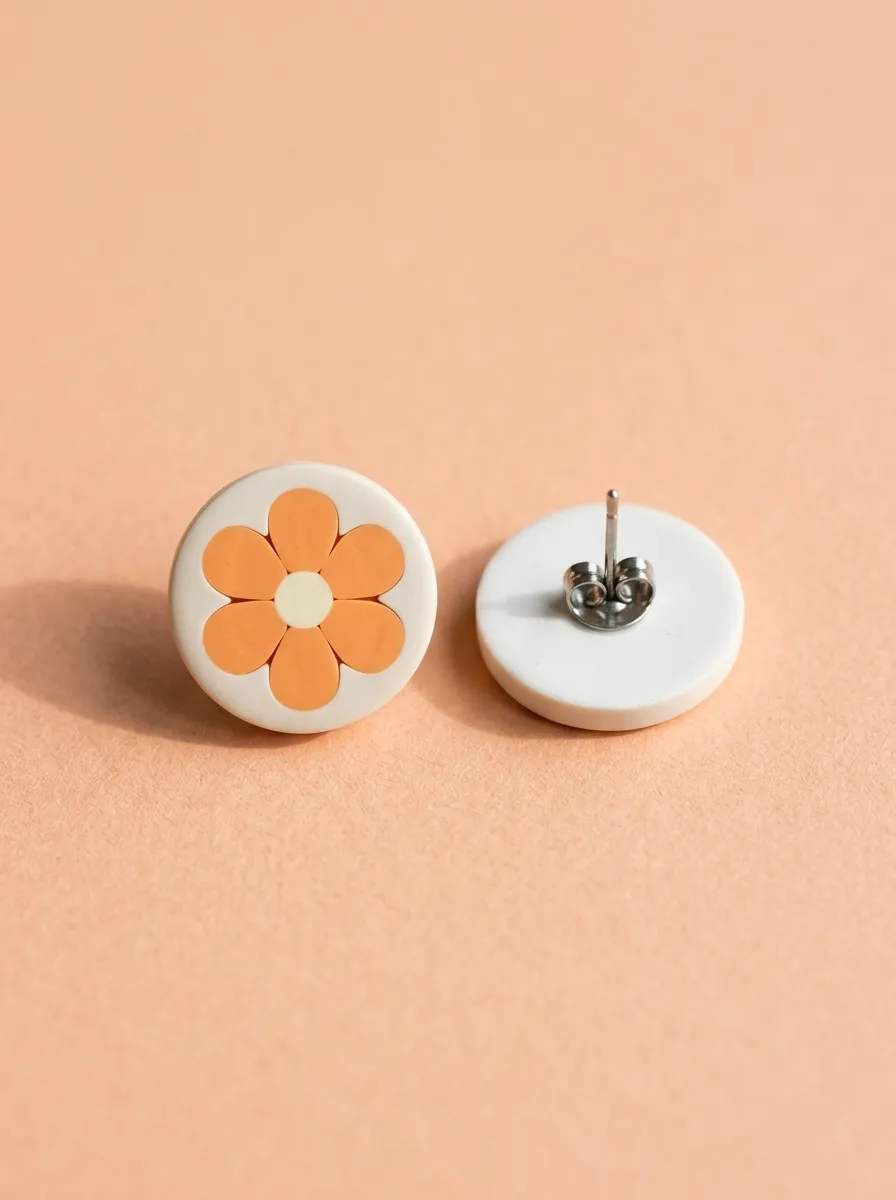
    Retro inlaid mod flower studs showcase 1960s-inspired graphic styling reimagined through cheerful contemporary spring color palettes. This flat-surface design incorporates flush-mounted petals of contrasting hues inlaid directly into a circular clay foundation, creating an uninterrupted glassy-smooth facade. Using combinations like apricot orange, pale cornflower blue, and creamy linen white establishes an engaging retro personality without visual disorder. Because the individual color sections sit on an identical horizontal plane rather than resting in raised layers, the completed accessory offers an exceptionally clean silhouette that will not catch on scarves or collars. This flush inlay method eliminates the structural vulnerabilities associated with small, projecting surface attachments that can break off during transit. Crafting mod flower studs develops essential layout planning skills, high-precision cutter alignment, and the delicate leveling maneuvers required to merge separate clay cutouts into a seamless mosaic.
    Roll out two matching sheets of polymer clay to an identical thickness of three millimeters: one in creamy linen for the background disc and one in cheerful apricot for the floral petals. Cut out base circles measuring eighteen millimeters across from the linen slab, then use a tiny five-petal flower cutter to punch out matching cavities from their centers. Cut identical apricot flower shapes using the same miniature cutter, gently seating the apricot flowers into the open negative spaces cut into the linen bases. Place a sheet of smooth wax paper or deli film across the assembled dual-color discs, rolling an acrylic pin over the surface with moderate pressure to weld the seams flush. Lift the parchment and trim away any distorted perimeter sections with the eighteen-millimeter round cutter to restore true circular geometry. Bake the smooth inlaid discs flat on parchment paper at 130 degrees Celsius for thirty-five minutes, let them cool entirely, and affix hypoallergenic titanium ear posts to the reverse using industrial craft glue.

    Idea 9: Organic Wavy Drop Earrings

    9

    Execution Process

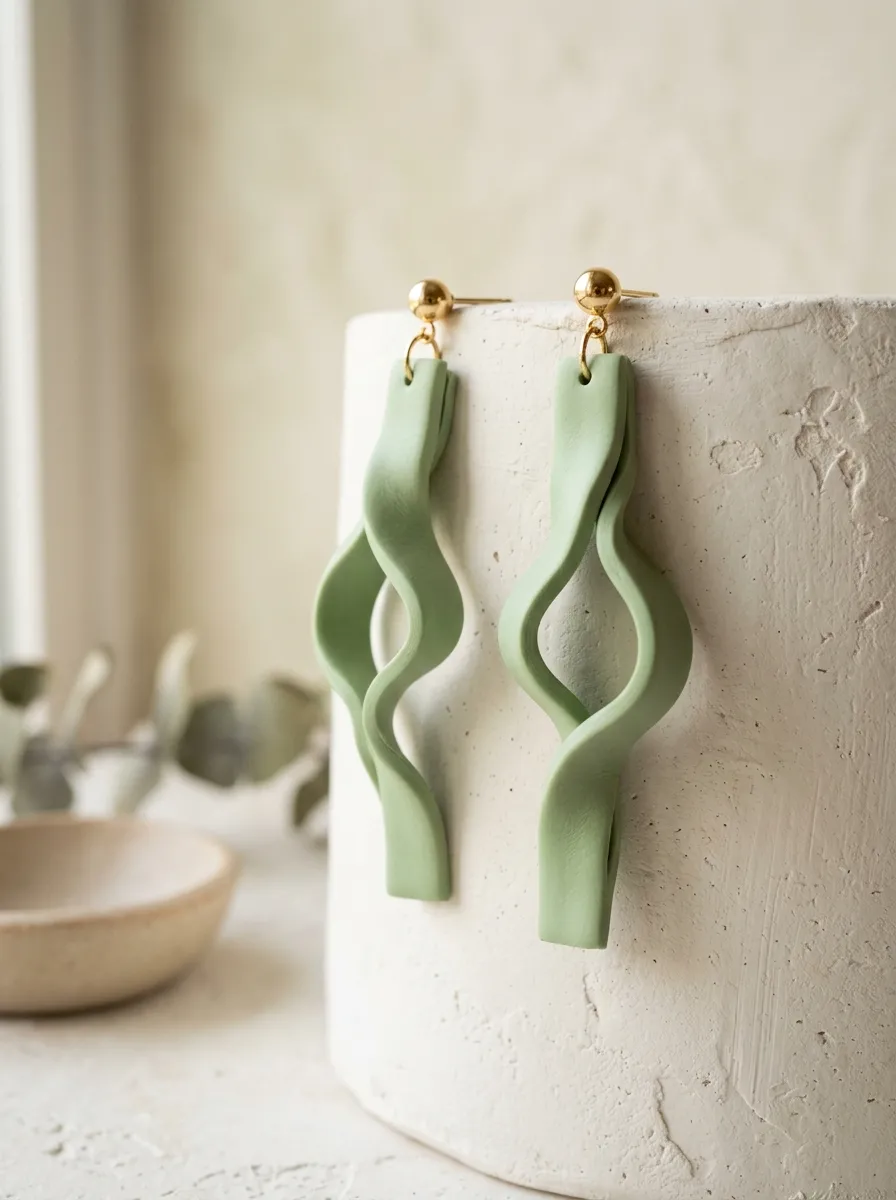
    Organic wavy drop earrings reflect the rise of fluid, irregular shapes in contemporary handmade jewelry, abandoning rigid geometry in favor of natural sculptural curves. These long vertical earrings utilize ribbon-like, undulating clay strips that twist gently down the neckline, mirroring flowing streams and budding vine tendrils. A palette of soft meadow green or pale melon brings fresh seasonal life to these modern design statements. The intentional lack of symmetry lends visual intrigue to the earrings, ensuring that the silhouette shifts attractively depending on the viewer’s angle. Despite their dramatic visual length, the slender width keeps the total weight exceptionally light, providing unmatched comfort for sensitive wearers. Developing this organic wavy concept expands a designer’s sculptural confidence, teaching freehand shaping, uniform material stretching, and heat-setting techniques for irregular forms that do not rest flat against baking surfaces.
    Condition the polymer clay until it is supple, and roll it to a uniform thickness of two millimeters using an acrylic pin and spacing rings. Cut long, narrow strips measuring six millimeters in width and sixty millimeters in length using a sharp scalpel blade alongside an aluminum cutting guide. Lift each strip gently from the tile, applying slow twisting motions between thumb and forefinger to impart three to four soft, flowing waves along its vertical axis. To preserve these three-dimensional undulations during the heating cycle, lay the wavy strips across a crumpled bed of clean baking parchment or an accordion-folded cardstock tent. This flexible bedding cradles the curves, preventing thermal drooping or flattening while the plasticizing resins set in the heat. Bake the curved ribbons at 130 degrees Celsius for thirty-five minutes, cooling them completely inside the oven to prevent thermal shock warping. Pierce the top crest with a micro-drill, inserting small jump rings to suspend the fluid ribbons from delicate ball-post studs.

    Idea 10: Spring Meadow Terrazzo Pendants

    10

    Setup Method

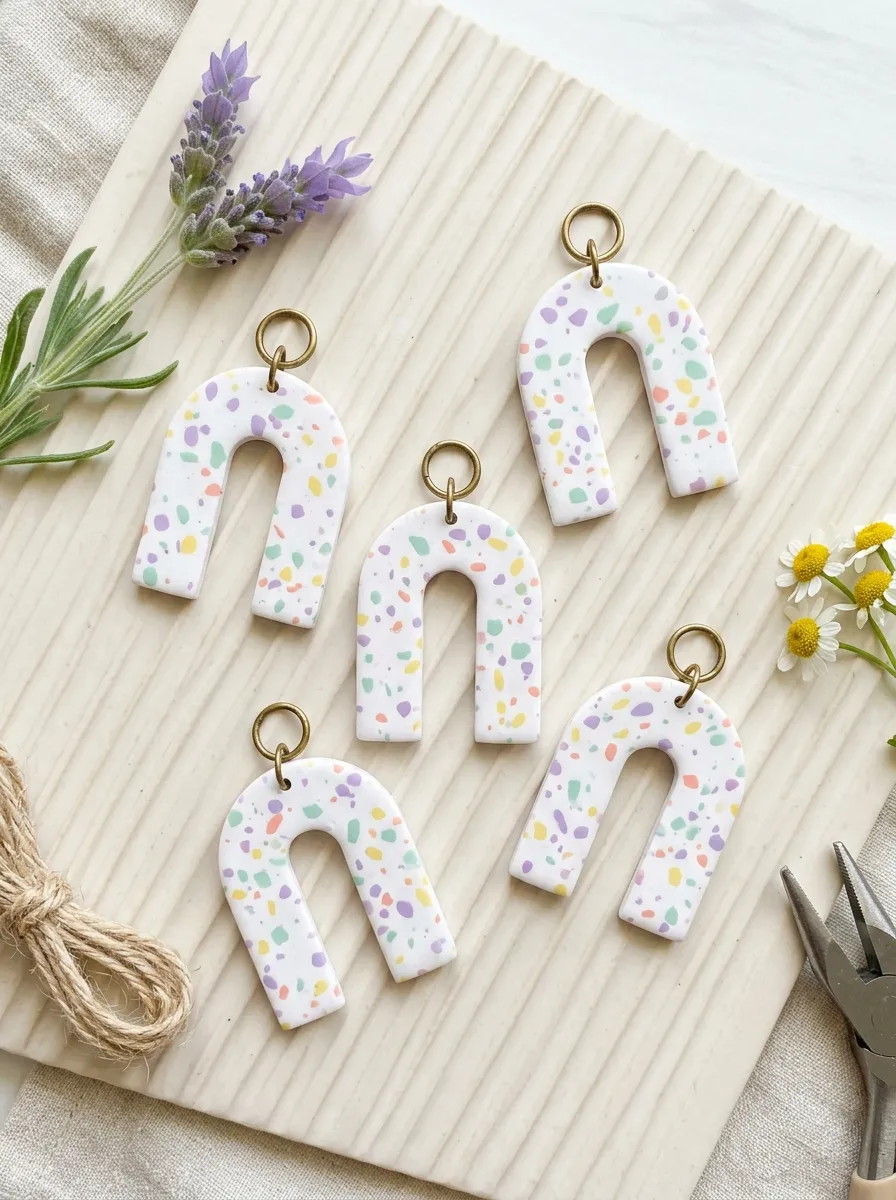
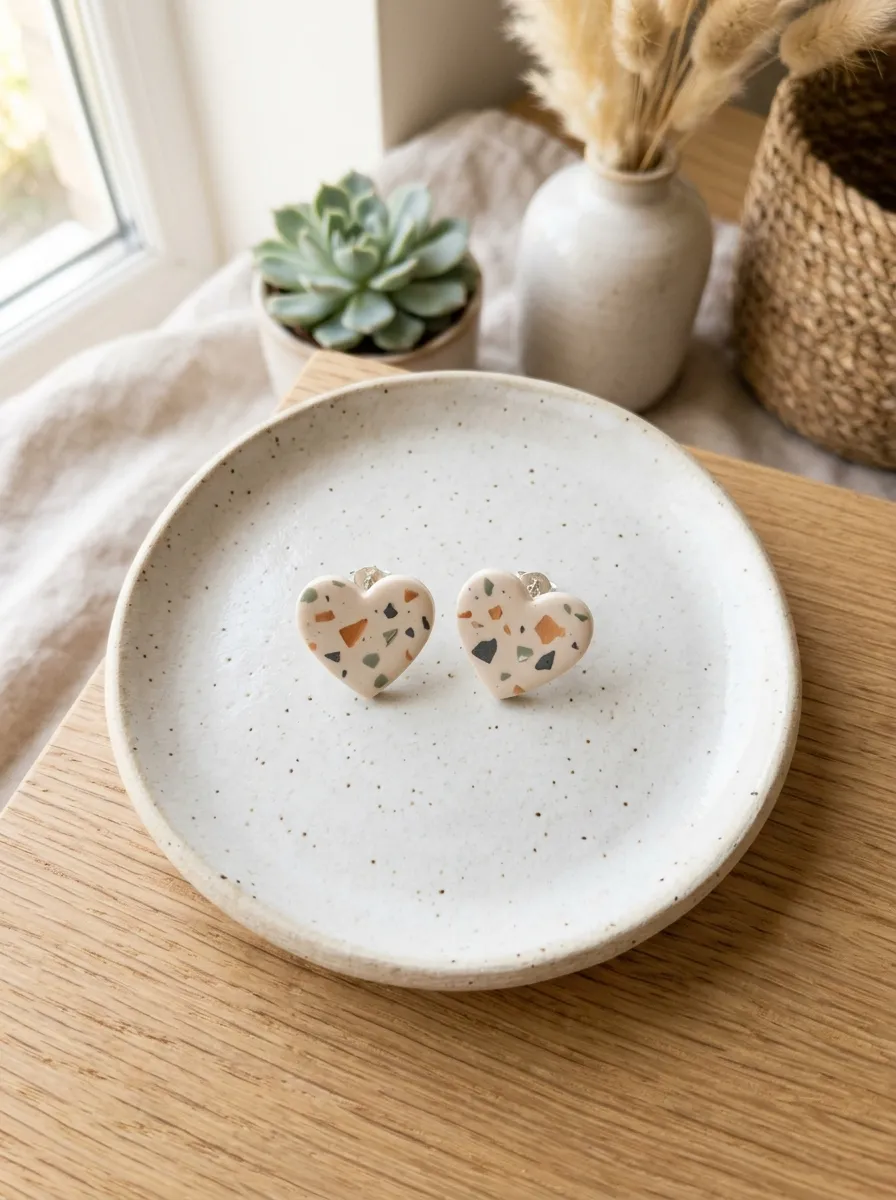
    Spring meadow terrazzo pendants pay homage to classic Italian composite stone surfacing, translated into a modern accessory through cheerful seasonal colors. This design scatters tiny chips of mint green, buttercup yellow, soft lilac, and coral across a crisp white clay base, forming a bright mosaic effect. Cut into balanced geometric silhouettes such as wide rectangles, drop arches, or large discs, the terrazzo pattern offers complex visual texture while maintaining a clean, contemporary profile. The flat surface finish mimics ground composite stone, providing an artisanal aesthetic that elevates simple spring daywear. Terrazzo designs are inherently forgiving for beginners, as random chip placement prevents obvious mistakes and guarantees that each finished pendant is genuinely unique. Mastering the terrazzo method instills foundational knowledge in mosaic rolling, cross-color integration, and surface leveling, providing makers with an adaptable technique that scales easily across extensive jewelry lines.
    Begin by rolling out a three-millimeter slab of bright white clay to serve as the structural base on an ultra-smooth glass work tile. Gather paper-thin scrap slivers of previously conditioned clay in mint, yellow, lilac, and coral, tearing them into irregular micro-fragments measuring one to three millimeters wide. Scatter these multicolored fragments randomly across the white foundation slab, leaving deliberate white spaces between the clusters to avoid an overcrowded pattern. Place a clean sheet of baking parchment over the speckled arrangement, burnishing it firmly with an acrylic roller in all directions to press the chips flush into the white substrate. Once the surface is smooth and flat, lift the paper and cut clean pendant shapes using an arch or rectangle cutter. Pierce an upper hole using a two-millimeter punch, bake the pendant flat at 130 degrees Celsius for forty minutes, cool, and finish with water-resistant micro-crystalline wax for a smooth stone luster.

    Common Beginner Mistakes and How to Avoid Them

    Beginners working with polymer clay frequently encounter structural brittleness, surface blemishes, and uneven curing, all of which compromise the durability of their finished jewelry. Underbaking is the primary cause of snapped earrings; clay requires sufficient thermal exposure at precise temperatures to complete its molecular cross-linking process. Always utilize a standalone oven thermometer rather than relying on residential oven dials, keeping temperatures steady at 130 degrees Celsius for thirty to forty minutes. Another widespread mistake is inadequate clay conditioning, which traps tiny air pockets that expand into unsightly blisters during the heating process. Knead clay thoroughly until it bends without cracking before cutting any shapes. Surface contamination from ambient dust, stray hairs, and skin oils can easily ruin light pastel projects. Maintain an immaculate work area by wiping all tools, rolling pins, and glass tiles with ninety-nine percent isopropyl alcohol before rolling out fresh slabs. Finally, forcing jump rings open outward alters their circular form permanently, weakening the joint. Open all metallic rings by twisting their ends laterally with two pliers, and close them until the cut edges click flush against each other.

    Practical Tips for Better Results

    Achieving professional results requires consistent attention to subtle material details and refined finishing methods throughout every stage of the fabrication process. Chill freshly rolled clay slabs inside a refrigerator for ten minutes prior to cutting complex shapes; cold clay separates cleanly from metal cutter rims without dragging, tearing, or distorting sharp edges. To avoid trapped air bubbles when attaching raw elements together, score the contact areas with a needle tool and apply a minute drop of liquid polymer clay as a heat-activated bond. When smoothing raw clay perimeters, rub the uncut borders lightly with a cotton swab dampened in rubbing alcohol to dissolve tiny burrs and eliminate fingerprints before baking. Post-cure wet sanding transforms average clay components into high-grade boutique jewelry. Sand cured pieces underwater using silicon-carbide abrasive papers, moving progressively from four-hundred-grit to six-hundred, one-thousand, and two-thousand grits to produce a satin sheen without needing harsh chemical varnishes. Store unbaked conditioned colors in clean, lint-free polypropylene bags to keep them fresh, dust-free, and instantly ready for your next creative session.

    Styling, Presentation, or Organization Ideas

    Effective styling, presentation, and storage elevate handmade polymer clay jewelry, enhancing its personal aesthetic appeal and retail marketability. When coordinating these spring accessories with daily outfits, balance pastel and floral statement pieces against clean, neutral backgrounds like crisp white button-downs, raw linen dresses, or muted knitwear. This deliberate restraint highlights the sculptural textures and delicate hues of the handmade clay components without clashing with bold clothing prints. For craft organization and studio display, store completed collections on framed linen boards, slotted wooden jewelry stands, or custom cardstock earring holders cut from heavy recycled kraft cardstock. Keeping individual pieces suspended upright protects the cured clay surfaces from abrasive contact and prevents jump rings from tangling. If displaying items for personal storage or seasonal markets, arrange the pieces logically by color families, grouping cool botanical mints and ocean blues separately from warm terracotta and buttercup yellows. Dust clay jewelry occasionally using a dry microfiber cloth or wash gently with mild soapy water, avoiding abrasive household cleaners, solvent perfumes, and direct prolonged moisture to preserve finding integrity.

    Budget or Time Planning

    Efficient time allocation and resource planning allow artisans to produce stunning handmade jewelry collections while keeping material costs and production hours well within budget. Polymer clay remains an exceptionally economical medium, with a single standard fifty-gram clay block capable of yielding several pairs of multi-piece statement earrings. Maximize material efficiency by consolidating production steps: condition and roll clay in large batches, cut components consecutively, and save all clean trimmings in airtight containers for future marbled or terrazzo accent designs. Plan creative studio sessions along an assembly-line schedule, dedicating one uninterrupted evening to color mixing and slab conditioning, the following afternoon to precision cutting and detail scoring, and a final block of time for baking and hardware assembly. This structured workflow maximizes workspace efficiency, minimizes repetitive tool cleanups, and ensures uniform consistency across multiple projects. Invest funds primarily in durable stainless steel findings, quality cutters, and an accurate oven thermometer, while using everyday household items like glass food-storage lids, ceramic wall tiles, and metal rulers to keep setup costs manageable and lean.

    Creative Expansion and Advanced Inspiration

    Once you master these fundamental assembly, curing, and finishing techniques, expand your jewelry creations through advanced multi-medium combinations and sophisticated sculptural methods. Introduce contrasting visual textures by embedding faceted glass beads, raw freshwater pearls, or woven fiber cords directly into raw or cured polymer clay structures. Experiment with surface treatments by applying metallic mica powders, fine alcohol ink washes, or silk-screen acrylic transfers across raw clay slabs before cutting, unlocking intricate decorative patterns impossible to replicate through manual sculpting alone. Consider transitioning these seasonal designs from simple earwear into broader home decor accents and cohesive lifestyle accessories, adapting floral slab assemblies into matching decorative trinket dishes, hairpin toppers, or sculptural curtain tieback buttons. Advanced makers can also explore micro-carving methods, using rotary diamond burrs on fully cured, unbaked clay blocks to produce carved reliefs reminiscent of classic shell cameos. Pushing traditional craft boundaries through persistent artistic experimentation and structural exploration transforms humble modeling compounds into remarkable, high-value artistic statements that express individual creativity throughout the spring season and beyond.
  • 10 Fall Color Polymer Clay Jewelry Ideas

    10 Fall Color Polymer Clay Jewelry Ideas

    Fall color polymer clay jewelry represents an engaging branch of wearable art, blending warm autumnal palettes with durable, lightweight sculptural mediums. When the seasons shift, personal styling moves toward rich organic tones like burnt terracotta, mustard ochre, deep olive, and spiced cinnamon. Polymer clay serves as an accessible canvas for capturing these seasonal transitions, allowing makers to create bespoke earrings, pendants, and bracelets with crisp geometric balance. This tutorial guides crafters through the fundamental principles of mixing custom fall palettes, conditioning clay slabs, cutting precise shapes, curing components, and assembling secure jewelry hardware. Readers will learn how to achieve professional, gallery-grade finishes through proper baking temperatures, wet-sanding methods, and clean hole-drilling techniques. Exploring these concepts provides practical strategies for crafting coordinated accessories that withstand regular wear while maintaining visual appeal. Rather than requiring complex equipment, this medium uses basic tabletop tools to achieve high-end artisanal results. By understanding how to balance color theory, structural thickness, and mechanical connections, makers of all skill levels can complete sophisticated collections that celebrate the textures, tones, and timeless elegance of seasonal handmade design.

    Why This Idea Is Trending or Useful

    Handmade polymer clay accessories continue to dominate modern Pinterest inspiration boards due to their exceptional versatility, comfortable weight, and accessible crafting techniques. As contemporary fashion embraces minimalist style and personalized statements, clay jewelry bridges the gap between affordable craft and elevated fashion. These creative ideas offer substantial practical value because cured polymer clay creates statement earrings that remain feather-light, eliminating the earlobe strain typically caused by heavy metal or stone components. The DIY appeal lies in the complete customization of shapes, textures, and color values, allowing crafters to produce bespoke pieces tailored to their seasonal wardrobes. For beginners, this craft presents an approachable entry point into small-scale jewelry fabrication; the material remains pliable until baked in a standard home oven, giving makers unlimited time to refine silhouettes. Furthermore, making jewelry provides excellent budget ideas for handmade gift-giving, small studio businesses, and creative wardrobe refreshes. By translating rich autumn palettes into clean geometric forms, makers can craft timeless, durable accessories that capture the natural warmth of autumn while maintaining modern design sophistication.

    Materials and Preparation

    Crafting durable, professional polymer clay jewelry requires systematic materials sourcing, proper workspace hygiene, and disciplined clay conditioning. The core materials consist of professional-grade polymer clay blocks in primary autumn hues, including raw sienna, cadmium yellow, sap green, cadmium red, and translucent blending clay. Essential tools include an acrylic roller, rolling depth guide rings, stainless steel jewelry cutters, ceramic baking tiles, parchment paper, a hand drill with micro-bits, and jewelry pliers. Structural hardware requires hypoallergenic stainless steel or brass jump rings, flat earring posts, silicone earring backs, and specialized jewelry adhesive. Preparation begins with workspace sanitization; wipe your non-porous glass or ceramic work surface with isopropyl alcohol to remove ambient dust and stray fibers. Condition each clay block by hand-kneading or passing it through a dedicated clay roller machine repeatedly until the sheet becomes smooth, pliable, and crack-free. Plan your slab thickness carefully, maintaining an even three-millimeter depth to ensure the final pieces resist snapping while staying lightweight. Organize your findings and plan each piece’s balance points before cutting to ensure seamless post-bake assembly.

    1. Terracotta and Ochre Geometric Arch Earrings

    1

    Step-by-Step Guide

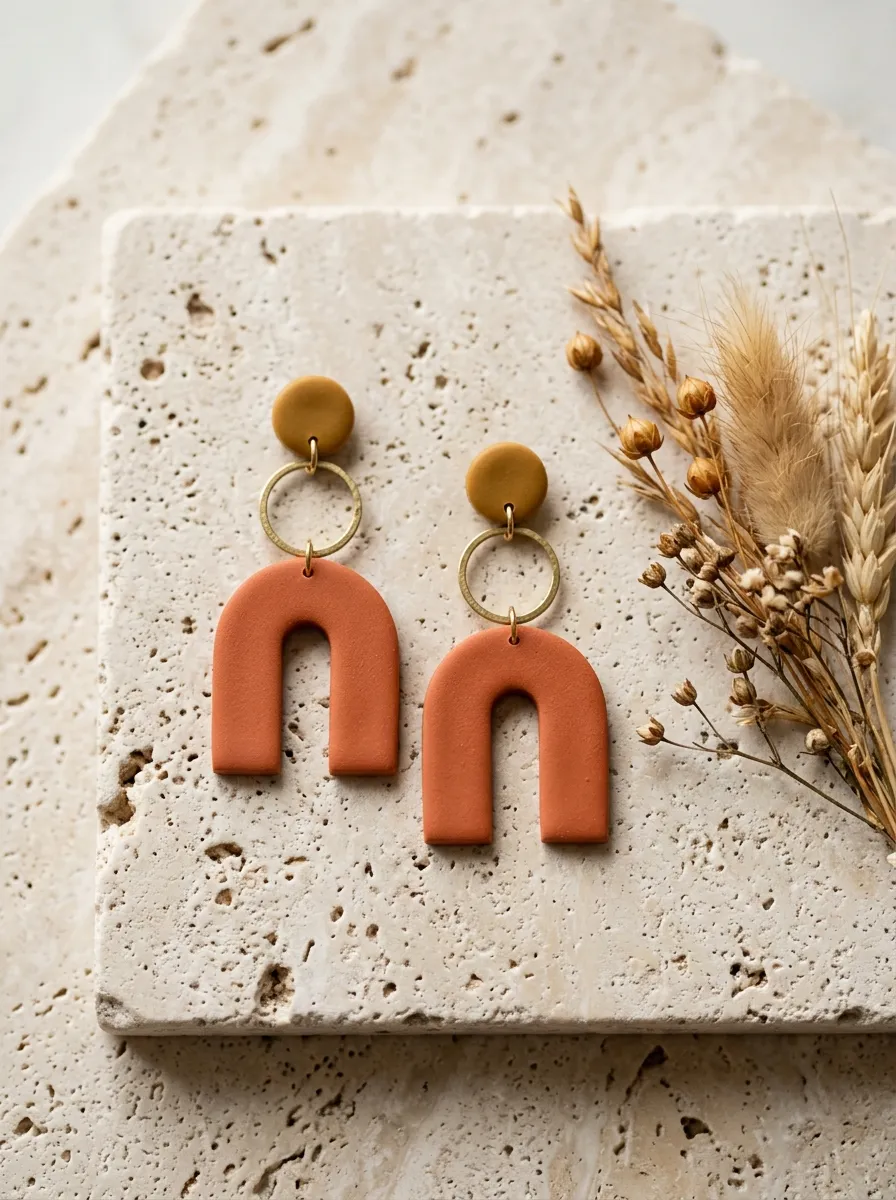
    Terracotta and ochre geometric arch earrings combine mid-century modern architectural silhouettes with warm, grounding autumn hues. The design features a smooth, inverted U-shaped arch pendant suspended beneath a solid circular stud top. A two-tone palette pairs deep terracotta with soft mustard ochre, creating a visual balance that flatters warm seasonal sweaters and structured outerwear. The simplicity of the arch silhouette highlights the flat, unblemished surface of the clay, demanding clean edges and uniform slab thickness. Because the arch design incorporates open interior negative space, the earrings remain exceptionally lightweight while creating a bold visual outline. The contrast between the grounded circular stud and the fluid, swinging arch adds subtle kinetic movement that catches the eye without overwhelming the wearer’s jawline. This project teaches beginners how to maintain clean symmetry and balanced proportions, serving as a reliable template for exploring varied geometric pairings across seasonal collections.
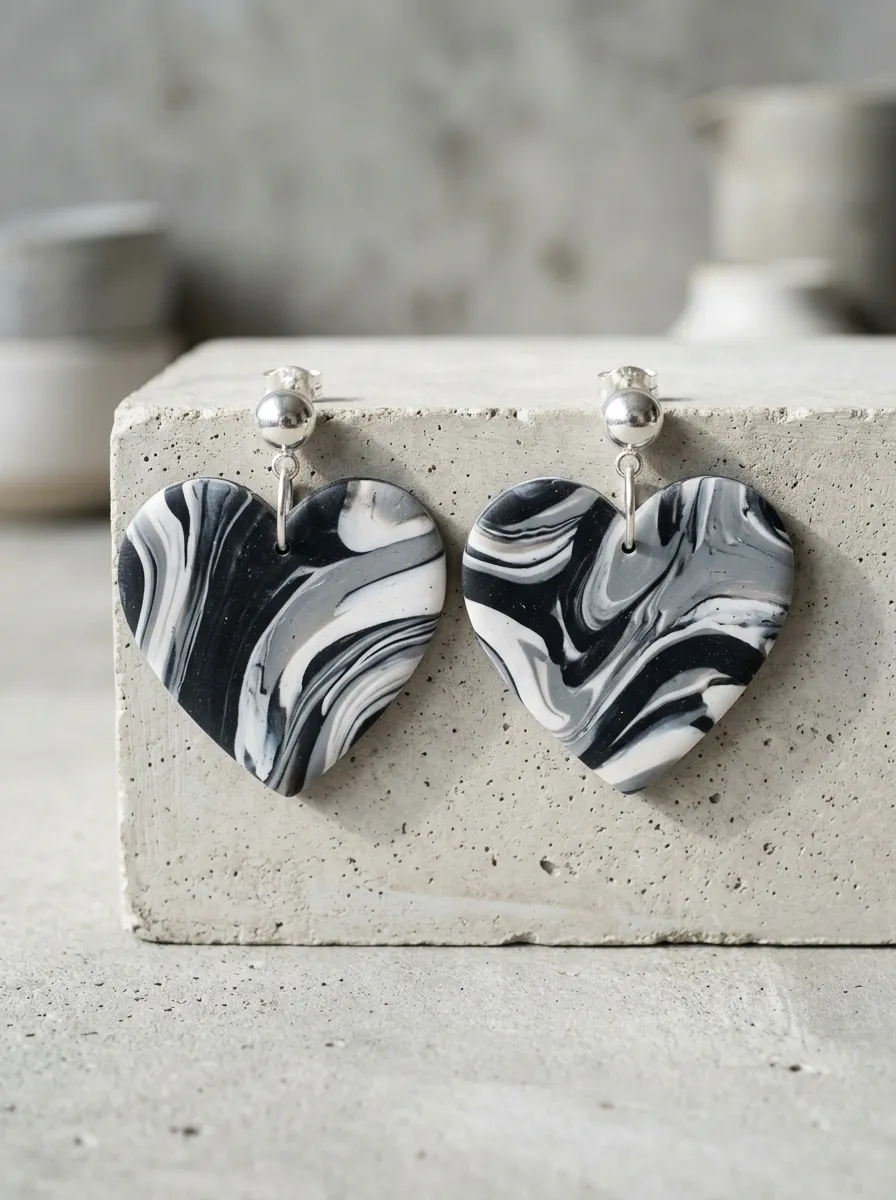
    To create the arch earrings, begin by conditioning equal portions of terracotta and mustard ochre polymer clay. Roll both colors into smooth, uniform slabs measuring three millimeters thick using acrylic rolling guides. Use a nested stainless steel arch cutter to cut two matching U-shaped frames from the terracotta slab, ensuring the outer and inner cutting edges slice cleanly through to the work tile. Next, cut two twelve-millimeter circular discs from the ochre slab using a round cutter to serve as the stud tops. Use a needle tool to pierce a one-millimeter hole at the top crest of each arch and a corresponding hole at the bottom rim of each ochre circle, maintaining a two-millimeter margin from the edges. Transfer the raw components on a ceramic tile lined with parchment paper into an oven preheated to the manufacturer’s exact specifications, curing for forty minutes. Once cool, connect the studs to the arches using four-millimeter brass jump rings, and attach surgical steel posts to the backs with jewelry glue.

    2. Marbled Cinnamon and Ecru Statement Pendants

    2

    How to Create

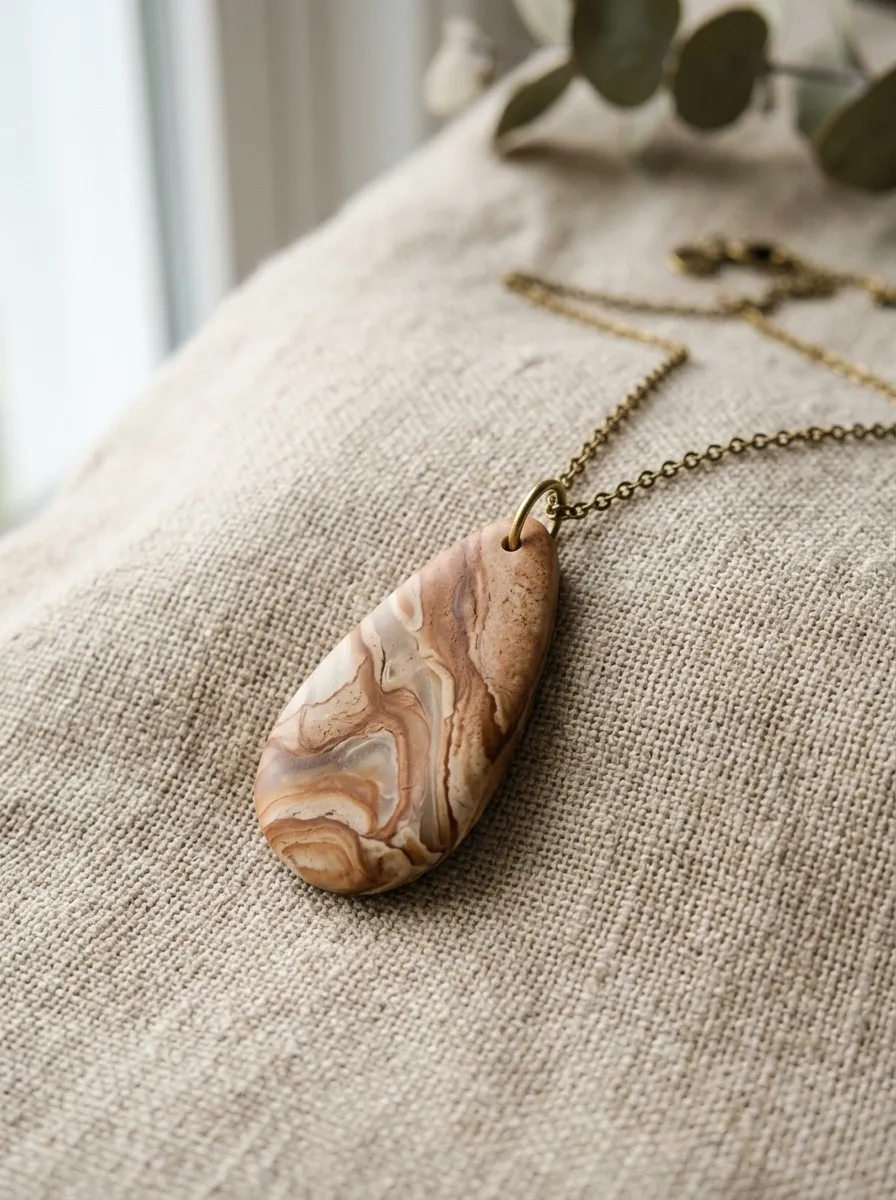
    The marbled cinnamon and ecru statement pendant translates natural geological striations and swirled stone patterns into a sophisticated focal necklace. This concept combines rich, spicy cinnamon-brown clay with creamy ecru and translucent white, creating an organic marbled slab that yields entirely unique pendants from every cut. The design relies on controlled twisting and folding rather than complete blending, preserving crisp, visible boundaries between the contrasting color veins. A clean teardrop or elongated rectangular silhouette frames the organic swirl pattern, giving the fluid marbling a structured, modern presentation. When suspended from a delicate brass cable chain or natural leather cord, the pendant serves as an anchor piece for layered autumn outfits. This design provides an approachable way to practice color integration without needing specialized carving tools. The natural variation in the marbling gives every piece an artisanal, one-of-a-kind quality that mirrors real natural jasper or agate stone.
    Begin by rolling thin coils of cinnamon, ecru, and translucent clay, keeping the ratio at two parts cinnamon, two parts ecru, and one part translucent. Twist the coils together into a single striped rope, fold the rope in half, and twist again to compress the colors without muddying them. Roll the twisted clay into a compact ball, then use an acrylic rolling pin to flatten it into a three-millimeter slab, revealing the marble veins across the surface. Place a long teardrop cutter over the most visually compelling section of the marbled pattern, pressing down firmly to slice the pendant shape. Smooth the outer rim using a damp fingertip to eliminate sharp tool marks. Use a micro-drill or needle tool to bore a clean horizontal hole through the upper neck of the teardrop to accommodate a bail. Bake the pendant flat on a smooth ceramic tile for forty-five minutes, let it cool completely, and polish the surface with a soft denim cloth to bring out the depth of the translucent marbling.

    3. Olive Branch Imprinted Botanical Drops

    3

    Execution Process

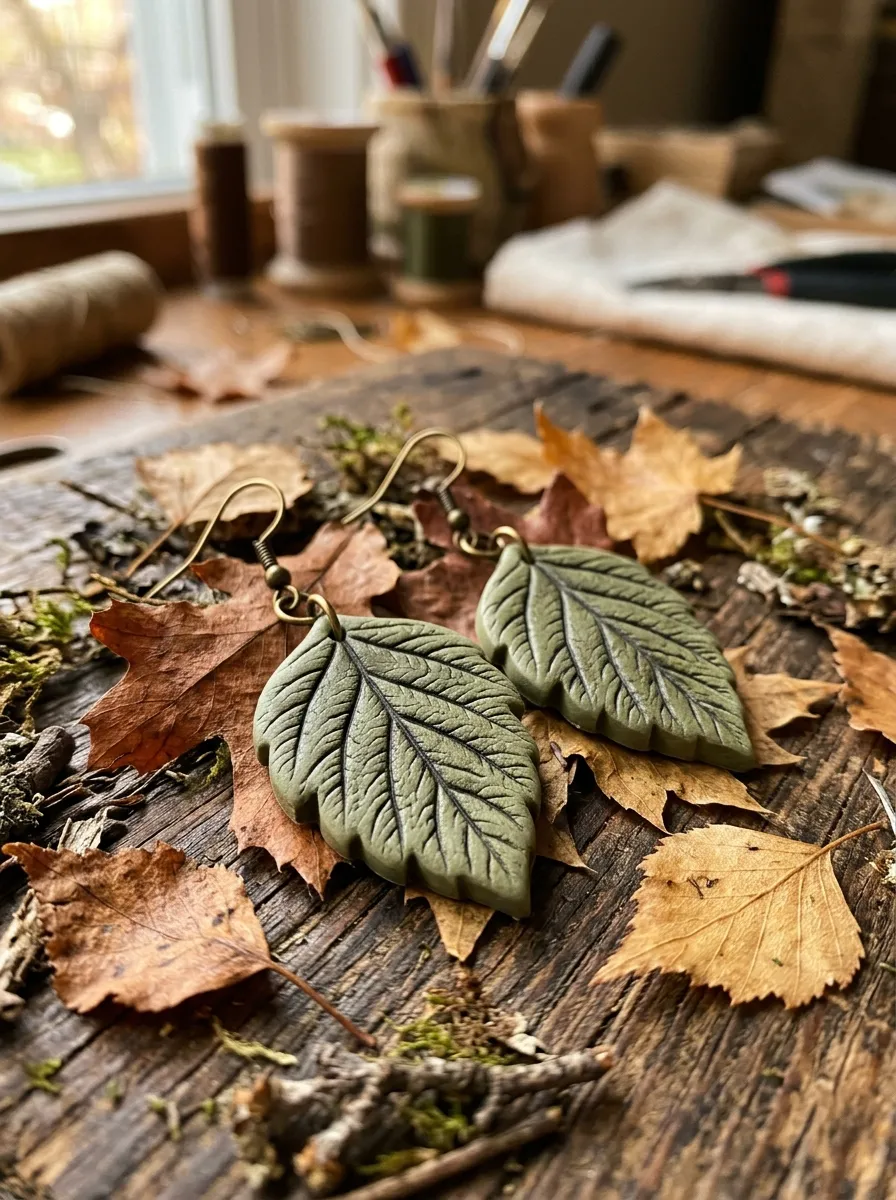
    The olive branch imprinted botanical drop earrings use direct nature-casting techniques to preserve fine plant venation into permanent clay jewelry. The design features elongated oval or spade-shaped drops rendered in a muted olive-green tone, carrying delicate surface impressions of real autumn foliage or carved botanical stamps. The soft, mossy green color provides an earthy backdrop that highlights the intricate veins and serrated margins of the pressed leaves. Applying a micro-thin wash of antique gold powder or burnt umber acrylic paint into the recessed leaf grooves accentuates the textural relief, giving the pieces an antique, botanical-illustration character. The slender profile of the drop elongates the neck, while the organic texture softens the clean cut of the clay. This project introduces crafters to relief texturing and surface antiquing, offering a practical way to capture the fleeting textures of autumn botanicals in durable, wearable everyday jewelry.
    Condition a block of olive-green clay and roll it out into a uniform three-millimeter slab across a non-porous ceramic work surface. Gather small, fresh foliage cuttings with prominent underside veins, placing them face down onto the raw clay slab. Roll an acrylic pin firmly over the leaves to embed the natural textures into the clay, then carefully peel away the botanical material using fine tweezers. Position an elongated oval cutter over the clearest leaf impressions and press down cleanly to cut out the earring pair. Use a fine needle tool to punch a clean suspension hole two millimeters below the top edge of each drop. Bake the pieces on a flat tile for thirty-five minutes at the recommended temperature. After cooling, brush dark brown water-based acrylic paint into the textured leaf grooves, immediately wiping the raised surfaces with a damp paper towel to leave pigment only in the recesses. Attach brass ear wires through the suspension holes to complete the drops.

    4. Spiced Pumpkin Textured Stud Sets

    4

    How to Make

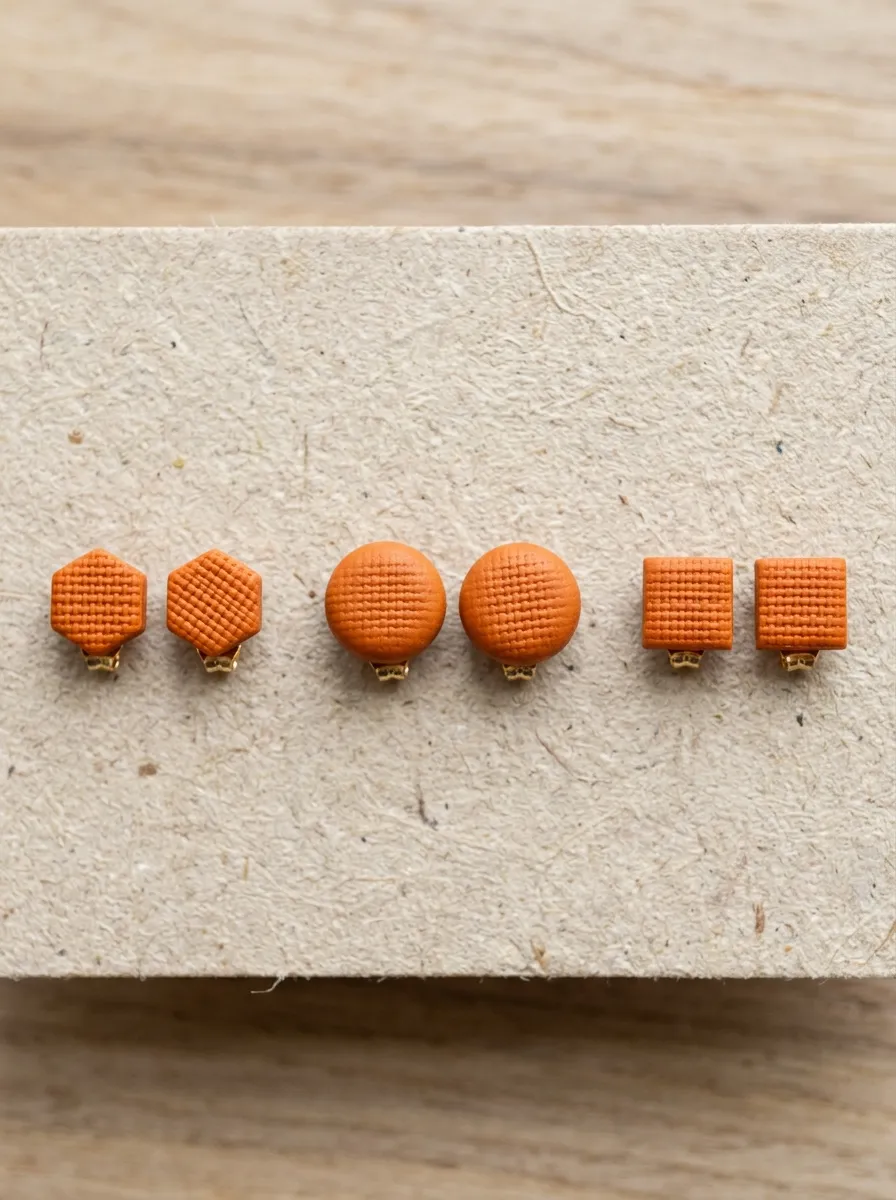
    The spiced pumpkin textured stud set focuses on compact, minimalist style everyday earrings that celebrate rich autumn warmth through subtle tactile surfaces. Rather than featuring flat, unadorned surfaces, these studs incorporate fine linen, woven canvas, or micro-stippled textures pressed directly into a warm pumpkin-orange clay base. The design encompasses three complementary miniature shapes—such as tiny hexagons, pillowed circles, and minimalist squares—providing a versatile capsule set for daily wear. The vibrant, warm orange hue brightens neutral knitwear, while the tactile matte texture prevents the bright color from appearing overly glossy or synthetic. Because studs sit directly against the earlobe with no hanging parts, they are practical for active daily wear, sports, and casual layering. This beginner friendly project emphasizes precision cutting, edge finishing, and secure mechanical stud embedding, forming an essential foundation for any handcrafted jewelry collection.
    Roll conditioned spiced-pumpkin polymer clay into a three-millimeter sheet on a clean glass cutting board. Lay a piece of clean, textured linen fabric across the clay sheet, rolling firmly with an acrylic pin to transfer the cross-hatch fabric weave across the surface, then peel the linen away cleanly. Use miniature geometric cutters measuring eight to ten millimeters across to stamp out pairs of small hexagons, circles, and squares from the textured clay. Lift the studs carefully from the board using a thin, flexible tissue blade to avoid distorting the textured tops. Place the raw pieces on a baking tile lined with parchment paper. Bake for thirty minutes at the correct temperature, allowing the studs to cure thoroughly to maximize structural durability. After cooling, lightly sand the base of each stud with medium-grit sandpaper to create a rough surface, apply high-strength jewelry adhesive, and press stainless steel earring posts firmly onto the backs, allowing twenty-four hours for the glue to cure.

    5. Golden Amber Translucent Dangle Hoops

    5

    Setup Method

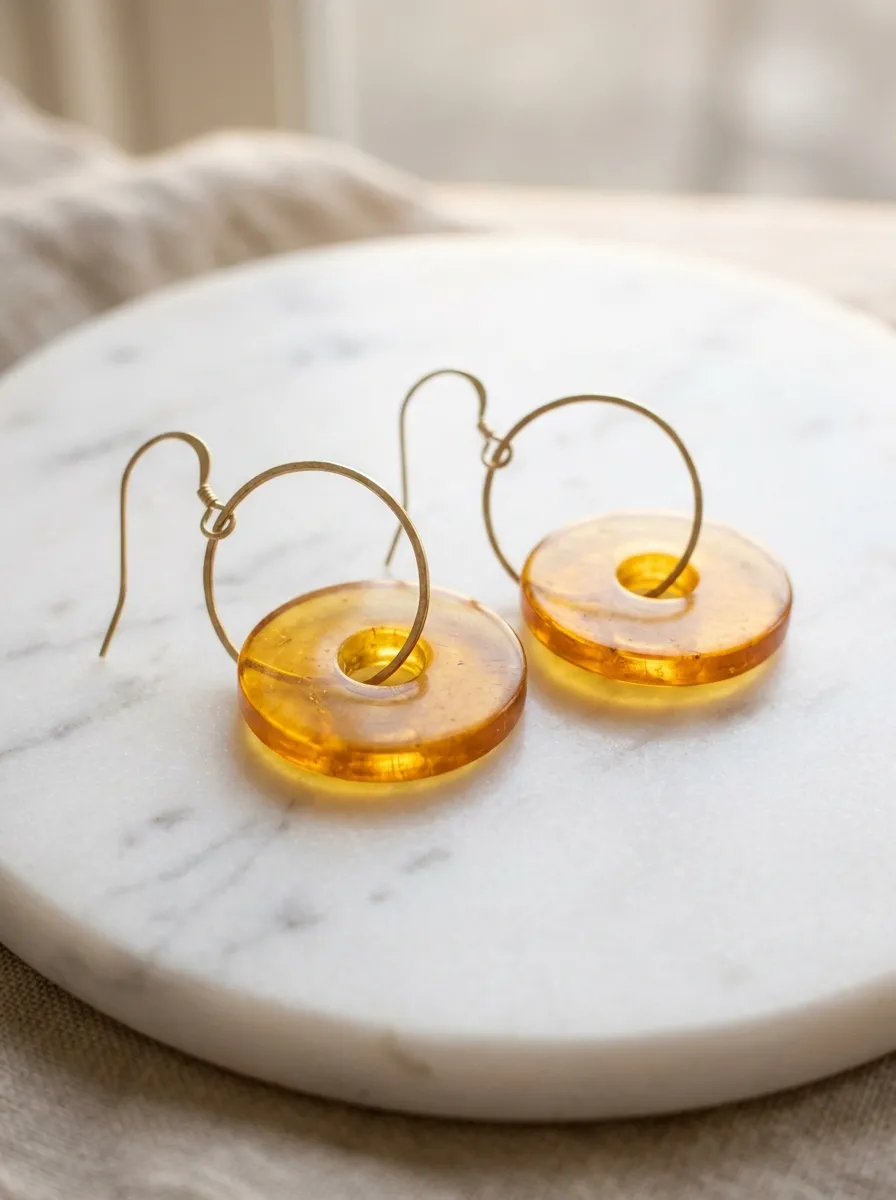
    The golden amber translucent dangle hoops combine the warm, light-catching clarity of fossilized tree resin with clean, contemporary hoop mechanics. This design utilizes a custom blend of translucent polymer clay and rich amber-yellow pigment, producing components that glow with warm golden light when illuminated from behind. The silhouette features a flat, hollow ring or donut suspended within or alongside raw brass wire hoops, creating an appealing contrast between polished metal and glowing clay. When worn, the translucent clay interacts with ambient daylight, shifting in visual depth throughout the day much like real amber or tortoiseshell. The circular geometry provides an open, airy visual weight that flatters diverse face shapes without dragging on the earlobes. This project allows crafters to explore the unique working properties of translucent clays, teaching how controlled baking temperatures preserve clarity without causing scorching or cloudiness.
    Blend four parts translucent polymer clay with one part cadmium yellow and a pinhead-sized crumb of warm brown clay, conditioning thoroughly until the color is uniform. Roll the amber blend into a three-millimeter slab on a clean ceramic tile, using guide rings to maintain an even thickness throughout. Use a two-inch circular cutter to stamp out the outer boundary, then center a one-inch circular cutter inside to remove the inner core, leaving a flat, hollow clay donut. Pierce a tiny suspension hole through the top edge of the ring using a fine needle tool. Cover the pieces with a clean sheet of cardstock on the baking tile to shield them from direct oven element heat, curing for fifty minutes at the exact temperature indicated on the clay packaging to achieve maximum clarity without yellowing. After cooling, buff the cured rings with a soft flannel cloth, then connect each clay hoop to an open brass ear wire using a five-millimeter brass jump ring.

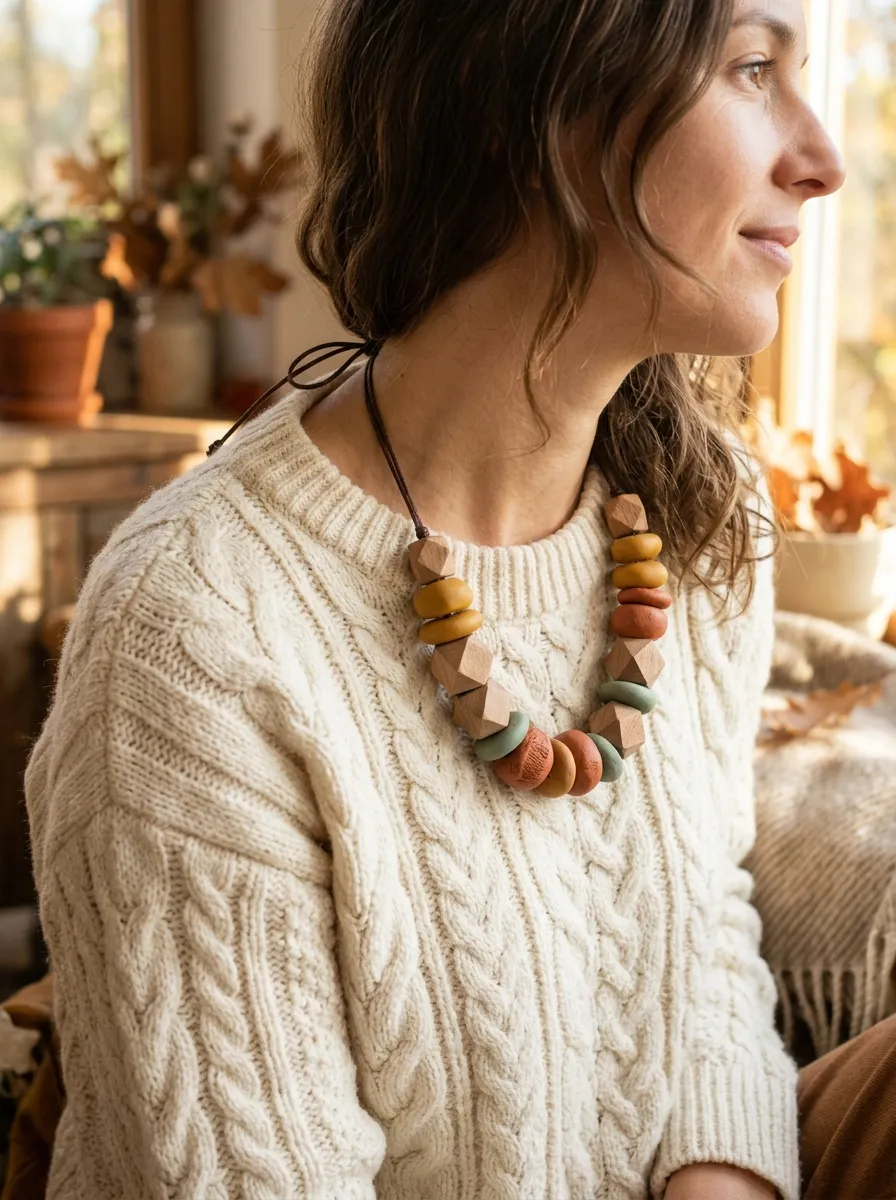
    6. Rustic Clay and Raw Wood Beaded Necklace

    6

    Step-by-Step Guide

    The rustic clay and raw wood beaded necklace bridges sculptural clay crafting with organic woodwork, creating a bold, textural collar necklace. The design features hand-rolled polymer clay beads in muted fall tones—such as mustard ochre, burnt orange, and sage green—interspersed with natural, unvarnished geometric wooden beads. The clay beads are shaped into varied geometric forms, including flattened discs, faceted polyhedrons, and smooth round spacers, creating a rhythm of varied shapes along the cord. The contrast between the velvety matte finish of cured clay and the porous grain of natural wood produces an organic, tactile aesthetic that pairs naturally with linen shirts, denim jackets, and chunky knit scarves. Strung on durable waxed cotton or natural leather cord, this necklace provides comfortable everyday durability. The project allows makers to practice hand-forming and bead-piercing techniques without requiring cookie cutters or flat slab tools.
    Begin by rolling conditioned clay in autumn shades into smooth, uniform spheres measuring fifteen millimeters in diameter. To create faceted polyhedrons, use a sharp craft blade to slice tiny flat planes around the perimeter of several spheres, creating clean geometric facets. To make flat spacer discs, roll smaller clay balls and flatten them gently between two smooth acrylic blocks to a four-millimeter thickness. Pierce a two-millimeter hole through the center of every raw bead using a pointed metal skewer, rotating the skewer slowly to prevent flattening the three-dimensional shapes. Stand the skewers across an oven-safe ceramic baking rack so the beads suspend in mid-air without touching any flat surfaces, curing for forty minutes. Once cool, slide the clay beads onto a one-meter length of two-millimeter waxed cotton cord, alternating with raw beechwood beads. Finish the necklace ends with clean barrel knots or brass cord crimps fitted with an adjustable lobster clasp.

    7. Deep Plum and Mustard Layered Fan Earrings

    7

    How to Create

    The deep plum and mustard layered fan earrings explore color blocking and stacked tiers, using art deco architectural inspiration to create dramatic movement. The design features a semi-circular fan base in rich, dark plum clay, overlaid with a smaller, scalloped or ribbed fan in warm mustard ochre. The contrast between the moody purple tone and the vibrant yellow hue creates visual energy that enlivens dark fall and winter clothing palettes. The lower edge of the plum fan can be left smooth or detailed with subtle radial stamped lines that extend outward from the center, emphasizing the fan geometry. Because the two pieces are linked with metal jump rings rather than glued rigidly together, the lower tier swings independently with every movement of the head. This project teaches crafters how to coordinate multi-piece articulated jewelry, balancing component scale and connection spacing to ensure the earrings hang straight.
    Condition deep plum and mustard ochre polymer clay, rolling each into separate three-millimeter slabs on your work surface. Use a semi-circular cutter measuring thirty millimeters wide to cut the base fans from the plum slab, smoothing the curved perimeter with a silicone blending tool. Next, use a smaller twenty-millimeter semi-circular cutter to cut the top fan overlays from the mustard slab. On the mustard pieces, use a dull craft blade to press fine radial lines radiating from the flat top edge toward the curved rim, creating a pleated fan texture. Punch two suspension holes along the flat bottom edge of the mustard fan, and two corresponding holes along the top edge of the plum fan, maintaining even spacing. Bake all components flat on parchment paper for thirty-five minutes. Once cured, connect the two tiers using four-millimeter brass jump rings, and attach a brass ball post to the top mustard fan with jewelry adhesive.

    8. Burnt Sienna Organic Pebble Link Bracelet

    8

    Execution Process

    The burnt sienna organic pebble link bracelet translates the smooth, weathered shapes of river stones into a flexible, tactile wrist accessory. The design consists of five to seven asymmetrical, softly rounded clay stones in graduated shades of burnt sienna, rust, and warm terracotta, linked together with sturdy metal jump rings. Each pebble is individually shaped by hand, giving the bracelet an organic, artisanal quality that departs from rigid geometric symmetry. The edges of each clay link are rounded and softened before baking, creating a smooth feel against the skin during movement. The warm rust tones complement gold, bronze, and leather jewelry, making this piece a versatile accent for seasonal bracelet stacks. This project teaches makers how to drill precise double holes through curved surfaces, ensuring the bracelet lays comfortably flat against the wrist without flipping or binding.
    Roll small portions of conditioned burnt sienna clay into flattened ovals and rounded pebble shapes, varying their sizes between fifteen and twenty millimeters across. Gently rub the perimeter of each raw pebble with a damp thumb to remove sharp edges, creating a soft, tumbled stone silhouette. Use an acrylic block to press each pebble flat so both sides remain parallel, ensuring a uniform thickness of three millimeters. Use a two-millimeter needle tool to bore two horizontal holes through opposite ends of each pebble, checking that the holes run parallel to the flat surface. Cure the pebbles on a ceramic tile dusted with cornstarch to prevent flat, shiny spots from forming on the undersides. After cooling, rinse away any residual cornstarch and buff the pebbles with a denim cloth. Link the pebbles together using heavy-duty six-millimeter brass jump rings, and attach an antique brass toggle clasp to the ends.

    9. Autumnal Terrazzo Chunky Hoop Earrings

    9

    How to Make

    The autumnal terrazzo chunky hoop earrings bring playful composite stone patterning into a bold, sculptural hoop format. This design utilizes a thick C-shaped hoop silhouette crafted from an ivory or warm oatmeal clay base embedded with tiny, irregular flecks of terracotta, olive green, mustard yellow, and deep chocolate brown. The terrazzo pattern distributes color across the entire curve of the hoop, creating a rich visual texture that coordinates with diverse autumn wardrobe pieces. Because the hoop forms a three-dimensional open ring rather than a flat cutout, it catches the light across multiple planes, highlighting the embedded colorful flecks. The chunky proportions provide a high-end, boutique aesthetic while remaining comfortable for all-day wear due to the lightweight nature of polymer clay. This project introduces crafters to curved mandrel baking techniques, showing how to shape and cure dimensional hoops without flattening their rounded profiles.
    Condition an ivory clay base, rolling it into a four-millimeter slab. Chop baked scraps of terracotta, mustard, olive, and brown clay into microscopic, irregular flakes using a sharp craft knife. Scatter the colorful flakes across the ivory slab, rolling firmly with an acrylic pin to press the flecks flush into the base sheet. Cut the patterned slab into straight strips measuring ten millimeters wide by sixty millimeters long, smoothing the long edges with a silicone shaper. Carefully wrap each strip around an oven-safe wooden dowel or metal tube measuring one inch in diameter, curving the strip into an open C-shaped hoop. Trim the ends cleanly, leaving a half-inch gap between the tips. Cure the hoops directly on the dowel in the oven for forty minutes to preserve their circular curvature. After cooling, slide the hoops off the dowel, drill a tiny hole near one tip, and secure a flat titanium earring post to the interior edge using strong jewelry adhesive.

    10. Forest Green and Gold Foil Bar Brooch

    10

    Setup Method

    The forest green and gold foil bar brooch reimagines vintage lapel pins into a modern minimalist accessory for autumn coats, blazers, and thick knit scarves. The design features a slender, elongated rectangular clay bar in deep, saturated forest green, accented with delicate flecks of genuine imitation gold leaf pressed into the surface. The deep green tone provides a moody, sophisticated background that allows the fractured gold foil to catch ambient light, mimicking the appearance of natural mineral veins running through dark emerald stone. The narrow bar silhouette provides an understated, tailored accent that secures lapels or stabilizes heavy wool scarves without pulling or damaging the fabric. This project teaches crafters how to apply delicate metallic leaf foils to raw polymer clay, opening creative possibilities for incorporating reflective metallic elements into seasonal jewelry and outerwear accessories.
    Condition deep forest-green polymer clay thoroughly and roll it into an even four-millimeter slab across a smooth glass tile. Lay a sheet of imitation gold leaf over the clay slab, patting it gently with a dry, soft makeup brush so the foil adheres across the surface. Use an acrylic roller to stretch the slab slightly, causing the gold leaf to fracture naturally into delicate, irregular veins and flecks that reveal the green clay beneath. Use a steel ruler and a sharp tissue blade to cut a clean, straight bar measuring twelve millimeters wide by sixty millimeters long. Smooth the cut perimeters with a flat silicone tool to remove any slight edge burrs. Bake the bar flat on a parchment-lined ceramic tile for forty minutes to ensure maximum strength and rigidity. Once cool, coat the top surface with a micro-thin layer of matte water-based varnish to seal the gold leaf, and attach a brass safety-catch bar pin to the reverse side using industrial jewelry glue.

    Common Beginner Mistakes and How to Avoid Them

    A frequent mistake beginners encounter when crafting polymer clay jewelry is under-baking their components, which results in brittle pieces that snap easily under light stress. Polymer clay requires sustained heat to fuse the plasticizers completely; baking for too short a duration leaves the core under-cured and fragile. Always cure pieces for the full time recommended by the manufacturer—typically thirty to forty-five minutes for three-millimeter slabs—using an independent oven thermometer to verify internal temperatures. Another common error is rolling slabs with uneven thickness, which leads to warped pieces during baking and imbalanced weight distribution in hanging earrings. Use acrylic rolling guides or matching stacks of playing cards on both sides of your rolling pin to ensure consistent thickness across every slab. Additionally, crafters often handle uncured clay with dusty hands, embedding lint and fingerprints into light-colored pastels; keep a pack of baby wipes nearby, and clean your hands and work surface between color changes. Finally, avoid using weak jewelry jump rings; choose sturdy, heavy-gauge rings and close them with a slight twisting motion rather than pulling them apart, preserving their structural tension and circular shape.

    Practical Tips for Better Results

    Achieving professional, boutique-quality finishes on handmade clay jewelry relies on careful surface preparation, clean cutting, and deliberate post-bake finishing. To achieve perfectly clean cutter releases without dragging or tearing clay edges, dust your cutters with a light coating of cornstarch before pressing them into the slab, or place a thin sheet of plastic wrap over the clay before cutting. If minor fingerprints or surface marks appear on raw clay, smooth them gently using a cotton swab dipped in isopropyl alcohol before baking, which dissolves surface imperfections without altering the shape. After curing, wet-sand the edges of your components underwater using four-hundred, six-hundred, and eight-hundred grit wet-or-dry sandpaper; wet sanding eliminates airborne clay dust while producing exceptionally smooth, rounded borders. When drilling connection holes, support the cured component flat on a scrap piece of wood and drill slowly using a hand pin vise rather than high-speed rotary tools, preventing friction heat that can melt the clay. Finally, when gluing metal posts to clay backs, score both surfaces with a needle tool to create mechanical texture that helps the jewelry glue bond permanently.

    Styling, Presentation, or Organization Ideas

    Styling handmade fall polymer clay jewelry thoughtfully enhances its visual warmth, integrating it into seasonal wardrobes and elevated retail displays. When wearing warm terracotta, mustard, or olive earrings, pair them with cream cable-knit sweaters, charcoal wool coats, or natural linen button-downs to let the rich earthy tones serve as the focal color accent. For jewelry makers presenting their work at seasonal craft markets or creating content for digital inspiration boards, mount finished pieces on custom unbleached kraft paper cards stamped with clean, minimalist branding. Display collections on natural materials—such as raw oak risers, smooth river stones, or linen-covered trays—to complement the organic, handmade aesthetic of the accessories. To keep your personal collection organized at home, hang statement earrings on a wall-mounted brass mesh frame or store them flat in velvet-lined drawer organizers, protecting delicate clay edges from scratching against metal chains. When photographing completed jewelry, shoot under soft, indirect morning daylight against clean, neutral backgrounds like travertine stone or textured paper, capturing subtle surface textures and true color values without harsh reflections.

    Budget or Time Planning

    Creating a complete collection of autumn polymer clay jewelry is an economical creative project that delivers high artistic returns with minimal upfront investment. A single block of polymer clay costs very little and yields multiple pairs of statement earrings, allowing crafters to produce an extensive accessory collection from just four or five core colors. To keep startup costs manageable, avoid purchasing expensive motorized equipment early on; manual acrylic rollers, basic stainless steel cutters, and hand pin vises provide complete control at a fraction of the cost. When planning your production schedule, organize your workflow into structured, assembly-line stages: dedicate the first session to color mixing, slab conditioning, and shape cutting. Reserve the second session for baking, allowing pieces to cool thoroughly overnight, and use the third session for wet-sanding edges, drilling holes, and assembling findings. Completing projects in organized batches maximizes your efficiency and keeps your workspace clean, enabling you to finish a cohesive collection of ten to twelve finished jewelry pieces over a single relaxing weekend.

    Creative Expansion and Advanced Inspiration

    Once you feel confident with foundational slab cutting, curing, and assembly techniques, you can explore advanced variations that incorporate mixed media, dynamic surface carving, and complex assembly methods. Experiment with the Sutton slice technique, pressing contrasting clay colors into detailed texture plates, shaving the raised excess flush with a tissue blade, and transferring the intricate pattern onto a flat base slab. You can also explore adding cold-connection metals, such as riveting hand-cut brass geometric plates directly onto cured clay components using miniature eyelets to introduce mixed metallic shine. Another compelling direction involves carving cured clay surfaces with linoleum gouges or micro-woodcarving chisels, creating geometric grooves that can be filled with contrasting liquid clay or metallic wax pastes. Furthermore, you can expand beyond jewelry by using these exact color palettes and texturing methods to craft coordinating accessories, such as hair slides, minimalist bookmarks, compact trinket dishes, or decorative button sets. Exploring these multi-disciplinary methods expands your creative range while keeping the warm, comforting essence of seasonal color design at the center of your crafting journey.
  • 10 Beachy Boho Polymer Clay Jewelry Ideas

    10 Beachy Boho Polymer Clay Jewelry Ideas

    Polymer clay jewelry continues to dominate digital fashion boards, providing endless inspiration for modern makers who value handmade accessories with an organic aesthetic. The coastal bohemian style combines relaxed, nature-inspired elements with structural elegance, offering wearable art that captures the essence of sun-drenched shores, tidal textures, and earthy neutrals. In this complete tutorial, readers will learn how to transform basic blocks of oven-bake medium into durable, boutique-quality statement pieces. Polymer clay provides unmatched versatility for both decorative design and everyday adornment, allowing anyone to produce lightweight earrings, pendants, hair accessories, and charms without investing in commercial metalworking tools. By learning specialized texturing methods, custom pigment mixing, slab building, and careful assembly, crafters can execute professional collections from home. This practical guide covers essential materials, systematic step by step crafting procedures, and reliable curing protocols that guarantee structural longevity. Whether the goal is outfitting a summer capsule wardrobe, creating thoughtful personalized gifts, or establishing an artisan accessories brand, these actionable techniques establish a dependable foundation. You will master ten versatile design concepts that blend soft shoreline palettes, nautical geometry, and relaxed boho textures into elevated statement pieces that maintain structural integrity and timeless visual appeal.

    Why This Idea Is Trending or Useful

    The surge in popularity surrounding coastal bohemian polymer clay jewelry stems from a cultural movement toward slow fashion, tactile craft traditions, and customized personal styling. Modern Pinterest ideas routinely highlight organic textures, Mediterranean ceramic motifs, and neutral tones because they seamlessly bridge everyday casual apparel with high-end designer aesthetics. Polymer clay serves as an exceptionally forgiving medium, making this creative project remarkably accessible for beginners while offering advanced manipulation potential for seasoned artisans. The raw materials are naturally featherlight, meaning large statement earrings and tiered drops can be worn throughout the day without causing physical discomfort or stretching earlobes. From a budget perspective, crafting jewelry at home eliminates the steep retail markups associated with specialty boutique accessories, offering substantial savings while preserving complete creative control over color harmony, shape, and finish. Furthermore, the tactile nature of shaping, stamping, and curing clay delivers a tangible sense of accomplishment that digital activities cannot replicate. Because the finished designs integrate natural tones like warm sand, seafoam green, terracotta, and soft ivory, they fit right into contemporary minimalist style palettes, providing enduring relevance across seasons rather than fading as a temporary micro-trend.

    Materials and Preparation

    Achieving structural durability and polished finishes requires deliberate material selection and careful studio preparation before any shaping begins. The core requirement consists of quality polymer clay blocks in oceanic and earth tones, including ecru, translucent, seafoam, terracotta, and soft ochre. A smooth, non-porous working surface is critical; ceramic tiles, tempered glass panes, or polished marble boards prevent unwanted sticking while allowing direct transfer into an oven. Essential hand tools include an acrylic roller for uniform sheeting, a tissue blade for crisp slab cuts, shape cutters in geometric arches and floral motifs, and needle tools for piercing jump ring holes. Supporting jewelry findings must include surgical-grade stainless steel earring posts, hypoallergenic jump rings, flexible jewelry wire, and heavy-duty jeweler glue to secure posts. Preparation begins by deep-cleaning the work plane using isopropyl alcohol and lint-free microfiber cloths to eliminate residual dust, lint, and rogue pigments that easily bond to raw clay. Planning the visual scale and clay thickness prior to cutting preserves symmetry and prevents warping during the cure. Preheating an oven alongside a standalone oven thermometer guarantees temperature accuracy, preventing scorched edges or brittle, under-baked clay bodies.

    Idea 1: Tiered Sea Glass Arches

    1

    Execution Process

    The tiered sea glass arch earring concept captures the weathered, frosted appearance of ocean glass fragments arranged into clean, architectural forms. This design incorporates soft translucent clay tinted with a microscopic drop of oceanic green pigment, generating a frosted, semi-opaque finish that catches ambient sunlight when worn. The structural layout employs two nesting, inverted U-shapes connected sequentially by metallic findings, establishing fluid movement while retaining a clean, contemporary silhouette. By utilizing a minimalist style arch, the design softens modern geometric angles with fluid maritime color balance. Natural light interacts dynamically with the translucent material, mimicking water-worn glass collected along pebble beaches. The soft curves flatter diverse facial structures, making the piece suitable for both relaxed daytime outings and formal evening gatherings. The matte, unglazed texture mirrors authentic sea glass eroded by saltwater and sand over decades, avoiding artificial high-gloss sheens in favor of an understated, tactile presence. Balancing proportions ensures the top arch anchors comfortably against the earlobe while the bottom drop swings independently, accentuating natural movement throughout daily wear.
    Begin by conditioning translucent clay alongside a pinhead-sized segment of teal clay, rolling the medium thoroughly until the color disperses into an even, water-washed tone. Roll the prepared mass into a flat, three-millimeter slab across a chilled ceramic tile using an acrylic roller. Press nesting arch cutters firmly into the clay, withdrawing the metal cleanly to avoid edge distortion. Using a fine needle tool, pierce small attachment holes approximately two millimeters from the inner and outer connection edges before curing. Transfer the tile directly into a preheated oven calibrated to one hundred and thirty degrees Celsius, baking the shapes for thirty-five minutes to achieve optimal polymer fusion. After the elements cool to room temperature, rub the surface with four-hundred-grit wet-and-dry sandpaper submerged in cool water to produce a soft, frosted sea glass texture. Dry the clay thoroughly, then use flat-nose jewelry pliers to link the top and bottom arches using six-millimeter open jump rings. Secure stainless steel earring posts to the upper reverse side using two-part epoxy adhesive, allowing the bond to cure undisturbed for twenty-four hours.

    Idea 2: Terracotta Seashell Studs

    2

    Step-by-Step Guide

    Terracotta seashell studs translate classic coastal marine motifs into grounded, bohemian ear adornments using rich earth tones rather than predictable pastel blues. This design uses warm, reddish-brown clay with subtle mineral flecks to suggest ancient Mediterranean pottery mixed with shoreline geology. The physical shell texture features radiating ridges that spread outward from a compact base, producing delicate highlights and shadows across the earring face. Unlike bulky novelty accessories, this compact design maintains a low profile, hugging the earlobe neatly for everyday comfort and subtle sophistication. The warmth of the terracotta clay complements sun-kissed skin tones and neutral linen clothing, grounding breezy summer outfits with organic depth. The structural integrity relies on a solid single-layer construction that resists cracking or snapping under routine wear. The combination of historical pottery colors and nautical anatomy fits squarely into contemporary boho aesthetics, balancing rustic artisan charm with clean, intentional lines. These studs serve as a foundational accessory, versatile enough to pair with layered necklaces or function as quiet accents alongside more elaborate statement pieces.
    Condition rich terracotta clay by working it through your hands until fully pliable and smooth, eliminating air pockets. Roll the conditioned clay into a uniform slab measuring four millimeters in thickness to provide structural depth for dimensional texturing. Firmly press a ribbed seashell stamp or custom silicone texture sheet onto the surface, applying even downward pressure across the mold to capture crisp striations. Use a miniature scalloped circle cutter to frame the imprinted shell design, lifting away the excess scrap clay carefully with a tissue blade. Inspect the perimeter of each cut piece, smoothing any rough edges using a fingertip dipped in a droplet of isopropyl alcohol. Place the cut pieces on a flat baking sheet lined with parchment paper to prevent shiny contact spots from forming during heat exposure. Bake the elements at one hundred and thirty degrees Celsius for thirty minutes, ensuring thorough curing to keep the thin ridges resilient. Once fully cooled, attach hypoallergenic ear posts to the flat backings using an industrial jeweler adhesive, pressing firmly for thirty seconds to ensure complete contact.

    Idea 3: Rattan Weave Clay Hoops

    3

    How to Create

    Rattan weave clay hoops unite the warm, tactile charm of traditional woven basketry with the durable, water-resistant nature of cured polymer clay. This design relies on intertwining thin strands of sand-colored clay to construct open circular forms that evoke vintage woven straw sun hats and natural wicker furniture. The aesthetic value stems from intricate textural depth, where delicate, interwoven braids catch directional light and cast subtle linear shadows. Although visually complex and dense, the circular structure remains remarkably light, eliminating ear fatigue commonly associated with heavy metal hoops. The natural oatmeal color scheme functions as an effortlessly neutral base, coordinating seamlessly with flowing patterned maxi dresses, neutral canvas accessories, and beachside attire. This approach reinterprets conventional bohemian fibers through an adaptable polymer medium, ensuring the finished piece never frays, unravels, or absorbs moisture from coastal air. The open hoop configuration creates an airy, balanced frame around the jawline, delivering an intentional balance of artisan craft and tailored modern geometry suitable for diverse styling contexts.
    Prepare light sand-colored clay by mixing ecru with an imperceptible speck of raw sienna to produce a warm reed tone. Extrude the conditioned clay through a clay gun fitted with a one-millimeter multi-hole disc to produce long, identical clay filaments. Group three strands together, carefully plaiting them into a tight, consistent three-strand braid across your working tile. Wrap the braided strip around an oven-safe metal cylinder or round wooden dowel covered in parchment paper to form a uniform circular hoop, trimming the meeting ends neatly with a blade. Lightly compress the seam with a silicone modeling tool to fuse the clay ends without distorting the woven pattern. Bake the assembly while still mounted on the cylinder at one hundred and thirty degrees Celsius for forty minutes to prevent the circular shape from sagging under heat. Once cooled, slide the hoop off the cylinder and clean any jagged contact points with an eight-hundred-grit sanding block. Thread a fine wire hoop finding through the hollow core or glue a flattened connector finding to the reverse edge using strong craft cement.

    Idea 4: Driftwood and Dune Clay Drop Pendants

    4

    Execution Process

    Driftwood and dune clay drop pendants explore the organic color shifts found where coastal maritime forests meet shifting shoreline sands. This elongated neckpiece integrates a faux-wood polymer bar suspended horizontally, anchoring a hanging clay semi-circle that displays smooth, rolling tonal gradations. The top component mimics the fibrous grain and weathered gray-brown patina of ocean driftwood, while the lower component utilizes muted sand and ecru hues to evoke windswept dunes. The balance between the linear wooden bar and the soft curvature of the lower drop yields an intriguing structural harmony, drawing inspiration from mid-century modern design elements. Because polymer clay can accurately replicate natural materials without harvesting organic resources, it provides a dependable medium for producing durable, consistent wood textures. Suspended from an adjustable waxed cotton cord or delicate satellite chain, the pendant acts as a refined bohemian focal point over open necklines, knit sweaters, or simple summer camisoles. The overall composition remains grounded, artistic, and deeply rooted in the natural geography of wild coastal shores.
    Begin by combining equal parts brown, ecru, and gray clay partially to yield a marbled log showing distinct, irregular color striations. Roll the marbled log flat, dragging a stiff wire brush along the length to carve organic woodgrain fissures into the surface. Cut a rectangular bar measuring three centimeters wide by eight millimeters high, piercing vertical pass-through holes through each short end using a bead-piercing needle. Next, blend pale cream clay into a matching semi-circle shape using an acrylic roller and a round cutter cut in half. Texture the bottom drop with fine sandstone abrasive powder to create a matte, earthy texture before assembly. Carefully pierce a centered hole through the upper apex of the semi-circle to allow smooth hardware connection. Bake all components on a ceramic tile at one hundred and thirty degrees Celsius for thirty-five minutes, allowing them to cool slowly inside the turned-off oven to prevent thermal shock. Assemble the pieces by connecting the faux-driftwood bar to the dune drop using an oval jump ring, then thread a delicate link chain through the horizontal bar holes.

    Idea 5: Hammered Gold Leaf Tidal Discs

    5

    Step-by-Step Guide

    Hammered gold leaf tidal discs blend rugged coastal organic textures with the luminous, elevated sheen of gilded metallic accents. This design consists of flat circular clay bases rendered in a deep oceanic slate blue, overlaid with broken, micro-fragments of gold leaf that suggest sunlight refracting off rolling waves. The surface receives an intentional, hand-textured hammered pattern, dispersing glare into dynamic, undulating highlights reminiscent of moving water. The contrast between deep nautical tones and radiant metallic foil produces an elegant visual impact, turning simple circular studs or drop earrings into sophisticated statement accessories. This concept elevates bohemian accessories by introducing deliberate luxury, making the finished pieces versatile enough for casual beachside dining or upscale formal events. The clay acts as a stable, lightweight canvas that supports metallic leafing without peeling, flaking, or tarnishing over time. By balancing organic dimpling with balanced circular cuts, the design avoids looking unrefined, maintaining a high level of polished craft that mirrors artisanal boutique metalwork while retaining absolute featherlight wearability.
    Roll a smooth slab of slate-blue polymer clay to a uniform depth of three millimeters on a clean glass working surface. Gently lay a sheet of imitation gold leaf over the clay, brushing it down flat using a soft, dry makeup brush until it adheres completely. Run an acrylic roller lightly across the surface to crack the metallic leaf into irregular, organic fissures that reveal the underlying blue medium. Press a rounded-tip embossing tool repeatedly into the clay surface at varied angles, generating a realistic hammered texture across the entire sheet. Stamp out symmetrical circular components using a stainless steel circular punch, ensuring the edges remain crisp and free from ragged clay burrs. Pierce a neat hole near the top edge of each disc using an awl if the piece will hang as a drop earring. Bake the cut discs on parchment paper at one hundred and thirty degrees Celsius for thirty-five minutes to achieve maximum material toughness. After cooling, apply a water-based satin sealant over the surface to protect the delicate gold leaf, then affix ear wires or posts using two-part adhesive.

    Idea 6: Organic Pebble Mosaic Choker

    6

    How to Create

    The organic pebble mosaic choker takes its cue from smooth, water-tumbled stones gathered along windswept ocean shorelines. This project features an array of flat, asymmetrical clay shapes arranged into a cohesive geometric collar that rests flat against the collarbone. Each pebble element is crafted in an individual earthy neutral, spanning creamy chalk, pale taupe, speckled granite, and muted charcoal. The charm of this necklace comes from the deliberate asymmetry of the individual clay stones, which harmoniously link together through consistent thicknesses and matching matte finishes. The resulting jewelry piece feels organic, grounded, and modern, offering a striking alternative to rigid metal chains or traditional gemstone strings. Resting securely against the skin, the clay warms quickly to body temperature, providing an exceptionally comfortable wearing experience. This statement choker coordinates naturally with unbuttoned linen shirts, square-neck summer dresses, and minimalist knitwear, infusing casual coastal vibes into relaxed contemporary styling. The design celebrates the beauty of natural stone formations while retaining the unmistakable comfort of featherlight clay construction.
    Mix three distinct neutral batches of clay by kneading black pepper, fine craft sand, or dark polymer shavings into ecru and gray bases to simulate granite stone textures. Roll the conditioned clay batches into separate small logs, slicing irregular pieces off with a flexible blade to establish varied pebble dimensions. Flatten each pebble slightly with an acrylic roller to a uniform depth of three millimeters, keeping the outer silhouettes softly rounded and asymmetric. Smooth the edges of each pebble with a damp fingertip to remove harsh angles, mimicking the natural tumbled look of shoreline river stones. Pierce horizontal stringing channels straight through the center mass of every stone using an extra-fine bead wire before baking. Arrange the pierced pebbles on a baking tile lined with baking soda to support their rounded undersides without forming flat spots during heating. Cure the pieces at one hundred and thirty degrees Celsius for forty minutes, ensuring structural strength across all stringing holes. Once cool, string the pebbles sequentially onto durable nylon-coated beading wire, finishing the ends with crimp beads, wire guards, and a secure lobster clasp.

    Idea 7: Sunburst Raffia Fringe Earrings

    7

    Setup Method

    Sunburst raffia fringe earrings unite the structured precision of sculpted clay arches with the wild, tactile softness of natural coastal plant fibers. The upper portion of this dynamic accessory consists of a polymer clay arch or half-sun motif, detailed with delicate stamped rays that radiate outward from the center. The bottom edge features an integrated channel of fine holes that secure knotted strands of raw raffia or fringed linen cord, generating contrasting textures between hard and soft elements. This combination creates kinetic movement that sways gently with every step, drawing attention to the neckline and shoulders. The combination of radiant sun iconography and frayed plant fiber captures authentic bohemian style, balancing modern design discipline with earthy, laid-back craftsmanship. Because the bottom fringe consists of featherlight fiber, the earrings make a dramatic visual statement without adding unmanageable weight. The natural palette of golden straw, sun-bleached ecru, and warm mustard makes this design a standout choice for resort vacations, outdoor summer festivals, and coastal events.
    Condition rich mustard or warm ochre clay thoroughly, rolling it out evenly to a three-millimeter thickness on your smooth work surface. Cut out a wide half-circle shape using a clean cutter, then use a sharp craft knife to score delicate radiating sunburst grooves across the upper surface. Using a fine needle tool, pierce a series of evenly spaced holes along the flat bottom rim of the half-circle, placing them roughly two millimeters apart. Pierce a single centered mounting hole at the top curved edge to accept the primary earring finding after baking. Bake the components on a flat ceramic slab at one hundred and thirty degrees Celsius for thirty-five minutes, allowing them to cool completely before continuing. Cut several dozen strands of natural raffia fiber into four-inch lengths, bundling them into small groupings of two or three strands. Thread the folded center of each raffia bundle through a bottom hole, pulling the cut ends through the loop to create secure lark’s head knots. Trim the hanging fringe in a neat horizontal line or chevron point with sharp fabric shears, then mount an ear wire through the top hole.

    Idea 8: Marbled Seafoam Botanical Barrette

    8

    How to Create

    The marbled seafoam botanical barrette brings the dynamic, swirling motion of coastal surf and coastal flora into functional hair accessories. This hairpiece utilizes an elongated rectangular or oval clay bar decorated with soft, swirling veins of ocean teal, seafoam green, translucent white, and sparkling pearl clay. Delicate botanical fern or palm frond silhouettes are gently stamped into the marbled surface, uniting oceanic colors with lush coastal foliage. The swirling color pattern ensures that every single barrette emerges as an entirely original piece of wearable art, never identical to another. The durable polymer medium flexes slightly without breaking, making it an ideal protective cover for metal hair clip hardware. This versatile accessory effortlessly secures loose beach waves, half-up twists, or casual updos, adding an immediate touch of coastal bohemian charm to effortless hairstyles. Its polished, marble-like finish feels refined, proving that clay hair accessories can easily rival high-end resin or acetate boutique options in both visual appeal and daily durability.
    Prepare your marbled medium by rolling individual thin ropes of seafoam green, white, pale turquoise, and pearlized translucent clay. Twist the ropes together into a tight spiral, fold the spiral in half, and roll it smooth, repeating the process three times to build layered, organic color veins. Compress the twisted mass into a dense block, then slice thin cross-sections with a tissue blade, arranging them edge-to-edge on a work tile. Smooth the composite sheet with an acrylic roller to blend the seams, creating a continuous marbled slab measuring three millimeters thick. Press a clean botanical leaf stamp lightly across the marbled surface to leave delicate organic impressions, then cut an elongated rounded barrette blank using a craft knife. Drape the clay strip over a curved, oven-safe metal form to give the barrette an ergonomic curve that contours naturally against the scalp. Bake at one hundred and thirty degrees Celsius for thirty-five minutes, cooling the strip completely before sanding the outer edges smooth. Secure the cured clay piece to a metal alligator or French barrette clip using high-strength industrial epoxy.

    Idea 9: Bleached Coral Textured Hoops

    9

    Execution Process

    Bleached coral textured hoops draw structural inspiration from the intricate, porous calcified architecture found within living shoreline coral reefs. This design forms an open, hoop-style silhouette finished in matte off-white, bone, or pale sand, covered completely in an organic array of miniature divots, punctures, and irregular micro-crevices. The all-white, monochromatic palette highlights the dramatic surface variation without needing bold colors, keeping the design sophisticated, subtle, and fundamentally minimalist. By incorporating deep organic texture across the entire surface, the clay scatters light softly, preventing the piece from appearing flat, plain, or synthetic. The earrings capture the fragile wonder of the ocean floor, transforming intricate marine biology into wearable, sculptural art. Their neutral color palette makes them endlessly versatile, complementing colorful summer prints as easily as simple, crisp linen separates. These sculptural hoops bring depth and artisanal complexity to casual warm-weather styling, serving as conversation-starting accessories rooted in the quiet beauty of natural coastal formations.
    Condition ivory or unbleached porcelain clay until it is soft, rolling it into a uniform cylinder measuring eight millimeters in diameter. Curve the thick clay roll into a smooth hoop shape, cutting the ends diagonally to form clean, intentional terminal joints. Lay the shaped hoop on a ceramic tile and begin texturing the entire outer surface using needle tools, ball stylus heads, and natural coral fragments. Puncture varying sizes of microscopic holes and organic indentations into the clay body, creating an irregular, porous texture that mimics genuine reef structures. Check that the inner curve remains smooth and comfortable against the skin, focusing the porous texture along the outer and side perimeters. Carefully pierce a straight transverse hole through the top terminal end to accept a standard jewelry eye pin or jump ring finding. Bake the sculpted hoops at one hundred and thirty degrees Celsius for forty minutes, using a slightly longer bake to ensure complete structural strength throughout the thicker clay profile. Once fully cooled, wash the pieces with diluted gray acrylic wash, wiping the surface immediately so pigment remains only inside the deep crevices.

    Idea 10: Sand Dollar Geometric Drops

    10

    Step-by-Step Guide

    Sand dollar geometric drops merge the quiet symmetry of familiar shoreline fossils with modern, angular jewelry layouts. The design incorporates a circular clay disc bearing the iconic five-point perforated star motif of a coastal sand dollar, suspended within or beneath a clean geometric frame. Crafted in a soft, sun-bleached bone hue, the central fossil disc honors marine life, while the surrounding diamond or trapezoid frame adds contemporary architectural structure. This contrast between delicate organic anatomy and bold geometric lines keeps the accessory feeling fresh, modern, and stylish rather than literal or kitschy. The pierced perforations throughout the clay body allow daylight to pass through, creating an airy, weightless aesthetic that wears comfortably through all-day events. The design brings together historical natural history with modern runway trends, bridging relaxed vacation styling with high-end handmade craftsmanship. These statement drops add refined bohemian style to open-collar necklines, breezy linen ensembles, and outdoor beach wedding attire.
    Condition bone-colored clay thoroughly, mixing in a small pinch of translucent clay to give the cured material a natural, biological depth. Roll the clay to a uniform thickness of three millimeters on a smooth glass cutting tile, checking the surface for air bubbles. Cut a neat circle using a medium steel punch, then use an ultra-fine oval hole cutter to pierce the five traditional radial slots that define classic sand dollar anatomy. Use a micro ball stylus to lightly imprint delicate radiating dotted channels between each central perforation, reproducing authentic fossil patterns. Cut an open diamond-shaped geometric frame from a contrasting sand-toned clay slab to act as the primary structural hanger for the central disc. Pierce precise connection holes at the top and bottom junctions of the geometric frame, alongside a matching attachment hole at the upper rim of the sand dollar disc. Bake both structural elements on a parchment-lined tray at one hundred and thirty degrees Celsius for thirty-five minutes. Once cooled, connect the sand dollar disc inside the lower loop of the geometric frame using sturdy jump rings, finishing the earring with a secure ear hook.

    Common Beginner Mistakes and How to Avoid Them

    Creating polymer clay jewelry requires technical precision, and beginners often encounter frustrating structural issues by overlooking essential preparation steps. A widespread error is under-baking the clay, which leads to weak, brittle pieces that easily snap when bent or dropped. Polymer clay cures through chemical fusion that requires both accurate temperatures and adequate bake times; using an independent oven thermometer confirms the actual heat level, preventing under-curing or scorched, discolored edges. Another frequent misstep is poor conditioning, where makers skip rolling the clay until completely pliable, leaving hidden air pockets that blister and burst under high baking heat. Crafters also frequently ignore basic cleanliness, allowing rogue lint, pet hair, and stray dark clay crumbs to permanently embed into light-colored coastal slabs. You can prevent this contamination by routinely wiping tools and surfaces with ninety-one percent isopropyl alcohol and wearing lint-free finger cots during delicate shaping steps. Finally, many beginners drill attachment holes too close to the outer edge of their pieces, producing thin clay margins that break under the stress of opening jump rings. Maintaining at least two to three millimeters of solid clay between any connection hole and the outer rim ensures your finished jewelry withstands active, everyday wear.

    Practical Tips for Better Results

    Elevating your handmade polymer clay jewelry from amateur projects to professional artisan crafts relies on adopting specific, high-precision finishing techniques throughout your workflow. Always use a dedicated wet-sanding routine after baking, using silicone carbide sandpaper submerged in lukewarm, soapy water to smooth cut edges and erase surface imperfections without releasing fine airborne dust. Progressing sequentially through four-hundred, six-hundred, eight-hundred, and one-thousand grit papers produces an ultra-smooth, satiny surface that feels luxurious against the skin. When joining raw clay elements without mechanical hardware, apply a brush-on liquid polymer clay medium at the contact seams to establish a powerful chemical bond during baking. To keep backings smooth and free of shiny spots, bake your cut pieces on top of raw ceramic tiles lined with matte printer paper or parchment sheets rather than bare metallic pans. If you notice persistent fingerprints across unbaked clay slabs, gently smooth the surface using a cotton swab dipped in rubbing alcohol before curing. Finally, always use two pairs of smooth-jaw flat-nose pliers when manipulating jump rings, twisting the ends laterally rather than pulling them apart outward to maintain their structural circular shape and prevent metal fatigue.

    Styling, Presentation, or Organization Ideas

    Presenting and styling your coastal bohemian jewelry thoughtfully enhances its visual charm, whether you are organizing a personal vanity or curating cohesive collections for an artisan market. Display these organic designs against authentic natural elements that echo their coastal origins, such as bleached driftwood branches, hand-carved soapstone trays, or textured raw linen boards. When curating displays for photography or craft fairs, group pieces by color stories—pairing soft terracotta and ochre pieces together, while isolating cool seafoam and frosted translucent drops on another tray. For clean home storage that keeps pieces untangled and dust-free, hang finished earrings on custom wall-mounted organizers crafted from framed woven cane webbing or natural linen fabric. When wearing these statement accessories, pair bold sculptural clay earrings with understated wardrobe foundations like unbleached cotton tops, relaxed linen jumpsuits, or breezy, square-neck sundresses to let the intricate textures stand out cleanly. Consider pairing delicate clay studs with woven straw market bags and leather sandals to carry the laid-back beach aesthetic throughout your entire outfit. Thoughtful presentation frames each piece not as an everyday craft project, but as an intentional work of wearable coastal art.

    Budget or Time Planning

    Efficient time management and smart material sourcing allow crafters to produce entire jewelry collections affordably without sacrificing material quality or artistic integrity. When working with polymer clay, batch processing your designs cuts overall production time drastically compared to working on individual pieces from start to finish. Dedicate distinct blocks of studio time to specific stages: condition and blend custom color batches in your first session, roll slabs and cut shapes in the second, and reserve subsequent sessions for baking, sanding, and final hardware assembly. Purchasing standard polymer clay blocks in economical multipacks or buying primary colors in bulk saves significant money, as you can easily blend your own custom ocean hues, muted seafoams, and earthy terracottas using primary pigments. Invest your budget primarily in quality stainless steel, nickel-free jewelry findings, as inexpensive, low-grade base metals quickly tarnish, corrode from skin oils, and trigger allergic reactions that ruin otherwise beautiful designs. Keep scrap clay organized in airtight containers grouped by broad color family; you can knead these leftover trims into beautiful faux-granite stones, marbled veins, or hidden core bases for future projects, eliminating material waste and stretching your crafting budget substantially.

    Creative Expansion and Advanced Inspiration

    Once you master basic conditioning, cutting, and curing skills, you can expand your creative jewelry practice by exploring advanced multimedia techniques and more intricate structural forms. Experiment by embedding natural beach sand, dried sea kelp fragments, or real crushed shells directly into translucent clay slabs before shaping to add genuine shoreline elements to your pieces. Explore liquid polymer clay as a high-gloss enamel glaze, using heat guns to cure thin, glass-like topcoats that mimic wet ocean stones or glossy tidal pools. You can also integrate other traditional bohemian crafts into your jewelry, joining sculpted clay elements with macramé knotting, micro-crochet linen borders, or delicate hand-beaded seed bead fringes that add fluid, graceful movement. Consider expanding your product line beyond earrings and pendants into functional lifestyle accessories, crafting matching coastal drawer pulls, sculptural clay hair combs, or decorative clay handles for vanity tools. Advanced artisans can also experiment with complex internal wire armatures, building large, sculptural, three-dimensional coral branches and tidal wave forms that challenge traditional jewelry silhouettes. Polymer clay offers boundless potential, empowering makers to translate organic coastal beauty into durable, expressive, and timeless personal fashion statements.
  • 10 Heart-Shaped Polymer Clay Jewelry Ideas

    10 Heart-Shaped Polymer Clay Jewelry Ideas

    Heart-shaped polymer clay jewelry represents one of the most versatile and enduring craft movements across modern creative platforms. Crafters, designers, and home hobbyists frequently seek out these projects because they transform basic modeling materials into durable, stylish accessories suitable for daily wear or thoughtful gifting. This comprehensive guide examines ten distinct design concepts, offering detailed technical guidance for creating earrings, pendants, charms, and hair ornaments. You will learn the specific handling properties of polymer clay, essential conditioning methods, accurate baking procedures, and assembly techniques that ensure long-lasting structural strength. The heart silhouette serves as an ideal canvas for learning surface treatments such as marbling, botanical pressing, metallic leafing, and textural carving. Exploring these projects allows creators to develop fundamental clay-sculpting competencies while producing professional items without requiring expensive industrial equipment or specialized workshop facilities. The accessibility of the medium ensures that anyone can master the delicate balance of color blending, shape cutting, and hardware integration. By understanding the foundational mechanics of polymer clay crafting, readers can confidently design tailored collections that reflect contemporary accessory trends, refine their personal crafting skills, and produce wearable artwork directly from a modest home setup.

    Why This Idea Is Trending or Useful

    The sustained popularity of heart-shaped clay jewelry across digital mood boards stems from a wider cultural shift toward customizable, handmade accessories and intentional DIY projects. Polymer clay provides unmatched design relevance because it allows independent creators to reproduce modern design trends at home. From organic neutral palettes to playful retro motifs, the medium adapts instantly to changing aesthetics without demanding commercial production equipment. The practical value of polymer clay lies in its featherlight density; bold, oversized heart earrings remain comfortable on the earlobes throughout the day, avoiding the fatigue caused by heavy metals or cast resins. For beginners, this medium removes technical barriers to entry. The clay remains workable indefinitely at room temperature until heat-cured, which eliminates the time pressure common to fast-curing epoxies or traditional ceramics. Crafters can sculpt, refine, and reshape their components without wasting raw stock. This high level of forgiveness makes it an exceptionally beginner friendly craft. Furthermore, the universal recognition of the heart motif ensures these finished accessories remain timeless gift choices, wardrobe staples, and reliable handmade inventory for independent artisans aiming to build functional accessory collections with minimal startup overhead.

    Materials and Preparation

    Achieving clean, professional results with polymer clay requires a clean, organized work environment and the correct primary materials. Begin by selecting high-grade polymer clay blocks in your chosen color palettes, along with basic jewelry findings such as stainless steel jump rings, ball-post studs, silicone backs, and chain necklaces. Essential shaping tools include an acrylic rolling pin, stainless steel heart cutters in varied dimensions, a craft knife with a rigid blade, a needle tool for piercing connection holes, and high-grit wet-or-dry sandpaper ranging from four hundred to one thousand grit. Prepare your workspace by thoroughly wiping down a flat, non-porous surface such as a ceramic tile or glass cutting mat using isopropyl alcohol. This step removes stray dust, fibers, and natural oils that could otherwise embed into the light-colored clay. Condition your clay blocks by hand-kneading or passing thin strips through an acrylic roller until the material becomes supple, pliable, and free of internal micro-fractures. Pre-planning your structural holes before applying heat is critical, as drilling into cured pieces risks cracking fragile edges. Organize all metal components and tools systematically nearby so you can work methodically through each assembly stage without interrupting the flow of production.

    1. Minimalist Terrazzo Heart Studs

    1

    Execution Process

    The minimalist terrazzo heart stud combines a clean Scandinavian design sensibility with mid-century architectural textures. This design relies on a pale, neutral background slab embedded with contrasting geometric chips to evoke the look of polished composite stone. Traditional terrazzo tiles use chips of marble, quartz, and granite suspended in cement; this jewelry variation mimics that organic density on a miniature scale. Selecting the right base hue is vital for the visual balance of the finished stud. Soft cream, muted sandstone, or gentle parchment shades serve as an unobtrusive foundation that showcases the vibrant flecks without visual clutter. The finished earrings provide an understated aesthetic suitable for workplace outfits and casual weekend wear alike. Because the surface remains flat and uniform, the subtle distribution of colorful inclusions provides the visual interest rather than heavy sculpting or three-dimensional relief. This specific project suits makers who appreciate modern design aesthetics built around clean lines, understated charm, and repeatable production steps.
    To create these terrazzo heart studs, condition two ounces of white or ecru polymer clay until it rolls smoothly without cracking. Roll the base clay out on a ceramic tile to a consistent thickness of three millimeters using acrylic depth guides. In a separate workspace, roll tiny scraps of charcoal, mustard, dusty terracotta, and sage green clay into very thin ribbons, then slice them into tiny, irregular shards using your craft knife. Scatter these multicolored flecks across the surface of the pale base slab in an irregular pattern. Place a sheet of parchment paper over the prepared slab and roll your acrylic pin across it with light, even pressure to press the chips flush into the base. Remove the paper, position your one-centimeter stainless steel heart cutter firmly onto the slab, and press straight downward to excise each stud shape. Bake the pieces on the tile at the manufacturer’s recommended temperature. Once cool, glue stainless steel earring posts to the backs with two-part jewelry epoxy.

    2. Pressed Botanical Fern Hearts

    2

    Step-by-Step Guide

    Pressed botanical fern hearts merge organic natural elements with modern polymer clay jewelry design. This method uses real miniature foliage, such as delicate maidenhair fern tips or small moss leaves, permanently sealed into an earthy clay pendant base. The finished piece captures microscopic organic textures, turning simple foliage into wearable art that reflects a naturalist aesthetic. The key to this design is balancing the soft, matte look of cured clay with the delicate structure of preserved botanical specimens. Crafters can use neutral clay bases such as muted sage, bone white, or warm taupe to keep the visual focus entirely on the delicate greenery. This concept translates exceptionally well into larger statement pendants, delicate charm bracelets, and dangling earrings. It is an ideal project for gardeners, nature lovers, and anyone seeking a grounded, vintage-inspired addition to their personal jewelry wardrobe. The final piece showcases subtle surface variations, where natural plant veins create fine sculptural imprints within the cured matrix.
    Begin by collecting tiny foliage fronds and pressing them between the pages of a heavy book lined with absorbent paper towels for forty-eight hours until all moisture is removed. Condition two ounces of neutral clay, roll it to a uniform four-millimeter thickness on your glass work surface, and cut out a two-inch heart shape using a metal cutter. Gently place a dried fern leaf onto the uncured clay surface, pressing down lightly with your fingertip to anchor it. Use a fine needle tool to pierce a small suspension hole approximately three millimeters beneath the top center cleft of the heart. Bake the piece according to the clay manufacturer’s directions on a flat baking surface. After the cured heart cools completely, seal the fragile foliage beneath a thin layer of clear liquid clay or ultraviolet resin, spreading it to the outer edges with a toothpick to avoid overflow. Cure the clear topcoat completely, then attach an eighteen-gauge metal jump ring through the hole to hang your finished botanical pendant from an adjustable cord.

    3. High-Contrast Marble Statement Drops

    3

    How to Create

    High-contrast marble statement drops combine dynamic, fluid line work with a bold two-tone presentation. This style takes inspiration from traditional cut marble slabs, using contrasting tones such as deep charcoal, pure white, and soft silver-gray to create an illusion of natural stone depth. Unlike single-color clay pieces, marbled jewelry features flowing, organic patterns where no two pieces are identical. Each cut yields a unique pattern of swirls, striations, and mineral-like bands. Transforming this stone appearance into a large heart-shaped drop balances organic movement with clean outer contours. The resulting earrings make a bold visual impact while remaining light enough for all-day wear. The monochrome palette pairs effortlessly with both professional tailoring and casual denim, making these drops a versatile staple in any handmade collection.
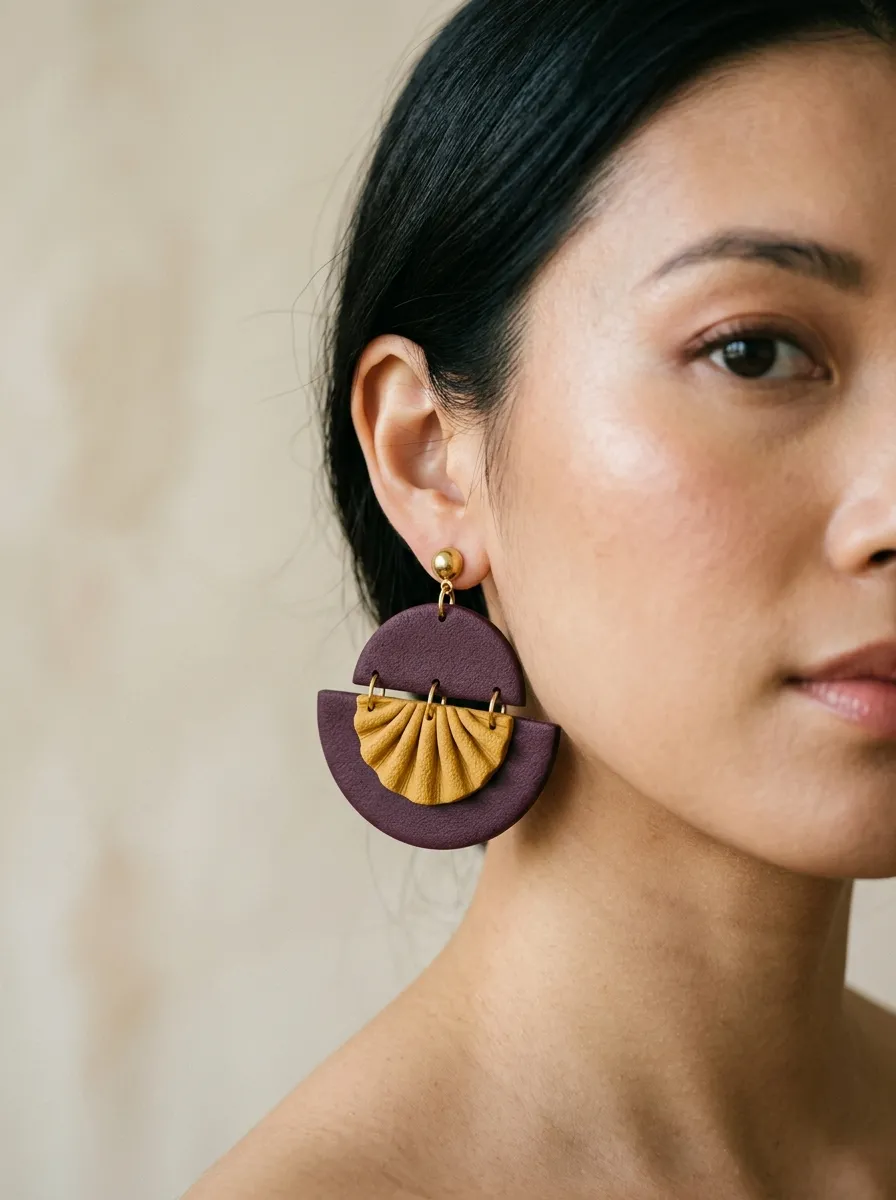
    Start by conditioning equal portions of solid black and bright white polymer clay until both are supple. Roll each color into a long, cylindrical snake roughly six inches in length and half an inch thick. Place the two clay snakes side by side, gently twist them together into a spiral, and fold the twisted strand in half upon itself. Roll this unified log smooth, then repeat the twisting and folding process two or three times to introduce fine streaks without blending the pigments into a solid gray. Form the twisted mass into a compact ball, then press and roll it flat with an acrylic roller to a uniform thickness of three millimeters. Position a two-inch drop-style heart cutter over the areas featuring the most compelling swirls, pressing straight down through the clay. Pierce an assembly hole at the top of the heart and bake the pieces flat. Once cooled, lightly sand the surfaces with wet one-thousand-grit sandpaper to reveal the sharp marbling, and connect them to metal hooks using sturdy jump rings.

    4. Vintage Scalloped Edge Heart Lockets

    4

    Step-by-Step Guide

    Vintage scalloped edge heart lockets offer an ornate, romantic look inspired by antique Victorian keepsakes and traditional filigree metalwork. Rather than relying entirely on smooth, modern lines, this approach frames the heart with decorative, rounded ruffles around its perimeter. The scalloped border softens the silhouette, providing a nostalgic feel reminiscent of heirloom lace or engraved vintage compacts. Crafters can use soft pastel clays—such as dusty rose, lavender gray, or muted buttercup—to enhance the historic charm of the piece. The interior surface of the pendant remains smooth, serving as a backdrop for pressed monograms, subtle hand-painted motifs, or polished metallic powders. This project is well-suited for makers who enjoy delicate manual detailing, as forming the edge border requires steady, repeatable manipulation of the clay. The finished locket-style charm pairs naturally with delicate brass chains, vintage lace collars, and cottage-inspired wardrobes.
    To construct this vintage-inspired piece, roll a sheet of conditioned dusty rose clay to a three-millimeter thickness on your ceramic tile. Use a medium heart cutter to produce the base shape, which serves as the structural foundation for your locket face. To form the scalloped edging, roll a separate strip of identical clay into a tiny snake measuring approximately two millimeters in diameter. Cut this thin strip into uniform segments roughly three millimeters long, rolling each into a tiny, perfect sphere between your fingertips. Position these small spheres side by side along the entire outer rim of the heart cutout. Gently flatten each sphere with the rounded end of a metal stylus or ball tool, creating an overlapping scalloped border that fuses securely to the base. Use a sewing needle to pierce a small hole through the top cleft for hanging. Bake the piece flat, let it cool, and buff the raised scalloped edges with a soft cloth to create a soft, satiny finish before stringing it onto an antique brass chain.

    5. Sunset Gradient Ombre Hearts

    5

    How to Make

    Sunset gradient ombre hearts showcase the beauty of smooth color transitions, shifting seamlessly from vibrant golden yellow through fiery orange to deep crimson. This color-melt approach borrows from traditional silk-screen printing and airbrush techniques, translating smooth chromatic shifts into solid modeling clay. When shaped into a clean heart, the gradient brings visual warmth and energy to the piece, recalling the natural glow of a late summer dusk. The clean transition between colors demands methodical blending, but the resulting slab yields stunning components for modern statement earrings and pendant necklaces. The continuous color shift adds visual depth, making the jewelry feel dimensional even with a flat, smooth surface. These gradient pieces serve as lively accent accessories, providing a bright pop of color against neutral clothing and dark outer layers.
    To build this sunset blend, prepare three triangular sheets of clay rolled to identical three-millimeter thicknesses: one bright yellow, one vivid orange, and one deep magenta red. Place these three triangles together on your work surface to form a single, flat rectangular sheet with diagonal seams running between the colors. Roll this multicolored rectangle through an acrylic clay roller along the direction of the stripes, then fold the sheet bottom to top, keeping the colors lined up. Repeat this rolling and folding process along the same vertical axis twenty to thirty times; the boundary lines will soften into a continuous, seamless sunset gradient. Lay the finished ombre sheet onto your glass tile, smoothing out any trapped air bubbles beneath it. Press a series of small to medium heart cutters into the sheet, positioning them to capture the full progression of colors from yellow at the top to deep magenta at the bottom. Pierce small holes at the top edges, bake as instructed, and seal with a matte finish.

    6. Geometric Color-Blocked Mod Hearts

    6

    Execution Process

    Geometric color-blocked mod hearts offer a sharp, retro look inspired by mid-century graphic design and sixties pop art. This approach divides the classic heart silhouette into crisp geometric zones, using contrasting colors along diagonal, horizontal, or vertical split lines. The sharp lines between contrasting hues—such as cobalt blue, mustard yellow, and crisp white—create an energetic design that feels modern and playful. Unlike marble or gradient techniques that focus on smooth blending, color-blocking depends on razor-sharp divisions and immaculate edge joins. This project provides excellent practice for crafters looking to refine their clay-slicing accuracy and seam-bonding skills. The finished accessories make bold statement earrings or graphic pendants, complementing structured tailoring, bold solid-color tops, and clean everyday basics.
    Begin by selecting three contrasting colors of polymer clay, such as rich cobalt blue, warm ochre, and pure white. Condition each block thoroughly and roll them out separately on your work surface to an identical thickness of three millimeters. Using a metal ruler and a straight craft blade, slice clean, straight edges along each colored slab. Place these cut edges firmly against one another on a smooth glass sheet, joining blue, ochre, and white into a single flat tile with sharp geometric seams. Place a sheet of baking parchment over the joined clay and roll your acrylic pin lightly across the surface to bond the seams together without warping the straight lines. Carefully align your heart cutter over the assembled slab so the straight seam cuts directly across the center of the heart. Press down firmly to cut the shape, trim away the excess clay, and pierce a hole through the top cleft. Bake the flat piece, sand the edges smooth, and complete the assembly using silver jump rings.

    7. Raw Textured Terracotta Boho Hearts

    7

    How to Create

    Raw textured terracotta boho hearts draw inspiration from rustic pottery, sun-baked desert ceramics, and ancient artifact carvings. This concept steps away from polished, glossy finishes in favor of an earthy, weathered surface that celebrates tactile imperfections and organic marks. Using deep burnt orange, warm sienna, and rich desert-clay tones, the finished jewelry has the grounding feel of hand-thrown earthenware, while remaining lightweight and shatter-resistant. The surface treatment relies on stamping tools, natural stone impressions, or coarse linen textures pressed into uncured clay slabs. The completed pieces suit earthy, bohemian wardrobes, pairing naturally with natural linen garments, woven cotton knits, and raw leather accessories. This beginner friendly project avoids complex color recipes, focusing entirely on surface texturing and clean edge trimming.
    To produce this rustic finish, condition two ounces of terracotta-colored polymer clay until pliable and roll it out to a sturdy thickness of four millimeters. To create the organic surface texture, press a piece of coarse linen, a sheet of coarse sandpaper, or a clean natural sandstone directly onto the clay slab with firm, even pressure. Peel the texturing material away slowly to expose the rough, porous pattern left behind in the clay. Place a heart cutter firmly onto the textured slab, cutting out your shapes without dragging the blade across the details. Use a toothpick or small needle to distress the cut edges slightly, softening any overly sharp industrial lines to maintain the hand-formed look. Pierce connection holes at the top corners for a balanced hanging mount. Bake the textured hearts directly on a ceramic tile, allow them to cool completely, and leave them unglazed to preserve the matte ceramic look before linking them to antiqued bronze ear wires.

    8. Gilded Rim Faux Quartz Hearts

    8

    Setup Method

    Gilded rim faux quartz hearts replicate the refined look of cut natural gemstones edged in precious metal leaf. This design pairs translucent polymer clay with metallic leafing along the outer perimeter, mimicking a piece of raw rose quartz or white agate sliced and dipped in pure gold. The translucency of the cured clay allows light to pass softly through the piece, producing a gentle luminescence that highlights the gleaming metallic border. This accessory brings an elevated, luxurious feel to everyday outfits while keeping material costs remarkably low. It works beautifully as a delicate pendant necklace, a standalone charm, or an upscale pair of drop earrings. The metallic framing emphasizes the heart’s silhouette, providing an appealing contrast between the soft, crystalline body of the piece and its polished, reflective rim.
    Condition two ounces of translucent polymer clay, blending in a speck of pink or milky white clay to create an authentic quartz appearance. Roll the clay to a four-millimeter thickness on a clean glass tile, taking care to keep the surface free of lint or air bubbles. Cut out your heart shapes using a smooth metal cutter and pierce a hanging hole near the top center of each shape. Bake the clay pieces according to the manufacturer’s instructions; remember that translucent clay shows its true crystalline appearance only after fully cooling from the oven. Once cooled, use a fine-tipped brush to apply a thin layer of metal leaf sizing adhesive along the outer edges of each heart. Allow the sizing to become tacky, then gently apply sheets of gold or silver metal leafing foil over the edge using a dry brush. Buff away the excess leaf, and seal the metallic rim with a durable gloss varnish to prevent wear during daily use.

    9. Modern Miniature Floral Bouquet Hearts

    9

    Step-by-Step Guide

    Modern miniature floral bouquet hearts transform flat jewelry slabs into dimensional, sculptural relief compositions. This project uses a flat heart-shaped clay slab as a base, decorating its surface with tiny, hand-sculpted flowers, buds, and delicate green foliage. The result mimics a miniature floral arrangement resting across the face of the pendant. This style draws inspiration from traditional porcelain florals, but updates the look through the use of contemporary pastel palettes such as butter yellow, soft lilac, and muted olive green. The three-dimensional detailing catches directional light, bringing sculptural depth and rich artisan texture to the piece. These miniature floral hearts are particularly popular for spring accessories, garden party ensembles, and bridal party gifts. Sculpting the tiny petals develops fine motor control and precision shaping skills, making it an engaging project for crafters looking to expand their hands-on sculpting abilities.
    Begin by rolling out a base slab of soft ivory or pale sage clay to a three-millimeter thickness, cutting out a one-and-a-half-inch heart using a sharp metal cutter. Set this base piece directly onto your baking tile. To form the tiny blossoms, roll tiny specks of pastel pink clay into teardrop shapes, then slit the rounded tops with a needle tool to fan out miniature flower petals. Roll pinpoint-sized balls of yellow clay and press them into the centers to serve as stamens. Use small leaves shaped from olive green clay to frame the cluster, using a craft blade to score central veins down each leaf before placing them on the base. Arrange the flowers and foliage across one shoulder of the heart base, pressing down gently with a stylus so the raw clay components fuse securely without distorting the petals. Pierce a top suspension hole, bake the assembled piece, and apply a light satin varnish across the floral details for subtle protection and shine.

    10. Floating Inlay Terrazzo Confetti Hearts

    10

    How to Make

    Floating inlay terrazzo confetti hearts offer a lively, modern twist on classic stone terrazzo, introducing translucent elements for added visual depth. This design suspends colorful geometric clay fragments within a clear, translucent clay matrix rather than an opaque base. The cured piece allows ambient light to pass around the suspended confetti shards, giving the impression that the colorful flecks are floating within a slice of crystalline resin or sea glass. This lighter, airy aesthetic feels distinctly modern and pairs well with relaxed summer wear, resort fashion, and cheerful everyday jewelry. The technique requires careful rolling to keep the colored chips crisp and unblurred against the clear background. The finished accessories are eye-catching, unique, and highlight the creative possibilities of translucent polymer clays.
    Start by rolling out several thin sheets of bright, saturated polymer clay in contrasting colors like sunshine yellow, teal, coral, and lavender. Bake these colored sheets flat for ten minutes at the recommended temperature, let them cool, and snap or chop them into tiny, crisp confetti flakes with a rigid blade. Next, condition two ounces of clear translucent polymer clay and roll it out flat to a four-millimeter thickness on your glass work surface. Scatter your baked confetti flakes evenly across the translucent slab, allowing open space between the flecks so light can pass through. Place parchment paper over the slab and roll firmly with your acrylic roller, pushing the hard confetti chips down into the soft translucent base until the surface is flush and level. Cut out your heart shapes with a metal cutter, pierce your hanging holes, and bake the pieces flat. Once cooled, sand the pieces smooth with one-thousand-grit sandpaper to maximize transparency, and assemble them with simple earring hoops.

    Common Beginner Mistakes and How to Avoid Them

    Beginners working with polymer clay often encounter issues that can compromise the structural strength and appearance of their finished pieces. The most common pitfall is improper baking, specifically underbaking the clay. Polymer clay requires sustained heat to fuse its synthetic binders completely; pieces baked for too short a time or at low temperatures remain brittle and easily snap under light pressure. Always calibrate your oven with an independent oven thermometer, and bake items for the full duration specified by the manufacturer. Another frequent mistake is rolling slabs unevenly, which leads to weak thin spots and curling edges during baking. Using acrylic depth guides or rolling pin spacer rings ensures a uniform thickness across the entire slab. Crafters also frequently introduce dust and lint into pale clays by working on porous or dusty surfaces. Prevent contamination by cleaning your hands, tools, and work mats thoroughly with isopropyl alcohol before handling clay. Finally, avoid using fast-drying superglues to attach earring posts, as they break down over time when exposed to skin moisture and movement. Use a dedicated two-part jewelry epoxy, which forms a flexible, long-lasting chemical bond with the clay surface.

    Practical Tips for Better Results

    Achieving clean, professional finishes on your heart-shaped clay jewelry requires systematic attention to detail throughout the production process. A helpful practice is using a single ceramic tile as both your cutting surface and baking sheet. By cutting your heart shapes directly on the tile, you avoid the need to peel up uncured, fragile cutouts, which often stretches and warps delicate edges. When excising shapes with metal cutters, place a thin sheet of plastic wrap over the clay before pressing down. The plastic softens the cutter’s sharp edge, creating smooth, rounded rims that require minimal post-bake sanding. Keep a pack of water-based wet wipes at your workstation to clean your hands between different clay colors, which stops darker pigments from muddying lighter pastels. For wet sanding after baking, submerge your cured pieces in a shallow dish of cool water mixed with a drop of liquid dish soap. The soapy water lubricates the sandpaper, prevents airborne clay dust, and keeps the abrasive paper from clogging, yielding a smooth, satin finish with minimal effort.

    Styling, Presentation, or Organization Ideas

    The aesthetic appeal of handmade polymer clay jewelry extends beyond wearing the items to how you display, store, and organize your collection. When styling heart-shaped accessories, pair large, vibrant statement drops with minimalist, monochrome tops to let the handcrafted details stand out as the primary focal point of your outfit. Smaller terrazzo or botanical studs add a subtle artisan touch to everyday casual wear, denim, and business attire. Storing your jewelry properly helps preserve its surface finish and hardware over time. Hang earring pairs on a wall-mounted wooden display rack or a standing linen earring organizer to keep jump rings from tangling and prevent clay surfaces from rubbing against hard metal objects. For displaying pieces on a vanity, use raw ceramic catchall trays or carved soapstone bowls, which complement the handmade, sculptural quality of the clay. If you are preparing pieces as gifts, package the jewelry on custom-cut, heavy cardstock backer cards stamped with natural botanical motifs. Tying the cards with simple cotton twine creates a cohesive, high-end presentation that reflects the handcrafted nature of the jewelry.

    Budget or Time Planning

    Creating a collection of heart-shaped polymer clay jewelry can be both budget-conscious and time-efficient when planned with a practical production schedule. Basic start-up expenses remain modest, requiring only a few primary color blocks, an acrylic roller, a multi-pack of metal heart cutters, and stainless steel findings. A practical way to optimize your materials is to mix your own custom hues using a standard palette of primary colors plus white and black, rather than buying dozens of specialty clay colors. Planning your workflow in dedicated stages makes production far more efficient. Group similar tasks together: devote the first hour to conditioning, color-mixing, and rolling your flat slabs, the second hour to cutting shapes, piercing holes, and adding surface textures, and a third block of time to baking your pieces in a single, unified batch. While your pieces cure and cool in the oven, use that downtime to organize your jump rings, earring posts, and packaging materials. Batching your workflow this way eliminates repeated tool cleanups, speeds up your creative process, and ensures you produce uniform, high-quality jewelry within a single afternoon.

    Creative Expansion and Advanced Inspiration

    Once you feel confident with foundational polymer clay jewelry techniques, you can explore more advanced methods to expand your creative work. Consider moving beyond flat two-dimensional cutouts by curing your clay hearts over curved metal forms, which creates gentle domes and rippled contours that catch the light dynamically. You can also experiment with surface-transfer techniques, using laser-printed line art, vintage illustrations, or typographic designs transferred directly onto uncured clay using water baths or rubbing alcohol. Another compelling avenue is combining polymer clay with mixed-media elements, such as embedding raw semi-precious stone chips, wood veneer accents, or braided embroidery threads directly into the clay matrix before curing. Advanced makers can also explore hollow-core building techniques, sculpting hollow, bead-like heart charms that offer bold visual volume without adding any noticeable weight. By treating the humble heart shape as an evolving platform for personal experimentation, you can continually refine your artistic voice and build an imaginative, cohesive portfolio of modern handmade accessories.
  • 10 Polymer Clay Pen Holder Ideas

    10 Polymer Clay Pen Holder Ideas

    Polymer clay pen holders represent a practical intersection of sculptural craft and functional desktop organization. Working with oven-bake polymer clay allows makers to build durable, customized desk accessories that match specific workspace aesthetics and spatial requirements. This comprehensive tutorial details ten unique, beginner friendly projects designed to store writing instruments, stylus pens, fine-point markers, and everyday stationery. Readers will learn the essential principles of three-dimensional clay fabrication, including slab building, structural core reinforcement, surface texturing, seamless joining, and controlled oven curing. Incorporating handmade polymer clay organizers into home office environments provides genuine utility by eliminating desktop clutter, protecting delicate nib points, and keeping daily essentials within immediate reach. Because polymer clay cures into a dense, water-resistant, and resilient plastic composite, finished holders withstand continuous daily use without chipping or deteriorating. By understanding proper wall thickness, weight distribution, and baking parameters, beginners can produce professional, durable pieces using basic household craft tools. Transforming basic clay blocks into structured organizers bridges the gap between creative expression and workspace efficiency, offering an accessible method for upgrading your desk setup.

    Why Handmade Clay Desk Organizers Are Trending

    The increasing prominence of polymer clay pen holders across modern Pinterest ideas reflects a widespread movement toward intentional workspace personalization, slow crafting, and clutter-free minimalist style environments. Remote and hybrid professionals seek practical ways to elevate functional desks into inspiring, curated spaces that reflect personal aesthetics. Mass-produced plastic containers often lack tactile warmth, weight, and visual distinction, prompting home decor enthusiasts to craft custom handmade alternatives that integrate seamlessly with contemporary interiors. From a DIY perspective, desk accessories are rewarding creative project ideas because they require modest raw materials while delivering high everyday utility. Beginners appreciate that polymer clay stays workable indefinitely until baked, allowing unlimited time to refine contours, correct angles, and smooth imperfections. The tactile richness of matte surfaces, speckled stone inclusions, and subtle pastel palettes complements modern design aesthetics, including Scandinavian, mid-century modern, and Japandi styling. These functional sculptures offer an accessible, satisfying entry into three-dimensional clay craft while providing dedicated storage solutions for creative workspaces.

    Essential Materials and Preparation Methods

    Successfully sculpting durable polymer clay pen holders requires assembling compatible materials, testing structural stability, and preparing a clean working station. The primary material is standard oven-bake polymer clay in curated tones, supported by high-tack liquid polymer clay to reinforce seams. Essential tools include an acrylic rolling pin or manual clay conditioning machine, rigid stainless steel tissue blades for clean cuts, silicone shaping tools for smoothing joins, metal ruler guides, and oven-safe armatures such as empty aluminum cans, glass cylinders, or ceramic tiles. Preparation begins by thoroughly cleaning your ceramic tile or tempered glass working surface with isopropyl alcohol to eliminate surface lint, dust, and microscopic debris. Clay conditioning is mandatory: knead small chunks by hand or pass the material through rollers until it becomes completely pliable, glossy, and free of air pockets. Planning requires measuring the height and diameter of your tallest pens, ensuring holder walls measure between five and seven millimeters in thickness to prevent structural warping during the oven-curing process.

    Idea 1: Minimalist Fluted Arch Desk Caddy

    1

    Step-by-Step Guide

    The minimalist fluted arch desk caddy utilizes architectural forms and repeating vertical textures to create an understated home decor centerpiece for modern desks. This design features a flat-backed, semi-arched silhouette with three graduated vertical cylindrical chambers designed to hold fountain pens, mechanical pencils, and gel pens separately. The exterior perimeter is adorned with continuous vertical fluting, mimicking the classical stone details seen in neoclassical and modern Mediterranean architecture. The monochromatic cream or warm limestone color palette accentuates the shadows cast by the recessed fluted grooves without visual clutter. Because the caddy features a flat base and a broad footprint, it maintains complete stability even when fully loaded with heavy metal writing instruments. This beginner friendly concept introduces crafters to template cutting, multi-chamber slab assembly, and texture strip application, resulting in an organized, sculptural desk fixture that complements sleek laptop setups, natural linen blotters, and neutral wooden office furnishings.
    Begin by rolling conditioned warm ivory clay into an even six-millimeter sheet on a smooth ceramic tile using depth guide rings. Cut out an arched backplate measuring twelve centimeters in height and eight centimeters in width using a metal ruler and a sharp tissue blade. Form three separate hollow cylinders by wrapping conditioned clay sheets around oven-safe glass spice jars measuring three centimeters in diameter, joining the vertical seams with liquid clay and smoothing them flat with a silicone tool. Trim the cylinders to staggered heights of six, eight, and ten centimeters, then press them firmly against the flat arched backplate, fusing the contact points with liquid clay. Cut narrow, three-millimeter-wide clay strips using a multi-blade cutter, adhering them vertically along the exposed outer curved faces of the cylinders to produce clean fluted ridges. Transfer the entire assembly on its ceramic tile into an oven preheated to 135°C (275°F), baking for forty-five minutes before cooling completely inside the turned-off oven chamber.

    Idea 2: Modern Terrazzo Hexagonal Pencil Cup

    2

    How to Create

    The modern terrazzo hexagonal pencil cup reimagines ancient Venetian mosaic flooring into a contemporary geometric desktop organizer. This project features a clean six-sided polygon profile with crisp, beveled vertical corners and a flat interior base. The surface showcases an array of sharp, multi-colored clay chips—such as forest green, mustard ochre, soft blush, and charcoal—embedded flush into an unbleached white clay foundation. The exterior walls are cured and subsequently wet-sanded, revealing the smooth cross-sections of the colorful fragments beneath the surface. This geometric design provides ample volume for twenty or more standard pens, scissors, and studio markers while maintaining a tidy desktop footprint. The hexagonal form allows multiple cups to nest flush against each other, creating modular organization configurations for growing tool collections. The project teaches crafters foundational terrazzo compounding, accurate mitered edge trimming, and progressive grit wet-sanding to achieve a stone-like finish.
    To make the terrazzo sheet, roll a base block of white polymer clay into a smooth five-millimeter slab on parchment paper. Chop small, baked or firm scraps of green, mustard, blush, and black clay into irregular two-millimeter fragments using a tissue blade, scattering them evenly across the raw white sheet. Place parchment paper over the scattered chips, using an acrylic roller with firm downward pressure to press the fragments flush into the base sheet until the surface is completely level. Cut out six identical rectangular wall panels measuring ten centimeters tall by four centimeters wide, shaving the long vertical edges at a forty-five-degree inward bevel using an angled blade. Join the beveled edges around a flat hexagonal base cut from the same slab, applying liquid clay along every interior seam and smoothing the joins with a ball stylus. Bake the assembled cup at 135°C (275°F) for forty-five minutes, then wet-sand the cooled exterior using 400, 800, and 1200-grit sandpaper under running water.

    Idea 3: Sculptural Ribbed Cylinder Pen Pot

    3

    Execution Process

    The sculptural ribbed cylinder pen pot draws inspiration from wheel-thrown ceramic vessels, utilizing horizontal concentric rings to introduce tactile depth to a classic cylindrical container. This design features an upright cylindrical vessel encased in five to seven rounded horizontal clay toroids that wrap around the circumference like stacked structural ribs. The deep terracotta or raw umber color scheme highlights the organic warmth of unglazed clay, delivering a handmade aesthetic that coordinates with modern bohemian and mid-century interiors. The substantial wall thickness and circular base lower the center of gravity, preventing accidental tipping when removing long paintbrushes or heavy stylus tools. This project is practical for novice makers because building over a permanent or removable glass cylinder ensures straight internal walls and uniform symmetry without complex wheel-throwing machinery. The finished pot functions as a tactile decorative piece that holds essential office stationery securely.
    Commence by conditioning a block of rich terracotta clay, rolling out a uniform four-millimeter sheet on your work surface. Wrap the clay sheet around a clean, oven-safe glass tumbler measuring seven centimeters in diameter and ten centimeters in height, trimming the excess with a blade and smoothing the vertical seam with your thumb. Roll several long, uniform clay ropes measuring eight millimeters in diameter using a flat acrylic board to maintain even thickness throughout each strand. Apply a thin film of liquid clay around the exterior of the wrapped tumbler, wrapping the clay ropes horizontally around the vessel from the base to the upper rim, stacking each ring snugly atop the one below it. Blend the contact seams between each horizontal rib using a curved wooden modeling tool, preserving the outer rounded profile of each ring. Bake the covered glass vessel at 135°C (275°F) for forty minutes, allowing it to cool slowly inside the oven to prevent thermal shock to the glass core.

    Idea 4: Organic Blob Desktop Pen Stand

    4

    How to Make

    The organic blob desktop pen stand introduces playful, fluid forms to functional desk organization by abandoning rigid geometric symmetry in favor of soft, asymmetrical curves. This design features a low-profile, solid horizontal clay mass shaped like an undulating river stone or organic pebble, punctuated with several vertical holes of varying diameters. Rather than holding pens in a single loose cluster, this organizer stores each writing instrument in its own dedicated, upright slot, displaying fine stationery like individual sculptural elements. The soft sage green or pale buttercup yellow finish brings a calming, modern design presence to minimalist desks. Because this design holds each pen separately, it prevents delicate pen barrels from scratching against one another, making it an excellent storage solution for high-end fountain pens or digital drawing styluses. The solid mass provides substantial physical weight, anchoring the stand firmly to the desktop surface without slipping.
    Condition two blocks of soft sage polymer clay, combining them into a dense, solid spherical mass and kneading thoroughly to expel any trapped air pockets. Press the mass firmly down onto a ceramic working tile, tapping the outer margins with your palms to sculpt an asymmetrical, rounded organic pebble measuring twelve centimeters long, eight centimeters wide, and four centimeters tall. Smooth away all visible finger impressions across the upper contours using a lint-free wipe dampened with isopropyl alcohol. Select three to five pens from your daily workspace to serve as sizing guides, wrapping their tips in plastic wrap to protect the barrels. Press the wrapped pen tips straight down into the top surface of the clay mass at varying depths, rotating them slightly to expand the holes by one millimeter before carefully withdrawing the pens. Bake the solid clay stand on the ceramic tile at 135°C (275°F) for fifty-five minutes to ensure complete core curing, then let it cool before use.

    Idea 5: Faux White Marble Cube Pen Rest

    5

    Setup Method

    The faux white marble cube pen rest combines the luxurious look of natural Carrara stone with the clean, sharp geometry of minimalist architectural blocks. This design consists of a solid, crisp cube measuring seven centimeters on each side, featuring a wide, angled circular cavity bored into the top face to hold several pens at an accessible thirty-degree slant. The body utilizes bright white clay veined with translucent gray and soft charcoal filaments, realistically capturing the subtle crystalline depth and movement of real quarried marble. The compact, heavy cube format fits into small corner desks, tight shelving units, or modern reception counters where surface space is limited. The angled internal chamber presents pen caps forward, allowing users to select their preferred writing tool with a natural, ergonomic hand motion. This project teaches precision marbling formulas, geometric block forming, and clean diagonal core carving techniques.
    To create the marble compound, roll two blocks of white clay into thick logs, pressing thin, rolled threads of gray and black clay randomly along the length of each log. Twist the logs together, fold the twisted rope in half, and roll it out into a single block, repeating the twist-and-fold motion three times to produce soft, organic veins without muddying the colors together. Pack the marbled clay into an oven-safe cubic silicone mold, or square the block manually against a flat glass work surface using an acrylic roller. Use a hollow metal piping tube or circular clay corer measuring four centimeters in diameter to core out an angled cylindrical cavity from the top center down toward the base. Smooth the outer flat planes and beveled corners with an acrylic blade guide to ensure sharp edges. Bake the cube supported on a flat ceramic tile at 135°C (275°F) for fifty minutes, then finish the cooled piece by wet-sanding all exterior faces with 1000-grit sandpaper for a soft satin sheen.

    Idea 6: Stackable Modular Tiered Desk Cups

    6

    Step-by-Step Guide

    The stackable modular tiered desk cups solve complex stationery storage challenges through interlocking geometric components that can be reconfigured based on changing workspace needs. This system consists of two or three shallow, interlocking octagonal or square cups that stack securely on top of one another, crowned with a taller open cup dedicated to vertical pen storage. The lower tiered compartments store small accessories like paperclips, pushpins, and erasers, while the upper vessel holds writing instruments, consolidating multiple desktop organizers into a single space-saving footprint. A warm, earthy palette—combining mustard, dusty peach, and soft terracotta—distinguishes each functional tier while maintaining visual harmony. The interlocking structural lips along the rims prevent upper modules from sliding off when pens are retrieved. This project develops skills in precision measurement, edge consistency, and multi-component registration, providing an adaptable DIY organization system for creative desks.
    Begin by rolling conditioned mustard clay into a consistent five-millimeter sheet, cutting out an eight-centimeter square base and four vertical wall panels measuring four centimeters tall. Join the walls to the base using liquid clay, smoothing the vertical seams, then attach a continuous three-millimeter recessed clay ridge along the top interior perimeter to create an interlocking stacking lip. Construct a second identical shallow cup using dusty peach clay to serve as the intermediate tier. For the top pen container, use terracotta clay to construct an eight-centimeter square base with taller wall panels measuring nine centimeters high, creating a deep vessel for pens, leaving the bottom exterior recessed to lock over the lower cup lip. Verify that each module nests snugly on top of the tier below it before curing, trimming any friction points with a blade. Bake all three modules side by side on a flat baking sheet at 135°C (275°F) for forty minutes, cooling completely before stacking the finished organizer on your desk.

    Idea 7: Raw Speckled Sandstone Vessel

    7

    How to Create

    The raw speckled sandstone vessel captures the natural texture and organic aesthetic of desert sandstone through custom clay inclusions and a matte, unglazed surface. This design features a wide-mouthed cylindrical silhouette with gently tapered base walls, providing a balanced vessel for pens, rulers, and scissors. The clay body is mixed with real ground spices, coarse sand, and dark volcanic rock powder, resulting in an authentic mineral grain that mimics artisan wheel-thrown pottery. A subtle, hand-carved linear notch encircles the vessel two centimeters below the rim, introducing a tailored architectural detail that breaks up the continuous stone surface. This earthy organizer fits effortlessly into minimalist, coastal, and Japandi interiors, pairing naturally with raw wood furniture, ceramic mugs, and natural woven accessories. The project teaches makers how to safely mix particulate inclusions into polymer clay without compromising structural strength or causing brittle fractures during baking.
    Condition a block of unbleached cream polymer clay, kneading in two teaspoons of fine craft sand and a quarter-teaspoon of ground black pepper until the speckles are evenly dispersed throughout the clay. Roll the speckled clay into an even five-millimeter sheet, then wrap it around a removable, parchment-covered glass jar measuring eight centimeters in diameter. Cut the bottom edge flush and weld a flat circular base cut from the same speckled sheet onto the bottom of the cylinder, blending the perimeter seam using a rubber-tipped shaping tool. Use the blunt edge of a steel ruler to press a clean, horizontal indentation line around the vessel circumference two centimeters beneath the top rim. Slide the glass jar carefully out of the clay cylinder before baking, keeping the parchment paper cylinder inside to support the walls during curing. Place the vessel upright on a baking tile, baking at 135°C (275°F) for forty-five minutes, then let it cool before gently peeling out the internal parchment liner.

    Idea 8: Botanical Fern Imprint Pen Cylinder

    8

    Execution Process

    The botanical fern imprint pen cylinder brings natural textures directly into office spaces by using real botanical foliage to create delicate surface relief. This design features a classic upright cylinder in soft sage green or unbleached off-white, wrapped in pressed botanical impressions derived from fresh fern fronds, rosemary sprigs, or cedar leaves. After the plant material is pressed into the raw clay and removed, the recessed veins and frond outlines are highlighted with a wash of dark green or raw umber acrylic paint, which settles into the grooves to emphasize the botanical details. The clean, functional form holds up to fifteen pens, keeping workspaces organized while adding a touch of biophilic design. This project is ideal for nature enthusiasts and beginners, requiring no specialized sculpting skills beyond harvesting garden clippings and applying even rolling pressure.
    Gather several fresh, sturdy fern leaves, washing and drying them completely to remove surface dust. Roll conditioned white polymer clay into a six-millimeter sheet measuring twenty-five centimeters long by ten centimeters wide. Lay the fresh fern fronds vein-side down across the clay slab, covering them with parchment paper and rolling over them firmly with an acrylic rolling pin to press the leaf structure into the clay. Carefully peel the fern leaves away using tweezers, revealing the clean botanical impressions left in the surface. Wrap the embossed clay sheet around an oven-safe aluminum can, trimming the ends for a neat vertical seam and sealing the bottom with a flat clay disc. Bake the cylinder supported on the can at 135°C (275°F) for forty minutes, allowing it to cool fully. Brush dark green acrylic paint over the botanical impressions, immediately wiping the raised surface clean with a damp sponge so pigment remains only inside the leaf veins.

    Idea 9: Retro Checkered Mod Desk Pen Cup

    9

    How to Make

    The retro checkered mod desk pen cup channels vintage seventies and nineties design energy through a bold, two-tone checkered surface pattern. This eye-catching organizer features an upright cylinder wrapped in a balanced checkerboard grid composed of alternating squares of soft lavender and warm mustard, or classic black and crisp white. The flat checkered slab is constructed using traditional clay cane slicing techniques, ensuring that each individual square maintains straight edges and crisp corners without messy color bleeding. The bold graphic aesthetic provides a playful focal point for modern creative desks, balancing retro nostalgia with contemporary desk accessories. The sturdy cylindrical build provides dependable storage for colorful art markers, mechanical pencils, and paintbrushes. Crafters will develop fundamental skills in constructing multi-strand cane assemblies, precision block slicing, and joining patterned veneers onto three-dimensional supporting vessels.
    Begin by rolling separate blocks of lavender and mustard polymer clay into two identical square logs measuring two centimeters on each side and ten centimeters long. Cut each log lengthwise into four equal square strips, then reassemble the strips in an alternating two-by-two checkerboard pattern, pressing them firmly together to eliminate internal air gaps. Compress and lengthen the checkered log by squeezing from the center outward until the cane measures three centimeters square. Using a sharp tissue blade, slice thin, two-millimeter cross-sections from the cane, laying the sliced checkered tiles edge-to-edge on parchment paper to create a continuous patterned sheet. Smooth the seams between tiles by rolling lightly with an acrylic roller. Wrap the checkered sheet around a prepared four-millimeter clay cylinder supported by an oven-safe glass jar, trimming the edges to form a continuous pattern around the vessel. Bake the assembled cup at 135°C (275°F) for forty minutes, letting it cool before sliding the inner glass jar free.

    Idea 10: Slanted Desktop Multi-Pen Organizer

    10

    Step-by-Step Guide

    The slanted desktop multi-pen organizer provides an ergonomic, horizontal storage solution designed for artists, architects, and writers who use multiple pens throughout the day. This design features an architectural wedge profile with three stepped, angled tiers, each equipped with a shallow horizontal trough that cradles writing instruments on their sides. This horizontal presentation keeps pen labels, nib sizes, and ink colors fully visible, allowing users to switch between pens quickly without searching through a crowded cup. The cool slate-gray or charcoal finish provides a modern, utilitarian aesthetic that pairs well with drafting boards, mechanical keyboards, and metal desk lamps. The low-profile wedge fits neatly beneath elevated computer monitors or against desk walls, maximizing vertical space in compact home offices. This project teaches crafters how to build structured angled armatures, carve curved storage troughs, and ensure dimensional consistency across multi-tiered clay functional objects.
    Construct an internal supportive wedge armature from folded heavy-duty aluminum foil, shaping it into a triangular prism measuring twelve centimeters wide, ten centimeters deep, and six centimeters tall at the back, tapering down to two centimeters at the front. Roll conditioned charcoal polymer clay into an even five-millimeter sheet, cutting panels to encase the foil armature completely, then seal all outer seams with liquid clay. Use a rounded wooden dowel measuring two centimeters in diameter to press three parallel horizontal troughs into the top slanted face, spacing them two centimeters apart from front to back. Smooth the contours of each trough with a damp fingertip to ensure pens rest securely without rolling forward. Check that the front retaining lip of each tier sits tall enough to hold pens in place on the incline. Bake the organizer on a flat ceramic tile at 135°C (275°F) for fifty minutes to ensure the thick exterior shell cures completely around the foil core, allowing the piece to cool fully before placing it on your desk.

    Common Beginner Mistakes and How to Avoid Them

    When sculpting polymer clay pen holders, beginners often make several common technical mistakes that can compromise the structural integrity, balance, and appearance of their finished organizers. A frequent mistake is creating vessel walls that are too thin, typically under four millimeters; thin-walled clay containers often slump, warp, or crack during baking when unsupported by an internal armature. Crafters should maintain a minimum wall thickness of five to six millimeters, using oven-safe glass, metal, or dense foil cores to preserve clean vertical lines throughout the baking cycle. Another common error is joining raw clay components without sufficient surface pressure or bonding agents, which causes walls, bases, and decorative attachments to separate cleanly after curing. Always score contact surfaces lightly, apply a thin coat of bakeable liquid polymer clay between joints, and blend visible seams using silicone shaping tools. Additionally, failing to verify true oven temperatures with an independent, analog oven thermometer often leads to scorched clay surfaces or under-cured, brittle pieces; never rely solely on built-in appliance dials. Finally, leaving trapped air pockets inside clay slabs can cause bubbling or blistering during curing; knead clay thoroughly and smooth slabs carefully with a roller to release trapped air before assembly.

    Practical Tips for Better Results

    Achieving clean, boutique-quality finishes with polymer clay desk accessories depends on adopting specific technical habits that refine raw clay into polished homeware. Always build and bake your projects directly on transportable, smooth ceramic tiles or tempered glass sheets; this eliminates the need to lift or handle delicate, unbaked structures, preventing accidental dents and warped walls. When smoothing out visible fingerprints, tool marks, and minor surface imperfections before baking, rub the raw clay lightly using a cotton swab or lint-free cloth dipped in isopropyl alcohol; the alcohol dissolves superficial surface irregularities, leaving a smooth finish. To produce crisp geometric edges and square walls, let conditioned clay slabs rest on the tile for twenty minutes to cool and firm up before making cuts with a rigid tissue blade; cool clay resists dragging and stretching when cut. When designing hollow pen cups, cut a small, two-millimeter pinhole into the base plate before baking; this hidden vent allows expanding air to escape safely without cracking seams. Finally, wet-sand cured pieces in a shallow water bath using progressive grits to achieve a soft stone-like finish that elevates the finished piece.

    Styling, Presentation, or Organization Ideas

    Integrating handmade polymer clay pen holders into your workspace decor requires thoughtful color coordination, functional clustering, and balanced spatial placement across the desk. To create an intentional, cohesive home office aesthetic, pair your clay pen holder with complementary desk accessories that echo its textures, such as stone coasters, linen blotters, and matte ceramic mugs. When organizing varied writing tools, use the rule of functional separation: dedicate tall cylindrical vessels to long markers and scissors, reserve low-profile multi-hole stands for premium fountain pens, and use shallow stacking cups for small items like clips and erasers. If styling a long desk or credenza, group your handmade organizer in an odd-numbered cluster alongside a small potted succulent and an architectural brass desk lamp to create balanced visual height. For creative gift presentation, pair a completed handmade pen holder with a set of curated, high-end gel pens tied with natural jute twine and a handwritten care tag. Storing your organizer along the non-dominant side of your computer screen maintains an efficient desktop workflow, keeping tools easily accessible without obstructing primary typing areas.

    Budget or Time Planning

    Crafting polymer clay desk organizers provides an economical alternative to expensive retail homeware, delivering custom storage solutions on a modest materials budget. A standard five-hundred-gram block of polymer clay costs very little and can produce two large cylindrical pencil cups or three low-profile pen stands, making this an affordable DIY project. To manage your budget effectively, upcycle everyday household items—such as clean aluminum food cans, glass beverage bottles, and cardboard shipping tubes wrapped in foil—as supportive baking armatures rather than purchasing specialized metal molds. From a time management perspective, building a standard pen holder requires approximately one to two hours of active sculpting, followed by forty-five minutes of baking and an optional thirty minutes of wet-sanding and finishing. Organize your creative sessions into focused stages: spend thirty minutes conditioning clay and rolling base slabs, forty-five minutes assembling walls and adding surface textures, and conclude with a consolidated baking and cooling cycle. Planning your projects in small batches saves energy, allowing you to cure multiple desk accessories simultaneously on a single large oven rack.

    Creative Expansion and Advanced Inspiration

    Once you feel comfortable executing basic cylindrical and slab-built pen holders, consider exploring advanced decorative techniques that introduce mixed-media materials, intricate surface relief, and expanded functionality. Experiment with embedding natural raw crystals, polished sea glass, or solid brass eyelets directly into raw clay walls before baking, creating luxurious, textural focal points that catch desktop light. Advanced makers can also explore combining polymer clay with turned hardwood bases, using liquid clay and two-part epoxy to join cured clay cylinders to oiled walnut or oak pedestals for sophisticated Scandinavian styling. Another rewarding design direction involves incorporating functional organizational components, such as embedding strong neodymium magnets beneath the clay surface of a pencil cup to hold metallic paperclips neatly against the exterior wall. You can also experiment with creating multi-tier revolving desk carousels by mounting large multi-compartment clay holders onto small ball-bearing lazy susan hardware. These creative expansions build upon foundational skills, encouraging crafters to develop unique, heirloom-quality desk organizers that enhance daily productivity and workspace style.
  • 10 Polymer Clay Candle Holder Ideas

    10 Polymer Clay Candle Holder Ideas

    Polymer clay candle holders have emerged as an essential craft focus across interior design communities, combining modern sculptural forms with accessible, functional art for the home. Polymer clay is a versatile modeling compound composed of polyvinyl chloride, plasticizer, and color pigments, celebrated for its smooth working texture and permanent durability once cured in a standard home oven. Creating your own functional candle stands enables you to design custom tabletop decor tailored to specific living room color schemes, seasonal dining themes, or bedside accents. This comprehensive tutorial details ten distinct, step-by-step concepts that guide makers through constructing stable taper holders, tea light pedestals, and decorative votive dishes. You will discover practical methods for preparing raw clay, conditioning dense blocks, shaping accurate socket cavities, and curing final pieces without surface distortion or scorching. Mastering these clay-building methods expands personal craft proficiency while providing reliable strategies to build long-lasting home decor elements without the requirement of expensive ceramic kilns or wheel-throwing machinery. Exploring these structured ideas builds a strong foundation in three-dimensional balance, structural stability, and surface finishing, allowing you to turn modest blocks of polymer clay into refined, functional household decor.
    Why This Idea Is Trending or Useful
    The enduring prominence of polymer clay candle holders across contemporary Pinterest ideas stems from an intersection of affordable DIY home styling, tactile mindfulness, and modern design principles. Modern homeowners increasingly favor intentional, handmade objects that feature organic silhouettes, earthy textures, and bespoke colorways over mass-produced, identical factory homeware. Polymer clay provides an exceptional medium for this aesthetic because it allows for clean edges, geometric curves, and smooth stone-like finishes right on a kitchen table. From a practical perspective, designing custom candle holders offers valuable functionality: crafters can customize socket dimensions to fit any candle base precisely, preventing loose, leaning tapers that cause uneven burns and dripping wax. For beginners, polymer clay represents an accessible creative project with a very low barrier to entry, as it requires no specialized workshop spaces or toxic chemical glazes. Its forgiving nature allows you to reshape, re-roll, and adjust unbaked clay indefinitely until the balance and symmetry are dialed in. The finished items serve as reliable, functional accents that harmonize with minimalist style interiors, making this a dependable and rewarding craft venture.
    Materials and Preparation
    Proper studio preparation, disciplined tool selection, and careful workspace organization establish the foundation for durable, professional-quality polymer clay projects. Essential materials include premium oven-bake polymer clay in neutral tones such as terracotta, sandstone, slate gray, ivory, and olive green, alongside metal candle socket inserts to protect the clay from direct heat. Required tools consist of a heavy acrylic roller, an accurate craft blade, a metal ruler, silicone smoothing tools, and metal circle cutters matching the diameter of standard taper candles or tea lights. Work surfaces must remain completely non-porous and clean; tempered glass cutting boards or smooth ceramic tiles work best because pieces can be built and transferred directly to the oven on the same plate. Preparation requires wiping down work surfaces with isopropyl alcohol to remove dust, lint, and residual oils that could stain lighter clay shades. Thoroughly condition the raw clay by kneading it between clean palms or rolling it through a manual conditioning machine until it feels pliable, elastic, and free of internal air bubbles. Pre-planning your base weight and socket depth ensures every holder supports vertical candle loads securely without wobbling.

    Idea 1: Sculptural Ribbed Arch Taper Stand

    1

    Step-by-Step Guide
    The sculptural ribbed arch taper stand utilizes clean architectural geometry, pairing a curved rainbow silhouette with vertical fluted grooves along the curved face. The body consists of an inverted U-shape bridge resting flat on two balanced footings, with two candle sockets embedded at the upper apex shoulders. This design draws on modern retro styling, transforming a flat tabletop surface with rhythmic lines and dramatic negative space beneath the arch. The ribbed texture catches ambient light and shadows, giving the monochrome clay surface visual depth without requiring complicated paint washes. Sizing the dual feet evenly provides solid lateral stability, keeping tall taper candles from tipping during movement. This piece serves as a striking centerpiece on a dining table, an artistic mantle focal point, or a sophisticated coffee table accent, demonstrating how clean geometric balance turns simple clay forms into refined interior decor.
    To construct this piece, condition three hundred grams of sandstone or beige polymer clay until completely smooth, shaping the mass into a uniform cylinder measuring four centimeters in diameter and twenty-five centimeters in length. Using the dull spine of a craft blade or a wooden scoring tool, press straight vertical grooves along the entire length of the cylinder, spacing each rib five millimeters apart. Gently bend the ribbed cylinder into a symmetrical U-shape over an empty glass bottle, ensuring the two flat ends align flush on your work tile to establish stable footings. While the clay remains pliable, press two metal taper candle cups into the top curve of the arch until the rims sit flush with the clay surface, removing any displaced clay cleanly. Carefully slide the clay arch off the supporting bottle, verify that the two feet rest level without wobbling on a flat baking sheet, and cure in a preheated oven at 130°C for forty minutes before letting it cool completely.

    Idea 2: Minimalist Fluted Pedestal Tea Light Dish

    2

    How to Create
    The minimalist fluted pedestal tea light dish pairs a raised cylindrical pillar with a wide, shallow drip plate designed to hold standard metal-cupped tea lights. The aesthetic is inspired by classical Greek columns, using crisp vertical fluting along the pedestal stem to balance the soft, rounded edges of the upper saucer. Raising the candle two inches off the tabletop adds visual height, creating dynamic variation when grouped with low-profile dishes or framed prints. The wide surrounding rim catches incidental wax drips, keeping fine tablecloths and polished wooden surfaces protected. This design offers beginner-friendly practice in creating balanced vertical forms, teaching makers how to join separate wheel-less clay components securely without visible seams. The finished dish functions well on bedroom nightstands, bathroom vanity trays, or quiet reading nooks, providing gentle ambient warmth through simple, disciplined styling.
    Begin by rolling out a three-centimeter-thick cylinder of ivory clay, trimming the height to six centimeters using a rigid craft blade to create the central pedestal. Roll a ribbed clay texture mat firmly around the circumference of the cylinder to imprint clean, uniform fluting, and set the pedestal upright on your ceramic tile. Next, roll a separate slab of matching ivory clay to a five-millimeter thickness, using an eight-centimeter circular cutter to produce the upper drip dish. Form a low, raised lip around the circular dish by gently pinching the outer edges upward with your thumbs, smoothing the transition with a wet silicone tool. Apply a small amount of bakeable liquid polymer clay to the top of the fluted pedestal, centering the saucer on top and pressing down gently to fuse the pieces. Press a standard tea light cup into the center of the dish to form a clean circular recess, remove the cup, and bake the pedestal upright at 130°C for thirty-five minutes.

    Idea 3: Organic Wabi-Sabi Pinch Pot Votive

    3

    Execution Process
    The organic wabi-sabi pinch pot votive embraces deliberate asymmetry, soft natural indentations, and an unrefined silhouette inspired by traditional handmade Japanese pottery. Rather than using mechanical straightedges or polished geometric molds, this concept relies entirely on gentle finger pressure to shape a raw lump of clay into an organic vessel. The walls feature subtle, soft variations in thickness, with the upper rim dipping and curving naturally to create an earthy, unforced feel. An earthy, speckled clay formulation—such as white clay mixed with tiny specks of black pepper or dark clay powder—gives the piece the look of fired stoneware. This design provides an approachable, low-stress project for beginners, proving that intentional imperfections can look refined and artistic. The votive looks right at home on rustic wooden shelves, outdoor garden tables, or grouped along a windowsill where flickering flames illuminate the organic contours of the rim.
    Take two hundred grams of off-white polymer clay, mixing in a pinch of dried coffee grounds or fine black polymer shavings to create an organic stone speckle. Roll the clay into a smooth sphere, holding it in the palm of your non-dominant hand while pressing your thumb deep into the center to create an initial cavity. Slowly rotate the clay in your palm, pinching the walls upward and outward between your thumb and fingers until the vessel reaches an even thickness of six millimeters. Keep the bottom base relatively thick and tap it firmly against a flat work surface to create a wide, stable bottom that will not rock. Place an empty glass votive cup into the inner well, pressing the bottom clay down to seat the glass securely while letting the rim remain loose and organic. Remove the glass cup before baking, place the clay vessel on a ceramic tile, and bake at 130°C for thirty-five minutes, allowing it to cool slowly inside the oven.

    Idea 4: Stacked Geometric Donut Taper Holder

    4

    Setup Method
    The stacked geometric donut taper holder stacks multiple rounded clay rings into a totem-style column, bringing playful modern design to traditional candle displays. Each individual tier consists of a plump, torus-shaped ring that sits securely atop the one below, forming an architectural column that tapers or alternates in diameter. Working with rounded donut shapes creates smooth, sweeping shadows down the height of the piece, softening the rigid vertical lines of standard taper candles. Crafters can explore tonal colorways—such as shifting from deep terracotta to soft desert peach—or keep the entire stack in a single clean tone like slate gray. This project provides practical training in creating matching, uniform elements, challenging makers to control wall thickness and maintain structural alignment along a central vertical axis. The finished totem is particularly suited for entryway consoles, modern credenzas, and creative desk setups.
    Condition your chosen clay thoroughly, dividing the mass into three equal balls weighing eighty grams each to ensure consistent ring proportions. Roll each portion into a smooth, even snake measuring fifteen centimeters long, joining the ends together with a clean forty-five-degree diagonal cut to form three identical circular rings. Gently press the joined seams flat with a silicone smoothing tool, rounding the edges until the joint disappears completely into the ring profile. Stack the three rings on top of one another on a baking tile, applying a drop of liquid polymer clay between the contact surfaces to form a permanent bond. Insert a metal taper candle cup down through the center hole of the top ring, pressing it firmly until it rests securely within the second ring layer. Check the piece with a small level to confirm the socket sits plumb and straight, then bake the stacked assembly at 130°C for forty-five minutes to ensure full heat penetration through the thick layers.

    Idea 5: Terrazzo Slab Low Profile Taper Block

    5

    Step-by-Step Guide
    The terrazzo slab low profile taper block brings modern mosaic composite textures to a low-slung, rectangular clay block. The concept incorporates small, multi-colored clay chips pressed into a contrasting base slab, mimicking polished Venetian terrazzo stone. The rectangular shape provides broad, low-profile stability, making it practically impossible for candles to tip over on crowded dining tables. Embedding two or three candle sockets in a clean horizontal row creates an efficient runner centerpiece that fits comfortably between place settings. The smooth, flat surface highlights the colorful aggregate flecks, balancing functional stability with graphic modern charm. This design teaches fundamental slab construction, chip embedding techniques, and surface shaving with a flexible tissue blade, giving makers the skills to produce faux-stone finishes without specialized equipment.
    Roll out a thick foundational base of soft cream polymer clay to a uniform thickness of 2.5 centimeters, trimming the edges into a neat rectangle measuring fifteen centimeters long by six centimeters wide. Prepare your colorful aggregate chips by slicing cured scraps of terracotta, mustard yellow, forest green, and black clay into tiny, irregular shards. Scatter the cured colored chips evenly across the raw cream slab, pressing them into the surface with an acrylic roller until the chips sit completely flush with the surrounding clay. Carefully shave away any high spots across the top with a flexible tissue blade, creating a flat, mosaic-style surface that exposes the crisp shapes of the embedded chips. Use a metal circle cutter to core out three equally spaced holes along the centerline of the block, inserting metal candle cups into each opening. Bake the slab flat on parchment paper at 130°C for forty minutes, and wet-sand the cooled surface with 800-grit sandpaper for a silky, stone-like finish.

    Idea 6: Twisted Ribbon Modern Candlestick

    6

    How to Create
    The twisted ribbon modern candlestick transforms flat clay strips into a dynamic, spiral ribbon that loops upward around a central candle socket. The design uses a continuous band of clay that bends and twists through the air, creating an open, airy silhouette with a surprisingly small footprint. Despite its delicate appearance, the holder maintains structural balance by anchoring its bottom ribbon loop into a broad, flat circular base plate. The flowing curves capture changing light and shadows, producing an eye-catching decorative accent that feels fresh and sculptural from every angle. This project challenges makers to balance structural weight, working with thin slabs supported by internal armatures or temporary props during the baking process. The finished candlestick makes an elegant statement on modern sideboards, vanity tables, or curated open shelving units.
    Roll out a smooth, even strip of polymer clay to a thickness of four millimeters, cutting it to four centimeters wide and thirty centimeters long with a craft blade and metal ruler. Cut a separate circular base plate measuring ten centimeters across from a five-millimeter-thick slab of matching clay to serve as the ground foundation. Take the long clay strip and form a sweeping, continuous vertical twist, coiling the lower loop flat against the base plate and bringing the upper loop upward to support the candle socket. Secure the top loop around an open metal candle insert, using liquid polymer clay to weld the metal cup directly inside the clay band. Support the open, floating curves of the twisted ribbon using crumpled balls of aluminum foil to keep the shape from sagging in the oven. Bake the entire assembly at 130°C for thirty-five minutes, allow it to cool completely before removing the foil supports, and inspect the structural seams for a secure, rigid finish.

    Idea 7: Interlocking Knot Sculptural Taper Base

    7

    Execution Process
    The interlocking knot sculptural taper base translates decorative nautical knotting and continuous woven forms into a functional, single-piece candle stand. The design features a continuous clay cylinder woven into an open pretzel or continuous figure-eight knot, resting flat on three contact points along the tabletop. The central intersection of the woven knot is sculpted to hold a vertical candle socket, integrating the functional opening seamlessly into the winding curves of the design. This continuous woven form offers a modern take on tabletop decor, bridging traditional textile crafts with clean contemporary sculpture. Knotting thick clay coils requires smooth, uniform tension to avoid surface cracking or flat spots as the clay curves over itself. The finished holder works well on minimalist credenzas, low coffee tables, or alongside art books, serving as an engaging sculptural accent even when unlit.
    Condition three hundred grams of clay in a muted sage or olive green hue, rolling it evenly across a clean work surface into a smooth coil forty centimeters long and 2.5 centimeters thick. Carefully weave the long coil into a flat figure-eight or loose sailor’s knot on your ceramic work tile, keeping the curves open and rounded without stretching the clay thin at the bends. Gently press the overlapping sections together at their contact points, using a silicone modeling tool to blend the bottom contact seams while leaving the upper curves distinct. At the central intersection where the loops cross, press a metal candle insert down into the clay, shaping the surrounding coil so it cradles the socket smoothly. Tap the base lightly against your work surface to ensure the lower curves sit flat and level on the tabletop. Bake the knot flat on its tile at 130°C for forty minutes, and let it cool completely inside the oven to prevent thermal shock and maintain structural strength.

    Idea 8: Flared Petal Botanical Candle Cup

    8

    Setup Method
    The flared petal botanical candle cup takes inspiration from opening flower calyxes, wrapping five overlapping, sculptural clay leaves upward around a central candle core. The design begins with a sturdy circular base that transitions into five pointed petals that cup the base of the candle before flaring outward at the tips. The organic petal arrangement provides an attractive transition from the vertical line of the taper to the horizontal surface of the table. Working with warm terracotta, rich ochre, or burnt umber clay accentuates the natural botanical look, bringing garden-inspired warmth indoors. This project helps crafters practice rolling smooth, tapered edges, shaping gentle curves, and attaching uniform petals securely around a central core. The finished holder works beautifully on dining tables, bedside stands, or garden terrace tables, bringing a soft, organic touch to evening gatherings.
    Roll out a five-millimeter-thick sheet of terracotta clay, cutting out a small circular base measuring five centimeters across using a round cutter. Next, cut five identical teardrop-shaped petals measuring eight centimeters long from the remaining slab, gently smoothing the perimeter of each petal to feather the edges thin. Position an aluminum or brass candle cup in the center of the circular base, using a drop of liquid clay to glue it in place. Begin attaching the petals around the perimeter of the metal cup, overlapping each petal slightly over its neighbor while pressing the bases firmly into the bottom disc. Gently curve the tips of the petals outward with your fingers, using crumpled tissue paper beneath the flared ends to support their shape until they go into the oven. Check that the candle socket remains clean, vertical, and free of excess clay, then bake the supported piece at 130°C for thirty-five minutes before cooling.

    Idea 9: Stepped Arch Deco Votive Sconce

    9

    Step-by-Step Guide
    The stepped arch deco votive sconce combines clean Art Deco lines with functional candle display, pairing a stepped geometric backplate with a cantilevered front votive shelf. The backplate features three graduated, rounded arches that rise behind the flame, serving as a clean visual frame that reflects the warm light of the candle forward. Extending outward from the bottom of the arch is a small semicircular ledge that holds a glass votive cup or a metal-encased tea light securely. This architectural design creates an eye-catching focal point, using clean geometric silhouettes to frame the flickering flame. Constructing this piece sharpens skills in cutting clean parallel lines, laminating flat clay sheets together without air bubbles, and building strong ninety-degree load-bearing joints. The finished sconce sits comfortably on modern wall ledges, fireplace mantels, or bedroom dressers, delivering structured geometric charm to contemporary living spaces.
    Roll out a smooth slab of charcoal or slate gray clay to a uniform thickness of six millimeters, using a metal ruler and craft blade to cut three arched profiles of graduated sizes. Stack the three arches with their bottom edges aligned flush, pressing them together lightly with an acrylic roller to laminate the layers into a single stepped backplate. Cut a separate semicircle measuring seven centimeters wide from the six-millimeter slab to create the front candle platform. Join the flat edge of the semicircular shelf to the base of the stepped backplate at a precise ninety-degree angle, reinforcing the underside joint with a small triangular clay gusset and liquid polymer clay. Press an empty metal tea light cup into the top of the shelf to form a neat circular indentation, then remove the cup before baking. Support the cantilevered shelf with an upright wooden block during baking, cure at 130°C for forty minutes, and allow it to cool completely before placing a candle on the shelf.

    Idea 10: Asymmetrical Curved Wave Taper Trough

    10

    How to Create
    The asymmetrical curved wave taper trough features an organic, undulating clay strip that winds across the tabletop like a gentle wave, supporting three candle sockets along its raised crests. The wave shape moves fluidly between high points that hold candles and low troughs that dip down to touch the table, creating a playful sense of motion. By distributing the candle sockets across an extended S-curve, this design provides balanced three-point stability while using very little vertical material. Choosing a calm neutral tone—such as matte cream, desert sand, or soft dove gray—keeps the focus on the continuous flowing lines of the clay. This project teaches crafters how to build balanced multi-socket holders, calculate weight distribution, and handle long, flexible clay slabs without stretching or distorting the material. The finished trough serves as an elegant, low-profile runner centerpiece on long dining tables, allowing guests to converse easily over its sweeping curves.
    Roll out a thick strip of desert sand polymer clay measuring five centimeters wide, forty centimeters long, and eight millimeters thick, using a metal ruler to keep the edges parallel and straight. Carefully lift the clay strip and arrange it into an undulating S-curve across your ceramic baking tile, creating three raised crests separated by two low points that rest flat against the tile. At the peak of each raised crest, press a metal taper candle cup down into the clay, ensuring all three sockets remain completely vertical and plumb with one another. Smooth the clay around the base of each metal cup using a silicone tool, ensuring the socket walls blend cleanly into the flowing curves of the wave. Tap each low valley gently against the tile to create flat, stable footings that keep the wave from rocking. Bake the curved assembly supported by small balls of foil at 130°C for forty-five minutes, allowing it to cool slowly inside the oven to ensure maximum structural strength.
    Common Beginner Mistakes and How to Avoid Them
    A frequent and dangerous mistake beginners make when creating polymer clay candle holders is allowing open candle flames or burning wicks to come into direct contact with the clay surface. While cured polymer clay is heat-resistant, it remains an organic plastic compound that can scorch, emit irritating fumes, or blister if exposed directly to naked flames or hot pooling wax. To prevent this, always incorporate metal candle cups or glass votive inserts into your designs, ensuring the clay serves strictly as an exterior decorative base rather than the immediate combustion surface. Another common issue is constructing bases that are too light or top-heavy, which allows tall taper candles to tip over easily when brushed. Prevent tipping by making your bases wide and heavy, keeping the base diameter at least half the total height of the intended candle. In addition, makers often bake thick clay pieces too quickly at uneven temperatures, leading to internal bubbles, surface scorching, or fragile, under-cured centers. Always use an independent oven thermometer to verify your temperatures, and bake thicker items for longer durations at the recommended heat to ensure the vinyl molecules fuse completely throughout.
    Practical Tips for Better Results
    Achieving smooth, professional results with polymer clay candle holders relies on disciplined studio habits, thorough clay conditioning, and careful surface finishing. Always knead raw clay until it is supple, elastic, and free of internal crumbling, which prevents surface cracking when bending thick cylinders into arches or knots. When smoothing visible fingerprints, seam lines, or small surface flaws, gently buff the raw clay with a cotton swab moistened with isopropyl alcohol before baking, which dissolves surface irregularities and creates an even, velvety finish. To ensure candle sockets fit standard tapers properly after baking, wrap your metal candle inserts in a single layer of baking parchment before pressing them into raw clay; this accounts for thermal shrinkage and guarantees a snug, safe fit. If your design includes thin, cantilevered, or hollow elements, always support those sections during baking with crumpled aluminum foil or mounds of plain baking soda to prevent sagging under heat. Finally, wet-sand your cured pieces under running water with graduated sandpaper grits from 400 to 1000 to produce a silky, ceramic-like stone texture that elevates the look of your finished piece.
    Styling, Presentation, or Organization Ideas
    Displaying your handmade polymer clay candle holders thoughtfully helps integrate their sculptural forms into your overall home decor aesthetic. Arrange groupings of varied heights—such as pairing a tall ribbed arch with a low terrazzo block and a small wabi-sabi votive—on a low wooden tray or marble riser to create a dynamic, balanced focal point on coffee tables or sideboards. Setting these handmade pieces against natural textures, such as washed linen tablecloths, unfinished oak shelving, or raw travertine surfaces, highlights their smooth, matte finishes and handcrafted character. For a cohesive, modern look, select candles that complement your clay colors, such as pairing olive-green twisted tapers with cream-toned holders, or using beeswax tapers with warm terracotta bases. When styling multiple holders down a long dining table, weave delicate sprigs of dried eucalyptus, olive branches, or textured cotton runners between the bases to tie the elements together into a flowing tablescape. Keeping your finished holders clean is straightforward: dust them periodically with a dry microfiber cloth, and wipe away any stray wax drops using warm soapy water and a soft sponge.
    Budget or Time Planning
    Constructing your own polymer clay candle holders is an economical DIY home decor project that delivers high-end artisan results on an accessible budget. A single standard five-hundred-gram block of polymer clay costs very little and provides enough material to build two substantial taper stands or three small tea light holders, keeping per-piece costs low compared to boutique retail homeware. To keep material costs manageable, purchase multi-packs of universal brass or silver candle inserts in bulk, and save leftover clay scraps in airtight containers to use as internal filler or colorful terrazzo chips for future projects. Organize your crafting into structured stages: dedicate the first hour to sketching shapes, calculating socket dimensions, and thoroughly conditioning your clay blocks. Spend the second hour shaping, joining, and smoothing your sculptural components, followed by forty-five minutes of supervised oven baking. Allowing your pieces to cool slowly in the oven and spending thirty minutes wet-sanding the surfaces completes the project in an afternoon. This organized approach ensures you make the most of your materials and time, producing durable home decor pieces with minimal waste.
    Creative Expansion and Advanced Inspiration
    Once you master these ten foundational polymer clay candle holder designs, you can easily adapt the basic techniques into advanced, mixed-media home accents. Try incorporating surface embellishments, such as pressing botanical cuttings, dried fern leaves, or natural lace into raw clay slabs to imprint fine organic textures before shaping your holders. You can also explore multi-colored marbling techniques, twisting contrasting tones like charcoal, gold mica, and white clay together to mimic the natural strata of Carrara marble or sedimentary sandstone. Advanced crafters can scale these sculpting methods up to create multi-tiered candelabras, connecting several arched or looped components with hidden wire armatures to support five or six tapers simultaneously. You might also experiment with combining polymer clay with other materials, mounting cured clay holders onto turned wooden bases or securing them within cast plaster trays for a weighted, mixed-media look. Pushing the boundaries of traditional clay modeling helps you cultivate a distinctive artistic style, turning simple clay blocks into functional, modern sculptures that bring warmth and personality to any room.
  • 10 Polymer Clay Photo Frame Ideas

    10 Polymer Clay Photo Frame Ideas

    Customizing picture frames using polymer clay provides an approachable, creative, and durable way to display cherished memories within modern home decor. Traditional wooden or plastic frames often lack unique personality and tactile texture, functioning merely as basic border holders for printed photographs. Handcrafted clay borders allow decorators to incorporate customized geometric patterns, faux mineral striations, tactile botanical reliefs, and sculptural details directly onto display pieces. This comprehensive tutorial delivers ten complete polymer clay photo frame projects designed specifically for crafters seeking functional, gallery-grade room accents. Readers will discover the step by step methods required to condition soft clay, wrap wooden or glass substrates, blend consistent marbling, build secure baking armatures, and apply long-lasting protective finishes. Working on flat and beveled frame profiles provides an accessible entry point to sculptural clay crafting, eliminating the structural balance challenges common to freestanding figurines. Understanding how to manage substrate adhesion, prevent air bubbles, and verify curing temperatures ensures that every finished piece remains flat, resilient, and visually captivating. Following these practical guidelines allows makers of all skill levels to transform plain, budget-friendly frame blanks into bespoke handmade keepsakes that elevate bedside tables, office desks, and living room gallery walls.

    Why This Idea Is Trending or Useful

    The consistent prominence of polymer clay home accessories across contemporary Pinterest inspiration stems from a growing desire for tactile, personalized, and color-matched interior decorations. Modern living spaces increasingly embrace intentional design choices where everyday objects showcase authentic craftsmanship and sculptural personality rather than mass-produced uniformity. Polymer clay delivers exceptional practical value because it cures to a lightweight, water-resistant, and impact-tolerant finish using standard home ovens. The wide variety of available clay colors, metallics, and translucent formulas makes it simple to coordinate custom frame borders with specific room palettes, wallpaper motifs, or seasonal accents. For beginners exploring DIY decor, modifying picture frames provides a straightforward, beginner friendly project that requires minimal financial investment and zero specialized pottery machinery. A plain wooden or ceramic craft frame can be completely resurfaced within an afternoon, producing functional home decor that looks bespoke and artisanal. These trending ideas also offer great creative flexibility for personalized gift-giving, allowing crafters to design thoughtful frames for wedding portraits, baby milestones, and vacation snapshots on practical budget ideas. Embracing custom clay frame design enables crafters to blend functional display needs with expressive aesthetic style.

    Materials and Preparation

    Constructing durable, professional-grade clay frames requires methodical preparation of specialized hand tools, clean work environments, and suitable frame substrates. Essential materials include premium oven-bake polymer clay blocks, liquid polymer bakeable adhesive, flat-profile unfinished wooden or metal frame blanks, two-part epoxy glue, and water-based protective varnishes. Necessary tools comprise an acrylic rolling pin, calibrated thickness guides, flexible stainless steel tissue blades, silicone-tipped clay shapers, fine-grit wet-dry sandpaper, and a dedicated freestanding metal oven thermometer. Thorough preparation begins by wiping down your ceramic tile or tempered glass work board with isopropyl alcohol to remove lint, microscopic dust, and skin oils. Planning considerations require inspecting the frame blank to remove glass inserts, backing cardboard, and metal hanging clips before starting the modeling process. Lightly scuff smooth wooden or painted frame borders with medium-grit sandpaper, wiping away sawdust to ensure a strong mechanical bond for the liquid adhesive. Formulate your intended color schemes ahead of time, mixing custom neutral pastels and conditioned slabs before wrapping the base. Preparing flat baking supports and testing your oven’s temperature stability guarantees smooth, warp-free curing results from start to finish.

    1. Minimalist Terrazzo Stone Slab Picture Frame

    1

    Step-by-Step Guide

    The minimalist terrazzo stone slab frame draws inspiration from Mediterranean architectural composite materials, combining crisp geometric borders with scattered organic color chips. The primary design foundation features a flat, smooth rectangular surface rendered in warm oatmeal, pale linen, or soft stone-colored polymer clay. Distributed across this neutral field are flat, irregular geometric flakes cut from contrasting clay colors such as deep terracotta, forest green, mustard yellow, and charcoal. Because the colorful stone chips are pressed completely flush into the base sheet, the finished frame face maintains an unbroken, level plane that feels cool and stone-like to the touch. This low-profile design complements Scandinavian and modern minimalist interiors, adding subtle pattern without competing with the framed artwork or photography. The clean edges and lack of protruding details make this frame remarkably durable and simple to clean over years of display.
    To begin assembly, roll two ounces of conditioned oatmeal-colored polymer clay through an acrylic roller fitted with three-millimeter thickness guides to produce a uniform slab. Roll out thin, one-millimeter sheets of contrasting clay colors, using a tissue blade to slice them into tiny, irregular angular chips measuring between two and six millimeters wide. Scatter the colored chips randomly across the surface of the oatmeal slab, pressing them down lightly with your fingertips. Place a sheet of smooth parchment paper over the prepared slab and roll firmly with an acrylic pin to push the colored chips flush into the base layer. Coat the flat front of an unfinished wooden frame blank with a thin, even layer of liquid polymer clay using a flat brush. Lay the trimmed terrazzo slab over the frame face, trimming the outer borders and central photo window flush with a sharp craft scalpel. Bake the wrapped frame flat on a ceramic tile for forty-five minutes at 130 degrees Celsius, letting it cool slowly before applying a clear matte sealant.

    2. Organic Twisted Rope Border Tabletop Frame

    2

    Execution Process

    The organic twisted rope border frame brings rich dimensional texture and nautical movement to display styling through layered, spiraled clay cords. This design utilizes continuous strands of clay twisted tightly together to create an unbroken corded boundary that frames the central photo window. Crafted in warm sand, natural flax, or unbleached ivory tones, the twisted cords mimic the appearance of rustic marine hemp or woven wool ropes while providing the durability of cured polymer clay. The spiraling ridges capture ambient light, casting soft, rhythmic shadows that frame portraiture with subtle textural depth. Pairing this raised border with a flat, recessed inner rim ensures that the photograph remains the clear visual focus while the outer perimeter adds tactile interest. This design works exceptionally well within modern coastal, rustic farmhouse, and bohemian interior spaces, serving as a reliable accent for seaside vacation prints and candid family portraits.
    Begin by conditioning two equal portions of warm sand-toned polymer clay, rolling each portion into a long, uniform snake measuring four millimeters in diameter and twenty-four inches in length. Pinch the ends of the two clay snakes together firmly at one end, then twist the strands around one another in a consistent spiral, maintaining uniform tension to prevent lumpiness. Apply a thin line of bakeable liquid clay around the outer border of a flat four-by-six-inch wooden frame blank using a fine detail brush. Carefully press the twisted clay rope along the outer perimeter of the frame, pressing the lower surface gently into the adhesive while keeping the upper rounded spiral intact. Cut the corners at clean forty-five-degree mitered angles using a rigid tissue blade, smoothing the corner seams together with a silicone color shaper. Roll a thinner two-millimeter single cord, adhering it around the inner picture opening to frame the photo neatly. Bake the frame flat in a preheated oven, allow it to cool completely, and buff the raised rope ridges with a dry denim cloth for a natural satin finish.

    3. Sculpted Botanical Vine and Wildflower Border

    3

    How to Create

    The sculpted botanical vine and wildflower frame combines delicate floral modeling with functional borders, creating an heirloom-quality decorative accent. The structural foundation begins with a flat, sage-green or muted forest-green clay base that wraps the frame smoothly. Emerging from this green foundation are three-dimensional, hand-sculpted climbing vines, delicate vein-textured leaves, and miniature clustered wildflowers in shades of blush pink, buttercup yellow, and optic white. Concentrating the floral volume in asymmetrical clusters—such as a dense lower corner flowing into a fine, winding vine along the top rail—keeps the design visually balanced without overwhelming the framed image. This botanical motif introduces an organic garden feel to bedside tables, powder room vanities, and entry consoles. The sturdy attachment of leaves and flower petals directly to the underlying base sheet ensures that the delicate components resist chipping during everyday dusting and handling.
    Roll out a smooth, two-millimeter-thick sheet of pale sage-green polymer clay, applying it smoothly over the face and outer sides of a clean frame blank with liquid clay adhesive. Sculpt fifteen miniature teardrop leaves from deep olive clay, pressing a fine needle tool down the center of each to create natural leaf veins. For the wildflowers, roll five tiny balls of white clay for each flower, flattening them into circular petals around a microscopic dot of yellow clay to form the central blossom core. Arrange the sculpted leaves and blossoms in a sweeping diagonal cascade across the bottom-left corner of the frame face, securing each element with a droplet of liquid clay. Weave thin, rolled vine threads of olive clay upward along the left and bottom edges, tucking tiny leaf buds along the vine pathway. Bake the completed frame for forty minutes, cool fully, and brush high-gloss varnish over the floral blossoms while leaving the sage base in a natural matte finish.

    4. Modern Checkerboard Grid Pattern Display Frame

    4

    Setup Method

    The modern checkerboard grid frame explores graphic contrast, mid-century geometry, and pop-art energy through crisp, alternating squares of colored clay. The design features a precise grid of two-toned checks, such as classic cream and espresso, pale lavender and olive green, or soft peach and terracotta. Constructing the grid using solid clay canes ensures that the square corners remain sharp, straight, and clearly defined across the entire frame surface. This bold geometric pattern brings high visual energy to modern design layouts, functioning as an eye-catching focal piece that contrasts well with minimalist black-and-white photography or architectural line drawings. The flat, polished planar surface keeps the frame sleek, preventing visual clutter while delivering bold visual personality. This project provides crafters with a practical, rewarding method for practicing precise cane construction, clean slicing techniques, and flat surface alignment.
    Condition equal blocks of cream and deep espresso-brown polymer clay, rolling each color into a long, uniform square log measuring one centimeter in width and height. Slice each log lengthwise into two equal halves, reassembling the four resulting square strips into a two-by-two checkerboard cane with alternating colors. Compress the cane evenly from all four sides, gently reducing its dimensions until each individual square within the grid measures exactly five millimeters wide. Chill the reduced cane in the refrigerator for twenty minutes to firm the clay, then use a sharp, rigid tissue blade to slice thin, two-millimeter cross-sectional tiles. Coat a flat wooden frame blank with liquid polymer adhesive, arranging the sliced checkerboard tiles across the face in tight, seamless rows. Roll lightly over the assembled tiles with an acrylic roller protected by parchment paper to blend the seam lines into a unified plane. Trim all excess clay flush with the outer and inner frame edges, bake flat on a ceramic tile, and sand with wet-dry paper after cooling.

    5. Faux Green Marble Inlay with Gold Leaf Fissures

    5

    Step-by-Step Guide

    The faux green marble inlay frame captures the luxurious depth, mineral fractures, and polished elegance of natural architectural stone. The body of the frame features swirling, organic striations of deep emerald, rich malachite, translucent white, and deep forest-green polymer clay. Interspersed throughout these winding geological layers are thin, reflective fissures of genuine metallic gold leaf, which catch ambient room light and simulate natural mineral veins. The marbled pattern extends across the entire beveled frame face, creating a continuous, seamless stone slab look that feels substantial and elevated. This design pairs beautifully with vintage black-and-white portraits, antique botanical prints, and formal landscape photographs displayed on mahogany desks or dark floating shelves. Applying a high-gloss resin or polyurethane topcoat creates optical depth, making the embedded gold leaf and translucent green layers appear submerged beneath a polished stone surface.
    Begin by rolling out thin sheets of emerald green, translucent, dark green, and white polymer clay, stacking the colors in alternating layers to create a multi-tiered block. Tear the stacked block apart by hand into irregular chunks, pressing flecks of genuine gold leaf onto the torn, jagged surfaces. Compress the gold-coated chunks firmly back together into a single solid loaf, twisting the mass once to swirl the internal mineral veins without blending the colors completely. Use a flexible tissue blade to slice thin, three-millimeter slabs from the loaf, revealing the marbled interior veins and shimmering gold fractures. Adhere the marbled slabs onto the front of a beveled wooden frame blank using liquid clay, smoothing the diagonal corner joins with an acrylic roller. Wrap the clay neatly around the outer edges of the frame blank, trimming away excess material from the inner window. Bake for forty-five minutes at the recommended temperature, wet-sand the cooled surface from four-hundred to twelve-hundred grit, and apply a thick coat of clear gloss glaze.

    6. Scalloped Pastel Edge Nursery Picture Frame

    6

    Execution Process

    The scalloped pastel edge frame introduces soft curves, playful geometry, and gentle colors tailored for nurseries, children’s bedrooms, and whimsical living spaces. The design features a flat base border framed along its outer and inner margins by a continuous, overlapping row of semi-circular scalloped tabs. Rendered in soft candy pastels—such as butter yellow, blush pink, sky blue, or mint green—the repeating rounded edges soften rigid frame angles into friendly silhouettes. The layered construction adds gentle stepped dimension without creating sharp, fragile protrusions that could break during everyday handling. This sweet frame design is particularly suited for displaying newborn milestone photos, watercolor animal art, and handwritten keepsake cards. Its simple, repetitive construction offers a relaxing, beginner friendly crafting experience that teaches novices how to achieve uniform circular cuts and neat edge overlapping.
    Condition four ounces of baby-blue or pastel-mint polymer clay, rolling the material out into a uniform two-millimeter-thick sheet using an acrylic rolling pin. Use a small, circular metal plunger cutter measuring twelve millimeters in diameter to punch out approximately sixty identical clay discs from the sheet. Coat the surface of a flat wooden frame blank with a thin layer of liquid polymer adhesive, spreading it evenly to the outer borders. Begin layering the round discs along the outer perimeter of the frame, overlapping each disc halfway across the previous one to create a continuous scalloped chain. Once the outer border is complete, repeat the scalloped layering process along the inner window border, working in the same direction to maintain visual rhythm. Smooth the flat inner field of the frame with a silicone blending shaper, ensuring all underlying seams are sealed cleanly against dust. Cure the decorated frame in the oven for thirty-five minutes, allow it to cool fully, and seal with a soft satin varnish.

    7. Chunky Wavy Squiggle Accent Gallery Frame

    7

    How to Create

    The chunky wavy squiggle frame celebrates post-modern Memphis design and modern art aesthetics through bold, ribbon-like curves and playful movement. Rather than adhering to straight, rigid frame borders, this concept features a thick, sculpted clay snake that bends in continuous, fluid S-curves around the frame perimeter. The undulating waves break outside the traditional rectangular frame boundaries, creating a dynamic, sculptural silhouette that commands attention on gallery walls. Rendered in saturated contemporary tones like cobalt blue, warm ochre, or burnt rust, the bold wavy ribbon provides a joyful contrast against neutral wall paint. This statement piece works exceptionally well with abstract art prints, typography posters, and colorful party snapshots. The substantial thickness of the clay snake provides structural stability, ensuring the undulating waves remain firm and impact-resistant once cured.
    Select a simple, flat-faced wooden or MDF frame blank measuring five by seven inches, sanding the face lightly to improve mechanical grip. Roll out a long, uniform snake of cobalt-blue polymer clay measuring ten millimeters in diameter, keeping the cross-section perfectly circular along its entire length. Lay the clay snake along the top rail of the frame face, bending the rope back and forth in rhythmic, three-centimeter-wide horizontal waves that loop slightly beyond the frame edge. Continue the undulating wave pattern around all four sides of the frame, mitering and smoothing the corner joins with a silicone chisel tool to create an unbroken wavy loop. Apply small drops of liquid bakeable adhesive beneath every point where the clay snake touches the wooden frame surface, pressing down lightly to secure the bond. Bake the frame flat on a ceramic baking sheet for forty-five minutes at 130 degrees Celsius. Once cool, wipe down the smooth surface with a microfiber cloth and apply a protective coat of matte spray sealant.

    8. Sunburst Art Deco Geometric Relief Frame

    8

    Setup Method

    The sunburst Art Deco geometric relief frame channels vintage glamour and architectural symmetry through radiating dimensional rays and metallic finishes. The design features a series of triangular and trapezoidal clay facets that fan outward from the central photo aperture toward the outer corners like stylized sunbeams. Rendered in burnished antique bronze, rich copper, or metallic champagne gold clay, the geometric facets catch directional light, creating an interplay of highlights and shadows. The precise, angular relief brings structured, formal elegance to display surfaces, providing an elevated home decor accent for wedding portraits, historic prints, and graduation photos. The low-profile triangular segments create a durable surface that resists warping or cracking over time. This project teaches crafters how to execute clean straight-edge cuts, align radial angles symmetrically, and burnish metallic mica clays for maximum reflective shine.
    Condition three blocks of metallic gold or bronze polymer clay thoroughly, rolling the material into a smooth four-millimeter sheet on a clean glass working tile. Cut a flat rectangular base sheet to fit the face of a wooden frame blank, adhering it with an even coat of liquid polymer adhesive. Using a metal ruler and a sharp scalpel, score light guidelines radiating outward from the four corners of the central photo window to the outer frame edges. Cut slender triangular wedges from remaining metallic clay sheets, arranging them along the scored guide lines so the pointed tips meet neatly at the photo opening. Press each triangular ray firmly into the base sheet, using a flat acrylic block to ensure the upper relief surfaces remain straight and uniform. Burnish the surface of the metallic clay gently with a dry fingertip to align the internal mica particles for an even metallic luster. Cure the frame in the oven for forty minutes, cool slowly, and finish with a coat of water-based gloss glaze.

    9. Pressed Botanical Herbarium and Textured Clay Frame

    9

    Step-by-Step Guide

    The pressed botanical herbarium frame blends delicate natural flora with raw ceramic-like clay surfaces, creating an understated, cottagecore display piece. The frame face is wrapped in an unglazed, warm white or pale linen clay that features a subtle, matte linen canvas texture pressed into the surface. Embedded directly into the uncured clay borders are real, dried miniature botanicals, including tiny pressed ferns, delicate baby’s breath blossoms, and wild field grass sprigs. The organic botanicals are sealed within the clay surface using thin layers of translucent liquid clay, preserving their natural silhouettes, textures, and subtle autumnal colors permanently. This gentle, nature-inspired frame serves as a wonderful home for outdoor landscape prints, pressed flower wedding keepsakes, and vintage family portraits. The natural, earth-toned aesthetic pairs effortlessly with light oak furniture, raw linen textiles, and sunlit spaces.
    Roll out a sheet of unbleached translucent-white polymer clay to a three-millimeter thickness, laying a piece of clean linen fabric over the top and rolling firmly to emboss a fine woven texture. Remove the linen carefully, trimming the textured clay slab to match the dimensions of a flat wooden frame blank coated with liquid clay. Arrange small, completely flat dried botanical specimens—such as tiny fern leaves and pressed white alyssum flowers—across the textured clay face in an asymmetrical, organic layout. Use a soft silicone brush to paint a paper-thin layer of clear bakeable liquid polymer clay over each dried botanical, sealing the delicate organic materials firmly against the clay slab. Smooth the outer edges of the liquid clay with a damp finger to blend the boundary lines seamlessly into the textured background. Bake the decorated frame on a parchment-lined tray for forty-five minutes at 125 degrees Celsius, keeping temperatures low to prevent scorched botanicals, and seal with matte varnish once cooled.

    10. Sculpted Miniature Food and Confectionery Frame

    10

    Execution Process

    The sculpted miniature food frame introduces delightful kawaii whimsy and vibrant artisan personality through tiny, three-dimensional baked confections arranged around the border. The frame begins with a pastel background—such as soft strawberry pink, mint cream, or butter yellow—that acts as a clean, cheerful foundation. Arranged along the border are miniature, hand-sculpted clay food charms, including tiny croissants, glazed berry donuts, miniature strawberries, and tiny pastel macarons. The tiny treats are secured around the border in an abundant, celebratory arrangement that brings joy to study desks, kitchen memo boards, and children’s vanity spaces. This creative project is especially suited for framing vacation snapshots, birthday celebration prints, and candid portraits with friends. Crafting these miniature confections offers an excellent exercise in fine-detail micro-sculpting, realistic food texturing, and multi-color assembly.
    Cover a flat wooden frame blank with a smooth, two-millimeter layer of pastel strawberry-pink clay using liquid polymer adhesive to anchor the sheet. Sculpt miniature food elements separately: roll tiny tan clay balls into miniature croissants with rolled folds, shape tiny donuts with pink liquid clay icing and micro-sprinkles, and form miniature layered macarons. Use a clean toothbrush and needle tool to stipple realistic pastry textures onto the surfaces of the croissants and donut bases before baking. Position the miniature confections along the bottom rail and lower corners of the pink frame face, pressing them gently into drops of liquid clay adhesive to secure their bonds. Weave tiny, hand-rolled white clay pearls and micro-strawberries between the larger pastries to fill the negative space with colorful detail. Bake the assembled frame on a flat ceramic tile for forty minutes, allowing it to cool fully inside the oven before brushing high-gloss glaze over the miniature fruit and pastry icing.

    Common Beginner Mistakes and How to Avoid Them

    The most critical mistake beginners make when crafting polymer clay photo frames is applying raw clay directly onto unfinished wooden or plastic frames without an adhesive bonding agent. Uncured polymer clay does not form a permanent chemical bond with porous wood or smooth glass during the baking process; without a bonding medium, the cured clay slab will peel away or snap off the frame once cool. Prevent this failure by always coating the frame blank with a thin, uniform layer of bakeable liquid polymer clay or heat-tolerant industrial adhesive before laying down the clay slabs. Another widespread error is failing to remove the glass insert, cardboard backing, and metal turn-buttons before placing the frame in the curing oven. Cardboard can warp and scorch, while sudden temperature changes can cause trapped moisture inside the glass to crack or shatter. Always disassemble the frame blank completely, baking only the bare wooden or metal substrate wrapped in clay. Beginners also frequently roll clay slabs with uneven thickness, which leads to lumpy borders, visible air pockets, and uneven heat distribution during curing. Always use calibrated thickness guide rings on your acrylic rolling pin, rolling smoothly from the center outward to ensure a uniform, planar surface across all four rails. Finally, avoid rushing the cooling process by submerging hot frames in cold water, as thermal shock causes delicate clay bonds to crack and separates the clay layer from the underlying substrate.

    Practical Tips for Better Results

    Achieving clean, boutique-grade results with polymer clay frames requires disciplined hygiene, precise edge alignment, and patient surface finishing. Always clean your hands, acrylic rollers, and cutting blades with isopropyl alcohol or lint-free baby wipes between colors to prevent dark lint and stray pigments from contaminating light pastel or white clay slabs. When mitering the corner seams of textured or patterned borders, use a rigid stainless steel tissue blade held at an exact forty-five-degree angle, smoothing the joined edges gently with a silicone color shaper to make the seam invisible. To eliminate unwanted fingerprints and subtle surface creases from raw clay, smooth the uncured surface gently using a cotton swab lightly moistened with rubbing alcohol before baking. When creating flat, modern designs like terrazzo or checkerboard, wet-sand the cured frame under running water using progressive grits from four-hundred to twelve-hundred, polishing the surface with a soft denim scrap to produce an authentic, stone-like satin sheen. If your design includes raised three-dimensional elements like flowers, ropes, or miniature confections, bake the decorated frame on a bed of raw cornstarch or polyfill batting to prevent the weight of the clay from flattening the back edges against the baking tray. Finally, always calibrate your oven with an independent standing metal thermometer placed directly beside the frame to ensure constant, accurate curing heat.

    Styling, Presentation, or Organization Ideas

    Styling handcrafted polymer clay photo frames effectively depends on creating a cohesive aesthetic relationship between the framed artwork, the frame design, and the surrounding room decor. When displaying frames on open shelves or bedside tables, cluster them in harmonious groupings of three, balancing one bold patterned design—such as a modern checkerboard or faux marble—with two understated neutral frames like the terrazzo slab or twisted rope border. Match the colors within the frame border to subtle accent shades in the photograph itself, such as pairing a botanical vine frame with an outdoor garden portrait to create a unified visual story. For gallery wall installations, mix clay-wrapped frames with traditional thin metal or natural wood frames to introduce rich tactile contrast across the vertical wall space. Present handcrafted clay frames as luxurious, personalized gifts by packaging them inside rigid kraft gift boxes lined with natural crinkle paper, accompanied by a small custom art print and a handwritten care instruction card. In home workspaces, use small clay frames to hold inspirational quotes, mini calendar cards, or delicate watercolor sketches on floating ledges to create an inspiring, modern visual moodboard. These thoughtful presentation methods highlight the unique artisanal qualities of each handmade frame while protecting the clay borders from accidental bumps and direct sunlight.

    Budget or Time Planning

    Creating custom polymer clay picture frames offers exceptional cost efficiency, delivering high-end artisan home decor at a fraction of boutique retail prices. Standard wooden frame blanks can be purchased inexpensively in multipacks, and a standard two-ounce block of polymer clay provides enough material to cover a complete four-by-six-inch frame, keeping material costs remarkably low per finished piece. Maximize your initial crafting budget by purchasing large economy blocks of white, translucent, and black clay, mixing your own custom pastel shades, stone colors, and muted neutrals using tiny pinches of primary pigments rather than buying numerous individual specialty colors. From a time management perspective, an experienced crafter can roll, wrap, and detail a complete picture frame in sixty to ninety minutes once the workspace is organized. To maximize your creative output, implement batch production methods: dedicate one focused afternoon session to sanding and priming ten wooden frame blanks with liquid adhesive, followed by a dedicated session for rolling slabs, cutting patterns, and assembling borders. Consolidate several decorated frames onto large ceramic tiles for a single, efficient baking cycle, saving electrical energy and minimizing oven monitoring time. Dedicate a quiet morning session to wet-sanding, hardware reassembly, and applying protective clear varnishes to ensure that finishing touches are executed with meticulous attention to detail.

    Creative Expansion and Advanced Inspiration

    Once you have mastered foundational slab wrapping and border detailing across these ten frame concepts, you can explore advanced variations that elevate your clay crafting into collectible decorative art. Experiment with mixed-media integrations by pressing raw faceted crystal points, genuine freshwater seed pearls, or flat brass charms directly into the uncured clay borders to add light-reflecting luxury. Explore translucent liquid clay techniques to create realistic stained-glass mosaic frames, layering colored liquid clays between raised polymer wire borders to produce luminous, light-catching effects when placed near sunny windows. You can also explore micro-carving by using fine dental linoleum gouges and rotary tools to carve intricate botanical patterns, geometric mandalas, or personalized family initials into the surface of cured, unglazed clay borders. Crafters interested in functional home organization can scale up these exact techniques to decorate wooden desktop organizers, wall-mounted key hook plaques, decorative light switch covers, and matching jewelry trays to create a cohesive, handcrafted room suite. Incorporating metallic leafing, iridescent mica powders, and delicate antiquing patinas expands the design possibilities even further, transforming humble polymer clay into timeless, heirloom-quality home decor that brings warmth and artistic personality to any interior space.
  • 10 Polymer Clay Wind Chime Ideas

    10 Polymer Clay Wind Chime Ideas

    Polymer clay wind chimes represent an imaginative intersection of sculptural craft, acoustic design, and personalized exterior styling. Working with oven-bake clay allows crafters to produce weather-resistant decorative items featuring customized textures, distinctive color palettes, and balanced kinetic movement. This tutorial examines ten original wind chime concepts designed to enhance living spaces, covered patios, garden pergolas, and sunlit windows. Readers will discover how to prepare durable clay slabs, shape resonant ceramic-style components, pierce balanced suspension points, and string multi-tier assemblies securely. The technical utility of polymer clay lies in its malleability before baking and its dense, durable finish once properly cured. When suspended in gentle breezes, fired clay pendants strike one another to emit delicate, earthy clinking sounds rather than sharp metallic ringing. Learning proper slab thickness, hole-punching spacing, cord selection, and heat management empowers makers to create long-lasting outdoor mobiles that resist cracking. These structured guidelines ensure that beginners and experienced crafters alike can translate basic clay blocks into balanced, kinetic home decor pieces that celebrate authentic handmade craftsmanship.

    Why This Idea Is Trending or Useful

    Kinetic clay mobiles and outdoor wind chimes continue to capture significant attention on modern Pinterest inspiration boards due to their tactile charm and organic appeal. Contemporary interior design often incorporates natural materials and gentle movement, driving interest in creative ideas that soften clean living areas and garden spaces. A handmade wind chime offers clear practical value, serving as dynamic porch decoration, an acoustic patio accent, or a sensory garden marker. Furthermore, polymer clay crafting remains exceptionally beginner friendly; it requires no specialized ceramic kilns, messy pottery wheels, or hazardous glazing chemicals. Crafters can achieve the elevated aesthetic of terracotta, terrazzo, or unglazed stoneware right in a standard home kitchen oven. The modular nature of suspension mobiles makes this an ideal budget ideas project, as makers can utilize clay scrap remnants, raw wooden beads, and basic cordage to produce high-impact designs. This easy project format provides immediate creative satisfaction while offering makers an accessible medium to customize their living environments with timeless, handcrafted charm.

    Materials and Preparation

    Achieving structural durability and crisp acoustic quality in a polymer clay wind chime begins with deliberate materials sourcing and workspace preparation. The primary materials include high-density, professional-grade polymer clay blocks, heavy-duty weather-resistant nylon or waxed cotton cord, split rings, and an assortment of natural unfinished wooden or ceramic beads. Essential utility tools consist of an acrylic rolling pin, rolling depth guides to maintain uniform slab thickness, assorted stainless steel clay cutters, a needle tool or brass hole punch tubes, a ceramic baking tile, and parchment paper. Proper planning begins by thoroughly conditioning the clay through hand-kneading or a clay roller machine until the material is pliable and free of trapped air pockets. Clean the work surface thoroughly with isopropyl alcohol to prevent ambient dust from adhering to light-colored clays. Pre-plan the suspension holes on every pendant while the clay is completely raw, using a three-millimeter hole punch to ensure cords slide through easily after baking. Always bake pieces directly on flat ceramic tiles to prevent curling or warping during the curing cycle.

    1. Minimalist Terrazzo Arch Wind Chime

    1

    Step-by-Step Guide

    The minimalist terrazzo arch wind chime combines mid-century architectural geometry with the playful visual texture of composite stone surfaces. The foundational structure features a large, flat clay rainbow arch that serves as the horizontal suspension bridge for cascading vertical pendants. Suspended beneath the main curved arch are multiple slender vertical bell bars that sway freely, tapping against one another with every breeze. The terrazzo effect is achieved by pressing multicolored, irregularly shaped micro-flecks of cured clay into a neutral ecru or warm stone-colored base slab. This graphic arrangement provides an understated minimalist style that coordinates effortlessly with modern indoor spaces, sunrooms, and covered entryways. The broad silhouette of the arch provides stability against sudden wind gusts, keeping the suspension cords evenly spaced to prevent tangling. The matte, stone-like finish absorbs light softly, turning a basic mobile into a sophisticated piece of contemporary wall art or kinetic ceiling decor.
    Condition a large block of unbleached titanium-white or ecru clay, rolling it into a four-millimeter-thick slab across a flat ceramic tile. Scatter tiny, sliced shards of baked clay in terracotta, forest green, mustard, and charcoal across the surface, rolling firmly over the slab once more to embed the flecks flush into the base. Use an arch-shaped metal cutter or a hand-drawn template to cut a five-inch wide, four-inch tall semi-circular arch frame. Cut four long rectangular clapper bars measuring one inch wide by five inches long from the remaining patterned slab. Use a three-millimeter brass punch to create one hanging hole at the crest of the arch, four evenly spaced holes along the bottom rim, and one hole at the top of each clapper bar. Smooth all cut edges with a water-dampened fingertip or silicone shaper. Bake the components flat on the tile at the manufacturer-recommended temperature for forty minutes. Once cooled, knot durable waxed cord through each bar and secure them to the arch.

    2. Sculpted Terracotta Lotus Petal Mobile

    2

    How to Create

    The sculpted terracotta lotus petal mobile captures botanical fluid lines, transforming organic flower forms into a multi-tiered acoustic garden ornament. This design utilizes concave petal shields arranged in graduated concentric tiers, suspended so that the curved clay edges overlap and collide smoothly in circulating air. Deep terracotta, raw ochre, and warm umber tones echo traditional outdoor pottery, making this piece a natural complement to container gardens and wooden balcony railings. Each petal features subtle hand-scored radial ridges along its surface, mimicking the delicate structural veins found in real water lilies. The slight curvature pressed into each petal before baking adds dimensional depth and enhances the acoustic resonance, creating a hollow, soft clicking sound when the elements tap together. This project teaches crafters how to add three-dimensional forms to flat clay cutouts without requiring complex wire armatures, resulting in a balanced, grounded botanical centerpiece.
    Roll conditioned terracotta-toned clay to a three-millimeter thickness, using guide rings to maintain absolute uniformity across the entire sheet. Use a teardrop or petal cutter to stamp out twelve matching petal discs, dividing them into three distinct size groupings to prepare a graduated hanging drop. Use a dull craft needle or modeling stylus to press fine vertical vein lines from the pointed base outward toward the rounded tip of each petal. Place each raw petal over the curved surface of a heat-safe wooden bead or inside a ceramic spoon bowl to create a gentle, organic concave bend. Punch a two-millimeter hole through the pointed stem end of each curved piece. Cure the shaped petals in the oven on their curved supports to permanently preserve the dimensional forms. Once cooled, tie three lines of weather-resistant nylon monofilament to a central three-inch clay suspension ring, threading four petals onto each line using small stopper knots to maintain equal vertical intervals.

    3. Celestial Moon Phase Kinetic Chime

    3

    Execution Process

    The celestial moon phase kinetic chime incorporates cosmic iconography into a vertical balance mobile that highlights the cyclical transformation of the lunar surface. The layout consists of seven suspended clay discs demonstrating the full progression from waxing crescent through full moon to waning crescent, anchored by a central circular striker plate. Finished in a dusky palette of midnight blue, soft charcoal, and shimmering pearl-white mica accents, this chime brings an air of quiet contemplation to bedroom windows and reading corners. Light surface indentations, applied using natural sea sponges or stippling tools, replicate the cratered landscape of the moon, giving the smooth clay a rich, tactile dimension. When hung vertically, the alternating crescent and orb cutouts twist gracefully in response to indoor thermal currents, catching ambient daylight. The balanced, linear configuration makes it an exceptional choice for narrow, vertical wall spaces or sliding patio door frames.
    Condition dark charcoal clay and mix in a subtle pinch of white translucent clay to produce a soft, marble-veined celestial background. Roll the clay slab to a uniform four-millimeter thickness on parchment paper, smoothing the surface with an acrylic roller. Use a two-inch circular metal cookie cutter to stamp out five identical discs, leaving one whole for the full moon and slicing crescent cuts out of the remaining rounds to create paired moon phases. Stipple the surface of each moon shape with a textured sea sponge, then dust the raised crater rims with a soft fan brush dipped in silver mica powder. Punch vertical alignment holes at the top and bottom edges of each phase, except the bottom terminal piece, which requires only a single top hole. Bake the shapes flat on a smooth ceramic tile for thirty-five minutes. Thread an eight-ply braided nylon cord through each phase, securing them in correct lunar order with simple double overhand knots.

    4. Geometric Bohemian Diamond Wind Bell

    4

    Step-by-Step Guide

    The geometric bohemian diamond wind bell pairs sharp polygonal planes with warm desert tones to produce an eye-catching, angular hanging chime. The central visual element features three interlocking open-diamond frames that nest loosely inside one another, enclosing a solid diamond-shaped pendulum clapper at the core. The color palette draws from southwestern landscapes, combining sand beige, dusty cactus green, and burnt sienna with natural raw brass jump rings. The open-frame construction reduces the overall wind resistance of the mobile, allowing the inner pendulum to swing with greater sensitivity even in faint breezes. The clean, straight lines and defined ninety-degree corners offer a crisp contrast to traditional rounded wind bells, aligning with contemporary geometric home decor trends. This piece functions equally well as a modern indoor window sculpture or an understated acoustic accent suspended from a porch ceiling hook.
    Roll out conditioned sand-colored polymer clay to a thickness of four millimeters on a chilled ceramic work surface. Use a precision craft ruler and an ultra-sharp hobby blade to cut three nested diamond frames, keeping the outer borders at a uniform width of half an inch. From the remaining inner clay diamond, cut a solid diamond pendant to serve as the interior striking clapper. Use a fine needle tool to bore smooth hanging holes through the top and bottom apex of each nested diamond frame. Smooth away all knife drag lines along the sharp polygonal edges using a flat silicone color shaper. Cure all diamond frames flat on an unglazed ceramic tile, covering the pieces with a clean sheet of cardstock to ensure the planes remain flat. After cooling, connect the graduated frames together using large brass jump rings, and suspend the solid central diamond clapper from the interior top apex using a short, flexible cord.

    5. Scandinavian Bell Cone Acoustic Chime

    5

    How to Make

    The Scandinavian bell cone acoustic chime reimagines traditional metal tubular bells into sleek, conical clay pendants that ring softly with movement. The arrangement features three to five inverted conical clay cups suspended at staggered heights from an untreated round birch wood branch. The clean, flared rim of each cone acts as a small soundbox, amplifying the soft tapping sound produced when an internal wooden bead striker collides with the fired clay interior. A restrained, Nordic-inspired palette of bone white, soft sage, and matte dove gray keeps the focus centered on form and silhouette. The clean cones taper smoothly to a narrow apex, shedding rainwater naturally when displayed in semi-sheltered outdoor locations. The contrast between the smooth matte cones, natural light wood beads, and organic driftwood branches makes this design a staple of modern, organic interior decoration and outdoor living spaces.
    Condition bone-white clay thoroughly and roll it into a three-millimeter slab, utilizing guide rails to keep the thickness consistent. Cut out semicircular patterns measuring four inches in diameter using a round cutter, slicing each circle in half with a straight-edge blade. Wrap each semicircle around an oven-safe wooden cone mandrel or a rolled cone of parchment paper, pressing the overlapping straight edges together to form a seamless cone. Smooth the exterior seam using a rounded silicone blending tool until the joint line disappears entirely. Carefully pierce a two-millimeter hole directly through the pointed tip of the cone while it rests supported on the mandrel. Cure the cones standing upright on their bases in the oven for thirty-five minutes to prevent flat spots from forming along the curved sides. Thread a waxed cotton cord through the cone tip, knotting a twelve-millimeter raw wooden bead inside the cone cavity to serve as the functional acoustic striker.

    6. Coastal Sea Glass Disc Driftwood Chime

    6

    Setup Method

    The coastal sea glass disc driftwood chime captures the weathered, frosted beauty of the ocean shoreline through translucent clay formulations and weathered natural wood. This design consists of dozens of smooth, circular clay coins crafted from translucent polymer clay tinted with oceanic shades of seafoam green, aqua, and soft cobalt. The edges of each disc are softened and tumbled by hand before baking, replicating the rounded, frosted profile of glass shaped by ocean waves. Suspended beneath a natural piece of ocean-tumbled driftwood, these thin translucent discs catch passing sunlight, casting colorful marine shadows against nearby walls. Because the discs are rolled thin, they produce a high-pitched, gentle clinking sound when ocean winds cause them to flutter and collide. This lightweight chime is especially suited for sunrooms, coastal balconies, and bright kitchen windows, bringing breezy seaside charm into everyday living spaces.
    Condition translucent polymer clay, blending in tiny pinhead-sized crumbs of turquoise and emerald clay to create translucent sea-tinted colors. Roll the colored translucent clay into a thin two-millimeter slab on a glass cutting mat to maximize the natural light transmission of the cured material. Stamp out thirty small circles measuring one inch in diameter using a metal circle cutter or brass pastry tube. Rub each circle edge gently with a damp thumb to round off sharp corners, producing a natural, tumbled stone silhouette. Punch a small hole two millimeters from the top edge of each disc using a blunt needle tool. Bake the thin discs between two sheets of smooth ceramic tile lined with parchment paper to prevent curling and ensure absolute flatness. After curing, string three to four discs along multiple lengths of clear fishing line, spacing them with small seed beads, and tie the strands securely to a piece of driftwood.

    7. Textured Botanical Herbarium Leaf Chime

    7

    Execution Process

    The textured botanical herbarium leaf chime uses direct nature casting techniques to transfer the fine venation and textures of real plant leaves into permanent clay ornaments. The design features an array of leaf-shaped clay pendants suspended in a circular arrangement from a clay embroidery-style hoop, swaying like falling leaves in an autumn breeze. Using deep forest green, sage, moss, and warm olive clay gives the chime an authentic botanical aesthetic that blends into outdoor garden spaces. Real fresh leaves, such as sage, mint, or fern fronds, are pressed firmly into the raw clay to leave detailed botanical imprints across every pendant. When winds move the mobile, the overlapping leaf forms clink together softly while rotating, displaying the detailed leaf veins on their surfaces. This design bridges the gap between natural gardening elements and handmade home decor, serving as an attractive acoustic accent for garden arches, greenhouse interiors, and outdoor dining pergolas.
    Condition earthy olive-green clay and roll it out into a four-millimeter slab across a non-stick silicone craft sheet. Gather fresh, sturdy botanical leaves with prominent raised underside veins, placing them vein-side down across the rolled clay surface. Roll firmly over the leaves with an acrylic rolling pin to press the natural vein structures deep into the clay, then peel the plant leaves away cleanly. Cut around each pressed leaf impression using a fine craft knife, following the natural serrated and lobed contours of the foliage. Punch a hole through the stem base of each clay leaf using a hollow leather hole punch tool. Bake the botanical cutouts on a tile dusted with cornstarch to preserve their textured undersides without leaving flat, shiny pressure marks. Once cooled, wash away any loose cornstarch, and tie each leaf pendant to a central round clay suspension ring using natural unbleached hemp cord.

    8. Japanese Wind Bell with Calligraphy Sail

    8

    How to Make

    The Japanese wind bell with calligraphy sail draws inspiration from traditional Furin bells, pairing a domed clay bell with a fluttering paper or fabric windcatcher hanging beneath. The centerpiece is a smooth, inverted hemispherical clay dome, finished in minimalist neutral tones such as chalk white, charcoal, or soft ceramic gray. Suspended from the interior center of the dome is a small clay bead clapper that connects directly to a long, slender paper sail hanging below the rim. As breezes push against the broad surface area of the paper sail, it activates the internal clapper, which taps against the clay bell rim with clear acoustic rhythm. The juxtaposition of a solid clay bell with a fluttering, lightweight paper pendulum demonstrates how balanced weight distribution optimizes wind movement. This chime works wonderfully in outdoor courtyards, Zen-inspired gardens, and quiet patio corners, producing a peaceful acoustic presence that marks passing breezes.
    Condition porcelain-white clay and roll it into a three-millimeter slab, cutting out a four-inch diameter circle using a round cookie cutter. Drape the raw clay disc over an oven-safe glass or ceramic sphere, smoothing the darts and folds carefully with a damp sponge to form an uncreased, hollow hemispherical cup. Use a needle tool to pierce a small three-millimeter hole through the exact center of the dome while it remains on its baking form. Cure the dome in the oven on the glass support to maintain its circular curvature. For the wind sail, cut a strip of heavy-weight, water-resistant washi paper measuring two inches wide by eight inches long, writing a favorite phrase or brushstroke motif down its length. Thread a strong nylon cord through the bell dome, knotting a round clay bead inside the bell at rim level, and tie the washi paper sail to the remaining cord tail below.

    9. Modernist Abstract Cutout Suncatcher Chime

    9

    Step-by-Step Guide

    The modernist abstract cutout suncatcher chime merges Bauhaus art shapes with kinetic acoustic design, creating an expressive, museum-inspired hanging sculpture. This concept incorporates varied asymmetrical geometric shapes, such as hollow squiggles, curved kidney forms, and pierced discs, that nest visually without touching when stationary. Finished in an earthy, high-contrast palette of ochre, cobalt, burnt peach, and raw linen, this chime functions as a bold visual statement piece for modern living spaces and patio areas. The deliberate inclusion of negative space within the hollow cutouts keeps the mobile lightweight, allowing the shapes to glide and pivot on their hanging lines. When ambient air currents pick up, the irregular forms collide in unpredictable rhythms, producing an appealing acoustic presence. This project provides an ideal canvas for crafters interested in modern abstract design, turning simple clay cuts into a dynamic, kinetic ceiling sculpture that catches the eye.
    Condition separate blocks of cobalt blue, ochre yellow, and terracotta clay, rolling each color into an even four-millimeter slab on parchment paper. Sketch several abstract mid-century shapes onto cardstock, cut them out to serve as templates, and trace them onto the clay slabs with a sharp scalpel. Cut out interior negative spaces within the shapes, such as circular windows or organic slots, using smaller geometric craft cutters. Smooth the outer and inner contours with a damp foam sponge to create soft, rounded edges typical of cast ceramic sculpture. Punch two-millimeter suspension holes at the balance points of each abstract shape, testing the balance by supporting the piece on the tip of a needle. Bake the shapes flat on a smooth ceramic tile for forty minutes. Assemble the mobile by stringing the shapes together with fine-gauge brass wire links, joining the pieces in an asymmetrical, balanced vertical drop.

    10. Tiered Ombre Raindrop Mobile Chime

    10

    Execution Process

    The tiered ombre raindrop mobile chime uses gradual color shifts and fluid teardrop geometry to produce an acoustic display inspired by gentle spring rain showers. The design utilizes multiple sculpted clay raindrops suspended from a circular hoop, graduated in color from pale sky blue down to deep navy. Each raindrop is crafted with a flat back and a softly rounded front face, ensuring the components remain stable while turning in the wind. The drops hang in a spiral cascade, so that each tier collides with the row below as the mobile rotates. This graduated spiral layout maximizes the surface contact between pendants, generating frequent, gentle tapping sounds even in light indoor breezes. The ombre color transition gives the mobile an intentional, polished look that fits beautifully into nurseries, modern bathrooms, and breezy porch settings.
    Create an ombre color progression by blending pure white polymer clay with small, increasing amounts of cyan blue clay, dividing the mix into four distinct blue values. Roll each color batch into a three-millimeter slab, keeping the surfaces smooth and uniform. Use a teardrop cutter to stamp out five raindrops from each of the four color slabs, producing twenty drops in total. Soften the perimeter edges of each raindrop by gently rolling a smooth glass rod across the cut boundaries. Punch a small suspension hole through the tapered top of each raindrop using a needle tool. Bake all teardrops on a ceramic tile lined with parchment paper, allowing them to cure thoroughly for thirty minutes. Cut a four-inch circular clay suspension ring, pierce twenty evenly spaced holes around its perimeter, and bake it until rigid. Tie the raindrops to the ring using clear monofilament line, dropping each color tier an inch lower to form a continuous downward spiral.

    Common Beginner Mistakes and How to Avoid Them

    A frequent mistake beginners make when creating polymer clay wind chimes is rolling the clay slabs too thin, resulting in brittle pendants that fracture upon impact. Slabs rolled under three millimeters often lack the structural density required to withstand repeated outdoor wind collisions. To ensure durability, always maintain a slab thickness between three and five millimeters using thickness guides or acrylic rolling rings. Another common misstep is punching suspension holes too close to the outer perimeter, which creates weak points that tear under the friction of hanging cords. Always position hanging holes at least five millimeters away from any raw edge to provide an adequate clay margin. Beginners also frequently use cheap sewing thread or thin jute twine for outdoor assembly, which degrades rapidly under ultraviolet solar radiation and moisture. Instead, use weather-resistant materials like braided nylon, fishing monofilament, or marine-grade waxed polyester cordage. Finally, under-baking clay leaves the core soft and vulnerable to snapping; always cure clay for the full duration specified by the manufacturer, using an oven thermometer to verify internal temperatures.

    Practical Tips for Better Results

    Achieving professional, resonant results with polymer clay wind chimes requires attention to clay density, hole placement, and balanced stringing techniques. Choose firm, professional-grade polymer clay brands rather than soft modeling clays; firmer clays cure with a higher Shore D hardness rating, resulting in a cleaner, more resonant clinking sound when struck. To ensure smooth, uniform holes that prevent cord wear, punch holes into raw clay using hollow brass tubing, twisting the tube as you press down to remove the clay core cleanly. If small surface fingerprints appear during assembly, smooth the uncured clay with a cotton swab dipped in isopropyl alcohol to dissolve light surface imperfections before baking. To achieve a modern, ceramic matte finish, sand the cured clay pieces underwater using fine four-hundred to eight-hundred grit wet-or-dry sandpaper. Finally, when assembling multi-tier mobiles, use high-quality split jump rings between the clay pieces and cord lines; this gives the pendants complete freedom of motion, allowing them to swing and strike cleanly without cord binding.

    Styling, Presentation, or Organization Ideas

    Styling handmade polymer clay wind chimes effectively elevates their visual impact, integrating them into the surrounding home or garden architecture. When hanging chimes on covered porches or verandas, suspend them at eye level near open corners where gentle air currents circulate without exposing the pieces to violent roof runoff. Pair earthy terracotta or terrazzo chimes with potted hanging plants, such as trailing string-of-pearls or ivy, allowing the green foliage to drape naturally around the suspended clay pendants. For interior styling, hang minimalist kinetic chimes near air vents, sunny windows, or reading corners, where passing movements create gentle, relaxing motion. If presenting these handcrafted chimes as gifts, wrap the individual pendants in soft tissue paper within a flat presentation box, securing the top cord with a branded cotton ribbon to prevent the suspension lines from tangling during transit. Photographers capturing chimes for craft inspiration portfolios should shoot under soft morning daylight against clean, neutral backgrounds like white limewash walls or natural wood siding, highlighting the fine surface textures and rhythmic shadows.

    Budget or Time Planning

    Creating custom polymer clay wind chimes is an economical craft project that can be completed efficiently through organized assembly-line methods. Polymer clay remains an affordable DIY medium because leftover scraps and marbled remnants can be gathered, re-rolled, and used as interior cores or terrazzo chips, minimizing material waste. Sourcing basic assembly hardware—such as wooden beads, jump rings, and waxed cord—in bulk multipacks from craft distributors reduces the per-unit cost of every chime you build. When planning your schedule, divide the crafting process into distinct stages: spend the first evening conditioning, color blending, cutting shapes, and punching holes. Dedicate the second session to baking, cooling, and wet-sanding the fired components to achieve smooth, clean edges. Reserve the final session for stringing cords, balancing suspension rings, and tying finishing knots. Completing the project in organized batches allows you to produce a cohesive collection of three to five unique chimes over a single weekend, maximizing your creative output while maintaining high craftsmanship standards.

    Creative Expansion and Advanced Inspiration

    Once you feel comfortable with foundational chime assembly and slab shaping, you can explore advanced variations that combine mixed media, complex acoustic structures, and interactive functional elements. Experiment with embedding metallic leaf foils, such as genuine silver or variegated copper leaf, directly into the clay slabs before cutting to introduce shimmering reflective highlights that catch passing sunlight. You can also combine polymer clay pendants with natural sound elements, such as dried bamboo hollow reeds, sea glass shards, or brass bell shells, creating layered acoustic tones with every strike. Another compelling direction is designing multi-tiered chandelier chimes using concentric metal wire rings, suspending dozens of graduated clay coins to form an intricate, swirling outdoor mobile. For evening interest, try integrating photo-luminescent glow-in-the-dark polymer clays into select pendants, creating a subtle, glowing celestial silhouette after dusk. Exploring these advanced mixed-media ideas pushes the boundaries of conventional clay crafting, transforming simple hanging ornaments into sophisticated works of kinetic acoustic art.
  • 10 Birthstone-Inspired Polymer Clay Jewelry Ideas

    10 Birthstone-Inspired Polymer Clay Jewelry Ideas

    Birthstone-inspired polymer clay jewelry combines geological color inspiration with modern design, yielding accessible handcrafted accessories. This DIY tutorial provides a step by step guide to creating ten jewelry concepts modeled after natural gemstones. Readers will learn how to mimic authentic mineral structures—including deep garnet, raw emerald, translucent amethyst, and fiery opal—using oven-bake clay, mica powders, and translucent conditioning mediums. Beyond simple color matching, this guide covers slab rolling, precise shape cutting, progressive wet sanding, and hardware assembly. Transforming polymer clay into faux mineral treasures provides fine-motor control practice and an understanding of material composition. These handcrafted jewelry designs offer lightweight, skin-friendly alternatives to heavy natural stones, making them ideal for everyday wear or personalized gift collections. As an easy project medium, polymer clay lets beginners produce gallery-quality pieces on accessible budget ideas. Exploring these creative ideas allows crafters to adapt timeless gemstone aesthetics into wearable accessories that maintain balanced proportions and structural durability.
    Why Faux Gemstone Jewelry Is Trending and Practical
    The popularity of birthstone-inspired polymer clay jewelry across contemporary design platforms stems from its customization potential, lightweight comfort, and sustainable accessibility. Authentic fine gemstones and mineral specimens are often heavy, fragile, and costly to source and cut. Polymer clay replicates the visual depth, veining, and internal refractions of precious stones without specialized lapidary equipment. The minimalist style favored in modern jewelry design complements simulated minerals, especially when paired with simple geometric cuts and brushed metallic hardware. For DIY enthusiasts, birthstone motifs provide immediate narrative value, celebrating birthdays, anniversaries, and personal milestones through recognizable color palettes. Clay formulations allow complete control over color saturation, translucency, and surface sheen, enabling crafters to recreate both rough-cut raw crystals and polished cabochons. Because finished clay components weigh only a fraction of natural rock, large statement pendants and drop earrings remain comfortable for all-day wear. This project allows beginners to build wearable jewelry collections that look sophisticated while remaining economical and durable.
    Essential Materials, Tools, and Advance Preparation
    Successful imitation of crystalline minerals requires intentional material selection, a clean workspace, and specialized sculpting tools. Key materials include oven-bake polymer clay in translucent, opaque white, and saturated primary shades, along with interference mica powders, gold leaf foil, and liquid polymer clay. Essential tools include an acrylic roller or manual clay conditioning machine, rigid and flexible tissue slicing blades, shape cutters, and a ceramic baking tile. For finishing, gather wet-or-dry silicon carbide sandpaper in 400, 800, and 1200 grits, an acrylic water basin, a hand-twist pin vise drill, jewelry pliers, and hypoallergenic hardware findings. Preparation begins with workspace hygiene: wipe all surfaces, tools, and hands with isopropyl alcohol to prevent lint from contaminating translucent clay. Condition the clay thoroughly through repeated folding and rolling to eliminate trapped air pockets and ensure optimal plasticizer distribution. Calibrate your baking oven using an independent standing oven thermometer, as consistent curing temperatures are critical for activating clay translucency without scorching pale mineral tints.

    1. Deep Garnet Faceted Drop Earrings

    1

    Step-by-Step Guide
    The deep garnet faceted drop earring captures the moody elegance of January’s pyrope gemstone, showcasing a rich wine-red core with geometric light-catching bevels. This design relies on blending translucent clay with deep crimson and black pigments to achieve optical depth. When ambient light passes through the tapered perimeter, the piece shifts from near-black to a glowing ruby hue, mimicking genuine garnet. The geometric hexagonal or teardrop silhouette keeps the presentation modern, moving away from traditional claw-set gemstones toward minimalist sculptural art. The flat facets along the face reflect overhead illumination, providing a subtle sheen that enhances evening and formal attire. Because garnet symbolism connects to strength and protection, this piece serves as a thoughtful personalized gift or an everyday talisman. The compact, balanced dimensions ensure the drops hang straight without swinging excessively or tugging on delicate earlobes.
    To create the faceted stones, condition two parts translucent clay with one part deep crimson and a pea-sized dot of raw black clay until fully blended. Roll the conditioned mixture into a thick, uniform ten-millimeter slab on your ceramic tile. Place the slab into the refrigerator for twenty minutes; chilling hardens the plasticizer, allowing you to slice clean, razor-sharp geometric facets without squishing the form. Using a rigid tissue blade, cut the slab into two matching elongated octagons measuring one inch in length. Carefully bevel the front outer edges by slicing thin slivers away at a thirty-degree angle, creating an elevated central table and angled facets that resemble a rose-cut gem. Bake the faceted drops on the tile at 275 degrees Fahrenheit for forty minutes. Once fully cooled, wet-sand the facets progressively using 600-grit and 1200-grit sandpaper submerged in water to produce a silky satin sheen, then drill the top edge with a pin vise and attach 14k gold-filled ear wires.

    2. Luminous Amethyst Geode Slice Pendant

    2

    How to Create
    The luminous amethyst geode slice pendant mimics the crystalline concentric growth rings found inside natural February quartz geodes. This creative project utilizes an layered bullseye cane composed of translucent purple, deep royal violet, opaque white, and sparkling lavender clay. When sliced cross-sectionally and textured around the perimeter, the clay replicates the crystalline center, pale quartz rind, and rough exterior matrix rock of an authentic geode specimen. Fine iridescent purple glitter or mica powder added to the interior chamber catches light, creating an authentic crystalline sparkle. Paired with a delicate silver chain, the organic silhouette sits comfortably along the collarbone, functioning as an eye-catching focal piece for casual knitwear or open blouses. The geological theme brings earthy elegance to everyday wardrobes while highlighting the detailed patterning possible with polymer clay.
    Begin by rolling four thin sheets of clay: one deep purple, one lavender mixed with fine glitter, one translucent white, and one slate gray for the outer rock crust. Form a small cylinder of translucent purple, wrap it sequentially in the glitter lavender, the translucent white, and finally the gray sheet, compressing the combined cane gently to remove air pockets. Flatten the circular cane into an irregular, organic oval shape to mimic a natural geological formation. Use a flexible tissue blade to slice four-millimeter cross-sections from the cane, exposing the layered rings. Lay the slices on a ceramic tile and texture the outer gray rim using a stiff wire brush or needle tool to simulate rough, weathered stone. Dust the inner purple core lightly with violet mica powder to enhance the crystalline shimmer. Bake at 275 degrees Fahrenheit for thirty-five minutes. After curing, use a 1.2 mm drill bit to pierce the upper rim, insert a sterling silver jump ring, and suspend the pendant from an eighteen-inch chain.

    3. Raw Aquamarine Crystal Stud Earrings

    3

    Execution Process
    The raw aquamarine crystal stud captures the icy pale blue clarity associated with March’s natural beryl formations. Unlike high-gloss cut stones, this concept highlights the beauty of rough-cut, unpolished mineral specimens straight from the earth. The design uses translucent clay tinted with a trace of cobalt blue and seafoam green, shaped into small, asymmetrical crystal clusters with sharp edges and organic fractures. A dusting of interference blue mica along select faces enhances the subtle color shifts found in untreated natural aquamarine. Mounted directly on low-profile surgical steel posts, these understated studs provide an easy project for minimalist styling. Their compact footprint sits neatly within the earlobe contour, adding a fresh, cool-toned accent that coordinates with linen garments, denim jackets, and neutral summer palettes.
    To construct the raw crystals, blend four parts translucent clay with a tiny speck of opaque turquoise clay, maintaining high transparency so light can travel through the cured piece. Roll the pale seafoam mixture into an irregular six-millimeter rod. Using a scalpel or precision craft knife, make random angled cuts along the length of the rod, carving sharp, uneven planes and points that mimic natural hexagonal crystal terminals. Slice off two matching six-millimeter clusters for the earring pair. Lightly brush one side of each cluster with pearl interference powder to create an optical sheen. Transfer the raw crystals onto a ceramic tile and bake at 275 degrees Fahrenheit for thirty minutes; tent the pieces loosely with aluminum foil to protect the light, translucent clay from oven heat discoloration. After cooling, clean the flat backs with isopropyl alcohol, abrade them slightly with 400-grit sandpaper, and bond surgical steel flat-pad posts to the clay using two-part jewelry epoxy.

    4. Gilded Faux Diamond Slab Necklace

    4

    Step-by-Step Guide
    The gilded faux diamond slab necklace translates the brilliance of April’s birthstone into an artistic statement collar, using translucent clay infused with genuine metal leafing. Because pure white clay appears opaque and flat, this piece relies on bleached translucent clay embedded with micro-flakes of silver and platinum leaf. When conditioned and cured, the clay creates a clear, luminous matrix filled with floating metallic inclusions that capture and refract surrounding light. The slab is cut into an elongated rectangular or bar pendant, combining modern architectural geometry with timeless sparkle. Framing the pendant with hand-gilded edges adds high-contrast warmth that elevates the simple shape into a sophisticated modern design. This lightweight necklace rests flat against the chest, providing an accessible, cruelty-free interpretation of diamond jewelry that pairs naturally with both work blazers and cocktail dresses.
    Start by rolling out a three-millimeter slab of translucent clay using an acrylic roller over a smooth glass surface. Lay a full sheet of silver leaf foil directly over the raw slab, tapping it flat with a dry brush. Fold the clay in half, pass it through your conditioning machine, and repeat this fold-and-roll process three times until the silver foil breaks into thousands of tiny, suspended metallic flecks distributed throughout the translucent base. Smooth the slab onto a clean tile, checking that no air bubbles remain trapped underneath. Use a metal ruler and a straight tissue blade to cut a clean bar pendant measuring two inches long by one-half inch wide. Bake the bar at 275 degrees Fahrenheit for thirty-five minutes, allowing it to cool slowly inside the oven. Sand the flat faces up to 1200 grit for optimal transparency. Coat the perimeter edges with gold-leaf sizing adhesive, apply 24k gold foil along the border, seal with a water-based varnish, and connect the bar to a split chain using corner-drilled jump rings.

    5. Raw-Cut Emerald Branch Brooch

    5

    Execution Process
    The raw-cut emerald branch brooch brings a botanical, woodland aesthetic to May’s birthstone, pairing rich forest-green hues with organic metallic branches. This concept features three rough-textured emerald-toned crystal nuggets nestled within an entwined, gold-rubbed polymer branch armature. Natural emeralds often display deep garden inclusions known as “jardin”; this design recreates that internal complexity by mixing translucent green clay with flecks of dark moss wool fibers or burnt umber clay particles. The deep green stones stand out against the warm metallic branch setting, creating a historical, heirloom feel reminiscent of Art Nouveau botanical jewelry. Worn on a wool coat lapel, a chunky knit scarf, or a canvas tote bag, this brooch adds rich color and handmade character to fall and winter layering.
    To make the faux emeralds, blend three parts translucent clay with one part emerald green and a pinhead-sized inclusion of raw sienna to mimic natural iron inclusions. Tear the clay into three irregular pea-sized nuggets using your fingers, keeping the surfaces rough and fractured rather than smooth. Roll a thin snake of metallic bronze clay to form the structural branch base, twisting and splitting the ends into delicate woody forks that wrap securely around the bases of the green nuggets. Press the stones firmly into the clay branch sockets, using a drop of bakeable liquid clay at each contact joint to ensure a durable chemical bond during firing. Highlight the bark texture of the bronze branch by lightly brushing metallic gold powder across the raised ridges with a soft fingertip. Bake the assembled brooch on a tile at 275 degrees Fahrenheit for forty minutes. After cooling, secure a two-inch locking metal brooch pin to the reverse side using epoxy and a reinforcing clay patch.

    6. Luminous Pearl and Iridescent Moonstone Ring

    6

    Setup Method
    The luminous pearl and moonstone ring celebrates June’s traditional birthstones through delicate surface marbling and pearlescent finishes. This design features a domed, oval cabochon that mimics the blue-and-silver adularescence of fine moonstone, set upon a sculptural polymer clay ring shank. The optical effect is created by blending pearl mica clay with a hint of translucent white and interference blue pigment, producing a stone that appears to shift from milky white to ghostly blue under different lighting angles. The smooth, domed cabochon contrasts with a textured, antiqued gold clay bezel that cradles the faux gem securely. This low-profile ring provides an easy, comfortable statement piece that highlights the smooth finish achievable with proper clay polishing. Its soothing neutral tones make it a versatile accessory that coordinates with everyday minimalist wardrobes and bohemian styles alike.
    Begin by rolling equal parts pearl clay and translucent white clay into two smooth rods, twisting them together loosely to create broad, sweeping marble layers without over-blending. Roll the twisted clay into a smooth ball, press it onto a ceramic tile, and shape it into an eight-millimeter oval cabochon using your fingertips and a rounded wooden modeling tool. Lightly dust the top dome with interference blue mica powder using a soft cosmetic brush to produce the signature moonstone glow. For the ring base, wrap a snake of antique gold clay around an oven-safe wooden ring mandrel calibrated to your finger size, shaping a small circular bezel cup on top to receive the cabochon. Seat the raw moonstone cabochon firmly into the golden clay bezel, using a needle tool to press the bezel rim snugly around the stone. Bake the entire ring on the mandrel at 275 degrees Fahrenheit for forty minutes. Once cooled, polish the cabochon with a soft cotton cloth and seal it with a satin gloss glaze.

    7. Ruby Red Vintage Cocktail Drop Earrings

    7

    Step-by-Step Guide
    The ruby red vintage cocktail drop earrings honor July’s birthstone with an art deco silhouette and saturated crimson color. This design utilizes a two-tier construction featuring an upper square stud connected to a dramatic, elongated diamond-shaped drop. The faux ruby is formulated by combining rich crimson clay with translucent red and a dusting of fine magenta mica, giving the baked pieces a deep, multi-dimensional luster. The perimeter of each geometric piece is stamped with a fine beaded border using a leather-stamping tool, mimicking vintage milgrain metalwork. This combination of deep red and detailed borders makes the earrings a striking choice for evening wear, holiday parties, and anniversary dinners. The lightweight clay components ensure that even an expansive two-inch drop hangs comfortably throughout the evening without stretching delicate ear piercings.
    To craft the ruby components, mix two parts translucent clay with two parts cadmium red and a half-part magenta clay, passing the mixture through a clay machine to yield a three-millimeter slab. Dust the slab with red metallic pigment, smoothing it evenly across the surface with an acrylic roller. Cut two small eight-millimeter squares for the studs and two large one-and-a-half-inch diamond drops using clean metal cutters. Press a small, round-tipped stylus or milgrain wheel around the perimeter of each shape to impress a decorative border. Bake the cut pieces flat on a tile at 275 degrees Fahrenheit for thirty-five minutes, keeping them covered with a parchment tent to preserve the vivid red hue. After cooling, use a hand-twist pin vise to drill connection holes near the bottom corner of the studs and the top point of the diamond drops. Link the tiers together using four-millimeter gold jump rings, and attach titanium posts to the back of the studs with jewelry epoxy.

    8. Olive Peridot Geometric Pendant

    8

    How to Create
    The olive peridot geometric pendant highlights the fresh lime-green tones of August’s birthstone through modern design and asymmetry. Peridot is recognized for its yellow-green coloration; this design captures that hue by combining translucent clay with bright chartreuse and warm amber pigments. The finished stone is shaped into a crisp triangular or trapezoidal pendant with flat planes, framed on one side by an opaque, brushed-slate gray clay accent. This two-toned, mixed-material look bridges natural geological color with contemporary graphic styling. The pendant hangs from a minimalist leather cord or a delicate gold bar chain, functioning as an earthy, grounding accent piece. Its olive-green palette complements autumnal neutrals, oatmeal linens, and crisp white shirts, making it a versatile seasonal transition accessory.
    To make the peridot element, condition three parts translucent clay with one part lime green and a small speck of translucent yellow clay. Roll the conditioned mixture into a thick, uniform five-millimeter slab on a smooth tile. Cut an asymmetrical triangle measuring one and a half inches along its longest edge using a craft knife and a straight metal guide. Smooth the edges gently with an alcohol-dampened foam swab to remove any slicing burrs. Cut a matching, slender slate-gray accent strip and press it flush against the left vertical edge of the peridot triangle, securing the seam with light fingertip pressure. Bake the pendant at 275 degrees Fahrenheit for thirty-five minutes. Once cooled, wet-sand the entire flat surface using 400-grit, 800-grit, and 1200-grit silicon carbide sandpaper in a shallow bowl of water to achieve a soft matte stone finish. Drill a horizontal channel through the top edge using a pin vise, and thread a slender cord through the opening.

    9. Royal Sapphire Teardrop Hairpin

    9

    Execution Process
    The royal sapphire teardrop hairpin adapts September’s birthstone into an elegant hair accessory suitable for updos, French twists, and braided crowns. This design features a deep cobalt blue teardrop cabochon that captures the velvety, semi-translucent depths of fine Kashmir sapphires. The faux sapphire is created by layering translucent blue clay over an opaque navy foundation, creating a rich color gradient that lightens toward the center. The teardrop cabochon is framed by a delicate polymer filigree border dusted with antique silver powder to mimic vintage platinum jewelry settings. Permanently bonded to a sturdy metal bobby pin or hair fork, this piece holds hair securely while providing a refined touch of jewel-toned color. Its deep blue hue stands out against various hair shades, making it a popular choice for bridesmaid gifts, winter weddings, and special events.
    To craft the sapphire cabochon, mix two parts translucent clay with one part royal blue clay, rolling it into an eight-millimeter tapered teardrop dome. Form a small backing disc from solid dark navy clay and press the translucent blue teardrop on top, allowing the deeper navy to show through the edges for added depth. Roll an ultra-thin thread of silver-colored clay and twist it into a two-strand rope. Wrap this twisted rope around the base of the blue teardrop to form an ornamental bezel, pressing the ends together at the tapered point. Lightly dust the silver border with bright aluminum powder using a small watercolor brush to give the border a polished platinum appearance. Bake the assembled piece on a tile at 275 degrees Fahrenheit for thirty-five minutes. Once cooled, roughen the back of the clay and the pad of a heavy-duty steel hairpin with 400-grit sandpaper, apply a dab of two-part epoxy, and clamp the pieces together for twelve hours to ensure a strong bond.

    10. Fiery Opal Mosaic Statement Choker

    10

    Setup Method
    The fiery opal mosaic statement choker celebrates October’s birthstone through an intricate mosaic technique that mimics natural precious opal. Opals display flashes of pink, green, yellow, and blue as light moves across their surface; this design replicates that play of color by embedding micro-shards of iridescent cellophane film inside a milky, semi-translucent clay base. When sliced and assembled into a collar or bib pendant, the overlapping inclusions reflect rainbow hues with every movement. Setting the mosaic panels against an understated black or nude base keeps the iridescent effect front and center. Suspended from a modern choker wire or satin ribbon, this statement piece adds color and artistic flair to open-collar necklines, plain knit tops, and evening wear.
    To construct the faux opal material, chop sheets of iridescent crinkle craft film into tiny fragments measuring between one and two millimeters. Condition a block of translucent clay until soft, and fold the chopped iridescent flakes into the clay, distributing the cellophane evenly throughout the mass. Form the clay into a solid rectangular block, wrap it in wax paper, and chill it in the freezer for ten minutes to firm up the matrix. Using a sharp tissue blade, shave paper-thin slices from the block to reveal the embedded iridescent flakes. Press these patterned slices onto a two-millimeter backing sheet of white clay, rolling over the surface through parchment paper to create a smooth, unified slab. Use geometric cutters to produce five matching trapezoid tiles for the choker. Bake the tiles at 275 degrees Fahrenheit for thirty-five minutes. After cooling, sand the tiles up to 1200 grit under running water to clear away surface haze, drill corner holes, and link the panels together with jump rings to complete the collar.
    Common Beginner Mistakes and How to Avoid Them
    The most frequent error when creating birthstone polymer clay jewelry is underbaking, which leaves the polymer chains partially fused and results in weak, brittle pieces that break easily. Novice crafters often reduce baking times out of fear of scorching pale, translucent colors; however, translucent clay requires a full thirty-five to forty minutes at 275 degrees Fahrenheit to achieve structural durability and visual clarity. Prevent surface scorching by tenting an aluminum foil pan over the baking tile to shield the clay from direct oven heating elements. Another common mistake is introducing air bubbles during color conditioning, which expand into unsightly surface blisters during baking. To prevent trapped air, always pass clay through your roller with the folded edge entering the machine first. Additionally, avoid skipping progressive wet sanding steps; jumping from a rough 400-grit paper directly to a fine polish leaves visible scratch patterns across the faux stone face. Always progress through 400, 800, and 1200 grits, keeping the sandpaper wet to flush away clay dust and create a smooth, stone-like finish.
    Practical Tips for Better Results
    Refining small details elevates simulated gemstone clay jewelry from casual crafts to polished, retail-ready accessories. When mixing custom mineral shades, use translucent clay as your primary base rather than white; opaque white clay flattens the appearance of faux gems, while translucent clay allows light to penetrate into the piece, creating the natural depth seen in real crystals. Clean your tools, hands, and cutting surfaces with isopropyl alcohol between color changes to prevent dark pigments or stray lint from contaminating lighter stones like aquamarine and diamond. When cutting geometric facets or straight cabochon edges, chill the raw clay block in the refrigerator for fifteen minutes beforehand to firm up the material, preventing the blade from compressing the clay during slicing. For assembly, use a manual pin vise rather than a motorized rotary tool to drill connection holes, as high-speed friction can melt the cured plasticizer and cause messy burrs. Finally, applying a microcrystalline wax or a light coat of UV resin to finished pieces enhances optical clarity, mimicking the polished surface of high-end faceted gems.
    Styling, Presentation, and Display Ideas
    Thoughtful presentation highlights the craftsmanship of handmade birthstone jewelry, enhancing its appeal for gifts, portfolio photography, and craft displays. When photographing simulated mineral pieces, use textured, natural backdrops such as raw slate slabs, tumbled travertine tiles, or rough linen fabrics. The contrast between rough rock textures and smooth, polished clay surfaces reinforces the geological inspiration of the collection. For gift packaging, mount earrings and pendants on heavy cardstock debossed with the corresponding birth month, astrological sign, and mineral properties, providing a boutique-style unboxing experience. When styling these pieces with clothing, pair rich jewel tones—such as garnet red and sapphire blue—with neutral garments like oatmeal knits, camel coats, or charcoal blazers to let the colorful accessories stand out. For craft fairs or home organization, arrange the jewelry across tiered wooden displays or inside vintage velvet-lined jewelry trays, grouping pieces by calendar month to make it easy for shoppers to browse and find their personal birthstones.
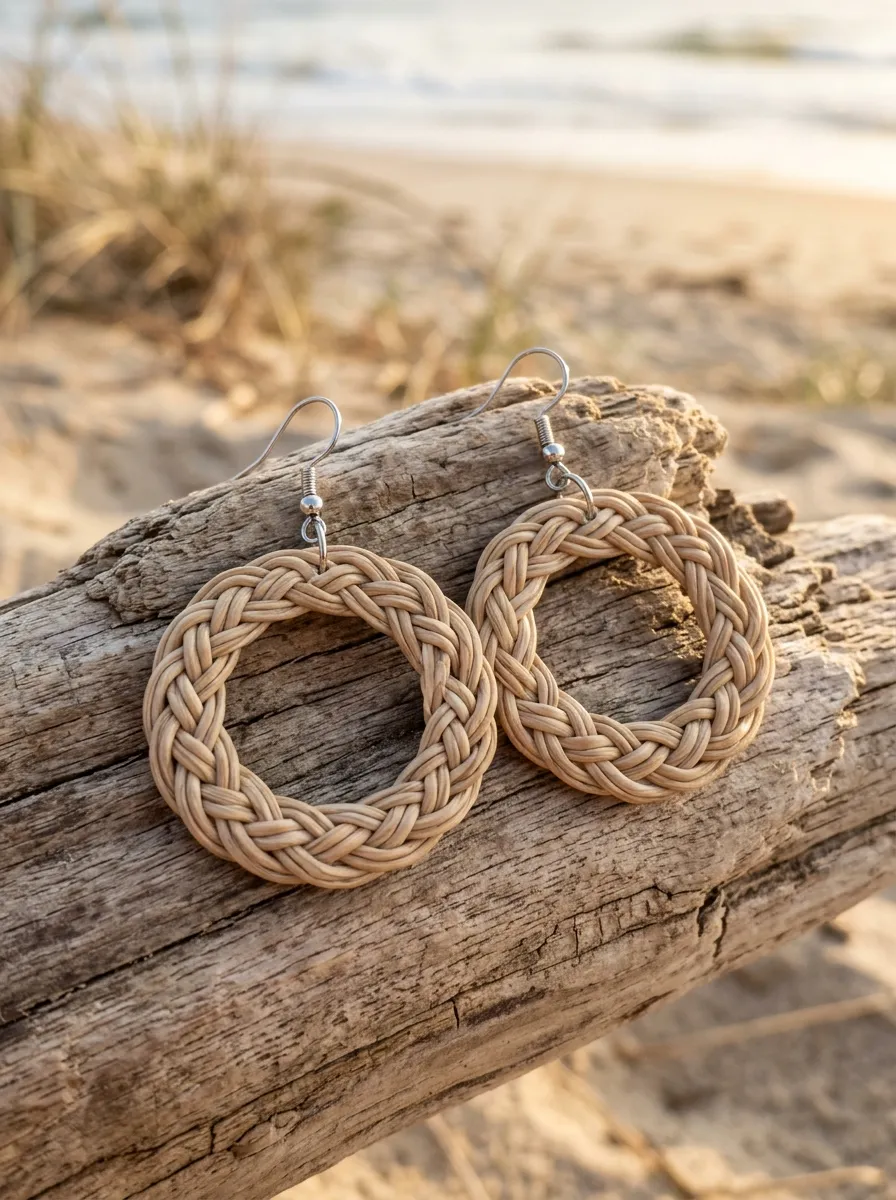
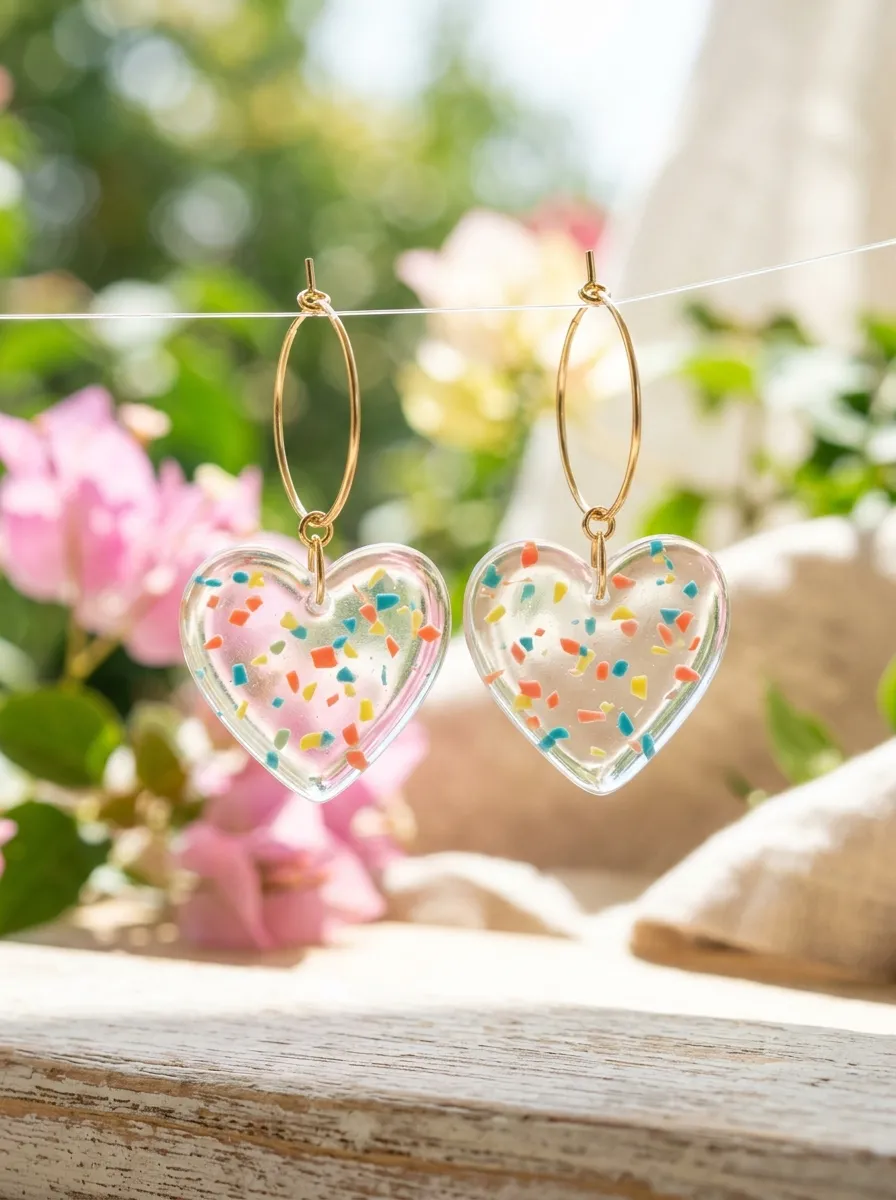
    Budget Planning and Time Management
    Crafting a full birthstone jewelry collection is a cost-effective alternative to working with natural cut gems, provided materials and production schedules are managed efficiently. A standard two-ounce block of translucent clay combined with small amounts of primary accent colors can produce several complete jewelry sets, keeping the cost per unit low compared to genuine gemstones. To optimize your budget, purchase versatile translucent clay in large one-pound blocks, and invest in a starter set of primary pigments and interference mica powders that can be mixed into endless custom mineral colors. For production efficiency, batch your workflow into focused stages: dedicate your first session to color mixing and conditioning; the second to shape cutting, carving, and baking; and the third to wet sanding, hole drilling, and hardware assembly. Batching these steps saves time on tool cleaning and workspace transitions, helping you produce cohesive collections on a sensible budget and schedule.
    Creative Expansion and Advanced Inspiration
    Once you master foundational mineral blending and geometric cutting, numerous techniques exist to expand your gemstone jewelry designs. You can experiment with liquid polymer clay to create freeform, dripped-agate slices or translucent resin-like geode cavities filled with crushed glass glitter. Advanced makers can also explore mokume-gane techniques, stacking contrasting translucent and metallic leaf layers, distorting the stack with carvers, and shaving thin cross-sections to mimic the internal banding of malachite, turquoise, and banded agate. You can also incorporate mixed-media elements by setting your faux clay cabochons into fabricated brass bezel cups, combining clay stones with freshwater pearls, or using wire-wrapping techniques to mount raw-crystal clay shards. Beyond wearable jewelry, these same mineral simulation techniques can be applied to decorative home accents, including polished stone drawer knobs, mosaic ring dishes, and embellished picture frames. Developing your faux mineral crafting skills allows you to create unique, personalized gifts and decor that celebrate the timeless beauty of natural gemstones.