Polymer clay jewelry continues to dominate digital fashion boards, providing endless inspiration for modern makers who value handmade accessories with an organic aesthetic. The coastal bohemian style combines relaxed, nature-inspired elements with structural elegance, offering wearable art that captures the essence of sun-drenched shores, tidal textures, and earthy neutrals. In this complete tutorial, readers will learn how to transform basic blocks of oven-bake medium into durable, boutique-quality statement pieces. Polymer clay provides unmatched versatility for both decorative design and everyday adornment, allowing anyone to produce lightweight earrings, pendants, hair accessories, and charms without investing in commercial metalworking tools. By learning specialized texturing methods, custom pigment mixing, slab building, and careful assembly, crafters can execute professional collections from home. This practical guide covers essential materials, systematic step by step crafting procedures, and reliable curing protocols that guarantee structural longevity. Whether the goal is outfitting a summer capsule wardrobe, creating thoughtful personalized gifts, or establishing an artisan accessories brand, these actionable techniques establish a dependable foundation. You will master ten versatile design concepts that blend soft shoreline palettes, nautical geometry, and relaxed boho textures into elevated statement pieces that maintain structural integrity and timeless visual appeal.
Why This Idea Is Trending or Useful
The surge in popularity surrounding coastal bohemian polymer clay jewelry stems from a cultural movement toward slow fashion, tactile craft traditions, and customized personal styling. Modern Pinterest ideas routinely highlight organic textures, Mediterranean ceramic motifs, and neutral tones because they seamlessly bridge everyday casual apparel with high-end designer aesthetics. Polymer clay serves as an exceptionally forgiving medium, making this creative project remarkably accessible for beginners while offering advanced manipulation potential for seasoned artisans. The raw materials are naturally featherlight, meaning large statement earrings and tiered drops can be worn throughout the day without causing physical discomfort or stretching earlobes. From a budget perspective, crafting jewelry at home eliminates the steep retail markups associated with specialty boutique accessories, offering substantial savings while preserving complete creative control over color harmony, shape, and finish. Furthermore, the tactile nature of shaping, stamping, and curing clay delivers a tangible sense of accomplishment that digital activities cannot replicate. Because the finished designs integrate natural tones like warm sand, seafoam green, terracotta, and soft ivory, they fit right into contemporary minimalist style palettes, providing enduring relevance across seasons rather than fading as a temporary micro-trend.
Materials and Preparation
Achieving structural durability and polished finishes requires deliberate material selection and careful studio preparation before any shaping begins. The core requirement consists of quality polymer clay blocks in oceanic and earth tones, including ecru, translucent, seafoam, terracotta, and soft ochre. A smooth, non-porous working surface is critical; ceramic tiles, tempered glass panes, or polished marble boards prevent unwanted sticking while allowing direct transfer into an oven. Essential hand tools include an acrylic roller for uniform sheeting, a tissue blade for crisp slab cuts, shape cutters in geometric arches and floral motifs, and needle tools for piercing jump ring holes. Supporting jewelry findings must include surgical-grade stainless steel earring posts, hypoallergenic jump rings, flexible jewelry wire, and heavy-duty jeweler glue to secure posts. Preparation begins by deep-cleaning the work plane using isopropyl alcohol and lint-free microfiber cloths to eliminate residual dust, lint, and rogue pigments that easily bond to raw clay. Planning the visual scale and clay thickness prior to cutting preserves symmetry and prevents warping during the cure. Preheating an oven alongside a standalone oven thermometer guarantees temperature accuracy, preventing scorched edges or brittle, under-baked clay bodies.
Idea 1: Tiered Sea Glass Arches
Execution Process
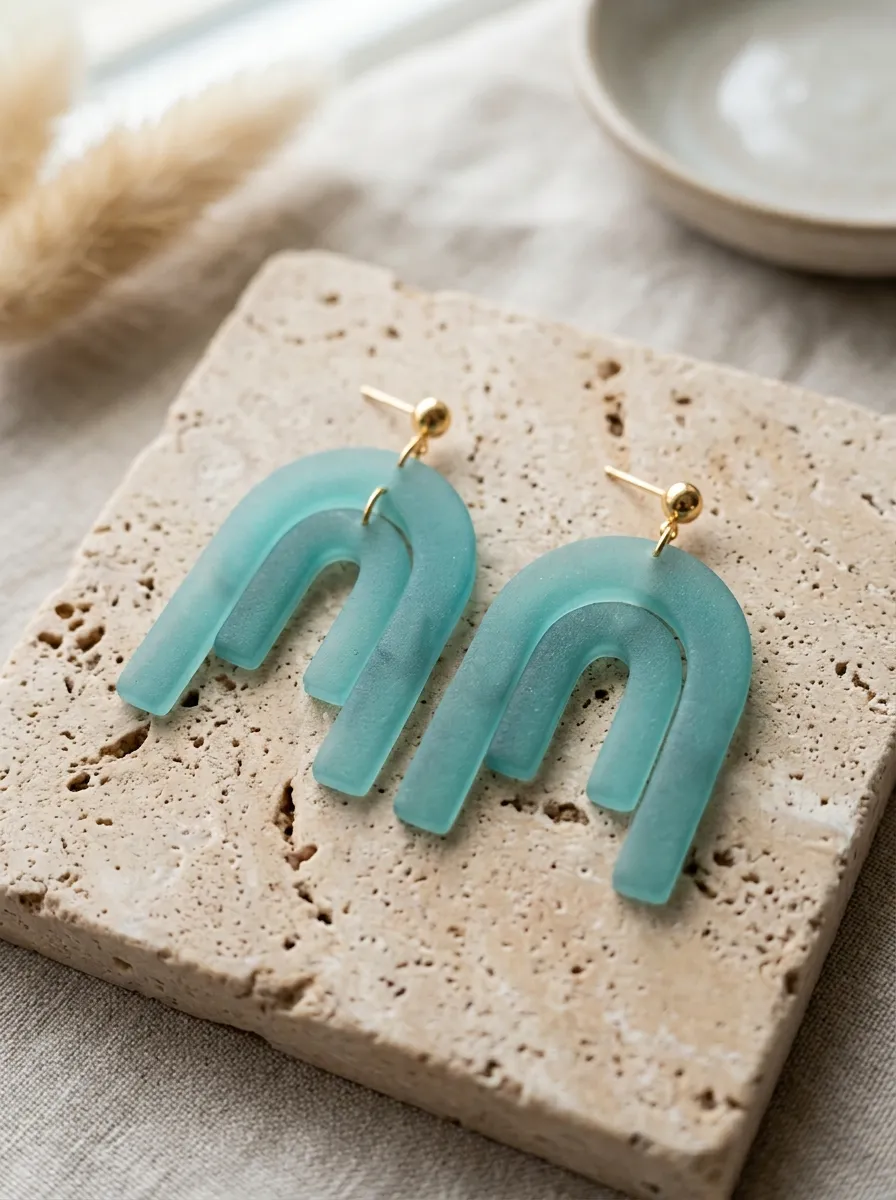
The tiered sea glass arch earring concept captures the weathered, frosted appearance of ocean glass fragments arranged into clean, architectural forms. This design incorporates soft translucent clay tinted with a microscopic drop of oceanic green pigment, generating a frosted, semi-opaque finish that catches ambient sunlight when worn. The structural layout employs two nesting, inverted U-shapes connected sequentially by metallic findings, establishing fluid movement while retaining a clean, contemporary silhouette. By utilizing a minimalist style arch, the design softens modern geometric angles with fluid maritime color balance. Natural light interacts dynamically with the translucent material, mimicking water-worn glass collected along pebble beaches. The soft curves flatter diverse facial structures, making the piece suitable for both relaxed daytime outings and formal evening gatherings. The matte, unglazed texture mirrors authentic sea glass eroded by saltwater and sand over decades, avoiding artificial high-gloss sheens in favor of an understated, tactile presence. Balancing proportions ensures the top arch anchors comfortably against the earlobe while the bottom drop swings independently, accentuating natural movement throughout daily wear.
Begin by conditioning translucent clay alongside a pinhead-sized segment of teal clay, rolling the medium thoroughly until the color disperses into an even, water-washed tone. Roll the prepared mass into a flat, three-millimeter slab across a chilled ceramic tile using an acrylic roller. Press nesting arch cutters firmly into the clay, withdrawing the metal cleanly to avoid edge distortion. Using a fine needle tool, pierce small attachment holes approximately two millimeters from the inner and outer connection edges before curing. Transfer the tile directly into a preheated oven calibrated to one hundred and thirty degrees Celsius, baking the shapes for thirty-five minutes to achieve optimal polymer fusion. After the elements cool to room temperature, rub the surface with four-hundred-grit wet-and-dry sandpaper submerged in cool water to produce a soft, frosted sea glass texture. Dry the clay thoroughly, then use flat-nose jewelry pliers to link the top and bottom arches using six-millimeter open jump rings. Secure stainless steel earring posts to the upper reverse side using two-part epoxy adhesive, allowing the bond to cure undisturbed for twenty-four hours.
Idea 2: Terracotta Seashell Studs
Step-by-Step Guide
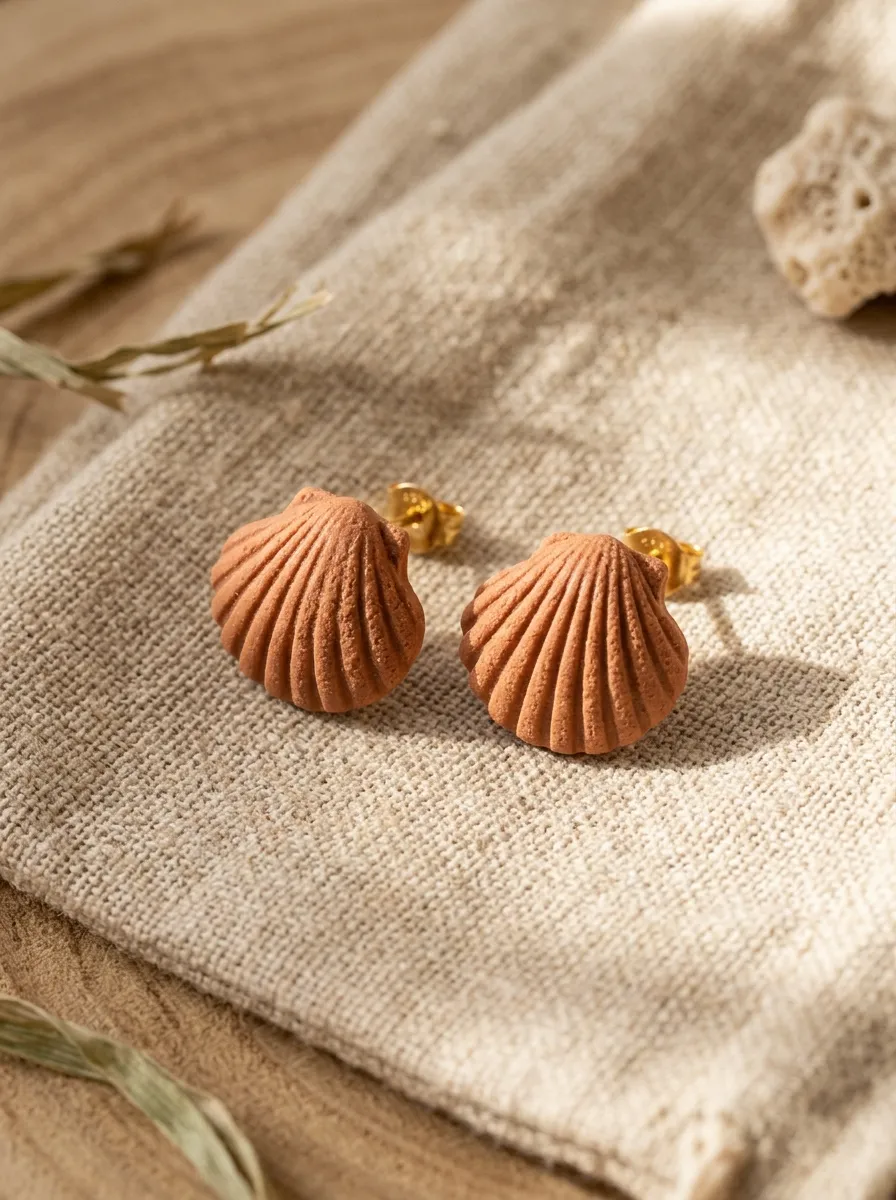
Terracotta seashell studs translate classic coastal marine motifs into grounded, bohemian ear adornments using rich earth tones rather than predictable pastel blues. This design uses warm, reddish-brown clay with subtle mineral flecks to suggest ancient Mediterranean pottery mixed with shoreline geology. The physical shell texture features radiating ridges that spread outward from a compact base, producing delicate highlights and shadows across the earring face. Unlike bulky novelty accessories, this compact design maintains a low profile, hugging the earlobe neatly for everyday comfort and subtle sophistication. The warmth of the terracotta clay complements sun-kissed skin tones and neutral linen clothing, grounding breezy summer outfits with organic depth. The structural integrity relies on a solid single-layer construction that resists cracking or snapping under routine wear. The combination of historical pottery colors and nautical anatomy fits squarely into contemporary boho aesthetics, balancing rustic artisan charm with clean, intentional lines. These studs serve as a foundational accessory, versatile enough to pair with layered necklaces or function as quiet accents alongside more elaborate statement pieces.
Condition rich terracotta clay by working it through your hands until fully pliable and smooth, eliminating air pockets. Roll the conditioned clay into a uniform slab measuring four millimeters in thickness to provide structural depth for dimensional texturing. Firmly press a ribbed seashell stamp or custom silicone texture sheet onto the surface, applying even downward pressure across the mold to capture crisp striations. Use a miniature scalloped circle cutter to frame the imprinted shell design, lifting away the excess scrap clay carefully with a tissue blade. Inspect the perimeter of each cut piece, smoothing any rough edges using a fingertip dipped in a droplet of isopropyl alcohol. Place the cut pieces on a flat baking sheet lined with parchment paper to prevent shiny contact spots from forming during heat exposure. Bake the elements at one hundred and thirty degrees Celsius for thirty minutes, ensuring thorough curing to keep the thin ridges resilient. Once fully cooled, attach hypoallergenic ear posts to the flat backings using an industrial jeweler adhesive, pressing firmly for thirty seconds to ensure complete contact.
Idea 3: Rattan Weave Clay Hoops
How to Create
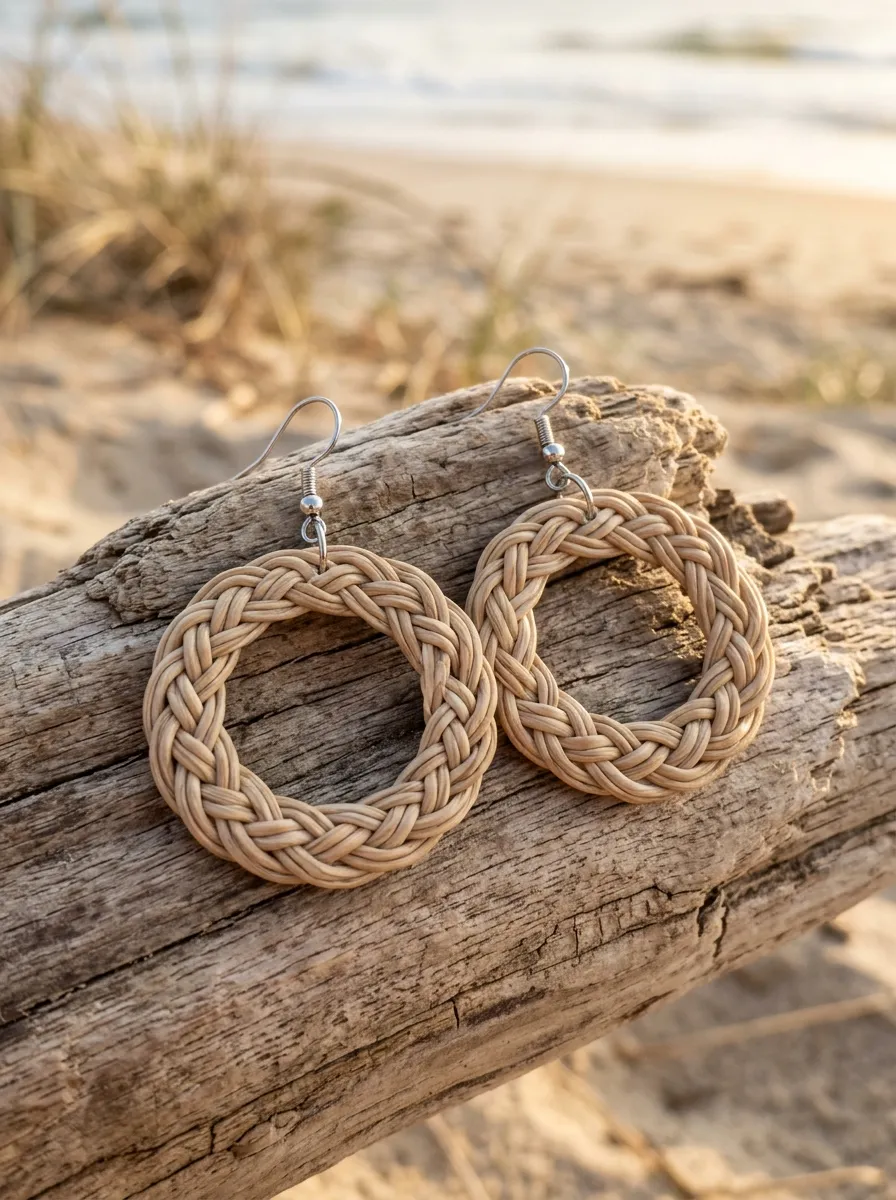
Rattan weave clay hoops unite the warm, tactile charm of traditional woven basketry with the durable, water-resistant nature of cured polymer clay. This design relies on intertwining thin strands of sand-colored clay to construct open circular forms that evoke vintage woven straw sun hats and natural wicker furniture. The aesthetic value stems from intricate textural depth, where delicate, interwoven braids catch directional light and cast subtle linear shadows. Although visually complex and dense, the circular structure remains remarkably light, eliminating ear fatigue commonly associated with heavy metal hoops. The natural oatmeal color scheme functions as an effortlessly neutral base, coordinating seamlessly with flowing patterned maxi dresses, neutral canvas accessories, and beachside attire. This approach reinterprets conventional bohemian fibers through an adaptable polymer medium, ensuring the finished piece never frays, unravels, or absorbs moisture from coastal air. The open hoop configuration creates an airy, balanced frame around the jawline, delivering an intentional balance of artisan craft and tailored modern geometry suitable for diverse styling contexts.
Prepare light sand-colored clay by mixing ecru with an imperceptible speck of raw sienna to produce a warm reed tone. Extrude the conditioned clay through a clay gun fitted with a one-millimeter multi-hole disc to produce long, identical clay filaments. Group three strands together, carefully plaiting them into a tight, consistent three-strand braid across your working tile. Wrap the braided strip around an oven-safe metal cylinder or round wooden dowel covered in parchment paper to form a uniform circular hoop, trimming the meeting ends neatly with a blade. Lightly compress the seam with a silicone modeling tool to fuse the clay ends without distorting the woven pattern. Bake the assembly while still mounted on the cylinder at one hundred and thirty degrees Celsius for forty minutes to prevent the circular shape from sagging under heat. Once cooled, slide the hoop off the cylinder and clean any jagged contact points with an eight-hundred-grit sanding block. Thread a fine wire hoop finding through the hollow core or glue a flattened connector finding to the reverse edge using strong craft cement.
Idea 4: Driftwood and Dune Clay Drop Pendants
Execution Process
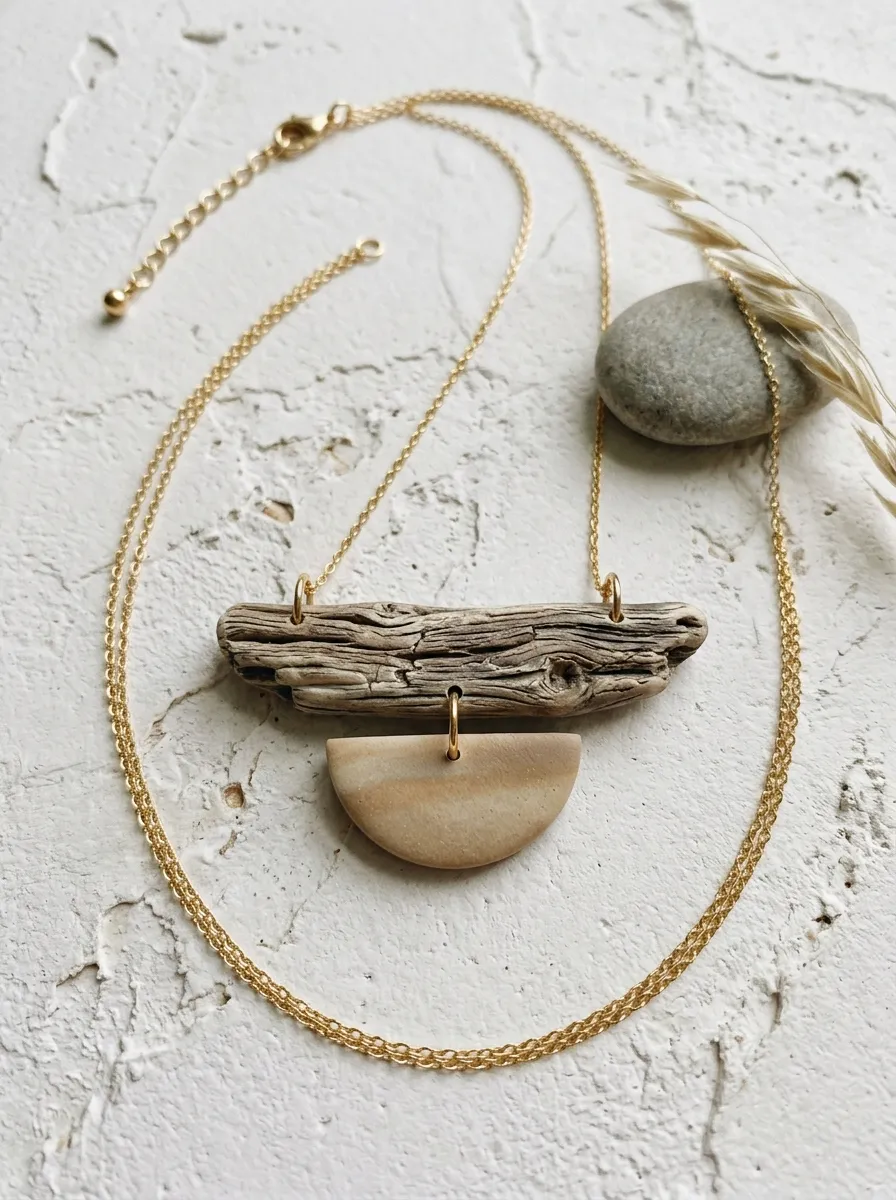
Driftwood and dune clay drop pendants explore the organic color shifts found where coastal maritime forests meet shifting shoreline sands. This elongated neckpiece integrates a faux-wood polymer bar suspended horizontally, anchoring a hanging clay semi-circle that displays smooth, rolling tonal gradations. The top component mimics the fibrous grain and weathered gray-brown patina of ocean driftwood, while the lower component utilizes muted sand and ecru hues to evoke windswept dunes. The balance between the linear wooden bar and the soft curvature of the lower drop yields an intriguing structural harmony, drawing inspiration from mid-century modern design elements. Because polymer clay can accurately replicate natural materials without harvesting organic resources, it provides a dependable medium for producing durable, consistent wood textures. Suspended from an adjustable waxed cotton cord or delicate satellite chain, the pendant acts as a refined bohemian focal point over open necklines, knit sweaters, or simple summer camisoles. The overall composition remains grounded, artistic, and deeply rooted in the natural geography of wild coastal shores.
Begin by combining equal parts brown, ecru, and gray clay partially to yield a marbled log showing distinct, irregular color striations. Roll the marbled log flat, dragging a stiff wire brush along the length to carve organic woodgrain fissures into the surface. Cut a rectangular bar measuring three centimeters wide by eight millimeters high, piercing vertical pass-through holes through each short end using a bead-piercing needle. Next, blend pale cream clay into a matching semi-circle shape using an acrylic roller and a round cutter cut in half. Texture the bottom drop with fine sandstone abrasive powder to create a matte, earthy texture before assembly. Carefully pierce a centered hole through the upper apex of the semi-circle to allow smooth hardware connection. Bake all components on a ceramic tile at one hundred and thirty degrees Celsius for thirty-five minutes, allowing them to cool slowly inside the turned-off oven to prevent thermal shock. Assemble the pieces by connecting the faux-driftwood bar to the dune drop using an oval jump ring, then thread a delicate link chain through the horizontal bar holes.
Idea 5: Hammered Gold Leaf Tidal Discs
Step-by-Step Guide
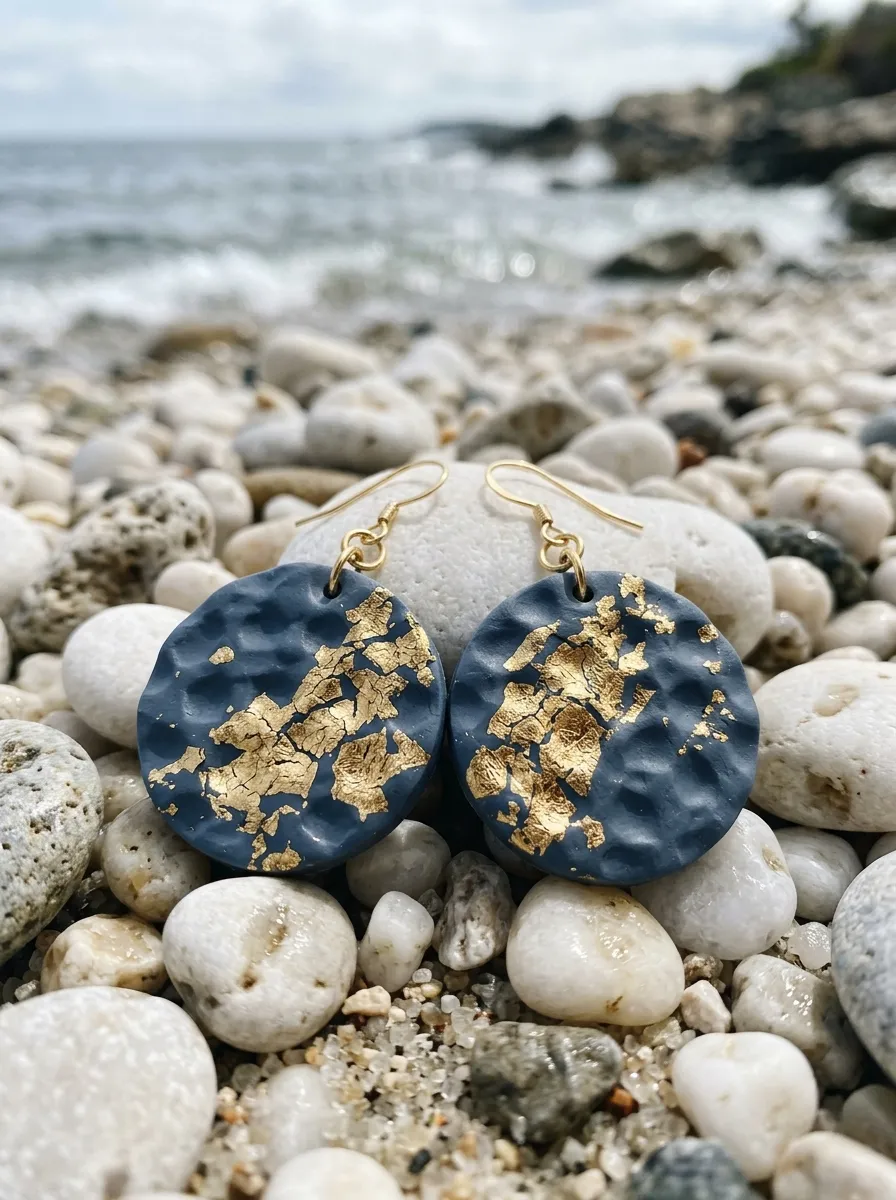
Hammered gold leaf tidal discs blend rugged coastal organic textures with the luminous, elevated sheen of gilded metallic accents. This design consists of flat circular clay bases rendered in a deep oceanic slate blue, overlaid with broken, micro-fragments of gold leaf that suggest sunlight refracting off rolling waves. The surface receives an intentional, hand-textured hammered pattern, dispersing glare into dynamic, undulating highlights reminiscent of moving water. The contrast between deep nautical tones and radiant metallic foil produces an elegant visual impact, turning simple circular studs or drop earrings into sophisticated statement accessories. This concept elevates bohemian accessories by introducing deliberate luxury, making the finished pieces versatile enough for casual beachside dining or upscale formal events. The clay acts as a stable, lightweight canvas that supports metallic leafing without peeling, flaking, or tarnishing over time. By balancing organic dimpling with balanced circular cuts, the design avoids looking unrefined, maintaining a high level of polished craft that mirrors artisanal boutique metalwork while retaining absolute featherlight wearability.
Roll a smooth slab of slate-blue polymer clay to a uniform depth of three millimeters on a clean glass working surface. Gently lay a sheet of imitation gold leaf over the clay, brushing it down flat using a soft, dry makeup brush until it adheres completely. Run an acrylic roller lightly across the surface to crack the metallic leaf into irregular, organic fissures that reveal the underlying blue medium. Press a rounded-tip embossing tool repeatedly into the clay surface at varied angles, generating a realistic hammered texture across the entire sheet. Stamp out symmetrical circular components using a stainless steel circular punch, ensuring the edges remain crisp and free from ragged clay burrs. Pierce a neat hole near the top edge of each disc using an awl if the piece will hang as a drop earring. Bake the cut discs on parchment paper at one hundred and thirty degrees Celsius for thirty-five minutes to achieve maximum material toughness. After cooling, apply a water-based satin sealant over the surface to protect the delicate gold leaf, then affix ear wires or posts using two-part adhesive.
Idea 6: Organic Pebble Mosaic Choker
How to Create
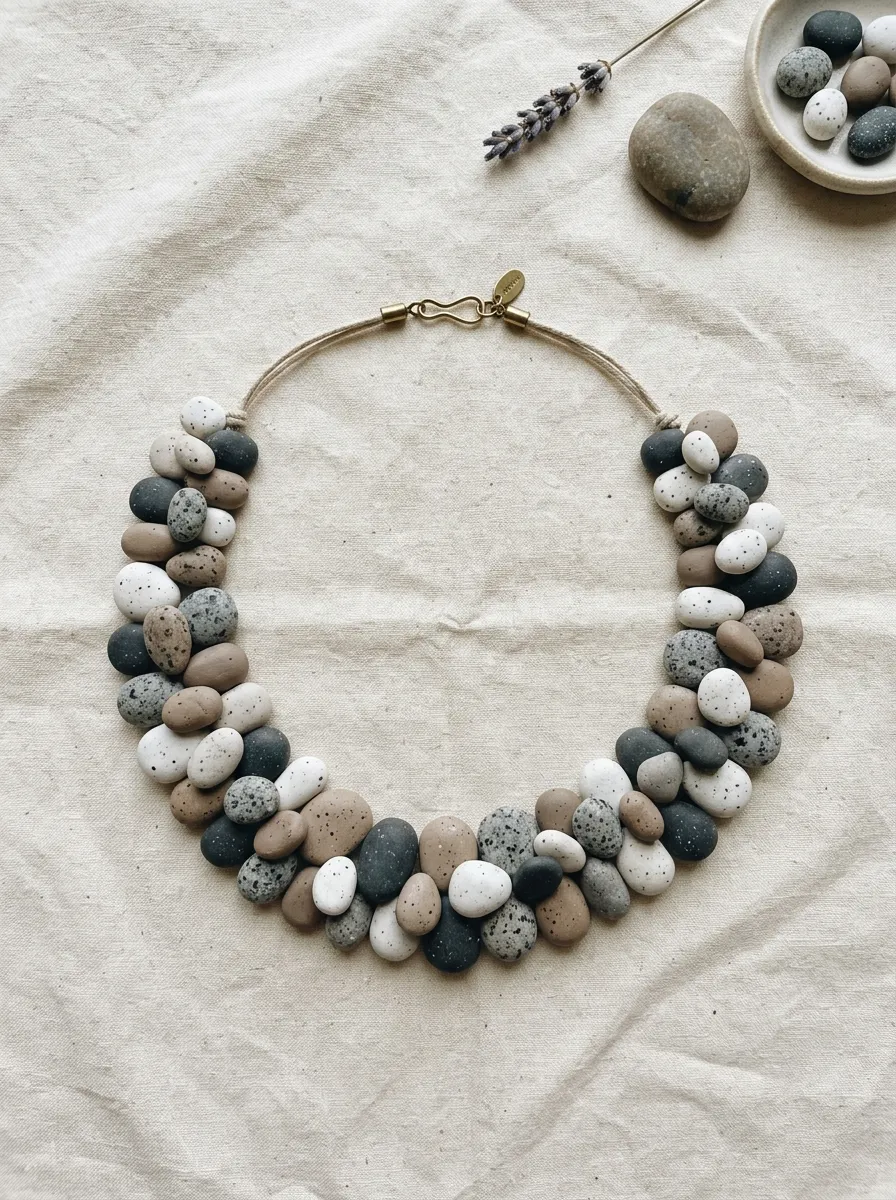
The organic pebble mosaic choker takes its cue from smooth, water-tumbled stones gathered along windswept ocean shorelines. This project features an array of flat, asymmetrical clay shapes arranged into a cohesive geometric collar that rests flat against the collarbone. Each pebble element is crafted in an individual earthy neutral, spanning creamy chalk, pale taupe, speckled granite, and muted charcoal. The charm of this necklace comes from the deliberate asymmetry of the individual clay stones, which harmoniously link together through consistent thicknesses and matching matte finishes. The resulting jewelry piece feels organic, grounded, and modern, offering a striking alternative to rigid metal chains or traditional gemstone strings. Resting securely against the skin, the clay warms quickly to body temperature, providing an exceptionally comfortable wearing experience. This statement choker coordinates naturally with unbuttoned linen shirts, square-neck summer dresses, and minimalist knitwear, infusing casual coastal vibes into relaxed contemporary styling. The design celebrates the beauty of natural stone formations while retaining the unmistakable comfort of featherlight clay construction.
Mix three distinct neutral batches of clay by kneading black pepper, fine craft sand, or dark polymer shavings into ecru and gray bases to simulate granite stone textures. Roll the conditioned clay batches into separate small logs, slicing irregular pieces off with a flexible blade to establish varied pebble dimensions. Flatten each pebble slightly with an acrylic roller to a uniform depth of three millimeters, keeping the outer silhouettes softly rounded and asymmetric. Smooth the edges of each pebble with a damp fingertip to remove harsh angles, mimicking the natural tumbled look of shoreline river stones. Pierce horizontal stringing channels straight through the center mass of every stone using an extra-fine bead wire before baking. Arrange the pierced pebbles on a baking tile lined with baking soda to support their rounded undersides without forming flat spots during heating. Cure the pieces at one hundred and thirty degrees Celsius for forty minutes, ensuring structural strength across all stringing holes. Once cool, string the pebbles sequentially onto durable nylon-coated beading wire, finishing the ends with crimp beads, wire guards, and a secure lobster clasp.
Idea 7: Sunburst Raffia Fringe Earrings
Setup Method
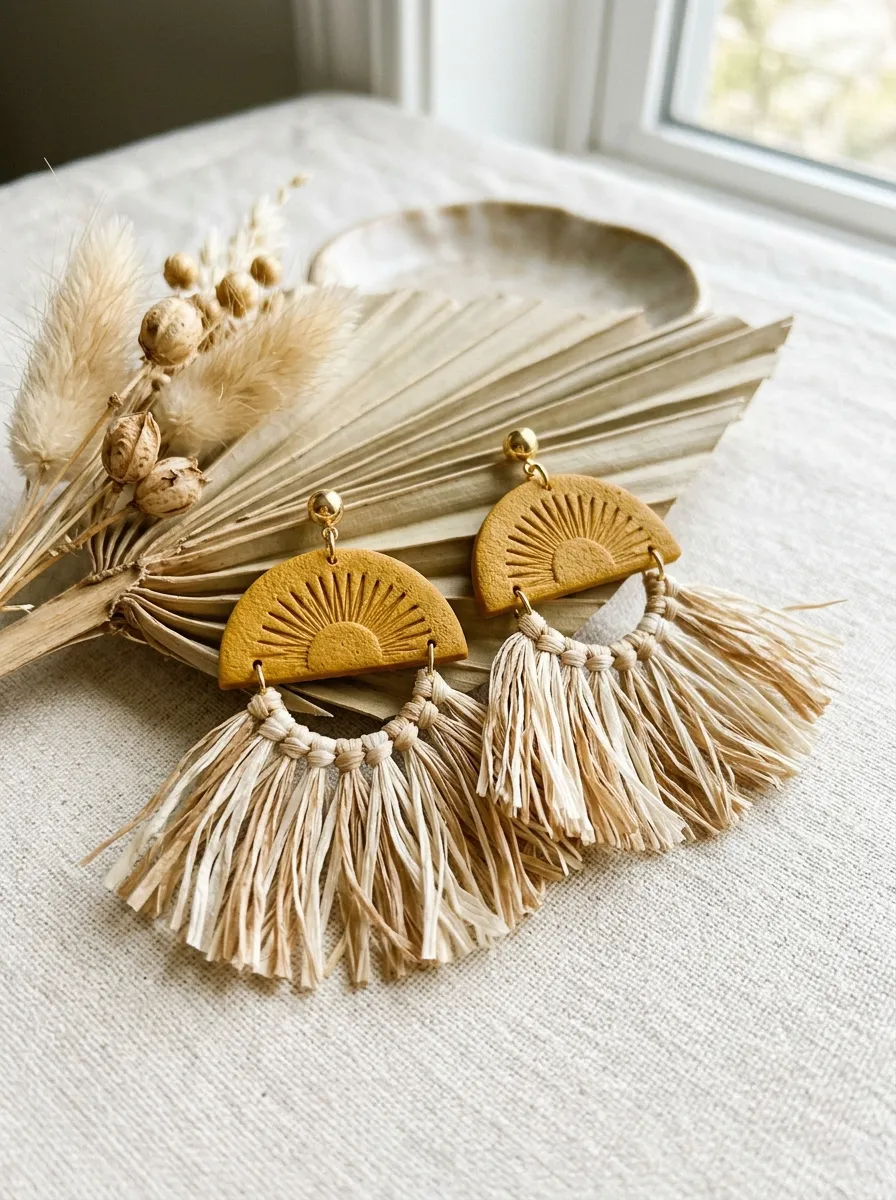
Sunburst raffia fringe earrings unite the structured precision of sculpted clay arches with the wild, tactile softness of natural coastal plant fibers. The upper portion of this dynamic accessory consists of a polymer clay arch or half-sun motif, detailed with delicate stamped rays that radiate outward from the center. The bottom edge features an integrated channel of fine holes that secure knotted strands of raw raffia or fringed linen cord, generating contrasting textures between hard and soft elements. This combination creates kinetic movement that sways gently with every step, drawing attention to the neckline and shoulders. The combination of radiant sun iconography and frayed plant fiber captures authentic bohemian style, balancing modern design discipline with earthy, laid-back craftsmanship. Because the bottom fringe consists of featherlight fiber, the earrings make a dramatic visual statement without adding unmanageable weight. The natural palette of golden straw, sun-bleached ecru, and warm mustard makes this design a standout choice for resort vacations, outdoor summer festivals, and coastal events.
Condition rich mustard or warm ochre clay thoroughly, rolling it out evenly to a three-millimeter thickness on your smooth work surface. Cut out a wide half-circle shape using a clean cutter, then use a sharp craft knife to score delicate radiating sunburst grooves across the upper surface. Using a fine needle tool, pierce a series of evenly spaced holes along the flat bottom rim of the half-circle, placing them roughly two millimeters apart. Pierce a single centered mounting hole at the top curved edge to accept the primary earring finding after baking. Bake the components on a flat ceramic slab at one hundred and thirty degrees Celsius for thirty-five minutes, allowing them to cool completely before continuing. Cut several dozen strands of natural raffia fiber into four-inch lengths, bundling them into small groupings of two or three strands. Thread the folded center of each raffia bundle through a bottom hole, pulling the cut ends through the loop to create secure lark’s head knots. Trim the hanging fringe in a neat horizontal line or chevron point with sharp fabric shears, then mount an ear wire through the top hole.
Idea 8: Marbled Seafoam Botanical Barrette
How to Create
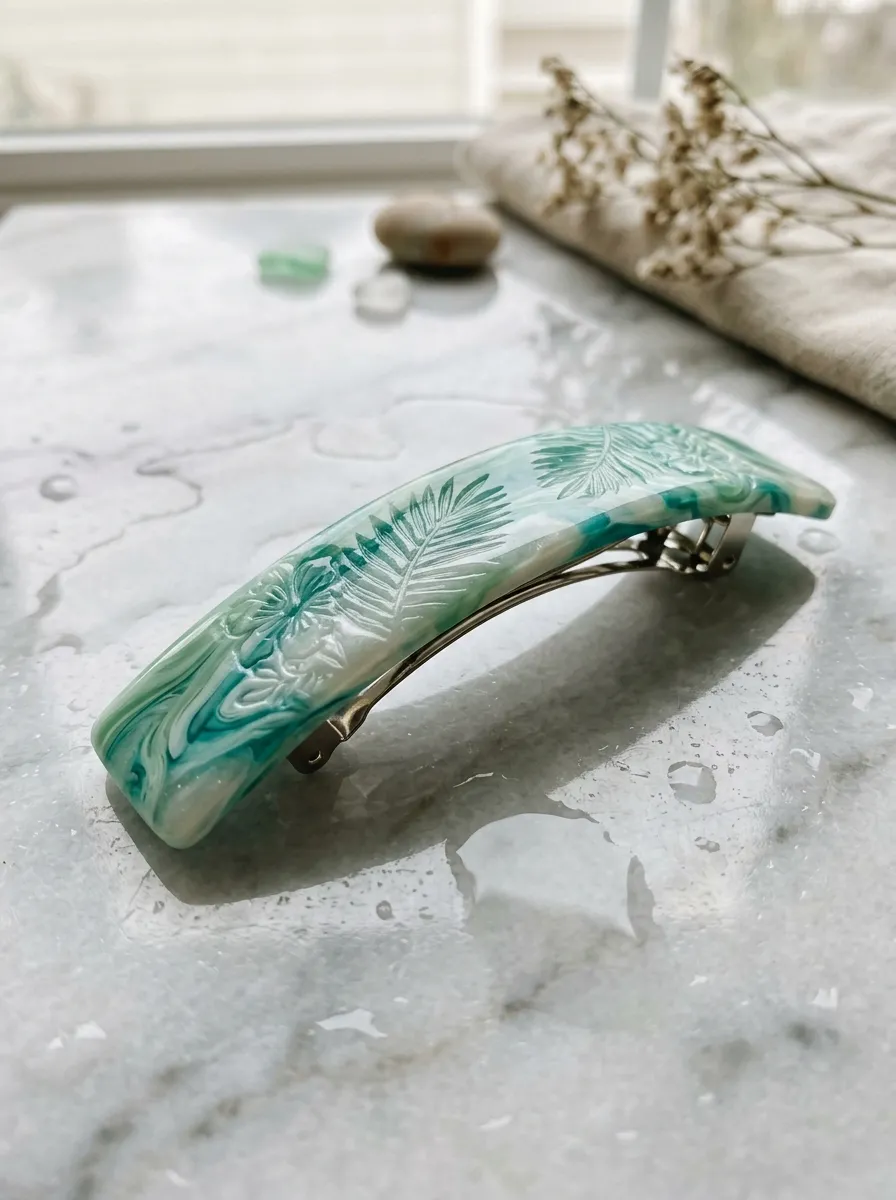
The marbled seafoam botanical barrette brings the dynamic, swirling motion of coastal surf and coastal flora into functional hair accessories. This hairpiece utilizes an elongated rectangular or oval clay bar decorated with soft, swirling veins of ocean teal, seafoam green, translucent white, and sparkling pearl clay. Delicate botanical fern or palm frond silhouettes are gently stamped into the marbled surface, uniting oceanic colors with lush coastal foliage. The swirling color pattern ensures that every single barrette emerges as an entirely original piece of wearable art, never identical to another. The durable polymer medium flexes slightly without breaking, making it an ideal protective cover for metal hair clip hardware. This versatile accessory effortlessly secures loose beach waves, half-up twists, or casual updos, adding an immediate touch of coastal bohemian charm to effortless hairstyles. Its polished, marble-like finish feels refined, proving that clay hair accessories can easily rival high-end resin or acetate boutique options in both visual appeal and daily durability.
Prepare your marbled medium by rolling individual thin ropes of seafoam green, white, pale turquoise, and pearlized translucent clay. Twist the ropes together into a tight spiral, fold the spiral in half, and roll it smooth, repeating the process three times to build layered, organic color veins. Compress the twisted mass into a dense block, then slice thin cross-sections with a tissue blade, arranging them edge-to-edge on a work tile. Smooth the composite sheet with an acrylic roller to blend the seams, creating a continuous marbled slab measuring three millimeters thick. Press a clean botanical leaf stamp lightly across the marbled surface to leave delicate organic impressions, then cut an elongated rounded barrette blank using a craft knife. Drape the clay strip over a curved, oven-safe metal form to give the barrette an ergonomic curve that contours naturally against the scalp. Bake at one hundred and thirty degrees Celsius for thirty-five minutes, cooling the strip completely before sanding the outer edges smooth. Secure the cured clay piece to a metal alligator or French barrette clip using high-strength industrial epoxy.
Idea 9: Bleached Coral Textured Hoops
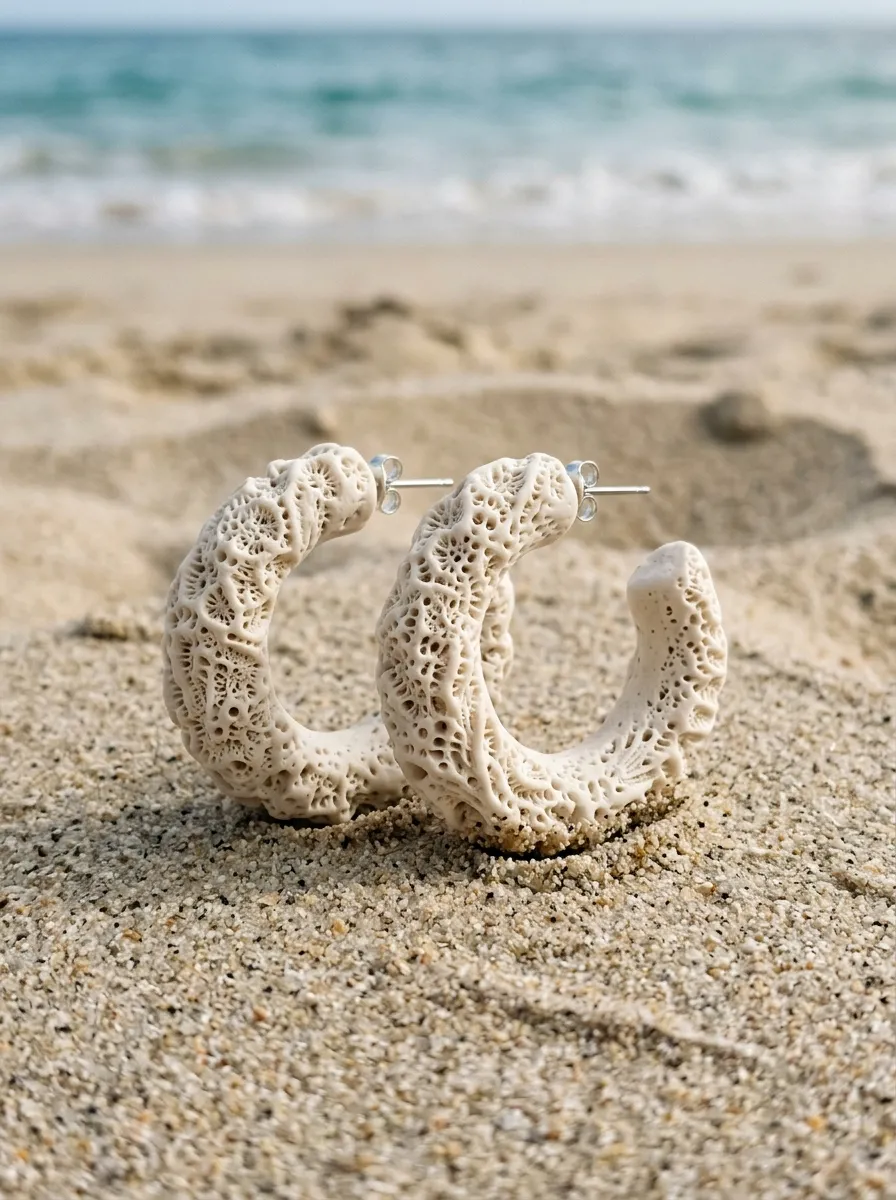
Execution Process
Bleached coral textured hoops draw structural inspiration from the intricate, porous calcified architecture found within living shoreline coral reefs. This design forms an open, hoop-style silhouette finished in matte off-white, bone, or pale sand, covered completely in an organic array of miniature divots, punctures, and irregular micro-crevices. The all-white, monochromatic palette highlights the dramatic surface variation without needing bold colors, keeping the design sophisticated, subtle, and fundamentally minimalist. By incorporating deep organic texture across the entire surface, the clay scatters light softly, preventing the piece from appearing flat, plain, or synthetic. The earrings capture the fragile wonder of the ocean floor, transforming intricate marine biology into wearable, sculptural art. Their neutral color palette makes them endlessly versatile, complementing colorful summer prints as easily as simple, crisp linen separates. These sculptural hoops bring depth and artisanal complexity to casual warm-weather styling, serving as conversation-starting accessories rooted in the quiet beauty of natural coastal formations.
Condition ivory or unbleached porcelain clay until it is soft, rolling it into a uniform cylinder measuring eight millimeters in diameter. Curve the thick clay roll into a smooth hoop shape, cutting the ends diagonally to form clean, intentional terminal joints. Lay the shaped hoop on a ceramic tile and begin texturing the entire outer surface using needle tools, ball stylus heads, and natural coral fragments. Puncture varying sizes of microscopic holes and organic indentations into the clay body, creating an irregular, porous texture that mimics genuine reef structures. Check that the inner curve remains smooth and comfortable against the skin, focusing the porous texture along the outer and side perimeters. Carefully pierce a straight transverse hole through the top terminal end to accept a standard jewelry eye pin or jump ring finding. Bake the sculpted hoops at one hundred and thirty degrees Celsius for forty minutes, using a slightly longer bake to ensure complete structural strength throughout the thicker clay profile. Once fully cooled, wash the pieces with diluted gray acrylic wash, wiping the surface immediately so pigment remains only inside the deep crevices.
Idea 10: Sand Dollar Geometric Drops
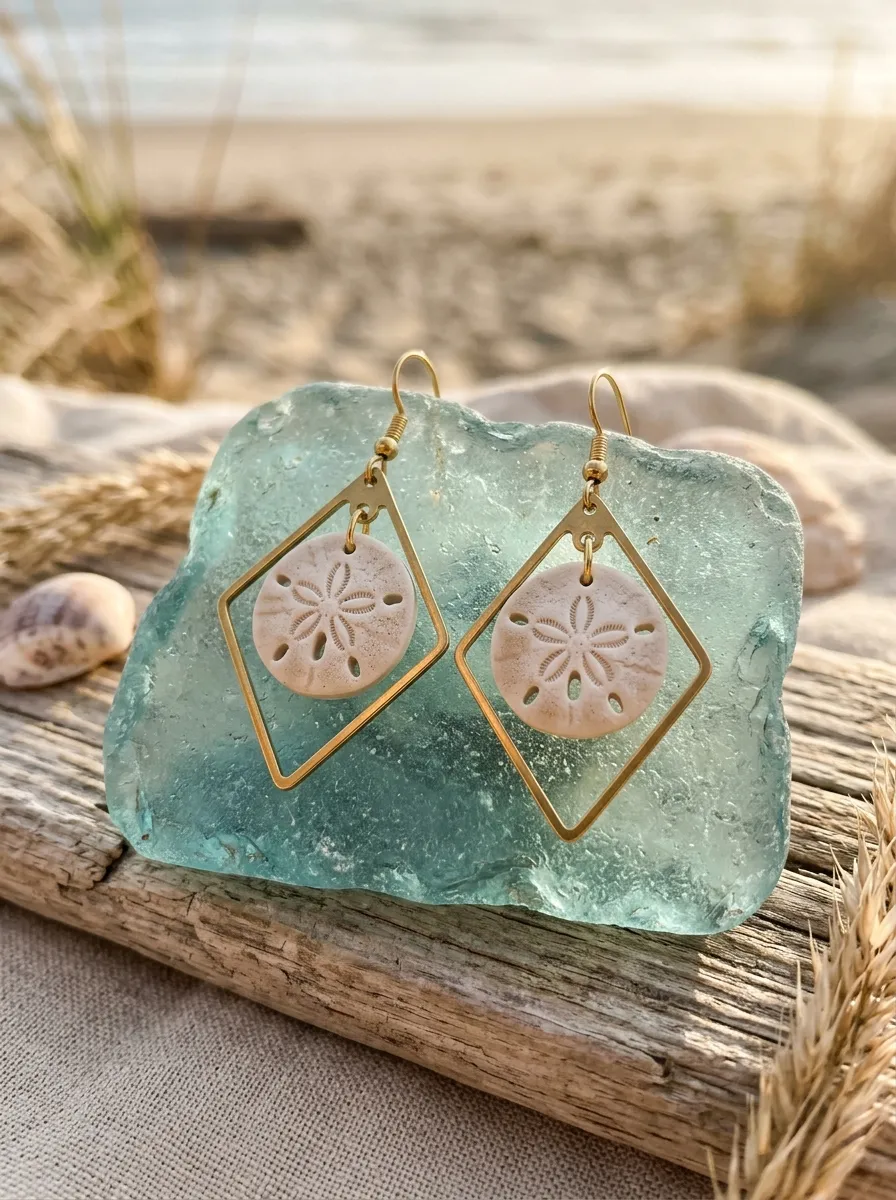
Step-by-Step Guide
Sand dollar geometric drops merge the quiet symmetry of familiar shoreline fossils with modern, angular jewelry layouts. The design incorporates a circular clay disc bearing the iconic five-point perforated star motif of a coastal sand dollar, suspended within or beneath a clean geometric frame. Crafted in a soft, sun-bleached bone hue, the central fossil disc honors marine life, while the surrounding diamond or trapezoid frame adds contemporary architectural structure. This contrast between delicate organic anatomy and bold geometric lines keeps the accessory feeling fresh, modern, and stylish rather than literal or kitschy. The pierced perforations throughout the clay body allow daylight to pass through, creating an airy, weightless aesthetic that wears comfortably through all-day events. The design brings together historical natural history with modern runway trends, bridging relaxed vacation styling with high-end handmade craftsmanship. These statement drops add refined bohemian style to open-collar necklines, breezy linen ensembles, and outdoor beach wedding attire.
Condition bone-colored clay thoroughly, mixing in a small pinch of translucent clay to give the cured material a natural, biological depth. Roll the clay to a uniform thickness of three millimeters on a smooth glass cutting tile, checking the surface for air bubbles. Cut a neat circle using a medium steel punch, then use an ultra-fine oval hole cutter to pierce the five traditional radial slots that define classic sand dollar anatomy. Use a micro ball stylus to lightly imprint delicate radiating dotted channels between each central perforation, reproducing authentic fossil patterns. Cut an open diamond-shaped geometric frame from a contrasting sand-toned clay slab to act as the primary structural hanger for the central disc. Pierce precise connection holes at the top and bottom junctions of the geometric frame, alongside a matching attachment hole at the upper rim of the sand dollar disc. Bake both structural elements on a parchment-lined tray at one hundred and thirty degrees Celsius for thirty-five minutes. Once cooled, connect the sand dollar disc inside the lower loop of the geometric frame using sturdy jump rings, finishing the earring with a secure ear hook.
Common Beginner Mistakes and How to Avoid Them
Creating polymer clay jewelry requires technical precision, and beginners often encounter frustrating structural issues by overlooking essential preparation steps. A widespread error is under-baking the clay, which leads to weak, brittle pieces that easily snap when bent or dropped. Polymer clay cures through chemical fusion that requires both accurate temperatures and adequate bake times; using an independent oven thermometer confirms the actual heat level, preventing under-curing or scorched, discolored edges. Another frequent misstep is poor conditioning, where makers skip rolling the clay until completely pliable, leaving hidden air pockets that blister and burst under high baking heat. Crafters also frequently ignore basic cleanliness, allowing rogue lint, pet hair, and stray dark clay crumbs to permanently embed into light-colored coastal slabs. You can prevent this contamination by routinely wiping tools and surfaces with ninety-one percent isopropyl alcohol and wearing lint-free finger cots during delicate shaping steps. Finally, many beginners drill attachment holes too close to the outer edge of their pieces, producing thin clay margins that break under the stress of opening jump rings. Maintaining at least two to three millimeters of solid clay between any connection hole and the outer rim ensures your finished jewelry withstands active, everyday wear.
Practical Tips for Better Results
Elevating your handmade polymer clay jewelry from amateur projects to professional artisan crafts relies on adopting specific, high-precision finishing techniques throughout your workflow. Always use a dedicated wet-sanding routine after baking, using silicone carbide sandpaper submerged in lukewarm, soapy water to smooth cut edges and erase surface imperfections without releasing fine airborne dust. Progressing sequentially through four-hundred, six-hundred, eight-hundred, and one-thousand grit papers produces an ultra-smooth, satiny surface that feels luxurious against the skin. When joining raw clay elements without mechanical hardware, apply a brush-on liquid polymer clay medium at the contact seams to establish a powerful chemical bond during baking. To keep backings smooth and free of shiny spots, bake your cut pieces on top of raw ceramic tiles lined with matte printer paper or parchment sheets rather than bare metallic pans. If you notice persistent fingerprints across unbaked clay slabs, gently smooth the surface using a cotton swab dipped in rubbing alcohol before curing. Finally, always use two pairs of smooth-jaw flat-nose pliers when manipulating jump rings, twisting the ends laterally rather than pulling them apart outward to maintain their structural circular shape and prevent metal fatigue.
Styling, Presentation, or Organization Ideas
Presenting and styling your coastal bohemian jewelry thoughtfully enhances its visual charm, whether you are organizing a personal vanity or curating cohesive collections for an artisan market. Display these organic designs against authentic natural elements that echo their coastal origins, such as bleached driftwood branches, hand-carved soapstone trays, or textured raw linen boards. When curating displays for photography or craft fairs, group pieces by color stories—pairing soft terracotta and ochre pieces together, while isolating cool seafoam and frosted translucent drops on another tray. For clean home storage that keeps pieces untangled and dust-free, hang finished earrings on custom wall-mounted organizers crafted from framed woven cane webbing or natural linen fabric. When wearing these statement accessories, pair bold sculptural clay earrings with understated wardrobe foundations like unbleached cotton tops, relaxed linen jumpsuits, or breezy, square-neck sundresses to let the intricate textures stand out cleanly. Consider pairing delicate clay studs with woven straw market bags and leather sandals to carry the laid-back beach aesthetic throughout your entire outfit. Thoughtful presentation frames each piece not as an everyday craft project, but as an intentional work of wearable coastal art.
Budget or Time Planning
Efficient time management and smart material sourcing allow crafters to produce entire jewelry collections affordably without sacrificing material quality or artistic integrity. When working with polymer clay, batch processing your designs cuts overall production time drastically compared to working on individual pieces from start to finish. Dedicate distinct blocks of studio time to specific stages: condition and blend custom color batches in your first session, roll slabs and cut shapes in the second, and reserve subsequent sessions for baking, sanding, and final hardware assembly. Purchasing standard polymer clay blocks in economical multipacks or buying primary colors in bulk saves significant money, as you can easily blend your own custom ocean hues, muted seafoams, and earthy terracottas using primary pigments. Invest your budget primarily in quality stainless steel, nickel-free jewelry findings, as inexpensive, low-grade base metals quickly tarnish, corrode from skin oils, and trigger allergic reactions that ruin otherwise beautiful designs. Keep scrap clay organized in airtight containers grouped by broad color family; you can knead these leftover trims into beautiful faux-granite stones, marbled veins, or hidden core bases for future projects, eliminating material waste and stretching your crafting budget substantially.
Creative Expansion and Advanced Inspiration
Once you master basic conditioning, cutting, and curing skills, you can expand your creative jewelry practice by exploring advanced multimedia techniques and more intricate structural forms. Experiment by embedding natural beach sand, dried sea kelp fragments, or real crushed shells directly into translucent clay slabs before shaping to add genuine shoreline elements to your pieces. Explore liquid polymer clay as a high-gloss enamel glaze, using heat guns to cure thin, glass-like topcoats that mimic wet ocean stones or glossy tidal pools. You can also integrate other traditional bohemian crafts into your jewelry, joining sculpted clay elements with macramé knotting, micro-crochet linen borders, or delicate hand-beaded seed bead fringes that add fluid, graceful movement. Consider expanding your product line beyond earrings and pendants into functional lifestyle accessories, crafting matching coastal drawer pulls, sculptural clay hair combs, or decorative clay handles for vanity tools. Advanced artisans can also experiment with complex internal wire armatures, building large, sculptural, three-dimensional coral branches and tidal wave forms that challenge traditional jewelry silhouettes. Polymer clay offers boundless potential, empowering makers to translate organic coastal beauty into durable, expressive, and timeless personal fashion statements.
Leave a Reply