Polymer clay wind chimes represent an imaginative intersection of sculptural craft, acoustic design, and personalized exterior styling. Working with oven-bake clay allows crafters to produce weather-resistant decorative items featuring customized textures, distinctive color palettes, and balanced kinetic movement. This tutorial examines ten original wind chime concepts designed to enhance living spaces, covered patios, garden pergolas, and sunlit windows. Readers will discover how to prepare durable clay slabs, shape resonant ceramic-style components, pierce balanced suspension points, and string multi-tier assemblies securely. The technical utility of polymer clay lies in its malleability before baking and its dense, durable finish once properly cured. When suspended in gentle breezes, fired clay pendants strike one another to emit delicate, earthy clinking sounds rather than sharp metallic ringing. Learning proper slab thickness, hole-punching spacing, cord selection, and heat management empowers makers to create long-lasting outdoor mobiles that resist cracking. These structured guidelines ensure that beginners and experienced crafters alike can translate basic clay blocks into balanced, kinetic home decor pieces that celebrate authentic handmade craftsmanship.
Why This Idea Is Trending or Useful
Kinetic clay mobiles and outdoor wind chimes continue to capture significant attention on modern Pinterest inspiration boards due to their tactile charm and organic appeal. Contemporary interior design often incorporates natural materials and gentle movement, driving interest in creative ideas that soften clean living areas and garden spaces. A handmade wind chime offers clear practical value, serving as dynamic porch decoration, an acoustic patio accent, or a sensory garden marker. Furthermore, polymer clay crafting remains exceptionally beginner friendly; it requires no specialized ceramic kilns, messy pottery wheels, or hazardous glazing chemicals. Crafters can achieve the elevated aesthetic of terracotta, terrazzo, or unglazed stoneware right in a standard home kitchen oven. The modular nature of suspension mobiles makes this an ideal budget ideas project, as makers can utilize clay scrap remnants, raw wooden beads, and basic cordage to produce high-impact designs. This easy project format provides immediate creative satisfaction while offering makers an accessible medium to customize their living environments with timeless, handcrafted charm.
Materials and Preparation
Achieving structural durability and crisp acoustic quality in a polymer clay wind chime begins with deliberate materials sourcing and workspace preparation. The primary materials include high-density, professional-grade polymer clay blocks, heavy-duty weather-resistant nylon or waxed cotton cord, split rings, and an assortment of natural unfinished wooden or ceramic beads. Essential utility tools consist of an acrylic rolling pin, rolling depth guides to maintain uniform slab thickness, assorted stainless steel clay cutters, a needle tool or brass hole punch tubes, a ceramic baking tile, and parchment paper. Proper planning begins by thoroughly conditioning the clay through hand-kneading or a clay roller machine until the material is pliable and free of trapped air pockets. Clean the work surface thoroughly with isopropyl alcohol to prevent ambient dust from adhering to light-colored clays. Pre-plan the suspension holes on every pendant while the clay is completely raw, using a three-millimeter hole punch to ensure cords slide through easily after baking. Always bake pieces directly on flat ceramic tiles to prevent curling or warping during the curing cycle.
1. Minimalist Terrazzo Arch Wind Chime
Step-by-Step Guide
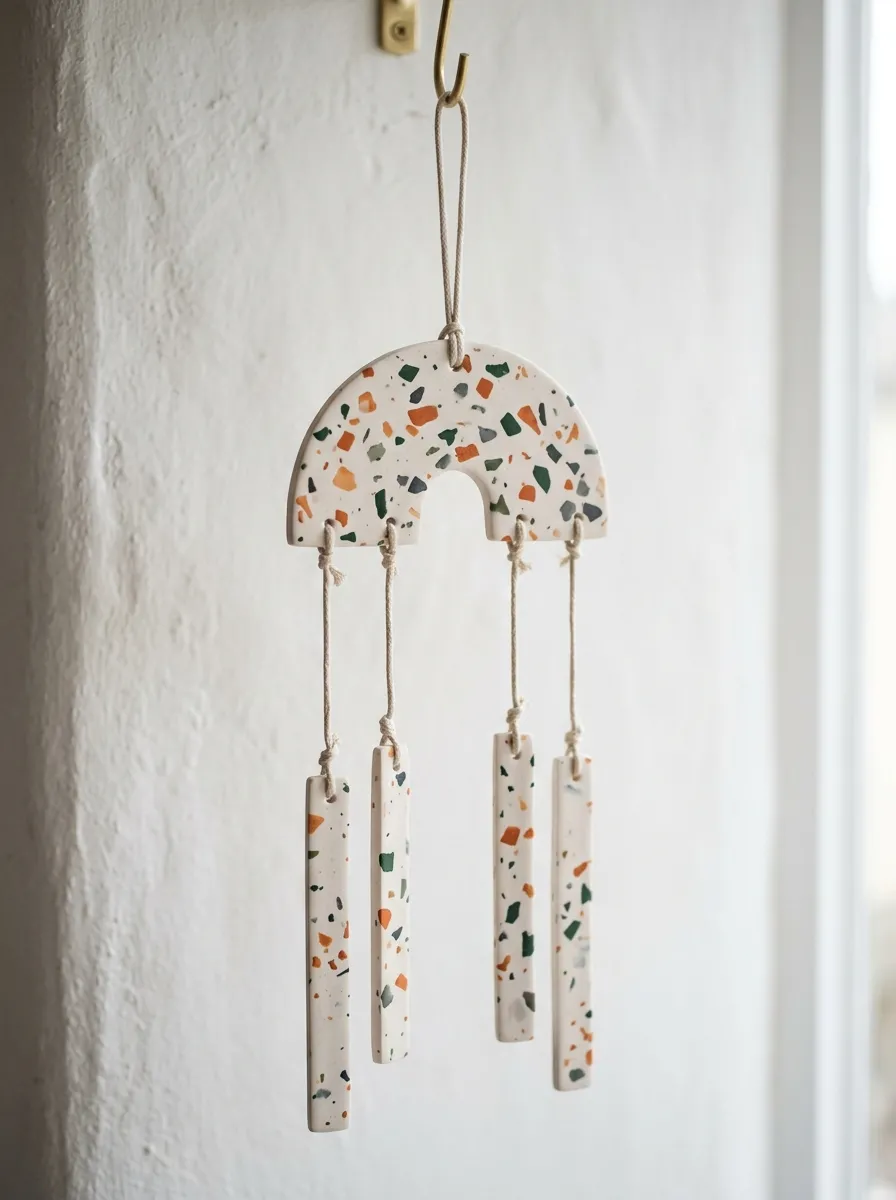
The minimalist terrazzo arch wind chime combines mid-century architectural geometry with the playful visual texture of composite stone surfaces. The foundational structure features a large, flat clay rainbow arch that serves as the horizontal suspension bridge for cascading vertical pendants. Suspended beneath the main curved arch are multiple slender vertical bell bars that sway freely, tapping against one another with every breeze. The terrazzo effect is achieved by pressing multicolored, irregularly shaped micro-flecks of cured clay into a neutral ecru or warm stone-colored base slab. This graphic arrangement provides an understated minimalist style that coordinates effortlessly with modern indoor spaces, sunrooms, and covered entryways. The broad silhouette of the arch provides stability against sudden wind gusts, keeping the suspension cords evenly spaced to prevent tangling. The matte, stone-like finish absorbs light softly, turning a basic mobile into a sophisticated piece of contemporary wall art or kinetic ceiling decor.
Condition a large block of unbleached titanium-white or ecru clay, rolling it into a four-millimeter-thick slab across a flat ceramic tile. Scatter tiny, sliced shards of baked clay in terracotta, forest green, mustard, and charcoal across the surface, rolling firmly over the slab once more to embed the flecks flush into the base. Use an arch-shaped metal cutter or a hand-drawn template to cut a five-inch wide, four-inch tall semi-circular arch frame. Cut four long rectangular clapper bars measuring one inch wide by five inches long from the remaining patterned slab. Use a three-millimeter brass punch to create one hanging hole at the crest of the arch, four evenly spaced holes along the bottom rim, and one hole at the top of each clapper bar. Smooth all cut edges with a water-dampened fingertip or silicone shaper. Bake the components flat on the tile at the manufacturer-recommended temperature for forty minutes. Once cooled, knot durable waxed cord through each bar and secure them to the arch.
2. Sculpted Terracotta Lotus Petal Mobile
How to Create
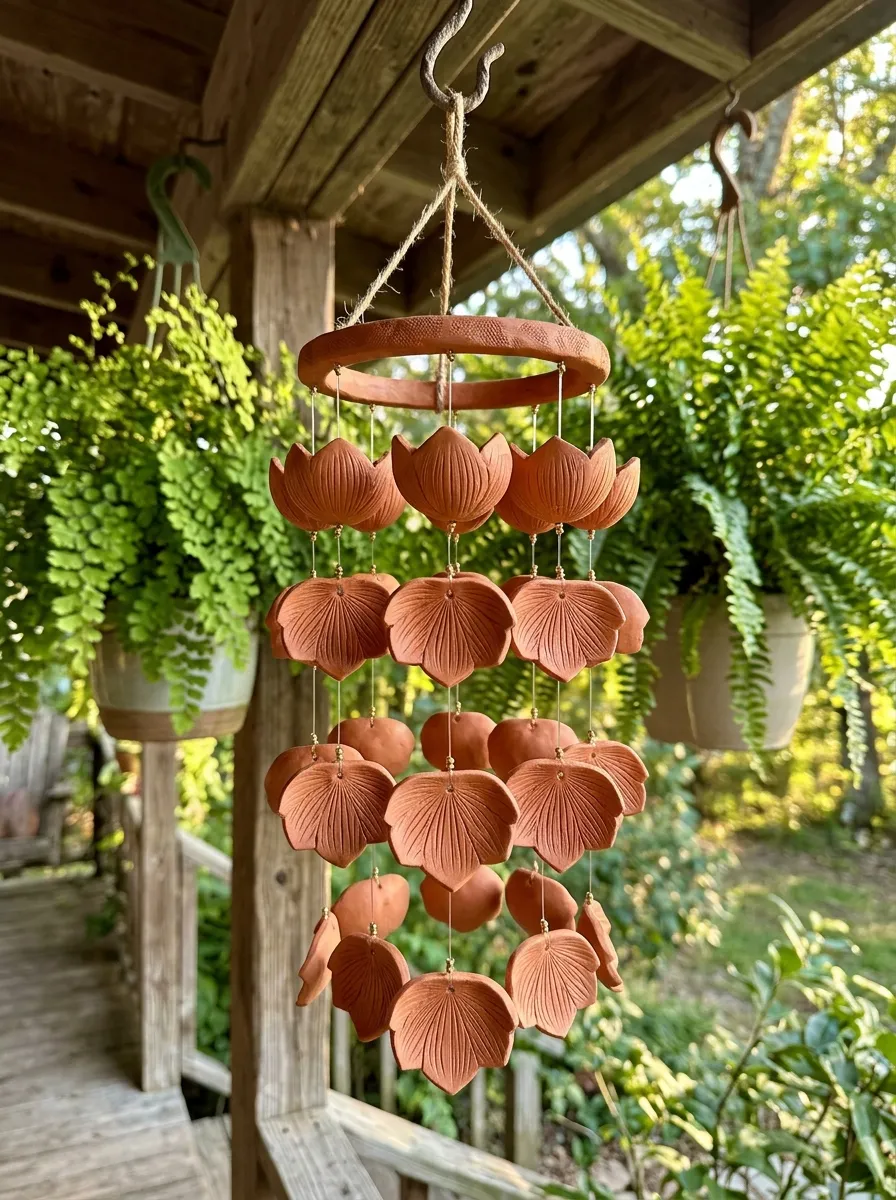
The sculpted terracotta lotus petal mobile captures botanical fluid lines, transforming organic flower forms into a multi-tiered acoustic garden ornament. This design utilizes concave petal shields arranged in graduated concentric tiers, suspended so that the curved clay edges overlap and collide smoothly in circulating air. Deep terracotta, raw ochre, and warm umber tones echo traditional outdoor pottery, making this piece a natural complement to container gardens and wooden balcony railings. Each petal features subtle hand-scored radial ridges along its surface, mimicking the delicate structural veins found in real water lilies. The slight curvature pressed into each petal before baking adds dimensional depth and enhances the acoustic resonance, creating a hollow, soft clicking sound when the elements tap together. This project teaches crafters how to add three-dimensional forms to flat clay cutouts without requiring complex wire armatures, resulting in a balanced, grounded botanical centerpiece.
Roll conditioned terracotta-toned clay to a three-millimeter thickness, using guide rings to maintain absolute uniformity across the entire sheet. Use a teardrop or petal cutter to stamp out twelve matching petal discs, dividing them into three distinct size groupings to prepare a graduated hanging drop. Use a dull craft needle or modeling stylus to press fine vertical vein lines from the pointed base outward toward the rounded tip of each petal. Place each raw petal over the curved surface of a heat-safe wooden bead or inside a ceramic spoon bowl to create a gentle, organic concave bend. Punch a two-millimeter hole through the pointed stem end of each curved piece. Cure the shaped petals in the oven on their curved supports to permanently preserve the dimensional forms. Once cooled, tie three lines of weather-resistant nylon monofilament to a central three-inch clay suspension ring, threading four petals onto each line using small stopper knots to maintain equal vertical intervals.
3. Celestial Moon Phase Kinetic Chime
Execution Process
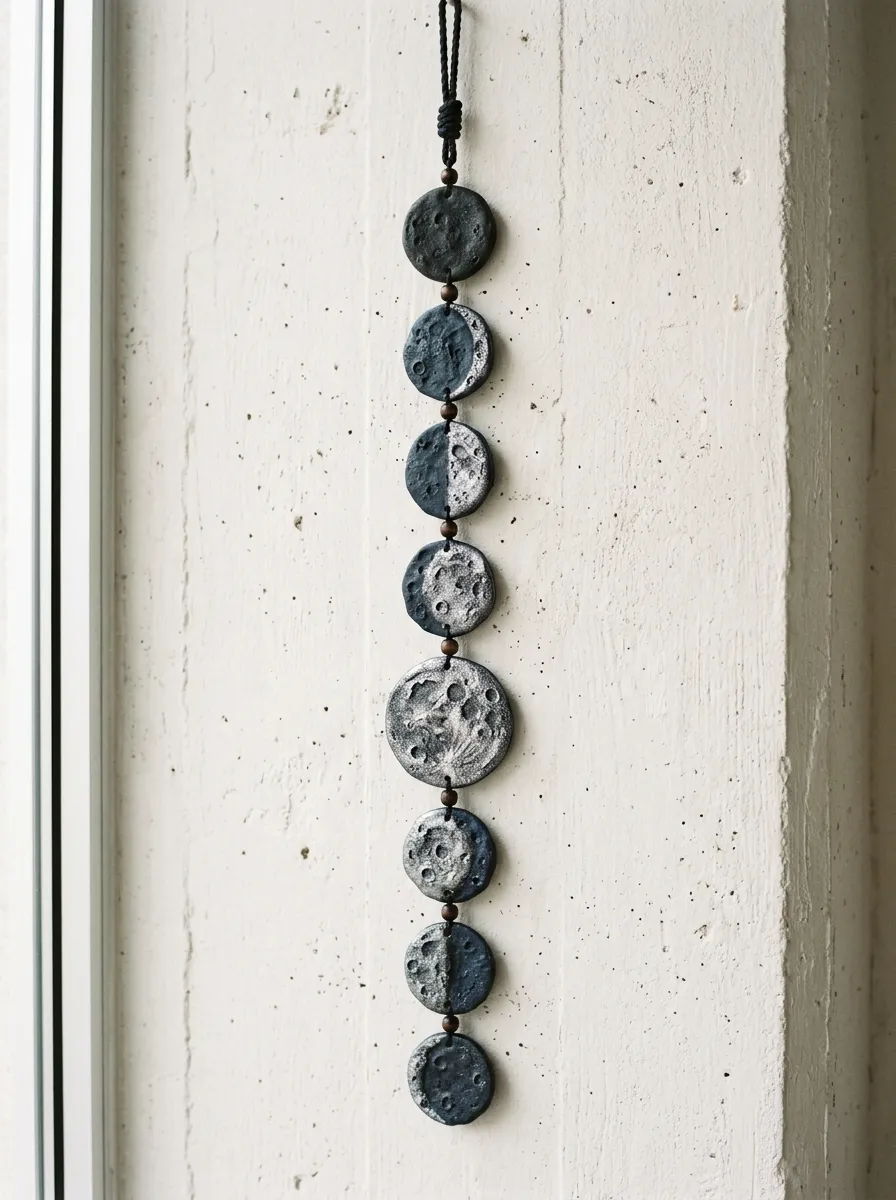
The celestial moon phase kinetic chime incorporates cosmic iconography into a vertical balance mobile that highlights the cyclical transformation of the lunar surface. The layout consists of seven suspended clay discs demonstrating the full progression from waxing crescent through full moon to waning crescent, anchored by a central circular striker plate. Finished in a dusky palette of midnight blue, soft charcoal, and shimmering pearl-white mica accents, this chime brings an air of quiet contemplation to bedroom windows and reading corners. Light surface indentations, applied using natural sea sponges or stippling tools, replicate the cratered landscape of the moon, giving the smooth clay a rich, tactile dimension. When hung vertically, the alternating crescent and orb cutouts twist gracefully in response to indoor thermal currents, catching ambient daylight. The balanced, linear configuration makes it an exceptional choice for narrow, vertical wall spaces or sliding patio door frames.
Condition dark charcoal clay and mix in a subtle pinch of white translucent clay to produce a soft, marble-veined celestial background. Roll the clay slab to a uniform four-millimeter thickness on parchment paper, smoothing the surface with an acrylic roller. Use a two-inch circular metal cookie cutter to stamp out five identical discs, leaving one whole for the full moon and slicing crescent cuts out of the remaining rounds to create paired moon phases. Stipple the surface of each moon shape with a textured sea sponge, then dust the raised crater rims with a soft fan brush dipped in silver mica powder. Punch vertical alignment holes at the top and bottom edges of each phase, except the bottom terminal piece, which requires only a single top hole. Bake the shapes flat on a smooth ceramic tile for thirty-five minutes. Thread an eight-ply braided nylon cord through each phase, securing them in correct lunar order with simple double overhand knots.
4. Geometric Bohemian Diamond Wind Bell
Step-by-Step Guide
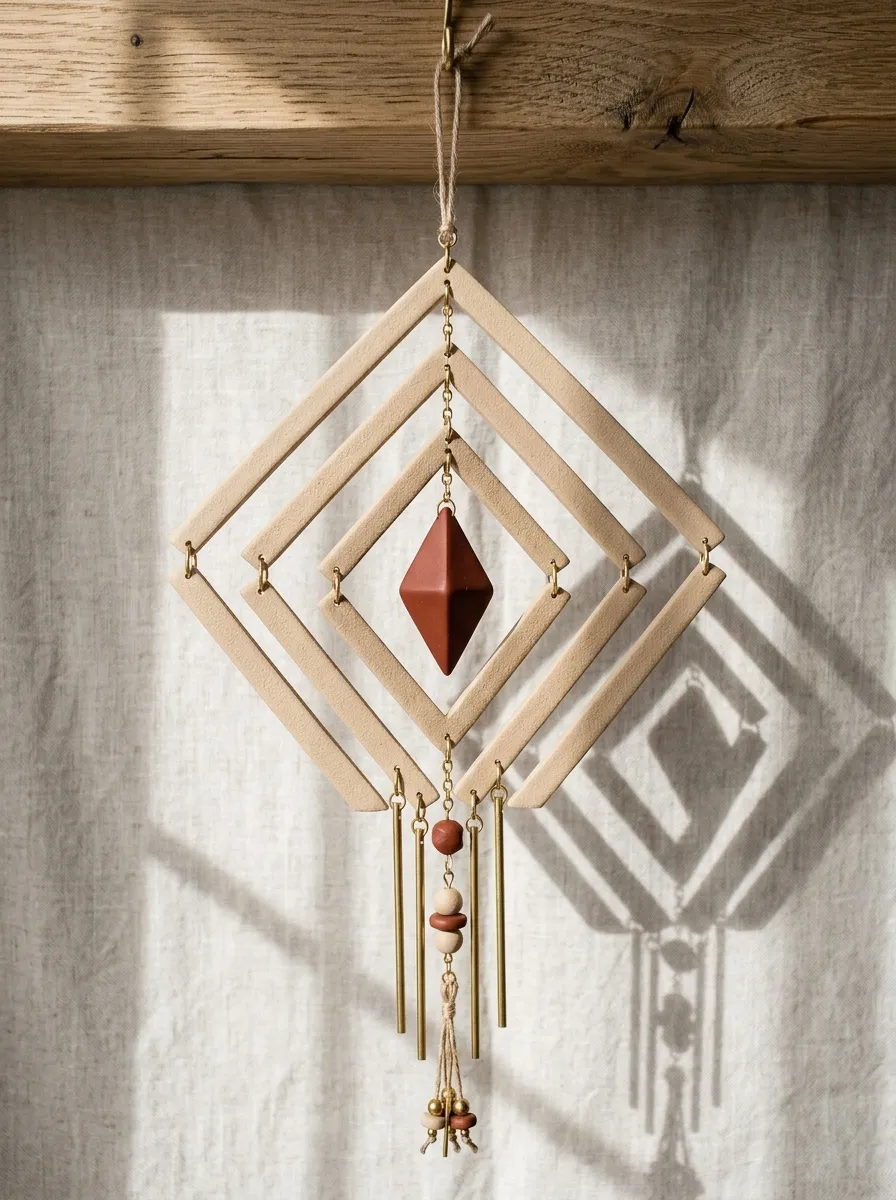
The geometric bohemian diamond wind bell pairs sharp polygonal planes with warm desert tones to produce an eye-catching, angular hanging chime. The central visual element features three interlocking open-diamond frames that nest loosely inside one another, enclosing a solid diamond-shaped pendulum clapper at the core. The color palette draws from southwestern landscapes, combining sand beige, dusty cactus green, and burnt sienna with natural raw brass jump rings. The open-frame construction reduces the overall wind resistance of the mobile, allowing the inner pendulum to swing with greater sensitivity even in faint breezes. The clean, straight lines and defined ninety-degree corners offer a crisp contrast to traditional rounded wind bells, aligning with contemporary geometric home decor trends. This piece functions equally well as a modern indoor window sculpture or an understated acoustic accent suspended from a porch ceiling hook.
Roll out conditioned sand-colored polymer clay to a thickness of four millimeters on a chilled ceramic work surface. Use a precision craft ruler and an ultra-sharp hobby blade to cut three nested diamond frames, keeping the outer borders at a uniform width of half an inch. From the remaining inner clay diamond, cut a solid diamond pendant to serve as the interior striking clapper. Use a fine needle tool to bore smooth hanging holes through the top and bottom apex of each nested diamond frame. Smooth away all knife drag lines along the sharp polygonal edges using a flat silicone color shaper. Cure all diamond frames flat on an unglazed ceramic tile, covering the pieces with a clean sheet of cardstock to ensure the planes remain flat. After cooling, connect the graduated frames together using large brass jump rings, and suspend the solid central diamond clapper from the interior top apex using a short, flexible cord.
5. Scandinavian Bell Cone Acoustic Chime
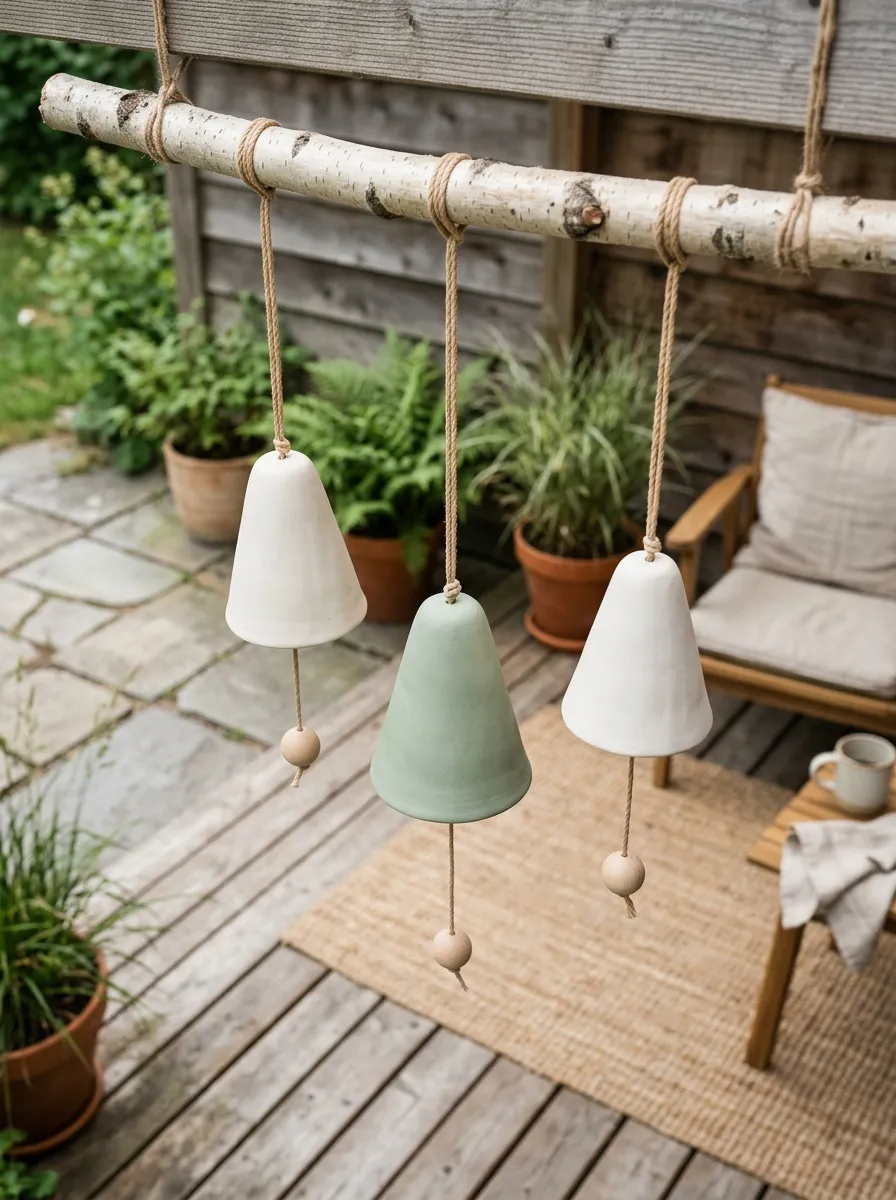
How to Make
The Scandinavian bell cone acoustic chime reimagines traditional metal tubular bells into sleek, conical clay pendants that ring softly with movement. The arrangement features three to five inverted conical clay cups suspended at staggered heights from an untreated round birch wood branch. The clean, flared rim of each cone acts as a small soundbox, amplifying the soft tapping sound produced when an internal wooden bead striker collides with the fired clay interior. A restrained, Nordic-inspired palette of bone white, soft sage, and matte dove gray keeps the focus centered on form and silhouette. The clean cones taper smoothly to a narrow apex, shedding rainwater naturally when displayed in semi-sheltered outdoor locations. The contrast between the smooth matte cones, natural light wood beads, and organic driftwood branches makes this design a staple of modern, organic interior decoration and outdoor living spaces.
Condition bone-white clay thoroughly and roll it into a three-millimeter slab, utilizing guide rails to keep the thickness consistent. Cut out semicircular patterns measuring four inches in diameter using a round cutter, slicing each circle in half with a straight-edge blade. Wrap each semicircle around an oven-safe wooden cone mandrel or a rolled cone of parchment paper, pressing the overlapping straight edges together to form a seamless cone. Smooth the exterior seam using a rounded silicone blending tool until the joint line disappears entirely. Carefully pierce a two-millimeter hole directly through the pointed tip of the cone while it rests supported on the mandrel. Cure the cones standing upright on their bases in the oven for thirty-five minutes to prevent flat spots from forming along the curved sides. Thread a waxed cotton cord through the cone tip, knotting a twelve-millimeter raw wooden bead inside the cone cavity to serve as the functional acoustic striker.
6. Coastal Sea Glass Disc Driftwood Chime

Setup Method
The coastal sea glass disc driftwood chime captures the weathered, frosted beauty of the ocean shoreline through translucent clay formulations and weathered natural wood. This design consists of dozens of smooth, circular clay coins crafted from translucent polymer clay tinted with oceanic shades of seafoam green, aqua, and soft cobalt. The edges of each disc are softened and tumbled by hand before baking, replicating the rounded, frosted profile of glass shaped by ocean waves. Suspended beneath a natural piece of ocean-tumbled driftwood, these thin translucent discs catch passing sunlight, casting colorful marine shadows against nearby walls. Because the discs are rolled thin, they produce a high-pitched, gentle clinking sound when ocean winds cause them to flutter and collide. This lightweight chime is especially suited for sunrooms, coastal balconies, and bright kitchen windows, bringing breezy seaside charm into everyday living spaces.
Condition translucent polymer clay, blending in tiny pinhead-sized crumbs of turquoise and emerald clay to create translucent sea-tinted colors. Roll the colored translucent clay into a thin two-millimeter slab on a glass cutting mat to maximize the natural light transmission of the cured material. Stamp out thirty small circles measuring one inch in diameter using a metal circle cutter or brass pastry tube. Rub each circle edge gently with a damp thumb to round off sharp corners, producing a natural, tumbled stone silhouette. Punch a small hole two millimeters from the top edge of each disc using a blunt needle tool. Bake the thin discs between two sheets of smooth ceramic tile lined with parchment paper to prevent curling and ensure absolute flatness. After curing, string three to four discs along multiple lengths of clear fishing line, spacing them with small seed beads, and tie the strands securely to a piece of driftwood.
7. Textured Botanical Herbarium Leaf Chime
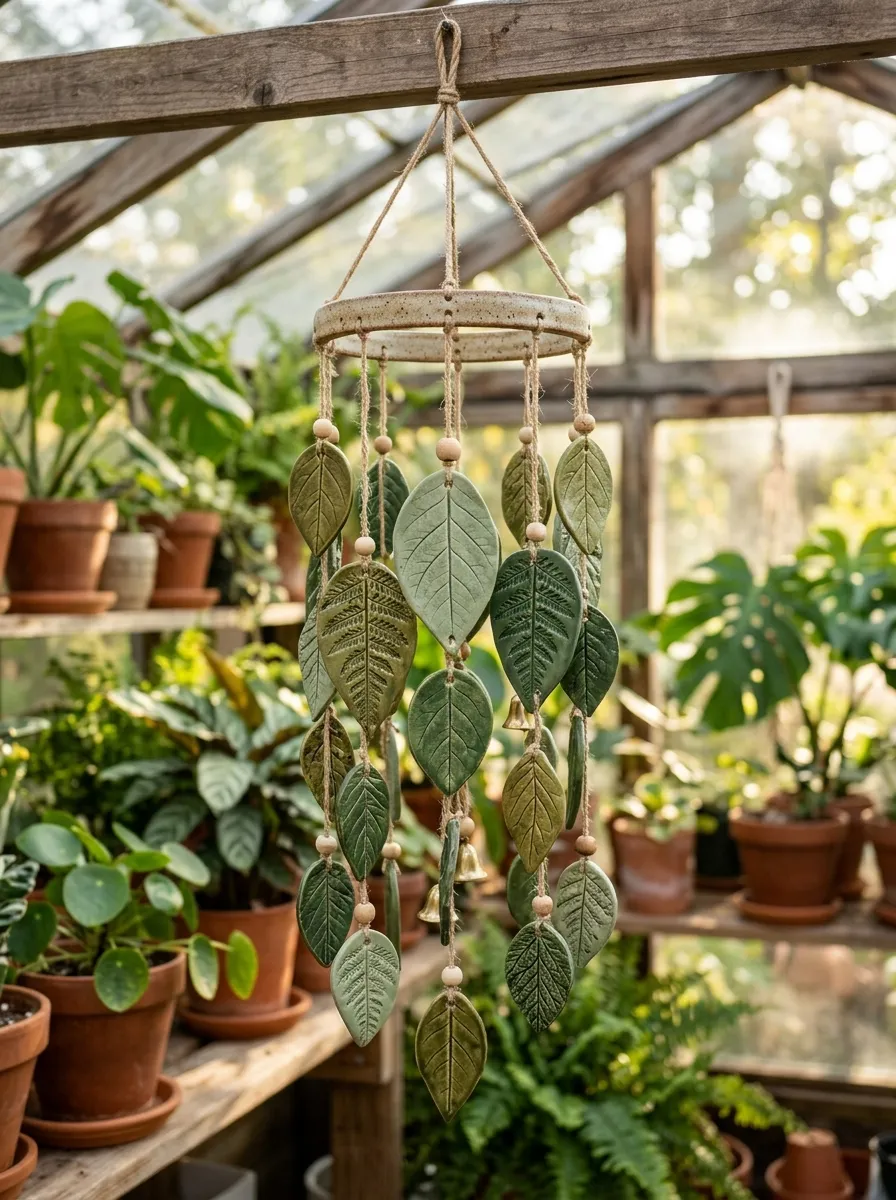
Execution Process
The textured botanical herbarium leaf chime uses direct nature casting techniques to transfer the fine venation and textures of real plant leaves into permanent clay ornaments. The design features an array of leaf-shaped clay pendants suspended in a circular arrangement from a clay embroidery-style hoop, swaying like falling leaves in an autumn breeze. Using deep forest green, sage, moss, and warm olive clay gives the chime an authentic botanical aesthetic that blends into outdoor garden spaces. Real fresh leaves, such as sage, mint, or fern fronds, are pressed firmly into the raw clay to leave detailed botanical imprints across every pendant. When winds move the mobile, the overlapping leaf forms clink together softly while rotating, displaying the detailed leaf veins on their surfaces. This design bridges the gap between natural gardening elements and handmade home decor, serving as an attractive acoustic accent for garden arches, greenhouse interiors, and outdoor dining pergolas.
Condition earthy olive-green clay and roll it out into a four-millimeter slab across a non-stick silicone craft sheet. Gather fresh, sturdy botanical leaves with prominent raised underside veins, placing them vein-side down across the rolled clay surface. Roll firmly over the leaves with an acrylic rolling pin to press the natural vein structures deep into the clay, then peel the plant leaves away cleanly. Cut around each pressed leaf impression using a fine craft knife, following the natural serrated and lobed contours of the foliage. Punch a hole through the stem base of each clay leaf using a hollow leather hole punch tool. Bake the botanical cutouts on a tile dusted with cornstarch to preserve their textured undersides without leaving flat, shiny pressure marks. Once cooled, wash away any loose cornstarch, and tie each leaf pendant to a central round clay suspension ring using natural unbleached hemp cord.
8. Japanese Wind Bell with Calligraphy Sail

How to Make
The Japanese wind bell with calligraphy sail draws inspiration from traditional Furin bells, pairing a domed clay bell with a fluttering paper or fabric windcatcher hanging beneath. The centerpiece is a smooth, inverted hemispherical clay dome, finished in minimalist neutral tones such as chalk white, charcoal, or soft ceramic gray. Suspended from the interior center of the dome is a small clay bead clapper that connects directly to a long, slender paper sail hanging below the rim. As breezes push against the broad surface area of the paper sail, it activates the internal clapper, which taps against the clay bell rim with clear acoustic rhythm. The juxtaposition of a solid clay bell with a fluttering, lightweight paper pendulum demonstrates how balanced weight distribution optimizes wind movement. This chime works wonderfully in outdoor courtyards, Zen-inspired gardens, and quiet patio corners, producing a peaceful acoustic presence that marks passing breezes.
Condition porcelain-white clay and roll it into a three-millimeter slab, cutting out a four-inch diameter circle using a round cookie cutter. Drape the raw clay disc over an oven-safe glass or ceramic sphere, smoothing the darts and folds carefully with a damp sponge to form an uncreased, hollow hemispherical cup. Use a needle tool to pierce a small three-millimeter hole through the exact center of the dome while it remains on its baking form. Cure the dome in the oven on the glass support to maintain its circular curvature. For the wind sail, cut a strip of heavy-weight, water-resistant washi paper measuring two inches wide by eight inches long, writing a favorite phrase or brushstroke motif down its length. Thread a strong nylon cord through the bell dome, knotting a round clay bead inside the bell at rim level, and tie the washi paper sail to the remaining cord tail below.
9. Modernist Abstract Cutout Suncatcher Chime
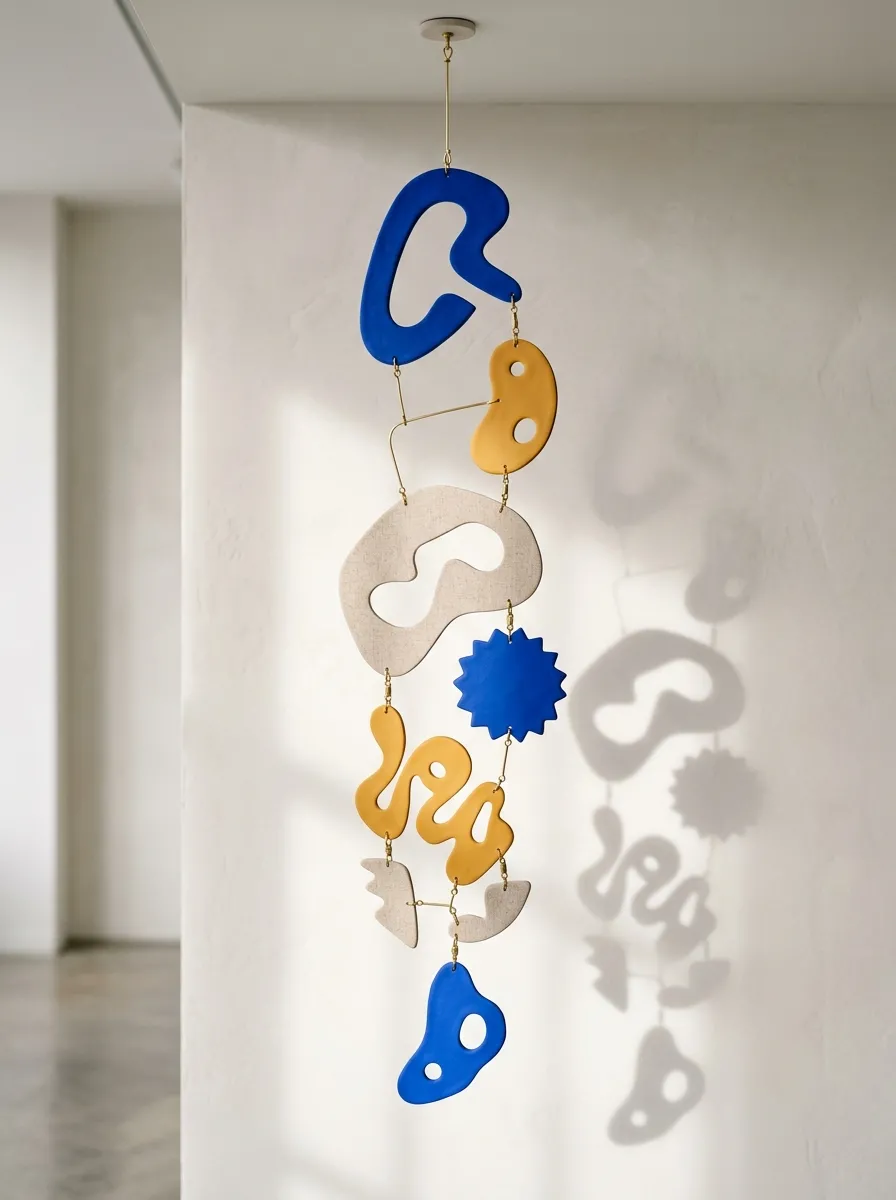
Step-by-Step Guide
The modernist abstract cutout suncatcher chime merges Bauhaus art shapes with kinetic acoustic design, creating an expressive, museum-inspired hanging sculpture. This concept incorporates varied asymmetrical geometric shapes, such as hollow squiggles, curved kidney forms, and pierced discs, that nest visually without touching when stationary. Finished in an earthy, high-contrast palette of ochre, cobalt, burnt peach, and raw linen, this chime functions as a bold visual statement piece for modern living spaces and patio areas. The deliberate inclusion of negative space within the hollow cutouts keeps the mobile lightweight, allowing the shapes to glide and pivot on their hanging lines. When ambient air currents pick up, the irregular forms collide in unpredictable rhythms, producing an appealing acoustic presence. This project provides an ideal canvas for crafters interested in modern abstract design, turning simple clay cuts into a dynamic, kinetic ceiling sculpture that catches the eye.
Condition separate blocks of cobalt blue, ochre yellow, and terracotta clay, rolling each color into an even four-millimeter slab on parchment paper. Sketch several abstract mid-century shapes onto cardstock, cut them out to serve as templates, and trace them onto the clay slabs with a sharp scalpel. Cut out interior negative spaces within the shapes, such as circular windows or organic slots, using smaller geometric craft cutters. Smooth the outer and inner contours with a damp foam sponge to create soft, rounded edges typical of cast ceramic sculpture. Punch two-millimeter suspension holes at the balance points of each abstract shape, testing the balance by supporting the piece on the tip of a needle. Bake the shapes flat on a smooth ceramic tile for forty minutes. Assemble the mobile by stringing the shapes together with fine-gauge brass wire links, joining the pieces in an asymmetrical, balanced vertical drop.
10. Tiered Ombre Raindrop Mobile Chime

Execution Process
The tiered ombre raindrop mobile chime uses gradual color shifts and fluid teardrop geometry to produce an acoustic display inspired by gentle spring rain showers. The design utilizes multiple sculpted clay raindrops suspended from a circular hoop, graduated in color from pale sky blue down to deep navy. Each raindrop is crafted with a flat back and a softly rounded front face, ensuring the components remain stable while turning in the wind. The drops hang in a spiral cascade, so that each tier collides with the row below as the mobile rotates. This graduated spiral layout maximizes the surface contact between pendants, generating frequent, gentle tapping sounds even in light indoor breezes. The ombre color transition gives the mobile an intentional, polished look that fits beautifully into nurseries, modern bathrooms, and breezy porch settings.
Create an ombre color progression by blending pure white polymer clay with small, increasing amounts of cyan blue clay, dividing the mix into four distinct blue values. Roll each color batch into a three-millimeter slab, keeping the surfaces smooth and uniform. Use a teardrop cutter to stamp out five raindrops from each of the four color slabs, producing twenty drops in total. Soften the perimeter edges of each raindrop by gently rolling a smooth glass rod across the cut boundaries. Punch a small suspension hole through the tapered top of each raindrop using a needle tool. Bake all teardrops on a ceramic tile lined with parchment paper, allowing them to cure thoroughly for thirty minutes. Cut a four-inch circular clay suspension ring, pierce twenty evenly spaced holes around its perimeter, and bake it until rigid. Tie the raindrops to the ring using clear monofilament line, dropping each color tier an inch lower to form a continuous downward spiral.
Common Beginner Mistakes and How to Avoid Them
A frequent mistake beginners make when creating polymer clay wind chimes is rolling the clay slabs too thin, resulting in brittle pendants that fracture upon impact. Slabs rolled under three millimeters often lack the structural density required to withstand repeated outdoor wind collisions. To ensure durability, always maintain a slab thickness between three and five millimeters using thickness guides or acrylic rolling rings. Another common misstep is punching suspension holes too close to the outer perimeter, which creates weak points that tear under the friction of hanging cords. Always position hanging holes at least five millimeters away from any raw edge to provide an adequate clay margin. Beginners also frequently use cheap sewing thread or thin jute twine for outdoor assembly, which degrades rapidly under ultraviolet solar radiation and moisture. Instead, use weather-resistant materials like braided nylon, fishing monofilament, or marine-grade waxed polyester cordage. Finally, under-baking clay leaves the core soft and vulnerable to snapping; always cure clay for the full duration specified by the manufacturer, using an oven thermometer to verify internal temperatures.
Practical Tips for Better Results
Achieving professional, resonant results with polymer clay wind chimes requires attention to clay density, hole placement, and balanced stringing techniques. Choose firm, professional-grade polymer clay brands rather than soft modeling clays; firmer clays cure with a higher Shore D hardness rating, resulting in a cleaner, more resonant clinking sound when struck. To ensure smooth, uniform holes that prevent cord wear, punch holes into raw clay using hollow brass tubing, twisting the tube as you press down to remove the clay core cleanly. If small surface fingerprints appear during assembly, smooth the uncured clay with a cotton swab dipped in isopropyl alcohol to dissolve light surface imperfections before baking. To achieve a modern, ceramic matte finish, sand the cured clay pieces underwater using fine four-hundred to eight-hundred grit wet-or-dry sandpaper. Finally, when assembling multi-tier mobiles, use high-quality split jump rings between the clay pieces and cord lines; this gives the pendants complete freedom of motion, allowing them to swing and strike cleanly without cord binding.
Styling, Presentation, or Organization Ideas
Styling handmade polymer clay wind chimes effectively elevates their visual impact, integrating them into the surrounding home or garden architecture. When hanging chimes on covered porches or verandas, suspend them at eye level near open corners where gentle air currents circulate without exposing the pieces to violent roof runoff. Pair earthy terracotta or terrazzo chimes with potted hanging plants, such as trailing string-of-pearls or ivy, allowing the green foliage to drape naturally around the suspended clay pendants. For interior styling, hang minimalist kinetic chimes near air vents, sunny windows, or reading corners, where passing movements create gentle, relaxing motion. If presenting these handcrafted chimes as gifts, wrap the individual pendants in soft tissue paper within a flat presentation box, securing the top cord with a branded cotton ribbon to prevent the suspension lines from tangling during transit. Photographers capturing chimes for craft inspiration portfolios should shoot under soft morning daylight against clean, neutral backgrounds like white limewash walls or natural wood siding, highlighting the fine surface textures and rhythmic shadows.
Budget or Time Planning
Creating custom polymer clay wind chimes is an economical craft project that can be completed efficiently through organized assembly-line methods. Polymer clay remains an affordable DIY medium because leftover scraps and marbled remnants can be gathered, re-rolled, and used as interior cores or terrazzo chips, minimizing material waste. Sourcing basic assembly hardware—such as wooden beads, jump rings, and waxed cord—in bulk multipacks from craft distributors reduces the per-unit cost of every chime you build. When planning your schedule, divide the crafting process into distinct stages: spend the first evening conditioning, color blending, cutting shapes, and punching holes. Dedicate the second session to baking, cooling, and wet-sanding the fired components to achieve smooth, clean edges. Reserve the final session for stringing cords, balancing suspension rings, and tying finishing knots. Completing the project in organized batches allows you to produce a cohesive collection of three to five unique chimes over a single weekend, maximizing your creative output while maintaining high craftsmanship standards.
Creative Expansion and Advanced Inspiration
Once you feel comfortable with foundational chime assembly and slab shaping, you can explore advanced variations that combine mixed media, complex acoustic structures, and interactive functional elements. Experiment with embedding metallic leaf foils, such as genuine silver or variegated copper leaf, directly into the clay slabs before cutting to introduce shimmering reflective highlights that catch passing sunlight. You can also combine polymer clay pendants with natural sound elements, such as dried bamboo hollow reeds, sea glass shards, or brass bell shells, creating layered acoustic tones with every strike. Another compelling direction is designing multi-tiered chandelier chimes using concentric metal wire rings, suspending dozens of graduated clay coins to form an intricate, swirling outdoor mobile. For evening interest, try integrating photo-luminescent glow-in-the-dark polymer clays into select pendants, creating a subtle, glowing celestial silhouette after dusk. Exploring these advanced mixed-media ideas pushes the boundaries of conventional clay crafting, transforming simple hanging ornaments into sophisticated works of kinetic acoustic art.
Leave a Reply