Handcrafted polymer clay jewelry offers an approachable medium for producing clean, wearable accessories that align with contemporary personal aesthetics. Crafting minimalist rings allows makers to explore clean silhouettes, neutral palettes, and tactile geometric forms without requiring metal fabrication tools or foundry equipment. This comprehensive guide details ten structured minimalist polymer clay ring ideas, ranging from monochrome domed bands to architectural signet shapes, twisted rope arches, and embedded mineral accents. Readers will learn the precise mechanical requirements of conditioning synthetic modeling clay, shaping custom band circumferences, reinforcing stress points, and executing reliable curing cycles for maximum structural durability. Creating bespoke clay jewelry eliminates the sizing limitations and metallic sensitivities often encountered with mass-manufactured rings, providing custom dimensions tailored to individual fingers. Furthermore, developing these modeling capabilities builds transferrable sculpting skills that easily adapt to broader textile crafts, ceramic homewares, and vanity organization accents. By mastering straightforward forming techniques such as uniform slab rolling, seam welding, and wet sanding, hobbyists can produce durable, gallery-quality jewelry. The following sections outline core preparatory workflows, essential equipment inventories, two-paragraph assembly guides for ten individual designs, and strategic planning principles for executing a clean, modern creative project.
Why This Idea Is Trending or Useful
Contemporary jewelry design has shifted toward sculptural forms, tactile textures, and earthy neutrals, making polymer clay rings prominent across modern digital mood boards and trending ideas. The practical value of polymer clay lies in its lightweight physical profile, which allows for bold geometric profiles that remain comfortable throughout everyday wear. From an artistic standpoint, the medium translates clean minimalist style principles into three-dimensional shapes, utilizing muted tones such as bone white, terracotta, slate, and raw ochre to complement modern wardrobes. As a focused DIY creative project, fashioning clay rings requires minimal table space and standard domestic craft tools, making it accessible for home crafters. Because primary ring construction relies on basic geometric manipulations like rolling uniform coils, cutting clean edges, and smoothing joints, the process serves as an exceptionally beginner friendly craft. Crafting custom rings also provides functional budget ideas, as a standard two-ounce block of artist-grade clay yields dozens of distinct pieces at minimal cost. Additionally, these handmade pieces can be integrated into home decor setups, serving as decorative accents displayed on vanity dishes or organized inside modern jewelry trays.
Materials and Preparation
Thorough planning and careful material selection are necessary for fabricating polymer clay rings that withstand daily kinetic stress. Select professional-grade polymer clay formulations with high flexibility ratings after curing; brittle baking clays must be avoided, as thin bands require tensile strength to resist snapping. Essential shaping tools include an acrylic roller, a rigid carbon steel tissue blade, a set of circular metal micro-cutters, silicone-tipped modeling pens, and a wooden or metal ring mandrel for accurate sizing. Precision calipers, parchment paper, and high-grit wet-or-dry sandpaper ranging from four hundred to one thousand grit are necessary for achieving smooth, flawless surface finishes. Preparation begins by establishing an immaculate, lint-free workspace on a polished ceramic tile or glass plate, wiping all surfaces down with isopropyl alcohol. Condition the chosen clay thoroughly by hand kneading or running it through a manual conditioning machine until the slab bends without tearing along folded edges. Record exact finger circumferences using standard sizing strips before trimming clay components, factoring in a minor thermal shrinkage margin of approximately one to two percent during the heat curing process.
1. Sculpted Bone White Dome Signet Ring
Step-by-Step Guide
The dome signet ring reimagines classic masculine signet jewelry through a softened, monolithic silhouette that flatters the hand with smooth geometry. This design features a flat, circular or oval face that transitions seamlessly into a tapered, thick band, rendered in an unglazed, matte bone white or ecru hue. The continuous curvature eliminates hard visual breaks, establishing an architectural profile that highlights subtle shadow lines across the finger. By utilizing a single uniform color, the piece emphasizes shape and negative space rather than decorative surface embellishments, adhering strictly to minimalist design traditions. The top surface provides an expansive plane that catches natural light, while the thicker band profile delivers the structural mass needed to prevent accidental fractures at the lateral stress zones. This substantial yet understated ring pairs effortlessly with tailored linen garments and neutral capsule wardrobes, functioning as an everyday statement piece that maintains quiet visual refinement.
To construct the dome signet ring, begin by conditioning a two-ounce block of bone white polymer clay until it reaches uniform plasticity without trapping internal air bubbles. Roll the clay on a glass work tile into a dense cylinder measuring approximately fifteen millimeters in diameter. Using a rigid tissue blade, slice a segment twenty millimeters long, then gently press the top face against the flat glass to create a smooth, circular upper surface. Rest the partially formed cylinder across a metal ring mandrel coated with a light dusting of cornstarch at your measured ring size, bending the lower halves downward around the metal cylinder. Blend the two bottom ends together at the underside of the mandrel using a flat silicone color shaper, smoothing the seam until completely invisible. Trim excess material from the lateral edges to create a gentle, ergonomic taper toward the base of the finger. Cure the ring supported upright on the mandrel in an oven calibrated to the clay manufacturer specifications, let it cool completely, and smooth all exterior contours using six-hundred-grit wet sandpaper.

2. Flat Square Contour Geometric Band
Execution Process
The flat square contour band challenges conventional circular ring silhouettes by introducing external angularity while preserving an ergonomic circular interior. The design presents four distinct, flat exterior facets that meet at crisp ninety-degree corners, framing the finger within a precise architectural square. When viewed from the side, the inner circle conforms comfortably to the anatomy of the finger, ensuring everyday usability without pinching neighboring digits. Rendered in a deep, matte slate gray or charcoal polymer clay, the flat exterior surfaces reflect directional light in sharp planar contrasts. This geometric design reflects structural brutalist and minimalist principles, celebrating pure geometry over ornate decoration. The added clay mass at the four corners provides natural reinforcement, significantly increasing the structural integrity of the ring compared to thin, round bands. The clean perimeter sits flat against adjacent rings if worn in a stack, making it an adaptable modular element within a broader modern jewelry collection.
Begin fabrication by rolling out a conditioned slab of slate gray clay to a uniform thickness of four millimeters, using depth guide rings on an acrylic roller. Select a circular metal cutter that corresponds to your exact finger diameter, and punch a clean hole through the center of the slab. Next, position a square metal cutter or a steel ruler around the circular cutout, aligning the circle centrally within the square borders to ensure a minimum wall thickness of two millimeters on all sides. Cut firmly downward with a sharp tissue blade to establish the crisp ninety-degree exterior corners, removing the outer clay scraps cleanly. Carefully lift the square band from the work surface using a flexible blade to prevent warping the geometric profile. Place the ring flat onto an unglazed ceramic tile lined with parchment paper to prevent thermal shine marks on the underside. Bake the piece for thirty minutes at the recommended curing temperature, cool gradually, and lightly bevel the sharp interior edges using eight-hundred-grit sandpaper.

3. Asymmetric Sculpted Wave Arch Ring
How to Create
The asymmetric wave arch ring translates organic fluid dynamics into a rigid, sculptural accessory that rests comfortably across the hand. Rather than maintaining a uniform horizontal height, the band rises into an off-center crest that sweeps diagonally over the finger before tapering back into a slender base. Crafted from warm terracotta or sandstone polymer clay, the undulating profile mimics natural wind-carved stone formations while maintaining restrained, contemporary contours. The flowing asymmetrical line creates an optical illusion that visually elongates the finger, offering a dynamic silhouette that shifts in appearance depending on which direction the ring is worn. The surface remains completely unembellished, allowing the fluid transitions between thick and thin volumes to serve as the sole design element. This piece bridges the divide between organic craft and disciplined minimalism, making it an excellent centerpiece for casual, earthy outfits.
To shape this flowing ring, roll a conditioned rope of terracotta polymer clay to a uniform diameter of six millimeters, tapering one end down to three millimeters while keeping the opposite side thicker. Drape the prepared rope around a wooden ring mandrel at the desired size marker, overlapping the ends diagonally on the underside of the finger. Use a rounded silicone tool to weld the seam together, smoothing the clay in circular motions until the connection is structurally unified with the band. On the upper surface of the ring, gently push and pinch the thicker section upward using your fingertips to form a smooth, continuous wave crest that angles across the top of the mandrel. Smooth any accidental fingernail impressions with a drop of isopropyl alcohol applied via a cotton swab. Transfer the mandrel with the supported ring directly into the curing oven, baking for forty minutes to maximize polymer cross-linking. After the piece cools, wet-sand the wave crest with one-thousand-grit abrasive paper to achieve a smooth finish.

4. Architectural Archway Tunnel Ring
Step-by-Step Guide
Drawing inspiration from classical architectural arcades, the tunnel ring features an elongated horizontal structure that wraps around the finger like a miniature vault. The top of the ring extends several millimeters along the length of the digit, presenting a smooth, barrel-vaulted exterior curve that sits flat against the natural contours of the knuckle. Finished in a pale limestone or unbleached ecru clay, the design prioritizes clean industrial forms and generous surface area. The extended barrel design distributes pressure evenly across the skin, creating an exceptionally stable fit that does not spin or tilt during daily activity. Its monolithic, tunnel-like appearance gives the illusion of a solid stone carving while retaining the lightweight properties of cured polymer compound. The continuous curved exterior surface acts as a canvas for natural light, creating soft gradients that highlight the smooth, polished texture of the finished piece.
Fabricate the tunnel ring by conditioning a generous block of limestone-tinted polymer clay and rolling it into a flat sheet measuring five millimeters in thickness. Cut a wide rectangular strip from the slab, measuring twenty-five millimeters in width and matching your calculated finger circumference in length. Bevel the two short ends at complementary forty-five-degree angles using a straight razor blade to ensure a flush, secure scarf joint when wrapped. Curve the prepared rectangular slab around a lubricated metal sizing mandrel, aligning the beveled ends underneath and smoothing the seam with a flat metal spatula. Use the flat edge of an acrylic block to press gently against the top of the tunnel, flattening the apex slightly to introduce a subtle planar architectural facet. Bake the ring while mounted on the metal mandrel for forty-five minutes to ensure thorough heat penetration through the thick clay walls. Once cooled, sand the lateral openings on a flat sheet of wet four-hundred-grit sandpaper to guarantee parallel side planes.

5. Dual Tone Split Horizon Contrast Band
Execution Process
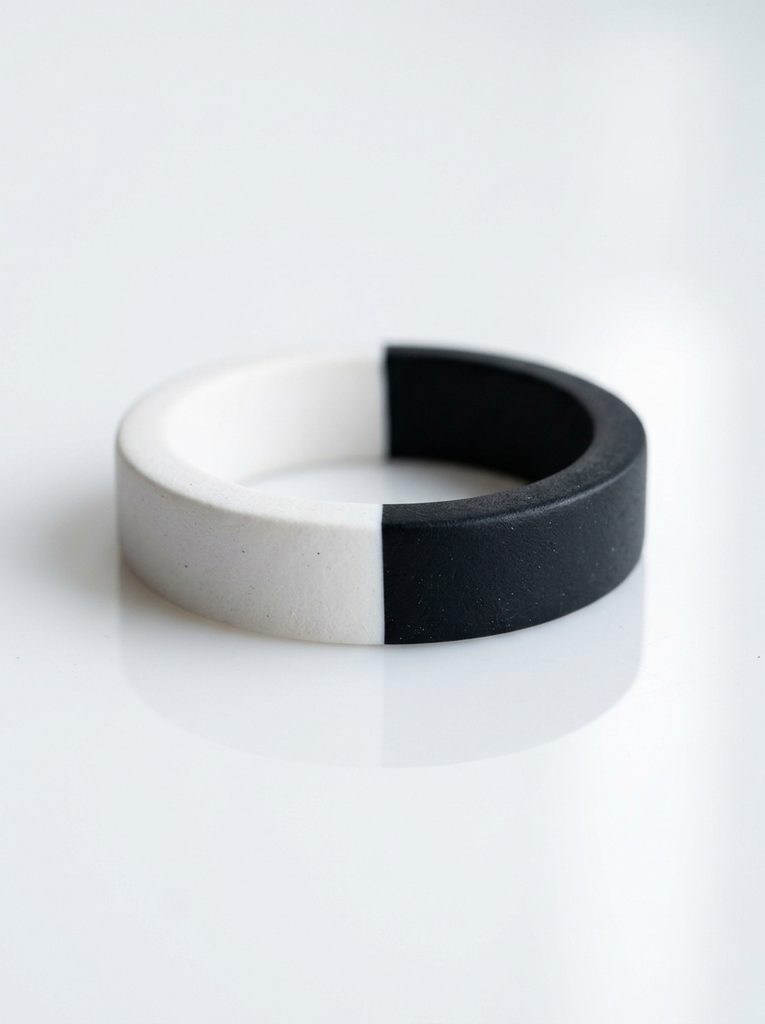
The dual tone split horizon band combines two contrasting neutral clay shades into a single, clean ring divided by a sharp vertical or horizontal line. Combining deep basalt black and pure porcelain white creates a striking graphic statement that relies on color blocking rather than decorative textures. The split-color format captures modern visual tension, celebrating clean intersections and technical precision. The band maintains a flat, low-profile exterior with a uniform four-millimeter width, preventing the contrasting colors from appearing excessive or visually chaotic. Because the design depends on the crisp division between two clay masses, seamless joining without color muddying is critical to the aesthetic success of the piece. When styled on the hand, the ring can be rotated to feature either the dark face, the light face, or the precise bisecting horizon line, offering subtle versatility within a single minimalist accessory.
To execute this clean split-color design, condition separate equal portions of pure white and deep black polymer clay, rolling each into a sheet precisely two millimeters thick. Trim one edge of each colored sheet with a rigid blade to create two straight lines. Lay the trimmed edges flush against each other on a glass plate, placing a sheet of parchment paper over the seam and rolling lightly with an acrylic pin to bond the joint without distorting the straight boundary line. Cut a narrow strip measuring four millimeters wide perpendicular to the seam, ensuring half the strip is white and the other half is black. Wrap this two-tone strip around a ring mandrel so the color intersection sits centered on top of the finger. Weld the underside ends together using a heated metal spatula, smoothing the base carefully. Bake the band on the mandrel for thirty minutes, then sand the perimeter using running water and eight-hundred-grit sandpaper to remove surface bleed and reveal a clean line between the two shades.

6. Monolithic Cylindrical Block Pillar Ring
How to Create
The cylindrical block pillar ring treats jewelry as miniature sculpture, incorporating a bold geometric cylinder positioned horizontally across a clean band base. The central design element is a crisp, solid cylinder of clay that spans the width of the finger, anchored securely to a flat, low-profile under-band. Rendered in a cool sage green or muted eucalyptus hue, the piece offers a refreshing alternative to standard metallic rings through its soft, powdery matte finish. The horizontal cylinder provides an architectural focal point that rests close to the hand, balancing striking visual presence with functional comfort. The absence of surface carving or metallic findings emphasizes the pure relationship between the curved cylinder and the flat supporting band beneath it. This ring serves as a creative conversation piece, pairing naturally with modern structural clothing, monochrome outerwear, and tailored workwear.
Begin construction by shaping a dense, uniform clay rod measuring eight millimeters in diameter, cutting a clean segment twenty millimeters in length with a razor blade to form the primary horizontal pillar. Next, roll a separate strip of matching sage green clay to a thickness of two millimeters and a width of six millimeters, sized to wrap around your measured ring mandrel. Join the ends of the flat band securely on the underside of the mandrel using a silicone blending tool. Apply a thin coat of liquid polymer clay across the top apex of the curved band to act as a heat-cured structural adhesive. Press the pre-cut cylindrical pillar firmly into the liquid clay layer, aligning it perpendicular to the direction of the finger. Use a fine needle tool to smooth the seam line where the cylinder meets the curved band, creating a reinforced structural fillet. Bake the assembled unit on the mandrel for forty minutes, cooling completely before sanding the flat ends of the cylinder with fine abrasive paper.

7. Minimalist Tapered Coil Wrap Ring
Step-by-Step Guide
The tapered coil wrap ring utilizes continuous linear line work, coiling an uninterrupted clay strand around the finger in an open, adjustable spiral. The design features a smooth cord that wraps one and a half times around the digit, terminating with clean, diagonally sliced tips that rest flat against the skin. Finished in a warm sand or desert taupe shade, the ring wraps the finger with minimalist grace, celebrating negative space between its parallel strands. The slight gap between the coiled layers provides visual lightness, preventing the ring from feeling heavy or visually dominant on the hand. Because the ends remain open rather than fused into a continuous loop, the design offers slight flexibility for seasonal swelling or multi-finger wear. The clean, untextured surface highlights the uniform thickness of the extruded cord, requiring precise manual control during the rolling and wrapping stages.
Create this open coil ring by conditioning taupe clay and extruding or hand-rolling a smooth, uniform rope measuring three millimeters in diameter and eighty millimeters in length. Roll the ends of the cord with a flat acrylic block to ensure a consistent circular cross-section throughout the entire piece. Wrap the rope diagonally around a wooden sizing mandrel at your target size, allowing the strands to circle the circumference once fully and overlap across the top third of the finger. Use a scalpel or razor blade to slice both terminal tips at a crisp thirty-degree angle, ensuring the sliced planes sit flush with the natural curve of the band. Smooth the freshly cut tips with a drop of rubbing alcohol on a fine-tipped brush to remove any sharp cut marks. Place the mandrel into the curing oven, baking the wrapped assembly for thirty-five minutes. Once cooled, gently slide the ring from the mandrel, checking that the open coils retain their spring and structural memory.

8. Embedded Raw Terrazzo Pebble Band
Execution Process
Inspired by traditional Venetian composite stone flooring, the embedded terrazzo band incorporates contrasting particulate fragments into a neutral base clay. This design features a flat, wide band of warm ecru clay scattered with microscopic flecks of cured black, sienna, and olive clay shards. The surface is ground flat and smooth through extensive wet sanding, exposing the interior geometric shapes of the embedded fragments flush with the main band surface. The resulting pattern offers subtle textural complexity while preserving a disciplined, modern minimalist aesthetic. The matte stone-like finish mimics natural composite rock, pairing beautifully with woven fabrics, raw denim, and understated accessories. By integrating cured clay scraps into an uncured matrix, the technique functions as an efficient, low-waste method that repurposes workshop remnants into durable, wearable accents.
To produce the terrazzo band, gather small cured scraps of black, olive, and sienna clay, chopping them into fine, irregular flakes measuring between half a millimeter and two millimeters using a tissue blade. Condition a fresh block of ecru clay, roll it out into a sheet three millimeters thick, and scatter the chopped colored fragments across the surface. Place a sheet of baking parchment over the clay and roll firmly with an acrylic pin to press the fragments into the uncured ecru base until completely flush. Cut a clean strip measuring six millimeters wide and matching your measured finger circumference. Wrap the strip around a ring mandrel, cutting the ends square and joining them with a firm butt joint reinforced with liquid clay. Bake the ring on the mandrel for forty minutes at the prescribed curing temperature. After the ring cools, wet-sand the outer surface under running water using successive grits from four hundred to one thousand to level the flecks and achieve a smooth finish.
9. Narrow Double-Ridge Parallel Split Band
How to Create
The double-ridge parallel split band creates an illusion of two distinct floating rings connected by an invisible structural bridge beneath the finger. The design presents two parallel circular bands, each measuring just one and a half millimeters in thickness, separated by an open air gap of three millimeters. Rendered in a deep, matte navy or slate blue clay, this design plays with transparency, structure, and negative space on the hand. The open gap allows the wearer’s skin tone to show through, breaking up the visual weight of the accessory while maintaining structural unity. By connecting the two parallel rings into a single wide base on the underside of the finger, the piece remains stable and properly aligned without twisting independently. This clean architectural style suits enthusiasts of modern industrial design, serving as an understated accent that adds visual interest without bulk.
Begin by rolling out a uniform sheet of navy clay to a thickness of two millimeters, cutting two long strips that each measure one and a half millimeters in width. Next, roll a third wider strip measuring six millimeters in width and ten millimeters in length to serve as the structural connecting plate for the underside of the band. Lay the two narrow strips across a metal ring mandrel side by side, using a three-millimeter-wide strip of scrap paper as a temporary spacer to maintain a uniform gap between the parallel rails. Wrap both strips around the mandrel, bringing their ends down to meet the wider connecting plate positioned on the underside of the finger. Fuse the ends of the narrow rails securely into the base plate using a needle tool, smoothing the junctions until the transitions are cohesive. Carefully remove the paper spacer, slide the mandrel into the oven, and bake for thirty-five minutes. Finish by hand-sanding the exterior rails with fine-grit abrasive paper to ensure straight profiles.

10. Beveled Hexagonal Facet Signet Ring
Step-by-Step Guide
The beveled hexagonal facet signet ring merges geometric discipline with classic jewelry shapes, presenting a six-sided flat face supported by faceted sloping shoulders. The top of the ring showcases a defined hexagonal plane that catches light across its flat face, flanked by six angled facets that taper smoothly down into a rounded bottom band. Rendered in a warm taupe, clay gray, or muted olive tone, the ring celebrates crisp edges, clean planes, and deliberate geometric symmetry. The angular geometry introduces a modern edge to the hand, balancing organic skin contours with sharp industrial lines. Despite its substantial appearance, the interior remains completely rounded and smooth, guaranteeing all-day wearability. The geometric structure provides high resistance to impact, as the angled facets distribute mechanical forces efficiently around the perimeter of the finger.
Fabricate the hexagonal ring by conditioning a block of taupe clay and forming it into an oversized, rounded signet ring base over a metal mandrel at your measured size. Once the rough signet shape is established with a flat top face and thick shoulders, chill the clay assembly on the mandrel in the refrigerator for twenty minutes to firm the material. Using a fresh, ultra-sharp carbon steel tissue blade, execute deliberate, single-pass cuts to carve the central face into an equilateral hexagon. Carefully slice angled bevels along the six perimeter edges of the top face, sloping them downward toward the rounded band below to establish clean facets. Use a light hand to avoid distorting the cooled clay during slicing. Bake the carved ring directly on the mandrel for forty-five minutes to achieve maximum density and structural cross-linking. After the piece cools, sand each facet on a flat piece of glass lined with wet eight-hundred-grit sandpaper, keeping the facets flat to preserve sharp lines.

Common Beginner Mistakes and How to Avoid Them
The most critical technical error in polymer clay ring making is under-baking the finished pieces out of fear of scorching the clay. Under-cured polymer clay remains brittle, weak, and prone to snapping under the natural bending pressures of daily hand movements. Prevent this by using an independent oven thermometer to verify temperature accuracy, curing high-strength clays for the maximum duration recommended by the manufacturer. Another frequent mistake is neglecting to condition the clay thoroughly, which traps microscopic air pockets within the band that manifest as structural failure points over time. Always knead raw clay until it is soft, pliable, and passes the fold test without cracking along its seams. Beginners also frequently overlook the importance of reinforcing the bottom seam where the band ends meet beneath the finger. Simply pressing ends together creates a weak butt joint that will split; always bevel the joining edges into a scarf joint, apply liquid polymer clay, and blend the material with a smoothing tool. Finally, avoid using fast-baking, brittle craft clays that lack flexibility, opting exclusively for professional artist-grade polymer clays engineered specifically for jewelry and functional accessories.
Practical Tips for Better Results
Achieving professional, gallery-quality finishes on polymer clay rings depends on meticulous surface preparation and disciplined sanding regimens. Always work over a clean sheet of glass or polished ceramic tile, keeping a bottle of ninety-one percent isopropyl alcohol and a lint-free cloth nearby to clean tools and smooth raw clay surfaces before baking. To eliminate tedious post-bake sanding, smooth out fingerprints and minor surface imperfections on uncured clay using a soft paintbrush dipped lightly in rubbing alcohol. When forming bands around metal mandrels, dust the metal lightly with cornstarch or wrap it in a single layer of baking parchment to prevent raw clay from sticking to the tool during the curing cycle. Invest in high-grade wet-or-dry abrasive papers, and always sand cured rings submerged in warm water containing a drop of dish soap to prevent clogging the abrasive grit and suppress airborne particulate dust. Progress systematically through four hundred, six hundred, eight hundred, and one thousand grits to eliminate tooling marks. Finally, buff the fully sanded, dry rings vigorously against a piece of soft cotton denim or a clean canvas cloth to bring out an understated, satin-smooth finish without relying on chemical varnishes.
Styling, Presentation, or Organization Ideas
Minimalist polymer clay rings function best when styled with intention, harmonizing with modern capsule wardrobes and clean interior vanity spaces. Pair neutral-toned clay bands with tailored, textured fabrics like heavy raw linen, ribbed cotton knits, and unstructured wool blazers to highlight the tactile qualities of the accessories. For a modern curated look, stack a slender flat-edge band alongside a broader architectural signet, balancing bold geometric mass with narrow negative space across adjoining fingers. When presenting these pieces as gifts or inventory, mount the rings on slotted untreated wood blocks or within raw linen jewelry boxes to reinforce the organic, artisanal nature of the craft. For home storage and daily display, arrange your collection on sculptural ceramic ring cones, shallow stone dishes, or carved wooden trays placed on open dresser shelving. This method integrates your jewelry into your bedroom decor while keeping your favorite pieces accessible and organized. Maintain the clean appearance of your rings by storing them flat away from direct sunlight, shielding the matte surfaces from abrasive contact with hard metallic jewelry items.
Budget or Time Planning
Executing a curated collection of polymer clay rings requires minimal capital outlay and structured time management to maximize creative efficiency. Save on initial startup costs by investing in basic multi-packs of neutral clays rather than large specialized tool kits, using household items like smooth drinking glasses, razor blades, and metal tubes as functional rolling and cutting implements. Organize production schedules into dedicated, modular crafting sessions: allocate the first hour to conditioning clay, mixing custom color recipes, and rolling uniform slabs; use a second uninterrupted block for cutting, sizing, and assembling rings on mandrels; and dedicate a final session to baking, curing, and wet-sanding. A single standard two-ounce block of clay can yield upwards of fifteen to twenty minimalist rings, keeping the material cost per piece under fifty cents. Store uncured custom clay mixtures in airtight polypropylene containers or clean wax paper wraps, shielding them from heat and dust to prevent premature firming. By batch-curing multiple rings simultaneously on a single ceramic baking tile, you conserve household oven energy and maximize production output during focused creative weekend projects.
Creative Expansion and Advanced Inspiration
Once you have mastered foundational ring sculpting, explore advanced variations to expand your decorative portfolio and refine your personal jewelry style. Experiment with creating faux stone finishes by incorporating natural materials like fine granite dust, powdered slate, or dried crushed tea leaves into translucent clay bases to simulate soapstone or jasper. You can also translate minimalist ring silhouettes into matching accessory collections, scaling up your geometric profiles to form sculptural bangle bracelets, modern pendant necklaces, and minimalist stud earrings. Consider integrating mixed-media hardware, embedding small sterling silver or brass wire frames into the clay before baking to add hidden structural reinforcement and metallic accents. Scale your clay fabrication skills into functional home accessories, sculpting coordinating modular ring cones, geometric cabinet knobs, and minimalist vanity trays using the same color recipes and finishing methods. Document your successful ring circumferences, custom color formulas, and curing parameters in a dedicated studio journal, creating an organized design archive that streamlines future creative projects and ensures consistent sizing across every handmade collection.
Leave a Reply