Handmade polymer clay jewelry has established itself as an essential staple within creative craft communities, offering makers an accessible medium to produce durable, wearable botanical art. This comprehensive guide examines ten unique floral polymer clay pendant ideas, detailing the exact fabrication techniques, color-blending strategies, and assembly methods required to produce professional studio-grade pendants at home. You will learn how to condition raw clay, sculpt intricate miniature petals, balance negative space on flat bases, cure finished pieces securely, and mount professional jewelry findings. Adopting polymer clay as a jewelry medium eliminates the need for expensive metal-casting equipment, allowing you to replicate organic botanicals with remarkable tactile precision and structural durability. By mastering petal manipulation, surface texturing, and pigment integration, you can transform simple clay blocks into refined accessories suitable for daily wear or gifting. The following blueprints outline practical sculpting processes, providing systematic instructions that streamline preparation, reduce material waste, and elevate your creative jewelry projects into polished, artisan-quality statement pieces.
Why This Idea Is Trending or Useful
Botanical clay pendants maintain immense popularity among trending ideas on Pinterest because they unite natural flora with timeless minimalist style. Modern jewelry enthusiasts increasingly seek out custom, handmade statement accessories that express individuality far better than mass-produced retail alternatives. From a practical perspective, polymer clay cures into a lightweight, water-resistant, shatterproof plastic, making it comfortable for everyday wear without pulling uncomfortably on chains or cords. This creative project holds massive DIY appeal for beginners, as it requires minimal upfront investment in specialized studio equipment to yield striking results. The process provides limitless design relevance, whether you prefer modern geometric backdrops paired with soft wildflowers or vintage-inspired cameo florals. Because the uncured clay remains completely workable until baked in a standard domestic home oven, beginners can practice shaping delicate petals repeatedly without rushing against drying times. This forgiving, highly tactile medium empowers makers of all experience levels to produce professional botanical jewelry efficiently.
Materials and Preparation
Achieving smooth, fingerprint-free results requires thoughtful workspace preparation, clean tools, and foundational materials before opening your clay blocks. Begin by collecting several blocks of professional polymer clay in botanical shades such as sage green, cream, terracotta, blush pink, and forest green, along with an ultra-smooth ceramic work tile or tempered glass cutting mat. Essential shaping tools include an acrylic roller, stainless steel tissue blades, micro-cutters in geometric configurations, a set of metal ball stylus tools, pointed needle tools, fine-grit wet-and-dry sandpaper, and an accurate freestanding oven thermometer. To assemble the pendants, keep jewelry findings on hand, specifically stainless steel jump rings, sturdy bail connectors, flat jewelry pliers, and flexible craft wire. Prepare your working environment by scrubbing all surfaces, washing your hands thoroughly to eliminate skin oils, and keeping isopropyl alcohol wipes nearby to wipe your roller and blade between color changes. Thorough planning ensures smooth progress: pre-sketch your pendant outlines onto gridded graph paper to establish accurate dimensions before conditioning and cutting your base slabs.
1. Sculpted Terracotta Wild Rose Medallion
Step-by-Step Guide
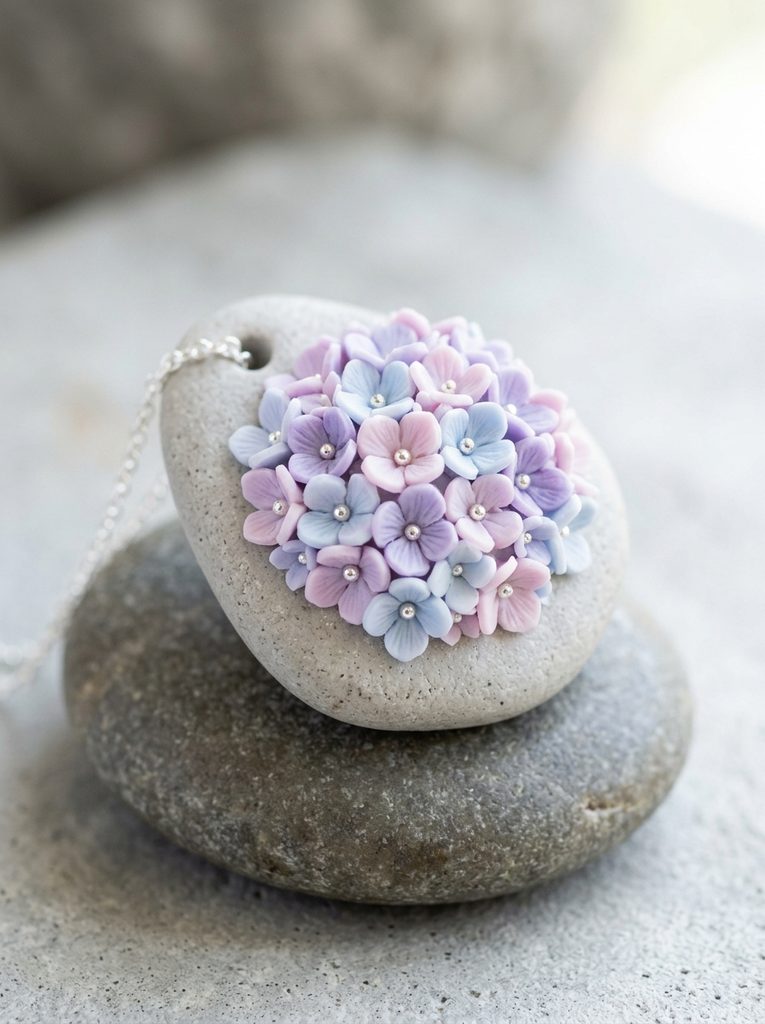
The sculpted wild rose medallion pairs warm terracotta clay bases with delicate, soft-ivory petals to establish a rustic earth-toned aesthetic. This concept uses a round geometric foundation to anchor a single dimensional wild rose blossom surrounded by miniature textured foliage. The contrast between the matte, warm terracotta disk and the delicate ivory petals captures organic charm while maintaining clean perimeter lines. Unlike flat graphic pendants, this design incorporates raised relief, allowing each layered petal to cast natural micro-shadows across the pendant surface. The overall composition balances bold color blocking with delicate miniature sculpting, creating a versatile accessory that complements casual linen apparel and neutral knitwear alike.
Condition two portions of terracotta clay through an acrylic roller until the slab reaches an even depth of three millimeters, then cut out a circular base using a forty-millimeter stainless steel round cutter. To create the rose, roll twelve miniature spheres of ivory clay ranging from one to three millimeters in diameter. Flatten each sphere between two sheets of clear wax paper using your thumb to form organic, paper-thin petals with slightly irregular edges. Using a fine-point needle tool, wrap the smallest flattened petal tightly around itself to build the center bud, and gradually adhere the remaining petals around the core in overlapping concentric layers. Mount the rose onto the upper quadrant of the terracotta disk, press three teardrop-shaped sage leaves along the base, and use the needle tool to indent central leaf veins before baking.
2. Pressed Wildflower Ceramic Slab Silhouette
Execution Process
This pressed wildflower silhouette reinterprets traditional ceramic tile work by embedding flat botanical elements directly into a white polymer background. The aesthetic relies on an ultra-smooth, stark-white rectangular slab that functions as a blank canvas for pressed botanical stems, tiny blossoms, and delicate greenery. Rather than building high-relief dimensions, this method maintains a uniform, flat surface where petals and stems fuse flush with the background clay during rolling. The result is a clean, modern design reminiscent of fine porcelain stationery or framed botanical specimens. This pendant delivers an understated, minimalist look with a smooth tactile surface that rests comfortably against the chest without catching on delicate clothing threads.
Prepare a flat rectangular base by rolling conditioned white clay to an even four-millimeter thickness on a glass sheet, trimming the edges into a sharp twenty-five by forty millimeter rectangle with a clean tissue blade. For the botanical elements, roll minuscule threads of olive green clay to serve as fragile flower stems, along with mustard yellow and lavender spheres for the blossoms. Position the stems vertically across the white surface in natural curves, carefully placing the tiny colored clay spheres at the branch tips. Lay a smooth sheet of parchment paper over the uncured arrangement and roll an acrylic roller gently across the paper with even, moderate pressure until all botanical components press entirely flush with the white slab. Pierce a neat hole at the top using a three-millimeter hollow leather punch before baking.

3. Geometric Arch with Sunburst Daisies
How to Make
The geometric arch pendant combines architectural lines with cheery retro daisies, resulting in a balanced composition that bridges structural geometry and organic softness. The base utilizes a clean archway silhouette cut from deep forest green or rich navy clay, providing a deep visual foundation. Across the lower curved span of the arch, a cluster of miniature daisies fans outward in an asymmetrical sunburst formation. The stark contrast between the structured straight bottom edge, the smooth upper radius, and the delicate white petals establishes visual movement. This modern design appeals to those who enjoy clean Scandinavian or mid-century aesthetics, bringing an artistic focal point to monochrome or minimalist wardrobe choices.
Condition deep forest-green clay and roll it to a three-millimeter thickness on your ceramic tile, cutting the main silhouette using a metal arch cutter measuring thirty millimeters wide by forty-five millimeters high. To construct the daisies, roll a thin sheet of pure white clay to a one-millimeter thickness and use a miniature multi-petal cutter or hand-cut tiny teardrop petals using a sharp craft scalpel. Arrange five petals in a radial circle directly onto the lower left curve of the green arch, pressing a tiny textured ball of sunny yellow clay into the center using a blunt ball stylus. Repeat this process to create two smaller companion daisies flanking the primary flower, overlapping the petals slightly along the arch curve. Smooth the edges with a soft silicone tool before baking to ensure clean seams.

4. Vintage Botanical Cameo Oval
Setup Method
Inspired by classical European heirlooms, the vintage botanical cameo oval uses an ornate frame to elevate delicate clay florals into timeless statement jewelry. This design relies on a traditional black or deep burgundy oval foundation bordered by a finely twisted clay rope trim. Resting inside this framed boundary is a delicate white lily of the valley or miniature morning glory vine sculpted in soft relief. The deliberate pairing of dark background clay with pale botanical accents replicates antique carved shell or stone cameos. This pendant style carries substantial visual weight and historical elegance, making it an ideal pairing for formal collars, vintage blouses, or evening wear.
Roll conditioned black clay to a solid four-millimeter thickness and cut an oval shape measuring thirty-five by fifty millimeters using a dedicated stainless steel oval cutter. Create the ornate outer frame by extruding two extremely thin strands of black clay, twisting them tightly together into a uniform decorative rope, and adhering it around the oval edge. For the botanical cameo subject, shape tiny translucent white clay teardrops into drooping bell flowers, hollowing out each opening with a fine round stylus. Attach a curved pale green vine across the dark oval field, positioning the hollow bell blossoms along the stem in a descending cascade from largest to smallest. Lightly dust the raised petals with dry pearlescent mica powder using a soft watercolor brush to accentuate the antique relief before oven curing.

5. Floating Fern Leaf Asymmetrical Teardrop
How to Create
The floating fern leaf teardrop features asymmetrical balance, utilizing negative space and fine linear textures to produce a peaceful, woodland-inspired pendant. The base is an elongated teardrop cut from translucent or milky-white clay, giving the finished piece a soft, sea-glass look when cured. Suspended along one outer curve of the teardrop is an intricate, curved fern frond rendered in muted eucalyptus green. Leaving the opposite side of the pendant open creates an uncluttered, modern look that emphasizes the delicate fern silhouette. This design functions as an easy project that teaches makers how to manage delicate miniature greenery without overwhelming small pendant bases.
Roll translucent clay to a uniform three-millimeter slab, smoothing away any surface dust with a cotton swab dipped in rubbing alcohol, then cut out an elongated teardrop shape thirty millimeters wide by fifty millimeters tall. Prepare the delicate fern frond by rolling a tapered thread of eucalyptus green clay to serve as the central rachis, positioning it along the curved edge of the teardrop base. Form dozens of miniature green leaf segments by rolling tiny clay grains into pointed ovals, flattening each piece lightly onto your fingertip. Attach these leaf pairs symmetrically down both sides of the central green stem using a needle tool, pressing the center of each leaf to create a natural furrow. Ensure all leaf tips adhere securely to the base slab before transferring the piece to your baking tray.
6. Golden Ochre Sunflower Disk
Step-by-Step Guide
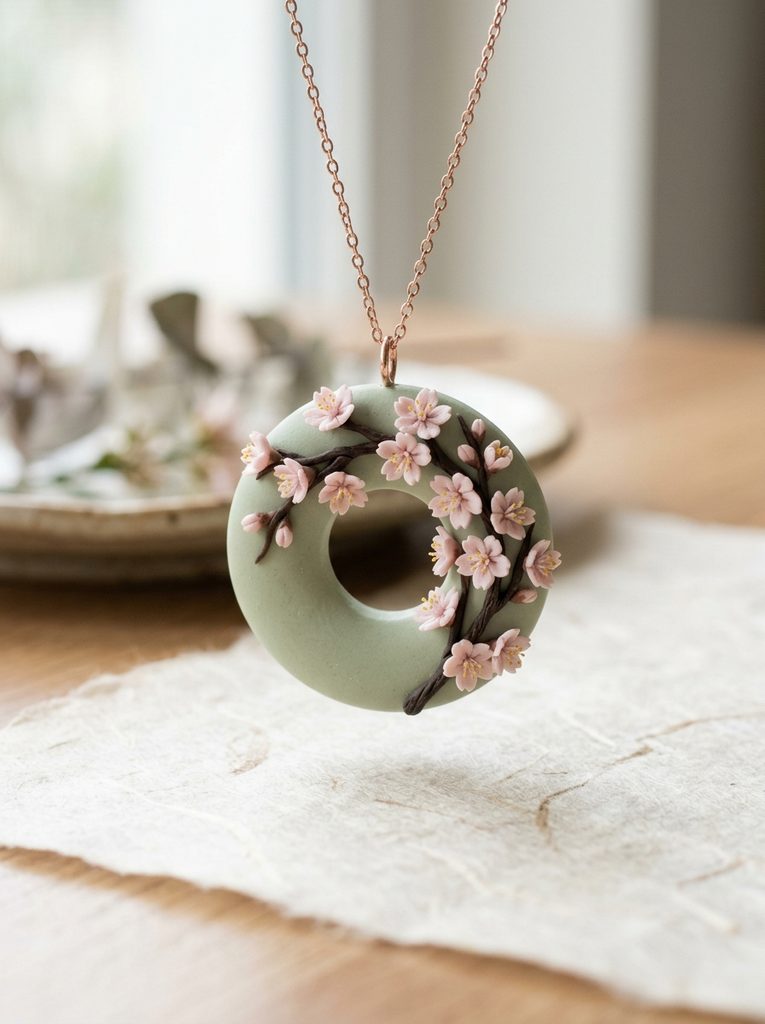
The golden ochre sunflower disk utilizes warm, radiant tones and rich surface texturing to create a bold, cheerful botanical pendant. This design features an oversized sunflower head centered upon a circular base cut from warm beige or sandy-toned clay. The composition focuses on depth and texture: deep golden-yellow petals surround a dark espresso-brown seed center that is heavily stippled with a needle tool. The rich palette brings natural warmth to autumn collections, capturing the organic charm of late-summer harvests. Its sturdy, round shape and low-profile relief make it durable for regular daily wear, resting comfortably without fragile petals catching on outerwear.
Roll beige polymer clay into a three-millimeter sheet on your glass work surface and stamp out a circular base measuring thirty-five millimeters across. Condition rich mustard-yellow clay, roll it to a one-millimeter thickness, and cut fourteen pointed almond shapes to construct the sunflower petals. Arrange these petals evenly around the perimeter of the disk, overlapping their sides slightly and using a needle tool to score two light longitudinal crease lines down each petal face. Roll a ball of deep brown clay, flatten it into a thick circular coin, and position it directly over the petal roots in the center. Use a fine needle tool or stiff-bristled craft brush to repeatedly stipple the entire surface of the brown disk, generating a dense, tactile seed texture before baking the pendant fully.
7. Pastel Hydrangea Cluster Pebble
How to Make
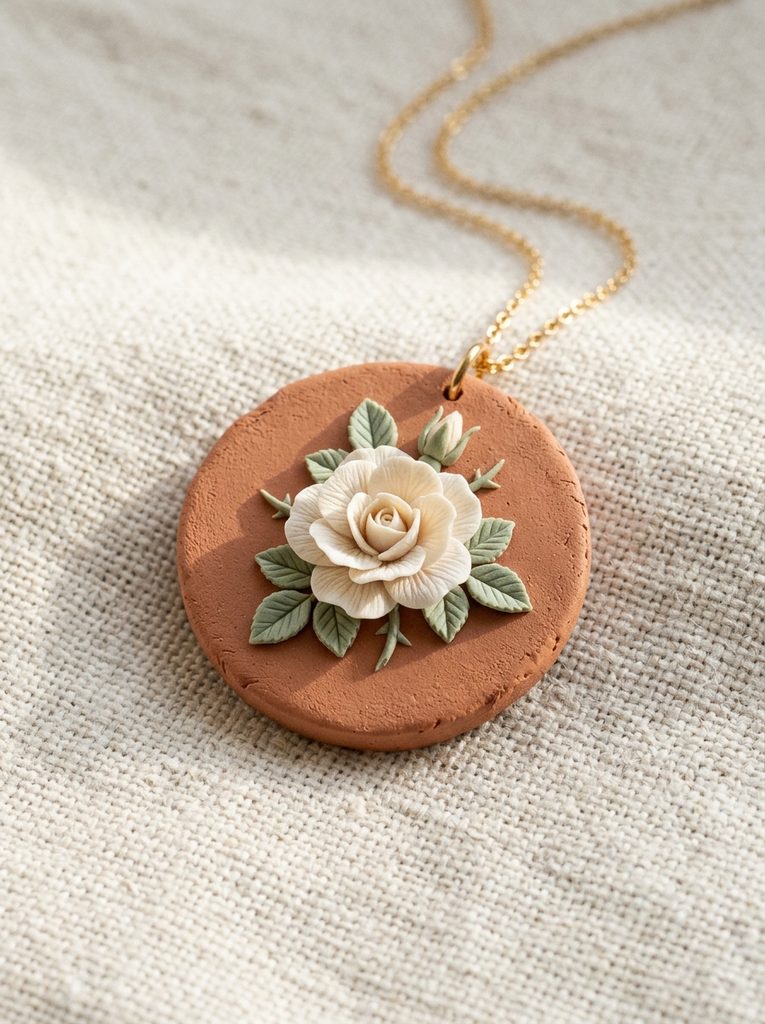
The pastel hydrangea cluster pebble takes inspiration from smooth river stones, using an organic, rounded pebble-shaped clay base covered with a delicate cluster of four-petal hydrangea florets. The foundation is sculpted freehand without sharp geometric cutters, creating a soft, tactile shape that feels organic in the hand. Across this surface, individual hydrangea blossoms in lavender, baby blue, and seafoam green overlap to form a dense floral crown. This pendant celebrates pastel color harmonies, blending subtle tones that complement breezy spring wardrobes. The tactile floral texture over the curved pebble base creates an engaging, touchable piece of handcrafted artisan jewelry.
Begin by shaping a block of stone-gray clay into a smooth, flattened pebble approximately thirty-five millimeters wide, forty millimeters long, and five millimeters thick, rounding all perimeter edges carefully with your thumbs. Mix pale periwinkle, soft blush, and lavender clay shades, rolling each color out to a paper-thin one-millimeter thickness. Using a four-petal micro plunge cutter, stamp out fifteen to twenty miniature hydrangea blossoms across the varied pastel shades. Cup each blossom slightly in the palm of your hand using a small ball stylus to give the petals natural movement, then press them onto the upper half of the gray pebble base in a tight cluster. Drop a microscopic sphere of metallic silver clay into the center of each floret, securing the assembly before baking.

8. Midnight Poppy Crescent Moon
Setup Method
The midnight poppy crescent moon combines celestial silhouettes with bold botanical contrast to create an eye-catching statement pendant. The foundation is a slender crescent moon cut from deep matte black clay, establishing a dramatic, shadow-toned backdrop. Climbing along the lower horn of the crescent is an open-faced red poppy, complete with delicate folded petals, a textured green-and-black seed pod center, and micro-fine green vine accents. The striking juxtaposition of stark black against bright vermillion red creates dynamic visual energy that instantly draws the eye. This accessory brings dramatic, sophisticated styling to dark formal ensembles, combining fine miniature sculpting with clean graphic contours.
Roll thoroughly conditioned jet-black clay to a three-millimeter thickness and cut a large crescent moon using two intersecting circle cutters measuring fifty millimeters and thirty-five millimeters in diameter. To create the poppy, condition bright crimson clay and sculpt four wide, ruffled fan-shaped petals, thinning the petal rims between your fingertips to achieve organic ruffled edges. Layer the petals onto the lower curve of the black crescent, cupping them upward to simulate a blooming poppy. Roll a tiny ball of moss green clay for the central seed capsule, press it into the center, and wrap it with a thin ring of black clay fringed with delicate needle cuts to mimic poppy stamens. Smooth the rear seams where the flower joins the crescent before oven baking.

9. Modern Minimalist Botanical Inlay Arch
How to Create
The modern minimalist botanical inlay arch uses flat marquetry techniques to build graphic floral motifs embedded seamlessly within a modern stone-effect slab. Rather than sculpting raised relief petals, this design carves floral outlines into a faux-granite clay arch, filling the voids with contrasting black or white clay to form an unbroken, level plane. The smooth, flat surface highlights the beauty of raw geometry while offering a clean, snag-free pendant. This style perfectly captures modern Scandinavian homeware aesthetics, translating home decor trends into wearable art that pairs effortlessly with tailored suits, structured blouses, and contemporary architectural apparel.
Form a faux-granite slab by chopping cured black and white clay scraps into microscopic flecks and kneading them through translucent white clay before rolling it to a four-millimeter thickness. Cut an elongated arch measuring twenty-five by forty-five millimeters, smoothing the edges flat. Using an ultra-fine linoleum carving tool or miniature stylus, lightly engrave a minimalist one-line tulip or botanical branch silhouette into the front surface of the slab. Roll ultra-thin threads of solid black clay and press them firmly into the carved recesses until flush with the granite background. Place baking parchment over the arch and roll your acrylic roller firmly across the surface to bond the elements, then trim the edges cleanly with a sharp blade before baking.
10. Floating Sakura Blossom Ring Frame
Execution Process
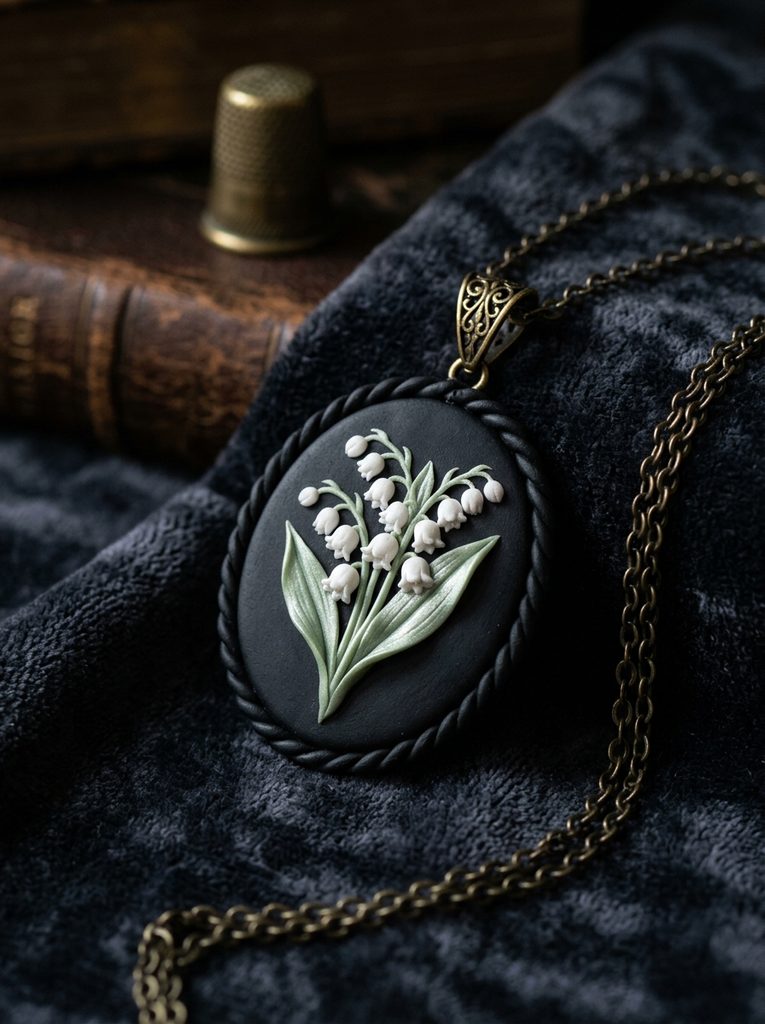
The floating sakura blossom ring frame utilizes open space and delicate cherry blossom motifs to create a lightweight, airy pendant. The piece is structured around an open circular clay doughnut or ring frame cut from clean ivory or pale sage clay, leaving the center open. Delicate pink and white sakura blossoms, paired with tiny buds and brown branches, climb across one side of the open ring, partially bridging the empty interior space. This delicate Japanese-inspired aesthetic emphasizes lightness, movement, and negative space. The open framework keeps the overall pendant remarkably light and comfortable on the neck, even when created in larger statement diameters.
Roll pale sage clay to an even three-millimeter slab on your work tile and use two concentric circle cutters measuring forty millimeters and twenty-five millimeters to cut out an open ring frame. Form branches by rolling tapering threads of raw umber clay, adhering them across the right perimeter of the frame so they gently reach across the open center void. Craft the sakura blossoms from pale pink clay, flattening five rounded petals for each blossom and indenting a tiny V-notch into each petal tip using a craft scalpel. Position two fully open blossoms and three tiny closed buds along the branch, pressing a microscopic cluster of yellow thread stamens into each blossom center. Check that all floating elements adhere firmly to the ring frame before baking.

Common Beginner Mistakes and How to Avoid Them
One of the most frequent mistakes made by beginners working with polymer clay is under-baking finished pendants out of fear of scorching the delicate colors. Polymer clay does not cure through moisture evaporation; rather, it undergoes chemical plasticization that requires sustained heat over time to become durable, flexible, and break-resistant. When under-baked, pendants remain brittle and will snap under minimal pressure. Always verify your internal oven temperature with an independent, freestanding oven thermometer rather than relying on the oven dial, baking your creations at the manufacturer’s specified temperature for a full thirty to forty-five minutes. Another common error is allowing dust, lint, and fingerprint ridges to settle onto uncured clay surfaces, which dulls the crisp finish of the piece. Prevent this by wiping your hands and tools regularly with isopropyl alcohol wipes, and gently buff away surface marks using a cotton swab dipped in alcohol before baking. Finally, avoid placing uncured pieces directly onto bare metal baking sheets, as this leaves shiny, scorched spots on the backs of your pendants; instead, bake your work on a ceramic tile or parchment-lined tray for an even matte finish.
Practical Tips for Better Results
Achieving professional, boutique-quality results requires establishing systematic finishing routines once your pendants emerge from the oven and cool completely. Allow your baked pieces to cool gradually inside the oven with the door cracked open; this slow cooling prevents thermal shock, which can cause micro-cracking between thin sculpted petals and thick bases. Once cured, refine all outer perimeter edges using wet-and-dry sandpaper, working systematically through four-hundred, six-hundred, and one-thousand grit papers under a trickle of lukewarm water. Wet sanding removes sharp seam lines and flash marks without releasing airborne plastic particles, leaving the borders silky-smooth. When attaching metal jump rings, drill neat, straight holes through the clay using a manual hand drill rather than piercing uncured clay with blunt pins, which distorts delicate geometric shapes. Always use two pairs of smooth-jaw jewelry pliers to twist jump rings open sideways rather than pulling them apart, preserving the structural circle when locking them around your pendant bails. A light, targeted application of matte water-based varnish preserves surface pigments while keeping the organic clay finish looking natural.
Styling, Presentation, or Organization Ideas
Botanical polymer clay pendants can be styled across varied aesthetics by switching out the suspension cord or chain materials. For a clean, minimalist style, string your pendant on an eighteen-karat gold-filled cable chain or a delicate stainless steel rope chain, allowing the sculpted florals to stand out as refined focal points against solid-color crewnecks. To highlight an earth-toned, boho aesthetic, mount your pendants on natural waxed cotton cord, braided micro-macrame, or unpolished leather thongs secured with sliding barrel knots for adjustable lengths. If you plan to sell your creations at craft markets or gift them to loved ones, package them on custom kraft-paper cards stamped with botanical branch graphics to reinforce the handmade theme. For studio storage and organization, mount an open multi-tier wooden rack fitted with small brass hooks, hanging your finished pendants individually to protect sculpted relief petals from rubbing together. Organize your ongoing projects by cataloging custom clay color recipes on small index cards with cured color chips, ensuring you can replicate successful floral palettes accurately in future batches.
Budget or Time Planning
Creating polymer clay jewelry remains one of the most budget-friendly craft pursuits because raw materials yield exceptional volume when planned thoughtfully. A standard sixty-gram block of polymer clay can yield six to eight finished pendant bases, keeping your average raw material investment low per wearable piece. When organizing your crafting sessions, save time by batching the work into dedicated phases: schedule clay conditioning, color mixing, and base cutting into one initial session, dedicate the following block purely to detailed floral sculpting, and finish with a collective baking and hardware assembly cycle. Grouping similar tasks eliminates the need to clean your tools repeatedly between different colors and steps. To reduce waste, collect all unbaked, mixed-color scraps in an airtight container to use as the hidden interior cores of future textured beads or practice slabs. Invest your early budget in a handful of foundational tools—specifically an acrylic roller, a good tissue blade, and an oven thermometer—before spending on large collections of specialty cutters. This disciplined approach keeps overhead low while allowing your technical sculpting skills to grow naturally.
Creative Expansion and Advanced Inspiration
Once you feel confident in basic petal construction and slab assembly, you can introduce advanced multimedia techniques to expand your botanical jewelry collections. Experiment with blending fine liquid polymer clay with soft dry pastels to paint delicate, watercolor-like gradients directly across raw petals before baking, simulating the natural color transitions found in live orchids and morning glories. You can also incorporate genuine metallic accents by applying pure gold leaf or silver leaf to your uncured bases before sculpting floral elements over them, creating a rich cracked-gilding effect beneath translucent petals. Another compelling direction involves using translucent liquid clay to encase cured miniature floral scenes within raised bezel frames, mimicking real dried flowers preserved in glassy jeweler’s resin without dealing with chemical fumes. Finally, consider scaling these floral designs into matched jewelry suites, adapting smaller versions of your favorite pendant compositions into delicate drop earrings, hair pins, or minimalist charm bracelets to build cohesive, artisan-crafted collections.
Leave a Reply