Hand-painted clay planters provide an accessible avenue for upgrading everyday indoor greenery into striking decorative centerpieces that reflect personal style and intentional home decor. This comprehensive tutorial details ten versatile creative project concepts for transforming standard terracotta pots and air-dry clay vessels into custom functional art. Readers will discover clear methods for executing varied design styles, including mid-century arches, minimalist color blocks, organic botanical silhouettes, and textured modern terrazzo. Hand-painting clay planters allows plant enthusiasts to harmonize disparate nursery pots, introduce trending colors to living spaces, and protect porous earthenware surfaces against environmental wear. Learning the fundamentals of surface preparation, pigment application, and moisture sealing bridges the gap between basic crafting and durable ceramic styling. With clear step by step instructions, this guide covers tool selections, painting mechanics, sealing protocols, and troubleshooting methods tailored for crafters of all skill levels. By mastering foundational painting techniques like color masking, continuous linework, and sponge mottling, makers can produce unified botanical displays that elevate windowsills, desks, and shelving units. These painted vessels protect delicate houseplant root systems while serving as timeless, handcrafted home accents.
Why This Idea Is Trending or Useful
The popularity of painted clay planters across visual social boards reflects a widespread cultural interest in personalized living spaces, mindful crafting, and affordable home styling. Standard orange terracotta pots are durable and inexpensive, yet their uniform appearance often clashes with contemporary interior aesthetics. Applying custom paint treatments offers a budget ideas solution, allowing decorators to customize off-the-shelf garden containers to match modern design palettes without spending money on expensive ceramic collections. The ongoing rise of indoor gardening has created a demand for visually interesting plant housing, particularly for small succulents, trailing vines, and compact tropicals. Hand-painting pottery satisfies this need by combining practical plant care with an easy project suitable for a quiet afternoon. The activity requires no specialized machinery, making it exceptionally beginner friendly and safe for home worktables. Furthermore, painting terracotta allows makers to control internal and external porosity through strategic sealing, which helps regulate soil moisture levels for finicky houseplants. These adaptable vessels make thoughtful handmade gifts, cohesive desk organizers, and customizable accent pieces that adapt seamlessly to shifting seasonal decor themes.
Materials and Preparation
Executing clean, long-lasting painted clay planters requires thorough surface preparation, appropriate paint chemistry, and reliable sealing agents. Begin by acquiring standard unglazed terracotta pots or smooth, fully cured air-dry clay vessels equipped with bottom drainage holes. Essential painting materials include multi-surface acrylic craft paints, flat wash brushes, fine-detail liner brushes, high-density foam sponges, and low-tack painter tape for creating sharp geometric boundaries. Clay is a naturally porous earthenware material that absorbs water rapidly; therefore, raw pots must be thoroughly prepared before applying paint. Clean existing pots with warm water and a stiff nylon brush to remove surface dust, efflorescence salts, and soil residues, allowing the clay to dry completely for twenty-four hours. Sand rough manufacturing seams with a 220-grit sanding sponge to establish a smooth working canvas for fine linework. Apply a water-based interior clay pot sealer or clear acrylic primer to the inner walls and bottom to prevent moisture from seeping through the clay and bubbling the outer paint layer. Finally, secure a clear water-resistant acrylic varnish in matte or satin to safeguard completed painted artwork from soil stains and routine watering.
1. Idea 1: Desert Sand Dune Horizon
How to Create
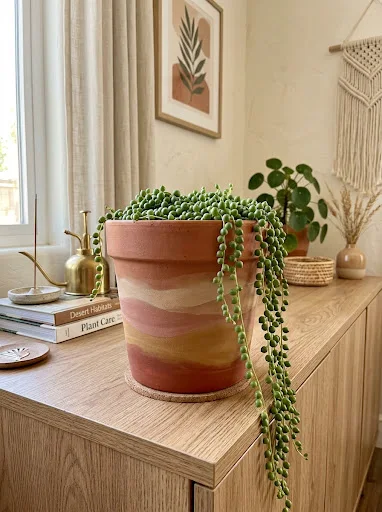
The desert sand dune horizon design pairs earthy warmth with clean minimalist style, utilizing flowing horizontal bands to evoke arid landscapes. This design uses an understated color palette of warm terracotta, muted ochre, dusty rose, and creamy sand layered around the pot’s circumference. The organic curved lines soften the rigid, tapered conical shape of standard clay flowerpots, adding visual movement and calm stability. Contrasting flat clay tones against warm earth tones creates a grounded foundation that flatters blue-green succulents, snake plants, and trailing string-of-pearls. The horizontal banding visually widens the planter base, making tall, slender plants appear well-proportioned on side tables and desks. This pattern relies on sweeping, freehand brush strokes rather than rigid tape masks, making it a stress-free project that welcomes natural variation. The finished container brings a relaxed desert aesthetic into contemporary living rooms, pairing effortlessly with warm timber furniture, woven textiles, and neutral walls.
Start with a thoroughly cleaned, primed terracotta pot, using a soft pencil to lightly sketch three to four undulating horizontal dune ridges around the vessel. Space the curves so that each band varies in height between two and four centimeters, establishing natural visual rhythm. Mix your acrylic paints on a ceramic palette, preparing a four-step gradient ranging from a pale desert sand hue to a rich spiced terracotta. Using a medium flat-edge filbert brush, fill the lowest horizontal section with your darkest tone, pulling smooth horizontal brush strokes along the pencil lines. Progress upward through your color gradient, painting adjacent bands with lighter pigments while maintaining crisp, clean boundary lines where sections meet. Allow each individual band to dry for twenty minutes before applying a second opaque coat to eliminate uneven streaking. Clean up slightly irregular transitions using a dampened fine-liner brush dipped in the lighter boundary color. Once the entire vessel is dry to the touch, apply two light coats of matte acrylic sealer across the exterior to preserve the soft chalky texture.
2. Idea 2: Mid-Century Arch and Sphere Motif
Step-by-Step Guide
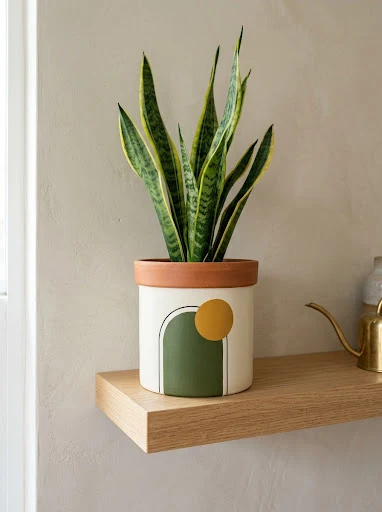
The mid-century arch and sphere motif incorporates retro architectural geometry through stacked vertical portals, clean semicircles, and solid spheres. Rendered in classic modern hues like olive green, warm mustard, matte black, and off-white, this design brings dynamic structure to indoor plant displays. The repetition of upright curved arches elongates the planter’s silhouette, making compact pots appear taller and more commanding on low display shelving. The contrast between rounded arches and solid circular orbs introduces balanced visual interest without cluttering the planter’s surface. This clean graphic aesthetic complements upright houseplants with architectural leaf structures, such as sansevieria, zamioculcas, or rubber trees. The structured layout teaches precision brush handling and template tracing, delivering a polished, boutique-quality finish. It functions as a bold accent piece that coordinates seamlessly with mid-century modern credenzas, clean gallery walls, and minimalist desks.
Begin by painting the entire exterior surface of the pot in two coats of an off-white or creamy eggshell acrylic base, letting it cure for two hours. Trace an arch template cut from thin cardstock onto the front face of the pot, positioning the arch four centimeters above the bottom rim. Use a plastic bottle cap to trace a matching circular orb directly above the curved apex of the arch, leaving a one-centimeter gap between the shapes. With a flat chisel-edge brush, paint the arch body using deep olive green, starting from the outer boundary and pulling strokes inward to prevent paint bleed. Fill the floating sphere above the arch with an opaque warm mustard acrylic paint, applying two thin layers for uniform coverage. Carefully outline the perimeter of both geometric shapes using a fine-detail liner brush loaded with matte black paint to accentuate the graphic lines. Inspect the edges, smoothing minor wobbles with an angled brush moistened with the off-white background paint. Finish the project by applying a clear satin protective varnish over the cured paint to enhance color richness.
3. Idea 3: Botanical Monochrome Ginkgo Leaves

How to Make
The botanical monochrome ginkgo leaves design introduces delicate, organic linework by painting stylized fan-shaped foliage across an understated background. This concept features fan-like leaves with delicate radiated ribbing rendered in crisp white paint over a dark charcoal or slate grey clay surface. The high-contrast palette creates a striking silhouette that emphasizes delicate leaf veins and curved stems. The dark background grounds the container visually, making vibrant green foliage—such as bright lemon button ferns or baby tears—stand out dramatically against the pot. Painting detailed botanical motifs sharpens fine-motor control and brush manipulation, proving that monochrome palettes can deliver rich visual depth. The pattern wraps continuously around the cylinder, providing visual interest from every angle as the plant grows and shifts toward window light. This design fits into contemporary, transitional, and classic interior spaces, serving as a functional piece of botanical illustration.
Coat the entire outer surface and upper two centimeters of the pot’s interior with two coats of deep charcoal or matte graphite acrylic paint. Allow the dark base coat to dry completely for at least one hour until the surface is non-tacky and uniform in sheen. Lightly map out four to five distinct ginkgo leaf heads across the vessel using white chalk, connecting them with slender, gently curling stems. Load a fine number-one round liner brush with opaque titanium white acrylic paint, thinning the pigment slightly with water to ensure smooth, fluid brush glide. Begin painting each leaf by pulling delicate, radiating linework outward from the stem junction to the wide, scalloped outer perimeter of the leaf fan. Vary the pressure on the brush tip, pressing lightly at the stem base and releasing smoothly toward the outer leaf margin to achieve natural taper. Once all leaves are rendered, trace the connecting vine stems with continuous, uninterrupted line strokes. Allow the linework to cure fully before spraying with an invisible ultra-matte protective coat to secure the delicate white pigments.
4. Idea 4: Bold Color-Blocked Half-Moon

Execution Process
The bold color-blocked half-moon design applies sharp graphic geometry and high color contrast to transform a basic clay pot into a contemporary art object. This layout divides the pot vertically down its center, featuring a contrasting half-circle spanning across the dividing line, or an asymmetric horizontal split. Utilizing vivid color pairings like cobalt blue with pale peach, or forest green with warm terracotta, delivers an immediate visual statement. The clean lines provide structured balance, making this pot an effective home for trailing ivy, string-of-hearts, or cascading pothos vines. The graphic color separation draws the eye toward the center of the vessel, establishing a solid anchor on open living room shelving. Executing clean lines on a curved surface teaches disciplined painter tape application, burnishing techniques, and edge sealing mechanics. This easy project offers maximum decorative impact with minimal painting time, ideal for weekend decorators updating room accents.
Thoroughly wipe down your clean clay pot and apply a smooth base coat of pale peach acrylic paint over the entire exterior wall, letting it dry completely. Measure the circumference of the vessel with a flexible cloth tape, marking the exact center points along the top and bottom rims with faint pencil dots. Apply a strip of flexible low-tack blue painter tape vertically down the side of the pot, aligning it with your measured guide marks. Burnish the tape edge firmly with your thumbnail or the back of a spoon to create an impenetrable barrier that prevents pigment bleed. Paint the exposed side with two coats of deep cobalt blue, brushing from the tape outward toward the open surface. Carefully peel away the painter tape while the second coat is still slightly damp, pulling back at a flat forty-five-degree angle to reveal a sharp edge. Once dry, position a circular stencil across the vertical seam and paint a contrasting half-moon using warm terracotta paint. After drying, apply two thin coats of clear water-resistant sealer to protect the graphic line work.
5. Idea 5: Modern Earthy Terrazzo Pattern

Setup Method
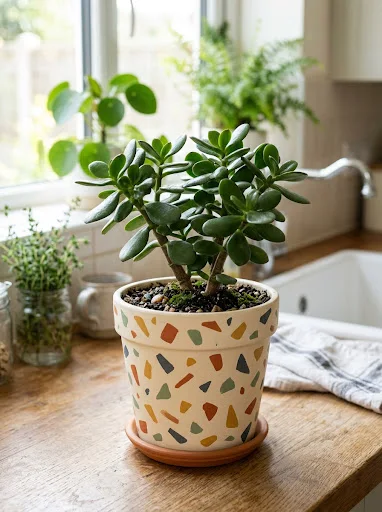
The modern earthy terrazzo pattern captures the lively, composite look of traditional Italian flooring through irregular hand-painted geometric chips. This concept scatters angular flecks of rust, soft sage green, warm mustard, and dark charcoal across a warm ivory or stone-colored base. The random arrangement of shapes produces dynamic movement that keeps the eye moving around the pot’s circumference. Terrazzo patterns soften the rigid symmetry of indoor furniture, introducing playful visual texture that complements compact jade plants, hawthorns, and flowering cacti. Because the chips are intentionally irregular, the painter is freed from strict measurement and precision symmetry, making the process relaxing and forgiving for beginners. The neutral stone background unifies the varied fleck pigments, ensuring the completed vessel complements existing decor without clashing. This style bridges classic stone composite architecture with playful modern design, functioning as an artistic conversation starter.
Apply two smooth, even layers of warm ivory or pale buff acrylic paint across the entire exterior of the pot, letting each coat dry thoroughly. Select four accent colors: rust orange, sage green, ochre yellow, and deep charcoal, placing coin-sized portions of each pigment onto your mixing palette. Using a small flat square-tip shader brush, stamp small triangular, rectangular, and irregular polygonal chips randomly across the surface. Vary the orientation and size of the shapes, keeping individual flecks between three and eight millimeters across while leaving open space between marks. Rotate the pot continuously as you work, alternating colors systematically to ensure balanced distribution of tones without clustering identical hues. After painting the larger shapes, use the tip of a toothpick or fine round brush to add tiny specks and dots within the open spaces. Allow the multi-colored terrazzo chips to cure for forty-five minutes before applying a wet-look or satin clear coat to simulate polished composite stone.
6. Idea 6: Scandi Minimalist Dotted Grid

How to Make
The Scandi minimalist dotted grid applies ordered, rhythmic pointillism over natural raw clay to produce a calm, Nordic-inspired desktop accent. This aesthetic utilizes tiny, uniform white acrylic dots arranged in straight vertical and horizontal grid rows, creating an understated geometric framework. The contrast between raw reddish terracotta and crisp white enamel dots highlights the natural earthenware texture while introducing modern organization. This subdued design works particularly well in home offices, reading nooks, and bedrooms where quiet, non-distracting decor is preferred. The linear grid pattern complements upright botanical forms, including snake plants and structural aloe vera, echoing their upward verticality. Executing uniform point spacing sharpens patience and measurement discipline, teaching decorators how small details can transform basic surfaces. The finished pot functions as a tactile, modern accessory that balances raw materials with orderly styling.
Seal the interior of a smooth terracotta pot with a clear clay pot sealer, leaving the exterior clay natural and raw for textural contrast. Use a clear ruler and faint pencil marks to draw a light grid matrix around the pot’s exterior, spacing horizontal and vertical guide marks one centimeter apart. Pour a small pool of thick, unthinned white acrylic paint onto a disposable surface, ensuring the pigment maintains a rich, viscous consistency. Dip the rounded wooden tip of a cotton swab, pencil eraser, or specialized clay dotting tool straight down into the white paint. Press the loaded tool gently against the first grid intersection on the pot, pulling the tool straight back to leave a crisp, three-dimensional dot. Re-dip the tool before stamping every individual point to ensure uniform dot volume and diameter across the entire grid field. Continue stamping systematically row by row, wiping the tool tip periodically on a damp cloth to prevent paint accumulation. Once the dots are fully dry and firm, gently erase visible pencil lines with a soft vinyl eraser, finishing with a clear matte sealant.
7. Idea 7: Painted Textured Gingham Check
Step-by-Step Guide
The painted textured gingham check translates classic woven textile patterns into dimensional ceramic art, creating an inviting cottage-inspired plant container. This design features intersecting horizontal and vertical bands in soft sage green, powder blue, or muted terracotta over a crisp white base. Where the semi-transparent colored bands cross, a deeper saturated tone is applied to replicate the natural optical overlap of woven textile threads. This pattern introduces cozy visual warmth that softens austere, minimalist interiors, bringing a relaxed farmhouse charm to sunny kitchen windowsills. The structured grid contrasts nicely with cascading greenery, making it a fitting vessel for creeping figs, culinary herbs, and delicate maidenhair ferns. Constructing this layered pattern develops an understanding of color transparency, brush control, and multi-stage masking. The resulting planter feels nostalgic, tactile, and distinctly handmade, introducing artisan character into everyday spaces.
Paint the entire clay vessel with two coats of clean white multi-surface acrylic paint, allowing the surface to dry for one hour. Use low-tack painter tape to mask out vertical stripes two centimeters wide around the pot, maintaining uniform two-centimeter gaps between taped sections. Mix your primary color—such as dusty sage green—with twenty percent clear acrylic mixing medium to create a semi-transparent glaze. Paint the open vertical stripes with a flat brush using smooth vertical strokes, peeling the tape away while the paint remains slightly wet. Allow the vertical stripes to dry completely for thirty minutes before re-taping the pot horizontally with the same two-centimeter spacing. Apply the same semi-transparent paint over the horizontal openings, which naturally doubles the pigment depth at intersecting squares to create the authentic gingham effect. Remove the tape carefully, use a fine liner brush to touch up any small line bleeds with white paint, and seal the finished pattern with a satin protective varnish.
8. Idea 8: Abstract Face Line Art Silhouette

Execution Process
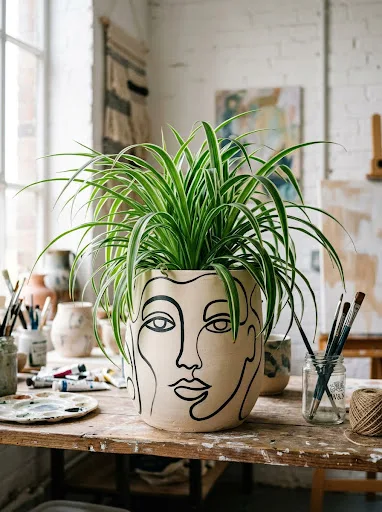
The abstract face line art silhouette design draws inspiration from continuous contour drawing, turning a plain clay pot into a piece of modern figurative art. Rendered in a single continuous line of deep black or dark ochre paint over a warm cream or natural clay surface, this design emphasizes expressive facial silhouettes. The flowing line work wraps organically around the curve of the pot, revealing different profile elements as the vessel is rotated. When paired with trailing or unruly plants like spider plants or hoyas, the foliage appears like a sculptural head of hair, bringing playful humor into home styling. The minimalist aesthetic complements modern gallery walls, curated bookshelves, and creative studio workspaces where graphic, expressive art is appreciated. Executing fluid line art challenges the painter to commit to confident, continuous brush strokes without second-guessing or hesitation. This project delivers an artistic accent piece that looks like custom designer studio pottery.
Prepare the surface of the pot by applying a smooth base coat of matte cream or soft linen acrylic paint, allowing it to dry thoroughly. Lightly sketch a continuous-line abstract face on the front wall using a faint watercolor pencil, incorporating fluid brows, closed eyes, an abstract nose, and curved lips. Prepare your black acrylic paint by blending it with a few drops of water or acrylic flow release until it reaches the consistency of heavy cream. Load a high-quality number-two script liner brush completely with the thinned black paint, gently rolling the bristles on your palette to form a sharp point. Beginning at the top of the silhouette, paint the continuous line in one smooth, confident movement, rotating the pot with your opposite hand to keep the brush stroke steady. Maintain light, even pressure along the brush tip, pulling the stroke continuously to prevent pooling or unexpected width variations along the line. Allow the black contour line to dry undisturbed for two hours before gently erasing any stray pencil guide marks with a damp cloth. Seal the finished artwork with two coats of non-glare ultra-matte varnish to maintain an authentic sketchbook aesthetic.
9. Idea 9: Dip-Dye Ombre Ocean Wave

Setup Method
The dip-dye ombre ocean wave design pairs soothing aquatic gradients with horizontal fluid color transitions, capturing the calm rhythm of coastal waters. This concept features a smooth vertical color bleed that transitions seamlessly from deep marine teal at the bottom base through seafoam green up to crisp white at the rim. The horizontal gradient creates an anchoring visual weight at the bottom of the pot, stabilizing top-heavy plants like fiddle-leaf fig cuttings or upright monsteras. The oceanic color palette introduces a refreshing, vibrant element to neutral bathrooms, sunny sunrooms, and airy outdoor patios. Blending paint smoothly across porous clay teaches gradient wet-on-wet blending mechanics, demonstrating how simple damp sponge tools can achieve professional airbrush-like transitions. The gentle color shift adds visual height to the container, making compact surfaces feel open and breezy. This design provides an engaging, tactile painting project that brings calm, coastal energy into everyday home decor.
Wipe the raw clay pot down with a damp cloth and apply a solid coat of bright white acrylic paint over the top third of the exterior wall. Dispense white, seafoam green, and deep marine teal acrylic paints in three adjacent pools onto a flat paper plate or mixing palette. Dampen a dense, high-density cellulose craft sponge with clean water, squeezing out all excess moisture until the sponge remains slightly damp. Dip the flat face of the damp sponge into the marine teal paint, dabbing it firmly around the lower third of the pot to establish an opaque base color. While the teal layer remains wet, dip the opposite edge of the sponge into seafoam green, dabbing it around the middle third of the vessel and blending downward into the wet teal. Blend upward into the white rim by working the sponge in soft circular motions with pale seafoam and pure white, softening any hard boundary lines. Work swiftly around the pot to keep paint edges wet and blendable, smoothing visible sponge textures with a dry fan brush if desired. Once dry, protect the gradient with a high-gloss waterproof clear coat to simulate the reflective quality of ocean water.
10. Idea 10: Rustic Brushstroke Color Block
How to Make
The rustic brushstroke color block design utilizes expressive, painterly textures and visible brush marks to create an authentic modern wabi-sabi home accessory. Departing from taped lines and rigid geometry, this concept features broad, dry-brushed swatches of muted olive, rust, and ivory overlapping across natural terracotta clay. Leaving large sections of the raw clay exposed creates an appealing dialogue between raw earthenware and layered paint pigments. The visible bristle marks and semi-sheer edges deliver an artisan aesthetic that feels creative and uncontrived. This design works exceptionally well with wild, unstructured houseplants like maidenhair ferns, asparagus ferns, and trailing cacti, whose dynamic shapes complement the casual painterly background. The technique requires no strict templates, making it an enjoyable, low-pressure project for beginners seeking immediate decorative success. The finished container functions as an adaptable rustic accent that blends seamlessly into modern farmhouse, bohemian, and eclectic interiors.
Clean the terracotta pot and seal only the interior cavity with a clear brush-on sealer, leaving the exterior clay natural and receptive to dry paint strokes. Squeeze small portions of muted olive green, warm rust, and matte black acrylic paints onto a textured cardboard palette. Dip a stiff-bristle flat hog-bristle brush lightly into the olive paint, dabbing the excess paint onto a paper towel until the brush is mostly dry. Hold the brush at a shallow angle against the pot, dragging it firmly horizontally across the surface to deposit a broad swatch with rough, textured edges. Repeat this dry-brush technique using the rust color, overlapping the olive swatch slightly while leaving forty percent of the natural terracotta pot exposed around the perimeter. Use a smaller flat brush to apply a final bold slash of matte black across the bottom third, creating an anchoring diagonal accent. Maintain light, swift hand movements to ensure brush marks remain distinct and dry, preventing thick, opaque paint accumulation. Once fully cured, spray the exterior with a single light coat of matte protective sealer, ensuring the natural raw clay retains its tactile earthenware texture.
Common Beginner Mistakes and How to Avoid Them
Beginner decorators frequently encounter issues with paint adhesion, bubbling surfaces, and messy lines when working with porous terracotta planters. A common mistake is painting directly onto uncleaned, dusty clay, which prevents pigments from bonding properly and causes peeling over time. Avoid this by washing pots with warm water and letting them dry completely for twenty-four hours before applying any paint. Another widespread misstep is skipping the interior sealant, which allows soil water to seep through porous clay walls and push off the outer paint in unsightly blisters. Always coat the pot’s interior with a liquid waterproofing sealer or use a plastic nursery pot inside to block moisture transfer completely. Beginners also often pull painter tape off dry paint, which tears the paint film and leaves jagged, uneven boundary lines. Remove your masking tape while the paint is still slightly damp, pulling the tape back flat at a forty-five-degree angle away from the painted edge. Additionally, applying heavy, unthinned acrylic coats often results in visible streaks and clumpy surfaces; build color gradually using two to three thin, even coats instead. Finally, forgetting to seal the finished exterior leaves painted designs vulnerable to scratches, soil stains, and fading from direct sunlight.
Practical Tips for Better Results
Achieving professional, store-quality finishes on hand-painted clay planters requires attention to tool hygiene, drying times, and proper material application. Keep your paint brushes clean by rinsing them frequently in cool water and reshaping damp bristle heads before setting them flat to dry. When masking geometric shapes, use flexible vinyl tape rather than traditional paper tape, as vinyl stretches smoothly across curved pot walls without puckering. If pencil guidelines remain visible after your paint has dried, gently remove them using a soft white artist eraser or a cotton swab dipped in rubbing alcohol. To achieve smooth, opaque solid color blocks without visible brush marks, use a high-density foam roller or dab lightly with a makeup sponge between brush coats. When working with fine linework or detailed lettering, steady your hand by resting your pinky finger against a clean, dry section of the pot wall. If you accidentally smudge wet paint onto an unpainted surface, immediately wipe it away with a damp cotton swab before the acrylic sets. Finally, apply clear protective sealers in multiple light coats rather than one heavy, dripping layer, allowing thirty minutes of drying time between applications to avoid cloudiness.
Styling, Presentation, or Organization Ideas
Displaying hand-painted clay planters effectively involves intentional placement, balanced scale, and complementary grouping within your living space. Cluster three planters of varying heights and coordinating patterns—such as a terrazzo pot, an arch planter, and a brushstroke vessel—to create an eye-catching tablescape. Place these groupings on natural wood credenzas, white floating wall shelves, or stone windowsills to showcase their handcrafted textures against clean backgrounds. Pair each painted container with plant varieties that complement its specific design style; match structured geometric pots with upright sansevierias, and pair organic, flowing patterns with trailing philodendrons. Elevating one planter on a wooden plant riser or a small stack of art books introduces vertical dimension, keeping flat shelf arrangements dynamic and balanced. On home office desks, these painted vessels can double as creative pen cups, brush holders, or tool storage caddies. Position planters where indirect natural daylight illuminates the painted surfaces, casting soft shadows that highlight layered textures without exposing pigments to harsh, fading sun rays. Adding a layer of small river stones, pea gravel, or polished black pebbles over the potting soil provides a clean, professional finish that complements the painted design.
Budget or Time Planning
Curating an original collection of hand-painted clay planters is an economical, time-efficient DIY craft that yields striking home decor with minimal expense. Standard terracotta pots are inexpensive, making them an accessible canvas for testing bold color palettes and new patterns without financial pressure. A starter set of multi-surface acrylic paints and basic craft brushes provides enough pigment to decorate a dozen small to medium pots, keeping initial project costs low. To optimize your time, organize your project into distinct stages: prepare and seal pots on one afternoon, followed by painting and detailing during a dedicated creative session. Batch-painting several pots at once saves preparation time, allowing you to rotate between vessels as base coats dry without idle waiting periods. Acrylic paints dry to the touch within twenty minutes, allowing a complete, detailed design to be completed within a two-hour crafting window. Allow finished planters to cure for twenty-four hours before potting live plants to ensure that both the paint film and protective clear sealers have hardened completely against moisture. Utilizing leftover household emulsion paints or sample pots from previous wall painting projects reduces costs further while ensuring new planters coordinate with your home’s existing color scheme.
Creative Expansion and Advanced Inspiration
Once you master fundamental color blocking, linework, and sponge blending techniques, you can explore advanced decorative approaches and mixed-media accents. Try incorporating metallic leafing, applying sheets of genuine gold, silver, or copper leaf along painted geometric borders to create refined, light-catching accents. You can also explore sgraffito-style techniques, painting contrasting acrylic layers over raw clay and carefully carving fine linear patterns through the top coat with an etching stylus before it fully cures. Integrating mixed-media elements—such as wrapping the top rim in natural jute twine, adding genuine leather hanging straps, or securing brass accents—introduces textural contrast to smooth painted pottery. Experiment with hand-cut stencils or specialized screen-printing transfers to reproduce complex botanical illustrations and typographic quotes across multiple matching containers. You can also scale your designs up to decorate large porch urns, hanging bowls, and matching ceramic saucers to create a unified outdoor container garden. Exploring relief textures by mixing coarse sand, baking soda, or texture pastes into acrylic paint yields a tactile, stone-like stucco finish that elevates modern minimalist designs. These advanced techniques provide limitless creative opportunities for personalizing functional plant housing throughout your home.
Leave a Reply