Boho polymer clay bracelets represent an expressive category of modern accessory design, combining earthy textures, organic palettes, and modular bead construction. Crafting handmade clay bracelets allows designers to produce custom wristwear that unites free-spirited bohemian aesthetics with the durable precision of cured polyvinyl chloride compounds. This comprehensive tutorial provides detailed, step-by-step guidance for planning, conditioning, forming, and assembling ten distinct bohemian bracelet styles at home. Readers will learn fundamental polymer engineering, such as establishing balanced structural thickness, selecting drill gauges, curing clay to ensure flexibility without brittleness, and integrating mixed materials like raw leather cords and unpolished metals. While the bohemian style traditionally emphasizes relaxed silhouettes and vintage finishes, achieving durable results requires disciplined studio mechanics and deliberate assembly habits. Learning these beadmaking and link-forming techniques enables makers to create layered stacks, sculptural bangles, and flexible woven cuffs that withstand daily mechanical wear. Beyond personal adornment, these techniques provide practical foundations for building artisan gift collections or launching independent jewelry lines. By mastering basic slab techniques, cane reductions, and manual polishing routines, any jewelry crafter can produce lightweight, comfortable statement bracelets tailored to modern bohemian fashion palettes.
Why Bohemian Clay Bracelets Remain a Modern Style Staple
Bohemian jewelry designs maintain consistent popularity across modern design channels because they merge relaxed personal expression with wearable functional art. Contemporary wardrobe trends increasingly favor tactile, organic accessories that soften industrial tailoring and complement casual linen or denim outfits. Polymer clay provides exceptional practical value in bracelet construction because cured pieces are remarkably lightweight, moisture-resistant, and break-resistant when formulated and cured correctly. Unlike heavy ceramic beads or porous natural minerals, lightweight polymer clay beads allow wearers to stack several wide bangles or tiered beaded strands without feeling weighed down. The medium offers immense DIY appeal because designers can mix custom pigments to reproduce the look of weathered terracotta, raw turquoise, bleached bone, or veined jasper without requiring costly lapidary saws or gemological equipment. For beginners, the craft remains uniquely accessible: standard household baking setups, acrylic rollers, craft knives, and elastic cords are sufficient to establish a functional home jewelry studio. The bohemian aesthetic naturally embraces asymmetrical shapes, organic surface impressions, and muted earthy tones, which makes minor variations feel intentional and artisanal. This blend of accessibility, customizability, and functional comfort keeps bohemian clay bracelets central to modern accessory collections.
Essential Materials, Workspace Setup, and Studio Preparation
Proper execution of bohemian polymer clay bracelets requires disciplined studio preparation, ergonomic tools, and intentional material selection. The core medium consists of professional-grade polymer clay blocks in neutral, terracotta, ochre, olive, and translucent varieties, avoiding low-density novelty clays that fracture under movement. Essential tools include non-porous ceramic work tiles, an acrylic rolling pin with depth guide rings, rigid steel tissue blades, needle tools, a manual pin vise hand drill, and wet-and-dry sandpaper sheets. Assembly components require strong threading materials such as pre-stretched elastic cord, braided nylon thread, waxed cotton line, or vegetable-tanned leather strips, alongside brass jump rings, crimp tubes, and lobster clasps. Workspace preparation begins with thoroughly sanitizing hands and work surfaces using isopropyl alcohol to eliminate ambient lint, residual oils, and dust particles. Condition each clay block by hand-kneading or rolling it repeatedly through a dedicated clay conditioning machine until the material becomes pliable, smooth, and crack-free. Careful planning of hole placements, bead diameters, and wrist circumferences ensures finished bracelets slide easily over knuckles or fasten comfortably without pinching the skin.
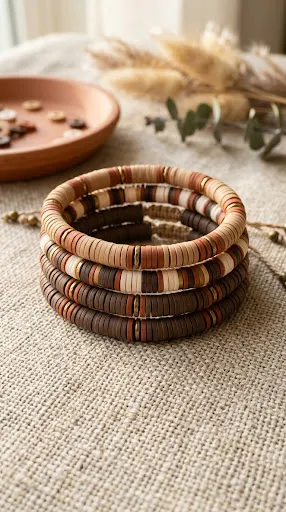
1. Terracotta Heishi Bead Stacking Bracelet
Step-by-Step Guide
Terracotta heishi bead stacking bracelets utilize flat, disc-shaped beads to create dense, continuous bands of color inspired by traditional southwestern lapidary work. This design features ultra-thin clay discs stacked tightly against one another on durable elastic thread, producing a flexible, serpent-like tube that contours to the wrist. The visual appeal comes from alternating warm, earthy clay tones such as burnt sienna, raw umber, desert sand, and ivory with thin metallic spacers. Because the individual discs are flat and closely packed, the bracelet remains comfortable during desk work, lying flush against the skin without digging into the wrist. The matte, unglazed terracotta texture delivers a grounded, artisanal quality that pairs naturally with woven textiles, denim, and loose cotton garments. Stacking three to five complementary heishi strands produces a layered bohemian statement that moves fluidly with the wearer.
To construct this piece, condition several blocks of warm earth-toned clays and roll each color into long, even cylinders measuring roughly six millimeters in diameter using an acrylic smoothing board. Pierce each clay cylinder along its central axis using a rigid steel bead-piercing pin, keeping the needle centered as you slide it through to form a uniform interior hole. Bake the clay cylinders directly on their metal piercing rods at two hundred seventy-five degrees Fahrenheit for thirty minutes to ensure complete curing. After cooling, slide the cured cylinders off the rods and place them flat against a wooden cutting jig. Use a fresh, sharp tissue blade to slice the cylinders crosswise into uniform one-millimeter discs. Sand the sliced edges inside a water bowl using eight-hundred-grit sandpaper to remove rough blade marks. String the smooth discs onto pre-stretched 0.7-millimeter clear elastic thread, alternating color blocks with raw brass spacer rings, and finish with a secure surgeon knot concealed with jewelers adhesive.
2. Sculpted Faux Turquoise Slab Cuff
Execution Process
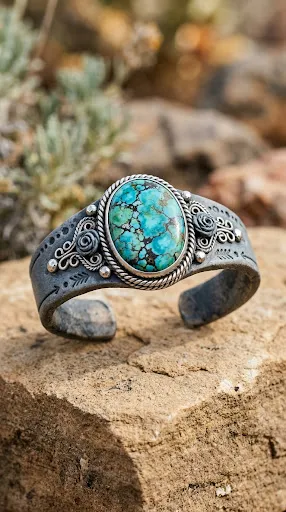
The sculpted faux turquoise slab cuff brings the bold look of hand-carved southwestern gemstone jewelry into an ultra-lightweight, wearable polymer design. This piece features an open-ended, curved bracelet band surfaced with marbled turquoise clay that mimics the irregular spiderweb matrix of natural turquoise stone. Sculpted bezels, faux silver wire twists, and raised dimensional rosettes frame the focal clay cabochon, giving the appearance of traditional metalsmithing without the heavy metal weight. The cuff’s curved profile allows it to slide easily onto the wrist from the side, providing an architectural focal point for bohemian outfits. The cool blue-green tones create a refreshing contrast against neutral linens and warm leather accessories, serving as a signature centerpiece in any accessory collection.
Begin by blending bright cyan, emerald green, and translucent clay to produce a vibrant base turquoise color, leaving the mix slightly marbled. Crumple a sheet of black tissue paper, wet it, and blot black acrylic paint across the surface of the clay block, then compress and fold the block to disperse irregular black matrix veins throughout the interior. Roll the clay into an elongated three-millimeter slab, cut an oval cabochon measuring two inches long, and bake it flat on parchment paper. Next, condition deep slate-gray clay mixed with silver mica powder, rolling it into a half-inch-wide strip to serve as the cuff band. Shape the raw band over an oven-safe metal bracelet mandrel, press the cured turquoise cabochon into the center, and wrap fine twisted clay coils around the perimeter to imitate jeweler’s silver rope. Bake the assembled cuff on the mandrel for forty minutes, sand the cured turquoise face to a satin sheen, and buff the faux-silver frame with a soft cloth.

3. Organic Pebble and Leather Wrap Bangle
Assembly Method
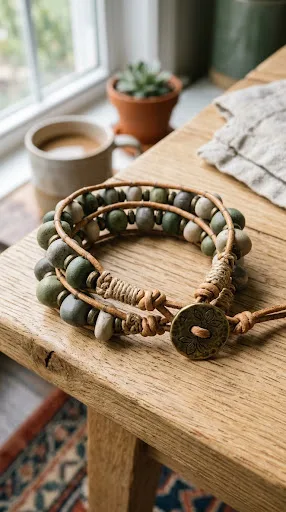
The organic pebble and leather wrap bangle combines soft, tumbled-stone clay beads with natural vegetable-tanned leather cord for an earthy, multi-textured design. Instead of using rigid geometric shapes, this bracelet uses hand-formed, asymmetrical clay pebbles shaped to look like river stones tumbled by water. The color palette incorporates riverbank hues such as moss green, slate gray, wet river pebble taupe, and raw ecru. Threaded onto dual strands of natural round leather cord, the beads sit snugly along the wrist, interspaced with deliberate knots and raw brass finding details. This wrap-style construction coils around the forearm two or three times, providing dynamic visual movement that complements bohemian wrap dresses and cozy oversized knit sweaters. The tactile contrast between matte stone-like clay and smooth leather cord reinforces the grounded, outdoor aesthetic of bohemian style.
To prepare the pebbles, condition several earthy clay colors and roll irregular balls ranging between eight and twelve millimeters in diameter. Gently flatten each sphere between your thumb and forefinger to create smooth, organic facets that mimic naturally tumbled river rocks. Pierce each raw pebble through its widest axis using an extra-thick two-millimeter needle tool to accommodate heavy leather cording, rotating the needle to keep the entry and exit holes clean. Bake the pierced pebbles on a bed of dry cornstarch to prevent shiny flat spots from forming on their curved undersides during curing. Once baked, rinse the beads thoroughly with cool water to remove residual powder, then tumble them inside a plastic container with fine wet sandpaper to soften the edges. Thread a four-foot length of 1.5-millimeter natural leather cord through a brass button clasp, knotting the cord, and string the pebbles along the dual strands using simple overhand knots to lock each pebble cluster securely in place.
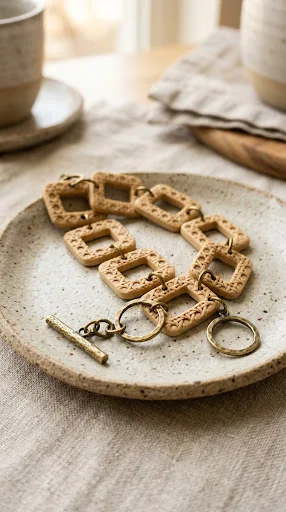
4. Textured Woven Rattan Clay Links
Step-by-Step Guide
Textured woven rattan clay links reinterpret natural woven cane furniture as interconnected, wearable jewelry components. This design features flat, interlocking geometric link segments stamped with fine basket-weave textures in warm straw, bleached wheat, and honey tones. The individual links are joined with heavy-gauge jump rings, allowing the bracelet to drape comfortably across the wrist with the natural movement of a classic chain-link bracelet. The surface texture catches ambient light in its recessed grooves, producing realistic depth that mirrors organic cane and wicker goods. This open, airy design provides an understated accent that pairs naturally with white linen shirts, straw sun hats, and woven summer market bags, making it a dependable warm-weather accessory.
To make the rattan links, condition a warm flaxen clay base and roll it out into a uniform two-millimeter slab using guide rings on an acrylic rolling pin. Lightly dust an etched basket-weave texture mat with cornstarch, position it across the clay slab, and apply firm, even pressure with the roller to emboss the pattern deeply into the surface. Use a nested pair of rectangular or oval cutters to stamp out hollow link frames, taking care not to distort the embossed weave when lifting the cutters. Dust a tiny amount of raw umber chalk pastel powder into the recessed grooves using a dry cosmetic brush to highlight the woven strands. Punch precise attachment holes through opposing ends of each link frame using a one-millimeter hole cutter, and bake the flat links between two parchment-lined tiles for thirty minutes to prevent curling. After curing, connect the links end-to-end using wide brass jump rings, and attach a matching brass toggle clasp to complete the chain.
5. Antiqued Clay Bone Bead Macrame Band
Execution Process
The antiqued clay bone bead macrame band draws inspiration from traditional nomadic trade beads, combining carved faux bone tubes with knotted cordwork. This style features cylindrical clay beads shaped and tinted to resemble weathered animal bone, complete with subtle surface pitting, organic striations, and antiqued patina. The beads are woven into a structured micro-macrame band made from waxed polyester or hemp cord, using square knots to hold each bead firmly along the central axis. The neutral, aged bone palette works alongside deep charcoal, chocolate brown, or forest green cordage, creating a rugged tribal presence. This lightweight bracelet offers durable everyday wear, resisting fraying and retaining its shape through daily activity while delivering an authentic handmade presence.
Begin by conditioning pure white polymer clay mixed with a tiny pinch of translucent clay and raw sienna to produce an authentic off-white ivory tone. Roll the clay into thick three-inch cylinders, texturing the exterior by rolling the cylinders over coarse sandpaper and pressing shallow, irregular notches along the sides with a blunt craft blade. Cut the cylinder into three-quarter-inch segments, pierce broad longitudinal holes through the center of each bead using a bamboo skewer, and bake the beads on an accordion-folded cardstock tray for thirty-five minutes. After the beads cool, brush dark brown acrylic wash over their surfaces, wiping away the excess paint with a damp towel so the pigment settles exclusively into the surface crevices. Cut two three-foot lengths of waxed cord, anchor them to a clipboard, and weave alternating square knots around the central cords, sliding an antiqued bone bead into every third knot sequence. Finish the macrame band with a sliding square-knot closure that allows for an adjustable fit.
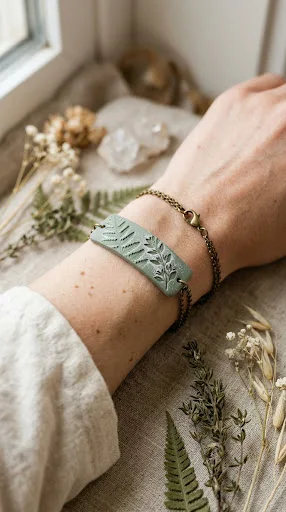
6. Muted Botanical Imprint Bar Bracelet
How to Make
The muted botanical imprint bar bracelet centers on a curved, rectangular clay plaque stamped with impressions of real local flora. Delicate leaves, fern fronds, or dried wildflower sprigs are pressed directly into raw clay, leaving delicate negative impressions that highlight the organic structure of the botanicals. The curved bar sits flat across the top of the wrist, held in place by fine metallic chains or soft suede cords attached at either end. Finished in matte, muted shades of sage, eucalyptus, dusty plum, or bone, this design captures nature-inspired aesthetics in a clean, minimalist silhouette. The low-profile bar design rests comfortably beneath long sleeves and outerwear, serving as an everyday signature piece for collectors who appreciate understated, botanical styling.
To create the botanical bar, condition a small block of dusty sage green clay and roll it to a three-millimeter thickness on a polished ceramic tile. Select small, deeply veined botanical specimens, such as wild thyme leaves or miniature fern fronds, placing them facedown onto the clay slab. Lay a sheet of parchment paper over the leaves and press firmly with an acrylic roller to embed the plant forms deeply into the surface without flattening the edges. Carefully peel the leaves out of the clay with fine tweezers to reveal the clean, botanical impressions below. Trim the slab into a curved, elongated rectangle measuring two inches long by half an inch wide using a sharp tissue blade, and punch mounting holes near each corner. Bend the wet clay plaque gently over a curved metal beverage can to shape the arc, baking it on the cylinder for thirty minutes. Once cooled, rub white chalk pastel powder into the botanical recesses, wipe the surface clean, and connect the bar to double-strand brass chains using open jump rings.
7. Tribal Geometric Shield Link Bracelet
Construction Guide
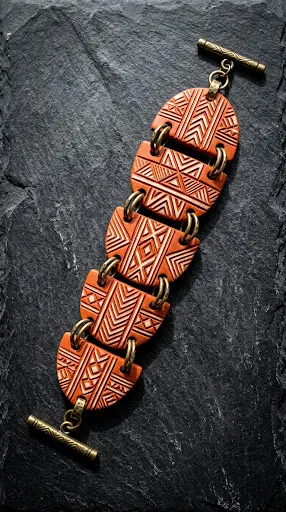
The tribal geometric shield link bracelet is an eye-catching, architectural accessory inspired by traditional global textile motifs and stamped metal armor. This construction uses modular, shield-shaped clay segments linked by sturdy double jump rings, creating a wide, articulated band that wraps comfortably around the wrist. Each shield link features incised geometric patterns, such as chevrons, diamond hatching, and stepped pyramids, filled with contrasting mineral pigments. The design balances visual drama with daily functionality; the segmented links flex naturally with the wrist, preventing the binding that often occurs with rigid, wide cuffs. Rendered in deep terracotta, midnight black, and warm sand, this piece brings bold bohemian energy to neutral monochrome outfits and tailored outerwear.
To make the shield links, condition two ounces of rich terracotta clay and roll it out to an even three-millimeter slab. Use a geometric shield cutter or hand-carved cardstock template to cut six identical shield segments, ensuring all edges remain straight and plumb. Use a fine-point needle tool or metal carving stylus to carve matching chevron and diamond line patterns across the front of each link, keeping the groove depths uniform at approximately one millimeter. Punch two parallel holes along the top and bottom borders of every shield link using a 1.5-millimeter hole punch to accommodate dual connecting rings. Bake the cut shields on a ceramic tile for thirty-five minutes at the temperature indicated by the clay manufacturer. After cooling, fill the carved grooves with ivory acrylic craft paint, wiping away the surface excess with a flat rubber squeegee before the paint dries. Link the segments together using heavy-gauge brass jump rings, and attach an ornate double-hook box clasp to balance the wide profile.
8. Layered Arch and Brass Drop Bracelet
Execution Process
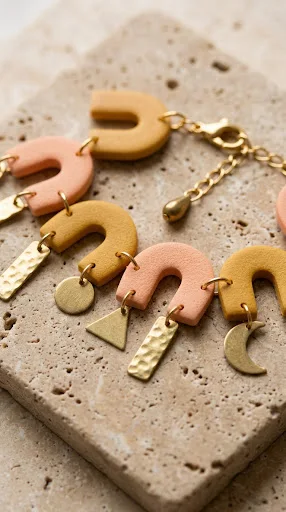
The layered arch and brass drop bracelet brings mid-century modern bohemian aesthetics to classic wrist jewelry by pairing smooth clay arches with articulated raw brass charms. This design incorporates repeating upside-down U-shaped clay arches alternating with dangling brass stamping drops, creating a kinetic, musical rattle as the wearer moves. The visual balance stems from pairing smooth, matte pastel clay in peach, clay pink, or warm mustard with reflective, hand-polished metal elements. The articulated drops catch the eye while resting securely against the lower wrist bone. This style acts as a statement bridge piece, pairing effortlessly with minimalist watches and woven fiber accessories for a balanced, modern bohemian aesthetic.
Begin by conditioning warm ochre and dusty peach polymer clays, rolling them into two-millimeter slabs on clean glass mats. Use nested arch cutters to stamp out hollow arch frames measuring roughly three-quarters of an inch tall, producing six identical pieces for a standard seven-inch wrist. Punch three connection points on each arch: one hole at the apex and one at the base of each vertical leg. Bake the arch components flat between two ceramic tiles lined with paper for thirty minutes to ensure they cure without warping. After baking, buff the smooth clay edges with twelve-hundred-grit sandpaper to achieve a soft satin texture. Thread open four-millimeter brass jump rings through the leg holes to connect the arches end to end. Suspend small, raw brass geometric drop pendants from the center hole of each arch, and finish the bracelet ends with a brass lobster clasp and a two-inch extender chain for adjustable sizing.
9. Weathered Ceramic Bead and Tassel Cord
How to Create
The weathered ceramic bead and tassel cord bracelet draws on the look of ancient clay trade beads and vintage fiber work. This piece features large, spherical clay beads treated with layered chalk pastels and surface crackling techniques to imitate ancient pitted earthenware. Strung onto a thick braided cotton thread, the clay beads are anchored by a handmade linen or silk embroidery floss tassel that drapes over the back of the hand. The color palette relies on earthy, mineral hues such as raw umber, antique whitewash, faded lapis, and clay red. The loose, adjustable cord styling produces a relaxed, bohemian look that fits comfortably on any wrist size, making it a thoughtful handmade gift option.
Roll twelve-millimeter spheres from scrap polymer clay to form the internal cores of the beads, saving fresh colored clay for the outer surfaces. Condition an off-white clay, roll it paper-thin, and coat one side with liquid black craft paint, letting the paint dry completely until it begins to crack. Wrap the crackled clay sheets around the raw bead spheres, rolling them gently between your palms to expose a spiderweb network of surface cracks across the white exterior. Pierce large three-millimeter holes through the center of each bead using a tapered bead mandrel, and bake the beads suspended on a wire baking rack for thirty-five minutes. Once cooled, rub dark antiquing wax across the bead surfaces, wiping away excess pigment to highlight the crackled texture. String the beads onto a twelve-inch length of braided cotton embroidery floss, slide a wooden slider bead onto the cord ends for an adjustable fit, and tie a handmade two-inch silk tassel to each cord tail.
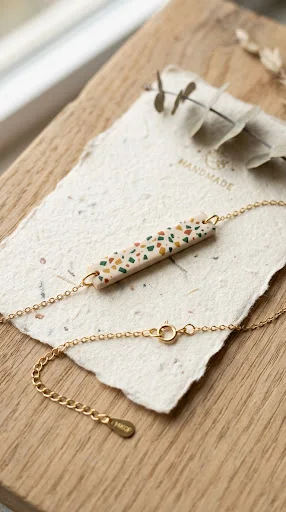
10. Minimalist Terrazzo Bar and Chain Bracelet
Setup Method
The minimalist terrazzo bar and chain bracelet merges clean, modern Scandinavian geometry with the playful mosaic patterns of contemporary bohemian style. This delicate design features a slender, rectangular clay bar embedded with colorful terrazzo chips, suspended from a fine metallic chain that wraps securely around the wrist. The base clay bar uses a neutral foundation such as almond, cream, or pale gray, while the internal terrazzo chips introduce bright pops of mustard, forest green, and rust. This low-profile piece offers a clean, streamlined alternative to chunky cuffs, making it easy to wear all day without catching on knit sweaters or desktop surfaces. The balance of smooth, flat clay with delicate jewelry chain produces a refined, understated accessory for casual and dressy occasions alike.
Prepare the terrazzo design by rolling a three-millimeter base slab of cream polymer clay on a polished glass tile. Shave fine, paper-thin curls of cured scrap clay in contrasting shades of rust, emerald, and dark umber using a sharp craft blade, scattering the colorful shavings evenly across the raw base slab. Cover the decorated slab with parchment paper and roll an acrylic pin firmly across the surface to press the colorful chips flush into the cream foundation. Cut the slab into clean rectangular bars measuring 1.5 inches long by one-quarter inch wide using a steel tissue blade and straightedge. Pierce horizontal holes through the short ends of each bar with a fine one-millimeter needle tool, and bake the bars flat on a tile for thirty minutes. Once cooled, wet-sand the front face through four progressively finer sandpaper grits to expose the sharp terrazzo flecks, and connect the bar ends to a fine brass cable chain with small jump rings and a spring-ring clasp.

Common Beginner Mistakes and How to Avoid Them
Beginner jewelry makers frequently encounter technical mistakes that cause polymer clay bracelets to crack, warp, or pull apart during wear. The most widespread error is underbaking the clay out of fear that higher temperatures will scorch the light-colored pastels. Polymer clay requires sufficient sustained heat over time for its internal plasticizers to cross-link completely; underbaked clay remains brittle and will snap under the tension of everyday movement. Always verify your oven’s internal temperature with an independent, freestanding oven thermometer rather than trusting the appliance’s built-in dial, and bake pieces for at least thirty to forty minutes at the exact temperature specified on the packaging. Another common mistake is drilling bead holes after baking with high-speed rotary tools, which can chip the clay or crack the bead core. Always pierce or punch your holes in the raw clay using dedicated needle tools, or use a manual pin vise drill at low speeds with light pressure if refining cured components. Finally, using regular sewing elastic instead of pre-stretched heavy jeweler’s elastic cord causes bracelets to loosen and droop over time. Always pre-stretch elastic cord firmly before stringing beads, and lock all terminal knots with a dab of industrial adhesive to keep the cord secure.
Practical Tips for Durable Construction and Clean Finishes
Achieving clean, professional results with handmade clay bracelets requires disciplined finishing habits and attention to assembly details. Always sand cured clay beads and flat links underwater using wet-and-dry sandpaper to prevent airborne dust while keeping the sandpaper surface clear of debris. Progress systematically through four-hundred, six-hundred, eight-hundred, and twelve-hundred grit sandpaper to remove blade marks and produce a smooth, satin surface that feels comfortable against the skin. When joining raw clay elements, apply a drop of liquid polymer clay between the surfaces; this serves as a heat-activated bond that fuses parts together during the baking cycle. Keep your working tools clean by wiping acrylic rollers, blades, and work tiles with rubbing alcohol between color changes to prevent cross-contamination on pale clays. When assembling elastic bracelets, choose cord diameters that match your bead hole sizes closely to minimize lateral bead movement, and conceal knots inside larger bead cavities for a clean, seamless finish.
Styling, Presentation, and Storage Ideas for Clay Bracelets
Styling and displaying bohemian polymer clay bracelets requires an eye for balanced textures and cohesive color stories. When wearing multiple pieces, create an intentional wrist stack by combining different widths and materials: pair a wide terracotta heishi strand with a slim terrazzo bar bracelet and a textured leather wrap to introduce dynamic visual variety without overcrowding the wrist. Keep the overall look cohesive by maintaining a shared color thread across the stack, such as matching terracotta tones in the beads with the warm undertones of natural leather or brass accents. If you are photographing or displaying your bracelets for sale, stage them on natural backgrounds like sun-bleached linen fabrics, raw oak blocks, or sand-toned travertine stone plates that complement the organic bohemian aesthetic. For personal storage, keep clay bracelets organized on velvet-wrapped display bars or inside compartmentalized jewelry boxes away from direct sunlight, extreme heat, and sharp metal edges. Proper storage prevents the smooth clay finishes from scratching and protects elastic cords from drying out over time, keeping your handmade collection looking fresh and ready to wear.
Studio Budgeting and Efficient Time Planning
Disciplined time management and thoughtful budget planning make polymer clay bracelet crafting both cost-effective and productive. The medium requires minimal financial investment; a small starter set of four standard two-ounce clay blocks can yield several complete bracelet stacks, keeping material costs remarkably low compared to conventional jewelry metals. Save on supply costs by purchasing core neutral colors like white, raw ecru, and translucent in bulk, mixing custom shades with concentrated pigments instead of buying individual specialty colors. To maximize your productivity, batch your studio sessions into distinct assembly stages: spend your first session conditioning clay, mixing custom palettes, and forming beads; reserve your second session for baking, cooling, and water-sanding; and use your final session for cord stringing and hardware assembly. Batching similar tasks keeps your rolling equipment clean, speeds up production, and ensures consistent bead sizes across entire collections. Keep all your cured and uncured scrap clay stored in labeled plastic containers; leftover scraps make ideal internal bead cores, custom terrazzo flecks, and marbled stone mixes for future designs.
Creative Expansions and Advanced Studio Variations
After mastering these core bohemian bracelet techniques, you can expand your designs into advanced studio collections featuring mixed-media components and intricate patterns. Experiment with surface treatments like gold leafing, mica powders, or alcohol ink washes applied directly to raw clay to create rich, luminous finishes that mirror natural minerals and vintage patinas. Explore complex polymer clay caning techniques, building kaleidoscopic geometric canes or detailed botanical patterns that can be reduced and sliced into dozens of matching bead faces. You can also incorporate mixed-media elements by integrating hand-forged copper wire connectors, carved wooden accents, or raw semi-precious stones directly into your clay link designs. Scale these wristwear concepts into matching accessory sets by adapting bead shapes into coordinating hoop earrings, pendant necklaces, and hair pins to build complete jewelry collections. As your sculpting precision and design confidence grow, your signature bohemian clay aesthetic can evolve into a dynamic line of wearable art that celebrates natural textures, balanced craftsmanship, and timeless bohemian style.
Leave a Reply