Terracotta clay planters represent a foundational element of indoor gardening and landscape styling, making earthen pot transformations a dominant category across creative digital platforms. Transforming standard orange earthenware vessels allows plant enthusiasts, decorators, and craft hobbyists to design personalized focal points that balance organic materials with custom living arrangements. This comprehensive guide outlines ten distinct terracotta clay planter ideas structured to deliver practical fabrication methods, dependable moisture-management strategies, and durable decorative finishes for modern domestic environments. Readers will learn surface preparation steps, structural stacking configurations, mineral-washing techniques, and geometric color-blocking procedures that turn standard commercial clay pots into gallery-grade decorative accents. Integrating customized clay containers into your living space bridges functional botanical horticulture with intentional residential curation, ensuring root systems remain healthy while elevating household plant presentations. Understanding the core properties of porous clay prevents common maintenance errors, including salt efflorescence, cracked bases, and compromised drainage channels. Every featured project emphasizes approachable fabrication routines, accessible craft supplies, and step by step guidance suitable for all skill levels. By applying these reliable construction methods, anyone can craft enduring, visually balanced planters that celebrate natural materials while improving indoor and outdoor botanical styling.
Why This Idea Is Trending or Useful
Red clay pottery remains a centerpiece of contemporary home decor and patio inspiration because it combines organic texture, functional soil breathability, and exceptional DIY customizability. Unlike synthetic plastic or glazed ceramic containers, natural earthenware features porous capillary walls that allow soil to breathe, facilitating air circulation around root balls and preventing catastrophic overwatering. From an aesthetic perspective, the earthy, sun-baked warmth of traditional terracotta complements modern interior styles, including Scandinavian minimalism, desert bohemian motifs, and Mediterranean courtyard themes. The strong DIY appeal comes from the accessible, low-risk nature of the medium; inexpensive standard pots found at local garden centers can be upgraded using basic household supplies like mineral paint, twined cordage, or masonry mortars. For beginners, working with unglazed pottery offers a forgiving foundation for creative experimentation, as bare surfaces readily absorb stains, adhesives, and textured compounds without demanding specialized studio tools. These customizable vessels provide an economical way to assemble coordinated, stylish plant arrangements that look intentional and cohesive. Mastering these simple container modifications produces customized planters that mass-market retail options cannot match in tactile character or craftsmanship.
Materials and Preparation
Achieving durable, visually appealing modifications on standard terracotta requires disciplined workspace setup and methodical material preparation. Essential supplies include porous unglazed terracotta pots in various standardized diameters, fine-grit silicone carbide sandpaper, exterior acrylic primer, matte mineral or masonry paint, natural sisal rope, water-based penetrating waterproofing sealers, and diamond-grit masonry drill bits. Preparation starts with thoroughly cleaning your clay vessels; submerge new or used pots in a water bath mixed with white vinegar to dissolve powdery manufacturing residues, mineral salts, and stubborn dirt. Allow the clay to dry completely in open air for twenty-four hours, as trapped moisture inside the capillary pores will cause paint blisters and prevent adhesives from bonding. When planning your design layout, consider whether the finished vessel will reside indoors on hardwood furniture or outdoors exposed to seasonal freezing temperatures. Outdoor vessels require breathable, frost-proof mineral coatings and open bottom drainage holes, whereas indoor display pieces require internal liquid waterproofing membranes and non-marking felt base pads to protect delicate wooden surfaces.
Idea 1: Weathered French Limestone Wash Vessel

How to Create
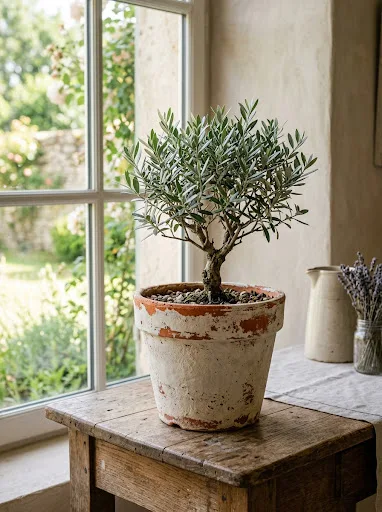
Transforming a bright orange clay flowerpot into an antiqued limestone container brings timeless European estate charm into modern domestic spaces. This concept relies on applying a diluted, chalky mineral wash over the exterior terracotta surface, softening the sharp reddish hue into a muted, creamy bone-white tone with natural earthen undertones. The visual appeal centers on subtle tonal gradations; the wash settles deeper into natural micro-crevices and around the raised rim, simulating decades of outdoor weathering, exposure to wind, and gentle mineral patina. This muted aesthetic coordinates effortlessly with soft, silvery botanical foliage, such as olive saplings, trailing rosemary, and culinary lavender, creating an elegant focal point for sunny kitchen sills or covered garden terraces. Because the applied coating remains semi-porous, the pot retains its essential root-aeration properties while achieving the historic character of salvaged architectural stone. This versatile treatment brings quiet sophistication to casual living areas, blending classical garden proportions with soft, neutral decor palettes.
Begin by scrubbing an eight-inch clean unglazed terracotta pot with two-hundred-twenty-grit sandpaper to open the surface pores, wiping away all residual dust with a damp cotton cloth. Prepare the mineral wash in a small container by mixing two parts matte off-white acrylic latex paint with one part cool water and one tablespoon of calcium carbonate powder, stirring until the mixture resembles thin cream. Using a wide, coarse-bristled utility brush, apply the wash rapidly across the exterior pot walls in multidirectional, erratic brushstrokes, working deliberately around the upper molded collar. While the surface remains wet, take a damp natural sea sponge and blot back high-contact areas along the body and bottom rim, exposing warm patches of underlying terracotta beneath the pale film. Allow the pigment to dry undisturbed for three hours, then gently buff the surface with a dry microfiber rag to remove loose chalky residue. Finish the exterior by applying a light mist of water-based matte penetrating sealer to lock the aged finish in place against moisture.
Idea 2: Minimalist Matte Charcoal Dip Container
Step-by-Step Guide
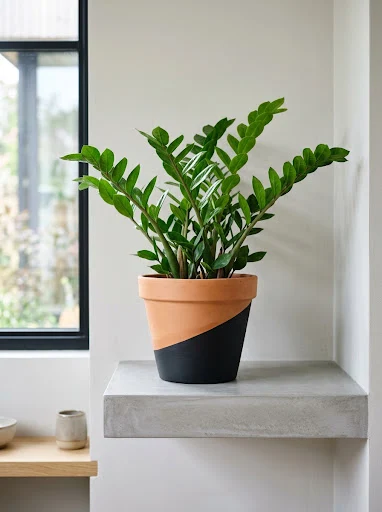
A two-tone, dipped-effect terracotta pot offers a sharp, modern silhouette that pairs exceptionally well with contemporary interior spaces and minimalist architectural settings. This design utilizes a clean diagonal line that divides the vessel into two distinct sections: an upper band of raw, warm earthen clay and a saturated, light-absorbing matte charcoal base. The visual drama comes from high-contrast color blocking; the deep, velvety dark surface grounds the container, creating an architectural pedestal effect that makes vibrant green foliage, such as glossy ZZ plants or silver-toned pothos, pop against room backgrounds. Leaving the upper rim unpainted preserves the authentic texture of the natural clay, establishing a pleasing contrast between industrial sophistication and handmade earthiness. This graphic layout fits cleanly on floating wall shelves, modular credenzas, and streamlined workstation desks, offering an organized modern look without requiring complicated structural alterations.
Start by preparing a smooth ten-inch terracotta planter, wiping the exterior with isopropyl alcohol to remove oil residues that could interfere with masking lines. Apply a continuous strip of flexible automotive-grade masking tape around the lower half of the pot at an intentional thirty-degree angle, burnishing the edge firmly with a wooden craft stick to prevent liquid paint from bleeding underneath. Apply a light coat of clear matte acrylic medium along the taped seam, letting it dry completely to seal the microscopic pores of the clay. Using a high-density foam roller, apply three thin, uniform coats of ultra-matte exterior charcoal or iron-black paint over the lower section of the pot, allowing thirty minutes of drying time between each application. Carefully peel away the masking tape while the third coat is slightly tacky to achieve a razor-sharp division line. Let the paint cure for forty-eight hours before potting your plant, ensuring the dark finish resists moisture, handling friction, and routine watering.
Idea 3: Natural Jute Wrapped Hanging Globe

How to Make
Suspending an inverted rounded terracotta pot using an integrated structural macrame wrap turns standard tabletop pottery into a functional vertical botanical display. This design encases the curved silhouette of a classic round-bellied clay pot within a cage of knotted natural jute twine, terminating in a secure hanging loop and a decorative fringe tassel beneath the base. The visual charm comes from natural material harmony; the raw, fibrous texture of natural jute rope complements the warm, unglazed clay surface, creating an earthy, organic aesthetic. Hanging planters are particularly useful for small urban apartments, compact sunrooms, and narrow entryways because they utilize unused ceiling space while keeping tabletops clear for daily living. The secure, knotted twine cradle balances the physical weight of wet potting soil and root systems, allowing trailing plants like string of hearts or English ivy to cascade freely downward. This lightweight, balanced installation adds dynamic movement and living dimension to sunny window bays.
Cut eight continuous lengths of four-millimeter-thick three-ply natural jute twine, each measuring roughly ten feet long, aligning the ends evenly on your work surface. Fold the entire bundle in half to form a top loop, tying a secure three-inch gathering knot around the base of the fold using an additional two-foot cord to create your main ceiling hanging loop. Suspend the loop from a stable hook and separate the sixteen dangling cords into four equal groups containing four strands each. Tie a series of flat square knots along each four-strand bundle for five inches, then take the two right-hand cords from one group and tie them to the two left-hand cords of the adjacent group using an alternating half-knot, repeating around the circumference to form an open diamond netting pattern. Lower a thoroughly cleaned six-inch curved terracotta planter into the center of the twine cradle, pulling the ropes taut around the pot’s shoulders. Secure the bottom strands tightly against the drain hole base with a firm wrapping knot, trimming the remaining cords to form a balanced four-inch bottom tassel.
Idea 4: Moroccan Geometric Stenciled Cachepot
Execution Process
Adding intricate geometric linework inspired by traditional Moroccan tile motifs elevates standard garden pottery into an eye-catching decorative cachepot. This design uses repetitive diamond grids, interlocking stars, and delicate linear fretwork applied in contrasting white or deep navy pigment across the curved terracotta body. The aesthetic impact relies on structured symmetry; repetitive geometric patterns provide visual order, balancing the wild, asymmetrical growth habits of companion plants like bushy Boston ferns or branching jade succulents. Using fine-line stencils or measured hand-masking techniques gives the artisan full control over line weight and pattern density, turning everyday clay pots into custom display containers. This design works exceptionally well as a standalone tabletop centerpiece, bringing artisanal craftsmanship and vibrant architectural rhythm to patio tables, entry consoles, and living room shelving.
Select a wide-mouthed eight-inch cylindrical terracotta pot, smoothing the exterior walls with fine-grit sandpaper and wiping away all surface dust. Fasten a flexible, repositionable Moroccan tile motif stencil firmly around the circumference of the vessel using low-tack painter’s tape, ensuring the stencil lies flat against the curved clay wall without bubbling. Dispense a small portion of thick, creamy white exterior craft acrylic paint onto a disposable paper palette, dabbing a flat-topped stiff stencil brush into the pigment. Tap the brush vigorously against a paper towel until nearly dry to the touch, as overloaded brushes cause paint to seep beneath stencil edges. Apply the paint through the stencil cutouts using a perpendicular bouncing or stippling motion, building up opaque, crisp lines across the open pattern areas. Carefully peel the stencil away while the paint is damp, clean off any pigment residue from the reverse side of the stencil, and repeat the process around the remaining circumference before sealing the dried patterns with a clear satin spray.
Idea 5: Layered Earthenware Herb Tower

Setup Method
Stacking graduated terracotta pots along a central stabilizing axis creates a compact vertical herb garden ideal for sunny balconies, kitchen stoops, and compact courtyards. This project arranges three or four clay pots of decreasing sizes on top of each other, forming concentric rings of exposed soil shelves that maximize planting capacity within a single square foot of ground space. The aesthetic appeal centers on balanced architectural tiers; cascading trailing herbs like creeping thyme and oregano soften the rigid circular rims, while upright varieties like chives and basil rise vertically from the central tiers. Beyond its visual charm, this stepped design provides functional horticultural zones, allowing gardeners to position sun-loving, drought-tolerant culinary herbs in the upper levels while moisture-loving varieties thrive in the broader, sheltered base pot. The physical mass of stacked, soil-filled earthenware forms a stable, wind-resistant installation that retains warmth through cool evenings.
Gather four standard unglazed terracotta pots with diameters measuring twelve, ten, eight, and six inches, checking that every container possesses a clear, unobstructed bottom drainage hole. Procure a four-foot length of half-inch threaded galvanized steel rod, along with matching heavy-duty washers and nuts to construct an internal stabilizing spine. Set the twelve-inch base pot onto its intended permanent level patio position, placing rubber riser feet underneath the base to ensure water flows freely away from the bottom drain. Drive the steel rod vertically through the center drainage hole into the ground beneath, or secure it firmly through an exterior wooden sub-base using washers and locking nuts. Fill the bottom pot with well-draining potting soil up to two inches below the rim, then slide the ten-inch pot down the central rod, resting its base securely on the compacted soil of the lower container. Repeat this sequence with the eight-inch and six-inch pots, tilting intermediate containers slightly in alternating directions to create staggered, accessible planting pockets for your selected culinary herbs.
Idea 6: Textured White Sand and Plaster Slurry Vessel

How to Create
Applying a thick coating of silica sand and structural plaster compound gives a standard terracotta pot the coarse, tactile feel of hand-sculpted studio pottery. This concept covers the smooth industrial shape of basic pots beneath a dense, textured stucco-like crust, introducing natural irregularities, gentle tool marks, and fine pitted surfaces. The design value lies in raw, light-scattering tactile depth; when placed near sunny windows, shifting natural daylight catches the gritty, raised surface, casting subtle shadows that highlight its artisanal look. Finished in an unbleached stone, chalk white, or soft oatmeal tone, this textured vessel fits naturally into wabi-sabi interiors, Japandi living rooms, and modern minimalist settings. By applying the gritty slurry directly over the clay, you produce an expensive-looking artisan vessel on a modest budget, providing an understated, earthy home for architectural botanicals like snake plants, rubber trees, or cactus varieties.
Wipe down an eight-inch clean clay pot with isopropyl alcohol, allowing the earthenware walls to dry thoroughly. In a plastic mixing tub, blend one cup of pre-mixed interior joint compound, half a cup of fine white silica play sand, and two tablespoons of matte white acrylic craft paint, stirring until the mixture reaches the consistency of gritty cake frosting. Using a flexible four-inch putty knife or a silicone spatula, apply the textured slurry over the exterior pot walls in broad, overlapping horizontal strokes, deliberately leaving subtle tool ridges, varied thicknesses, and tiny air pockets across the surface. While the compound remains pliable, lightly drag a dry, stiff nylon brush horizontally around the rim to create fine linear grooving. Allow the textured coating to cure undisturbed for twenty-four hours until rock-hard, then gently sand down any sharp points using one-hundred-twenty-grit sandpaper. Apply two coats of water-based matte polyurethane spray over the cured surface to shield the textured plaster from moisture and daily handling.
Idea 7: Terracotta and Burnished Copper Leaf Pedestal
Execution Process
Accenting the rim and base of an unglazed clay container with genuine metallic copper leaf produces an elevated mixed-material design that bridges earthy pottery and metallic warmth. This project applies thin sheets of metallic leafing over the natural clay, highlighting specific architectural details like the rolled upper lip or the recessed bottom base. The design impact comes from the contrast between two materials: the flat, porous, light-absorbing clay surface paired with the reflective, luminous glow of burnished copper metal. When placed on timber credenzas or brass-accented console tables, the copper elements catch ambient room light, adding a warm, sophisticated gleam to interior plant displays. The rich orange undertones of the copper harmonize naturally with the reddish hues of the terracotta, producing a cohesive, intentional palette that feels refined rather than overly decorative. This elevated look suits formal dining spaces, executive home offices, and modern living rooms that incorporate warm metallic hardware.
Clean the rolled upper lip of a nine-inch terracotta container with a dry lint-free cloth, ensuring the area is completely free of dust and grit. Using a soft one-inch flat brush, apply a thin, uniform layer of water-based metal leaf adhesive sizing around the upper collar, taking care to keep the application line straight and level. Allow the milky sizing adhesive to dry for twenty minutes until it becomes completely clear and aggressively tacky to the touch. Carefully lay individual sheets of copper leaf over the tacky band, using dry fingertips to press the delicate metal down smoothly against the contours of the rim. Use a soft, dry makeup brush or domed mop brush to burnish the copper leaf with circular motions, brushing away loose metal flakes and smoothing the edges flat against the clay surface. Let the leafing settle for two hours, then brush on a coat of clear acrylic metal-leaf sealer to prevent the exposed copper from oxidizing or tarnishing over time.
Idea 8: Sub-Irrigated Wicking Terracotta Basin

Setup Method
Converting a wide, shallow terracotta bulb pan into a sub-irrigated wicking planter provides a self-regulating watering system tailored for moisture-sensitive houseplants. This design uses a closed reservoir beneath an internal perforated soil shelf, drawing moisture upward into the soil using absorbent cotton wicks. The visual appeal comes from its low, wide silhouette; a shallow clay dish makes an elegant tabletop display, framing low-growing plants like African violets, creeping figs, or collections of nerve plants without cluttering vertical sightlines. Sub-irrigation takes advantage of the natural capillary properties of both potting soil and porous clay, delivering steady, uniform moisture directly to root zones without wetting delicate surface foliage. This bottom-watering approach prevents common houseplant problems like fungal gnats, powdery mildew, and soil compaction, ensuring plants stay healthy and hydrated. The finished vessel serves as a functional, attractive desktop centerpiece that minimizes everyday plant maintenance.
Select a wide ten-inch shallow terracotta bowl, thoroughly coating the entire interior floor and interior walls with three coats of liquid rubber waterproofing sealant to make the basin watertight, leaving the exterior unpainted. Cut a circular planting shelf from rigid perforated plastic needlepoint canvas to fit snugly inside the bowl, suspended two inches above the sealed bottom on three small plastic spacer blocks. Thread four eight-inch lengths of half-inch braided cotton wicking cord through the perforated shelf, letting the lower ends coil along the bottom reservoir floor while the top ends extend upward into the soil zone. Insert a rigid half-inch clear acrylic tube vertically through the edge of the shelf to serve as a water fill pipe and visual water-level gauge. Fill the upper compartment above the plastic shelf with an airy potting blend of peat, perlite, and vermiculite, planting your selected foliage around the wicks. Pour clean water down the fill pipe into the lower reservoir, allowing the cotton wicks to draw moisture upward into the root zone automatically.
Idea 9: Fluted Architectural Scallop Clay Planter
How to Make
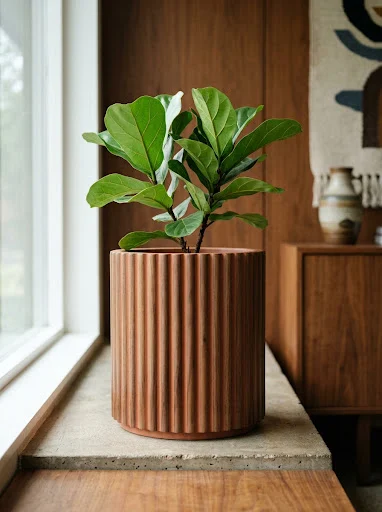
Adding vertical fluted half-round molding to the outer walls of a cylindrical clay pot turns a basic container into a textured, architectural statement piece. This design arranges slim wooden dowels or extruded polymer clay half-rounds vertically around the pot’s exterior, finished in a continuous coat of warm terracotta or stone-toned mineral paint. The visual appeal comes from dynamic vertical shadow lines; the raised, rounded ribs catch shifting daylight, creating rhythmic shadows that accentuate the circular geometry of the pot. Fluted textures introduce mid-century modern and Art Deco character into modern interiors, helping plain store-bought pots blend with fluted furniture, tambour paneling, and ribbed glassware. The added vertical ribs also provide a practical benefit, adding structural thickness to the pot walls and offering a secure, textured grip when moving heavy potted plants around your home.
Measure the height and circumference of an eight-inch straight-sided cylindrical unglazed terracotta pot using a flexible sewing tape measure. Cut half-inch wide half-round basswood molding strips to match the exact vertical height of the pot wall using a fine-toothed hand craft saw, smoothing the cut ends with sandpaper. Clean the pot exterior with rubbing alcohol, then draw straight vertical alignment guidelines around the pot every half-inch using a pencil and a carpenter’s square. Apply a thin bead of waterproof polyurethane construction adhesive along the flat backing of each wooden strip, pressing the molding firmly onto the marked guidelines until flush against the clay wall. Allow the structural adhesive to cure for twenty-four hours under the tension of two large elastic rubber bands wrapped around the pot. Once dry, coat the entire ribbed exterior with two coats of terracotta-toned exterior matte mineral paint, filling any fine seams between the wood ribs and clay walls to achieve a seamless, sculpted look.
Idea 10: Rustic Sun-Baked Mud Wash Vessel

Step-by-Step Guide
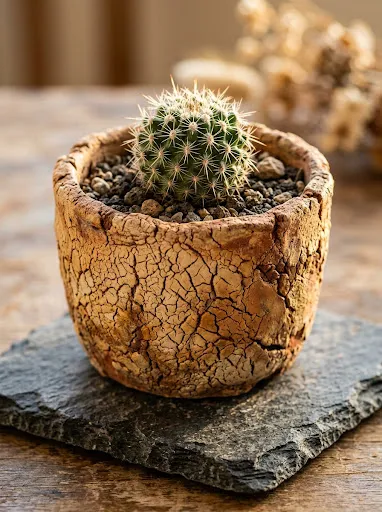
Emulating the sun-baked, hand-patted clay pottery of traditional rural artisan communities brings grounded, organic warmth into modern interior settings. This design uses a natural earth-and-clay slurry wash applied over an unglazed pot, producing fine surface fissures, matte chalkiness, and uneven mineral tones reminiscent of desert pottery. The appeal lies in intentional visual texture; rather than aiming for smooth factory perfection, this technique celebrates small surface cracks, rough earth tones, and authentic handmade character. This rustic style pairs naturally with desert succulents, sprawling cacti, and woody jade plants, creating a rugged botanical display suited for sunlit windowsills, exposed brick mantels, and rustic wooden dining tables. Because the wash uses natural earth pigments, the vessel retains its breathable capillary action, ensuring moisture evaporates smoothly from the soil to maintain healthy, resilient root systems.
Gather two tablespoons of dry red clay soil, one tablespoon of calcium carbonate chalk powder, two tablespoons of matte beige acrylic paint, and three tablespoons of warm water, blending the ingredients in a dish until smooth and spreadable. Wash a nine-inch raw terracotta pot with water to clear away dust, leaving the clay slightly damp to slow the drying process of the earth wash. Use a wide, coarse hog-bristle brush to dab the mud mixture generously over the exterior walls, working in stippled, cross-directional strokes to build an irregular surface texture. Immediately run a warm hair dryer or heat gun across the wet surface for five minutes; the rapid surface drying causes the natural clay mud layer to develop fine, authentic micro-cracks across the pot walls. Allow the vessel to cool and cure in a dry room for twenty-four hours, then lightly brush away any loose, unbonded soil particles with a dry bench brush. Mist the exterior with a matte penetrating fixative spray to lock the cracked mud finish firmly onto the terracotta base.
Common Beginner Mistakes and How to Avoid Them
Modifying terracotta planters involves specific material and moisture considerations that differ from standard home craft projects. The most frequent beginner mistake is painting the interior surfaces of unglazed clay pots with impermeable latex paints while leaving drainage holes open. When water is added to the soil, moisture seeps through the unsealed interior into the porous clay walls, pushing outward against exterior paint films and causing bubbles, peeling, and unsightly white salt efflorescence beneath the surface. To avoid this, either seal the interior walls completely with an elastomeric waterproofing membrane, or leave both the interior and exterior surfaces breathable by using mineral-based washes. Another common oversight is drilling new drainage holes using high-speed standard steel drill bits without water lubrication, which causes sudden thermal shock that shatters brittle clay pots. Always use diamond-tipped or carbide masonry hole saws at slow drill speeds, keeping the drilling point submerged beneath a steady trickle of cold water to prevent cracking. Finally, never skip cleaning new pots before painting; unseen factory release agents and packing dust prevent adhesives and primers from forming a permanent bond with the clay.
Practical Tips for Better Results
Achieving professional, boutique-quality finishes on DIY terracotta planters requires attention to surface prep, paint choices, and hardware assembly. Always smooth exterior clay seams and manufacturing marks before decorating; twenty minutes of wet-sanding with two-hundred-twenty-grit silicone carbide sandpaper removes rough casting ridges and creates an even surface for paint or adhesives. When choosing paints for decorative pots, prioritize mineral silicate paints, chalk-finish mineral paints, or specialized exterior masonry coatings rather than basic interior latex paints. Mineral coatings fuse chemically with the porous earthenware rather than sitting as a plastic film, ensuring the decorative layer will not peel or blister under everyday watering. When assembling stacked pots or tiered garden towers, insert rubber spacers, neoprene washers, or small ceramic pot feet beneath every container base. Elevating the pots keeps bottom drainage holes open, allows air to circulate underneath, and prevents wet pot bottoms from trapping moisture and leaving stubborn water stains on outdoor patios or indoor floor surfaces.
Styling, Presentation, or Organization Ideas
Styling custom terracotta planters effectively requires an eye for visual balance, contrasting foliage textures, and harmony with surrounding architectural finishes. Group pots in odd-numbered clusters—such as arrangements of three or five pots in varied heights and widths—to create a pleasing, dynamic visual rhythm in room corners or patio steps. Balance the warm red-orange undertones of unglazed terracotta by pairing pots with plants that feature contrasting foliage: cool silvery-blue succulents, deep emerald rubber trees, and variegated cream pothos stand out crisply against the warm earthen clay. When arranging containers on indoor wooden shelving or credenzas, place wide cork mats or unglazed ceramic saucers lined with silicone feet beneath every pot to catch residual drainage while keeping damp pottery off finished furniture. Use natural styling accents that complement the rustic quality of clay, such as matching terracotta plant tags, smooth river stone top-dressings, and woven seagrass floor baskets that hold extra tools and watering cans neatly nearby.
Budget or Time Planning
Upgrading basic terracotta pots is an economical and time-efficient way to achieve high-end designer aesthetics on a modest budget. Standard terracotta vessels cost a fraction of the price of glazed ceramic or designer composite planters, making them accessible bases for creative home improvement projects. You can complete most of these decorative ideas over an organized weekend: spend Saturday morning cleaning, sanding, and applying mineral washes or structural adhesives, allowing bonding agents and paints to cure overnight undisturbed. Dedicate Sunday afternoon to assembling hardware, potting your plants with well-draining soil mixes, and styling your finished pieces throughout your home. To keep expenses low, purchase basic terracotta pots in multi-packs from wholesale garden centers, repurpose leftover house paint or joint compound from previous home projects, and source natural jute twine or wood scraps from hardware remnant bins. Storing your leftover paints and mineral sealers in tightly sealed glass jars ensures you have supplies ready for future plant decor projects without having to buy new materials each time.
Creative Expansion and Advanced Inspiration
Once you feel comfortable with basic mineral washes, rope wrapping, and paint applications, explore advanced techniques that combine terracotta with diverse media. Experiment with mosaic inlays, pressing tumbled beach glass, ceramic tile shards, or sliced river pebbles into thin-set mortar beds applied over broad pot rims to create custom decorative borders. Explore traditional botanical clay printing: press freshly gathered fern fronds or textured leaves into thin slabs of wet air-dry clay, transferring the delicate leaf impressions onto the curved walls of terracotta containers before firing or sealing. You can also incorporate low-voltage LED strip lighting into stacked planter arrangements, tucking warm waterproof lights beneath the overlapping rims of tiered herb towers to cast a gentle downward glow across foliage during evening patio gatherings. Moving beyond conventional houseplant displays, these durable clay containers adapt easily into versatile outdoor features, including tabletop water fountains, aromatic patio citronella candle bowls, and structured tabletop fire vessels, providing endless creative inspiration for your living spaces.
Leave a Reply