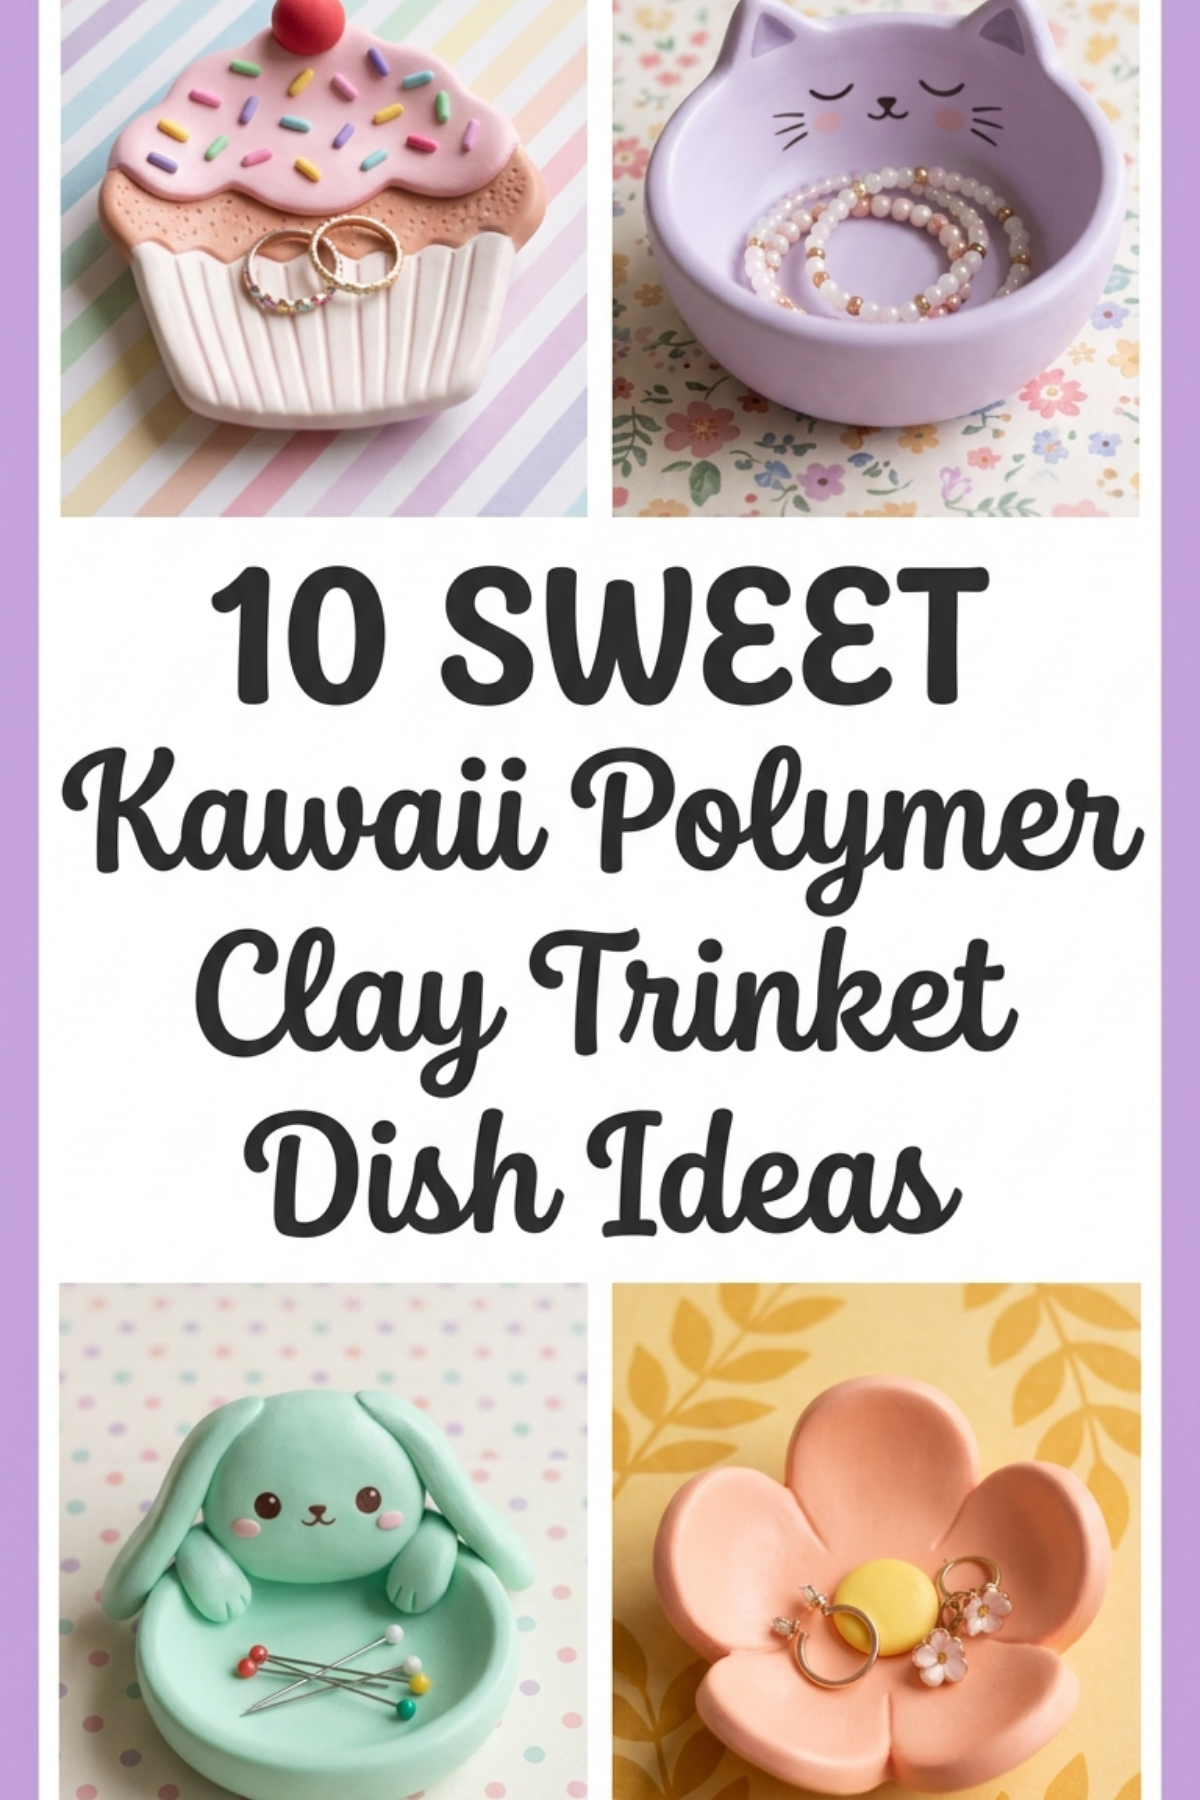

Creating custom organizers through craft projects allows makers to combine functional storage with charming visual elements. Polymer clay is an ideal medium for crafting miniature catchall trays, offering high durability, vibrant color retention, and ease of handling without requiring industrial kilns or specialized studio equipment. Exploring kawaii polymer clay trinket dish ideas provides an accessible way to organize rings, earrings, coins, and desktop essentials while incorporating Japanese cute culture aesthetics into everyday living spaces. In this guide, readers will learn how to condition, sculpt, bake, and finish ten distinct miniature dish designs featuring soft pastel tones, rounded character forms, and clean silhouettes. Mastering these clay-shaping methods enables crafters to convert simple blocks of compound into smooth, durable, moisture-resistant catchalls that protect small personal items from getting lost. This tutorial breaks down foundational clay modeling skills into straightforward techniques, explaining how to control depth, maintain balanced proportions, and apply protective topcoats. Making your own decorative trays offers complete control over colors, dimensions, and themes, resulting in practical home decor items that enhance bedside nightstands, vanity counters, and craft stations with tidy, handmade charm.
Why This Idea Is Trending or Useful
Small decorative dishes have become a staple across social media mood boards and modern design feeds due to their balance of utility and visual warmth. Miniature storage solutions address the universal need to prevent vanity clutter, making them an essential organization tool for daily jewelry, keys, and desk supplies. The kawaii aesthetic appeals to modern craft audiences by prioritizing soft curves, expressive character faces, and comforting pastel palettes that brighten minimalist living environments. Engaging in this DIY activity gives beginners a manageable creative project that yields a polished, functional decorative accent in just an afternoon. Polymer clay is widely accessible, cures reliably in a standard household oven, and requires minimal upfront financial investment, lowering the barrier to entry for novice makers. Crafting these dishes by hand provides a screen-free creative outlet, transforming raw modeling blocks into practical objects that serve daily organizational needs. These personalized catchalls also make thoughtful, budget-friendly handmade gifts suitable for birthdays, holidays, and seasonal exchanges, delivering high visual appeal alongside reliable utility.
Materials and Preparation
Achieving smooth, professional outcomes with oven-bake clay requires gathering proper tools and establishing a clean, organized work surface before shaping begins. The core materials include multi-color polymer clay blocks, an acrylic roller or dedicated clay conditioning machine, parchment paper, ceramic baking tiles, and liquid polymer medium. Essential sculpting tools comprise dual-ended silicone shaping pens, ball stylus tools, needle tools, metal tissue blades, and oven-safe ceramic or glass shaping bowls. Proper preparation requires thoroughly wiping down all cutting mats and non-porous surfaces with isopropyl alcohol to remove airborne lint, dust particles, and residue that could embed into light-colored clay. Crafters must condition the raw clay by rolling, folding, and kneading each portion until pliable, warm, and free from micro-fissures. Planning considerations involve verifying oven temperature using an independent analog oven thermometer, as integrated stove displays often fluctuate and risk scorching delicate pastel formulations. Having fine-grit sanding sponges, acrylic detail paints, ultra-fine synthetic liner brushes, and water-based gloss varnishes nearby ensures a seamless workflow from initial clay conditioning through the final sealing phase.
MAIN IDEAS SECTION
Idea 1: Pastel Smiling Cloud Catchall
How to Create
The smiling cloud dish features a gently scalloped rim, a soft white or sky-blue foundation, and a warm, inviting character face positioned across the base. This design relies on a slightly sunken center bordered by soft, pillowy lobes that prevent small hoop earrings and studs from sliding off the edge. To capture the signature kawaii aesthetic, the outer perimeter displays gentle undulating curves rather than sharp, rigid corners, mimicking a cartoon weather icon. The facial elements consist of simple curved closed eyes, flushed rosy cheeks, and an open smile, keeping the overall look minimal yet expressive. Choosing an opaque white or powdered pastel blue clay compound provides a neutral backdrop that makes colorful rings and charms stand out. The final cloud form balances organic contours with practical containment, serving as a peaceful bedside accent for resting night jewelry. Its structural depth remains shallow yet supportive, allowing effortless retrieval of small items while keeping surfaces tidy and protected.
Step-by-Step Guide
Begin by conditioning two ounces of white polymer clay until it rolls smoothly without cracking along the edges. Roll the conditioned clay into a uniform flat slab measuring four inches wide and one-quarter inch thick on a sheet of clean parchment paper. Use a round clay cutter or craft blade to carve out soft, rounded cloud lobes around the perimeter, then smooth the raw edges with a silicone sculpting tool. Gently press the center of the cloud downward using your thumbs, drawing the outer scalloped lobes upward at a slight inward angle to create a functional rim. Roll two tiny strands of black clay into thin, tapered arcs to form resting eyelids, and press them lightly onto the lower middle section. Shape two miniature discs of soft pink clay, flattening them on either side of the eyes to produce blushing cheeks. Transfer the shaped cloud on its parchment base directly onto a ceramic baking tile, and bake at the manufacturer-recommended temperature for thirty minutes before cooling and sealing.
Idea 2: Sleeping Shiba Inu Ring Nest
Execution Process
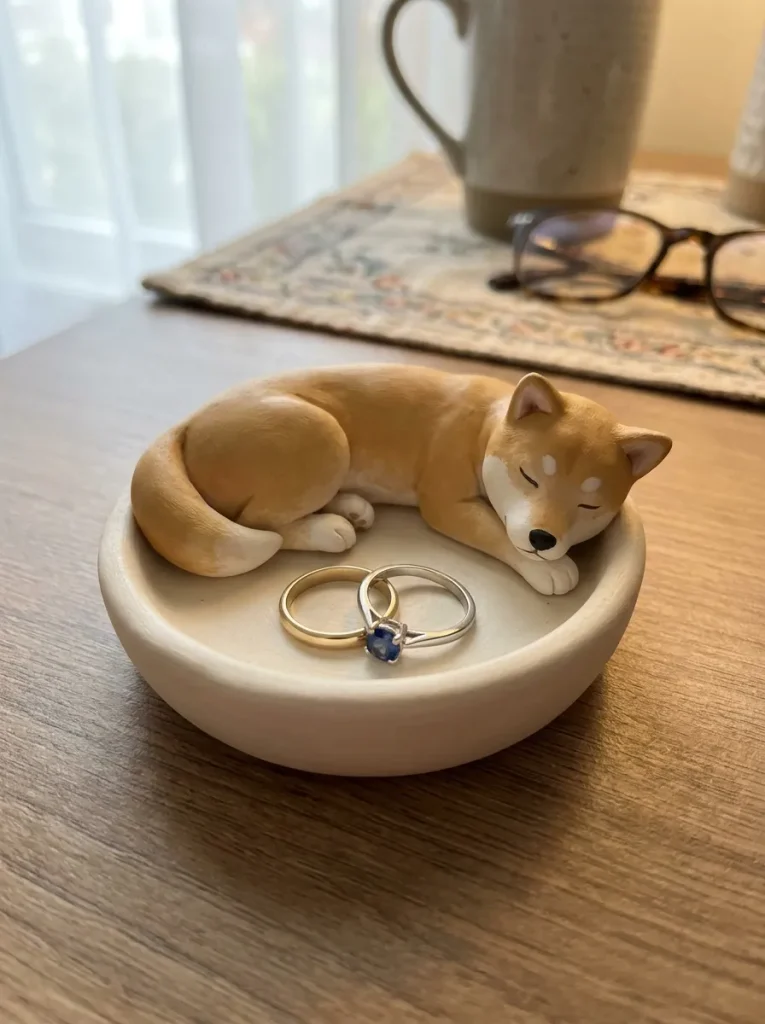
The sleeping Shiba Inu dish incorporates animal character modeling into a deep, round jewelry bowl, featuring curled paws and a resting canine head. The focal point rests on a rounded canine face sculpted along one side of the raised rim, angled inward as if the animal is sleeping curled up. Classic kawaii animal styling relies on simplified geometric forms, utilizing warm honey-tan and creamy off-white clay to recreate the dog’s distinct coat patterns. The deep circular bowl provides secure storage for bulkier rings, stacked bracelets, and hairpins, keeping everyday accessories organized in one spot. The dog’s tail arches along the opposite wall of the rim, completing the curled sleeping posture while acting as a natural divider within the tray. Soft, rounded contours prevent small items from catching on sharp protrusions, ensuring the interior remains smooth, durable, and practical. This animal-themed design brings gentle personality to desktop settings and dressing tables, offering practical storage with a warm, handmade feel.
Setup Method
Condition two ounces of warm tan clay and one ounce of white clay, rolling the tan portion into a five-inch circle with an even quarter-inch thickness. Lay the tan clay slab into an oven-safe small ceramic prep bowl, pressing it gently down to adopt a rounded basin shape while trimming the upper rim flat. Roll a small ball of tan clay into an egg-like teardrop to create the head, attaching it firmly to one section of the bowl’s edge with liquid polymer clay. Blend a thin patch of white clay onto the lower half of the dog’s muzzle and chest using a silicone blending tool, erasing all visible joints. Form two small triangular ears, attaching them to the crown of the head, and press a tiny black clay sphere into place for the nose. Score two small curved indentations for sleeping eyes using a fine needle tool, and affix tiny white paw shapes resting along the rim. Bake the supported bowl assembly, let it cool completely, and apply matte glaze to the character details.

Idea 3: Pink Frosted Strawberry Donut Basin
How to Make
The frosted donut dish adapts pastry themes into functional desk organization, providing a circular trench to hold delicate chains, cuff links, and coins. This design mimics an iced pastry using a golden-tan base ring with a glossy pink frosting layer that drips down the curved outer walls. Rather than having a hollow center hole, the middle features an elevated, rounded dome that prevents necklaces from tangling and keeps hair accessories separated. The perimeter curves upward in a smooth lip, retaining small items while showcasing hand-placed pastel sprinkle accents scattered across the upper glaze layer. The combination of warm pastry tones and soft pastel pink creates an appetizing, playful desk accessory that fits seamlessly with dessert-themed decor. The sturdy, wide base ensures stability on polished furniture, keeping the dish steady when placing or picking up jewelry.
Step-by-Step Guide
Condition one and a half ounces of light caramel-tan polymer clay and roll it into a thick five-inch disc with an even quarter-inch gauge. Press a rounded ball tool into the center to create a clean, raised central mound, gently shaping the perimeter upward into a curved outer lip. Roll a separate sheet of soft pink clay to a thin one-eighth-inch profile, cutting organic, wavy drip contours along its outer edges with a craft blade. Carefully drape this pink frosting layer over the tan base, aligning the center recess and smoothing the surfaces together to eliminate trapped air pockets. Extrude or roll paper-thin logs of mint green, white, pastel yellow, and lavender clay, slicing them into tiny two-millimeter sprinkle segments. Gently press these individual sprinkle pieces across the pink frosting surface using a ball stylus so they sit flush with the clay layer. Bake the completed donut dish on a flat tile, allow it to cool, and brush the pink frosted portion with high-gloss glaze while leaving the tan dough matte.
Idea 4: Happy Sunny-Side Egg Plate
How to Create
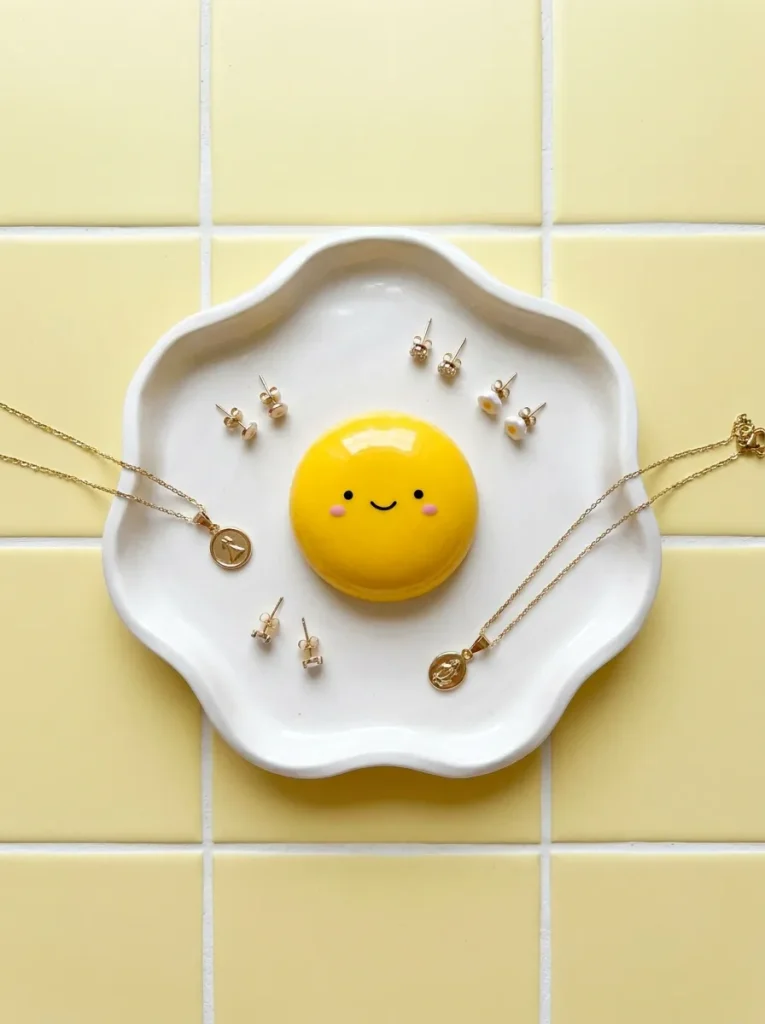
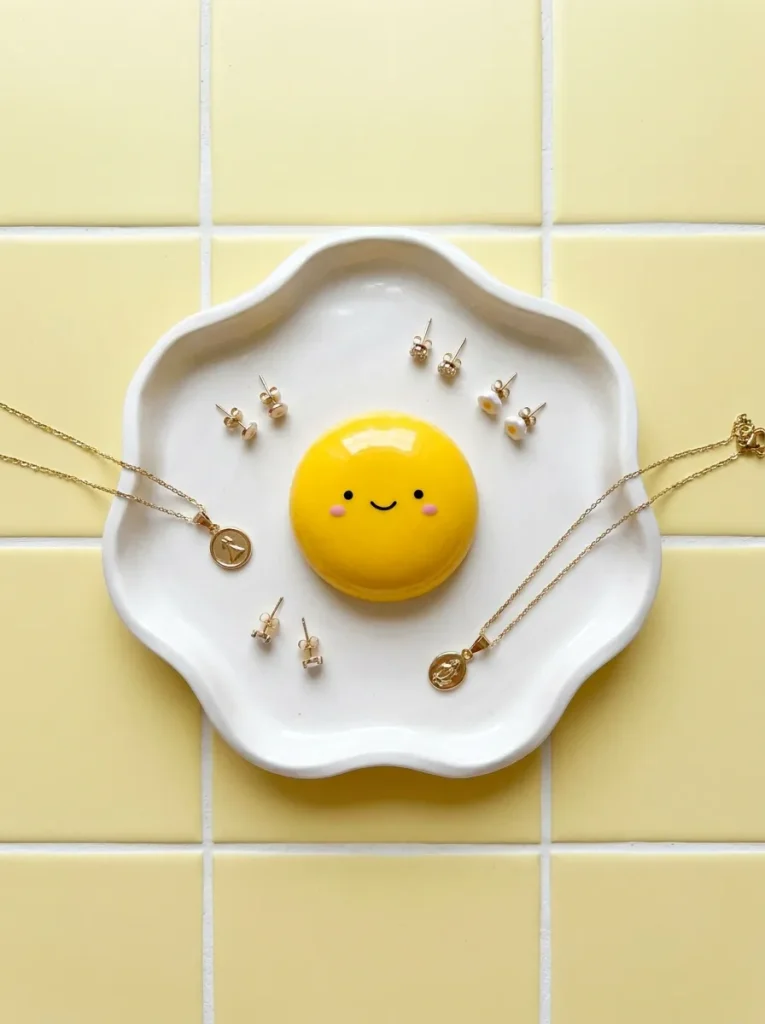
The sunny-side egg dish uses simple geometric forms and bright contrast to produce an energetic, minimalist catchall. The design features an organic, freeform white base shaped like a pan-fried egg white, with an offset yellow yolk dome in the center. This domed yolk serves as an upright post for hanging rings, while the surrounding white basin holds stud earrings, hair clasps, and safety pins. The kawaii face is placed directly onto the bright yellow yolk, using tiny black pupil dots and subtle cheek blushing to give the kitchen-inspired design an expressive focal point. Its smooth, rounded white borders flare upward slightly, creating a safe, contained barrier that keeps accessories in place. This project requires minimal complex tool manipulation, making it well suited for beginners learning basic slab rolling and dimensional assembly. The clean two-tone palette matches modern desk accessories, offering a cheerful, practical way to organize daily essentials.
Step-by-Step Guide
Roll two ounces of bright white polymer clay on parchment paper into an organic, slightly irregular oval approximately four inches across and one-quarter inch thick. Use the warmth of your fingertips to gently rub along the edges, softening any sharp cuts into a natural, undulating perimeter. Curve the outer perimeter upward roughly half an inch, smoothing the resulting transition with a damp finger to create a continuous, curved lip. Roll a half-ounce portion of golden yellow clay into a smooth, dome-shaped sphere, then flatten its base against a glass work tile. Coat the underside of the yellow dome with a drop of liquid clay and press it firmly into the center of the white basin. Roll two tiny spheres of black clay for wide-set eyes, followed by two flat soft-pink clay ovals for cheeks, pressing them onto the yellow dome surface. Bake the egg dish directly on its flat ceramic tile, let it cool slowly in the oven to prevent cracks, and finish with a durable semi-gloss sealant.
Idea 5: Kawaii Boba Milk Tea Cup Tray
Step-by-Step Guide
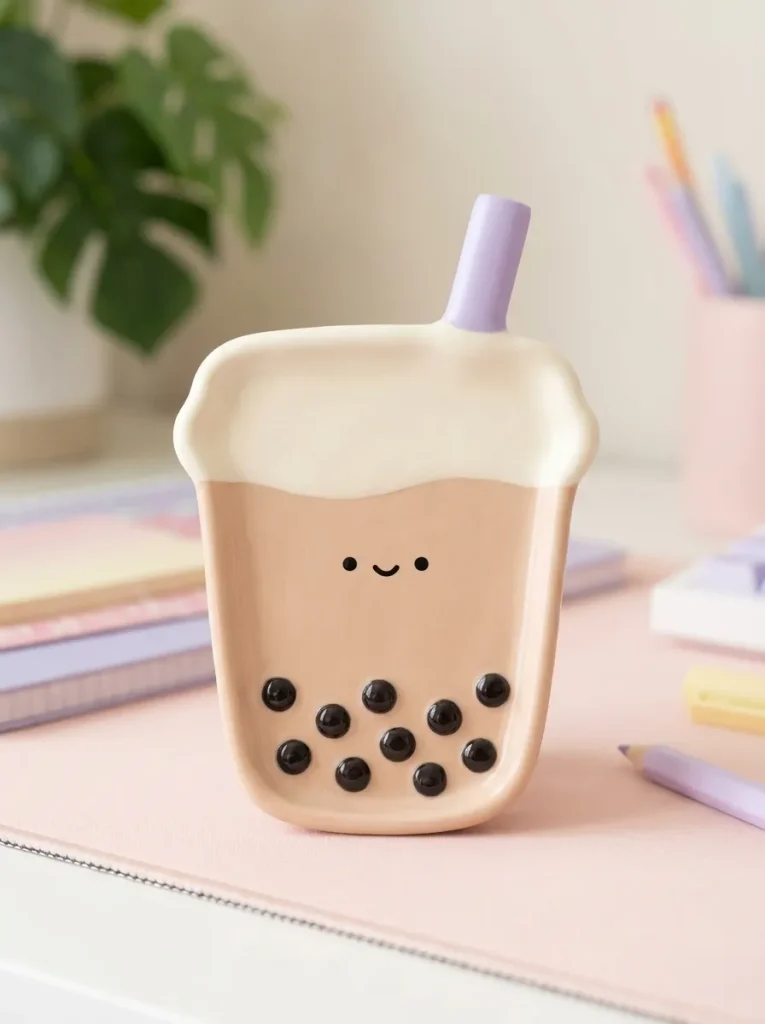
The boba milk tea tray takes visual cues from bubble tea drinks, featuring an upright cup profile with a domed lid and translucent tapioca pearls. The dish forms an elongated, rounded rectangular vessel with a lower rim that securely holds bracelets, bobby pins, and paperclips on a vanity or desk. The bottom half showcases a warm milk-tea tan hue, topped with a crisp white layer representing foam, and finished with a curved, pastel straw that doubles as a ring post. Tiny black or dark brown spheres sit along the base, replicating chewy tapioca pearls submerged beneath sweet milk tea. A subtle smiley face across the midsection adds the signature kawaii touch, giving the playful drink silhouette extra character. This structured, modern tray helps keep workspace supplies or daily jewelry organized, combining clean drink-inspired lines with practical everyday containment.
Execution Process
Condition two ounces of warm milk-tea colored clay and roll it out into a rectangular slab measuring five inches long by three inches wide. Use a tissue blade to round the bottom corners and taper the base slightly inward, keeping the top section wider to echo a classic tapered cup. Flare the entire perimeter upward by three-eighths of an inch to establish containment walls, reinforcing the inner seam with a fine clay coil. Layer a narrow band of white clay across the top edge to mimic creamy milk foam, trimming the edges neatly along the side boundaries. Roll eight to ten tiny beads of dark chocolate-brown clay and press them along the bottom interior, flattening their undersides so items sit comfortably above them. Cut a small cylindrical strip of pastel purple clay to serve as a thick straw, anchoring it firmly to the upper rim with liquid polymer. Bake the tray flat on a ceramic tile, cool thoroughly, and apply a satin protective finish over the entire interior.
Idea 6: Kawaii Frosted Cupcake Jewelry Bowl
How to Make
The cupcake jewelry bowl features a pleated pastry liner base beneath a swirling mound of decorative frosting that borders the catchall interior. The lower basin represents the fluted cupcake wrapper, detailed with fine vertical ridges that provide visual texture and an easy grip when lifting the tray. The upper rim is trimmed with spiraled, scalloped clay ropes resembling piped buttercream, complete with a tiny red cherry ornament that doubles as a hanging post for rings. Soft pastel colors, such as baby pink, mint, or pale buttercream yellow, maintain the sweet confectionery look. This deeper bowl design protects larger accessories, such as bulky watch bands, hair ties, and delicate bangles, from falling over the edges. The combination of structured vertical lines on the wrapper and fluid curves along the piped rim produces a balanced, charming piece of handmade home decor.
Setup Method
Condition two ounces of pastel-colored clay for the base and roll it out to a thickness of one-quarter inch on smooth parchment paper. Press the clay disc into a four-inch fluted tart pan or silicone mold, trimming away any excess clay flush with the upper rim. Use a dull modeling blade or needle tool to deepen the vertical groove indentations along the exterior sides, creating the look of a pleated paper wrapper. Roll two long coils of white clay, twisting them together into a decorative rope, and press this twisted rope around the upper lip to form the frosting border. Shape a small sphere of bright red clay, adding a tiny brown coil stem, and secure it firmly onto one side of the frosting rim with liquid clay. Add tiny, smiling eye details to the front section of the pleated wrapper using black acrylic paint after baking, or apply small raw clay arcs before curing. Bake the bowl within its metal form, allow it to cool, remove it carefully, and seal with a clear gloss coat.

Idea 7: Winking Star Celestial Trinket Plate
Step-by-Step Guide
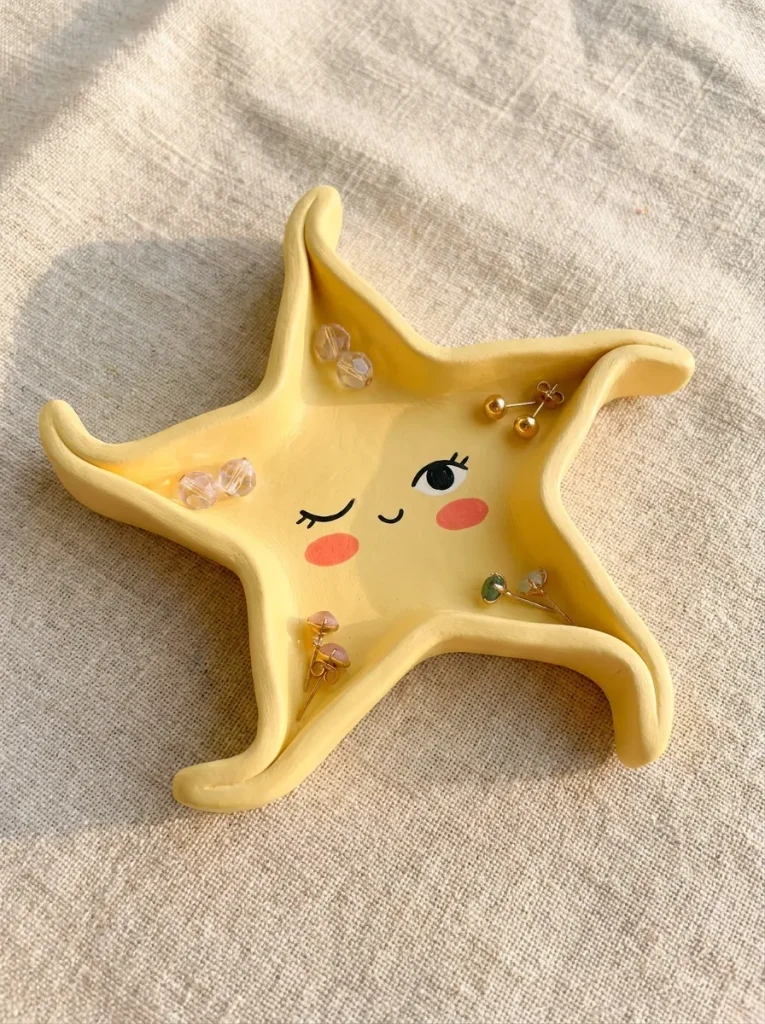
The winking star dish draws inspiration from celestial kawaii art, featuring a rounded five-point star with a charming facial expression across its central surface. Each point of the star angles upward slightly, creating five separate corner zones that naturally organize small earrings, loose jump rings, and individual charms. The tips of the star points are softly rounded rather than sharp, maintaining the safe, friendly aesthetic characteristic of modern Japanese craft designs. A warm pastel buttercup-yellow or shimmering pearl-white clay gives the piece a soft visual glow that complements metallic jewelry. The winking face—featuring one open curved eye and one wide star-shaped wink—adds playful personality to an otherwise simple geometric form. This celestial dish works well on bedside tables or bathroom vanities, holding rings, studs, and hairpins securely within its five designated corners.
Execution Process
Condition two ounces of soft pastel yellow clay, working it until smooth and pliable, then roll it into a flat four-inch circle of uniform thickness. Place a five-point star template cut from cardstock over the clay, carefully trimming along the edges with a sharp craft blade before smoothing the points. Gently pinch the center of each star point, bending all five tips upward at a thirty-degree angle while pressing the center flat against your work tile. Use a fine ball stylus to smooth the interior transitions, creating a continuous curved basin that keeps jewelry centered. Press a tiny, flattened crescent shape of black clay onto the left side for a winking eye, and form a small open circle on the right for an alert eye. Add two tiny circles of light coral clay beneath the eye positions to create soft blushing cheeks, blending the edges seamlessly. Transfer the star to a baking tile, cure according to package instructions, cool completely, and seal with a durable, water-resistant matte varnish.
Idea 8: Smiling Sprout Ceramic-Style Mini Pot
How to Create
The smiling sprout mini dish features an earthy, ceramic-look catchall accented with a tiny green seedling emerging from the center or edge. This design draws on the popular kawaii plant trend, using a speckled, off-white background paired with fresh leaf-green details for an organic look. The shallow bowl shape is deep enough to store coins, keys, or crystal stones without overflowing onto nearby surfaces. The pair of tiny green leaves serves as a functional center post for stacking rings, keeping bands arranged upright and easy to select. Subtle speckling throughout the clay body gives the piece the look of wheel-thrown stoneware, maintaining a clean minimalist style suitable for modern living spaces. The simple, cheerful face on the front wall creates a welcoming decorative accent for entryways, plant stands, or sunny office desks.
Step-by-Step Guide
Condition two ounces of ecru or granite-effect polymer clay, or blend tiny pinches of dark brown clay into plain white clay to create a faux-stone look. Roll the prepared clay into a smooth ball, then use your thumb to press into the center, working it outward into a three-inch pinch pot. Level the top rim by lightly inverting the pot onto a flat tile, keeping the walls at a sturdy three-sixteenths of an inch throughout. Roll a pea-sized sphere of forest-green clay into an upright cylinder, splitting the top into two small teardrop leaf shapes to create an emerging sprout. Secure this sprout firmly into the center base of the bowl with a drop of liquid clay, smoothing the join point with a silicone tool. Use a needle tool to lightly engrave two smiling eyes and a small curved mouth on the front wall, filling the lines with dark acrylic paint after baking. Bake the completed vessel on a flat sheet, allow it to cool, and apply a smooth satin glaze to mimic natural pottery.

Idea 9: Happy Panda Bear Catchall Dish
How to Make
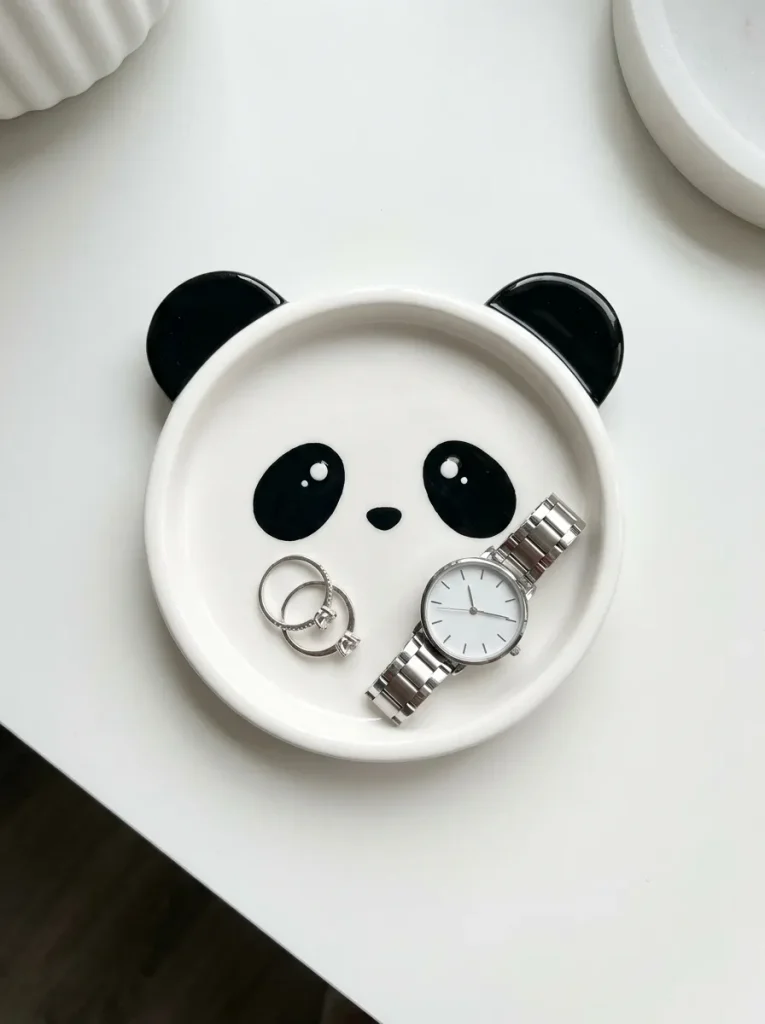
The happy panda catchall features a classic black-and-white color palette, combining high visual contrast with rounded, welcoming animal curves. The main base forms the panda’s round white head, with the curved rim forming the perimeter and two black hemispherical ears rising along the top edge. The ears can hold individual post earrings or small rings, while the spacious, flat center basin accommodates larger watches, brooches, or compacts. Deep black eye patches with tiny white catchlights give the panda a lively, friendly expression that stands out on any vanity table. The monochromatic palette integrates effortlessly into contemporary, neutral spaces while preserving playful character charm. This design focuses on smooth surface blending and balanced symmetry, resulting in an eye-catching craft project that keeps vanity clutter contained.
Setup Method
Condition two ounces of pure white clay and roll it out on clean parchment into an even four-inch circle measuring one-quarter inch thick. Press the outer perimeter upward using the smooth curve of a lightbulb or small round ceramic bowl to establish a gentle, continuous rim. Condition a half-ounce portion of deep black clay, shaping two matching flat half-circles to serve as the ears, and smooth their bases against the upper rim. Shape two small black ovals for the angled eye patches, pressing them onto the upper half of the white dish base using a silicone tool. Roll two tiny spheres of white clay and position them inside the dark eye patches to serve as bright, lively catchlights. Form a small triangular black nose, centered just below the eye line, and etch a tiny curved mouth beneath it using a needle tool. Bake the piece flat on a ceramic tile, let it cool thoroughly, and apply a protective high-gloss seal over the entire catchall.
Idea 10: Kawaii Rainbow Arch Ring Tray
Step-by-Step Guide
The rainbow arch tray features concentric curved bands of pastel clay formed into a stylish, rounded dish. This design uses three to five muted pastel tones—such as soft peach, butter yellow, sage green, and lavender—arranged in parallel arches. The flat base keeps rings, hairpins, and loose chains neatly arranged, while the curved rim holds loose accessories securely in place. Kawaii rainbow designs favor soft, desaturated pastel shades over harsh primaries, producing a gentle accent that complements contemporary room decor. Small, smiling cloud accents at the base of the arch frame the design with cheerful character detail. The balanced, geometric arch adds clean symmetry to nightstands and work desks, providing a dedicated catchall for daily essentials while brightening the room with soft pastel color.
Execution Process
Condition half-ounce portions of pastel pink, soft yellow, mint green, and pale blue clay, rolling each color into a uniform snake measuring one-quarter inch thick. Lay the four rolled clay snakes side by side on parchment paper, pressing them together lightly to form a continuous, four-color striped strip. Curve the banded strip into a smooth rainbow arch, flattening the bottom edge evenly with a straight metal tissue blade. Roll a thin slab of neutral white clay and back the entire rainbow with it, trimming flush around the outer perimeter to bind the arch into a single piece. Flare the outer edges upward slightly with your fingertips to create containment walls that keep jewelry from rolling off the surface. Add two small, smiling white cloud shapes to the bottom ends of the rainbow using liquid clay, detailing them with fine-tip paint pens after baking. Transfer the completed rainbow tray to a flat tile, bake according to compound specifications, let cool, and coat with a clean satin varnish.

Common Beginner Mistakes and How to Avoid Them
When working with polymer clay, beginners often run into a few common pitfalls that can affect the durability and finish of their trinket dishes. One frequent issue is dust, lint, and stray fibers settling onto light-colored clays, especially white and pastel shades. Prevent this by thoroughly wiping hands, tools, and work surfaces with alcohol wipes, and keeping a scrap piece of light clay on hand to roll across surfaces and pick up debris. Another common mistake is improper baking, which can cause under-cured, brittle pieces that snap, or over-baked clay that scorches and discolors. Never rely solely on an oven’s built-in dial; use a dedicated analog oven thermometer placed next to the curing tile to monitor consistent temperatures throughout the entire baking process. Trapped air pockets can also create raised bubbles or blisters on flat dish surfaces during curing. To prevent these, roll clay slabs slowly from multiple directions and gently pop visible surface bubbles with a sharp needle tool before baking. Finally, applying thick, heavy coats of liquid sealer can cause unsightly streaks, cloudy finishes, or sticky residues that attract lint over time. Always apply sealants in thin, even layers, allowing each application to dry thoroughly before adding another.
Practical Tips for Better Results
To achieve clean, professional-looking trinket dishes, pay close attention to consistent clay thickness, balanced heat transfer, and smooth surface finishing. Use rolling pin guide rings or uniform acrylic depth slats on both sides of your clay block to roll out slabs with a consistent thickness. Baking dishes directly on slick ceramic tiles or glass craft mats prevents the underside from sagging, warping, or developing unwanted textures while curing in the oven. To achieve smooth, fingerprint-free clay surfaces before baking, gently buff the raw, shaped clay with a cotton swab lightly moistened with rubbing alcohol. If a design requires baking over a curved armature, use oven-safe glass prep bowls or metal measuring cups, lightly dusting them with cornstarch beforehand to prevent sticking. After baking and cooling your piece completely, sand the outer edges using wet-and-dry sanding sponges in 400, 600, and 1000 grits under running water to produce a smooth, professional rim. Finally, use fine-tipped synthetic liner brushes when painting delicate facial expressions, steadying your wrist against your work table to paint clean, crisp character features.
Styling, Presentation, or Organization Ideas
Integrating handmade kawaii trinket dishes into your living space creates a tidy, visually cohesive look on vanity tables, desks, and shelves. Group these dishes in curated clusters of two or three complementary pieces—such as the cloud dish alongside the rainbow tray—to organize different jewelry types, from rings to hair clips, in one place. Pair pastel clay trays with clear acrylic organizers, fluted glass perfume bottles, or light natural wood surfaces to complement modern room decor. On bedside tables, use a single, character-focused dish like the sleeping Shiba Inu to hold daily essentials like watches and rings, keeping nightstands clean and clutter-free. In home office spaces, place these catchalls alongside keyboards to corral USB drives, paperclips, and binder rings, adding functional charm to your workstation. If you are gifting your handmade creations, place the finished dish in a small, rigid kraft box lined with shredded crinkle paper and tied with a matching pastel ribbon. You can also slip in a handwritten note with care instructions, advising against direct food use or harsh dishwashers to keep the handmade gift looking its best.
Budget or Time Planning
Making polymer clay trinket dishes is a practical and budget-friendly craft project that can easily fit into a weekend schedule. A starter set of multi-colored polymer clay blocks, a basic acrylic roller, and a pack of modeling tools provides enough material to craft four to six unique catchalls at a low cost per piece. To make the most of your crafting time, divide the process into three distinct stages: preparing materials, sculpting, and finishing the pieces. Spend the first hour conditioning your clay blocks, mixing custom pastel tones, and cutting out base templates. Dedicate the second phase to shaping and assembling all your planned designs, which usually takes between twenty and forty minutes per dish depending on its detail level. Bake multiple completed dishes together on a single ceramic tile to save time and reduce oven electricity use. The final phase involves cooling the pieces completely, painting on fine facial details, and applying thin protective clear coats. Following this step-by-step assembly process makes the project approachable and satisfying for beginners, yielding charming, personalized vanity organizers without straining your craft budget.
Creative Expansion and Advanced Inspiration
Once you are comfortable with basic dish construction, you can explore more advanced sculpting techniques to give your projects added texture and dimension. Try experimenting with translucent, metallic, or glow-in-the-dark clay compounds, blending them into pastel bases to create shimmering marble swirls and quartz-like finishes. You can also mix in tiny elements like heat-safe glitter flakes, dried lavender buds, or gold leaf foil before rolling out your slabs to give your designs an artisanal look. For added dimension, sculpt intricate three-dimensional kawaii figures—like tiny seated bunnies or sleeping bears—and anchor them firmly in the center of your dishes to serve as upright ring holders. Explore texturing techniques using silicone stamps, clean fabric weaves, or ball-ended embossing styluses to imprint delicate patterns onto the clay before shaping the outer rim. You can also try coating cured trays with UV or epoxy resin to achieve a deep, glossy, ceramic-like finish that locks in painted details and protects against daily wear. Continuing to practice and build on these fundamental clay-modeling skills will allow you to design custom decorative organizers that bring handmade charm and tidy functionality to every corner of your home.
Leave a Reply