Handcrafting gemstone-style accessories with polymer clay offers an accessible, durable, and creative method for designing personalized birthstone jewelry. Traditional fine jewelry crafted from genuine faceted minerals requires complex metalsmithing tools, expensive raw materials, and lapidary cutting equipment. In contrast, oven-bake polymer clay allows artisans to replicate the crystalline depth, internal veining, and rich colors of natural birthstones directly from a home workspace. This comprehensive tutorial delivers ten complete, original birthstone-inspired jewelry blueprints suitable for bespoke gifting, personal adornment, and small-batch studio collections. Readers will discover the step by step techniques necessary to mix translucent formulas, suspend metallic leafing, embed alcohol pigments, execute faux mineral fractures, and cure glass-like cabochons. By utilizing modern design principles, crafters can avoid costume-like imitations and produce elegant, gallery-grade earrings, pendants, and rings. Understanding the optical relationship between translucent clay bases, mica inclusions, and high-gloss sealing resins ensures that every finished piece catches light naturally. Working through these structured projects gives makers of all skill levels the foundational knowledge needed to create meaningful, handmade jewelry that celebrates individual birth months with lasting aesthetic refinement.
Why This Idea Is Trending or Useful
Birthstone-themed polymer clay jewelry has become a prominent category across modern Pinterest inspiration because it combines bespoke personalization with contemporary minimalist style. Modern jewelry consumers seek out creative ideas that convey emotional significance and personal identity without the prohibitive price tags of fine precious gems. Translucent polymer clay formulations possess unique light-diffusing characteristics that mimic the depth of genuine minerals such as raw emerald, deep sapphire, crystalline amethyst, and iridescent opal. This approach provides immense practical value because cured polymer clay remains featherlight, allowing artisans to construct large, dramatic statement earrings and sculptural pendants that do not pull or strain sensitive earlobes. For beginners embarking on an easy project, the medium is remarkably forgiving; uncured clay mixtures can be rolled, re-blended, and reshaped indefinitely until the desired mineral strata and marbling are achieved. The popularity of custom birthstone jewelry aligns with broader trending ideas focusing on thoughtful gifting, slow fashion, and authentic handmade craftsmanship. By mastering these mineral simulations, crafters gain a versatile platform to design tailored birthday, anniversary, and holiday gifts on realistic budget ideas.
Materials and Preparation
Producing high-clarity, professional-grade faux gemstone jewelry requires systematic preparation, spotless work surfaces, and specialized sculpting supplies. Essential materials include premium translucent polymer clay, concentrated alcohol inks, genuine metal leaf sheets, mica powders, surgical-grade stainless steel findings, and two-part epoxy or UV casting resin. Necessary tools comprise an acrylic rolling pin, calibrated thickness guides, ultra-thin flexible tissue blades, a hand-cranked pin vise drill, dual flat-nose jewelry pliers, and a silicone work mat. Thorough preparation requires cleaning a smooth ceramic tile or tempered glass working surface with isopropyl alcohol to remove all traces of surface dust, pet fur, and skin oils. Planning considerations require verifying your home oven temperature using an independent, standing metal oven thermometer, as digital dial settings often vary and high heat spikes can yellow translucent clays. Formulate your primary colored clay blocks ahead of time, wrapping them in plastic film to prevent premature surface drying. Keeping fine-grit wet-dry sandpaper and lint-free microfiber cloths nearby guarantees a smooth, systematic transition from cutting raw slabs to final resin finishing.
Idea 1: Raw Garnet Cluster Drop Earrings
Step-by-Step Guide
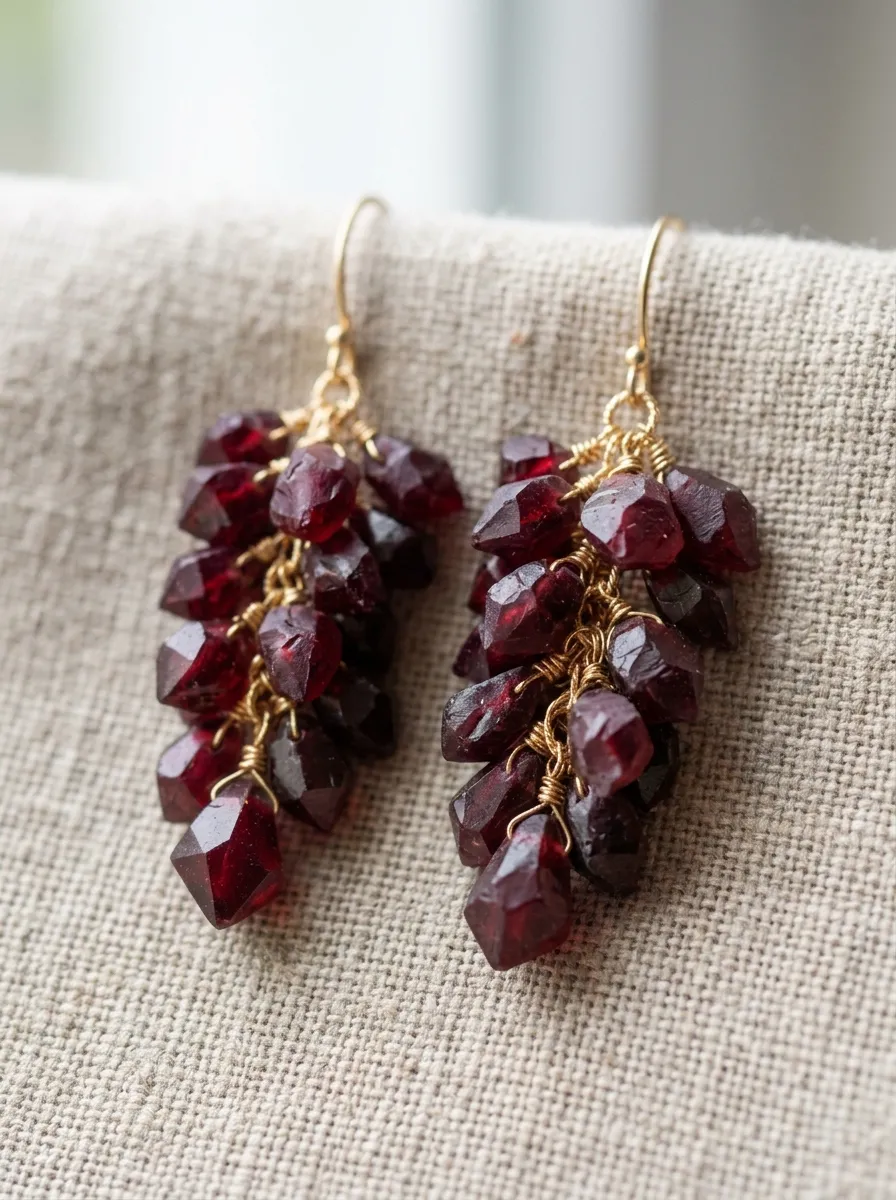
The raw garnet cluster design captures the deep, wine-red brilliance and rough crystalline geometry of natural January pyrope gemstones. This concept moves away from smooth cabochons by featuring hand-carved, multifaceted mineral shards clustered in an asymmetrical cascade. The deep crimson transparency is achieved by tinting high-translucency clay with concentrated scarlet and black alcohol inks, creating rich light absorption that mimics natural iron inclusions. The geometric facets catch ambient light from multiple angles, creating a dynamic surface that feels like natural tumbled rough gems. Suspended from minimalist raw brass or gold-plated ear wires, these drop earrings offer an organic, bohemian elegance that pairs naturally with chunky knitwear and evening attire. The natural angularity of the individual garnet fragments establishes a structured silhouette while preserving the lightweight comfort of cured polymer clay.
To begin assembly, condition two ounces of translucent polymer clay until warm and pliable, dividing the mass into three equal portions. Infuse the first portion with four drops of crimson alcohol ink, the second with two drops of ruby ink, and the third with a single drop of ink combined with a speck of black clay. Chop the three tinted blocks into tiny, irregular angular cubes with a sharp tissue blade, pressing the disparate pieces together into a variegated log. Hand-carve the exterior of the log with faceted planar cuts to form six distinct, irregular crystal points measuring between six and twelve millimeters. Pierce each faux crystal through its upper tip with an eye pin coated in bakeable liquid clay to establish a sturdy hanging loop. Bake the faceted points on a ceramic tile at 130 degrees Celsius for forty minutes, allowing them to cool slowly inside the oven. Once cooled, brush each facet with clear gloss glaze, link the stones in a graduating cluster using five-millimeter jump rings, and attach an ear hook.
Idea 2: Polished Amethyst Geode Slice Statement Pendant
Execution Process
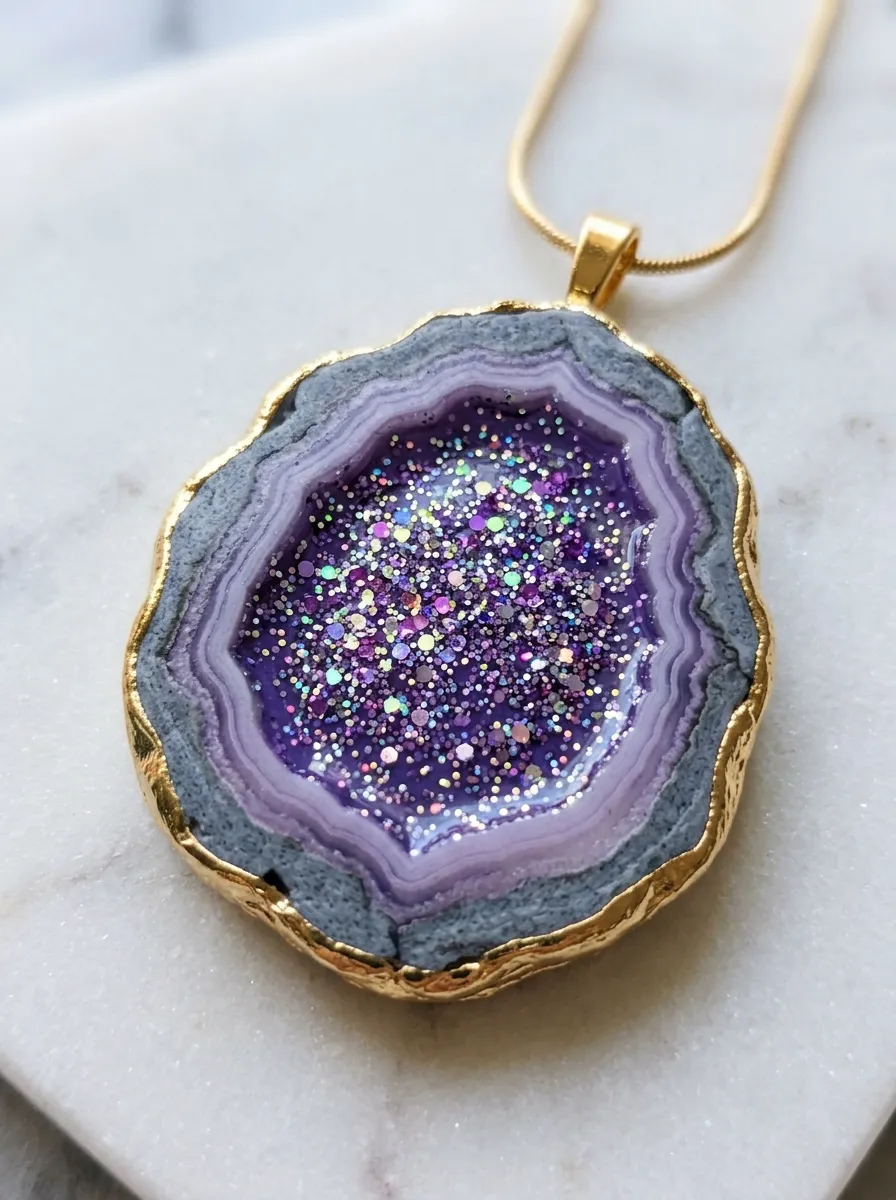
The polished amethyst geode pendant explores the layered geological strata of February crystalline cavities through translucent violet gradients and sparkling quartz rings. The design features a flat, organic slice displaying concentric rings that transition from an opaque rocky outer matrix toward an ultra-clear, violet-hued crystalline center. Fine flecks of iridescent silver glitter and clear quartz sand are embedded into the central window, reproducing the internal druzy sparkle found inside split volcanic geodes. A gleaming border of liquid gold leaf outlines the organic perimeter, framing the stone in a modern, luxury jewelry setting. Suspended from an eighteen-inch snake chain, this statement pendant creates a commanding focal point suitable for creative office spaces and formal dinner gatherings. The flat planar construction ensures the pendant rests comfortably against the breastbone without tilting or snagging on textured fabrics.
Begin by rolling out an opaque slate-gray clay strip to a two-millimeter thickness to serve as the rough volcanic rock shell. Next, prepare four concentric clay ribbons in graduated shades of white, pale lavender, vivid violet, and translucent amethyst tinted with purple alcohol ink. Wrap the colored ribbons sequentially around a core of clear translucent clay packed with fine holographic craft glitter, pressing the layered cylinder firmly from all sides to eliminate air pockets. Use a sharp tissue blade to slice cross-sections measuring four millimeters in thickness, gently stretching the edges of each slice to produce an asymmetrical, natural geode outline. Pierce a clean hanging hole through the upper edge using a metal needle tool, and bake the flat slices on parchment paper for forty-five minutes. After cooling, sand the perimeter with six-hundred-grit sandpaper, brush the outer edge with liquid metallic gold leaf, and coat both the front and back faces with self-leveling UV resin for a liquid-glass finish.
Idea 3: Raw Aquamarine Crystal Point Minimalist Choker

How to Create
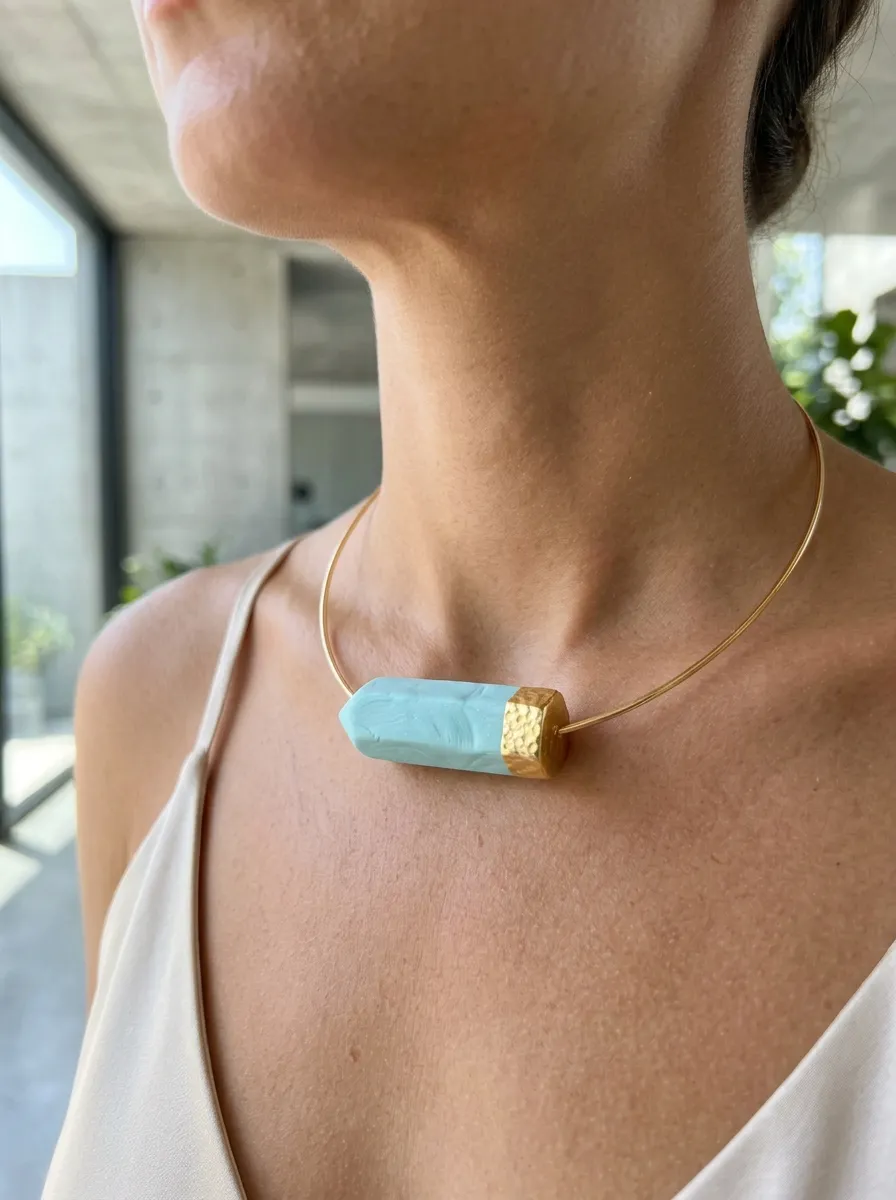
The raw aquamarine crystal choker celebrates the icy, pale-cyan clarity of March beryl gemstones through clean architectural lines and minimalist style. This design centers on an elongated hexagonal prism that replicates the natural column formations of untreated aquamarine crystals emerging from granite pegmatites. The clay body blends translucent polymer base with a microscopic hint of turquoise pigment and crushed white mica flake inclusions, producing subtle internal refraction. The hexagonal crystal point is capped at one end with a sculpted, textured band resembling hammered yellow gold, creating an appealing contrast between rough stone and refined metal. Strung horizontally along a delicate memory-wire choker or dainty cable chain, this piece offers an airy, oceanic visual element. The elongated horizontal line flatters the collarbone, making it an exceptional warm-weather accessory for linen shirts and boatneck blouses.
Condition two ounces of translucent polymer clay, folding in two drops of cyan alcohol ink and a quarter-teaspoon of fine white mica powder until the tint distributes evenly without streaks. Roll the prepared clay into a uniform cylinder measuring ten millimeters in diameter, chilling it in the refrigerator for fifteen minutes to firm the exterior. Using an acrylic block as a rolling guide, press six equal flat faces along the cylinder length to establish a crisp hexagonal crystal profile. Taper one end of the column into a natural three-sided pyramid point using light diagonal cuts with a tissue blade, leaving the opposite end flat. Wrap a three-millimeter strip of metallic gold polymer clay around the flat base of the crystal, texturing the gold strip with a coarse stone or wire brush. Insert a horizontal eye pin through the gold cap to serve as an internal chain channel, bake the piece for forty minutes, and coat the crystal facets with satin varnish.
Idea 4: Faux Herkimer Diamond Prisms on Geometric Hoops
Step-by-Step Guide
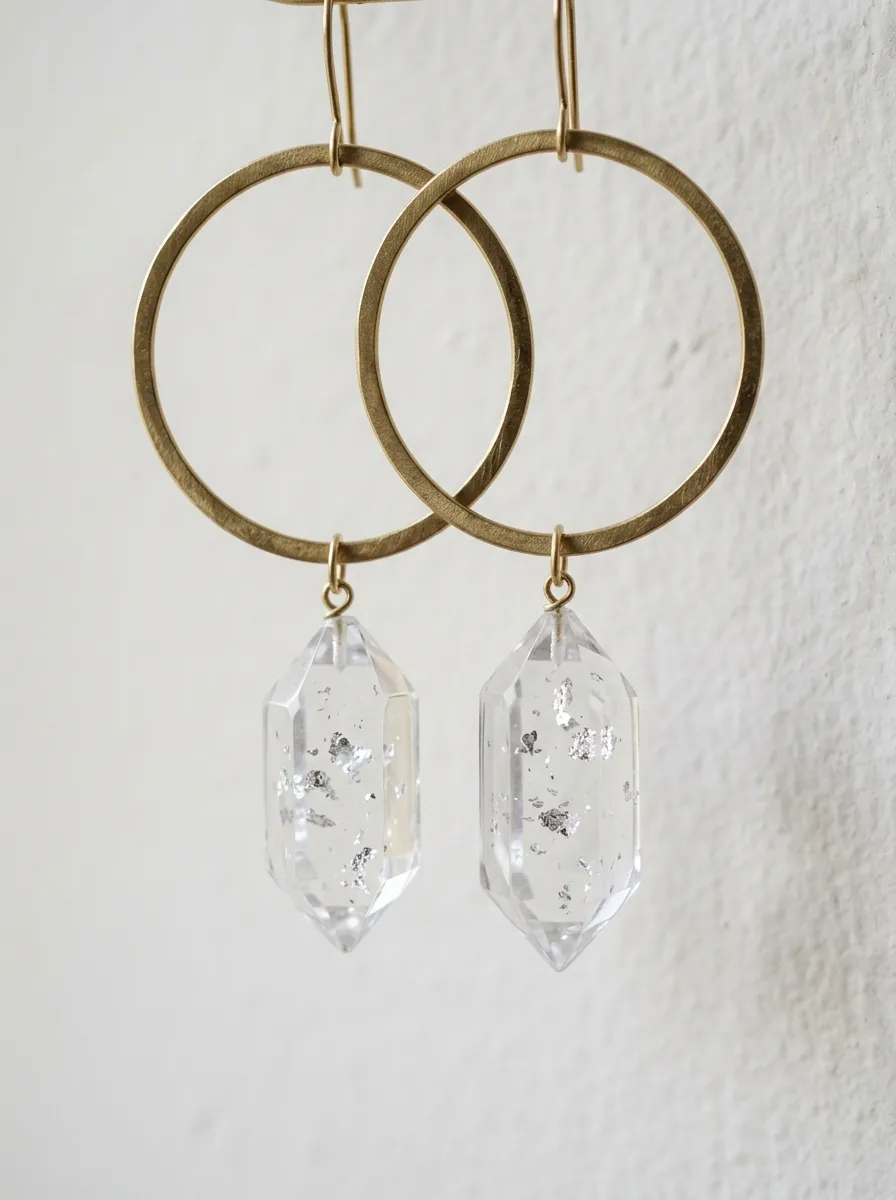
Faux Herkimer diamond hoop earrings replicate the double-terminated quartz crystals traditionally associated with April birthstones through geometric precision and light transmission. These miniature gemstones feature pointed terminations at both opposing ends, with faceted planar faces that reflect light without requiring mechanical stone cutting. Achieving absolute optical clarity involves blending premium unpigmented translucent clay with micro-fine silver leaf flakes, which mimic natural petroleum inclusions and internal light fractures. The suspended crystals hang freely inside open, circular raw brass hoops, producing kinetic movement that catches ambient illumination throughout the day. This lightweight earring format provides all the visual appeal of heavy diamond drops while ensuring zero physical stress on the earlobes. The clean pairing of geometric gold hoops and raw crystal points creates a refined, gallery-worthy aesthetic suitable for modern minimalist wardrobes.
Condition one ounce of ultra-clear translucent polymer clay, rolling the material into a smooth rod measuring eight millimeters thick on a clean glass tile. Cut the rod into twelve-millimeter segments, using a micro-blade to cut four sloping triangular facets on each opposing end to form double-terminated crystal points. Lightly press small flecks of genuine silver leaf onto the uncured facets, burnishing the metallic fragments into the clay surface with a soft silicone shaper. Carefully thread a thin, twenty-four-gauge stainless steel headpin lengthwise through the center axis of each crystal, creating a discrete mechanical hanging loop at the top. Suspend the threaded crystal points inside a folded cardstock baking tent to keep the facets from flattening against the baking tile during heat curing. Bake the crystals at the specified temperature for forty-five minutes, quench the hot pieces immediately in ice water to enhance clarity, and hang them inside twenty-five-millimeter brass hoop frames using jump rings.
Idea 5: Deep Emerald Cabochons with Gold Veining Ring
Setup Method
The deep emerald cabochon ring captures the lush, velvety green depths and internal fractures of May Colombian beryl in a luxurious statement setting. The focal gemstone features a high-domed oval cabochon displaying rich emerald tones, deep sea-green shadows, and delicate golden fissures that mirror genuine mineral veining. Layering tinted translucent clay over a reflective metallic gold base creates dimensional depth that shifts when viewed from different lighting angles. The cabochon is mounted securely into an adjustable, antique-finish crown bezel ring, giving it the appearance of an authentic bespoke heirloom. The smooth, rounded surface of the polished dome resists snagging on clothing, making it entirely practical for active daily wear. This project teaches artisans how to balance opaque and translucent clay strata to achieve realistic stone density without appearing plastic or flat.
Prepare the faux emerald slab by kneading emerald-green alcohol ink and a single speck of translucent yellow clay into conditioned clear polymer base. Roll the green clay into a flat four-millimeter sheet, tearing the sheet by hand into irregular, fractured chunks across a ceramic tile. Coat the torn fracture edges with liquid gold leaf or metallic gold mica powder, then press the fragments back together into a solid block to trap the golden veins internally. Press an oval cabochon cutter into the marbled block, using your fingertips to smooth the upper edge into a curved, high-domed profile. Bake the domed oval on a curved metal forming surface for forty minutes to prevent bottom flattening, allowing the stone to cool completely. Sand the cured cabochon under running water using progressive grits from four-hundred to twelve-hundred, wipe dry, and apply a thick coat of jewelry-grade epoxy resin over the dome before mounting it into an adjustable brass ring bezel.
Idea 6: Iridescent June Moonstone Cabochon Drop Hairpins

Step-by-Step Guide
The iridescent moonstone hairpin project captures the adularescence and ghostly blue illumination of natural June feldspar minerals in an elegant functional accessory. The design features a smooth, domed cabochon that emits a soft blue-white internal glow across a milky, semi-translucent base. This shifting optical effect is achieved by layering pearlescent mica interference powders between ultra-thin sheets of bleached translucent clay. Mounted onto minimalist metal bobby pins or vintage-style hair grips, these charms add an understated, artistic touch to updos, braids, and bridal hairstyles. The low-profile cabochon sits flat against the scalp without pulling delicate hair strands, ensuring comfortable wear throughout long events. This project demonstrates how subtle pigment interference creates high-value visual depth within a simple, beginner friendly geometric form.
Condition two ounces of translucent polymer clay, folding in a pea-sized amount of opaque white clay to create a milky, semi-opaque base. Roll the conditioned clay through a pasta machine or acrylic roller to a two-millimeter thickness, cutting the sheet into four equal square panels. Dust the surface of each panel lightly with blue-violet interference mica powder using a soft cosmetic brush, stacking the panels directly on top of one another to trap the mica layers. Compress the stacked block gently, rolling it into a solid log and slicing three-millimeter cross-sections with an ultra-thin tissue blade. Press a circular metal cutter through the slices, using a silicone blending tool to round the cut margins into a smooth, domed cabochon. Bake the stones for thirty-five minutes, allow them to cool, and coat the rounded surfaces with two-part clear epoxy resin. Secure the finished stones to flat-pad hairpins using industrial jewelry adhesive, holding them in place until the bond cures.
Idea 7: Raw Ruby Crystal Slices with Textured Brass Collars

Execution Process
Raw ruby crystal slice earrings showcase the rich, magenta-red tones and hexagonal growth habits of July corundum gems within an industrial jewelry frame. This design features flat hexagonal slices displaying natural growth rings, deep ruby-red saturation, and irregular mineral crust edges. The deep coloration is created by combining carmine alcohol inks with tiny flecks of black iron oxide powder, replicating the mineral impurities found in unheated natural rubies. The upper edge of each slice is clasped in a wide, textured raw brass collar, combining earthy stone surfaces with clean architectural metalwork. This combination appeals to collectors of organic, modern jewelry who value raw textures over standard faceted commercial cuts. The flat, thin profile keeps the weight minimal, making these statement earrings comfortable for day-long wear.
Condition one-and-a-half ounces of translucent polymer clay, tinting the mass to a deep magenta-red using carmine alcohol ink and a trace of burnt umber pigment. Shape the red clay into a distinct hexagonal prism measuring fifteen millimeters wide, pressing the exterior against a coarse stone surface to create a rough, textured outer skin. Coat the textured perimeter with matte dark gray chalk pastel to simulate the surrounding schist rock matrix. Chill the prism for twenty minutes, then use a sharp, rigid tissue blade to slice thin hexagonal wafers measuring two millimeters in thickness. Pierce a clean hanging hole near the upper edge of each slice, baking the wafers flat between two sheets of parchment paper weighted with a ceramic tile to prevent warping. Once cured and cooled, tumble the slices with damp four-hundred-grit sandpaper to soften sharp corners, and attach custom-folded raw brass metal sheet collars over the top edge before linking to ear hooks.
Idea 8: Olive Peridot Nugget and Raw Silk Cord Necklace

How to Create
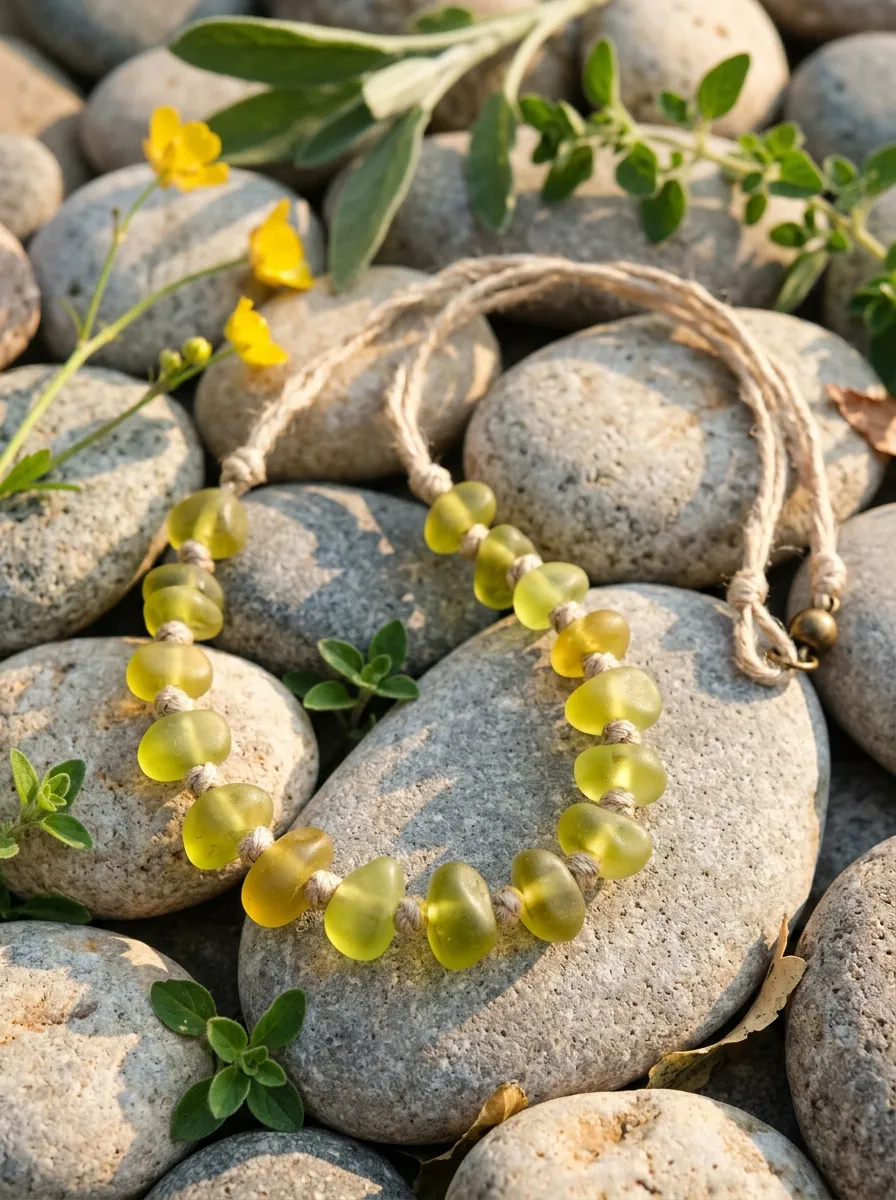
The olive peridot nugget necklace highlights the bright yellow-green tones and volcanic origins of August olivine crystals in a relaxed, wearable format. This design features an assortment of organic, tumbled pebble shapes displaying the chartreuse and lime-gold transparency characteristic of natural peridot sand formations. The stones are hand-rolled and lightly faceted, capturing the irregular appearance of tumbled gemstones polished naturally in mountain streams. Strung along an unbleached raw silk cord with knotted spacers, the translucent green nuggets produce a fresh, botanical aesthetic that coordinates effortlessly with linen tunics and relaxed summer clothing. The lack of rigid metal settings gives the necklace a fluid, tactile quality that drapes naturally against the collarbone. Crafting these irregular nuggets teaches beginners how to manipulate clay density and organic shaping without requiring precision geometric cutters.
Knead two drops of lime-green alcohol ink and one drop of golden-yellow ink into conditioned translucent polymer clay to establish an authentic peridot olive tone. Divide the colored clay into ten varied portions ranging from the size of a pea to that of a hazelnut, rolling each portion into a loose spherical pebble. Use an acrylic flat block to press asymmetrical, gentle flat planes onto the sides of each pebble, creating an organic tumbled appearance. Thread each uncured nugget onto a stainless steel beading wire coated with cornstarch, spacing them evenly so they do not touch during thermal curing. Suspend the wire across a metal baking rack, baking the suspended nuggets for thirty-five minutes at 130 degrees Celsius. Once cured, slide the beads off the wire, rinse away residual starch, and buff the surfaces with a denim cloth to produce a natural sea-tumbled satin sheen. Thread the finished nuggets onto a two-millimeter raw silk cord, tying neat overhand knots between each stone to secure their positions.
Idea 9: Lapis Lazuli and Pyrite Mosaic Square Studs
Step-by-Step Guide
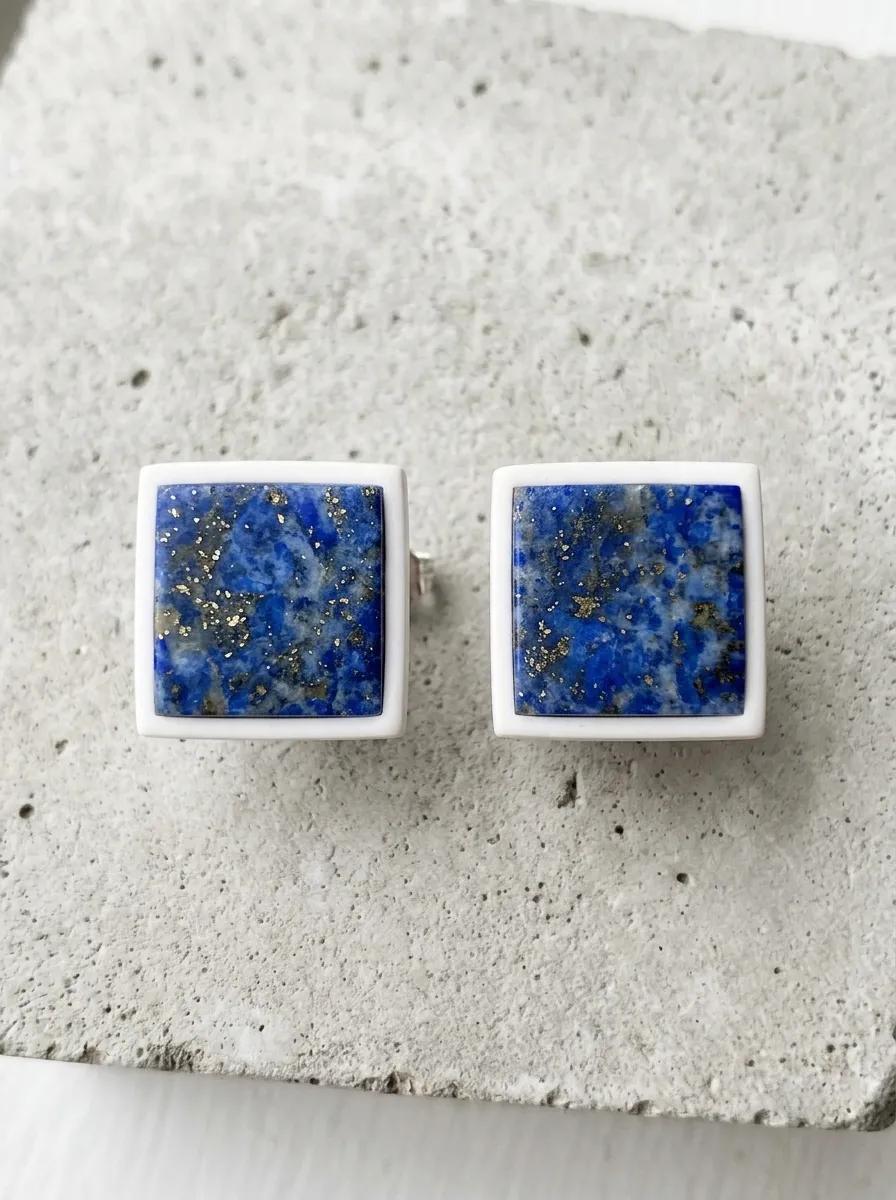
Lapis lazuli mosaic square studs capture the celestial midnight-blue majesty and golden pyrite inclusions of historic September lapis lazuli stones. The design consists of a sharp, modern square stud showcasing mottled ultramarine blue clay, deep denim undertones, and flecks of genuine crushed pyrite or brass powder. A stark border of unglazed white porcelain-tone clay frames the deep blue mosaic, referencing classical mosaic tile arts and modern geometric design. The flat, low-profile silhouette sits flush against the earlobe, providing a refined pop of color suitable for professional corporate environments and casual weekend outings alike. Because the golden inclusions and calcite variations are integrated throughout the clay body, the stone pattern remains permanently visible and will not rub off during active handling. This project introduces beginners to polymer clay mosaic cutting and precision square edge finishing.
Condition one ounce of opaque ultramarine blue polymer clay alongside a half-ounce of white clay and a quarter-ounce of translucent clay. Chop the three clays into tiny, irregular shards, tossing the mixture in a small container with a quarter-teaspoon of brass leaf flakes and powdered pyrite. Compress the coated shards firmly into a tight, solid cubic block, using an acrylic rolling pin to eliminate internal air voids. Slice the block into two-millimeter thick slabs with a flexible tissue blade, revealing the mottled lapis mosaic pattern. Lay the patterned slab onto a flat backing sheet of white clay, rolling firmly under parchment paper to bond the layers into an unbroken five-millimeter sheet. Use a clean, square twelve-millimeter cutter to punch out matched stud pairs, baking them flat on a ceramic tile for forty minutes. After cooling, sand the perimeter edges square using eight-hundred-grit sandpaper, buff the faces with a dry microfiber cloth, and adhere hypoallergenic surgical steel posts to the backings using two-part industrial epoxy.
Idea 10: Australian Opal Teardrop Pendant with Multi-Fire Flakes
Setup Method
The Australian opal teardrop pendant reproduces the optical phenomenon of natural October precious opals through layered iridescent mylar flakes and milky translucent clay. The finished piece features a high-domed teardrop cabochon that flashes vibrant pinfire greens, electric blues, and fiery pinks as it moves under natural light. This depth is achieved by suspending micro-cut color-shifting iridescent films within an ultra-clear polymer clay medium, backed by a thin layer of jet-black clay to maximize color contrast. Mounted in a minimalist wire-wrapped bail or a pre-formed pendant bezel, this piece exudes the luxurious, mysterious charm of high-value Australian black opals. The smooth teardrop silhouette offers a timeless, flattering profile that elongates the neck when worn on a fine cable chain. This advanced beginner project provides valuable experience in managing light-interference materials and achieving a bubble-free, glass-like resin topcoat.
Condition one ounce of ultra-translucent polymer clay, rolling it into a paper-thin sheet measuring one millimeter in thickness. Finely chop sheets of dichroic iridescent cellophane film into microscopic, irregular flakes using sharp shears, scattering the reflective flakes across the surface of the translucent clay sheet. Fold the clay repeatedly to distribute the glittering flakes evenly throughout the translucent base without crushing their reflective surfaces. Roll out a matching backing sheet of opaque black clay to a two-millimeter thickness, placing the glitter-packed translucent slab directly on top. Press a tear-shaped cutter through both layers, using your thumbs to smooth the top edge into a gentle, sloping cabochon dome. Bake the teardrop on a bed of baking soda for forty minutes to prevent bottom scorching, allowing it to cool fully. Apply a generous dome of jewelry-grade UV resin over the cured cabochon, cure under a thirty-six-watt UV lamp for three minutes to lock in optical clarity, and mount a gold pinch bail through the pre-drilled top hole.
Common Beginner Mistakes and How to Avoid Them
The most critical mistake beginners make when crafting birthstone-inspired polymer clay jewelry is over-kneading the clay, which completely blends the marble veins and creates a muddy, uniform color. Natural gemstones derive their character from distinct fissures, crystalline boundaries, and mineral inclusions; maintain this natural heterogeneity by folding colored clay blocks only two or three times before slicing. Another widespread error is curing translucent clays at uncalibrated, excessively high temperatures, which causes clear components to scorch and turn an unappealing yellowish-brown. Always utilize an independent, freestanding metal oven thermometer placed directly beside your baking tile, never trusting built-in appliance dials that often spike twenty degrees above their target setting. Novices also frequently skip wet-sanding stages, assuming that a topcoat of gloss resin will conceal surface flaws, tool marks, and trapped air bubbles. Resin magnifies surface irregularities rather than hiding them; always sand cured stones through four-hundred, eight-hundred, and twelve-hundred grits under running water before applying protective sealants. Finally, avoid using weak instant glues to mount metal earring posts and pendant bails to cured clay; standard cyanoacrylate becomes brittle and fails over time. Secure metal hardware using heavy-duty two-part epoxy paste or bake the hardware directly into the raw clay using liquid polymer adhesive for maximum structural longevity.
Practical Tips for Better Results
Achieving boutique-grade, gemstone-like finishes requires disciplined studio hygiene, calibrated curing processes, and calculated lighting manipulation. Always clean your hands, acrylic rollers, and cutting blades with rubbing alcohol or baby wipes between colors to prevent dark lint and stray pigment from contaminating translucent crystal clays. When attempting to simulate icy or crystalline stones such as aquamarine, diamond, or peridot, submerge your cured clay pieces directly into a bowl of ice water immediately upon removing them from the oven. This rapid thermal shock enhances polymer cross-linking density, noticeably improving the optical transparency and clarity of translucent formulations. To achieve crisp, reflective mineral facets without rounded edges, cut raw clay blocks only after chilling them in the refrigerator for fifteen minutes; cold clay resists the compressive drag of the blade, yielding sharp, clean geometric edges. When applying two-part epoxy or UV resin over cabochons, pass the flame of a butane craft lighter swiftly across the wet surface to pop microscopic surface tension bubbles before curing. Finally, consider using unglazed matte surfaces for matrix stones like turquoise, lapis, or raw tourmaline, reserving high-gloss resin exclusively for crystalline gems to produce a sophisticated, realistic contrast between raw host rock and polished crystal cores.
Styling, Presentation, or Organization Ideas
Presenting handcrafted birthstone jewelry with thoughtful packaging elevates your items from basic craft projects into luxurious, boutique-quality keepsakes. Mount finished earrings, necklaces, and rings onto custom-cut cardstock backing cards made from heavy linen-textured watercolor paper stamped with elegant calligraphy noting the birth month, gemstone lore, and personal astrological attributes. For safe shipping and elevated gifting, nestle each piece inside natural, unbleached cotton muslin pouches or rigid craft paper gift boxes filled with shredded wood excelsior to prevent metal scratches during transport. If showcasing your collection in an open studio or at artisan markets, organize the jewelry chronologically by calendar month across white ceramic trays, raw slate slabs, or natural wooden blocks to create a clean, modern aesthetic. When styling these accessories into everyday outfits, treat deep-toned gems like garnet, sapphire, and emerald as rich color anchors, pairing them with crisp white button-downs, tailored neutral blazers, and minimalist linen garments. Providing customers and gift recipients with a small lint-free jewelry polishing cloth and a printed care card outlining water safety rules and chemical avoidance ensures your handmade treasures will be worn and cherished for decades.
Budget or Time Planning
Crafting handmade birthstone polymer clay jewelry offers exceptional profit margins and time efficiency compared to traditional metalsmithing or lapidary arts. A single two-ounce block of translucent polymer clay costs only a few dollars yet yields between six and twelve pairs of medium-sized gemstone earrings, resulting in an exceptionally low material cost per finished item. Maximize your initial investment by purchasing large economy blocks of translucent and white clay alongside small, concentrated bottles of primary alcohol inks, mixing your own custom mineral palettes rather than buying dozens of specialty clay colors. In terms of scheduling, these modular projects fit naturally into busy everyday routines; a set of raw crystal earrings takes approximately thirty to forty-five minutes to sculpt once colors are formulated. To maximize your creative output, implement batch production methods: dedicate one focused evening session to color blending, cane slicing, and cabochon shaping across several birth months. Group all prepared pieces together on ceramic tiles for a single consolidated baking cycle, saving electrical energy and minimizing oven monitoring time. Dedicate a separate, quiet morning session to wet-sanding, resin coating, and hardware assembly to ensure that finishing touches are executed with meticulous attention to detail.
Creative Expansion and Advanced Inspiration
Once you have mastered foundational mineral simulation and stone-setting techniques, you can explore sophisticated creative expansions that push polymer clay into high-end wearable art. Experiment with complex composite geological formations, such as crafting matrix turquoise cabochons featuring intricate webbed spider-veins made from tinted liquid clay and pulverized copper leaf. Integrate raw mineral specimens into your clay work by setting genuine miniature quartz points, raw pyrite cubes, or freshwater seed pearls directly into the clay matrix before baking, creating dynamic mixed-media jewelry that bridges fine and synthetic mineral arts. You can also explore micro-carving by using rotary tools and miniature diamond dental burrs to engrave delicate cameos, intaglios, or sacred geometric patterns into the faces of cured faux agates and onyx stones. Crafters interested in home decor can scale up these exact faux gemstone techniques to produce stunning crystal drawer pulls, decorative cabinet knobs, matching coasters, and framed miniature mineral specimens. Exploring surface treatments with interference pigments, dichroic inclusions, and custom gold-leaf bezels elevates simple polymer clay crafting into a timeless artistic discipline, producing heirloom-worthy jewelry that honors personal history with enduring beauty.
Leave a Reply