Handcrafting gemstone-style accessories with polymer clay offers an accessible, durable, and creative method for designing personalized birthstone jewelry. Traditional fine jewelry crafted from genuine faceted minerals requires complex metalsmithing tools, expensive raw materials, and lapidary cutting equipment. In contrast, oven-bake polymer clay allows artisans to replicate the crystalline depth, internal veining, and rich colors of natural birthstones directly from a home workspace. This comprehensive tutorial delivers ten complete, original birthstone-inspired jewelry blueprints suitable for bespoke gifting, personal adornment, and small-batch studio collections. Readers will discover the step by step techniques necessary to mix translucent formulas, suspend metallic leafing, embed alcohol pigments, execute faux mineral fractures, and cure glass-like cabochons. By utilizing modern design principles, crafters can avoid costume-like imitations and produce elegant, gallery-grade earrings, pendants, and rings. Understanding the optical relationship between translucent clay bases, mica inclusions, and high-gloss sealing resins ensures that every finished piece catches light naturally. Working through these structured projects gives makers of all skill levels the foundational knowledge needed to create meaningful, handmade jewelry that celebrates individual birth months with lasting aesthetic refinement.
Why This Idea Is Trending or Useful
Birthstone-themed polymer clay jewelry has become a prominent category across modern Pinterest inspiration because it combines bespoke personalization with contemporary minimalist style. Modern jewelry consumers seek out creative ideas that convey emotional significance and personal identity without the prohibitive price tags of fine precious gems. Translucent polymer clay formulations possess unique light-diffusing characteristics that mimic the depth of genuine minerals such as raw emerald, deep sapphire, crystalline amethyst, and iridescent opal. This approach provides immense practical value because cured polymer clay remains featherlight, allowing artisans to construct large, dramatic statement earrings and sculptural pendants that do not pull or strain sensitive earlobes. For beginners embarking on an easy project, the medium is remarkably forgiving; uncured clay mixtures can be rolled, re-blended, and reshaped indefinitely until the desired mineral strata and marbling are achieved. The popularity of custom birthstone jewelry aligns with broader trending ideas focusing on thoughtful gifting, slow fashion, and authentic handmade craftsmanship. By mastering these mineral simulations, crafters gain a versatile platform to design tailored birthday, anniversary, and holiday gifts on realistic budget ideas.
Materials and Preparation
Producing high-clarity, professional-grade faux gemstone jewelry requires systematic preparation, spotless work surfaces, and specialized sculpting supplies. Essential materials include premium translucent polymer clay, concentrated alcohol inks, genuine metal leaf sheets, mica powders, surgical-grade stainless steel findings, and two-part epoxy or UV casting resin. Necessary tools comprise an acrylic rolling pin, calibrated thickness guides, ultra-thin flexible tissue blades, a hand-cranked pin vise drill, dual flat-nose jewelry pliers, and a silicone work mat. Thorough preparation requires cleaning a smooth ceramic tile or tempered glass working surface with isopropyl alcohol to remove all traces of surface dust, pet fur, and skin oils. Planning considerations require verifying your home oven temperature using an independent, standing metal oven thermometer, as digital dial settings often vary and high heat spikes can yellow translucent clays. Formulate your primary colored clay blocks ahead of time, wrapping them in plastic film to prevent premature surface drying. Keeping fine-grit wet-dry sandpaper and lint-free microfiber cloths nearby guarantees a smooth, systematic transition from cutting raw slabs to final resin finishing.
Idea 1: Raw Garnet Cluster Drop Earrings
Step-by-Step Guide
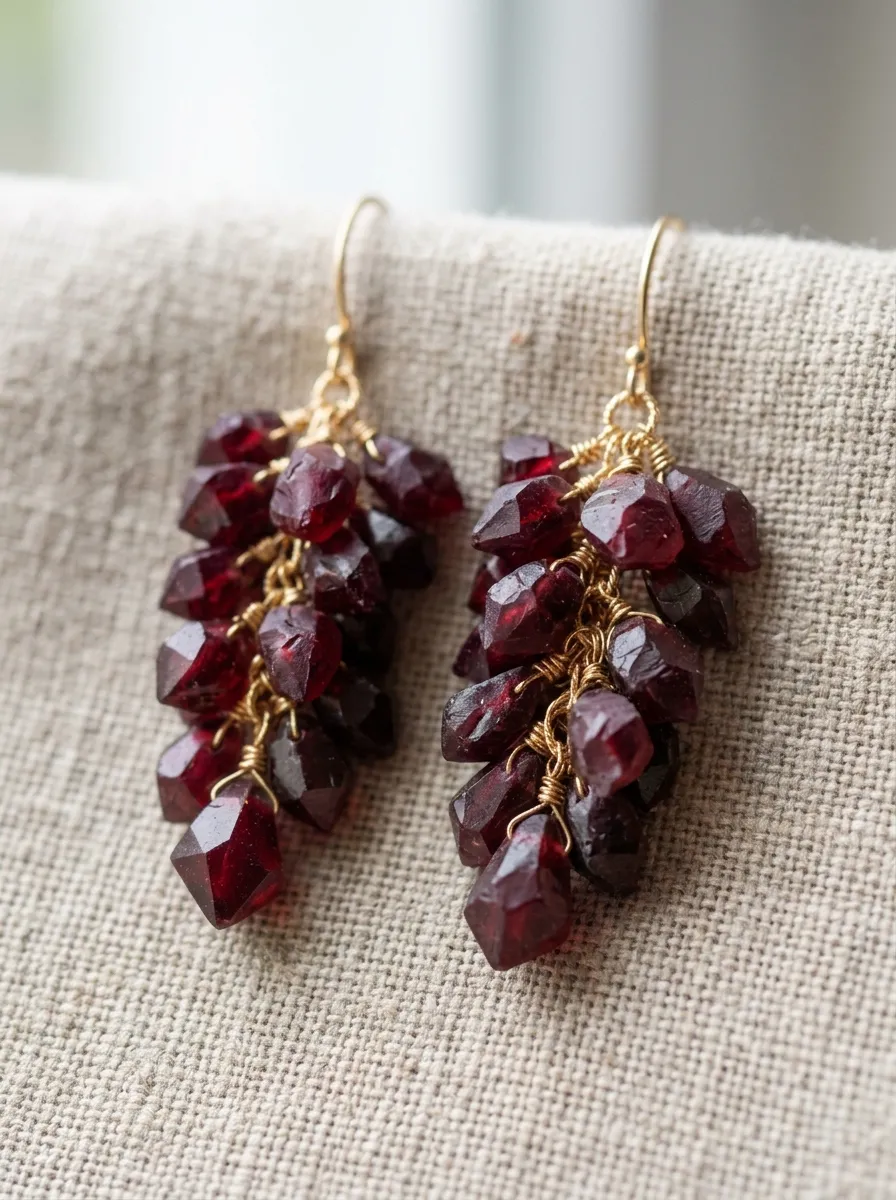
The raw garnet cluster design captures the deep, wine-red brilliance and rough crystalline geometry of natural January pyrope gemstones. This concept moves away from smooth cabochons by featuring hand-carved, multifaceted mineral shards clustered in an asymmetrical cascade. The deep crimson transparency is achieved by tinting high-translucency clay with concentrated scarlet and black alcohol inks, creating rich light absorption that mimics natural iron inclusions. The geometric facets catch ambient light from multiple angles, creating a dynamic surface that feels like natural tumbled rough gems. Suspended from minimalist raw brass or gold-plated ear wires, these drop earrings offer an organic, bohemian elegance that pairs naturally with chunky knitwear and evening attire. The natural angularity of the individual garnet fragments establishes a structured silhouette while preserving the lightweight comfort of cured polymer clay.
To begin assembly, condition two ounces of translucent polymer clay until warm and pliable, dividing the mass into three equal portions. Infuse the first portion with four drops of crimson alcohol ink, the second with two drops of ruby ink, and the third with a single drop of ink combined with a speck of black clay. Chop the three tinted blocks into tiny, irregular angular cubes with a sharp tissue blade, pressing the disparate pieces together into a variegated log. Hand-carve the exterior of the log with faceted planar cuts to form six distinct, irregular crystal points measuring between six and twelve millimeters. Pierce each faux crystal through its upper tip with an eye pin coated in bakeable liquid clay to establish a sturdy hanging loop. Bake the faceted points on a ceramic tile at 130 degrees Celsius for forty minutes, allowing them to cool slowly inside the oven. Once cooled, brush each facet with clear gloss glaze, link the stones in a graduating cluster using five-millimeter jump rings, and attach an ear hook.
Idea 2: Polished Amethyst Geode Slice Statement Pendant
Execution Process
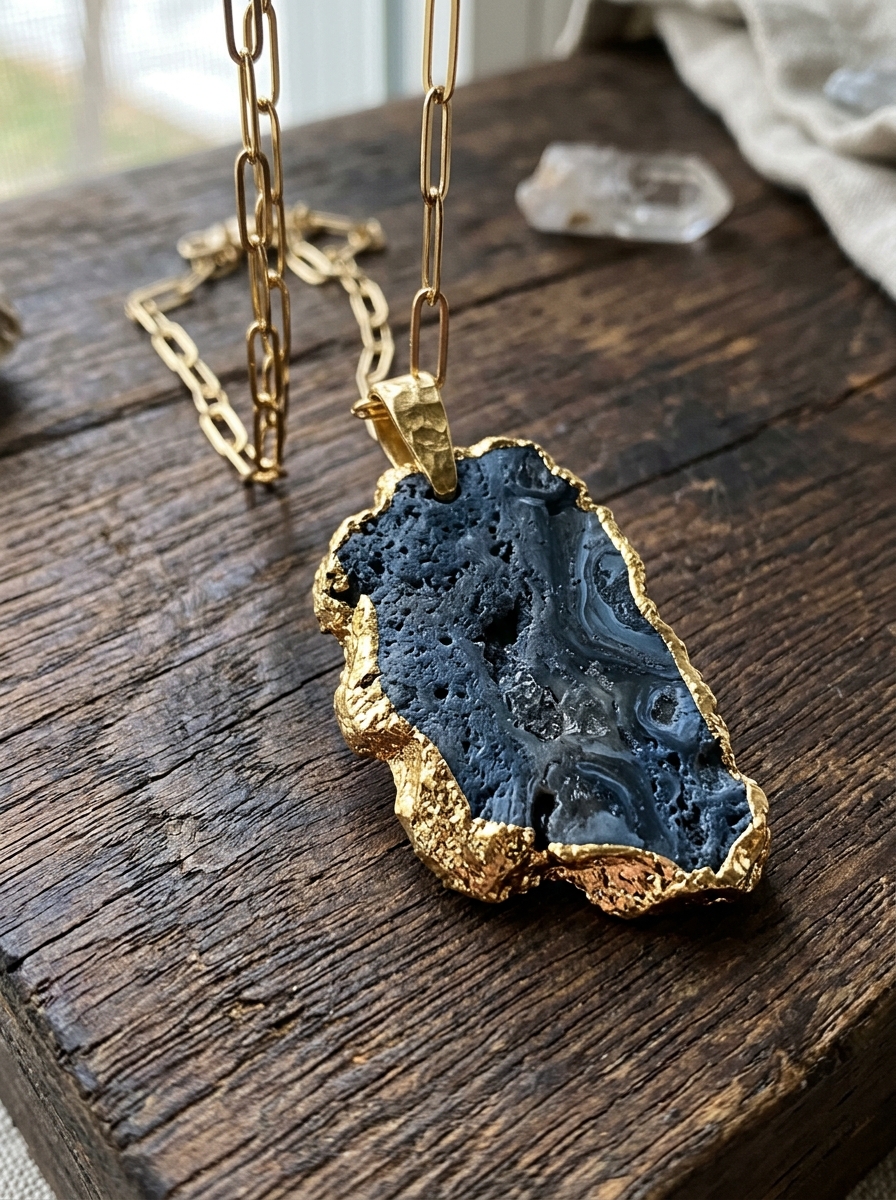
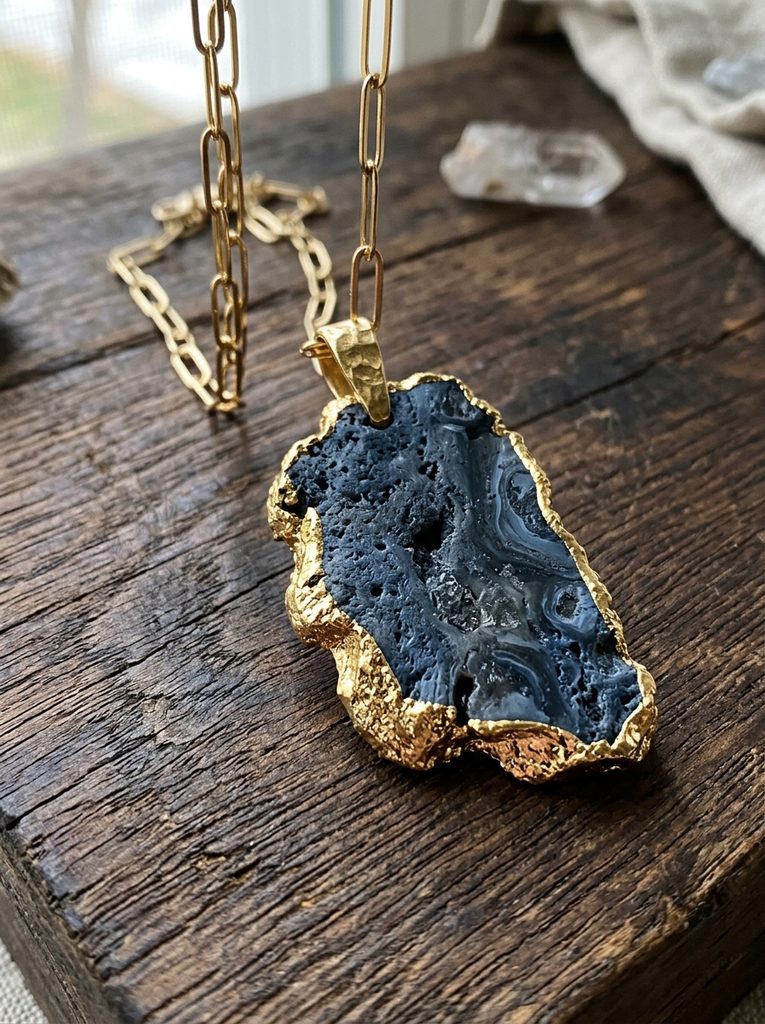
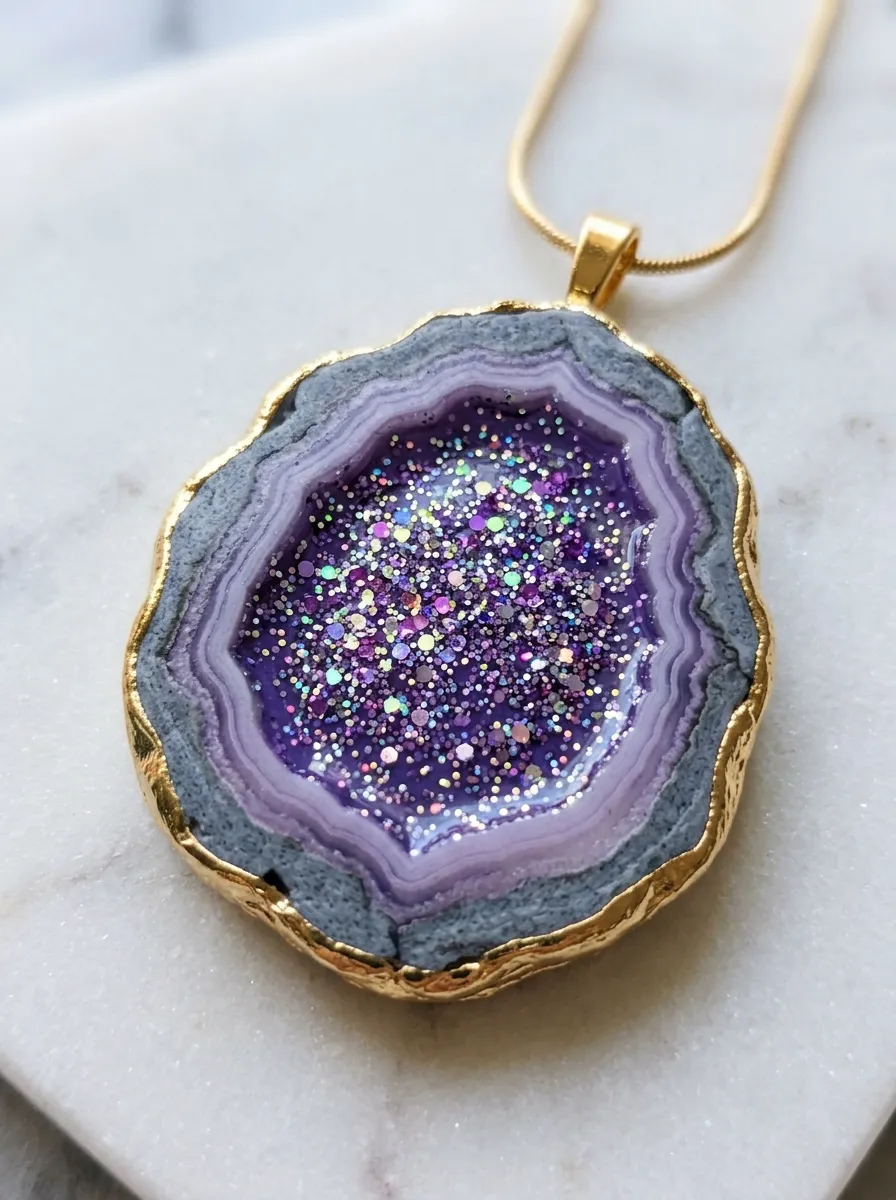
The polished amethyst geode pendant explores the layered geological strata of February crystalline cavities through translucent violet gradients and sparkling quartz rings. The design features a flat, organic slice displaying concentric rings that transition from an opaque rocky outer matrix toward an ultra-clear, violet-hued crystalline center. Fine flecks of iridescent silver glitter and clear quartz sand are embedded into the central window, reproducing the internal druzy sparkle found inside split volcanic geodes. A gleaming border of liquid gold leaf outlines the organic perimeter, framing the stone in a modern, luxury jewelry setting. Suspended from an eighteen-inch snake chain, this statement pendant creates a commanding focal point suitable for creative office spaces and formal dinner gatherings. The flat planar construction ensures the pendant rests comfortably against the breastbone without tilting or snagging on textured fabrics.
Begin by rolling out an opaque slate-gray clay strip to a two-millimeter thickness to serve as the rough volcanic rock shell. Next, prepare four concentric clay ribbons in graduated shades of white, pale lavender, vivid violet, and translucent amethyst tinted with purple alcohol ink. Wrap the colored ribbons sequentially around a core of clear translucent clay packed with fine holographic craft glitter, pressing the layered cylinder firmly from all sides to eliminate air pockets. Use a sharp tissue blade to slice cross-sections measuring four millimeters in thickness, gently stretching the edges of each slice to produce an asymmetrical, natural geode outline. Pierce a clean hanging hole through the upper edge using a metal needle tool, and bake the flat slices on parchment paper for forty-five minutes. After cooling, sand the perimeter with six-hundred-grit sandpaper, brush the outer edge with liquid metallic gold leaf, and coat both the front and back faces with self-leveling UV resin for a liquid-glass finish.
Idea 3: Raw Aquamarine Crystal Point Minimalist Choker
How to Create
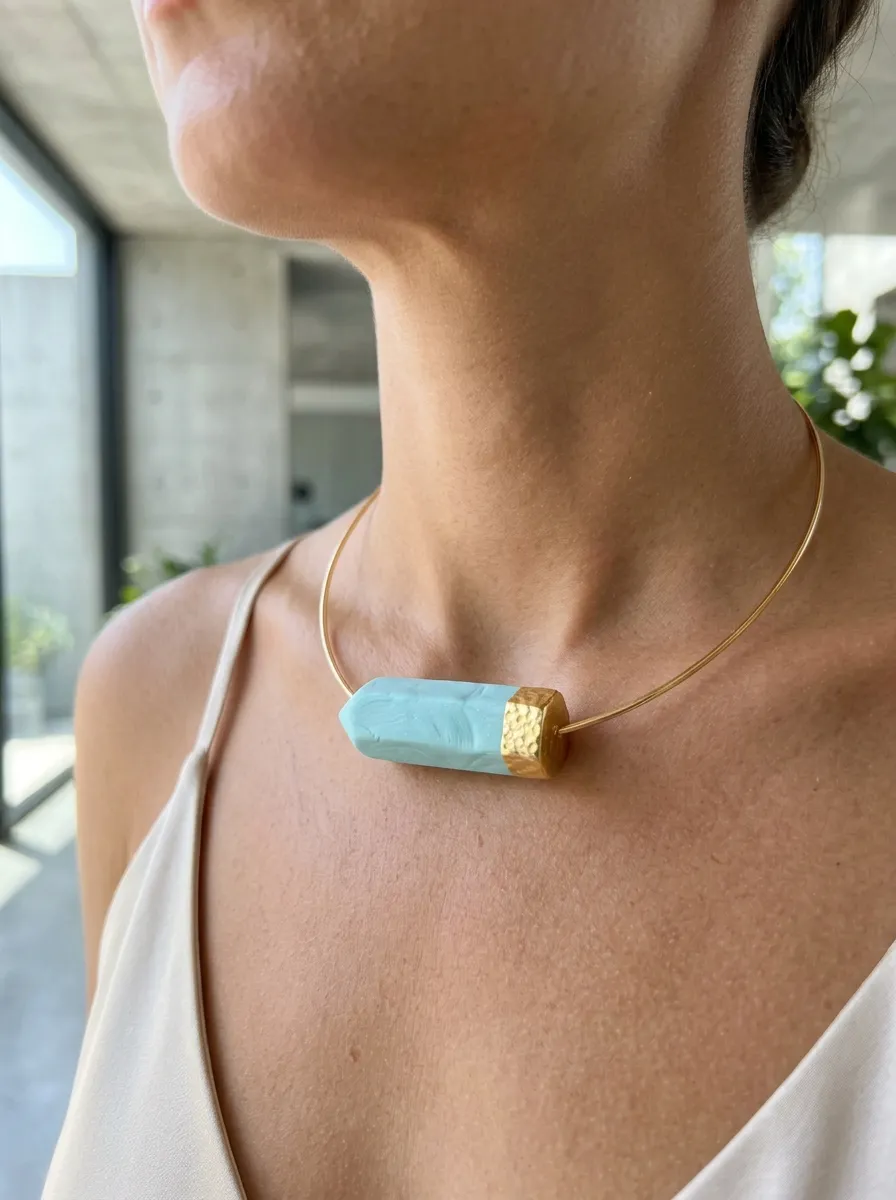
The raw aquamarine crystal choker celebrates the icy, pale-cyan clarity of March beryl gemstones through clean architectural lines and minimalist style. This design centers on an elongated hexagonal prism that replicates the natural column formations of untreated aquamarine crystals emerging from granite pegmatites. The clay body blends translucent polymer base with a microscopic hint of turquoise pigment and crushed white mica flake inclusions, producing subtle internal refraction. The hexagonal crystal point is capped at one end with a sculpted, textured band resembling hammered yellow gold, creating an appealing contrast between rough stone and refined metal. Strung horizontally along a delicate memory-wire choker or dainty cable chain, this piece offers an airy, oceanic visual element. The elongated horizontal line flatters the collarbone, making it an exceptional warm-weather accessory for linen shirts and boatneck blouses.
Condition two ounces of translucent polymer clay, folding in two drops of cyan alcohol ink and a quarter-teaspoon of fine white mica powder until the tint distributes evenly without streaks. Roll the prepared clay into a uniform cylinder measuring ten millimeters in diameter, chilling it in the refrigerator for fifteen minutes to firm the exterior. Using an acrylic block as a rolling guide, press six equal flat faces along the cylinder length to establish a crisp hexagonal crystal profile. Taper one end of the column into a natural three-sided pyramid point using light diagonal cuts with a tissue blade, leaving the opposite end flat. Wrap a three-millimeter strip of metallic gold polymer clay around the flat base of the crystal, texturing the gold strip with a coarse stone or wire brush. Insert a horizontal eye pin through the gold cap to serve as an internal chain channel, bake the piece for forty minutes, and coat the crystal facets with satin varnish.
Idea 4: Faux Herkimer Diamond Prisms on Geometric Hoops
Step-by-Step Guide
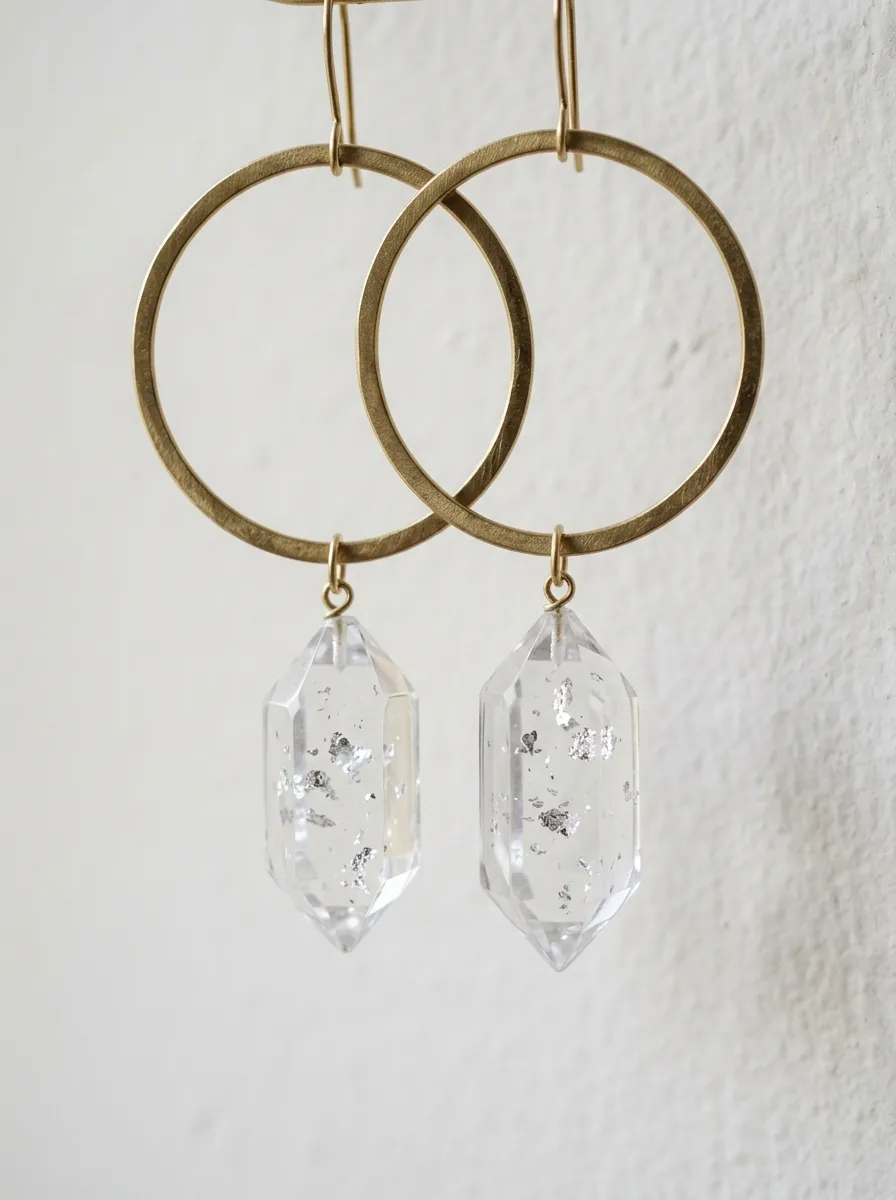
Faux Herkimer diamond hoop earrings replicate the double-terminated quartz crystals traditionally associated with April birthstones through geometric precision and light transmission. These miniature gemstones feature pointed terminations at both opposing ends, with faceted planar faces that reflect light without requiring mechanical stone cutting. Achieving absolute optical clarity involves blending premium unpigmented translucent clay with micro-fine silver leaf flakes, which mimic natural petroleum inclusions and internal light fractures. The suspended crystals hang freely inside open, circular raw brass hoops, producing kinetic movement that catches ambient illumination throughout the day. This lightweight earring format provides all the visual appeal of heavy diamond drops while ensuring zero physical stress on the earlobes. The clean pairing of geometric gold hoops and raw crystal points creates a refined, gallery-worthy aesthetic suitable for modern minimalist wardrobes.
Condition one ounce of ultra-clear translucent polymer clay, rolling the material into a smooth rod measuring eight millimeters thick on a clean glass tile. Cut the rod into twelve-millimeter segments, using a micro-blade to cut four sloping triangular facets on each opposing end to form double-terminated crystal points. Lightly press small flecks of genuine silver leaf onto the uncured facets, burnishing the metallic fragments into the clay surface with a soft silicone shaper. Carefully thread a thin, twenty-four-gauge stainless steel headpin lengthwise through the center axis of each crystal, creating a discrete mechanical hanging loop at the top. Suspend the threaded crystal points inside a folded cardstock baking tent to keep the facets from flattening against the baking tile during heat curing. Bake the crystals at the specified temperature for forty-five minutes, quench the hot pieces immediately in ice water to enhance clarity, and hang them inside twenty-five-millimeter brass hoop frames using jump rings.
Idea 5: Deep Emerald Cabochons with Gold Veining Ring
Setup Method
The deep emerald cabochon ring captures the lush, velvety green depths and internal fractures of May Colombian beryl in a luxurious statement setting. The focal gemstone features a high-domed oval cabochon displaying rich emerald tones, deep sea-green shadows, and delicate golden fissures that mirror genuine mineral veining. Layering tinted translucent clay over a reflective metallic gold base creates dimensional depth that shifts when viewed from different lighting angles. The cabochon is mounted securely into an adjustable, antique-finish crown bezel ring, giving it the appearance of an authentic bespoke heirloom. The smooth, rounded surface of the polished dome resists snagging on clothing, making it entirely practical for active daily wear. This project teaches artisans how to balance opaque and translucent clay strata to achieve realistic stone density without appearing plastic or flat.
Prepare the faux emerald slab by kneading emerald-green alcohol ink and a single speck of translucent yellow clay into conditioned clear polymer base. Roll the green clay into a flat four-millimeter sheet, tearing the sheet by hand into irregular, fractured chunks across a ceramic tile. Coat the torn fracture edges with liquid gold leaf or metallic gold mica powder, then press the fragments back together into a solid block to trap the golden veins internally. Press an oval cabochon cutter into the marbled block, using your fingertips to smooth the upper edge into a curved, high-domed profile. Bake the domed oval on a curved metal forming surface for forty minutes to prevent bottom flattening, allowing the stone to cool completely. Sand the cured cabochon under running water using progressive grits from four-hundred to twelve-hundred, wipe dry, and apply a thick coat of jewelry-grade epoxy resin over the dome before mounting it into an adjustable brass ring bezel.
Idea 6: Iridescent June Moonstone Cabochon Drop Hairpins
Step-by-Step Guide
The iridescent moonstone hairpin project captures the adularescence and ghostly blue illumination of natural June feldspar minerals in an elegant functional accessory. The design features a smooth, domed cabochon that emits a soft blue-white internal glow across a milky, semi-translucent base. This shifting optical effect is achieved by layering pearlescent mica interference powders between ultra-thin sheets of bleached translucent clay. Mounted onto minimalist metal bobby pins or vintage-style hair grips, these charms add an understated, artistic touch to updos, braids, and bridal hairstyles. The low-profile cabochon sits flat against the scalp without pulling delicate hair strands, ensuring comfortable wear throughout long events. This project demonstrates how subtle pigment interference creates high-value visual depth within a simple, beginner friendly geometric form.
Condition two ounces of translucent polymer clay, folding in a pea-sized amount of opaque white clay to create a milky, semi-opaque base. Roll the conditioned clay through a pasta machine or acrylic roller to a two-millimeter thickness, cutting the sheet into four equal square panels. Dust the surface of each panel lightly with blue-violet interference mica powder using a soft cosmetic brush, stacking the panels directly on top of one another to trap the mica layers. Compress the stacked block gently, rolling it into a solid log and slicing three-millimeter cross-sections with an ultra-thin tissue blade. Press a circular metal cutter through the slices, using a silicone blending tool to round the cut margins into a smooth, domed cabochon. Bake the stones for thirty-five minutes, allow them to cool, and coat the rounded surfaces with two-part clear epoxy resin. Secure the finished stones to flat-pad hairpins using industrial jewelry adhesive, holding them in place until the bond cures.
Idea 7: Raw Ruby Crystal Slices with Textured Brass Collars
Execution Process
Raw ruby crystal slice earrings showcase the rich, magenta-red tones and hexagonal growth habits of July corundum gems within an industrial jewelry frame. This design features flat hexagonal slices displaying natural growth rings, deep ruby-red saturation, and irregular mineral crust edges. The deep coloration is created by combining carmine alcohol inks with tiny flecks of black iron oxide powder, replicating the mineral impurities found in unheated natural rubies. The upper edge of each slice is clasped in a wide, textured raw brass collar, combining earthy stone surfaces with clean architectural metalwork. This combination appeals to collectors of organic, modern jewelry who value raw textures over standard faceted commercial cuts. The flat, thin profile keeps the weight minimal, making these statement earrings comfortable for day-long wear.
Condition one-and-a-half ounces of translucent polymer clay, tinting the mass to a deep magenta-red using carmine alcohol ink and a trace of burnt umber pigment. Shape the red clay into a distinct hexagonal prism measuring fifteen millimeters wide, pressing the exterior against a coarse stone surface to create a rough, textured outer skin. Coat the textured perimeter with matte dark gray chalk pastel to simulate the surrounding schist rock matrix. Chill the prism for twenty minutes, then use a sharp, rigid tissue blade to slice thin hexagonal wafers measuring two millimeters in thickness. Pierce a clean hanging hole near the upper edge of each slice, baking the wafers flat between two sheets of parchment paper weighted with a ceramic tile to prevent warping. Once cured and cooled, tumble the slices with damp four-hundred-grit sandpaper to soften sharp corners, and attach custom-folded raw brass metal sheet collars over the top edge before linking to ear hooks.
Idea 8: Olive Peridot Nugget and Raw Silk Cord Necklace
How to Create
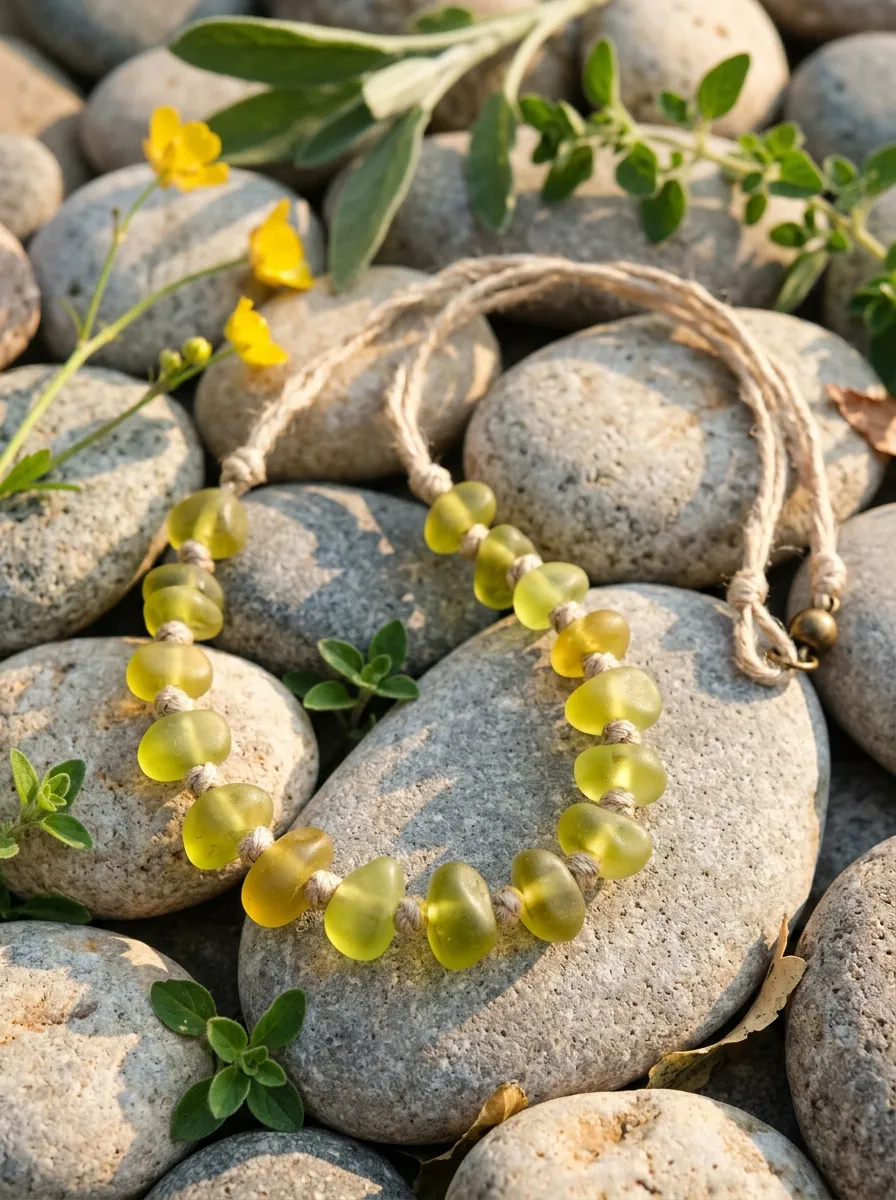
The olive peridot nugget necklace highlights the bright yellow-green tones and volcanic origins of August olivine crystals in a relaxed, wearable format. This design features an assortment of organic, tumbled pebble shapes displaying the chartreuse and lime-gold transparency characteristic of natural peridot sand formations. The stones are hand-rolled and lightly faceted, capturing the irregular appearance of tumbled gemstones polished naturally in mountain streams. Strung along an unbleached raw silk cord with knotted spacers, the translucent green nuggets produce a fresh, botanical aesthetic that coordinates effortlessly with linen tunics and relaxed summer clothing. The lack of rigid metal settings gives the necklace a fluid, tactile quality that drapes naturally against the collarbone. Crafting these irregular nuggets teaches beginners how to manipulate clay density and organic shaping without requiring precision geometric cutters.
Knead two drops of lime-green alcohol ink and one drop of golden-yellow ink into conditioned translucent polymer clay to establish an authentic peridot olive tone. Divide the colored clay into ten varied portions ranging from the size of a pea to that of a hazelnut, rolling each portion into a loose spherical pebble. Use an acrylic flat block to press asymmetrical, gentle flat planes onto the sides of each pebble, creating an organic tumbled appearance. Thread each uncured nugget onto a stainless steel beading wire coated with cornstarch, spacing them evenly so they do not touch during thermal curing. Suspend the wire across a metal baking rack, baking the suspended nuggets for thirty-five minutes at 130 degrees Celsius. Once cured, slide the beads off the wire, rinse away residual starch, and buff the surfaces with a denim cloth to produce a natural sea-tumbled satin sheen. Thread the finished nuggets onto a two-millimeter raw silk cord, tying neat overhand knots between each stone to secure their positions.
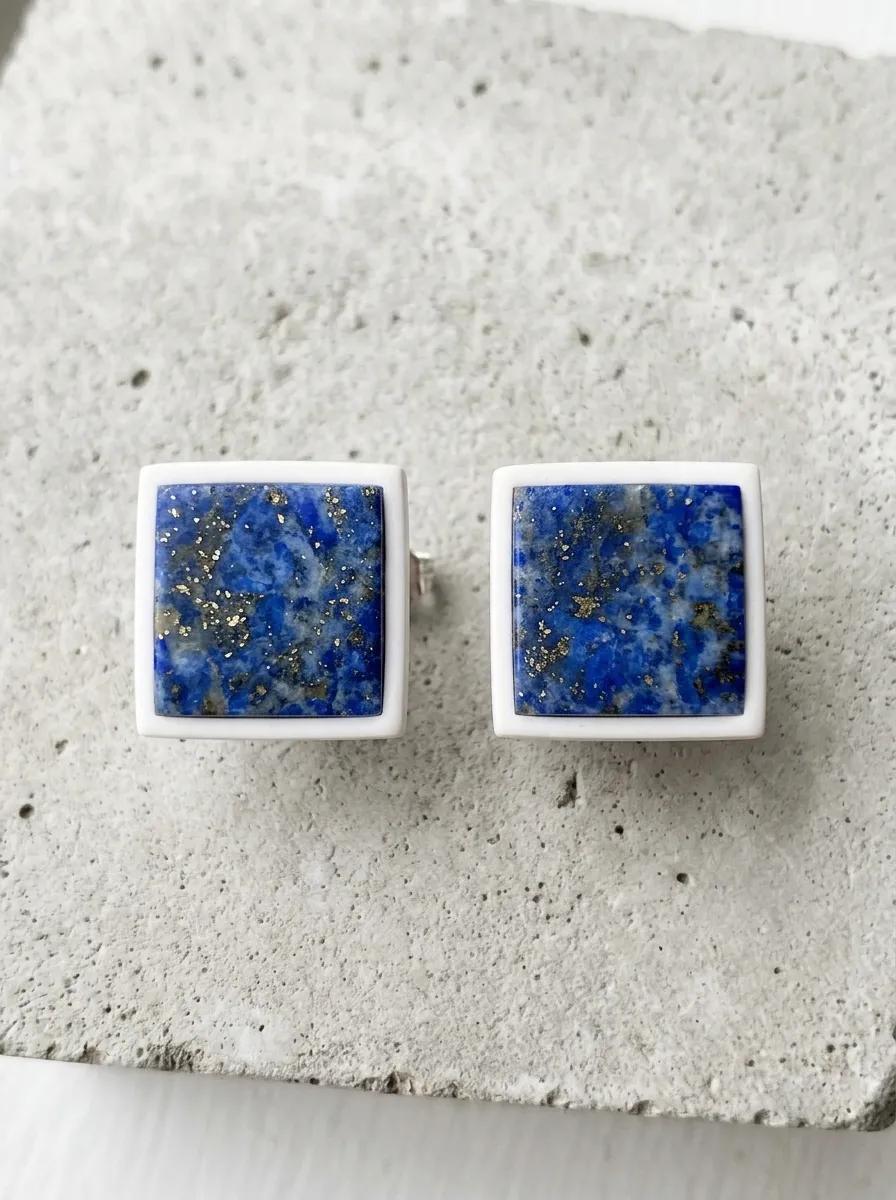
Idea 9: Lapis Lazuli and Pyrite Mosaic Square Studs
Step-by-Step Guide
Lapis lazuli mosaic square studs capture the celestial midnight-blue majesty and golden pyrite inclusions of historic September lapis lazuli stones. The design consists of a sharp, modern square stud showcasing mottled ultramarine blue clay, deep denim undertones, and flecks of genuine crushed pyrite or brass powder. A stark border of unglazed white porcelain-tone clay frames the deep blue mosaic, referencing classical mosaic tile arts and modern geometric design. The flat, low-profile silhouette sits flush against the earlobe, providing a refined pop of color suitable for professional corporate environments and casual weekend outings alike. Because the golden inclusions and calcite variations are integrated throughout the clay body, the stone pattern remains permanently visible and will not rub off during active handling. This project introduces beginners to polymer clay mosaic cutting and precision square edge finishing.
Condition one ounce of opaque ultramarine blue polymer clay alongside a half-ounce of white clay and a quarter-ounce of translucent clay. Chop the three clays into tiny, irregular shards, tossing the mixture in a small container with a quarter-teaspoon of brass leaf flakes and powdered pyrite. Compress the coated shards firmly into a tight, solid cubic block, using an acrylic rolling pin to eliminate internal air voids. Slice the block into two-millimeter thick slabs with a flexible tissue blade, revealing the mottled lapis mosaic pattern. Lay the patterned slab onto a flat backing sheet of white clay, rolling firmly under parchment paper to bond the layers into an unbroken five-millimeter sheet. Use a clean, square twelve-millimeter cutter to punch out matched stud pairs, baking them flat on a ceramic tile for forty minutes. After cooling, sand the perimeter edges square using eight-hundred-grit sandpaper, buff the faces with a dry microfiber cloth, and adhere hypoallergenic surgical steel posts to the backings using two-part industrial epoxy.
Idea 10: Australian Opal Teardrop Pendant with Multi-Fire Flakes
Setup Method
The Australian opal teardrop pendant reproduces the optical phenomenon of natural October precious opals through layered iridescent mylar flakes and milky translucent clay. The finished piece features a high-domed teardrop cabochon that flashes vibrant pinfire greens, electric blues, and fiery pinks as it moves under natural light. This depth is achieved by suspending micro-cut color-shifting iridescent films within an ultra-clear polymer clay medium, backed by a thin layer of jet-black clay to maximize color contrast. Mounted in a minimalist wire-wrapped bail or a pre-formed pendant bezel, this piece exudes the luxurious, mysterious charm of high-value Australian black opals. The smooth teardrop silhouette offers a timeless, flattering profile that elongates the neck when worn on a fine cable chain. This advanced beginner project provides valuable experience in managing light-interference materials and achieving a bubble-free, glass-like resin topcoat.
Condition one ounce of ultra-translucent polymer clay, rolling it into a paper-thin sheet measuring one millimeter in thickness. Finely chop sheets of dichroic iridescent cellophane film into microscopic, irregular flakes using sharp shears, scattering the reflective flakes across the surface of the translucent clay sheet. Fold the clay repeatedly to distribute the glittering flakes evenly throughout the translucent base without crushing their reflective surfaces. Roll out a matching backing sheet of opaque black clay to a two-millimeter thickness, placing the glitter-packed translucent slab directly on top. Press a tear-shaped cutter through both layers, using your thumbs to smooth the top edge into a gentle, sloping cabochon dome. Bake the teardrop on a bed of baking soda for forty minutes to prevent bottom scorching, allowing it to cool fully. Apply a generous dome of jewelry-grade UV resin over the cured cabochon, cure under a thirty-six-watt UV lamp for three minutes to lock in optical clarity, and mount a gold pinch bail through the pre-drilled top hole.
Common Beginner Mistakes and How to Avoid Them
The most critical mistake beginners make when crafting birthstone-inspired polymer clay jewelry is over-kneading the clay, which completely blends the marble veins and creates a muddy, uniform color. Natural gemstones derive their character from distinct fissures, crystalline boundaries, and mineral inclusions; maintain this natural heterogeneity by folding colored clay blocks only two or three times before slicing. Another widespread error is curing translucent clays at uncalibrated, excessively high temperatures, which causes clear components to scorch and turn an unappealing yellowish-brown. Always utilize an independent, freestanding metal oven thermometer placed directly beside your baking tile, never trusting built-in appliance dials that often spike twenty degrees above their target setting. Novices also frequently skip wet-sanding stages, assuming that a topcoat of gloss resin will conceal surface flaws, tool marks, and trapped air bubbles. Resin magnifies surface irregularities rather than hiding them; always sand cured stones through four-hundred, eight-hundred, and twelve-hundred grits under running water before applying protective sealants. Finally, avoid using weak instant glues to mount metal earring posts and pendant bails to cured clay; standard cyanoacrylate becomes brittle and fails over time. Secure metal hardware using heavy-duty two-part epoxy paste or bake the hardware directly into the raw clay using liquid polymer adhesive for maximum structural longevity.
Practical Tips for Better Results
Achieving boutique-grade, gemstone-like finishes requires disciplined studio hygiene, calibrated curing processes, and calculated lighting manipulation. Always clean your hands, acrylic rollers, and cutting blades with rubbing alcohol or baby wipes between colors to prevent dark lint and stray pigment from contaminating translucent crystal clays. When attempting to simulate icy or crystalline stones such as aquamarine, diamond, or peridot, submerge your cured clay pieces directly into a bowl of ice water immediately upon removing them from the oven. This rapid thermal shock enhances polymer cross-linking density, noticeably improving the optical transparency and clarity of translucent formulations. To achieve crisp, reflective mineral facets without rounded edges, cut raw clay blocks only after chilling them in the refrigerator for fifteen minutes; cold clay resists the compressive drag of the blade, yielding sharp, clean geometric edges. When applying two-part epoxy or UV resin over cabochons, pass the flame of a butane craft lighter swiftly across the wet surface to pop microscopic surface tension bubbles before curing. Finally, consider using unglazed matte surfaces for matrix stones like turquoise, lapis, or raw tourmaline, reserving high-gloss resin exclusively for crystalline gems to produce a sophisticated, realistic contrast between raw host rock and polished crystal cores.
Styling, Presentation, or Organization Ideas
Presenting handcrafted birthstone jewelry with thoughtful packaging elevates your items from basic craft projects into luxurious, boutique-quality keepsakes. Mount finished earrings, necklaces, and rings onto custom-cut cardstock backing cards made from heavy linen-textured watercolor paper stamped with elegant calligraphy noting the birth month, gemstone lore, and personal astrological attributes. For safe shipping and elevated gifting, nestle each piece inside natural, unbleached cotton muslin pouches or rigid craft paper gift boxes filled with shredded wood excelsior to prevent metal scratches during transport. If showcasing your collection in an open studio or at artisan markets, organize the jewelry chronologically by calendar month across white ceramic trays, raw slate slabs, or natural wooden blocks to create a clean, modern aesthetic. When styling these accessories into everyday outfits, treat deep-toned gems like garnet, sapphire, and emerald as rich color anchors, pairing them with crisp white button-downs, tailored neutral blazers, and minimalist linen garments. Providing customers and gift recipients with a small lint-free jewelry polishing cloth and a printed care card outlining water safety rules and chemical avoidance ensures your handmade treasures will be worn and cherished for decades.
Budget or Time Planning
Crafting handmade birthstone polymer clay jewelry offers exceptional profit margins and time efficiency compared to traditional metalsmithing or lapidary arts. A single two-ounce block of translucent polymer clay costs only a few dollars yet yields between six and twelve pairs of medium-sized gemstone earrings, resulting in an exceptionally low material cost per finished item. Maximize your initial investment by purchasing large economy blocks of translucent and white clay alongside small, concentrated bottles of primary alcohol inks, mixing your own custom mineral palettes rather than buying dozens of specialty clay colors. In terms of scheduling, these modular projects fit naturally into busy everyday routines; a set of raw crystal earrings takes approximately thirty to forty-five minutes to sculpt once colors are formulated. To maximize your creative output, implement batch production methods: dedicate one focused evening session to color blending, cane slicing, and cabochon shaping across several birth months. Group all prepared pieces together on ceramic tiles for a single consolidated baking cycle, saving electrical energy and minimizing oven monitoring time. Dedicate a separate, quiet morning session to wet-sanding, resin coating, and hardware assembly to ensure that finishing touches are executed with meticulous attention to detail.
Creative Expansion and Advanced Inspiration
Once you have mastered foundational mineral simulation and stone-setting techniques, you can explore sophisticated creative expansions that push polymer clay into high-end wearable art. Experiment with complex composite geological formations, such as crafting matrix turquoise cabochons featuring intricate webbed spider-veins made from tinted liquid clay and pulverized copper leaf. Integrate raw mineral specimens into your clay work by setting genuine miniature quartz points, raw pyrite cubes, or freshwater seed pearls directly into the clay matrix before baking, creating dynamic mixed-media jewelry that bridges fine and synthetic mineral arts. You can also explore micro-carving by using rotary tools and miniature diamond dental burrs to engrave delicate cameos, intaglios, or sacred geometric patterns into the faces of cured faux agates and onyx stones. Crafters interested in home decor can scale up these exact faux gemstone techniques to produce stunning crystal drawer pulls, decorative cabinet knobs, matching coasters, and framed miniature mineral specimens. Exploring surface treatments with interference pigments, dichroic inclusions, and custom gold-leaf bezels elevates simple polymer clay crafting into a timeless artistic discipline, producing heirloom-worthy jewelry that honors personal history with enduring beauty.
Sustainable jewelry design continues to reshape modern craft communities, merging tactile clay modeling with conscious material choices and low-waste studio practices. This comprehensive tutorial explores actionable Pinterest ideas for creating stylish, durable, eco-conscious polymer clay adornments without unnecessary environmental impact. Readers will discover practical fabrication methods, scrap re-utilization systems, non-toxic organic inclusions, and zero-waste studio workflows suitable for sustainable accessory design. Adopting environmentally mindful methods in miniature jewelry sculpting allows artisans to eliminate plastic waste, repurpose trimming off-cuts, and source hypoallergenic, recyclable metallic hardware for daily wear. This guide delivers the technical foundations needed to select sustainable raw components, calculate accurate curing thresholds, and protect wearable jewelry using biological plant waxes instead of harsh synthetic resins. The step by step guidance provided across each section ensures that every creative project balances visual elegance, skin safety, and structural longevity. Whether you are seeking new handmade accessory collections or seeking to transition your home studio toward cleaner crafting protocols, these frameworks offer practical, responsible solutions. By grounding your creative work in resource efficiency and minimalist style design principles, you can produce contemporary jewelry collections that reflect genuine environmental mindfulness.
The Sustainable Evolution of Contemporary Clay Adornments
The strong presence of conscious clay accessories across modern design galleries stems from an increasing public interest in transparent, sustainable, and handmade lifestyle choices. Contemporary consumers actively seek alternatives to fast-fashion accessories, opting instead for durable wearable art that minimizes micro-waste and honors responsible production cycles. Incorporating recycled clay scraps, natural earth pigments, and biodegradable botanicals into modern design elevates basic synthetic mediums into high-value artisan treasures. This approach delivers practical value by turning studio scrap collections into saleable marbled collections, eliminating the costly disposal of usable raw compounds. The DIY appeal remains exceptional because simple home ovens, fundamental hand blades, and kitchen rolling pins substitute fully for high-energy industrial metal foundries or high-temperature ceramic kilns. For newcomers, sustainable clay crafting offers an accessible creative project that develops patience, fine motor control, and material awareness without demanding huge startup capital. Transforming discarded material shavings into refined pendant geometries connects makers directly with circular economy principles. By merging clean Scandinavian geometry with natural mineral elements, artisans establish an organic, modern aesthetic that celebrates material resourcefulness and mindful craftsmanship.
Essential Materials and Studio Preparation for Clean Crafting
Establishing a sustainable studio workflow requires disciplined material sourcing, waste-reduction organization, and precise environmental planning before conditioning raw modeling compounds. The core materials for conscious accessory making include certified non-toxic oven-cure clay, reclaimed cured clay scrap granules, raw botanical plant seeds, natural mica mineral shimmers, and recycled surgical steel or reclaimed brass jewelry findings. Key manual tools consist of a tempered glass work surface, high-carbon steel tissue blades, manual acrylic conditioning rollers, unbleached parchment sheets, micro-mesh wet-sanding pads, and certified organic jojoba or carnauba sealing wax. Proper studio preparation begins by wiping all flat surfaces using pure isopropyl alcohol and reusable cotton rags, avoiding single-use disposable wipes that generate landfill waste. Organize an efficient scrap color categorization system using divided glass containers to sort cured and uncured trimmings by chromatic value, ensuring that no clay off-cuts enter domestic waste streams. Calibrate your baking apparatus using an independent standing thermometer to eliminate overheating risks that produce hazardous fumes or scorched projects. Methodical material planning ensures that every wearable piece retains structural integrity while reducing your environmental footprint.
1. Botanical Pressed Seed and Raw Clay Pendant
Step-by-Step Guide
The botanical pressed seed pendant combines raw, neutral polymer clay with real agricultural byproducts, producing an earthy, textural focal point for sustainable necklaces. This concept utilizes unbleached, raw-tone or translucent clay infused with viable culinary poppy seeds, dried chamomile husks, and crushed wild fennel seed hulls. The seed inclusions introduce fine, irregular speckles across the clay slab, creating a stone-like granite appearance that eliminates the need for petroleum-based glitter or artificial synthetic pigments. The flat, organic circular or rounded rectangular pendant geometry offers a grounded, modern design that integrates naturally into neutral capsule wardrobes. Because the seeds sit securely encased inside the conditioned polymer matrix, they withstand standard oven temperatures without burning or charring during thermal processing. The minimalist aesthetic emphasizes natural agricultural beauty, pairing effortlessly with reclaimed cordage, waxed hemp twine, or unplated raw brass chain suspensions.
Begin by conditioning two ounces of unbleached off-white or translucent modeling clay on a clean glass slab until completely soft and pliable. Flatten the prepared clay into a three-millimeter slab using a manual roller, then sprinkle one teaspoon of mixed dry poppy and crushed chamomile seeds evenly across the surface. Fold the clay slab in half and roll it through your hand roller three consecutive times to distribute the organic seeds evenly throughout the inner matrix. Cut out clean geometric oblongs or rounded discs using a clean metal cutter, smoothing the freshly sliced perimeters with a water-dampened fingertip to remove rough tool burrs. Pierce a neat two-millimeter suspension hole through the upper apex of each pendant using a blunt metal needle tool. Bake the cut pendants flat on a parchment-lined ceramic tile at the manufacturer-recommended heat for thirty-five minutes, allowing them to cool completely before buffing the surfaces with organic carnauba wax.
2. Terrazzo Scraps and Leftover Trimmings Drop Earrings
Execution Process
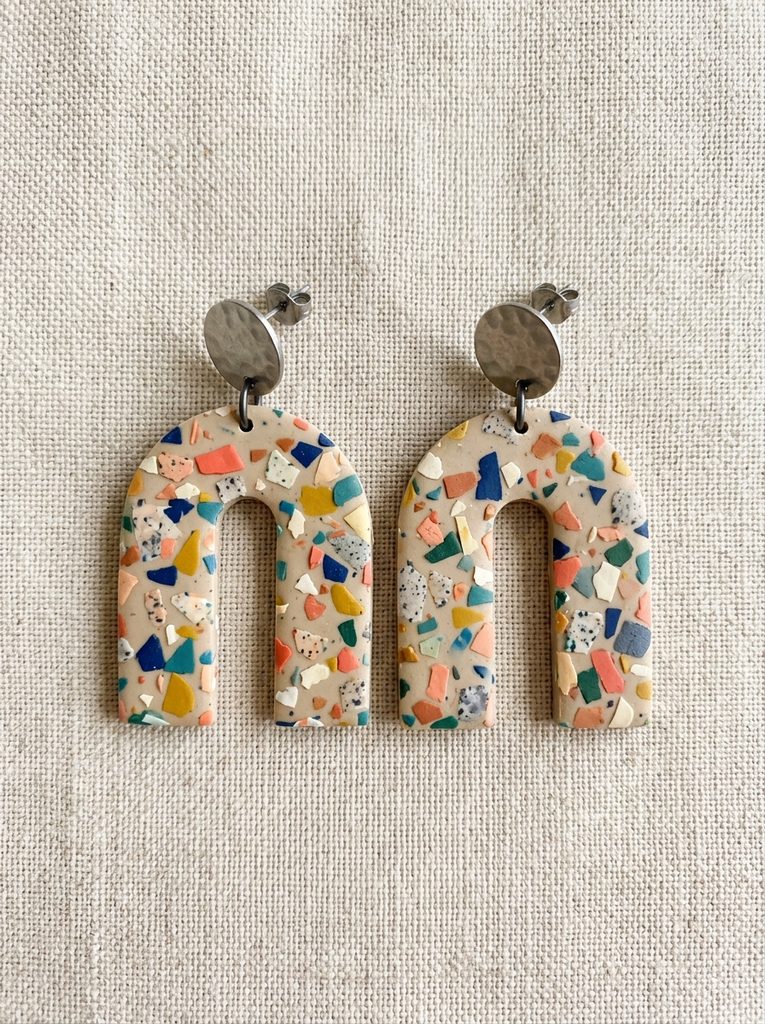
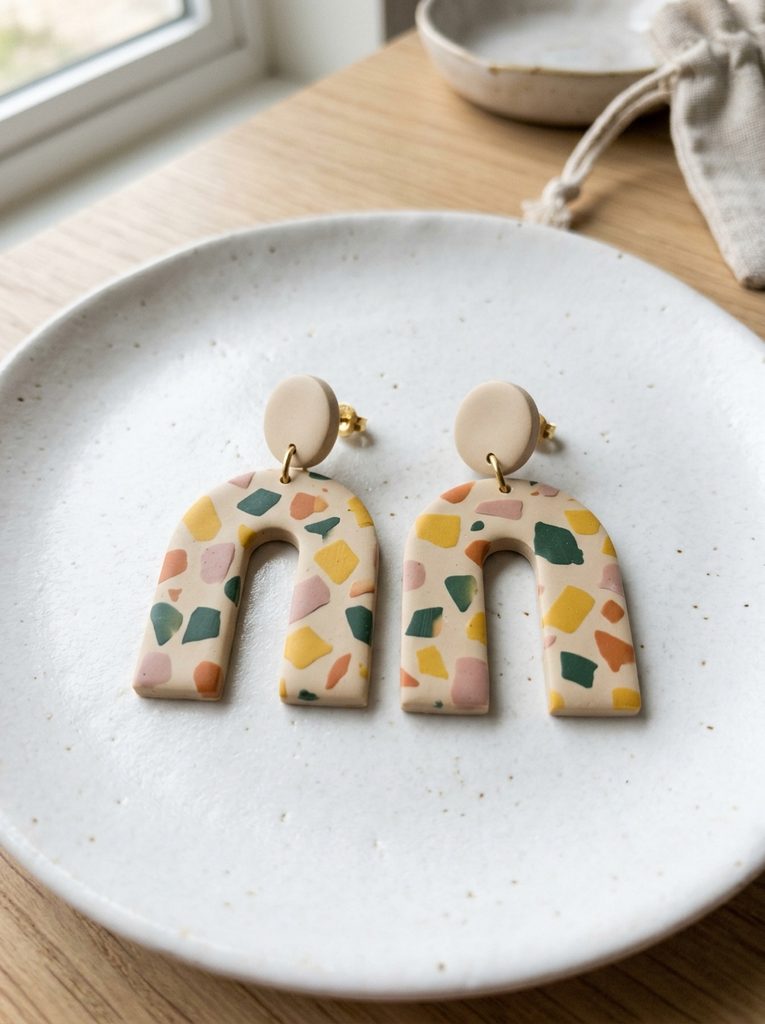
The recycled terrazzo drop earring design converts colorful studio waste trimmings into mosaic-patterned geometric statements, preventing clay disposal and celebrating circular studio ethics. This visual concept takes discarded, cured, and uncured clay trimmings from previous projects, slicing them into fine geometric confetti flakes before pressing them into a neutral background slab. The contrast between bright, colorful scrap flecks and a muted ivory or sand-colored base mimics traditional Venetian architectural flooring, delivering a sophisticated, design-forward look. These multi-tiered drop earrings utilize simple geometric forms, such as archways, circles, and balance bars, to produce a balanced, lightweight accessory that causes no physical earlobe drag. By utilizing everyday scraps, each piece becomes an original, unrepeatable color study that illustrates the practical beauty of zero-waste manufacturing. This approach offers immense creative utility for makers who accumulate colorful clay shavings throughout routine crafting cycles.
To prepare the terrazzo slab, gather assorted cured and uncured clay trimmings, sorting them into harmonious color groupings on your cutting station. Slice the trimmings into irregular micro-fragments measuring between one-half and two millimeters using a rigid high-carbon tissue blade, keeping the cut profiles angular and sharp. Roll a fresh base sheet of white or oatmeal-toned clay to a uniform two-millimeter thickness, distributing the scrap fragments across the top face in a balanced, open arrangement. Place a sheet of clean greaseproof baking paper over the speckled slab, rolling firmly with an acrylic roller to fuse the mosaic chips flush into the host clay layer. Cut matching pairs of arch or teardrop components using sharp metal cutters, piercing connector holes along the top and bottom margins with a bead-piercing needle. Bake the components thoroughly, cool them, and sand the edges underwater with four-hundred-grit wet-dry paper before joining the segments with recycled surgical steel jump rings.
3. Sand-Infused Coastal Beach Stone Studs
How to Create
Sand-infused coastal stone studs draw tactile authenticity directly from coastal shorelines, mixing genuine washed beach sand into raw polymer clay to build miniature geological treasures. The design concept mimics rough, wave-tumbled ocean pebbles, utilizing fine quartz sand grains, microscopic shell fragments, and slate dust gathered responsibly from shorelines. This mineral infusion adds authentic grit and a matte, stone-like texture to the finished pieces, avoiding the smooth, plastic-like sheen associated with conventional polymer surfaces. Shaped into soft, irregular organic pebbles, these stud earrings deliver understated, minimalist style simplicity suitable for everyday corporate, casual, and formal wear. The natural mineral weight gives the tiny studs substance while maintaining an exceptionally comfortable, featherweight feel on the earlobe. The earthy palette of ocean sand, sea glass tones, and wet rock shades creates a grounding, organic presentation that resonates with eco-conscious shoppers and nature enthusiasts.
Collect two tablespoons of fine coastal sand, washing it thoroughly in boiling tap water to remove all natural sea salts and marine organic debris before drying it completely. Knead one tablespoon of the prepared sand into two ounces of conditioned slate-grey, warm beige, or sea-foam clay, continuing the folding process until the mineral grains distribute smoothly. Roll the gritty mixture into irregular spheres measuring eight millimeters across, gently pressing each ball onto a ceramic work tile to establish a flat, stable mounting reverse. Use the rounded side of a wooden modeling tool to shape the front contours into asymmetrical, smooth pebble curves that mirror natural wave erosion patterns. Bake the stone studs directly on the tile, maintaining strict heat regulation to prevent localized scorching around the trapped quartz grains. Once fully cooled, clean the flat reverse sides with pure alcohol, bonding hypoallergenic titanium or surgical steel posts securely using a solvent-free two-part jewelry epoxy.
4. Reclaimed Cinnamon Bark and Clay Statement Choker
Step-by-Step Guide
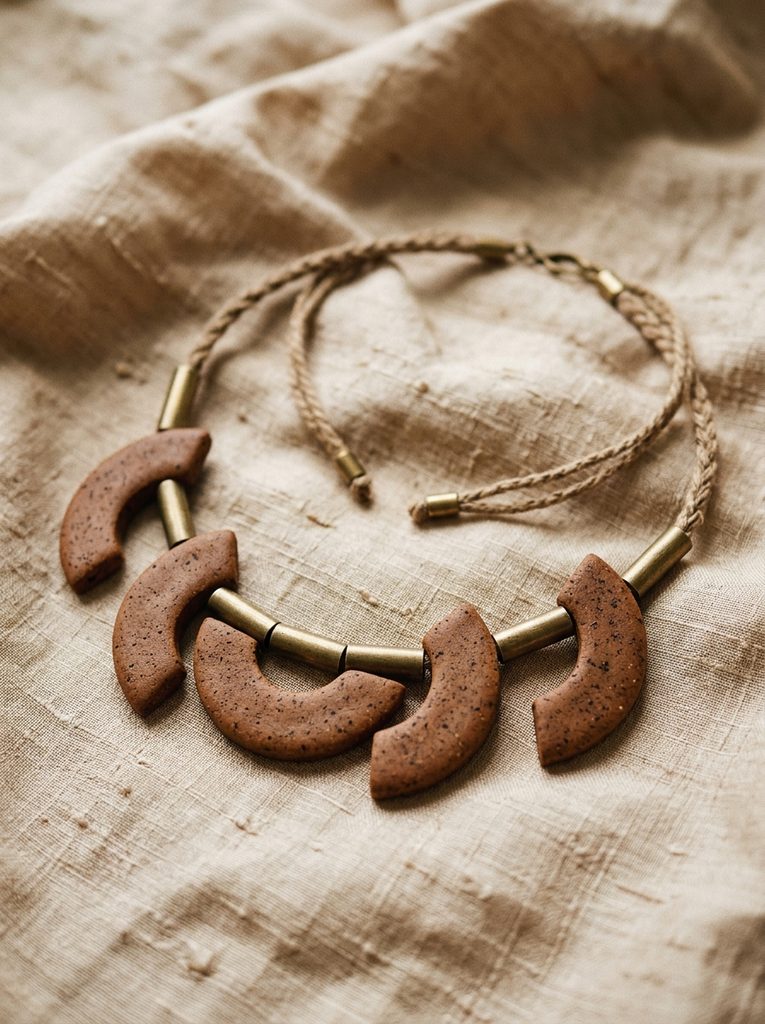
The reclaimed cinnamon bark statement choker combines domestic spice cabinet aromatics with sculpted clay arcs, creating a warm, multi-sensory accessory. The design showcases flat, crescent-shaped clay segments enriched with finely ground, expired cinnamon bark, ground nutmeg, and dark clove powder. The micro-particles of aromatic bark tint the raw clay a deep, warm umber while releasing a subtle, natural fragrance when warmed against the wearer’s skin. Interspersing these textured spice-clay arcs with brushed brass tubes on a reclaimed cotton cord creates an elegant, architectural collar that rests comfortably along the collarbones. This project emphasizes renewable kitchen spices that might otherwise go unused due to expired culinary potency, extending their usefulness into wearable artisan home decor and accessories. The warm spice tone pairs effortlessly with autumnal linens, chunky knit sweaters, and modern natural clothing collections.
Source expired or surplus cinnamon sticks, grinding them into a fine, consistent powder using a dedicated manual spice grinder or stone mortar. Add one teaspoon of ground cinnamon and a pinch of ground clove into two ounces of warm taupe polymer clay, kneading the mass thoroughly until an even, cinnamon-speckled dough forms. Roll the scented clay out to a sturdy four-millimeter thickness, slicing curved crescent bands measuring three inches in width using a circular arch template and a precision blade. Bore horizontal passage channels through the lateral ends of each curved band using an eighteen-gauge piercing wire, allowing cordage to pass cleanly through the clay body. Bake the spiced crescents at the proper temperature on clean baking parchment, running an exhaust fan to circulate the fragrant baking aromas. After baking, sand the edges lightly, then string the clay crescents onto braided organic linen cord, separating the segments with short reclaimed brass pipe spacers.
5. Recycled Paper Pulp and Clay Composite Bangle
Execution Process
The paper-clay composite bangle explores innovative mixed-medium recycling by combining post-consumer paper fiber shreds with ultra-flexible polymer clay to yield durable, lightweight arm cuffs. The design concept focuses on wide, sculptural wrist bangles that mimic porous travertine stone, architectural concrete, or unglazed earthenware pottery. By blending cellulose pulp derived from discarded studio sketches, bills, or unbleached packaging paper into the synthetic clay base, the final composite decreases plastic volume while gaining tensile flex strength. The exterior finish displays fine fibrous micro-textures and soft, paper-grain irregularities that eliminate industrial artificiality, giving the finished bangle an authentic, sculptural weightlessness. The broad cuff profile provides an expressive canvas that complements clean Scandinavian wardrobes and structured linen garments, functioning as a bold statement piece that illustrates creative resource recovery.
Begin by tearing discarded unbleached paper into tiny shreds, soaking them in warm water for two hours before pulsing them into fine cellulose slurry with a dedicated craft blender. Press the wet paper pulp through a fine mesh cheesecloth to extract all moisture, letting the compressed fiber cake dry out until it becomes a crumbly, dehydrated fluff. Knead one part dried cellulose fluff into three parts conditioned white polymer clay, working the mixture firmly until the fibers integrate completely into the binder. Mold the fibrous composite into a long, four-millimeter-thick band, wrapping it smoothly around an oven-safe aluminum bangle form or clean metal drinking tumbler to hold its curved bracelet shape. Bake the wrapped form upright inside a preheated oven, cooling it slowly to room temperature to prevent internal contraction fractures. Smooth the inner and outer rim edges using fine-grit sandpaper, sealing the porous paper-clay hybrid with a generous coat of pure beeswax paste.
6. Real Dried Florals Translucent Sunburst Pendant
Setup Method
This sunburst pendant design captures authentic botanical specimens inside translucent polymer clay, immortalizing seasonal blossoms without petroleum-based synthetic liquid casting resins. The visual arrangement features delicate petals of wild buttercups, miniature forget-me-nots, and sweet alyssum blossoms embedded beneath a paper-thin veil of transparent oven-bake clay. The warm, diffused translucency of the clay mimics frosted sea glass or glowing antique parchment, protecting the fragile floral pigments from direct physical abrasion. Encasing these delicate natural botanicals within clean, modern geometric frames—such as sharp hexagons, long ovals, or sunburst disks—creates a striking balance between wild nature and contemporary form. This technique offers a clean, low-fume alternative to chemical epoxy pours, producing lightweight, wearable botanical jewelry that celebrates backyard biodiversity and slow crafting values.
Begin by harvesting small, colorful wild blossoms, pressing them between sheets of absorbent paper inside a heavy wooden book press for ten consecutive days until fully dehydrated. Condition one ounce of ultra-translucent polymer clay, rolling it down to the thinnest workable setting on your manual roller to produce a pair of sheer, flexible membranes. Lay your pressed dried petals carefully across the first translucent sheet, positioning the botanicals neatly within your planned pendant cutting outline. Lay the second translucent clay membrane directly over the positioned flowers, smoothing gently from the center outward with a soft silicone shaper to expel all trapped air bubbles without crushing the delicate petals. Cut the composite slab into clean geometric forms using sharp brass cutters, piercing a jump-ring hole through the top margin with a needle. Bake the pendants at the lower end of the recommended temperature window to preserve flower colors, quenching the hot pieces in ice water immediately after baking to maximize transparency.
7. Reclaimed Coffee Grounds Granite Ring Band
How to Make
The reclaimed coffee grounds ring band merges urban hospitality waste with modern personal adornment, creating a deep-toned, textured material reminiscent of volcanic basalt stone. This creative project incorporates dried, spent espresso grounds collected from local cafes or home kitchens into a charcoal or raw umber polymer clay base. The microscopic coffee particles produce an organic, dark-flecked surface texture that scatters surface reflections, transforming smooth synthetic clay into a matte, stone-like material. The architectural, thick-walled band design features a comfort-fit interior curve that rests comfortably on the finger without pinching skin during daily activities. The subtle natural variation in coffee grind sizes creates unique patterns across every individual ring, turning common morning waste into an understated, conversation-starting accessory. This project demonstrates how thoughtful design can convert daily organic byproducts into sophisticated, durable personal decorations.
Collect used espresso grounds from an espresso machine, spreading the wet material across a baking tray and dehydrating it in a low-temperature oven until moisture-free. Blend one teaspoon of the dried, fine coffee grounds into two ounces of conditioned charcoal-grey or deep stone-colored polymer clay, rolling the slab until the flecks distribute evenly. Cut a long, four-millimeter-wide strip from the three-millimeter-thick slab, measuring the length to match the precise circumference of the target finger size. Wrap the prepared strip around a steel ring mandrel or an oven-safe metal socket, joining the two cut ends with a neat diagonal scarf joint smoothed flush with a flat silicone tool. Bake the ring assembly while still mounted on the metal cylinder, ensuring the round profile remains perfectly circular throughout the thermal curing cycle. After cooling, sand the internal and external surfaces with eight-hundred-grit wet-dry sandpaper, applying a drop of mineral oil to deepen the rich, dark tones.
8. Natural Ochre and Clay Marbled Hair Barrette
Step-by-Step Guide
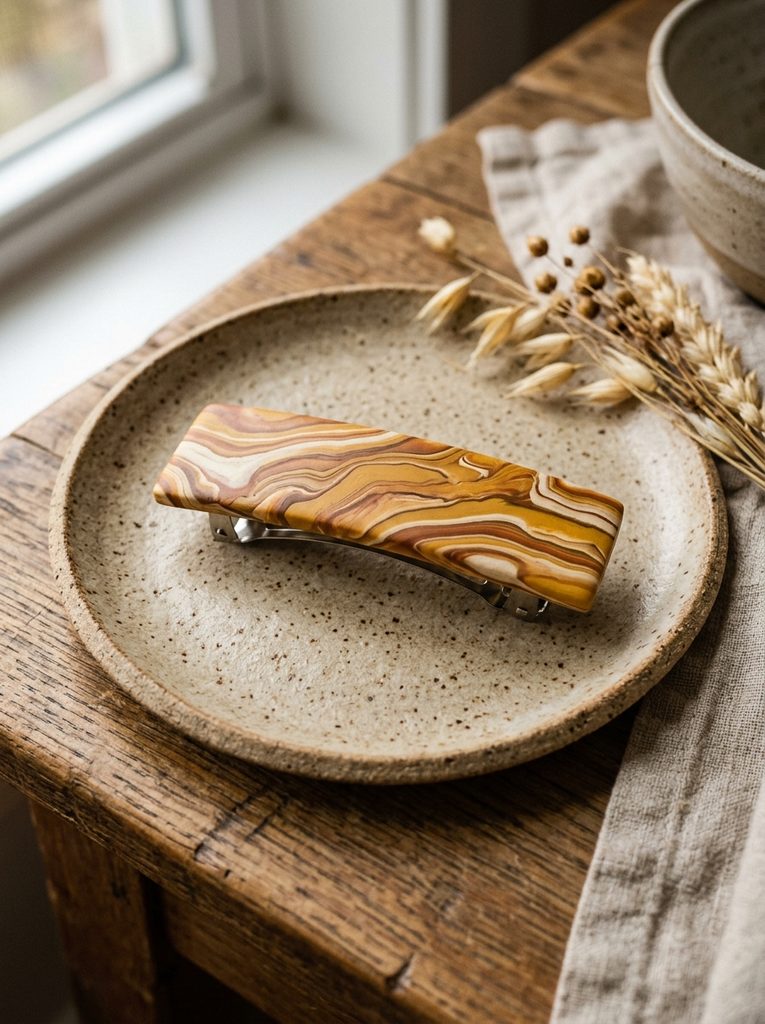
The natural ochre marbled hair barrette showcases historical geological pigments, incorporating raw earth clays and mined ochres into contemporary hair accessories. The visual design highlights flowing, geological river-bed striations, contrasting rich yellow ochre, raw sienna, and burnt umber ribbons against an ivory clay background. Rather than relying on commercial, pre-packaged chemical pigment blocks, sourcing natural earth powders introduces earthy colors that reflect regional geology and ancient artistic methods. The flat, elongated barrette silhouette provides a generous surface that showcases the organic marbled grain, securing long hair neatly while functioning as a functional piece of wearable art. The satin-buffed, unvarnished finish celebrates the natural powdery texture of raw earth minerals, pairing seamlessly with wooden hair accessories, tortoiseshell combs, and natural fiber fashion.
Source pure raw earth pigment powders, such as natural yellow iron ochre and red sienna, verifying they are non-toxic, unadulterated mineral powders. Separate conditioned neutral clay into three portions, kneading a half-teaspoon of dry earth pigment into each portion until you produce distinctly tinted color blocks. Roll each pigmented portion into a rope measuring six inches long, twist the three colored cords together tightly, and fold the twisted mass over itself twice to build internal strata. Compress the twisted block into a solid cylinder, slicing thin, longitudinal sheets with a flexible tissue blade to reveal the natural, marbled geological patterns inside. Press the patterned sheet onto a blank backing slab, cutting a clean rectangular barrette shape measuring four inches long by one inch wide. Cure the curved barrette over an oven-safe glass bottle, sanding the edges after cooling and securing a recycled stainless steel clip to the back using two-part epoxy.
9. Layered Raw Terracotta Clay Geometric Brooch
Execution Process
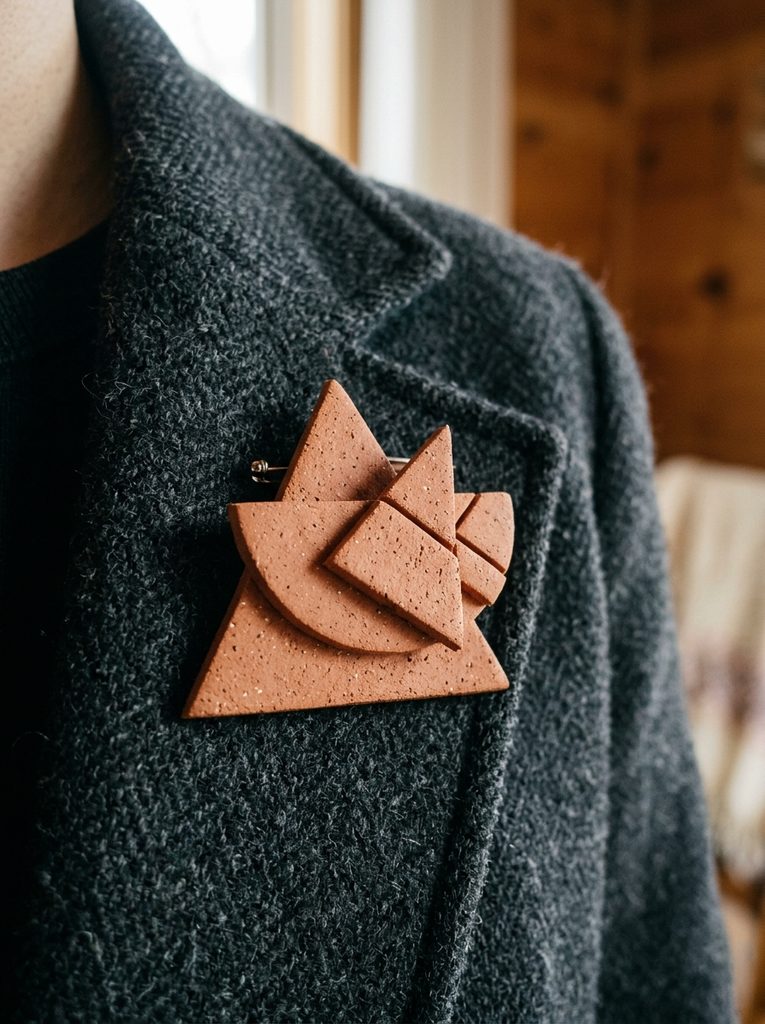
The layered raw terracotta brooch pairs traditional brick-making materials with clean mid-century geometric design, yielding an earthy, tactile focal piece for outwear lapels. The design incorporates raw terracotta-colored polymer clay blended with crushed terracotta pottery grog, creating a textured, unglazed ceramic appearance. The brooch consists of stepped geometric shapes—such as interlocking triangles, offset rectangles, and clean semi-circles—layered atop one another to create architectural shadows and structural dimension. The matte, porous visual texture mimics ancient Mediterranean architectural ruins, providing visual weight that grounds heavy wool overcoats, tweed jackets, and chunky knit scarves. The absence of surface paints or chemical coatings allows the warm, fired-earth tone to shine naturally, offering an approachable, beginner friendly project with lasting appeal. This low-maintenance brooch bridges fine jewelry making with traditional ceramic arts, keeping accessories functional, robust, and timeless.
Obtain damaged, unglazed terracotta flowerpots or clay roofing tiles, crushing the broken shards inside a heavy canvas bag with a mallet into fine, sand-sized grog granules. Knead one tablespoon of the crushed terracotta grog into two ounces of conditioned terracotta-toned polymer clay until the granules are evenly distributed throughout the body. Roll the clay slab to a sturdy three-millimeter thickness, using a precision metal ruler and an acute-angle scalpel to cut precise geometric segments, including squares, arcs, and support bars. Stack the geometric components in an overlapping stepped arrangement, brushing minimal amounts of liquid clay between contact zones to reinforce the mechanical bond. Pierce two small anchoring recesses on the backside to receive a locking safety brooch bar, pressing the metal findings into the clay with a light coat of bonding adhesive. Bake the assembly flat on an unglazed ceramic tile, allowing the brooch to cool naturally before applying a fine coat of protective botanical wax.
10. Upcycled Metal Wire and Clay Bead Collar
Step-by-Step Guide
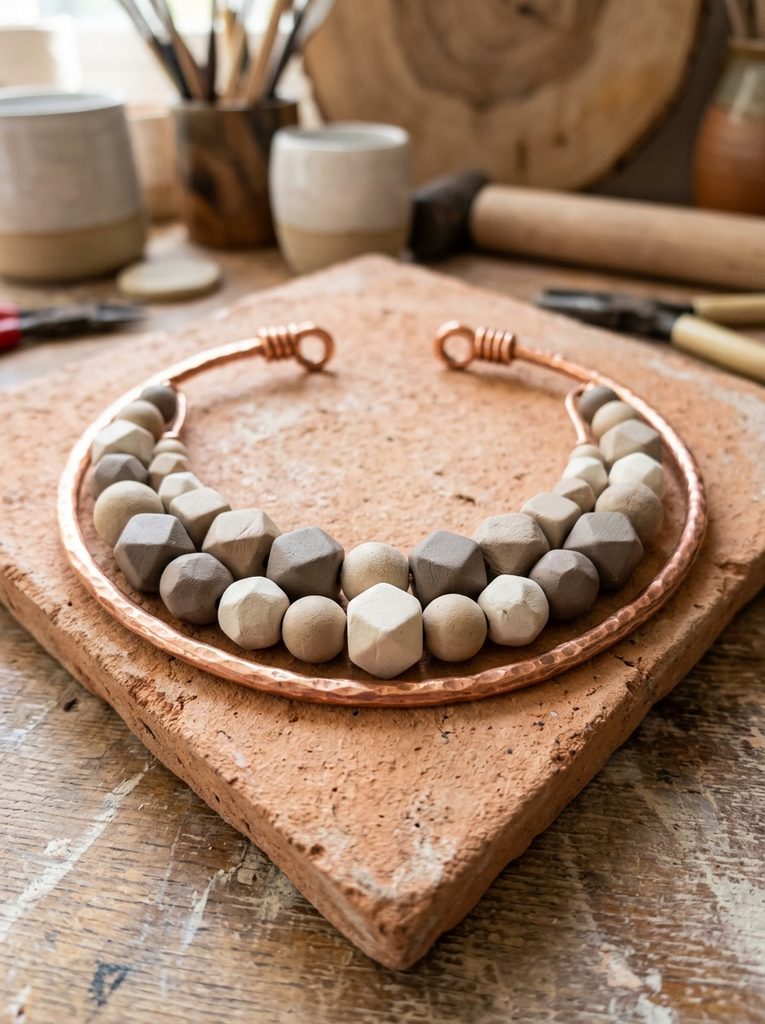
The upcycled wire and clay bead collar pairs reclaimed household electrical copper wire with geometric, hand-shaped polymer clay beads to build an open, sculptural neckpiece. The visual concept balances the warmth of recycled metal with the matte, chalky texture of raw clay beads shaped into spheres, cylinders, and faceted polyhedrons. The open torque design rests lightly on the collarbones, providing modern architectural lines that adapt comfortably to shifting necklines and seasonal wear. By stripping discarded copper household wiring from domestic renovations, crafters give discarded metals new life while bypassing the energy-intensive processing required for commercial jewelry casting. The contrast between bright polished copper and muted clay beads produces a sophisticated Scandinavian aesthetic that complements minimalist style wardrobe foundations. The durable construction resists everyday knocks, making it a reliable, statement-making accessory for work and casual social gatherings.
Salvage clean, heavy-gauge solid copper grounding wire from home electrical renovations, stripping away the exterior rubber insulation using an adjustable wire-stripping tool. Cut an eighteen-inch length of the exposed copper wire, smoothing the surface with fine steel wool before shaping it into a smooth, balanced circular neck collar around a round template. Form fifteen contemporary clay beads from scrap neutral clay blocks, shaping a combination of simple rounds, cubes, and hand-faceted geometric forms using a sharp craft blade. Pierce uniform holes through each bead using an eighteen-gauge needle tool, checking that each hole diameter allows the beads to slide smoothly along the copper wire collar. Bake the beads supported on a wire rack to prevent flat spots, allowing them to cool thoroughly before buffing the surfaces with a denim cloth. Slide the finished beads onto the shaped copper collar, turning the wire ends into small, comfortable terminal loops using round-nose pliers to complete the necklace.
Common Beginner Mistakes and How to Avoid Them
A frequent pitfall when creating eco-friendly polymer clay jewelry is under-curing items to protect natural inclusions like botanicals, seeds, or ground spices, resulting in brittle, fragile pieces that snap easily under light pressure. Organic additions require cautious baking, but dropping the oven temperature too low prevents polymer chains from fusing properly into durable plastic. Prevent structural failure by using a calibrated oven thermometer and baking pieces for the full time recommended by the manufacturer, shielding sensitive botanical surfaces with a loose foil tent to prevent surface scorching. Another common mistake is applying toxic synthetic gloss varnishes or liquid epoxy resins over natural clay surfaces, which undoes the sustainable, non-toxic focus of the piece and can turn sticky over time. Instead, seal clay accessories with natural carnauba wax, pure beeswax, or thorough wet-sanding up to two-thousand grit, which yields a smooth satin finish without synthetic chemicals. Finally, beginners often overlook mechanical jewelry connections, relying on weak surface glues that fail under wear; always embed metallic findings directly into unbaked clay or secure them through mechanical joins and two-part structural epoxies designed specifically for non-porous materials.
Practical Tips for Better Results and Studio Efficiency
Achieving clean, professional finishes with sustainable jewelry requires intentional conditioning, consistent thickness control, and disciplined post-cure surface treatments. Always use wooden depth guides or modern roller rings when rolling slabs; maintaining an even three-millimeter thickness ensures uniform heat distribution and prevents warping during the baking cycle. When combining natural organic powders like coffee grounds, spices, or dry sand into clay, add them gradually in small pinches, as over-saturating the mixture with dry particles can compromise flexibility and cause the clay to crumble during cutting. Keep an airtight glass jar filled with water and wet-sanding paper beside your curing oven; wet-sanding cured pieces underwater captures microscopic sanding dust, keeping studio air clean while yielding smooth, professional edges. For pieces requiring metallic connections, prioritize recycled surgical steel or solid reclaimed brass jump rings, closing joints with parallel-jaw jewelry pliers to ensure clean, flush joins that protect clothing threads from snagging. Adopting these small, refined habits elevates your handmade jewelry collections into polished, market-ready artisan pieces that endure everyday wear.
Styling, Presentation, and Eco-Friendly Packaging
Presenting and styling sustainable clay jewelry requires a cohesive visual identity that reflects the environmental focus of the pieces themselves. Group finished jewelry pieces on natural display surfaces—such as reclaimed driftwoods, unfinished travertine stone coasters, or coarse linen fabric swatches—to reinforce the organic, earth-conscious theme. When accessorizing daily outfits, pair textured, sand-infused or botanical clay pieces with breathable, natural textiles like washed linen shirts, unbleached cotton knits, and organic hemp coats, allowing the handmade jewelry to provide warm tactile contrast. For retail presentation and gift packaging, eliminate plastic blister packs and synthetic bubble envelopes entirely; instead, source unbleached recycled chipboard presentation cards, unprinted cotton drawstring pouches, and post-consumer kraft shipping mailers. Secure jewelry pieces to display cards using simple loops of compostable jute cord rather than plastic fasteners, printing care instructions directly onto cards using non-toxic vegetable inks. This cohesive, sustainable presentation reassures conscious consumers that their purchase supports ethical, low-waste production from raw material to doorstep delivery.
Budget Considerations and Production Timeline Planning
Building a sustainable clay jewelry collection can be exceptionally cost-effective when you plan material usage carefully and adopt efficient zero-waste studio routines. Rather than buying specialized pre-mixed seasonal colors, purchase large, economical blocks of primary neutral, white, and translucent clay, mixing your own custom earthy tones using raw natural mineral pigments, collected spices, and sorted scraps. A single standard clay block yields dozens of lightweight earring and pendant components, keeping your per-unit production cost remarkably low while maximizing your material yield. To maintain consistent creative momentum, organize your studio schedule into dedicated batch phases: reserve the first work session for sorting scraps, preparing botanical additions, and rolling foundational slabs. Dedicate the second session to cutting clean forms, piercing suspension holes, and batch curing, reserving the final session for wet-sanding, waxing, and assembling metallic findings. Working in organized production stages minimizes tool cleanup, saves oven electricity through concentrated batch baking, and ensures consistent quality across your entire jewelry collection.
Creative Expansion and Advanced Sustainable Crafting
Once you have mastered foundational sustainable clay techniques, you can expand your design language into advanced multimedia combinations and functional home decor accents. Experiment with integrating larger reclaimed elements, such as salvaged beach glass, broken ceramic shards, or recycled architectural copper wire, building striking statement brooches and hair pins that celebrate upcycled materials. Explore ancient natural dyeing methods by boiling undyed cured polymer pieces with natural botanical baths like onion skins, avocado pits, or indigo leaves, yielding soft, weathered surface tones without commercial chemical dyes. You can also scale up these small-scale jewelry methods to sculpt matching sustainable home decor items, including minimalist style cabinet knobs, curtain pull weights, and hanging plant ornaments that harmonize with your wearable designs. Sharing your sustainable production processes, scrap-recycling workflows, and material discoveries on digital visual boards helps inspire a growing global community of mindful makers. Embracing continuous material innovation allows your sustainable jewelry practice to flourish, proving that sophisticated contemporary design and environmental responsibility can coexist beautifully.
The revival of late-nineties and early-two-thousands aesthetics has reshaped contemporary accessories, bringing bold nostalgia, playful motifs, and expressive color palettes to everyday fashion. Polymer clay provides an accessible, durable modeling medium for sculpting these vibrant retro accents at home without requiring industrial manufacturing equipment. This detailed tutorial outlines ten distinct Y2K-inspired polymer clay jewelry ideas, spanning tactile checkered rings, dimensional butterfly hair accessories, blooming flower studs, and glossy cyber-futuristic pendants. Readers will learn the exact forming techniques, conditioning processes, curing protocols, and assembly methods necessary to produce professional, shatter-resistant wearable art. Designing your own handmade jewelry eliminates the sizing limitations and low-grade plastics typical of fast-fashion accessories, granting total control over color formulation and structural durability. Furthermore, mastering these three-dimensional clay crafting skills builds foundational knowledge that extends naturally into home decor accents, vanity organization trays, and seasonal gift construction. By exploring systematic techniques such as cane building, custom marbling, liquid glaze encapsulation, and wet sanding, makers of all skill levels can easily replicate vintage millennial styles. The subsequent sections deliver comprehensive preparation workflows, detailed supply checklists, two-paragraph instructional breakdowns for ten complete concepts, and actionable project planning advice.
Why This Idea Is Trending or Useful
Nostalgic millennial jewelry continues to dominate digital inspiration boards and modern Pinterest ideas because it blends joyful visual irony with tactile, handmade creativity. Contemporary fashion enthusiasts frequently seek out distinctive statement pieces that depart from sterile minimalist style rules, favoring high-saturation hues, chunky proportions, and whimsical pop-culture symbols. From a design perspective, polymer clay translates Y2K design tropes—such as cyber-hearts, smiley faces, and acid-bright checkerboards—into lightweight, durable jewelry that remains comfortable for extended wear. As a rewarding DIY creative project, fashioning clay accessories requires minimal initial investment, functioning seamlessly on a standard craft desk without demanding extensive studio infrastructure. Because fundamental clay sculpting relies on basic geometric forming, simple slab rolling, and straightforward cutter shapes, this medium serves as an exceptionally beginner friendly entry point into three-dimensional art. Crafting bespoke accessories also delivers practical budget ideas, as a handful of standard clay blocks can yield dozens of high-value, coordinated accessories at minimal unit cost. Finally, the finished cured creations integrate well into retro-themed home decor, serving as vibrant vanity display items or hanging wall accents when not actively worn.
Materials and Preparation
Thorough preparation and selective material procurement ensure that handcrafted polymer clay jewelry withstands routine daily wear without cracking or bending. Essential supplies include premium oven-bake polymer clay in neon, pastel, and translucent shades, alongside metallic leaf foil, solvent-resistant glitters, and liquid polymer clay. High-durability jewelry findings are required for assembly, including hypoallergenic surgical steel earring posts, reinforced jump rings, industrial two-part epoxy, and flexible ball chains. Key sculpting tools feature an acrylic roller, a rigid carbon steel tissue blade, varied micro-geometric cutters, silicone-tipped shaping pens, and an aluminum or wooden ring mandrel. Preparation begins by establishing an immaculate, lint-free workspace on a polished ceramic floor tile or glass cutting mat, wiping every surface down with isopropyl alcohol to prevent fiber contamination. Condition the clay thoroughly by hand-kneading or passing it repeatedly through a dedicated manual clay conditioning machine until it bends without cracking along its folded seams. Calibrate your household craft oven using a freestanding, independent oven thermometer, verifying precise thermal control before initiating any baking cycles to prevent scorching delicate pastel pigments.
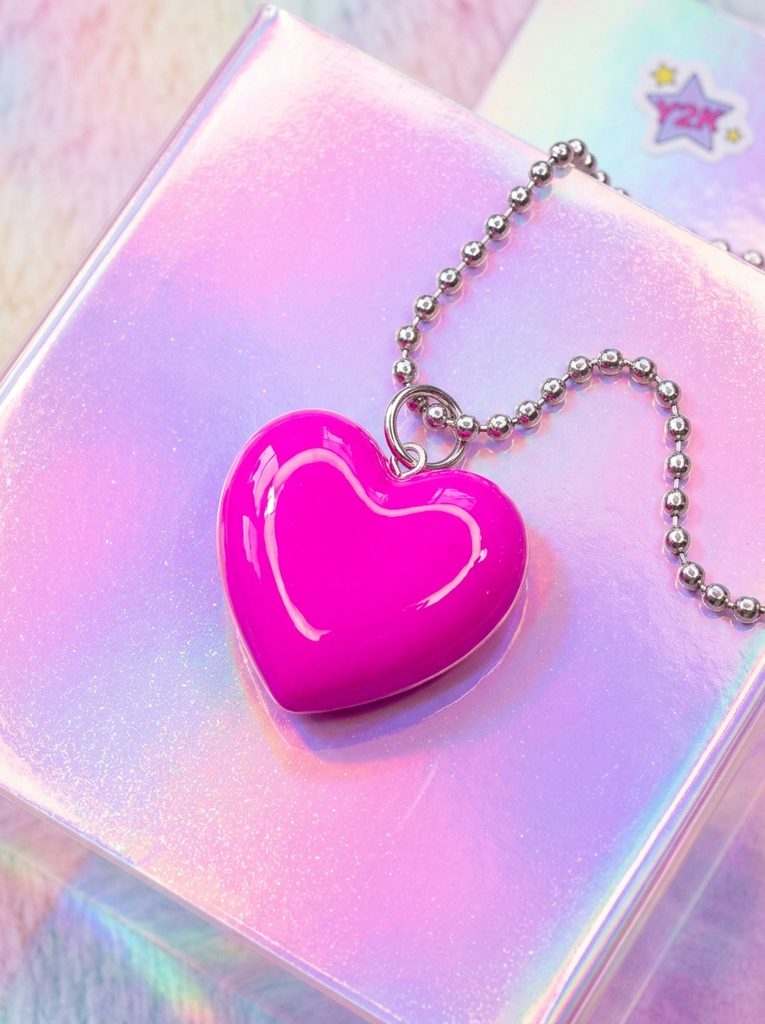
1. Chunky Bubble Heart Pendant with Liquid Glaze
Step-by-Step Guide
The puffy bubble heart is an unmistakable emblem of early-two-thousands accessory design, celebrated for its exaggerated dimensions, rounded curves, and playful aesthetic. This design pairs an inflated, three-dimensional heart profile with a high-gloss, wet-look finish reminiscent of clear vinyl accessories and glossy stationery. Rendered in a bright hot-pink or neon-coral polymer base, the pendant acts as a confident focal point when suspended from an open silver ball chain or colored cord. The soft, pillowy contours catch natural daylight, producing dynamic shadow lines and highlights that emphasize the piece’s sculptural volume. By reinforcing the internal core and rounding the exterior margins, the pendant provides substantial visual weight while remaining exceptionally comfortable and lightweight against the collarbone. This accessory functions as an energetic centerpiece for retro casualwear, graphic tees, and layered streetwear ensembles.
To create this bubble heart pendant, condition two ounces of bright magenta polymer clay until fully pliable and smooth. Roll the conditioned clay into a uniform sphere, then gently pinch the lower half between your thumb and index finger to form a plump, symmetrical teardrop cone. Rest the cone flat on your ceramic tile and use the dull back edge of a tissue blade to press an indentation vertically into the wide top end, dividing the mass into two rounded heart lobes. Smooth and round the lobes with your fingertips and a silicone shaper, ensuring there are no sharp edges or flat indentations along the perimeter. Insert a heavy-gauge stainless steel eye pin straight down through the center crevice between the lobes, securing it with a drop of liquid clay. Bake the heart on a ceramic tile for forty-five minutes at the manufacturer’s recommended temperature, let it cool completely, and apply a thick, self-leveling coat of high-gloss UV resin over the entire surface to achieve a glossy, glass-like finish.
2. Groovy Checkered Dome Ring in Acid Green and White
Execution Process
High-contrast checkerboard patterns defined the alternative skate, pop-punk, and digital aesthetics of the late nineties and early two-thousands. This project translates that iconic graphic motif into an oversized, domed band ring featuring contrasting squares of bright lime green and stark white polymer clay. The ring utilizes an ergonomic, curved exterior that tapers gently toward the base of the finger, ensuring comfortable wear while presenting an eye-catching geometric surface. Combining crisp geometric squares with a continuous curved band creates an appealing tension between flat graphics and three-dimensional form. The vibrant color pairing introduces an electric pop of color that stands out against casual denim and athletic streetwear. The substantial clay thickness delivers structural strength, preventing the ring from warping or cracking under everyday hand movements.
Begin by rolling out equal sheets of conditioned lime green and opaque white clay to a uniform thickness of three millimeters. Cut each sheet into several straight strips measuring precisely three millimeters in width using a metal ruler and a sharp tissue blade. Lay the contrasting strips side by side in an alternating pattern on your work tile, gently pressing their edges together to form a striped sheet. Cut across the striped sheet perpendicularly at three-millimeter intervals, realigning every second row to produce a seamless checkered grid. Roll an acrylic pin lightly across the checkered slab under parchment paper to seal the joins, then drape the slab around a metal ring mandrel sized to your finger. Trim the ends cleanly, weld the bottom seam securely with a flat silicone tool, and shape the outer edges into a smooth dome. Bake the ring directly on the mandrel for thirty-five minutes, cooling fully before wet-sanding the surface with one-thousand-grit abrasive paper to reveal sharp, clean square boundaries.
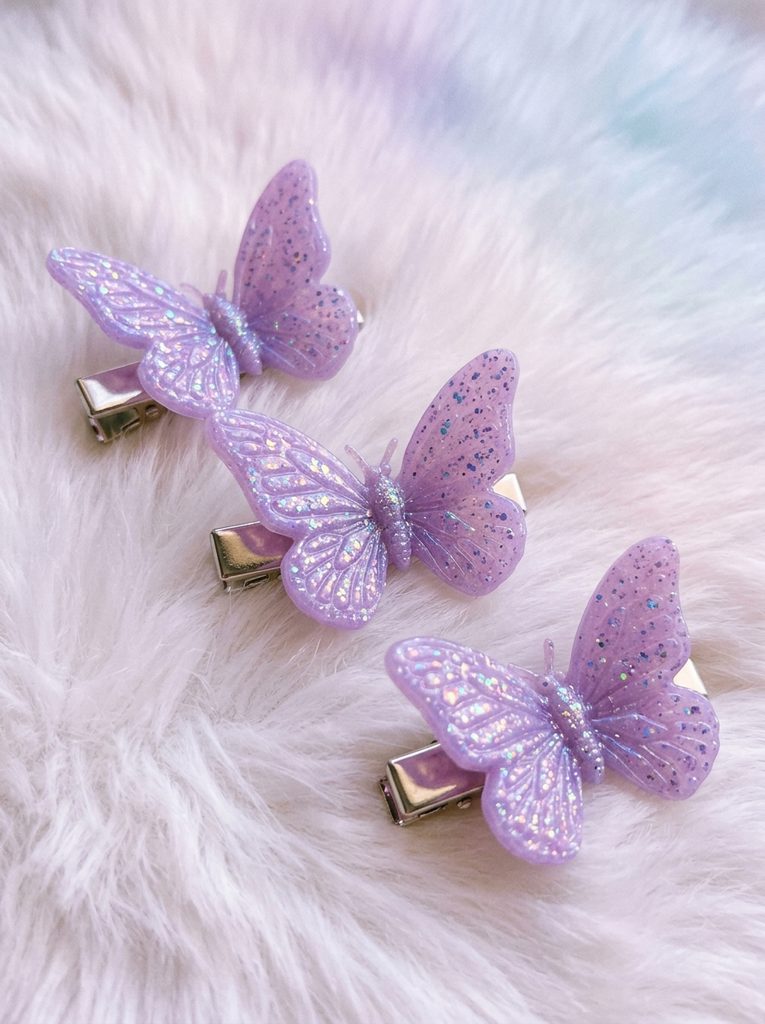
Whimsical butterfly clips were an absolute staple of turn-of-the-century hairstyle trends, adding playful pops of color, kinetic charm, and lighthearted character to layered cuts. This design features a trio of sculpted miniature butterflies crafted from translucent clay infused with fine holographic glitter and pastel mica powders. The wings are sculpted with delicate scalloped borders and raised structural veins, positioned at an upward angle to mimic an insect in mid-flight. When cured, translucent polymer clay allows light to pass through the thin wing membranes, creating an iridescent, ethereal glow that glistens under direct sunlight. Mounting these delicate paper-thin clay butterflies onto sturdy silver metal alligator hair clips creates an authentic, nostalgic styling accessory that secures braids, updos, and face-framing strands.
To construct the butterflies, blend a block of translucent polymer clay with a pinch of soft lilac mica powder and fine iridescent glitter flakes. Roll the clay into an even slab measuring two millimeters thick using an acrylic roller and depth guide rings. Use a miniature butterfly cutter or a sharp craft scalpel to cut out three symmetrical butterfly silhouettes, softening any rough cut margins with a damp fingertip. Place each cut butterfly into a folded strip of cardstock or a crumpled aluminum foil trough, propping the wings upward at a forty-five-degree angle while keeping the central body flat. Bake the butterflies within the foil supports for thirty minutes to set the dynamic, uplifted wing posture permanently. Once cooled, roughen the back of the flat clay bodies and the upper surface of three small metal alligator clips with coarse sandpaper, bonding them together using two-part industrial epoxy adhesive for maximum daily durability.
4. Retro Daisies and Squiggle Drop Earrings
Step-by-Step Guide
The simplified daisy motif, paired with dynamic serpentine squiggles, captures the sunny, retro-futuristic optimism that characterized millennial teen decor and fashion. This earring design features a two-part drop construction: an asymmetrical, wavy clay squiggle connector that suspends a classic five-petal cartoon daisy bloom. Utilizing an electric palette of buttercup yellow, crisp white, and saturated tangerine produces a playful visual balance that frames the jawline with energetic movement. The flat, graphic execution keeps the earrings exceptionally lightweight, preventing uncomfortable earlobe pulling during extended daily wear. The gentle swaying motion between the suspended daisy and the top wavy connector introduces kinetic charm to the accessory. This piece serves as an ideal statement accent for summer dresses, oversized cardigans, and colorful layered vintage outfits.
Begin by rolling out an opaque white clay slab to a two-millimeter thickness, using a small flower plunger cutter to stamp out two uniform five-petal daisy blossoms. Roll two small pea-sized balls of bright yellow clay, pressing them flat into the center of each white flower to create rounded, dimensional pollen centers. Next, roll a coil of tangerine orange clay to a diameter of four millimeters, curving it into a serpentine, S-shaped squiggle measuring one and a half inches in length. Pierce a small hole through the top and bottom of each orange squiggle, as well as through the top petal of each daisy, using a clean sewing needle or jewelry drill bit before curing. Bake all elements flat on a parchment-lined ceramic tile for thirty-five minutes at the temperature indicated on the clay packaging. After the pieces cool, connect the daisies to the bottom of the squiggles using six-millimeter stainless steel jump rings, adhering surgical steel earring posts to the top back of the squiggles with two-part epoxy.
5. Cyber-Futuristic Chrome Liquid Drop Pendant
Execution Process
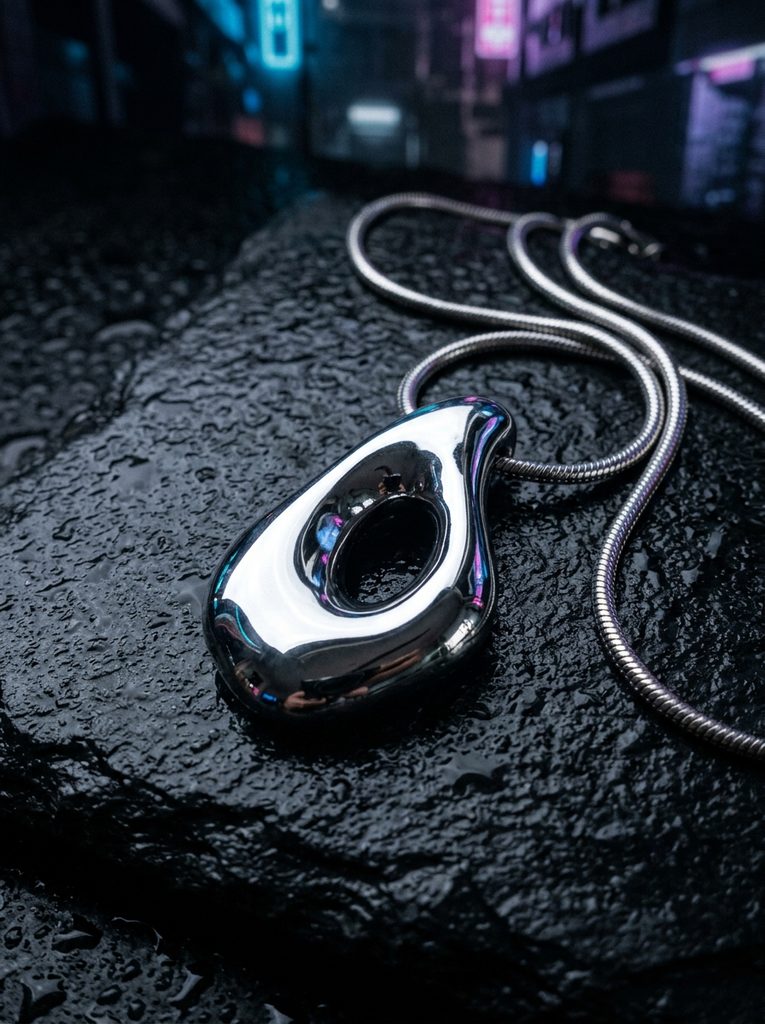
Drawing heavy inspiration from the Y2K era’s obsession with cyber-culture, digital interfaces, and liquid metal aesthetics, this pendant showcases an abstract, molten droplet silhouette. The design abandons traditional symmetry in favor of an organic, fluid puddle form featuring an off-center negative cutout. The clay base is coated with a mirror-shine chrome powder or silver leaf, producing a reflective surface that mimics molten mercury or polished liquid chrome. This bold, minimalist style statement carries an industrial edge that complements late-nineties cyberpunk, technical nylon outerwear, and dark denim. The smooth, flowing borders ensure the pendant feels comfortable against the skin, while the open central void provides visual lightness and modern balance within a chunky silhouette.
Start by conditioning a portion of dense black polymer clay, as a dark base provides superior depth for reflective metallic surface powders. Hand-sculpt the clay on a glass work mat into an asymmetrical, flowing droplet measuring two inches in length and five millimeters in thickness, keeping the perimeter edges rounded and soft. Use a small oval metal cutter to punch an irregular negative hole through the upper third of the droplet, smoothing the inner rim with a silicone shaping pen. Lightly buff silver chrome mica pigment across the entire surface of the raw black clay using a soft foam applicator brush until an opaque, mirror-like metallic sheen is achieved. Cure the pendant on an unglazed ceramic tile for forty minutes, allowing it to cool slowly inside the oven to prevent thermal shock. Finish by sealing the chrome surface with a protective coat of water-based gloss varnish, suspending the completed pendant from a heavy stainless steel snake chain.
6. Chunky Smiley Face Signet Ring
How to Create
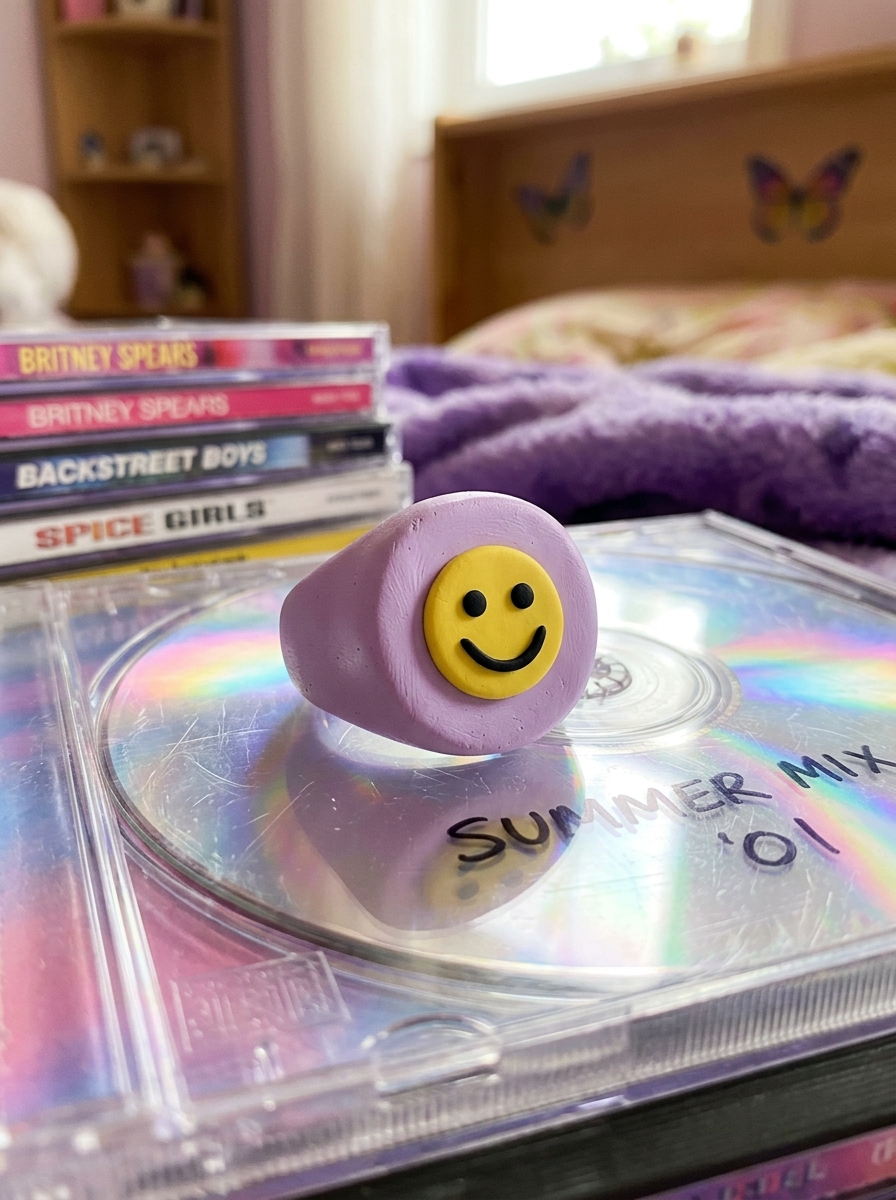
The classic yellow acid-house smiley face represents one of the most enduring symbols of millennial youth culture, radiating playful irony and nostalgic charm. This jewelry piece incorporates the cheerful motif into an oversized signet ring, featuring a thick, flat circular face supported by tapered, sculptural shoulders. The base of the ring is crafted from an unexpected pastel lavender or sky blue clay, creating a modern color contrast that frames the bright yellow smiley face set into the top surface. The bold, chunky mass of the signet ring provides a substantial hand presence that stands out when styled alone or stacked with other statement rings. The flat face keeps the artwork protected from friction, while the thick band walls ensure structural integrity against everyday wear and tear.
To fabricate this signet ring, condition a two-ounce block of pastel lavender polymer clay, rolling it into a thick rod fifteen millimeters in diameter. Cut a segment twenty millimeters long, flattening the top end against a glass tile to establish a crisp circular face while draping the lower ends around an appropriately sized metal ring mandrel. Weld the bottom ends together on the underside of the mandrel using a silicone shaper, smoothing the seam thoroughly. For the smiley motif, cut a very thin disc of bright yellow clay and apply it directly onto the flat lavender ring face using a tiny smear of liquid clay. Indent two vertical oval eyes and a curved smile line into the yellow disc, filling the grooves with black liquid polymer clay applied using a fine needle. Bake the entire assembly supported on the mandrel for forty minutes, letting it cool before wet-sanding the edges to produce a smooth, refined matte finish.
7. Pastel Pixel Heart Dangle Choker Elements
Step-by-Step Guide
The pixel heart motif pays homage to early digital virtual pets, sixteen-bit handheld gaming consoles, and low-resolution internet graphics from the dawn of the new millennium. This project constructs miniature pixelated hearts using a mosaic cane technique, assembling tiny square rods of clay into a crisp 8-bit silhouette. Rendered in soft pastel pink, mint green, and pale butter yellow, these stepped geometric charms introduce digital nostalgia to modern everyday outfits. The charms are suspended along a short black tattoo-style stretch choker or a velvet ribbon, sitting close to the throat to frame the neck with retro flair. The precise, stepped outer contours capture the charm of vintage digital sprites, turning low-resolution computer graphics into tangible, three-dimensional wearable art.
Begin by rolling out equal slabs of pastel pink and translucent white polymer clay, cutting them into long, uniform square rods measuring two millimeters on each side. Assemble the square rods in a grid pattern to build an 8-bit heart cross-section: use pink rods for the interior heart pixels and translucent rods to fill the outer negative spaces. Gently compress the assembled cane block from all four sides, reducing the overall thickness while preserving the internal square alignment. Chill the cane in the refrigerator for twenty minutes to firm the clay, then use a sharp, rigid tissue blade to slice off clean two-millimeter-thick pixel heart tiles. Pierce a horizontal hole through the top pixels of each heart using a fine needle. Bake the flat tiles on parchment paper for thirty minutes, cool completely, and string five finished pixel hearts along a velvet ribbon or cord, spacing them with silver crimp beads for a balanced neckline presentation.
8. Swirled Marble Cyber-Drop Hoop Earrings
Execution Process
Dynamic marble patterns blending vibrant, clashing colors were a staple of Y2K stationery, inflatable furniture, and casual accessories. This earring design showcases thick, crescent-shaped hoop charms characterized by energetic swirls of electric blue, bright orange, and opaque white clay. The colors are mixed just enough to produce bold, ribbon-like striations across the surface without blending into a muddy tone. Suspended from small silver huggie hoops, these chunky clay crescents swing freely, catching light across their curved contours and dynamic marbling. The seamless, fluid transitions between the bright colors provide an artistic, one-of-a-kind appearance for every single piece. This project is ideal for using leftover scrap clay, transforming small odds and ends into an elevated, high-fashion retro accessory.
To make the marbled hoop charms, condition equal portions of electric blue, vivid orange, and white polymer clay. Roll each color into a long rope roughly six millimeters thick, aligning the three ropes parallel to each other on your work surface. Twist the ropes tightly together into a single striped spiral, then fold the twisted coil in half and roll it out into a smooth rod again. Repeat the twisting and folding process three times until fine, organic marble ribbons run through the clay body. Cut the marbled rod into two equal segments, bending each into an open, tapered crescent hoop shape with rounded terminal ends. Pierce a small vertical hole through the top apex of each crescent using a pin. Bake the hoops on a bead-baking rack or curved ceramic surface for thirty-five minutes. Once cooled, wet-sand the hoops with fine-grit paper to remove surface imperfections and attach them to silver huggie earring findings.
9. Candy-Colored Inflatable Letter Initial Necklace
How to Create
Exaggerated bubble lettering embodies the playful, uninhibited visual culture of late-nineties pop music videos and teen magazines. This concept features an oversized, rounded initial letter sculpted to resemble an inflated balloon or soft candy confection. Rendered in a semi-translucent jelly hue—such as translucent grape purple or neon watermelon—the letter features soft, seamless curves that catch light like blown glass. The inflated aesthetic turns personal typography into an artistic, sculptural statement that rests comfortably on the chest. Suspended from an iridescent beaded cord or a bright plastic ball chain, this personalized accessory delivers vibrant retro charm while maintaining a clean, modern design execution. The smooth, rounded surfaces ensure there are no uncomfortable corners or delicate points that could snap during daily wear.
Begin by conditioning two ounces of translucent polymer clay mixed with a small amount of bright purple pigment paste until uniform. Roll the clay on your tile into a thick, even coil measuring eight millimeters in diameter, using your fingers to smooth away any seams or tool marks. Bend and curve the thick coil to form your chosen alphabet initial, gently blending any intersecting joints with a silicone shaper to preserve a seamless, inflated bubble appearance. Soften the terminal ends of the letter strokes into rounded domes, lightly pressing an acrylic block against the piece to keep the back surface flat. Insert a horizontal stainless steel wire tunnel through the upper back of the letter using a needle tool, creating an invisible channel for necklace stringing. Bake the finished letter flat on a tile for forty minutes, allowing it to cool slowly before coating it with two layers of water-based gloss glaze to replicate a shiny, inflatable texture.
10. Textured Yin-Yang Cord Pendant
Step-by-Step Guide
The ancient yin-yang symbol experienced an explosion of mainstream popularity during the late nineties, becoming an iconic visual motif across casual streetwear, jewelry, and room decor. This project reimagines the classic balance emblem by replacing traditional black and white with an unexpected millennial color pairing, such as pastel lilac and buttercup yellow. The pendant features a flat, circular disc displaying the flowing S-curve division and contrasting inlaid dots that define the symbol. The flat, graphic disc is suspended from a simple black satin cord, offering an authentic throwback style that pairs naturally with bucket hats, baby tees, and vintage denim. The clean planar surface showcases meticulous clay inlay work, celebrating technical precision within a relaxed, nostalgic aesthetic that remains endlessly wearable.
To construct the yin-yang pendant, roll out conditioned sheets of pastel lilac and soft butter yellow clay to an identical thickness of three millimeters. Use a two-inch circular cutter to cut a disc from each color, laying the discs flat on your glass mat. Use a curved paper template or an S-shaped cutter to slice through the vertical center of both circles, creating two interlocking comma-shaped halves. Swap the contrasting halves, pressing one lilac half and one yellow half together on your tile to form a two-tone circle. Roll lightly over the join with an acrylic roller to fuse the center seam securely. Use a small metal straw or micro-cutter to punch a small hole in each half, filling the holes with contrasting clay circles. Pierce a hanging hole through the top perimeter of the disc. Bake the pendant on a ceramic tile for thirty-five minutes, cool completely, and string the finished piece onto an adjustable knotted black satin cord.
Common Beginner Mistakes and How to Avoid Them
The most critical technical error encountered by novice clay jewelry makers is under-baking finished pieces out of fear of scorching bright pigments. Under-cured polymer clay remains brittle, chalky, and prone to snapping when subjected to the everyday kinetic stress of wearable jewelry. Prevent this by using an independent oven thermometer to verify temperature accuracy, curing high-strength clays for the maximum duration recommended by the manufacturer. Another frequent mistake is neglecting thorough clay conditioning, which leaves internal micro-fractures and air pockets that weaken the finished accessory. Always knead raw clay until it is soft, pliable, and passes the fold test without cracking along its seams. Beginners also often contaminate bright pastel and neon colors with airborne dust, lint, and dark fibers. Keep your work tile clean by wiping tools with isopropyl alcohol, washing hands frequently, and using a scrap piece of white clay to roll across surfaces and pick up stray dust before handling project materials. Finally, avoid using fast-drying superglues to attach metal earring posts directly to baked clay, as standard adhesives break down quickly under skin oils; use industrial two-part epoxy or embed findings behind an additional layer of baked clay.
Practical Tips for Better Results
Achieving professional, boutique-quality results relies on meticulous surface finishing and disciplined curing practices. Always utilize a high-density ceramic floor tile or thick glass cutting mat as both your primary sculpting surface and your baking tray; this eliminates the need to peel raw, delicate clay shapes off your desk, preventing unwanted fingerprint dents and warped outlines. To minimize post-bake sanding, smooth away tool marks and finger impressions on raw clay using a soft paintbrush dipped lightly in isopropyl alcohol before placing items in the oven. Invest in high-grade wet-or-dry sandpaper, and always sand your cured pieces submerged in a shallow bowl of warm water containing a drop of dish soap to suppress airborne dust and prevent the abrasive grit from clogging. Progress through four-hundred, six-hundred, eight-hundred, and one-thousand grits to achieve a satin-smooth finish. If an ultra-glossy, plastic-like surface is desired to capture that authentic millennial look, apply two thin coats of water-based polyurethane varnish or UV resin, curing thoroughly to achieve an enduring, crystal-clear protective shell.
Styling, Presentation, or Organization Ideas
Integrating Y2K-inspired polymer clay jewelry into modern wardrobes requires thoughtful styling balance, pairing bold retro statements with clean, contemporary foundational garments. Pair oversized bubble heart pendants and chunky checkered rings with understated modern staples like crisp oversized poplin shirts, neutral ribbed knitwear, or structured denim jackets to let the playful colors stand out. For an authentic throwback aesthetic, layer multiple clay accessories together, combining a pastel daisy choker with stacked checkered dome rings and translucent butterfly hair clips. When presenting these pieces as gifts or retail inventory, mount them on backing cards featuring holographic foil accents, retro pixel typography, or clean metallic borders that reinforce the turn-of-the-century design story. For home storage and vanity organization, display your clay jewelry inside transparent acrylic storage drawers, colorful melamine trays, or upon sculptural ceramic jewelry dishes. Storing your jewelry flat away from excessive heat and direct sunlight preserves the vibrant clay pigments and prevents UV resin finishes from premature yellowing over years of display.
Budget or Time Planning
Curating a comprehensive collection of Y2K-inspired clay accessories requires minimal capital outlay and structured time management to maximize creative efficiency. Save on startup expenses by purchasing multi-packs of primary and neon clays rather than dozens of pre-mixed specialty shades, hand-mixing custom pastel and retro tones by blending small amounts of saturated pigment into neutral white clay. Organize your production schedule into dedicated, modular crafting blocks: allocate the first session to conditioning clay, blending custom color palettes, and rolling uniform slabs; use a second uninterrupted block for cutting, shaping, and detailing your jewelry elements; and dedicate a final session to baking, wet-sanding, and assembling metal findings. A standard two-ounce block of clay can yield dozens of small earrings, charms, and rings, keeping your material cost per finished accessory under one dollar. Store uncured custom clay mixtures in clean polypropylene containers or wax paper wraps, shielding them from heat and airborne dust to prevent premature firming. By batch-curing multiple designs together on a single ceramic baking tile, you conserve household energy and produce an entire coordinated retro capsule collection in a single afternoon.
Creative Expansion and Advanced Inspiration
Once you have mastered foundational modeling techniques, explore advanced variations to expand your decorative portfolio and elevate your personal accessory collection. Experiment with embedding mixed-media accents into your raw clay designs, incorporating vintage glass seed beads, holographic glitter stars, or tiny freshwater pearls before baking to introduce tactile variety. You can also translate iconic jewelry motifs into functional home decor accents, scaling up chunky checkerboards and wavy squiggles to fashion decorative trinket trays, light switch covers, and sculptural desk organization pen pots. Consider applying advanced surface finishing methods, such as utilizing silk-screen stencils with acrylic paint on raw clay slabs to produce intricate, repetitive retro graphics that would be impossible to paint by hand. Expand your jewelry collection into functional lifestyle accessories, creating coordinating modular phone charms, beaded bag tassels, and decorative keychain pulls using the same durable clay formulations. Document your custom color formulas, successful baking times, and dimensional design sketches in a dedicated studio notebook, establishing a valuable design archive that streamlines future creative projects and ensures consistent, professional results across every handmade collection.
Rainbow polymer clay jewelry represents an expressive category of contemporary accessory making, combining structured color theory, clean geometric slicing, and modern aesthetic styling. Designing multi-colored clay accessories at home allows artists to build customized wearable statements that balance playful spectrums with disciplined minimalist style. This comprehensive tutorial delivers step-by-step techniques to condition, shape, cure, and assemble ten distinct rainbow jewelry projects. Readers will learn the essential principles of polymer science, seamless color blending, multi-strand extrusion, structural hole drilling, and durable hardware mounting. Creating custom accessories with polymer clay offers high practical utility: cured polyvinyl chloride materials remain featherlight, water-resistant, and remarkably shatterproof when baked to full maturity. By mastering fundamental cane assemblies, arch extrusions, and slab rolling, makers can craft lightweight earrings, articulated necklaces, and statement rings that elevate everyday wardrobes. The instructions below cover material selection, temperature calibration, surface refinement, and layout planning to help both beginners and seasoned jewelry makers achieve smooth, professional results. Engaging with this accessible creative project empowers crafters to turn standard blocks of colored clay into durable, gallery-grade personal collections or handcrafted gifts on a sensible studio budget.
Why Multi-Color Clay Jewelry Trends in Contemporary Fashion
Rainbow clay accessories continue to lead visual trend boards because they merge tactile craft satisfaction with vibrant personal expression. Modern fashion trends increasingly celebrate joyful, personalized accents that brighten neutral capsule wardrobes, linen shirts, and minimalist tailored blazers. The practical value of polymer clay jewelry lies in its exceptional strength-to-weight ratio; massive tiered dangles, multi-band cuffs, and wide statement pendants remain completely comfortable for all-day wear without pulling on earlobes or weighing down wrists. From a DIY perspective, polymer clay offers immense appeal because it requires minimal space and zero industrial machinery, operating comfortably on a standard kitchen counter or craft desk. Beginners appreciate the medium because the raw material remains fully workable indefinitely until heated, allowing limitless adjustments to color sequences without wasting materials. Furthermore, rainbow designs have evolved beyond neon novelty items into sophisticated modern design statements, utilizing muted earth tones, retro seventies harmonies, and translucent gradients that align with current lifestyle branding. This unique combination of accessible techniques, customizable palettes, and high durability keeps rainbow clay jewelry central to contemporary handmade inspiration.
Materials, Precision Tools, and Studio Preparation Protocols
Achieving clean finishes with rainbow polymer clay relies on disciplined workspace preparation, proper tool selection, and deliberate color planning. The foundational medium requires premium polymer clay blocks in primary red, yellow, and blue, alongside concentrated black, opaque white, and translucent clay for mixing custom spectrums. Essential sculpting equipment includes an acrylic rolling pin with depth-guide rings, rigid stainless steel tissue blades, fine-point needle tools, a manual pin vise hand drill, and wet-and-dry sandpaper sheets ranging from four-hundred to twelve-hundred grit. Hardware requirements encompass hypoallergenic stainless steel earring posts, brass jump rings, flexible beading wire, crimp beads, and flat-nose jewelry pliers. Workspace preparation begins with thoroughly sanitizing the rolling surface using isopropyl alcohol to eliminate ambient dust, lint, and residual skin oils that easily stain bright pigments. Condition each color block individually by kneading it until pliable and uniform, taking care to clean hands and rollers between colors to prevent pigment cross-contamination. Calibrate your oven using a dedicated, standalone analog oven thermometer to verify heat accuracy before curing, as precise baking temperatures prevent pastel fading and dark scorch marks.
The muted earth-tone concentric rainbow arch earring reinterprets the traditional spectrum motif through a warm, bohemian color story. This design features five nested semicircular clay tubes formed from terracotta, mustard yellow, olive green, dusty blush, and warm sand. Suspended beneath a matching flat circular stud post, the open arch creates negative space that frames the jawline gracefully. The muted palette provides an earthy, grounded quality that coordinates naturally with linen blouses and denim jackets. Because the arches are constructed from thin, extruded clay ropes, the earrings remain exceptionally lightweight while offering bold architectural presence. This piece serves as a reliable introductory project for beginners seeking clean, repeatable geometric forms without complex carving tools.
Begin by conditioning five quarter-ounce portions of clay in your chosen earth-tone shades. Roll each color into a smooth, uniform rope measuring three millimeters in diameter, using an acrylic flattening plate to maintain a consistent cylinder along the entire length. Lay the terracotta rope against a clean ceramic tile, bending it into a tight U-shape with an internal gap of one-quarter inch. Press the mustard rope firmly along the outside curve of the first rope, trimming the ends flush with a rigid tissue blade. Continue wrapping the olive, blush, and sand ropes concentrically around the expanding arch, smoothing the seams between strands with light fingertip pressure. Cut the bottom edge straight across with a single downward press of the blade. Pierce vertical attachment holes through the top center of each arch using a one-millimeter needle tool. Bake flat at two hundred seventy-five degrees Fahrenheit for thirty-five minutes, allow the pieces to cool, and link each arch to a round clay stud topper using a small brass jump ring.
2. Translucent Pastel Rainbow Slab Pendant
How to Make
The translucent pastel rainbow slab pendant uses semi-sheer clay layers to create glowing, watercolor-like transitions across a modern pendant silhouette. By combining pure translucent clay with soft pastel pink, butter yellow, mint green, and baby blue, the piece achieves remarkable optical depth that catches natural sunlight. The design features a smooth, flat teardrop or rounded rectangular plaque suspended from a delicate gold-filled chain. When cured, the translucent medium allows the rainbow layers to glow with an ethereal luminescence reminiscent of sea glass or polished quartz. This minimalist pendant pairs effortlessly with summer dresses, knit sweaters, and silk tops, providing an elegant, understated pop of color suitable for formal and casual occasions alike.
Prepare the custom pastel mix by blending small pinches of concentrated color into equal blocks of translucent clay, creating four soft tinted translucent sheets. Roll each tinted sheet to a two-millimeter thickness using the second-widest setting of a clay conditioning machine. Stack the four colored sheets on top of each other, alternating with thin sheets of uncolored translucent clay to establish distinct light-filtering barriers. Compress the stack gently with an acrylic roller, then trim the block diagonally to expose dynamic sloping color layers. Shave thin, horizontal cross-sections from the exposed diagonal face using a sharp tissue blade, laying the patterned slices over a solid white backing slab. Roll lightly to fuse the layers into a seamless four-millimeter sheet, then cut out a sleek teardrop shape using a metal cutter. Pierce a suspension hole near the top point, bake for forty minutes under a foil tent, sand the surface under running water to twelve-hundred grit, and mount onto a gold bail.
3. Retro Seventies Striped Geometric Bangle
Execution Process
The retro seventies striped geometric bangle brings vintage mid-century typography and graphic athletic stripes into a rigid, sculptural wrist accessory. This design features an open-ended C-cuff or continuous circular bangle covered in horizontal rainbow pinstripes of burnt orange, harvest gold, avocado green, chocolate brown, and cream. The bold, linear rhythm wraps around the entire circumference, producing a graphic statement that complements modern retro styling and chunky knitwear. Because the clay cures into a slightly flexible yet rigid plastic, the cuff slides comfortably over the wrist while retaining its circular memory. The smooth, flat exterior showcases the precision of the straight clay lines, demonstrating how disciplined clay caning techniques produce high-end boutique aesthetics.
Condition equal quantities of the five retro-toned clays, running each through a clay machine to produce flat sheets measuring precisely one millimeter thick. Stack the five colored sheets directly on top of one another, pressing them together with an acrylic roller to eliminate trapped air bubbles between the layers. Trim the layered block into a long, rectangular brick measuring six inches long and one inch wide. Slice the brick vertically into two-millimeter-thick strips to reveal the five-color striped pattern along the edge. Wrap these striped strips around an oven-safe metal bracelet mandrel, matching the seams carefully and smoothing the joints with a silicone modeling tool until the surface is uniform. Cover the raw clay band with a strip of parchment paper to prevent tool marks during final smoothing. Bake the bracelet directly on the metal mandrel at two hundred seventy-five degrees Fahrenheit for forty-five minutes, allow it to cool completely before sliding it off, and buff the exterior with a soft denim cloth to produce a natural satin luster.
4. Geometric Terrazzo Rainbow Tile Dangles
Step-by-Step Guide
Geometric terrazzo rainbow tile dangles combine modern architectural flooring patterns with playful spectrum palettes to create contemporary statement earrings. This design uses flat rectangular or hexagonal clay tiles in an unbleached ecru base, embedded with sharp, colorful confetti flecks of primary red, orange, yellow, green, blue, and violet. The resulting mosaic effect captures the tactile texture of cast stone while remaining exceptionally light on the ear. Connected by polished silver jump rings, the two-part earrings feature a small square stud topper linked to an elongated geometric drop. This clean, graphic silhouette makes a bold visual statement against dark clothing, offering a balanced mix of artistic texture and structured modern design.
Begin by rolling out a three-millimeter slab of ecru polymer clay on a smooth ceramic work tile. Prepare the rainbow terrazzo chips by shaving tiny, paper-thin shavings from pre-cured or firm scrap clay blocks in all six rainbow colors using a flexible tissue blade. Scatter the multicolored fragments across the surface of the raw ecru slab, ensuring an even, random distribution of hues. Lay a sheet of parchment paper over the decorated clay and roll firmly with an acrylic rolling pin to press the colored chips flush into the base layer. Stamp out two rectangular drop shapes and two small matching square toppers using stainless steel geometric cutters, pressing straight down without tilting the blades. Drill connection holes near the borders with a handheld needle tool, bake flat on the tile for thirty-five minutes, and wet-sand the front face through progressive grits to reveal sharp, crisp terrazzo boundaries. Link the components together using six-millimeter jump rings and secure hypoallergenic stud posts to the backs with two-part epoxy.
5. Extruded Rainbow Serpent Collar Necklace
How to Make
The extruded rainbow serpent collar necklace is an articulated, high-fashion statement piece that rests smoothly along the collarbone. Consisting of dozens of graduated cylindrical rainbow beads strung along flexible beading wire, this necklace flexes naturally with body movement. Each individual tubular bead features a miniature, five-layer rainbow cross-section that shows tiny striped bands from all viewing angles. The high bead density creates a clean, solid collar profile that pairs beautifully with open-collar shirts, deep scoop necklines, and crewneck sweaters. The smooth, curved clay tubes mimic the appearance of high-end enameled metal beads while offering the lightweight comfort and warmth of cured polymer clay.
To produce the uniform tubular beads, use a handheld clay extruder fitted with a multi-hole or half-round disc. Condition thin ribbons of red, yellow, green, and blue clay, stacking them tightly inside the extruder barrel. Extrude a continuous multicolored clay rod measuring four millimeters in diameter, catching the extruded strand carefully as it emerges to keep the lines straight. Lay the long clay rope flat on a cutting board, pierce through its entire length with a stiff steel beading wire, and bake the clay suspended across an accordion-folded cardstock tray for thirty minutes. Once cured and cooled, remove the rod from the wire and slice it into uniform eight-millimeter cylindrical beads using a fresh tissue blade. Tumble the cut beads in a container of soapy water with fine sandpaper to soften the sliced ends. String the finished beads onto nylon-coated stainless steel beading wire, add a gold-plated magnetic clasp at the ends, and secure the wire with crimp tubes covered by folding crimp covers.
6. Miniature Rainbow Cloud Stud Earrings
Execution Process
Miniature rainbow cloud stud earrings capture whimsical kawaii aesthetics within a clean, compact footprint suitable for subtle daily wear. This design features a puffy, sculptured white cloud shape from which three tiny, bright arching ribbons of color emerge along the lower rim. The clean, brilliant white base highlights the saturated rainbow ribbons, creating a cheerful contrast that adds personality to casual outfits. Because these stud earrings measure less than three-quarters of an inch across, they sit flat against the earlobe, making them a practical choice for professionals, students, or anyone who prefers low-profile jewelry. The dense, layered clay construction ensures that the delicate colors remain firmly bonded to the cloud base without needing fragile hanging wires.
Condition a block of opaque white clay thoroughly, rolling it into a smooth three-millimeter slab on a glass work tile. Cut out two identical cloud silhouettes using a miniature cloud cutter or by freehand sculpting three overlapping spheres of white clay flattened together with a silicone tool. Next, roll microscopic coils of saturated pink, yellow, and turquoise clay, each measuring less than one millimeter in diameter. Curve these tiny colored threads together to form a miniature rainbow banner, and press it firmly against the lower underside of each white cloud shape using a needle tool. Smooth the rear seams where the colors meet the white base using a soft silicone blending pen to ensure a strong physical bond during the bake. Bake the clouds flat on a cardstock-lined tile at two hundred seventy-five degrees Fahrenheit for thirty minutes. After cooling, sand the back surfaces flat, wipe with alcohol, and adhere surgical steel earring posts using industrial two-part epoxy resin.
7. Segmented Rainbow Arch Bar Brooch
Step-by-Step Guide
The segmented rainbow arch bar brooch translates architectural color blocking into a versatile pin accessory that accents outerwear, tote bags, and scarves. This design features a horizontal rectangular bar split into seven vertical color blocks representing the visible spectrum, bordered by crisp white or black structural endcaps. The flat, tailored bar format keeps the colors organized and linear, giving the brooch a mid-century modernist aesthetic. The horizontal orientation sits flat against heavy wool coats, denim jackets, and canvas bags without tipping forward. The smooth, flush surface demonstrates the beauty of the butt-joint technique, in which separate clay colors are fused seamlessly into a single level slab before cutting.
Condition seven distinct rainbow colors along with an opaque white base, rolling each block out to a uniform four-millimeter thickness using guide rings on an acrylic roller. Cut each colored sheet into precise quarter-inch strips using a stainless steel ruler and a rigid tissue blade. Lay the colored strips side by side in spectrum order across a glass tile, pressing their long edges flush together. Flank the colored group with two wider white border strips on either end. Lay a sheet of tracing paper over the assembled clay strips, rolling the surface gently in both horizontal and vertical directions to fuse the seams into a solid, level plaque. Trim the fused block into an elongated bar measuring two inches wide by half an inch tall. Bake the bar flat on a tile for thirty-five minutes, wet-sand the face down to twelve-hundred grit to achieve a stone-smooth finish, and attach a nickel-plated bar pin back to the reverse side using liquid polymer clay cured during a secondary ten-minute bake.
8. Layered Rainbow Chevron Drop Earrings
How to Create
Layered rainbow chevron drop earrings feature stacked, pointed V-shaped clay components that create an elongated, kinetic silhouette. Each chevron tier represents a separate color of the spectrum, nested closely beneath the previous tier with small jump rings that allow each segment to swing independently. This articulated construction creates gentle movement that catches the light as the wearer turns their head. The sharp geometric angles introduce an edgy, modern profile that balances the sweetness of the rainbow palette, making these earrings suitable for creative work environments and evening events. The thin profile of each chevron link ensures that the multi-tiered drops remain featherlight and comfortable to wear throughout the day.
Roll out six conditioned rainbow clay sheets to an even two-millimeter thickness on separate ceramic tiles. Use a pointed chevron metal cutter to stamp out matching pairs of graduated V-shapes from each color, ensuring the angles match precisely across all tiers. Pierce small connection holes near the upper points and bottom center tip of each chevron segment using a one-millimeter needle tool, keeping holes aligned across the tiers. Place the cut pieces on a parchment-covered baking sheet and bake for thirty minutes at the manufacturer’s recommended temperature. After cooling, lightly smooth the perimeter edges of each link using fine-grit sandpaper to remove any raw cutter burrs. Connect the graduated chevron links in descending spectrum order using three-millimeter brass jump rings, working carefully with two pairs of flat-nose pliers to avoid distorting the metal circles. Attach the top chevron segment to a matching brass ear wire to complete the drop earring.
9. Monochromatic Gradient Rainbow Bipyramid Ring
Execution Process
The monochromatic gradient rainbow bipyramid ring is an architectural statement ring featuring a faceted three-dimensional gemstone sculpted entirely from polymer clay. This design showcases a central diamond-like bipyramid bead that transitions smoothly through a rainbow gradient, mounted onto an adjustable brass ring shank. The faceted surfaces catch ambient light across multiple angled planes, showcasing the color shift with exceptional clarity. The dimensional silhouette turns the wearer’s hand into a display of geometric art, providing a bold conversation piece that stands out against minimalist outfits. The solid clay construction ensures high impact resistance, allowing the ring to withstand daily hand movements without chipping or cracking.
To create the seamless gradient, prepare a Skinner blend using equal triangular sheets of bright red, yellow, and blue clay laid side by side. Fold and roll the combined sheet repeatedly through a clay conditioning machine along the same axis until the colors blend into a continuous, smooth rainbow ribbon. Roll the blended ribbon into a tight, dense cylinder, keeping the color transitions concentric. Use a rigid tissue blade to carve flat, angled facets across the outside of the cylinder, sculpting it into an eight-sided bipyramid stone measuring roughly three-quarters of an inch across. Bake the faceted clay jewel upright on a bed of dry cornstarch for thirty-five minutes to protect the crisp cut edges from flattening in the heat. Once cooled, rinse the piece clean and wet-sand each individual facet to an ultra-smooth satin finish. Adhere the faceted clay stone to a textured brass ring pad using high-strength two-part epoxy adhesive, allowing it to cure fully for twenty-four hours before wearing.
10. Floating Rainbow Disc Charm Bracelet
Setup Method
The floating rainbow disc charm bracelet combines delicate jewelry chain work with small, coin-like polymer clay charms distributed along a wrist chain. Seven miniature clay discs, each representing a single saturated hue of the spectrum, dangle independently from a link bracelet, creating playful movement that catches the eye. The flat, coin-like shape of the charms keeps them comfortable against the skin, while the vibrant colors pop against warm gold or cool silver chain links. This modular design offers endless versatility: wearers can sport the full rainbow spectrum together for a bold bohemian statement or rearrange the charms for a more subtle look. The piece makes a thoughtful handmade gift, offering approachable craftsmanship with high visual charm.
Condition seven distinct rainbow colors, rolling each into a two-millimeter sheet on a glass work tile. Cut out miniature circular discs measuring eight millimeters in diameter using a small round plunger cutter or brass tube punch, ensuring the edges remain crisp. Pierce a single hole one millimeter from the top rim of each disc using a fine needle tool, rotating the tool gently to leave clean entry and exit holes. Lay the raw discs between two sheets of cardstock weighted with a small ceramic tile to keep them completely flat during curing. Bake at two hundred seventy-five degrees Fahrenheit for twenty-five minutes, allow them to cool, and smooth the rounded rims using eight-hundred-grit sandpaper. Open small four-millimeter jump rings with flat-nose pliers, thread them through the holes in the clay charms, and link each disc at one-inch intervals along a seven-inch gold-plated cable chain. Finish the bracelet ends with a secure lobster clasp and extender chain.
Common Beginner Mistakes and How to Avoid Them
Beginner jewelry crafters working with multi-colored polymer clay often encounter preventable technical mistakes that compromise the structural strength and appearance of their pieces. The most common error is underbaking the clay out of fear that bright rainbow tones will discolor or scorch in the oven. Polymer clay requires sufficient heat exposure over time for its internal plasticizers to cross-link completely; underbaked clay remains brittle and will snap under everyday handling. Always verify your oven temperature using a standalone analog oven thermometer rather than relying on the appliance’s built-in dial, and bake your pieces for at least thirty to forty minutes under a loose tent of aluminum foil to shield bright pigments from direct heating elements. Another frequent mistake is cross-contaminating clay colors during rolling, which leaves dark streaks on delicate pastel and yellow clays. Keep your hands, acrylic rollers, and blades clean by wiping them with rubbing alcohol between color changes, and work systematically from your lightest colors to your darkest pigments. Finally, drilling connection holes too close to the outer edges of shapes creates weak structural anchor points that can tear under tension. Always position holes at least two millimeters away from any edge to ensure a secure, long-lasting hardware mount.
Practical Tips for Better Surface Finishes and Edge Precision
Achieving professional, gallery-quality results with rainbow polymer clay jewelry requires disciplined finishing routines and attentive craftsmanship. Always sand your cured clay components underwater using wet-and-dry sandpaper to prevent airborne dust while keeping the abrasive paper clear of debris. Progress systematically through four-hundred, six-hundred, eight-hundred, and twelve-hundred grit sandpaper to remove raw blade marks, smooth out rough edges, and produce a silky satin finish that feels great against the skin. When joining separate raw clay segments—such as building concentric arches or applying charms—apply a microscopic drop of liquid polymer clay between the surfaces; this serves as a heat-activated bonding agent that fuses the components permanently during curing. When cutting shapes from freshly rolled slabs, let the conditioned clay rest on your work tile for fifteen minutes before pressing cutters into the surface; this brief cooling period reduces clay elasticity, preventing shapes from distorting as you lift the cutters away. For a high-gloss finish, consider applying a thin coat of UV-cured resin over the sanded clay, using a fine brush to ensure an even, bubble-free surface before curing under an ultraviolet lamp.
Styling, Presentation, and Storage Ideas for Clay Jewelry
Styling and presenting handmade rainbow polymer clay jewelry requires thoughtful visual balance to highlight its vibrant, multi-colored designs. When wearing bold rainbow statement earrings or segmented collar necklaces, pair them with understated, neutral clothing like ivory linen button-downs, charcoal crewneck sweaters, or classic denim jackets. This clean backdrop lets the saturated rainbow colors stand out as the primary focal point without competing with busy patterns. If you are photographing or displaying your jewelry for sale, stage pieces against natural, textured backdrops like raw birch wood blocks, travertine stone slabs, or textured watercolor paper that complement the smooth clay finish. Keep your finished pieces organized at home on hanging jewelry trees, wall-mounted display grids, or within velvet-lined compartments to prevent metallic hardware from scratching the sanded clay surfaces. Proper storage in a cool, dry area away from direct sunlight preserves the vibrancy of your pigments and keeps your collection looking fresh for years of daily wear.
Studio Budgeting and Efficient Time Planning
Disciplined time management and budget planning make polymer clay jewelry making both cost-effective and productive. The medium requires minimal financial investment; a starter collection of primary color blocks, black, white, and translucent clay can be mixed into dozens of custom spectrums, keeping material costs remarkably low compared to conventional jewelry metals. Save money on studio supplies by purchasing core neutral clays in bulk, mixing your own custom secondary shades, and saving all excess trimmings in airtight containers to use as internal structural cores or colorful terrazzo flecks in future designs. To maximize your productivity, batch your studio sessions into distinct assembly stages: spend your first session conditioning clay, mixing custom palettes, and cutting out shapes; run your baking cycles together in the second session; and reserve your final session for wet-sanding, drilling, and assembling hardware. Batching similar tasks keeps your rolling equipment clean, speeds up production, and ensures consistent proportions across entire jewelry collections.
Creative Expansions and Advanced Studio Variations
After mastering these ten fundamental rainbow jewelry projects, you can expand your design collection with advanced studio techniques that add depth and sophistication to your work. Experiment with surface inclusions by blending fine gold leaf, metallic mica powders, or cosmetic-grade glitter directly into the colored clay ropes before assembly, creating a subtle, shimmering galaxy effect throughout the rainbow spectrum. You can also explore complex cane techniques, building kaleidoscopic geometric canes or detailed pictorial rainbow canes that can be reduced and sliced into dozens of identical patterned tiles for matched accessory sets. Consider combining polymer clay with mixed-media elements: incorporate hand-hammered brass shapes, natural raw gemstones, or laser-cut wood components into your clay link designs for an upscale, mixed-texture finish. Scale these rainbow concepts into coordinating accessories by adapting earring components into matching hair pins, key fobs, and custom buttons to build complete design collections. As your sculpting precision and design confidence grow, your signature rainbow clay aesthetic can evolve into a wide range of collectible wearable art that celebrates vibrant colors, balanced craftsmanship, and timeless handmade style.
Handcrafted jewelry made from polymer clay provides an accessible, durable, and highly customizable path to producing meaningful personalized gifts. Pinterest ideas consistently showcase oven-bake polymer clay as a premier medium for wearable art because it requires minimal workshop infrastructure while delivering professional, studio-quality finishes. This detailed tutorial guides readers through ten complete, distinct handmade jewelry projects designed specifically for thoughtful gift-giving occasions throughout the year. Makers will learn the foundational science of clay conditioning, precision color blending, textural manipulation, accurate oven curing, and secure metal hardware assembly. Understanding how to manage structural strength, surface smoothness, and functional proportions allows artisans of any experience level to craft durable earrings, necklaces, pendants, and hair accessories. Beyond basic shaping techniques, this guide details practical methods for integrating modern design principles such as organic arch geometry, faux stone marbling, botanical relief stamping, and clean metallic leafing. By mastering these step by step jewelry blueprints, crafters can bypass commercially manufactured retail jewelry in favor of bespoke, artisanal pieces that carry lasting sentimental value.
Polymer clay jewelry continues to dominate modern Pinterest inspiration because it effortlessly bridges the gap between high-end runway trends, minimalist style, and approachable DIY crafts. The medium offers immense practical value through its featherlight weight profile, enabling creators to produce bold, oversized statement earrings that remain comfortable to wear for entire days without pulling on delicate earlobes. From a design standpoint, the clay mimics an extensive spectrum of luxurious raw materials including tumbled beach stone, Italian terrazzo tiles, polished marble, and raw mineral strata at a tiny fraction of the cost. For beginners entering the realm of creative ideas, clay represents an exceptionally forgiving creative project since uncured mistakes can be kneaded together, flattened, and recut without wasting expensive materials. The rise of slow fashion, boutique artisan markets, and handmade gifting culture has further accelerated these trending ideas across digital lifestyle boards. Modern recipients increasingly prefer personalized items crafted with care over mass-produced accessories, making custom-formulated earrings and sculptural pendants ideal gifts for birthdays, weddings, anniversaries, and holidays.
Executing professional-grade polymer clay accessories requires systematic preparation of specialized tools, sanitary work environments, and appropriate materials. Essential materials include premium oven-bake polymer clay blocks, surgical-grade stainless steel or titanium earring posts, solid brass jump rings, hypoallergenic necklace chains, and silicone baking mats. Critical tools comprise an acrylic rolling rod with calibrated thickness rings, ultra-thin flexible tissue slicing blades, miniature geometric shape cutters, a hand-cranked pin vise drill, and dual flat-nose jewelry pliers. Thorough preparation demands establishing a spotless, lint-free non-porous working surface, such as a smooth ceramic tile or a tempered glass plate, cleaned with isopropyl alcohol. Planning considerations require testing individual home ovens with an independent, calibrated oven thermometer, as integrated appliance temperature dials frequently fluctuate, resulting in either underbaked brittle pieces or scorched clay surfaces. Preparing a dedicated storage tray lined with wax paper protects raw, uncured clay elements from ambient airborne dust, pet fur, and accidental finger impressions during the production and cutting stages.
1. Architectural Terrazzo Arch Drop Statement Earrings
Step-by-Step Guide
The terrazzo arch drop design utilizes architectural geometry and playful mosaic flecks to reference mid-century Mediterranean stone flooring. The primary visual foundation consists of a clean, curved U-shaped arch pendant cut from an opaque, warm-toned neutral slab such as cream, biscuit, or pale terracotta. Distributed across this neutral backdrop are irregular, multi-colored micro-chips of contrasting clay shades, producing a balanced graphic mosaic across both earrings. The flat, planar profile gives these accessories an architectural, gallery-ready aesthetic that complements contemporary tailoring and linen garments. Maintaining a uniform thickness of approximately two to three millimeters ensures structural resilience across the open arch legs without introducing unwanted weight. The finished pieces swing gracefully from circular post studs, creating kinetic movement that catches the light naturally during wear. This project functions as an outstanding, beginner friendly entry point into slab manipulation, demonstrating how tiny leftover scrap pieces transform into high-end decorative patterns.
To begin assembly, condition two ounces of warm ecru clay by rolling and folding repeatedly until soft and pliable, then flatten it to a uniform three-millimeter thickness using an acrylic roller. Prepare the terrazzo chips by taking half-pea-sized remnants of mustard yellow, deep forest green, dusty blush, and burnt orange clay, rolling them into ultra-thin sheets and slicing them into tiny, irregular shards with a tissue blade. Scatter the colored flecks across the surface of the ecru base slab, leaving approximately two millimeters of open space between each fragment for balanced dispersal. Place a sheet of parchment paper over the prepared slab and roll gently with light downward pressure to press the flecks flush into the base without distorting their crisp angles. Press a two-inch arched metal cutter firmly into the slab to extract two identical arch shapes, followed by a half-inch circular cutter to produce the upper ear studs. Bake the components on a ceramic tile at the clay manufacturer’s designated temperature for forty-five minutes, let them cool completely, drill small attachment holes using a pin vise, and link the pieces using brass jump rings.
2. Botanical Wildflower Imprint Minimalist Oval Pendant
Execution Process
The botanical wildflower imprint pendant captures the delicate textures of real organic plant specimens within a refined, ceramic-like oval pendant medallion. This design features an unglazed, chalk-white or warm porcelain-toned base stamped with fine dried flora, including delicate ferns, yarrow leaves, or baby’s breath blossoms. The recessed floral impressions are lightly accentuated with soft earth pigments or liquid acrylic washes, creating dimensional shadow play that mimics antique bas-relief sculpture. Suspended from a dainty cable chain, this delicate pendant delivers a grounded, organic aesthetic that appeals to lovers of nature and timeless botanical home decor. The smooth, rounded perimeter edges of the oval contour prevent snagging on knit sweaters and silk fabrics, ensuring practical all-day wearability. Crafting this pendant teaches precise pressure regulation and negative space design, transforming simple backyard garden foliage into durable, wearable heirloom keepsakes.
Begin by conditioning pure white or translucent polymer clay thoroughly, rolling it out over a glass tile to a sturdy four-millimeter thickness using leveling guides. Select small, fully dried, flat botanical pressings, positioning a single branched sprig of dried greenery diagonally across the upper center of the smooth clay sheet. Lay a clean sheet of wax paper over the botanical arrangement and roll an acrylic cylinder over the surface with moderate, even downward force to press the veined plant fibers deep into the clay matrix. Carefully peel back the wax paper, using fine-point tweezers to lift the plant matter cleanly from the debossed channels without smudging the crisp botanical impressions. Position an elongated oval metal cutter directly over the stamped motif, pressing down squarely to cut the clean outer pendant perimeter. Cure the pendant in a preheated oven for forty minutes, sand the cured outer rim with wet four-hundred-grit sandpaper, brush burnt umber acrylic wash into the deep crevices, wipe the high surfaces clean with a damp sponge, and thread an eighteen-inch chain through the drilled bail hole.
The desert sunset landscape medallion transforms miniature scenic vistas into wearable graphic art through layered clay strip techniques and precise color gradients. The design features a circular disc showcasing horizontal undulating bands of clay that represent rolling sand dunes, layered desert hills, and glowing atmospheric horizons. A rich gradient palette moving from deep plum and terracotta up to warm ochre, peach, and pale cream creates an evocative sense of natural depth within a compact two-inch format. The layered strips are carefully fused along their edges, creating a seamless, flat disc that provides exceptional tensile strength across every color seam. This scenic medallion serves as an eye-catching focal necklace or an oversized statement brooch, making it an exceptional custom gift for travel enthusiasts and lovers of western landscapes. The clean circular perimeter contains the organic, flowing lines of the hills, framing the artistic landscape in a modern, gallery-worthy package.
Condition five quarter-ounce blocks of clay in graduated sunset hues, including rich wine, burnt rust, warm clay, mustard, and soft buttermilk. Roll each conditioned color into a separate flat sheet calibrated to an identical two-millimeter thickness using your acrylic roller guides. Use a sharp, flexible tissue blade to cut irregular, rolling wavy strips from each colored sheet, matching the undulations to mimic receding hillside ridges. Lay the cut ribbons side-by-side on a glossy ceramic tile, slightly overlapping the adjacent bottom margins by half a millimeter to establish secure structural contact. Place parchment paper over the aligned ribbons, smoothing firmly with your roller in both horizontal and vertical passes to weld the seams into an unbroken, flat multi-toned sheet. Press a one-and-a-half-inch round cookie cutter straight through the layered clay sheet to capture the landscape composition inside a circular frame. Bake the circular piece on the tile for forty-five minutes, lightly bevel the perimeter with eight-hundred-grit sanding paper under running water, and mount a secure bail component to the upper rear edge with two-part epoxy adhesive.
4. Polished Faux White Carrara Marble Geometric Studs
Step-by-Step Guide
Faux Carrara marble geometric studs replicate the high-end, crystalline elegance of natural Italian metamorphic rock through controlled clay blending and micro-foil veining. The design combines pure opaque white clay with subtle, translucent gray streaks, gossamer charcoal hair-veins, and occasional flecks of reflective silver or gold leafing. When cut into sharp, minimalist shapes such as hexagons, equilateral triangles, or clean trapezoids, the organic stone patterns provide a striking visual contrast against the rigid geometric silhouettes. These compact ear studs represent an essential staple within any minimalist wardrobe, offering subtle sophistication suitable for formal office settings and casual weekend outings alike. Because the surface patterning is distributed internally throughout the clay matrix rather than painted on top, the faux marble veining cannot scratch, peel, or fade over years of continuous handling. This project illustrates how simple twisting, slicing, and folding steps produce surprisingly realistic geological textures without requiring complex artistic painting skills.
Condition two ounces of bright white polymer clay until pliable, rolling it into a cylindrical log measuring approximately five inches long by one inch thick. Roll thin, hair-like snakes of translucent graphite-gray clay, wrapping them spirally around the circumference of the main white cylinder alongside several fragments of torn imitation silver leaf. Twist the entire composite cylinder tightly five times like a piece of rope, compress it into a solid ball, cut the ball in half with a blade, restack the two halves, and repeat the twisting process once more. Slice the manipulated clay mass into three-millimeter thick cross-sections, laying the patterned slices side-by-side over a clean ceramic tile to form a continuous marbled slab. Roll the slab smooth under parchment paper, then press small three-quarter-inch hexagonal cutters through the marble field to extract matched pairs. Bake the cut hexagons for thirty-five minutes, smooth their edges using fine wet-dry sandpaper, buff the face with a soft cotton denim cloth to produce a natural satin luster, and affix surgical steel posts to the backings using industrial jewelry adhesive.
5. Sculpted Miniature Clay Succulent and Petal Cluster Hoops
Setup Method
Miniature sculpted succulent cluster hoops combine delicate three-dimensional modeling with functional wire jewelry framing, resulting in a lush botanical gift. This project features tiny hand-sculpted echeveria succulents, fleshy jade leaves, and delicate rosette petals mounted directly onto the lower curve of a circular metal hoop earring. Using muted sage greens, dusty seafoam, and lavender-blush clay tones mimics the waxy, chalky farina coating found on living desert succulents. The dimensional botanical elements remain securely clustered on the wire curve, creating an eye-catching sculptural crescent that frames the wearer’s jawline naturally. The lightweight nature of polymer clay allows multiple three-dimensional rosettes to sit together without adding unmanageable weight to the hoop foundation. This concept serves as an outstanding, creative project for plant lovers, capturing the lively essence of living flora in a durable, permanent medium that requires zero watering or sunlight.
Prepare custom succulent colors by mixing small portions of emerald, sky blue, white, and a speck of black clay to produce realistic dusty seafoam tones. Roll twelve pea-sized balls of clay, shaping each into a tapered teardrop between your thumbs and index fingers, then flattening them into miniature pointed succulent petals. Form the central core of the primary succulent by rolling a tiny conical bud, progressively wrapping five overlapping petals around the center to build a blooming rosette measuring half an inch across. Repeat this process to make smaller accent rosettes, then sculpt tiny spherical filler berries from soft coral clay to introduce warm tonal contrast. Thread an open twenty-five-millimeter raw brass wire hoop through the back of a flat, baked clay backing pad, pressing the raw, uncured succulent rosettes firmly onto the front pad surface using liquid polymer clay as a heat-activated bonding agent. Bake the entire assembled hoop assembly in the oven for forty minutes, allowing the liquid clay to fuse the sculpted petals permanently to the metal hoop frame.
Monochromatic ribbed ribbon dangles explore pure sculptural form, tactile surface texture, and architectural fluidity through a single uniform clay tone. The design features a continuous strip of clay that has been impressed with deep, parallel linear grooves and folded gently into dynamic, flowing loops reminiscent of waving fabric ribbons. Rendering these dramatic shapes in a single bold color, such as cobalt blue, deep forest green, or stark black, emphasizes the play of light and shadow across the dimensional ribs without visual clutter. The structured ridges give the curved clay ribbon added structural rigidity, preventing the loops from collapsing during the high-heat curing stage. When suspended from matching circular studs, these dangles produce a striking, gallery-worthy silhouette that elongates the neck and moves gracefully with the wearer. This project demonstrates how simple texture tools transform basic monochromatic slabs into high-fashion sculptural accessories.
Condition two ounces of saturated cobalt blue clay thoroughly, passing it through your roller guides to produce an even three-millimeter thick rectangular sheet. Lay a textured silicone mat featuring parallel raised linear ridges over the clay sheet, rolling firmly across the mat to transfer deep, crisp vertical grooves across the entire surface. Use a straight steel ruler and a tissue blade to slice the textured slab into clean, uniform strips measuring half an inch wide by four inches long. Gently lift a textured strip, curving both end margins backward and overlapping them behind the center point to create a fluid, dimensional figure-eight ribbon loop with the ribbed pattern facing outward. Pierce a small pilot hole through the top folded crest using a round needle tool, supporting the internal hollow curves with crumpled aluminum foil to prevent sagging in the oven. Bake the supported loops for forty-five minutes, let them cool to room temperature, and attach them to matching ribbed round ear studs using five-millimeter jump rings.
7. Gilded Raw Raw-Edge Clay Gemstone Slab Necklaces
How to Create
Gilded raw-edge clay gemstone necklaces mimic the organic, fractured appearance of natural raw mineral slabs, rough quartz crystals, or cracked geodes. The design centers on a thick, organic clay pendant that has been hand-torn and sculpted along its margins to create irregular, faceted rocky contours rather than clean mechanical cuts. The primary face of the pendant features deep, mottled stone coloring achieved through mixed translucent clays, while the fractured outer perimeter is accented with gleaming metallic gold leaf or liquid gilding paint. This deliberate contrast between rough, earthy matte stone textures and luminous, polished metallic edges creates a luxurious, artisanal aesthetic. Suspended from a long, textured paperclip chain, this pendant functions as an earthy statement accessory that pairs beautifully with chunky knitwear and everyday casual styling. Crafting this piece requires no specialized cutter shapes, relying entirely on organic hand manipulation and intuitive edge texturing.
Formulate a deep stone hue by marbling together translucent clay, midnight black clay, and a touch of deep sapphire blue, keeping the blend coarse to retain distinct mineral veins. Shape the conditioned mass into a thick rectangular slab measuring five millimeters deep, then use your fingertips and a craft knife to tear and pick at the outer edges, creating jagged, naturally fractured rock margins. Press coarse sea salt or crumbled foil into the front surface to create micro-craters, baking the prepared slab directly on a ceramic tile for forty-five minutes. Once the cured pendant cools completely, dissolve and rinse away the surface salt crystals under warm running water to expose the weathered, porous stone texture. Paint the rough, fractured outer perimeter margins with rich liquid gold leaf enamel using a fine detail brush, keeping the gleaming border approximately one millimeter wide around the face. Drill a clean hole through the upper apex, insert a gold-plated pinch bail, and string the completed pendant onto an eighteen-inch gold paperclip chain.
8. Retro Checked Checkerboard Hair Barrette Clips
How to Create
The retro checked hair barrette brings mid-century graphic pattern design to hair accessories through high-contrast geometric clay assembly. This accessory features a smooth, rectangular flat plate displaying a precise two-color checkerboard grid, such as contrasting chocolate brown and buttercream, or olive green and pale blush. The surface is rolled completely flush, creating a flat planar surface that highlights the sharp intersections of the alternating squares without visible seam lines. Mounted onto a spring-steel alligator or traditional French barrette clip, this piece provides an eye-catching hair styling element that elevates simple everyday hairstyles. The high-contrast graphic grid aligns with trending ideas in vintage lifestyle aesthetics, making it a highly desirable handmade gift for fashion-conscious recipients. Assembling this pattern teaches the foundational cane-building technique, showing how stacked geometric slabs can be sliced into uniform, repeatable checkerboard patterns.
Condition one ounce of rich chocolate brown clay and one ounce of warm buttermilk clay, rolling both into long, square-sided rectangular logs of identical thickness. Slice each long square log lengthwise into four equal square strips, yielding four brown rods and four cream rods measuring approximately six millimeters square. Assemble the eight rods into a consolidated rectangular block, alternating colors in an overlapping two-by-four checkerboard pattern so that brown always borders cream on all sides. Gently compress the consolidated square cane from all four sides using flat acrylic blocks, then use a sharp, rigid tissue blade to slice three-millimeter thick cross-sections across the face of the cane. Align two sliced checkerboard panels edge-to-edge over a flat base backing sheet of brown clay, rolling smooth under parchment paper to merge the sections into an unbroken checked canvas. Cut a three-inch by three-quarter-inch rounded rectangle from the slab, bake for forty minutes, and attach securely to a metal French barrette base using two-part epoxy adhesive.
9. Modern Minimalist Clay and Raw Brass Chandelier Earrings
How to Create
Mixed-media chandelier earrings merge the warm, matte, earthy textures of polymer clay with the brilliant, reflective finish of raw architectural brass findings. The design pairs half-moon, fan, or arch-shaped clay elements with suspended metal components, such as pierced brass stamping bars, open hoops, and delicate metal teardrops. This combination elevates polymer clay jewelry from casual craft projects to sophisticated, contemporary boutique accessories. The lightweight clay anchors the upper part of the earlobe comfortably, while the lower hanging brass elements catch and bounce ambient light with every head movement. Using muted, sophisticated clay colors like eucalyptus green, dusty plum, or warm taupe ensures that the polished golden brass remains the primary visual focal point. This project introduces makers to mixed-media construction, teaching them how to choose complementary proportions, balance physical weights, and drill precise attachment points across diverse materials.
Condition one ounce of eucalyptus green clay, rolling it out smooth to a calibrated two-and-a-half-millimeter thickness using your acrylic roller. Use a clean semicircle metal cutter to punch out two matching half-moon clay components measuring approximately one-and-a-half inches across the straight top edge. Use a sharp needle tool to pierce two small attachment holes along the bottom curved arc of each half-moon, along with one central hole near the top straight margin for the post link. Place the cut clay semicircles onto a ceramic baking tile, curing them in a preheated oven for thirty-five minutes, then let them cool fully. Using dual flat-nose jewelry pliers, open five-millimeter raw brass jump rings with a gentle sideways twisting motion to avoid weakening the metal joints. Link raw brass teardrop charms or dangling wire bars through the bottom holes of each clay half-moon, attaching an ear post component to the top hole. Check that all jump rings close with a secure, flush seam to prevent hardware from slipping during active wear.
10. Textured Ceramic-Look Hoop Charms with Scalloped Rims
How to Create
Textured ceramic-look hoop charms deliver a tactile, artisan-pottery aesthetic through scalloped edges, speckling, and matte, unglazed surfaces. These accessories consist of circular, donut-shaped rings featuring undulating, ruffled, or scalloped perimeter rims that evoke the charm of hand-pinched stoneware pottery. The clay body incorporates fine synthetic inclusions, such as baking-safe craft flocking or coarse black pepper flecks, to simulate the rough, mineral speckles found in thrown stoneware clay. The central hole allows the lightweight clay donut to slide effortlessly onto standard metal huggie hoop earrings, creating an interchangeable jewelry system where recipients can swap colors to suit their daily outfits. The charming scalloped rim catches soft dimensional highlights, offering a subtle feminine touch that pairs naturally with linen shirts and casual knitwear. This quick, beginner friendly project serves as an ideal bulk gift option, allowing makers to produce dozens of charming, customizable hoop accents in a single afternoon crafting session.
Condition two ounces of warm oatmeal-colored clay, mixing in a pinch of finely ground black pepper or cured dark clay shavings to create an authentic speckled stoneware appearance. Roll the prepared clay flat on a clean glass work tile to a uniform thickness of three millimeters using standard roller guide rings. Cut outer discs using a two-inch scalloped round cookie cutter, then center a half-inch smooth circular cutter inside each disc to punch out the central hollow hoop cavity. Use a small wooden modeling tool or a silicone clay shaper to smooth down any rough cutting burrs along the scalloped edges, softening the curves to look like hand-pinched pottery. Bake the scalloped rings on a flat tile for forty minutes, allowing them to cure thoroughly to ensure the delicate scalloped lobes become resilient and flexible. After cooling, sand the back surfaces with six-hundred-grit sandpaper under running water, dry thoroughly, and slip the charms directly onto a pair of fourteen-millimeter gold huggie hoops.
Common Beginner Mistakes and How to Avoid Them
The most frequent error beginners encounter when crafting polymer clay jewelry is underbaking their cured pieces due to inaccurate oven temperatures. When clay does not reach and maintain its required temperature for the full designated time, the internal plastic polymers fail to cross-link completely, resulting in finished pieces that snap or crumble under minimal stress. Never rely on the built-in temperature dials of standard home ovens; always place an independent, standing metal oven thermometer directly beside your baking tile to monitor real-time heat conditions. Another common misstep is introducing airborne lint, dust particles, and oily fingerprints into light-colored clay during conditioning. Prevent contamination by wiping down your hands, acrylic rollers, and work surfaces with rubbing alcohol or baby wipes before touching each new color block. Additionally, crafters frequently use blunt cutting tools, which compress clay edges downward, producing rounded, messy perimeter seams that require extensive post-bake sanding. Always use ultra-sharp, micro-thin steel tissue blades, keeping cutters clean between cuts by wiping them with an alcohol-moistened cotton pad. Finally, avoid using weak, instant superglues to mount metal earring posts to baked clay backs; traditional cyanoacrylate bonds become brittle over time and pop off easily. Instead, secure metal hardware using two-part industrial epoxy adhesive or embed post bases beneath a thin raw clay patch and rebake for total structural security.
Practical Tips for Better Results
Achieving clean, professional, boutique-grade results requires disciplined finishing techniques, proper conditioning, and refined hardware selection. Always spend ample time conditioning fresh clay by rolling and folding it multiple times; properly conditioned clay becomes flexible, warm, and free from interior air bubbles that could expand and create surface blisters in the oven. When rolling out slabs, use calibrated acrylic thickness guide rings on both ends of your roller to maintain an absolute, uniform thickness across the entire sheet. For flawless, glass-smooth surfaces without tedious sanding, smooth uncured clay gently using a drop of baby oil or rubbing alcohol applied with a silicone brush tip before cutting. When removing freshly cut shapes from your work tile, place the entire tile into a refrigerator or freezer for ten minutes; chilling firms the clay, allowing intricate pieces to lift off cleanly without warping or stretching. After baking and cooling, execute a wet sanding routine using progressive grits of wet-dry sandpaper, starting at four-hundred grit to remove tool marks and progressing through eight-hundred and one-thousand grit for a silky satin finish. Lastly, choose premium hypoallergenic findings, such as surgical stainless steel, titanium, or fourteen-karat gold-filled jump rings, ensuring that your handmade gifts remain safe and comfortable for individuals with sensitive skin.
Styling, Presentation, or Organization Ideas
Presenting handcrafted polymer clay jewelry with thoughtful packaging elevates your items from basic craft projects into luxurious, boutique-quality gifts. Mount finished earrings, necklaces, and hair clips onto custom-cut cardstock backing cards made from heavy linen-textured kraft paper or recycled cotton board. Stamp the backing cards with subtle botanical illustrations, your personalized initials, or handwritten care guidelines using permanent, waterproof archival ink pads. For round or statement pieces, store them flat inside natural, unbleached cotton muslin drawstring pouches or rigid cardboard jewelry boxes lined with batting to prevent hardware friction during transport. If displaying jewelry in an open home studio or gifting space, organize pieces by color family across white ceramic trays, raw slate slabs, or slotted wooden jewelry stands to create an inviting, modern aesthetic. When coordinating these accessories into everyday outfits, treat bold, patterned clay pieces as focal elements, pairing them with understated monochrome clothing, crisp collars, and minimalist tailoring to let the colors shine. Providing recipients with a small lint-free polishing cloth and a printed care instruction card outlining water-resistance rules, storage tips, and cleaning steps ensures that your handmade gifts will be treasured and worn with pride for years.
Budget or Time Planning
Crafting handmade polymer clay jewelry offers outstanding cost efficiency and time management advantages compared to traditional metalworking or lapidary arts. A single two-ounce block of polymer clay costs only a few dollars yet yields between four to eight pairs of medium-sized statement earrings, resulting in an exceptionally low material cost per finished item. Maximize your starting budget by investing in a few foundational primary colors alongside large blocks of translucent and white clay, mixing your own custom pastels and earth tones rather than buying dozens of specialty colors. When planning your production schedule, implement batch processing to maximize efficiency; dedicate one session strictly to conditioning, color mixing, and cutting shapes across several slabs. Group all prepared pieces together on ceramic tiles for a single consolidated baking cycle, saving household electrical energy and reducing monitoring time. Dedicate a separate, quiet evening session to post-cure finishing tasks, such as wet sanding, edge beveling, drilling attachment holes, and hardware assembly. Storing mixed scrap clay remnants in organized, airtight zip-top plastic bags categorized by tonal family eliminates material waste, providing a continuous supply of pre-conditioned clay for future terrazzo and marbling projects.
Creative Expansion and Advanced Inspiration
Once you have mastered foundational clay shaping, texturing, and curing techniques, you can explore advanced, mixed-media decorative processes that expand your artistic horizons. Experiment with silkscreen printing stencils and water-based acrylic paints across raw clay slabs to produce intricate geometric patterns, botanical flourishes, or fine textile-like designs before cutting. Integrate fluid, translucent alcohol inks directly into translucent clay formulations, creating swirling, luminous patterns that replicate precious gemstones like turquoise, sea glass, and Mexican fire opals. You can also explore surface gilding using metallic mica powders applied with soft eyeshadow brushes to raw, textured clay reliefs, producing an aged, antique metallic patina upon baking. For dramatic visual contrast, combine baked clay elements with natural elements, such as threading smoothed beach driftwood beads, raw freshwater pearls, or geometric wooden spacers onto your assembly wire. Crafters interested in functional home accents can easily scale up these techniques from jewelry to home decor, transforming patterned slabs into matching coaster sets, decorative jewelry dishes, drawer pulls, and framed miniature wall art. These creative expansions elevate foundational clay crafting methods into a versatile artistic platform, yielding sophisticated, museum-quality designs that delight every recipient.