Handcrafted statement jewelry has established a dominant presence in modern personal style, with geometric polymer clay earrings standing out as an exceptionally adaptable and accessible medium. This comprehensive design guide provides a complete, step-by-step tutorial on designing and assembling ten unique geometric polymer clay earring designs, showing makers how to convert unbaked clay slabs into durable, contemporary fashion accessories. Readers will learn the exact mechanical steps required to properly condition raw clay, cut crisp angular and curvilinear components, complete clean curing cycles, drill connection points, and link hypoallergenic hardware components. Mastering these foundational techniques allows craft enthusiasts to produce boutique-quality jewelry collections for personal wardrobes, curated gifts, or craft collections without demanding industrial studio equipment. Because polymer clay remains lightweight even when formed into substantial multi-tiered compositions, it offers the ideal balance of dramatic scale and comfortable all-day wearability. Learning how to shape precise angles, balance negative space, and pair modern color palettes builds strong tactile precision and creative confidence. By applying the practical methods and structured guidelines detailed throughout this resource, beginners and intermediate artists alike can reliably produce clean, professional finishes across every handmade pair.
Why This Idea Is Trending or Useful
The continued popularity of geometric polymer clay jewelry across digital platforms stems from a broader appreciation for minimalist style, clean architecture, and modern design principles. Modern fashion prioritizes customizable personal accents, making bold geometric jewelry an effective way to introduce tailored color palettes and graphic contours to daily attire. In contrast to metal casting or glasswork, which require specialized workshops, polymer clay offers a beginner friendly creative project that can be executed safely at a standard kitchen table. The material cures at low oven temperatures, making the medium uniquely accessible for home crafters seeking immediate, durable results. From a design perspective, geometric layouts rely on simple mathematical forms like arches, triangles, discs, and trapezoids, which naturally lend themselves to balanced, visually pleasing compositions. This aesthetic adaptability allows makers to experiment freely with trending ideas, including muted earth tones, monochrome contrasts, and playful retro color blocking. Furthermore, the low cost of foundational supplies makes this an attractive DIY pursuit, providing a cost-effective avenue to produce handmade wearable art that rivals commercial retail pieces in beauty and longevity.
Materials and Preparation
Assembling a professional earring collection requires reliable materials, proper tools, and systematic workspace preparation to achieve clean, lint-free outcomes. Begin by selecting high-grade polymer clay that cures to a firm, slightly flexible finish rather than a brittle consistency, ensuring finished pieces withstand accidental drops. Essential hand tools include an acrylic rolling roller or manual clay conditioning machine, ultra-thin flexible tissue blades, metal or three-dimensional printed geometric cutters, a handheld micro-drill with assorted bits, and flat-nose jewelry pliers. You will also need smooth ceramic tiles to serve as both an unyielding work surface and a stable baking plaque. Secure hypoallergenic jewelry findings, focusing on stainless steel or gold-plated brass jump rings, flat-pad earring posts, silicone backs, and strong two-part liquid epoxy. Thorough preparation involves wiping down your ceramic work tile with isopropyl alcohol and washing your hands to remove any stray dust or skin oils that could mar light-colored clay. Planning your geometric layouts on graph paper beforehand establishes exact dimensional proportions, ensuring that every layered segment aligns accurately before the first slab is cut.
1. Minimalist Dual-Tone Arch Dangle

How to Create
The dual-tone arch dangle exemplifies modern design by juxtaposing an open architectural arch with a solid upper stud disc. This design balances structural negative space with clean exterior contours, producing a lightweight, modern silhouette that elongates the neck when worn. The top component consists of a small, opaque circular stud that anchors the earring directly to the lobe, while the lower pendant features a hollow, inverted U-shaped arch linked via a single jump ring. Choosing high-contrast color combinations, such as deep terracotta paired with creamy travertine or charcoal slate paired with warm mustard, reinforces the clean graphic lines of the geometric silhouette. The open interior cutout reduces physical weight significantly, preventing lobe fatigue while maintaining an eye-catching visual footprint. Because the arch swings freely from the upper disc, the earring moves naturally with the wearer, creating fluid dynamic interest against structured clothing or everyday casual wear.
To construct this piece, begin by conditioning two separate portions of clay until pliable, rolling each block out evenly on your ceramic tile to a consistent depth of two millimeters. Use an arch cutter with an internal cutout blade to stamp out the main dangling segment, pressing firmly into the clay and rocking the blade gently to ensure a clean, vertical separation. Next, use a small twelve-millimeter round cutter on the contrasting clay sheet to form the upper stud component. Carefully peel away the surrounding scrap clay, leaving the cut geometric shapes directly on the ceramic tile to prevent finger distortion. Bake the components on the tile in a preheated oven according to your specific clay instructions, then allow them to cool completely. Using a hand-cranked pin vise drill, bore a one-millimeter hole centered along the bottom of the stud disc and another through the upper crest of the arch. Connect both components using a six-millimeter open jump ring, and secure an earring post to the back of the circular disc using clear jewelry adhesive.
2. Tri-Tiered Hexagon Cascade
Step-by-Step Guide
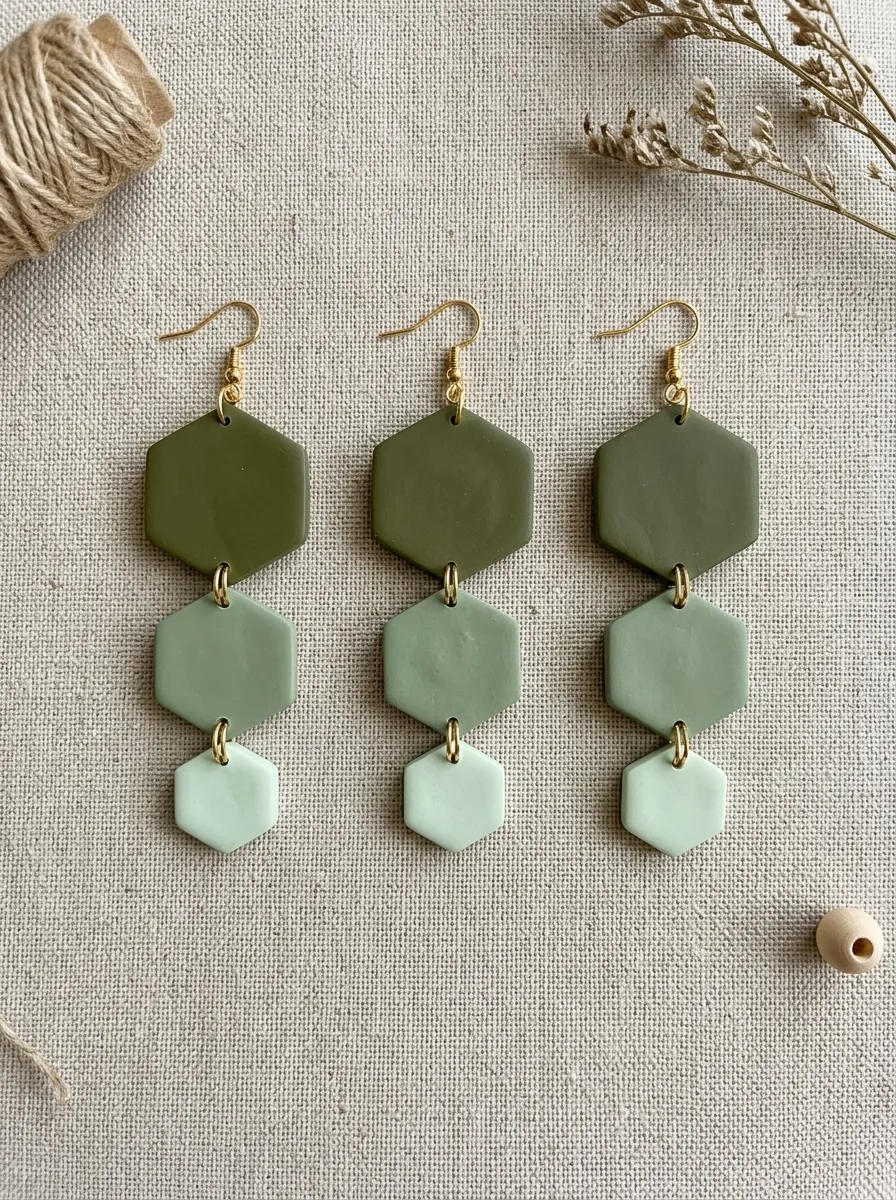
The tri-tiered hexagon cascade utilizes progressive scale to create an articulated, kinetic piece of jewelry that drapes elegantly. This concept stacks three regular hexagonal components in descending dimensions, linking each element with dual jump rings to establish a stable, planar orientation that resists twisting. The repeating geometric symmetry of six-sided polygons provides a structured visual rhythm, while the stepped sizing creates a balanced taper from the earlobe downward. Utilizing a subtle gradient color palette, such as transitioning from deep olive green to sage and finally to pale mint, highlights the structural shift between each tier. The flat, faceted edges catch room lighting cleanly, lending the finished accessory an angular, crystalline presence. Despite including three separate tiers per side, rolling the clay to an exact one-and-a-half millimeter thickness keeps the overall weight under five grams per earring, ensuring long-term wearability.
Initiate the project by rolling a conditioned sheet of clay through your pasta machine on a medium setting to achieve an even thickness of one and a half millimeters. Position nested hexagonal metal cutters measuring twenty-four millimeters, eighteen millimeters, and twelve millimeters across the slab, pressing down firmly to extract matching pairs for each tier. Carefully lift the surrounding excess clay, smoothing any micro-burrs along the cut perimeter with a soft fingertip dipped in a trace amount of water. Transfer the tile containing the shapes directly into the oven, baking at the recommended curing temperature for thirty-five minutes to ensure full polymer cross-linking. After the clay has cooled, map out drilling locations using a fine pencil, placing two parallel marks along the top and bottom flats of each intermediate hexagon. Drill precise one-millimeter holes through every marked coordinate, connect the descending tiers sequentially using four-millimeter jump rings, and attach a secure post to the reverse face of the smallest top hexagon.
3. Asymmetrical Circle and Trapezoid Drop

Execution Process
The asymmetrical circle and trapezoid drop challenges standard matching pairs by varying the geometric arrangement between the left and right earrings while preserving overall visual balance. One side features a solid circular stud suspending a long, tapered trapezoid, while the opposite side pairs a trapezoidal stud with a large suspended disc. This intentional imbalance introduces an avant-garde, gallery-inspired aesthetic that immediately draws attention and complements contemporary, minimalist wardrobes. A restrained, neutral color scheme, such as soft ivory, matte black, and warm sandstone, prevents the differing geometric silhouettes from appearing chaotic or visually disjointed. The stark, straight angled edges of the trapezoids provide a sharp counterpoint to the smooth curves of the circular discs, creating a dynamic visual interplay of forms. This project demonstrates how thoughtful spatial composition can elevate simple geometric cutouts into sophisticated, artistic accessories.
Start by rolling out two slabs of contrasting clay, maintaining a uniform two-millimeter thickness to guarantee uniform depth across both earrings. Using a round cutter measuring twenty millimeters and a matching trapezoid cutter measuring thirty millimeters in height, cut two circles and two trapezoids from your prepared slabs. For the first earring, designate the circle as the hanging lower drop and trim one trapezoid to serve as the compact upper stud base. For the companion piece, reverse this structural hierarchy, utilizing the second trapezoid as the elongated drop beneath the remaining circular stud. Bake all four pieces on a flat surface, allowing them to anneal slowly within the turned-off oven after the curing cycle finishes to prevent thermal warping. Once cold, drill clean connection holes through the designated interface points using a fine drill bit. Assemble each pair using five-millimeter jump rings, ensuring that the rings remain flush, and adhere hypoallergenic stainless-steel flat pads to the top components with two-part epoxy.
4. Concentric Triangle Cutout Pendant
How to Make
The concentric triangle cutout pendant utilizes sharp lines and nested geometry to form a striking, prism-inspired statement piece. This design features a large equilateral triangle with an inner triangular core removed, suspended beneath a matching miniature solid triangular stud. The framing effect created by the open interior chamber introduces a light, airy quality that prevents large-scale geometric earrings from feeling heavy or visually dense. Selecting a warm, monochromatic clay tone, such as raw umber, ochre, or brick red, emphasizes the clean, sharp perimeter angles without relying on distracting surface patterns. The precision of equilateral geometry gives these earrings a modern, graphic profile that pairs seamlessly with high-neckline apparel and structured tailoring. When constructed with straight, crisp cuts, the open framework creates a striking silhouette that frames the jawline cleanly.
Begin by rolling out thoroughly conditioned clay onto a ceramic tile, using guide rails to ensure an exact two-millimeter depth across the entire sheet. Take a thirty-five-millimeter equilateral triangle cutter and press it firmly into the clay slab to establish the primary outer perimeter. Align a smaller, fifteen-millimeter triangular cutter centrally within the larger impression, cutting completely through the core to extract the internal cutout and reveal a hollow triangular frame. Repeat the procedure to create a matching pair, and cut two solid ten-millimeter triangles to function as the upper ear studs. Remove the surrounding scrap clay with a flexible tissue blade, gently smoothing the outer triangular tips to eliminate sharp burs. Cure the shapes at your clay’s specified temperature for thirty minutes, drill a single suspension hole at the apex of each hollow triangle, and join each frame to its corresponding stud using a single jump ring.
5. Segmented Half-Moon Fan Earring

Step-by-Step Guide
The segmented half-moon fan earring blends Art Deco architecture with contemporary bohemian style, creating a sweeping fan motif that contours gently around the earlobe. The earring consists of a semi-circular top plate that suspends multiple vertical clay bars or radiating fringe segments, forming an articulated semicircle that swings freely. This segmented structure produces gentle motion and subtle clicking sounds as the wearer walks, adding a pleasant tactile dimension to the accessory. Working with a cohesive earth-tone palette, such as warm cinnamon, dusty blush, sand, and deep terracotta, enhances the sunburst or fan imagery. The flat upper crescent hugs the lower earlobe, providing a sturdy anchoring base that keeps the dangling fringe pieces hanging straight and evenly spaced. This design demonstrates how combining flat geometry with multi-point articulation can create sophisticated, fluid movement in polymer clay jewelry.
Roll a conditioned sheet of warm terracotta clay to an even two-millimeter thickness using a pasta machine or acrylic roller. Cut two large semicircular shapes measuring thirty millimeters wide to form the top header plates, and cut eight narrow rectangular strips measuring five millimeters wide by twenty millimeters long to serve as the hanging fringe bars. Arrange the rectangular fringe pieces beneath each half-moon plate, aligning the bottoms into a sweeping curved contour that mirrors the outer radius of the semicircular head. Bake all elements together on a flat ceramic tile, ensuring the narrow strips remain perfectly straight throughout the heating process. Once fully cured and cooled, use a fine jeweler’s hand drill to bore matching pilot holes along the flat base of the half-moon and through the top of each individual fringe strip. Connect each hanging fringe segment to the corresponding header hole using small four-millimeter jump rings, and attach a pad post to the back of the half-moon using adhesive.
6. Monochromatic Grid Stud Set

Setup Method
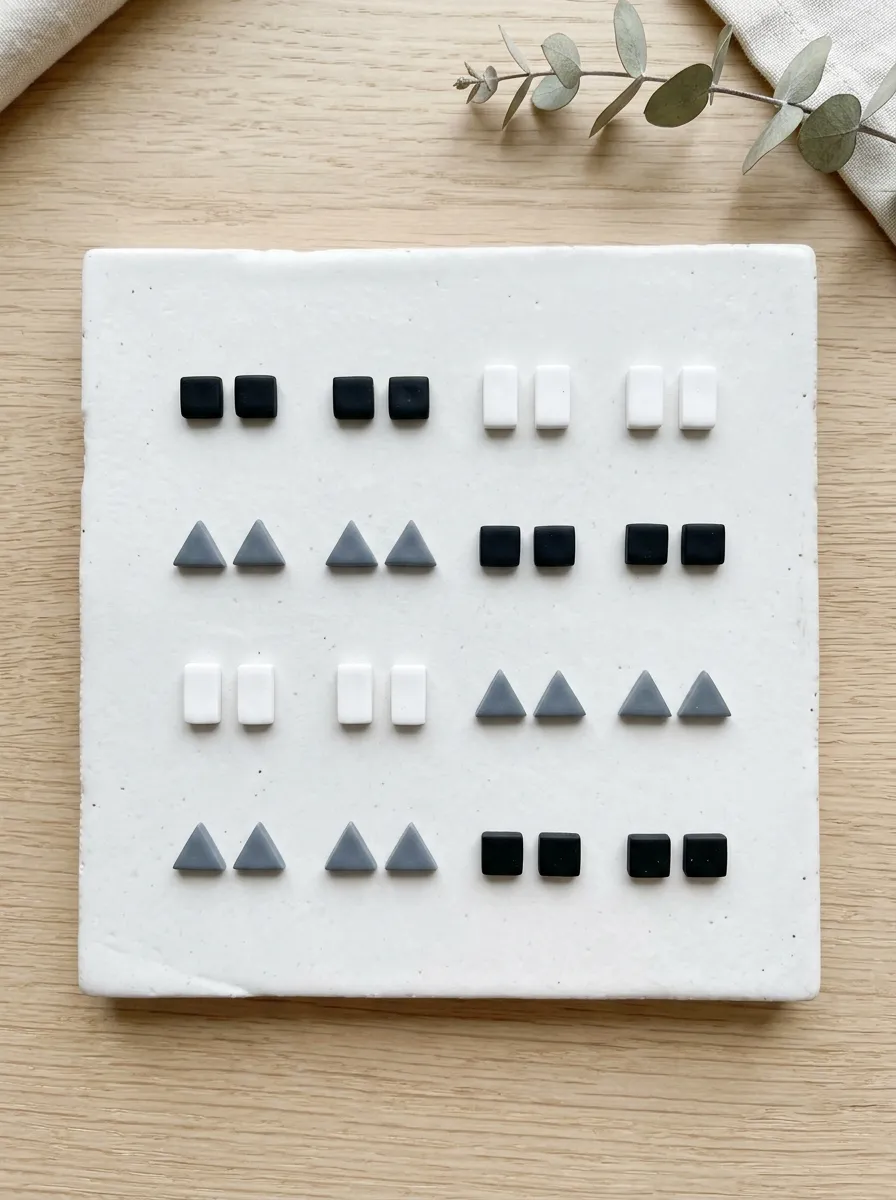
The monochromatic grid stud set offers an understated, everyday jewelry alternative focused entirely on minimalist geometric precision. This design collection features a set of petite studs based on elemental shapes, including five-millimeter squares, narrow rectangles, and small equilateral triangles, executed in a clean black, white, and gray palette. Without dangling tiers or complex jump ring connections, the visual impact relies entirely on sharp edges, flat surfaces, and clean color blocking. These compact geometric forms provide a modern, architectural finish that pairs effortlessly with multiple ear piercings and casual daily outfits. The low-profile silhouette ensures the earrings sit flush against the earlobe, eliminating snagging risks against hair or clothing. This project is ideal for beginners because it requires no hardware drilling, allowing makers to focus on mastering basic clay conditioning, flat rolling, and precise cutter alignment.
Prepare three small portions of polymer clay in pure white, jet black, and mid-tone slate gray, conditioning each until soft and free of air bubbles. Roll each color out separately on a clean glass plate or tile to a consistent depth of two and a half millimeters, taking care to prevent color cross-contamination between rolls. Use micro-geometric cutters measuring between five and eight millimeters to stamp out squares, rectangles, and small triangles from each colored sheet. Carefully remove the negative clay matrix using a flexible tissue blade, leaving the tiny geometric shapes resting untouched on the baking tile. Bake the cut studs for twenty-five minutes at the temperature recommended on your clay packaging to ensure a durable, break-resistant cure. After the pieces cool, sand the reverse side of each stud lightly with four-hundred-grit wet sandpaper to create a tooth, then secure stainless steel posts with a small dot of two-part epoxy.
7. Interlocking Oval and Rectangle Link

How to Create
The interlocking oval and rectangle link uses alternating curved and angular geometry to create a continuous, chain-inspired dangle. The upper component features a hollow, rounded oval loop, which cradles an elongated rectangular frame suspended freely within its lower curve. By pairing soft, sweeping curves with straight vertical lines, the design achieves visual balance through deliberate geometric contrast. Using a soft pastel color scheme, such as butter yellow paired with sage green or lilac paired with soft oat, softens the structural silhouettes and lends the accessory an airy, modern character. Because both components feature open centers, the earrings remain exceptionally light, producing an open-concept jewelry design that flatters without pulling down on the earlobe. The interlocking motion of the geometric frames creates natural fluidity, catching ambient light as the pieces shift throughout the day.
Roll a conditioned sheet of clay to an even two-millimeter thickness using a dedicated rolling pin fitted with rubber guide rings. Stamp out two elongated oval shapes using a forty-millimeter cutter, then use a smaller thirty-millimeter oval cutter centered inside each shape to remove the inner core, leaving two clean oval frames. Next, roll a contrasting clay sheet to the same thickness and cut two rectangular frames measuring twenty millimeters wide by thirty-five millimeters long, again removing the internal clay with a smaller rectangle cutter. Bake the four hollow geometric frames on your ceramic tile, letting them cool completely inside the oven to prevent uneven cooling and surface curling. Using a fine drill bit, bore a clean pilot hole at the top apex of each oval and at the top center of each rectangle. Link the rectangular frame beneath the oval frame using a robust five-millimeter jump ring, and secure a comfortable ball-post stud to the top loop to complete the assembly.
8. Rounded Trapezoid with Hollow Teardrop Core

Step-by-Step Guide
The rounded trapezoid with a hollow teardrop core combines bold, flat architectural planes with an organic, drop-shaped internal cutout. The silhouette features a broad trapezoid with softly rounded bottom corners, housing a centrally removed teardrop opening that exposes the wearer’s neck through the pendant. This contrast between an angular perimeter and a curvilinear internal window creates sophisticated negative space, keeping the design visually engaging from all angles. A muted, earthy palette, such as olive green, burnt amber, or dusty mauve, complements the retro-modern shape, blending Mid-Century modern elegance with modern artisan craftsmanship. The broad lower base of the trapezoid gives the earring grounded visual weight, while the hollow teardrop opening prevents the piece from feeling heavy or cumbersome. This versatile geometric design transitions seamlessly from casual daytime wear to formal evening settings.
Roll your conditioned polymer clay onto a smooth ceramic work surface to a uniform thickness of two millimeters. Align a rounded trapezoid cutter measuring thirty-five millimeters wide by forty millimeters tall over the slab, pressing down evenly to cut the primary perimeter shape. Before lifting the outer cutter, position an eighteen-millimeter teardrop cutter inside the center of the trapezoid, pressing straight down to punch out the hollow interior core. Carefully lift both cutters vertically away from the clay, and use a needle tool to gently extract the inner teardrop scrap without warping the outer frame. Repeat the sequence to produce a matching pair, placing two fifteen-millimeter solid round discs alongside them to serve as upper studs. Bake all components on the tile for thirty-five minutes at the appropriate curing temperature, drill a one-millimeter hole through the top of the trapezoid and the bottom of the stud, and link them securely with a jump ring.
9. Layered Isometric Diamond Drop

Execution Process
The layered isometric diamond drop uses overlapping diamond shapes and subtle stepped elevation to create a dimensional, relief-style statement earring. Rather than cutting out hollow sections, this design stacks smaller solid diamonds over a larger, contrasting diamond foundation to build visual depth. The resulting multi-layered profile casts subtle shadows across the surface of the earring, giving the piece an eye-catching, dimensional presence without adding unnecessary bulk. Working with a monochromatic or tonal palette, such as charcoal gray layered over light dove gray, emphasizes the stepped relief and brings out the clean lines of the diamond geometry. The vertical alignment of the pointed tips creates an elongated silhouette that naturally flatters the jawline. This design demonstrates how layering thin, flat geometric cutouts can produce rich, tactile dimension on a lightweight polymer base.
Condition two contrasting blocks of clay and roll both sheets to a slim thickness of one and a half millimeters using a mechanical clay roller. Cut two large diamond shapes measuring forty-five millimeters from tip to tip using a stainless-steel cutter, and cut two smaller diamonds measuring twenty-five millimeters from the secondary color sheet. Place the smaller diamond directly over the lower half of the larger diamond base, pressing down gently with a smooth acrylic block to bond the raw clay layers without distorting their crisp pointed edges. Bake the assembled layered diamonds on a flat tile for thirty-five minutes, ensuring the dual-layer clay fully bonds during the thermal curing process. Once the pieces have cooled completely, sand the outer edges with wet eight-hundred-grit sandpaper to blend the layer seam smoothly. Drill a clean hole through the top point of each diamond, connect an open earring hook through the opening, and close the loop securely with flat-nose pliers.
10. Split Circle Color-Blocked Geometric Dangle
Setup Method
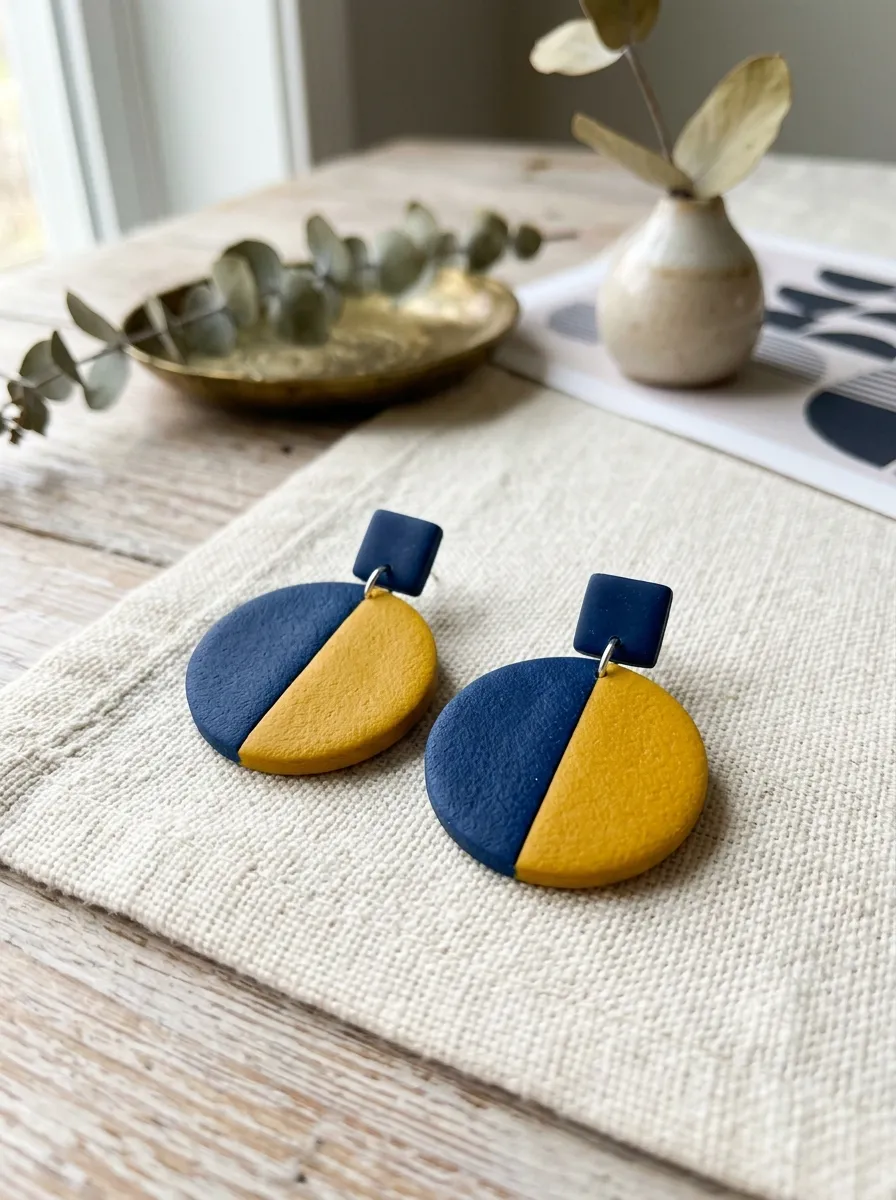
The split circle color-blocked dangle uses a bisected circular silhouette to explore geometric contrast and bold color blocking. This design takes a large circular disc, slices it straight down the vertical centerline, and rejoins the two halves using contrasting clay tones, such as mustard yellow paired with deep navy blue. The joined circle is then suspended beneath a small, square stud component, creating an engaging dialogue between curved and right-angled forms. The straight dividing line down the center of the circle provides a sharp graphic axis that anchors the design, while the circular outer perimeter keeps the overall silhouette soft and approachable. This design provides an exceptional canvas for exploring graphic color theory, allowing makers to experiment with seasonal palettes and complementary color stories. The flat, balanced shape hangs comfortably on the ear, delivering a bold pop of color and modern design appeal to any jewelry collection.
Condition two blocks of contrasting polymer clay and roll each sheet to a matching thickness of two millimeters on your ceramic work tile. Using a straight tissue blade, slice one straight, clean edge along both sheets, then press the two cut edges firmly together side-by-side to form a continuous, two-tone slab. Smooth the joined seam using an acrylic roller with light, even pressure, then center a thirty-millimeter circular cutter directly over the seam line and stamp out your round disc. This technique creates a clean, two-tone circle bisected precisely down the middle with crisp, unblurred color boundaries. Cut two small eight-millimeter square studs from one of the scrap colors to serve as the top anchoring pieces. Bake the components on the tile for thirty minutes, drill pilot holes at the top of each circle and the base of each square, connect the elements with jump rings, and attach stainless steel earring posts to the reverse sides with epoxy.
Common Beginner Mistakes and How to Avoid Them
Beginner jewelry makers frequently encounter structural and cosmetic issues when working with polymer clay, with incomplete conditioning serving as the most common root cause. When clay is not kneaded sufficiently before shaping, the internal plasticizers fail to distribute evenly, resulting in brittle cured pieces that snap or crumble under minor stress. Prevent this by kneading the raw clay thoroughly until it becomes warm, soft, and pliable, passing it repeatedly through a clay machine until it bends without cracking along the edges. Another widespread error is baking components at incorrect or fluctuating temperatures, which either leaves the pieces under-cured and fragile or scorches the clay and alters its color. Always utilize an independent, freestanding oven thermometer placed inside the oven to monitor real-time temperatures, rather than relying solely on the appliance dial. Additionally, working on rough or dusty surfaces can embed unwanted lint, hair, and fingerprints into the unbaked clay slabs. Protect your designs by cleaning smooth ceramic tiles with rubbing alcohol before rolling, keeping wet wipes handy, and gently wiping the surface of unbaked pieces with a cotton swab dipped in alcohol to smooth away stray surface debris.
Practical Tips for Better Results
Elevating the overall finish of handmade polymer clay earrings requires adopting refined preparation techniques and professional assembly practices. Utilizing ultra-thin, sharp cutters ensures clean vertical edges, significantly cutting down on post-bake sanding time. When working on smooth ceramic tiles, leave cut clay shapes directly on the tile during the baking cycle rather than lifting and transferring them, which prevents unintentional finger indentations and edge distortion. For post-curing refinements, invest in automotive wet-and-dry sandpaper in progressive grits ranging from four-hundred to one-thousand; sanding under a light trickle of running water prevents airborne clay dust while polishing edges to a smooth, factory-grade finish. When adhering metal earring posts to cured clay backs, avoid standard instant craft glues, which tend to degrade and pop loose over time. Instead, prepare the bonding surfaces by scratching a light crisscross texture into both the clay and the metal pad, then secure the post using a high-strength, two-part epoxy resin. Finally, use two pairs of flat-nose pliers to twist jump rings open sideways rather than pulling them apart, which preserves their round profile and prevents metal fatigue.
Styling, Presentation, or Organization Ideas
Presenting and organizing geometric polymer clay earrings thoughtfully enhances both their functional storage and their visual appeal as wearable art. For personal collections, display your earrings on tiered wooden stands fitted with perforated brass screens, which keeps hanging dangles untangled while turning colorful jewelry into attractive vanity decor. When styling geometric statement earrings with daily wardrobes, pair bold architectural shapes like arches and cascading hexagons with clean, minimalist clothing to let the jewelry serve as the central visual anchor. Neutral-toned clay accessories complement casual denim, crisp white button-down shirts, and tailored blazers effortlessly, while vibrant, color-blocked pieces bring energetic pops of color to dark knit sweaters and monochromatic outfits. If preparing earrings for gifting or boutique sales, mount finished pairs on heavy cardstock cards embossed with clean geometric patterns or neutral kraft textures. Store finished inventory in lidded compartments lined with soft cotton padding, shielding the cured clay surfaces from scratchy metal chains and keeping them safely protected from prolonged, direct sun exposure.
Budget or Time Planning
Careful material management and structured batch-working allow makers to produce high-end geometric jewelry collections efficiently on an accessible budget. A single standard two-ounce block of polymer clay can yield six to ten complete pairs of geometric earrings, making this craft an exceptionally economical creative pursuit. To keep initial costs low, invest in versatile starter tools, such as basic geometric cutter sets, a smooth acrylic roller, an independent oven thermometer, and a variety pack of stainless steel findings, avoiding expensive specialty equipment until your foundational skills are established. Maximize your crafting time by organizing production into dedicated, sequential stages: dedicate one session to planning layouts and conditioning clay, a second session to rolling, cutting, and baking, and a final session to drilling, sanding, and assembling hardware. Working in batches this way reduces tool cleanups, streamlines assembly-line efficiency, and ensures consistent quality across multiple pairs. Storing usable clay scraps by color family in airtight plastic bags prevents material waste, allowing you to recondition leftover trimmings into custom mixed shades, faux stone textures, or marbled slabs for future jewelry collections.
Creative Expansion and Advanced Inspiration
Once you master fundamental geometric cutting and assembly techniques, explore advanced variations that push the boundaries of polymer clay jewelry design. Experiment with mixed-media compositions by incorporating hammered raw brass charms, natural wood pendants, or woven cotton tassels alongside cured clay components, creating rich tactile contrast across your jewelry line. You can also introduce unique surface treatments to unbaked slabs, such as using silkscreen stencils with acrylic paint, embedding metallic gold leaf foil, or dusting mica powders over raw clay to simulate natural stone, terrazzo, or aged ceramics. Advanced structural methods include experimenting with hollow-core techniques, creating two-tone extruded cane patterns, or sculpting dimensional relief accents directly on flat geometric backers. Beyond personal jewelry, these same geometric clay techniques can be scaled up to create modern home accents, including decorative hanging wall mobiles, fan pulls, and minimalist keychain fobs. Keeping a dedicated sketchbook of architectural outlines, textile patterns, and trending color combinations will provide endless inspiration, helping you continuously evolve your personal aesthetic across future creative projects.
Leave a Reply