The revival of late-nineties and early-two-thousands aesthetics has reshaped contemporary accessories, bringing bold nostalgia, playful motifs, and expressive color palettes to everyday fashion. Polymer clay provides an accessible, durable modeling medium for sculpting these vibrant retro accents at home without requiring industrial manufacturing equipment. This detailed tutorial outlines ten distinct Y2K-inspired polymer clay jewelry ideas, spanning tactile checkered rings, dimensional butterfly hair accessories, blooming flower studs, and glossy cyber-futuristic pendants. Readers will learn the exact forming techniques, conditioning processes, curing protocols, and assembly methods necessary to produce professional, shatter-resistant wearable art. Designing your own handmade jewelry eliminates the sizing limitations and low-grade plastics typical of fast-fashion accessories, granting total control over color formulation and structural durability. Furthermore, mastering these three-dimensional clay crafting skills builds foundational knowledge that extends naturally into home decor accents, vanity organization trays, and seasonal gift construction. By exploring systematic techniques such as cane building, custom marbling, liquid glaze encapsulation, and wet sanding, makers of all skill levels can easily replicate vintage millennial styles. The subsequent sections deliver comprehensive preparation workflows, detailed supply checklists, two-paragraph instructional breakdowns for ten complete concepts, and actionable project planning advice.
Why This Idea Is Trending or Useful
Nostalgic millennial jewelry continues to dominate digital inspiration boards and modern Pinterest ideas because it blends joyful visual irony with tactile, handmade creativity. Contemporary fashion enthusiasts frequently seek out distinctive statement pieces that depart from sterile minimalist style rules, favoring high-saturation hues, chunky proportions, and whimsical pop-culture symbols. From a design perspective, polymer clay translates Y2K design tropes—such as cyber-hearts, smiley faces, and acid-bright checkerboards—into lightweight, durable jewelry that remains comfortable for extended wear. As a rewarding DIY creative project, fashioning clay accessories requires minimal initial investment, functioning seamlessly on a standard craft desk without demanding extensive studio infrastructure. Because fundamental clay sculpting relies on basic geometric forming, simple slab rolling, and straightforward cutter shapes, this medium serves as an exceptionally beginner friendly entry point into three-dimensional art. Crafting bespoke accessories also delivers practical budget ideas, as a handful of standard clay blocks can yield dozens of high-value, coordinated accessories at minimal unit cost. Finally, the finished cured creations integrate well into retro-themed home decor, serving as vibrant vanity display items or hanging wall accents when not actively worn.
Materials and Preparation
Thorough preparation and selective material procurement ensure that handcrafted polymer clay jewelry withstands routine daily wear without cracking or bending. Essential supplies include premium oven-bake polymer clay in neon, pastel, and translucent shades, alongside metallic leaf foil, solvent-resistant glitters, and liquid polymer clay. High-durability jewelry findings are required for assembly, including hypoallergenic surgical steel earring posts, reinforced jump rings, industrial two-part epoxy, and flexible ball chains. Key sculpting tools feature an acrylic roller, a rigid carbon steel tissue blade, varied micro-geometric cutters, silicone-tipped shaping pens, and an aluminum or wooden ring mandrel. Preparation begins by establishing an immaculate, lint-free workspace on a polished ceramic floor tile or glass cutting mat, wiping every surface down with isopropyl alcohol to prevent fiber contamination. Condition the clay thoroughly by hand-kneading or passing it repeatedly through a dedicated manual clay conditioning machine until it bends without cracking along its folded seams. Calibrate your household craft oven using a freestanding, independent oven thermometer, verifying precise thermal control before initiating any baking cycles to prevent scorching delicate pastel pigments.
1. Chunky Bubble Heart Pendant with Liquid Glaze
Step-by-Step Guide
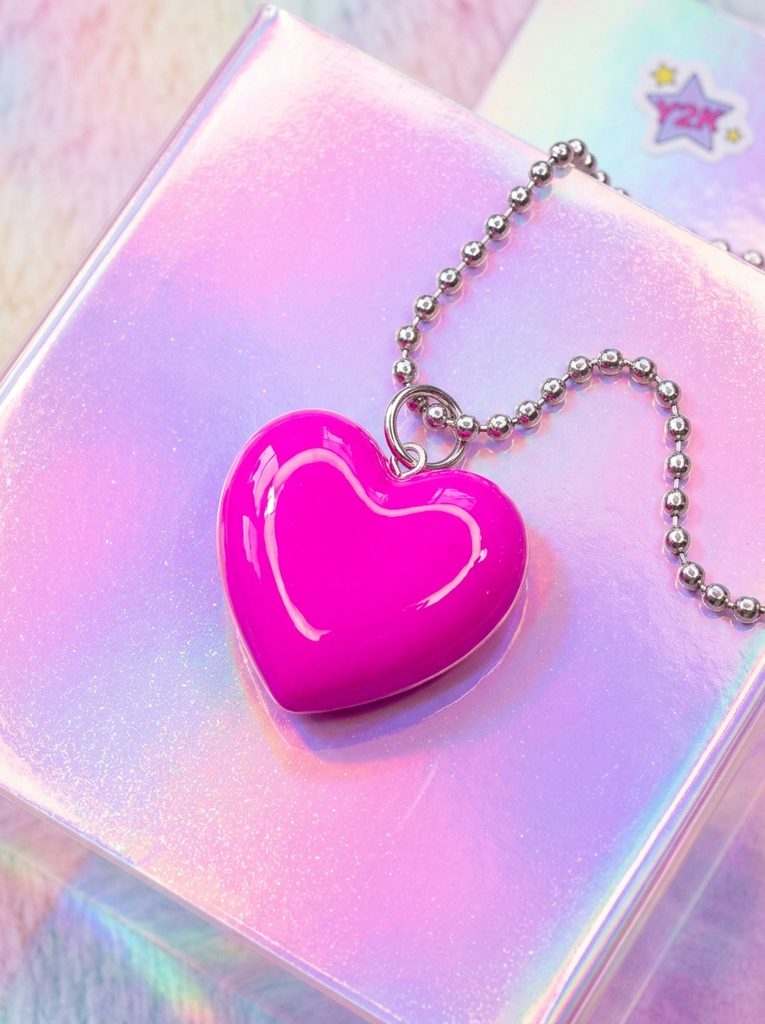
The puffy bubble heart is an unmistakable emblem of early-two-thousands accessory design, celebrated for its exaggerated dimensions, rounded curves, and playful aesthetic. This design pairs an inflated, three-dimensional heart profile with a high-gloss, wet-look finish reminiscent of clear vinyl accessories and glossy stationery. Rendered in a bright hot-pink or neon-coral polymer base, the pendant acts as a confident focal point when suspended from an open silver ball chain or colored cord. The soft, pillowy contours catch natural daylight, producing dynamic shadow lines and highlights that emphasize the piece’s sculptural volume. By reinforcing the internal core and rounding the exterior margins, the pendant provides substantial visual weight while remaining exceptionally comfortable and lightweight against the collarbone. This accessory functions as an energetic centerpiece for retro casualwear, graphic tees, and layered streetwear ensembles.
To create this bubble heart pendant, condition two ounces of bright magenta polymer clay until fully pliable and smooth. Roll the conditioned clay into a uniform sphere, then gently pinch the lower half between your thumb and index finger to form a plump, symmetrical teardrop cone. Rest the cone flat on your ceramic tile and use the dull back edge of a tissue blade to press an indentation vertically into the wide top end, dividing the mass into two rounded heart lobes. Smooth and round the lobes with your fingertips and a silicone shaper, ensuring there are no sharp edges or flat indentations along the perimeter. Insert a heavy-gauge stainless steel eye pin straight down through the center crevice between the lobes, securing it with a drop of liquid clay. Bake the heart on a ceramic tile for forty-five minutes at the manufacturer’s recommended temperature, let it cool completely, and apply a thick, self-leveling coat of high-gloss UV resin over the entire surface to achieve a glossy, glass-like finish.
2. Groovy Checkered Dome Ring in Acid Green and White
Execution Process
High-contrast checkerboard patterns defined the alternative skate, pop-punk, and digital aesthetics of the late nineties and early two-thousands. This project translates that iconic graphic motif into an oversized, domed band ring featuring contrasting squares of bright lime green and stark white polymer clay. The ring utilizes an ergonomic, curved exterior that tapers gently toward the base of the finger, ensuring comfortable wear while presenting an eye-catching geometric surface. Combining crisp geometric squares with a continuous curved band creates an appealing tension between flat graphics and three-dimensional form. The vibrant color pairing introduces an electric pop of color that stands out against casual denim and athletic streetwear. The substantial clay thickness delivers structural strength, preventing the ring from warping or cracking under everyday hand movements.
Begin by rolling out equal sheets of conditioned lime green and opaque white clay to a uniform thickness of three millimeters. Cut each sheet into several straight strips measuring precisely three millimeters in width using a metal ruler and a sharp tissue blade. Lay the contrasting strips side by side in an alternating pattern on your work tile, gently pressing their edges together to form a striped sheet. Cut across the striped sheet perpendicularly at three-millimeter intervals, realigning every second row to produce a seamless checkered grid. Roll an acrylic pin lightly across the checkered slab under parchment paper to seal the joins, then drape the slab around a metal ring mandrel sized to your finger. Trim the ends cleanly, weld the bottom seam securely with a flat silicone tool, and shape the outer edges into a smooth dome. Bake the ring directly on the mandrel for thirty-five minutes, cooling fully before wet-sanding the surface with one-thousand-grit abrasive paper to reveal sharp, clean square boundaries.

3. Dimensional Translucent Butterfly Hair Clip Trio
How to Create
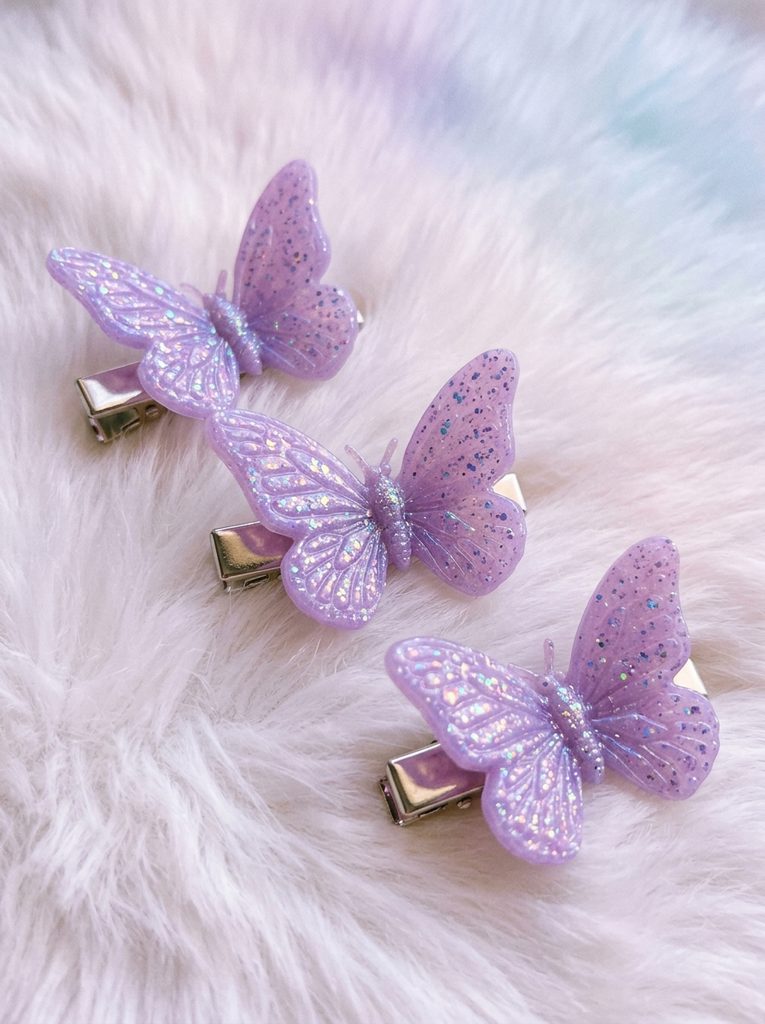
Whimsical butterfly clips were an absolute staple of turn-of-the-century hairstyle trends, adding playful pops of color, kinetic charm, and lighthearted character to layered cuts. This design features a trio of sculpted miniature butterflies crafted from translucent clay infused with fine holographic glitter and pastel mica powders. The wings are sculpted with delicate scalloped borders and raised structural veins, positioned at an upward angle to mimic an insect in mid-flight. When cured, translucent polymer clay allows light to pass through the thin wing membranes, creating an iridescent, ethereal glow that glistens under direct sunlight. Mounting these delicate paper-thin clay butterflies onto sturdy silver metal alligator hair clips creates an authentic, nostalgic styling accessory that secures braids, updos, and face-framing strands.
To construct the butterflies, blend a block of translucent polymer clay with a pinch of soft lilac mica powder and fine iridescent glitter flakes. Roll the clay into an even slab measuring two millimeters thick using an acrylic roller and depth guide rings. Use a miniature butterfly cutter or a sharp craft scalpel to cut out three symmetrical butterfly silhouettes, softening any rough cut margins with a damp fingertip. Place each cut butterfly into a folded strip of cardstock or a crumpled aluminum foil trough, propping the wings upward at a forty-five-degree angle while keeping the central body flat. Bake the butterflies within the foil supports for thirty minutes to set the dynamic, uplifted wing posture permanently. Once cooled, roughen the back of the flat clay bodies and the upper surface of three small metal alligator clips with coarse sandpaper, bonding them together using two-part industrial epoxy adhesive for maximum daily durability.
4. Retro Daisies and Squiggle Drop Earrings
Step-by-Step Guide
The simplified daisy motif, paired with dynamic serpentine squiggles, captures the sunny, retro-futuristic optimism that characterized millennial teen decor and fashion. This earring design features a two-part drop construction: an asymmetrical, wavy clay squiggle connector that suspends a classic five-petal cartoon daisy bloom. Utilizing an electric palette of buttercup yellow, crisp white, and saturated tangerine produces a playful visual balance that frames the jawline with energetic movement. The flat, graphic execution keeps the earrings exceptionally lightweight, preventing uncomfortable earlobe pulling during extended daily wear. The gentle swaying motion between the suspended daisy and the top wavy connector introduces kinetic charm to the accessory. This piece serves as an ideal statement accent for summer dresses, oversized cardigans, and colorful layered vintage outfits.
Begin by rolling out an opaque white clay slab to a two-millimeter thickness, using a small flower plunger cutter to stamp out two uniform five-petal daisy blossoms. Roll two small pea-sized balls of bright yellow clay, pressing them flat into the center of each white flower to create rounded, dimensional pollen centers. Next, roll a coil of tangerine orange clay to a diameter of four millimeters, curving it into a serpentine, S-shaped squiggle measuring one and a half inches in length. Pierce a small hole through the top and bottom of each orange squiggle, as well as through the top petal of each daisy, using a clean sewing needle or jewelry drill bit before curing. Bake all elements flat on a parchment-lined ceramic tile for thirty-five minutes at the temperature indicated on the clay packaging. After the pieces cool, connect the daisies to the bottom of the squiggles using six-millimeter stainless steel jump rings, adhering surgical steel earring posts to the top back of the squiggles with two-part epoxy.

5. Cyber-Futuristic Chrome Liquid Drop Pendant
Execution Process
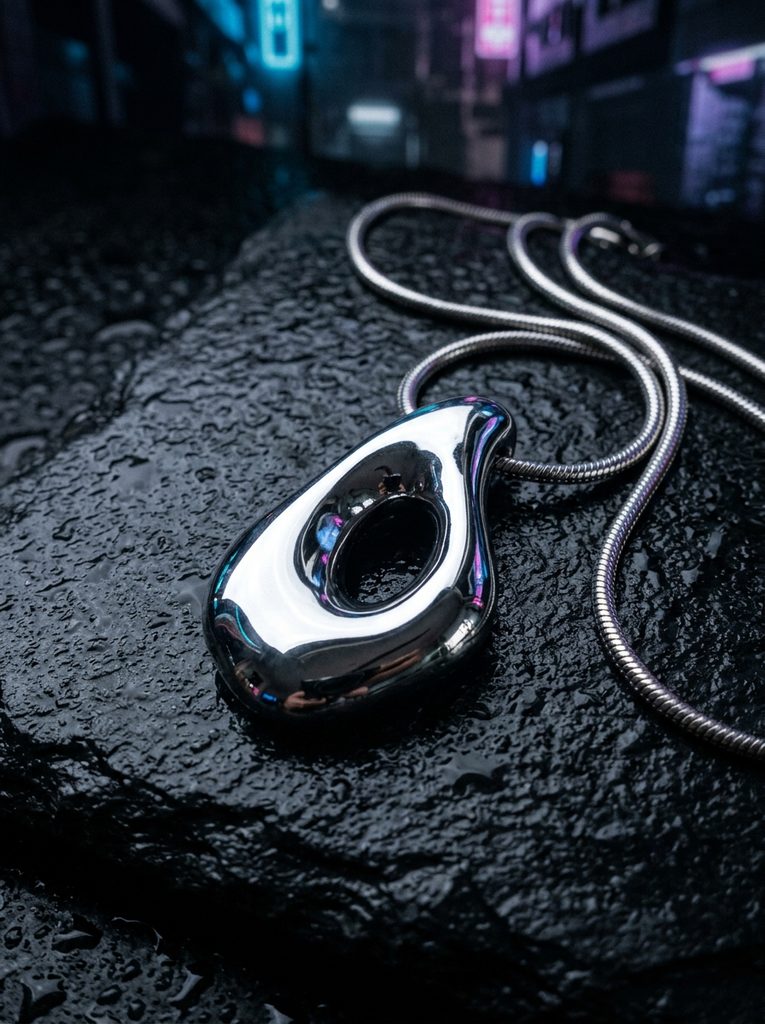
Drawing heavy inspiration from the Y2K era’s obsession with cyber-culture, digital interfaces, and liquid metal aesthetics, this pendant showcases an abstract, molten droplet silhouette. The design abandons traditional symmetry in favor of an organic, fluid puddle form featuring an off-center negative cutout. The clay base is coated with a mirror-shine chrome powder or silver leaf, producing a reflective surface that mimics molten mercury or polished liquid chrome. This bold, minimalist style statement carries an industrial edge that complements late-nineties cyberpunk, technical nylon outerwear, and dark denim. The smooth, flowing borders ensure the pendant feels comfortable against the skin, while the open central void provides visual lightness and modern balance within a chunky silhouette.
Start by conditioning a portion of dense black polymer clay, as a dark base provides superior depth for reflective metallic surface powders. Hand-sculpt the clay on a glass work mat into an asymmetrical, flowing droplet measuring two inches in length and five millimeters in thickness, keeping the perimeter edges rounded and soft. Use a small oval metal cutter to punch an irregular negative hole through the upper third of the droplet, smoothing the inner rim with a silicone shaping pen. Lightly buff silver chrome mica pigment across the entire surface of the raw black clay using a soft foam applicator brush until an opaque, mirror-like metallic sheen is achieved. Cure the pendant on an unglazed ceramic tile for forty minutes, allowing it to cool slowly inside the oven to prevent thermal shock. Finish by sealing the chrome surface with a protective coat of water-based gloss varnish, suspending the completed pendant from a heavy stainless steel snake chain.

6. Chunky Smiley Face Signet Ring
How to Create
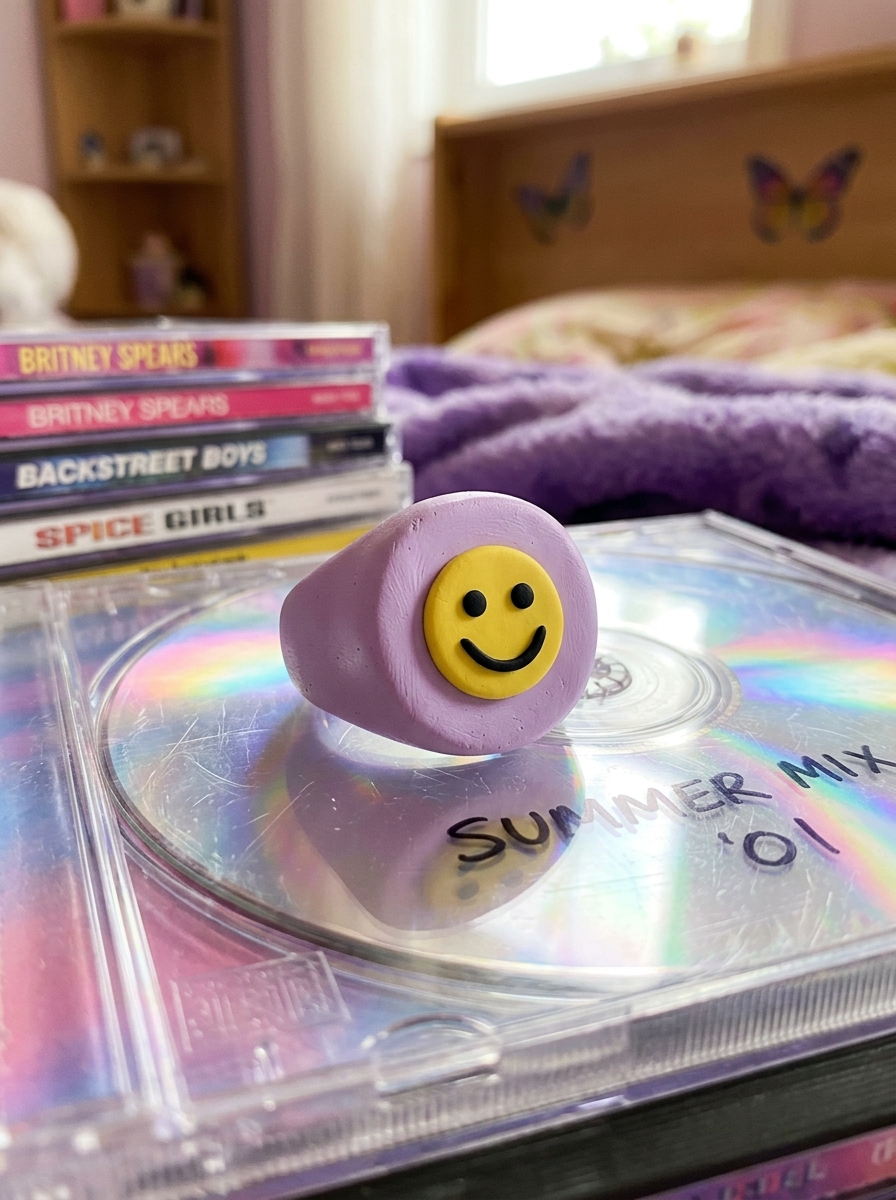
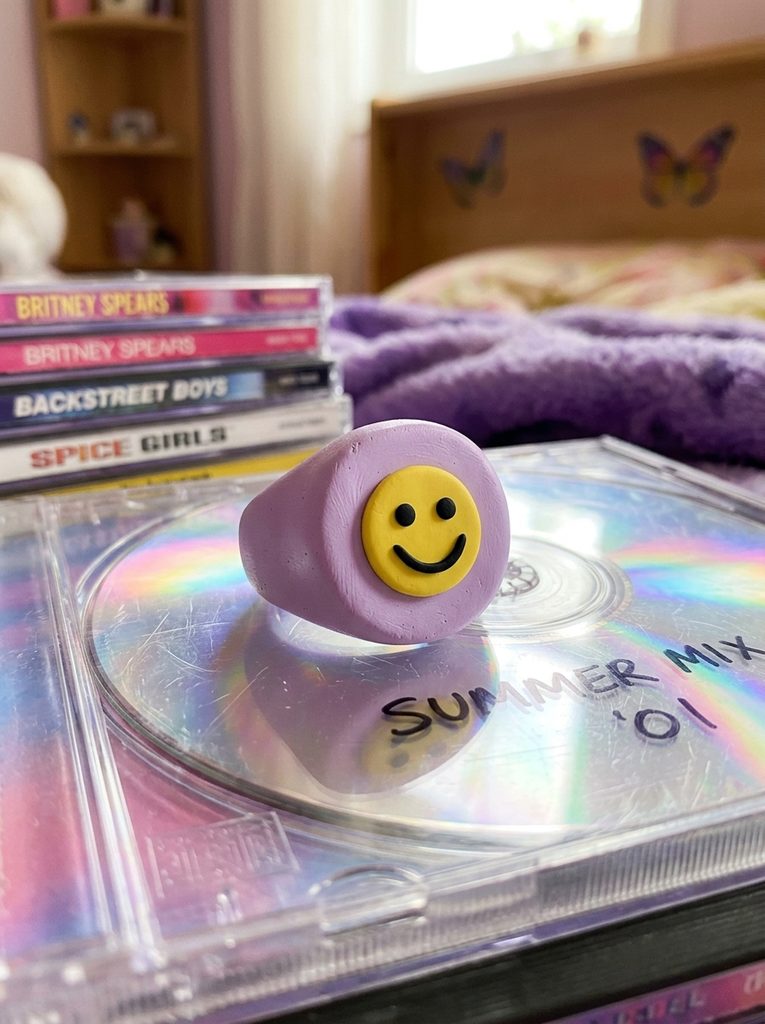
The classic yellow acid-house smiley face represents one of the most enduring symbols of millennial youth culture, radiating playful irony and nostalgic charm. This jewelry piece incorporates the cheerful motif into an oversized signet ring, featuring a thick, flat circular face supported by tapered, sculptural shoulders. The base of the ring is crafted from an unexpected pastel lavender or sky blue clay, creating a modern color contrast that frames the bright yellow smiley face set into the top surface. The bold, chunky mass of the signet ring provides a substantial hand presence that stands out when styled alone or stacked with other statement rings. The flat face keeps the artwork protected from friction, while the thick band walls ensure structural integrity against everyday wear and tear.
To fabricate this signet ring, condition a two-ounce block of pastel lavender polymer clay, rolling it into a thick rod fifteen millimeters in diameter. Cut a segment twenty millimeters long, flattening the top end against a glass tile to establish a crisp circular face while draping the lower ends around an appropriately sized metal ring mandrel. Weld the bottom ends together on the underside of the mandrel using a silicone shaper, smoothing the seam thoroughly. For the smiley motif, cut a very thin disc of bright yellow clay and apply it directly onto the flat lavender ring face using a tiny smear of liquid clay. Indent two vertical oval eyes and a curved smile line into the yellow disc, filling the grooves with black liquid polymer clay applied using a fine needle. Bake the entire assembly supported on the mandrel for forty minutes, letting it cool before wet-sanding the edges to produce a smooth, refined matte finish.
7. Pastel Pixel Heart Dangle Choker Elements
Step-by-Step Guide
The pixel heart motif pays homage to early digital virtual pets, sixteen-bit handheld gaming consoles, and low-resolution internet graphics from the dawn of the new millennium. This project constructs miniature pixelated hearts using a mosaic cane technique, assembling tiny square rods of clay into a crisp 8-bit silhouette. Rendered in soft pastel pink, mint green, and pale butter yellow, these stepped geometric charms introduce digital nostalgia to modern everyday outfits. The charms are suspended along a short black tattoo-style stretch choker or a velvet ribbon, sitting close to the throat to frame the neck with retro flair. The precise, stepped outer contours capture the charm of vintage digital sprites, turning low-resolution computer graphics into tangible, three-dimensional wearable art.
Begin by rolling out equal slabs of pastel pink and translucent white polymer clay, cutting them into long, uniform square rods measuring two millimeters on each side. Assemble the square rods in a grid pattern to build an 8-bit heart cross-section: use pink rods for the interior heart pixels and translucent rods to fill the outer negative spaces. Gently compress the assembled cane block from all four sides, reducing the overall thickness while preserving the internal square alignment. Chill the cane in the refrigerator for twenty minutes to firm the clay, then use a sharp, rigid tissue blade to slice off clean two-millimeter-thick pixel heart tiles. Pierce a horizontal hole through the top pixels of each heart using a fine needle. Bake the flat tiles on parchment paper for thirty minutes, cool completely, and string five finished pixel hearts along a velvet ribbon or cord, spacing them with silver crimp beads for a balanced neckline presentation.

8. Swirled Marble Cyber-Drop Hoop Earrings
Execution Process
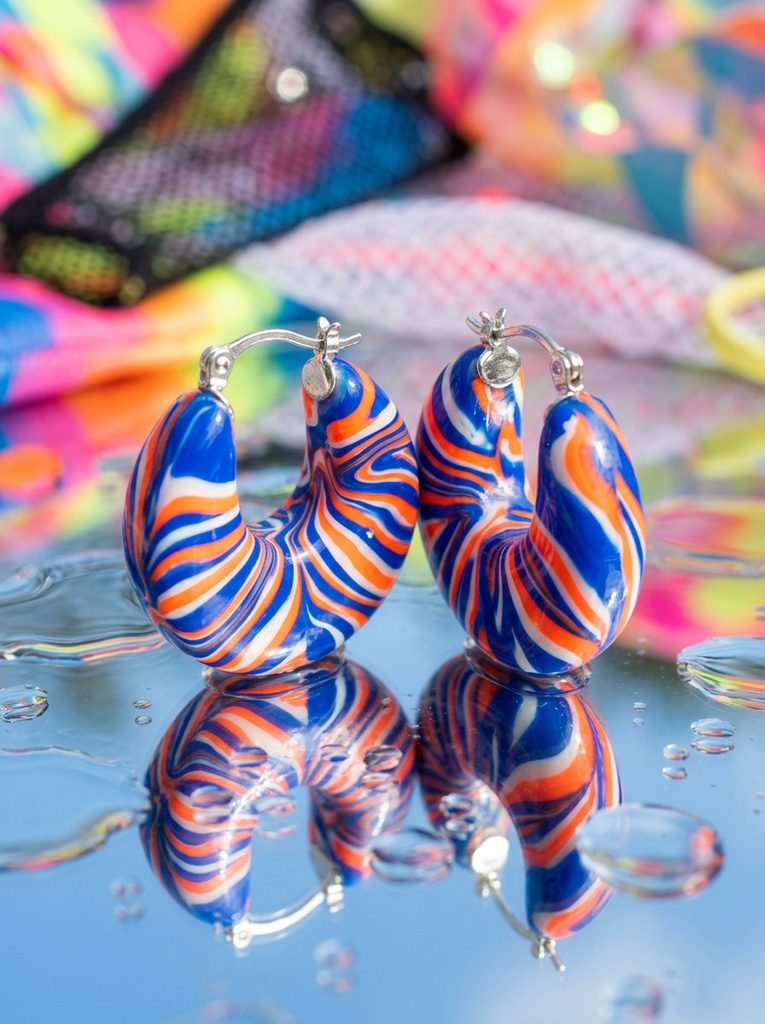
Dynamic marble patterns blending vibrant, clashing colors were a staple of Y2K stationery, inflatable furniture, and casual accessories. This earring design showcases thick, crescent-shaped hoop charms characterized by energetic swirls of electric blue, bright orange, and opaque white clay. The colors are mixed just enough to produce bold, ribbon-like striations across the surface without blending into a muddy tone. Suspended from small silver huggie hoops, these chunky clay crescents swing freely, catching light across their curved contours and dynamic marbling. The seamless, fluid transitions between the bright colors provide an artistic, one-of-a-kind appearance for every single piece. This project is ideal for using leftover scrap clay, transforming small odds and ends into an elevated, high-fashion retro accessory.
To make the marbled hoop charms, condition equal portions of electric blue, vivid orange, and white polymer clay. Roll each color into a long rope roughly six millimeters thick, aligning the three ropes parallel to each other on your work surface. Twist the ropes tightly together into a single striped spiral, then fold the twisted coil in half and roll it out into a smooth rod again. Repeat the twisting and folding process three times until fine, organic marble ribbons run through the clay body. Cut the marbled rod into two equal segments, bending each into an open, tapered crescent hoop shape with rounded terminal ends. Pierce a small vertical hole through the top apex of each crescent using a pin. Bake the hoops on a bead-baking rack or curved ceramic surface for thirty-five minutes. Once cooled, wet-sand the hoops with fine-grit paper to remove surface imperfections and attach them to silver huggie earring findings.
9. Candy-Colored Inflatable Letter Initial Necklace
How to Create
Exaggerated bubble lettering embodies the playful, uninhibited visual culture of late-nineties pop music videos and teen magazines. This concept features an oversized, rounded initial letter sculpted to resemble an inflated balloon or soft candy confection. Rendered in a semi-translucent jelly hue—such as translucent grape purple or neon watermelon—the letter features soft, seamless curves that catch light like blown glass. The inflated aesthetic turns personal typography into an artistic, sculptural statement that rests comfortably on the chest. Suspended from an iridescent beaded cord or a bright plastic ball chain, this personalized accessory delivers vibrant retro charm while maintaining a clean, modern design execution. The smooth, rounded surfaces ensure there are no uncomfortable corners or delicate points that could snap during daily wear.
Begin by conditioning two ounces of translucent polymer clay mixed with a small amount of bright purple pigment paste until uniform. Roll the clay on your tile into a thick, even coil measuring eight millimeters in diameter, using your fingers to smooth away any seams or tool marks. Bend and curve the thick coil to form your chosen alphabet initial, gently blending any intersecting joints with a silicone shaper to preserve a seamless, inflated bubble appearance. Soften the terminal ends of the letter strokes into rounded domes, lightly pressing an acrylic block against the piece to keep the back surface flat. Insert a horizontal stainless steel wire tunnel through the upper back of the letter using a needle tool, creating an invisible channel for necklace stringing. Bake the finished letter flat on a tile for forty minutes, allowing it to cool slowly before coating it with two layers of water-based gloss glaze to replicate a shiny, inflatable texture.
10. Textured Yin-Yang Cord Pendant
Step-by-Step Guide
The ancient yin-yang symbol experienced an explosion of mainstream popularity during the late nineties, becoming an iconic visual motif across casual streetwear, jewelry, and room decor. This project reimagines the classic balance emblem by replacing traditional black and white with an unexpected millennial color pairing, such as pastel lilac and buttercup yellow. The pendant features a flat, circular disc displaying the flowing S-curve division and contrasting inlaid dots that define the symbol. The flat, graphic disc is suspended from a simple black satin cord, offering an authentic throwback style that pairs naturally with bucket hats, baby tees, and vintage denim. The clean planar surface showcases meticulous clay inlay work, celebrating technical precision within a relaxed, nostalgic aesthetic that remains endlessly wearable.
To construct the yin-yang pendant, roll out conditioned sheets of pastel lilac and soft butter yellow clay to an identical thickness of three millimeters. Use a two-inch circular cutter to cut a disc from each color, laying the discs flat on your glass mat. Use a curved paper template or an S-shaped cutter to slice through the vertical center of both circles, creating two interlocking comma-shaped halves. Swap the contrasting halves, pressing one lilac half and one yellow half together on your tile to form a two-tone circle. Roll lightly over the join with an acrylic roller to fuse the center seam securely. Use a small metal straw or micro-cutter to punch a small hole in each half, filling the holes with contrasting clay circles. Pierce a hanging hole through the top perimeter of the disc. Bake the pendant on a ceramic tile for thirty-five minutes, cool completely, and string the finished piece onto an adjustable knotted black satin cord.

Common Beginner Mistakes and How to Avoid Them
The most critical technical error encountered by novice clay jewelry makers is under-baking finished pieces out of fear of scorching bright pigments. Under-cured polymer clay remains brittle, chalky, and prone to snapping when subjected to the everyday kinetic stress of wearable jewelry. Prevent this by using an independent oven thermometer to verify temperature accuracy, curing high-strength clays for the maximum duration recommended by the manufacturer. Another frequent mistake is neglecting thorough clay conditioning, which leaves internal micro-fractures and air pockets that weaken the finished accessory. Always knead raw clay until it is soft, pliable, and passes the fold test without cracking along its seams. Beginners also often contaminate bright pastel and neon colors with airborne dust, lint, and dark fibers. Keep your work tile clean by wiping tools with isopropyl alcohol, washing hands frequently, and using a scrap piece of white clay to roll across surfaces and pick up stray dust before handling project materials. Finally, avoid using fast-drying superglues to attach metal earring posts directly to baked clay, as standard adhesives break down quickly under skin oils; use industrial two-part epoxy or embed findings behind an additional layer of baked clay.
Practical Tips for Better Results
Achieving professional, boutique-quality results relies on meticulous surface finishing and disciplined curing practices. Always utilize a high-density ceramic floor tile or thick glass cutting mat as both your primary sculpting surface and your baking tray; this eliminates the need to peel raw, delicate clay shapes off your desk, preventing unwanted fingerprint dents and warped outlines. To minimize post-bake sanding, smooth away tool marks and finger impressions on raw clay using a soft paintbrush dipped lightly in isopropyl alcohol before placing items in the oven. Invest in high-grade wet-or-dry sandpaper, and always sand your cured pieces submerged in a shallow bowl of warm water containing a drop of dish soap to suppress airborne dust and prevent the abrasive grit from clogging. Progress through four-hundred, six-hundred, eight-hundred, and one-thousand grits to achieve a satin-smooth finish. If an ultra-glossy, plastic-like surface is desired to capture that authentic millennial look, apply two thin coats of water-based polyurethane varnish or UV resin, curing thoroughly to achieve an enduring, crystal-clear protective shell.
Styling, Presentation, or Organization Ideas
Integrating Y2K-inspired polymer clay jewelry into modern wardrobes requires thoughtful styling balance, pairing bold retro statements with clean, contemporary foundational garments. Pair oversized bubble heart pendants and chunky checkered rings with understated modern staples like crisp oversized poplin shirts, neutral ribbed knitwear, or structured denim jackets to let the playful colors stand out. For an authentic throwback aesthetic, layer multiple clay accessories together, combining a pastel daisy choker with stacked checkered dome rings and translucent butterfly hair clips. When presenting these pieces as gifts or retail inventory, mount them on backing cards featuring holographic foil accents, retro pixel typography, or clean metallic borders that reinforce the turn-of-the-century design story. For home storage and vanity organization, display your clay jewelry inside transparent acrylic storage drawers, colorful melamine trays, or upon sculptural ceramic jewelry dishes. Storing your jewelry flat away from excessive heat and direct sunlight preserves the vibrant clay pigments and prevents UV resin finishes from premature yellowing over years of display.
Budget or Time Planning
Curating a comprehensive collection of Y2K-inspired clay accessories requires minimal capital outlay and structured time management to maximize creative efficiency. Save on startup expenses by purchasing multi-packs of primary and neon clays rather than dozens of pre-mixed specialty shades, hand-mixing custom pastel and retro tones by blending small amounts of saturated pigment into neutral white clay. Organize your production schedule into dedicated, modular crafting blocks: allocate the first session to conditioning clay, blending custom color palettes, and rolling uniform slabs; use a second uninterrupted block for cutting, shaping, and detailing your jewelry elements; and dedicate a final session to baking, wet-sanding, and assembling metal findings. A standard two-ounce block of clay can yield dozens of small earrings, charms, and rings, keeping your material cost per finished accessory under one dollar. Store uncured custom clay mixtures in clean polypropylene containers or wax paper wraps, shielding them from heat and airborne dust to prevent premature firming. By batch-curing multiple designs together on a single ceramic baking tile, you conserve household energy and produce an entire coordinated retro capsule collection in a single afternoon.
Creative Expansion and Advanced Inspiration
Once you have mastered foundational modeling techniques, explore advanced variations to expand your decorative portfolio and elevate your personal accessory collection. Experiment with embedding mixed-media accents into your raw clay designs, incorporating vintage glass seed beads, holographic glitter stars, or tiny freshwater pearls before baking to introduce tactile variety. You can also translate iconic jewelry motifs into functional home decor accents, scaling up chunky checkerboards and wavy squiggles to fashion decorative trinket trays, light switch covers, and sculptural desk organization pen pots. Consider applying advanced surface finishing methods, such as utilizing silk-screen stencils with acrylic paint on raw clay slabs to produce intricate, repetitive retro graphics that would be impossible to paint by hand. Expand your jewelry collection into functional lifestyle accessories, creating coordinating modular phone charms, beaded bag tassels, and decorative keychain pulls using the same durable clay formulations. Document your custom color formulas, successful baking times, and dimensional design sketches in a dedicated studio notebook, establishing a valuable design archive that streamlines future creative projects and ensures consistent, professional results across every handmade collection.
Leave a Reply