Customizing picture frames using polymer clay provides an approachable, creative, and durable way to display cherished memories within modern home decor. Traditional wooden or plastic frames often lack unique personality and tactile texture, functioning merely as basic border holders for printed photographs. Handcrafted clay borders allow decorators to incorporate customized geometric patterns, faux mineral striations, tactile botanical reliefs, and sculptural details directly onto display pieces. This comprehensive tutorial delivers ten complete polymer clay photo frame projects designed specifically for crafters seeking functional, gallery-grade room accents. Readers will discover the step by step methods required to condition soft clay, wrap wooden or glass substrates, blend consistent marbling, build secure baking armatures, and apply long-lasting protective finishes. Working on flat and beveled frame profiles provides an accessible entry point to sculptural clay crafting, eliminating the structural balance challenges common to freestanding figurines. Understanding how to manage substrate adhesion, prevent air bubbles, and verify curing temperatures ensures that every finished piece remains flat, resilient, and visually captivating. Following these practical guidelines allows makers of all skill levels to transform plain, budget-friendly frame blanks into bespoke handmade keepsakes that elevate bedside tables, office desks, and living room gallery walls.
Why This Idea Is Trending or Useful
The consistent prominence of polymer clay home accessories across contemporary Pinterest inspiration stems from a growing desire for tactile, personalized, and color-matched interior decorations. Modern living spaces increasingly embrace intentional design choices where everyday objects showcase authentic craftsmanship and sculptural personality rather than mass-produced uniformity. Polymer clay delivers exceptional practical value because it cures to a lightweight, water-resistant, and impact-tolerant finish using standard home ovens. The wide variety of available clay colors, metallics, and translucent formulas makes it simple to coordinate custom frame borders with specific room palettes, wallpaper motifs, or seasonal accents. For beginners exploring DIY decor, modifying picture frames provides a straightforward, beginner friendly project that requires minimal financial investment and zero specialized pottery machinery. A plain wooden or ceramic craft frame can be completely resurfaced within an afternoon, producing functional home decor that looks bespoke and artisanal. These trending ideas also offer great creative flexibility for personalized gift-giving, allowing crafters to design thoughtful frames for wedding portraits, baby milestones, and vacation snapshots on practical budget ideas. Embracing custom clay frame design enables crafters to blend functional display needs with expressive aesthetic style.
Materials and Preparation
Constructing durable, professional-grade clay frames requires methodical preparation of specialized hand tools, clean work environments, and suitable frame substrates. Essential materials include premium oven-bake polymer clay blocks, liquid polymer bakeable adhesive, flat-profile unfinished wooden or metal frame blanks, two-part epoxy glue, and water-based protective varnishes. Necessary tools comprise an acrylic rolling pin, calibrated thickness guides, flexible stainless steel tissue blades, silicone-tipped clay shapers, fine-grit wet-dry sandpaper, and a dedicated freestanding metal oven thermometer. Thorough preparation begins by wiping down your ceramic tile or tempered glass work board with isopropyl alcohol to remove lint, microscopic dust, and skin oils. Planning considerations require inspecting the frame blank to remove glass inserts, backing cardboard, and metal hanging clips before starting the modeling process. Lightly scuff smooth wooden or painted frame borders with medium-grit sandpaper, wiping away sawdust to ensure a strong mechanical bond for the liquid adhesive. Formulate your intended color schemes ahead of time, mixing custom neutral pastels and conditioned slabs before wrapping the base. Preparing flat baking supports and testing your oven’s temperature stability guarantees smooth, warp-free curing results from start to finish.
1. Minimalist Terrazzo Stone Slab Picture Frame
Step-by-Step Guide
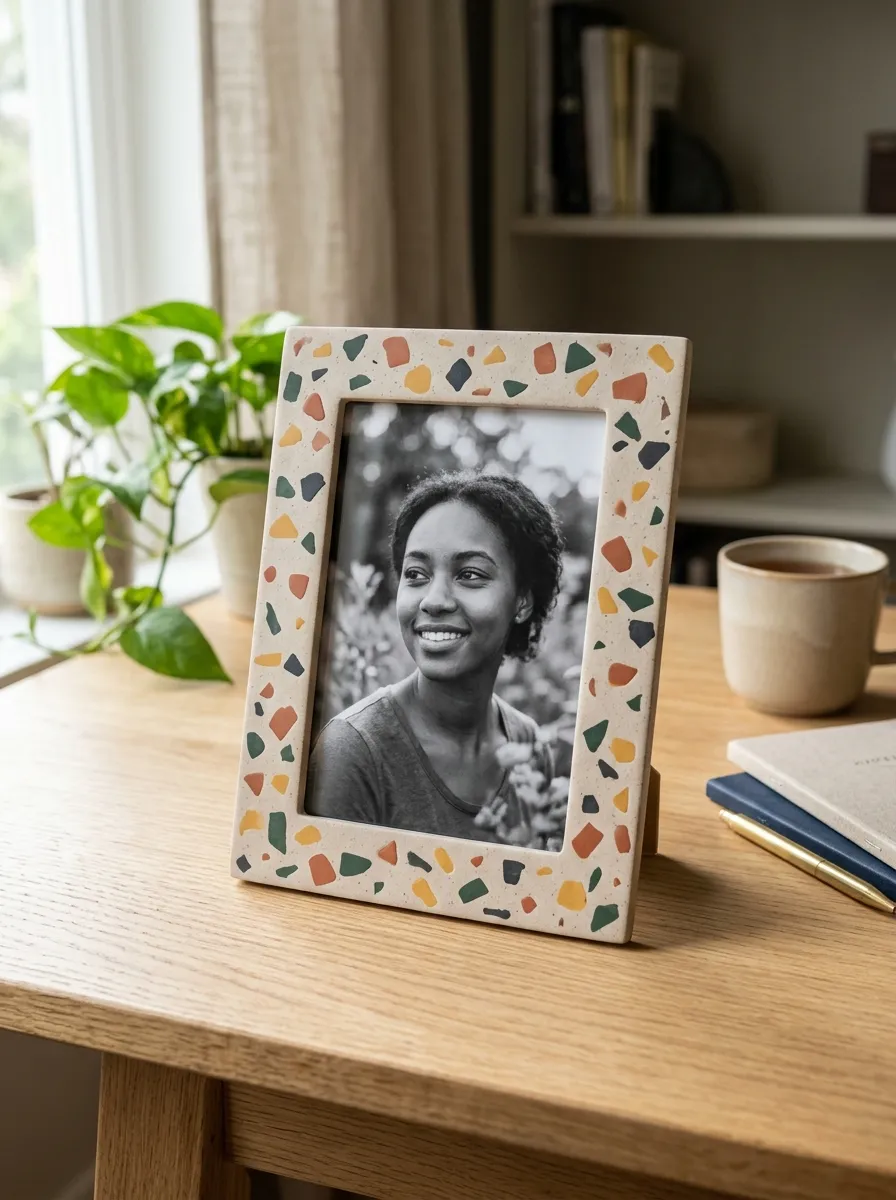
The minimalist terrazzo stone slab frame draws inspiration from Mediterranean architectural composite materials, combining crisp geometric borders with scattered organic color chips. The primary design foundation features a flat, smooth rectangular surface rendered in warm oatmeal, pale linen, or soft stone-colored polymer clay. Distributed across this neutral field are flat, irregular geometric flakes cut from contrasting clay colors such as deep terracotta, forest green, mustard yellow, and charcoal. Because the colorful stone chips are pressed completely flush into the base sheet, the finished frame face maintains an unbroken, level plane that feels cool and stone-like to the touch. This low-profile design complements Scandinavian and modern minimalist interiors, adding subtle pattern without competing with the framed artwork or photography. The clean edges and lack of protruding details make this frame remarkably durable and simple to clean over years of display.
To begin assembly, roll two ounces of conditioned oatmeal-colored polymer clay through an acrylic roller fitted with three-millimeter thickness guides to produce a uniform slab. Roll out thin, one-millimeter sheets of contrasting clay colors, using a tissue blade to slice them into tiny, irregular angular chips measuring between two and six millimeters wide. Scatter the colored chips randomly across the surface of the oatmeal slab, pressing them down lightly with your fingertips. Place a sheet of smooth parchment paper over the prepared slab and roll firmly with an acrylic pin to push the colored chips flush into the base layer. Coat the flat front of an unfinished wooden frame blank with a thin, even layer of liquid polymer clay using a flat brush. Lay the trimmed terrazzo slab over the frame face, trimming the outer borders and central photo window flush with a sharp craft scalpel. Bake the wrapped frame flat on a ceramic tile for forty-five minutes at 130 degrees Celsius, letting it cool slowly before applying a clear matte sealant.
2. Organic Twisted Rope Border Tabletop Frame
Execution Process
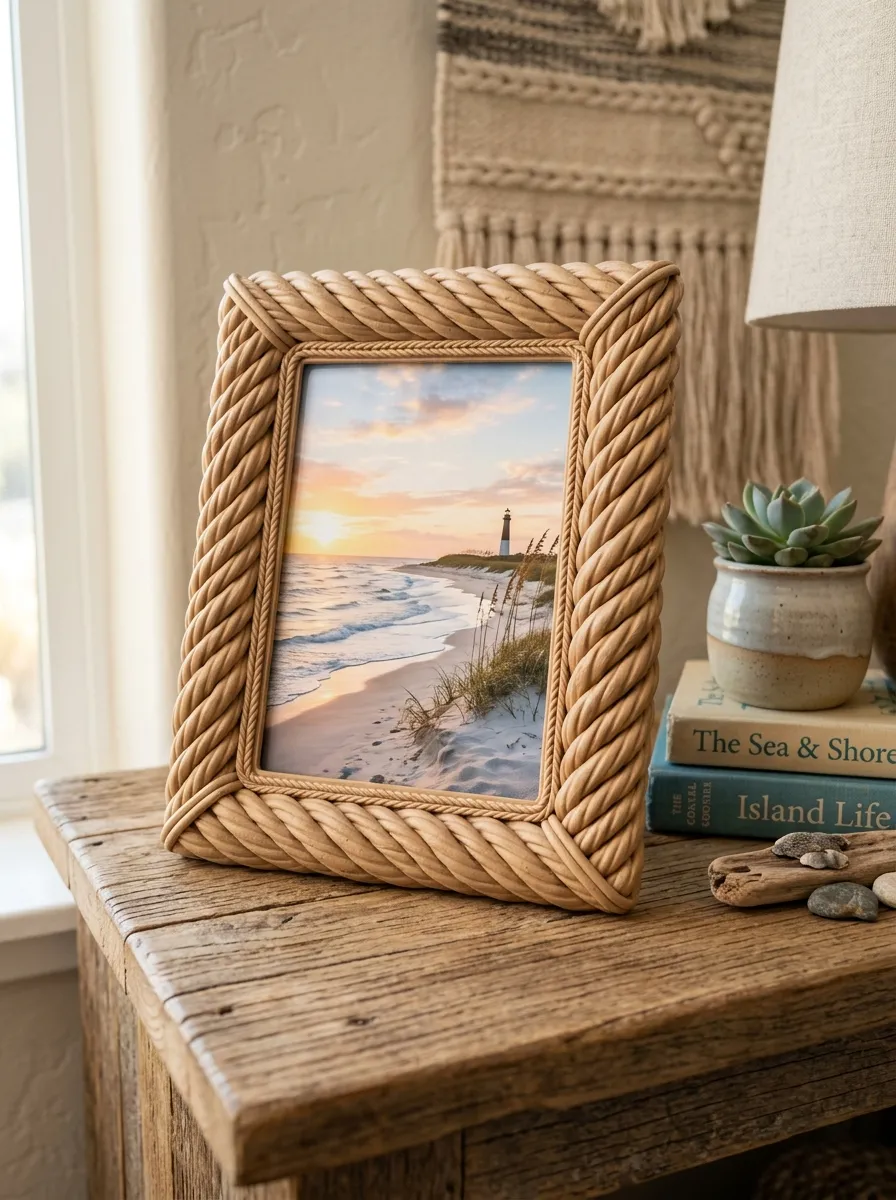
The organic twisted rope border frame brings rich dimensional texture and nautical movement to display styling through layered, spiraled clay cords. This design utilizes continuous strands of clay twisted tightly together to create an unbroken corded boundary that frames the central photo window. Crafted in warm sand, natural flax, or unbleached ivory tones, the twisted cords mimic the appearance of rustic marine hemp or woven wool ropes while providing the durability of cured polymer clay. The spiraling ridges capture ambient light, casting soft, rhythmic shadows that frame portraiture with subtle textural depth. Pairing this raised border with a flat, recessed inner rim ensures that the photograph remains the clear visual focus while the outer perimeter adds tactile interest. This design works exceptionally well within modern coastal, rustic farmhouse, and bohemian interior spaces, serving as a reliable accent for seaside vacation prints and candid family portraits.
Begin by conditioning two equal portions of warm sand-toned polymer clay, rolling each portion into a long, uniform snake measuring four millimeters in diameter and twenty-four inches in length. Pinch the ends of the two clay snakes together firmly at one end, then twist the strands around one another in a consistent spiral, maintaining uniform tension to prevent lumpiness. Apply a thin line of bakeable liquid clay around the outer border of a flat four-by-six-inch wooden frame blank using a fine detail brush. Carefully press the twisted clay rope along the outer perimeter of the frame, pressing the lower surface gently into the adhesive while keeping the upper rounded spiral intact. Cut the corners at clean forty-five-degree mitered angles using a rigid tissue blade, smoothing the corner seams together with a silicone color shaper. Roll a thinner two-millimeter single cord, adhering it around the inner picture opening to frame the photo neatly. Bake the frame flat in a preheated oven, allow it to cool completely, and buff the raised rope ridges with a dry denim cloth for a natural satin finish.
3. Sculpted Botanical Vine and Wildflower Border
How to Create
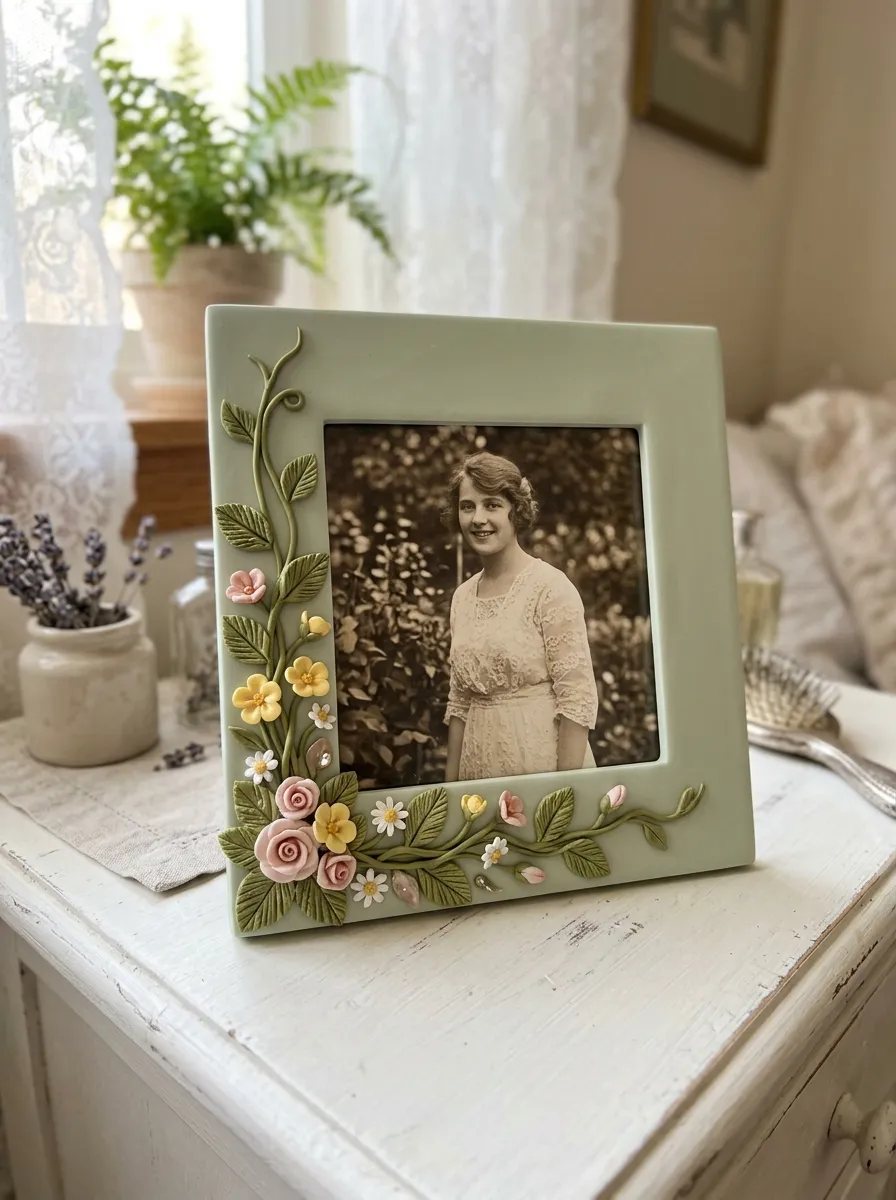
The sculpted botanical vine and wildflower frame combines delicate floral modeling with functional borders, creating an heirloom-quality decorative accent. The structural foundation begins with a flat, sage-green or muted forest-green clay base that wraps the frame smoothly. Emerging from this green foundation are three-dimensional, hand-sculpted climbing vines, delicate vein-textured leaves, and miniature clustered wildflowers in shades of blush pink, buttercup yellow, and optic white. Concentrating the floral volume in asymmetrical clusters—such as a dense lower corner flowing into a fine, winding vine along the top rail—keeps the design visually balanced without overwhelming the framed image. This botanical motif introduces an organic garden feel to bedside tables, powder room vanities, and entry consoles. The sturdy attachment of leaves and flower petals directly to the underlying base sheet ensures that the delicate components resist chipping during everyday dusting and handling.
Roll out a smooth, two-millimeter-thick sheet of pale sage-green polymer clay, applying it smoothly over the face and outer sides of a clean frame blank with liquid clay adhesive. Sculpt fifteen miniature teardrop leaves from deep olive clay, pressing a fine needle tool down the center of each to create natural leaf veins. For the wildflowers, roll five tiny balls of white clay for each flower, flattening them into circular petals around a microscopic dot of yellow clay to form the central blossom core. Arrange the sculpted leaves and blossoms in a sweeping diagonal cascade across the bottom-left corner of the frame face, securing each element with a droplet of liquid clay. Weave thin, rolled vine threads of olive clay upward along the left and bottom edges, tucking tiny leaf buds along the vine pathway. Bake the completed frame for forty minutes, cool fully, and brush high-gloss varnish over the floral blossoms while leaving the sage base in a natural matte finish.
4. Modern Checkerboard Grid Pattern Display Frame
Setup Method
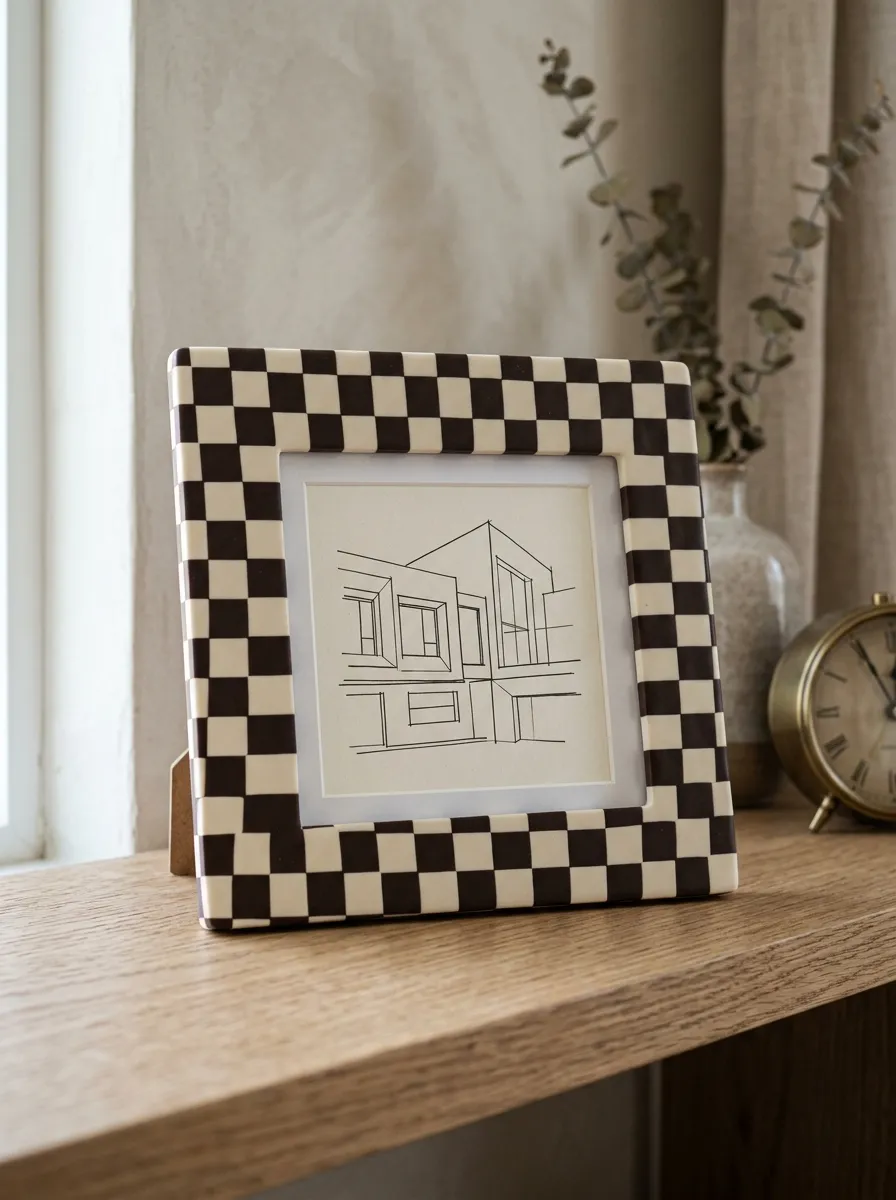
The modern checkerboard grid frame explores graphic contrast, mid-century geometry, and pop-art energy through crisp, alternating squares of colored clay. The design features a precise grid of two-toned checks, such as classic cream and espresso, pale lavender and olive green, or soft peach and terracotta. Constructing the grid using solid clay canes ensures that the square corners remain sharp, straight, and clearly defined across the entire frame surface. This bold geometric pattern brings high visual energy to modern design layouts, functioning as an eye-catching focal piece that contrasts well with minimalist black-and-white photography or architectural line drawings. The flat, polished planar surface keeps the frame sleek, preventing visual clutter while delivering bold visual personality. This project provides crafters with a practical, rewarding method for practicing precise cane construction, clean slicing techniques, and flat surface alignment.
Condition equal blocks of cream and deep espresso-brown polymer clay, rolling each color into a long, uniform square log measuring one centimeter in width and height. Slice each log lengthwise into two equal halves, reassembling the four resulting square strips into a two-by-two checkerboard cane with alternating colors. Compress the cane evenly from all four sides, gently reducing its dimensions until each individual square within the grid measures exactly five millimeters wide. Chill the reduced cane in the refrigerator for twenty minutes to firm the clay, then use a sharp, rigid tissue blade to slice thin, two-millimeter cross-sectional tiles. Coat a flat wooden frame blank with liquid polymer adhesive, arranging the sliced checkerboard tiles across the face in tight, seamless rows. Roll lightly over the assembled tiles with an acrylic roller protected by parchment paper to blend the seam lines into a unified plane. Trim all excess clay flush with the outer and inner frame edges, bake flat on a ceramic tile, and sand with wet-dry paper after cooling.
5. Faux Green Marble Inlay with Gold Leaf Fissures
Step-by-Step Guide
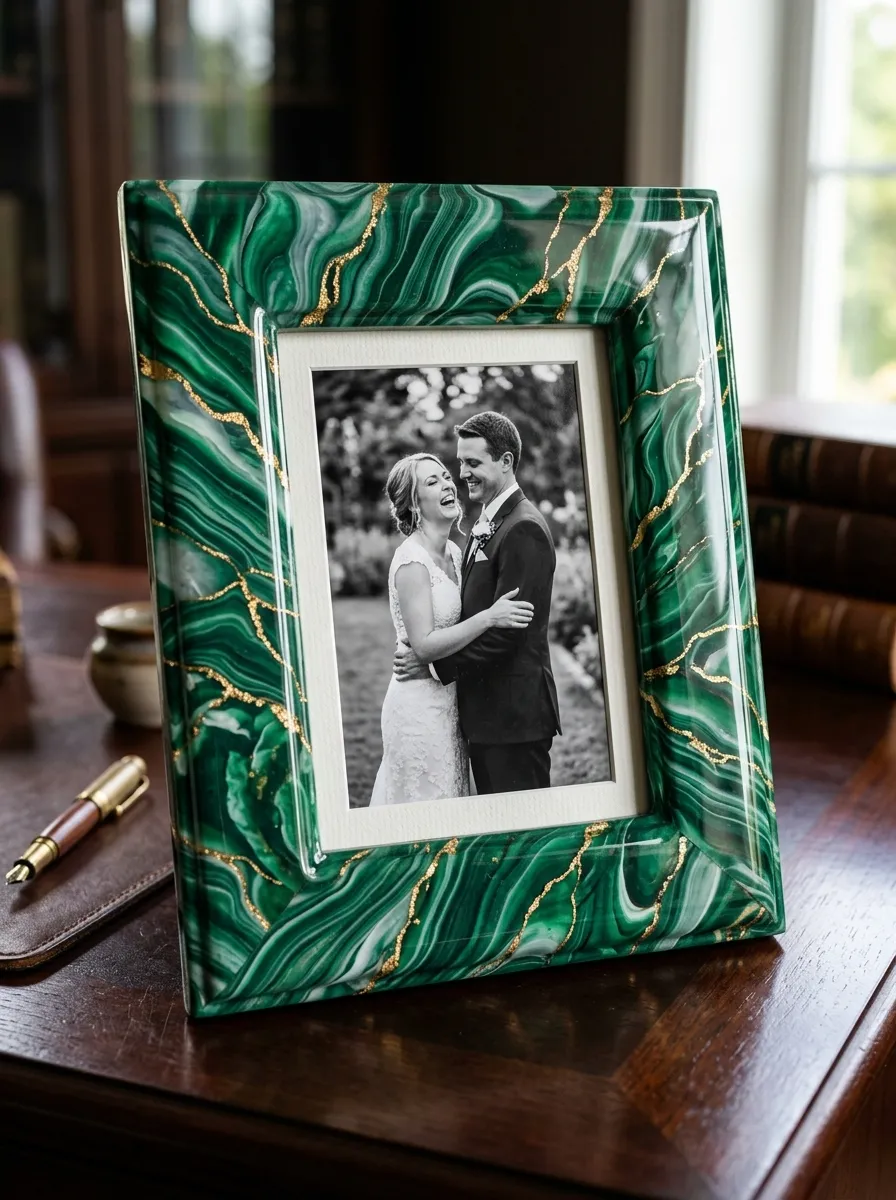
The faux green marble inlay frame captures the luxurious depth, mineral fractures, and polished elegance of natural architectural stone. The body of the frame features swirling, organic striations of deep emerald, rich malachite, translucent white, and deep forest-green polymer clay. Interspersed throughout these winding geological layers are thin, reflective fissures of genuine metallic gold leaf, which catch ambient room light and simulate natural mineral veins. The marbled pattern extends across the entire beveled frame face, creating a continuous, seamless stone slab look that feels substantial and elevated. This design pairs beautifully with vintage black-and-white portraits, antique botanical prints, and formal landscape photographs displayed on mahogany desks or dark floating shelves. Applying a high-gloss resin or polyurethane topcoat creates optical depth, making the embedded gold leaf and translucent green layers appear submerged beneath a polished stone surface.
Begin by rolling out thin sheets of emerald green, translucent, dark green, and white polymer clay, stacking the colors in alternating layers to create a multi-tiered block. Tear the stacked block apart by hand into irregular chunks, pressing flecks of genuine gold leaf onto the torn, jagged surfaces. Compress the gold-coated chunks firmly back together into a single solid loaf, twisting the mass once to swirl the internal mineral veins without blending the colors completely. Use a flexible tissue blade to slice thin, three-millimeter slabs from the loaf, revealing the marbled interior veins and shimmering gold fractures. Adhere the marbled slabs onto the front of a beveled wooden frame blank using liquid clay, smoothing the diagonal corner joins with an acrylic roller. Wrap the clay neatly around the outer edges of the frame blank, trimming away excess material from the inner window. Bake for forty-five minutes at the recommended temperature, wet-sand the cooled surface from four-hundred to twelve-hundred grit, and apply a thick coat of clear gloss glaze.
6. Scalloped Pastel Edge Nursery Picture Frame
Execution Process
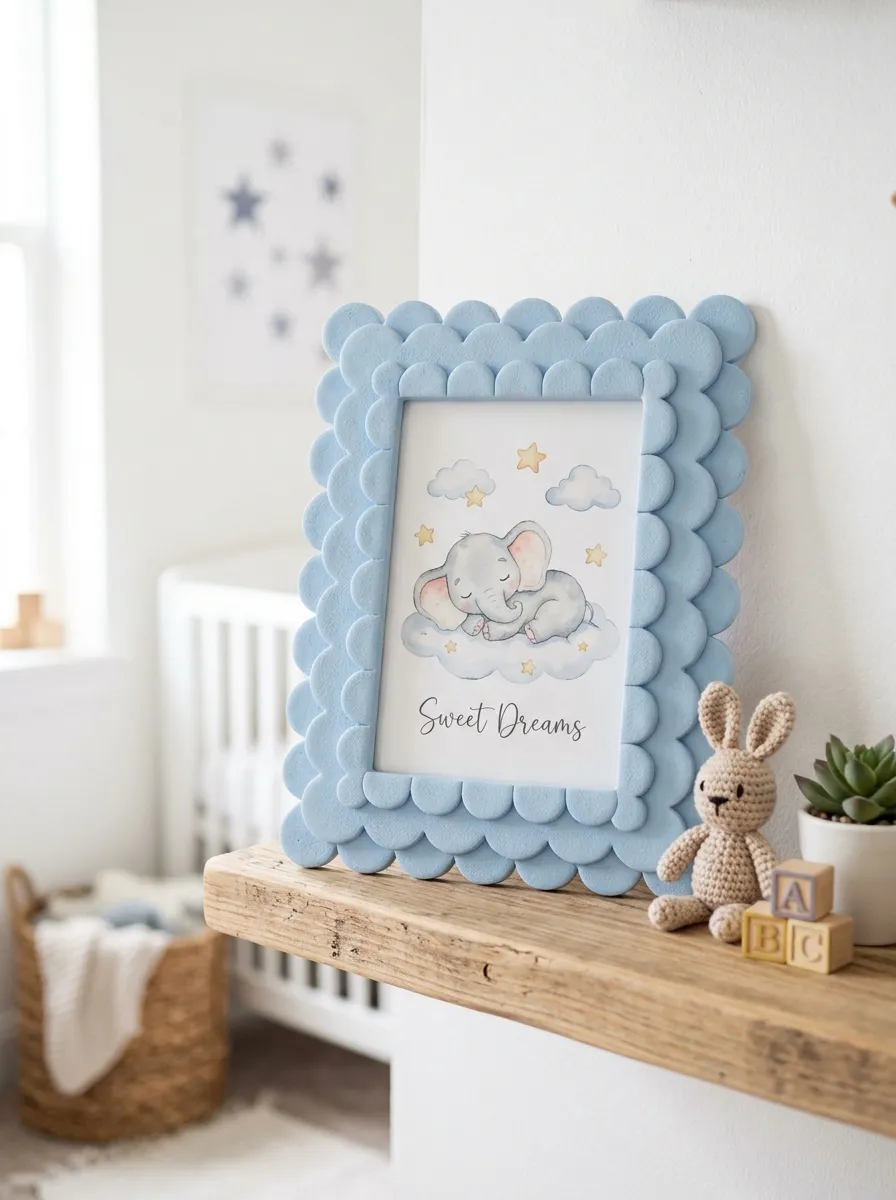
The scalloped pastel edge frame introduces soft curves, playful geometry, and gentle colors tailored for nurseries, children’s bedrooms, and whimsical living spaces. The design features a flat base border framed along its outer and inner margins by a continuous, overlapping row of semi-circular scalloped tabs. Rendered in soft candy pastels—such as butter yellow, blush pink, sky blue, or mint green—the repeating rounded edges soften rigid frame angles into friendly silhouettes. The layered construction adds gentle stepped dimension without creating sharp, fragile protrusions that could break during everyday handling. This sweet frame design is particularly suited for displaying newborn milestone photos, watercolor animal art, and handwritten keepsake cards. Its simple, repetitive construction offers a relaxing, beginner friendly crafting experience that teaches novices how to achieve uniform circular cuts and neat edge overlapping.
Condition four ounces of baby-blue or pastel-mint polymer clay, rolling the material out into a uniform two-millimeter-thick sheet using an acrylic rolling pin. Use a small, circular metal plunger cutter measuring twelve millimeters in diameter to punch out approximately sixty identical clay discs from the sheet. Coat the surface of a flat wooden frame blank with a thin layer of liquid polymer adhesive, spreading it evenly to the outer borders. Begin layering the round discs along the outer perimeter of the frame, overlapping each disc halfway across the previous one to create a continuous scalloped chain. Once the outer border is complete, repeat the scalloped layering process along the inner window border, working in the same direction to maintain visual rhythm. Smooth the flat inner field of the frame with a silicone blending shaper, ensuring all underlying seams are sealed cleanly against dust. Cure the decorated frame in the oven for thirty-five minutes, allow it to cool fully, and seal with a soft satin varnish.
7. Chunky Wavy Squiggle Accent Gallery Frame
How to Create
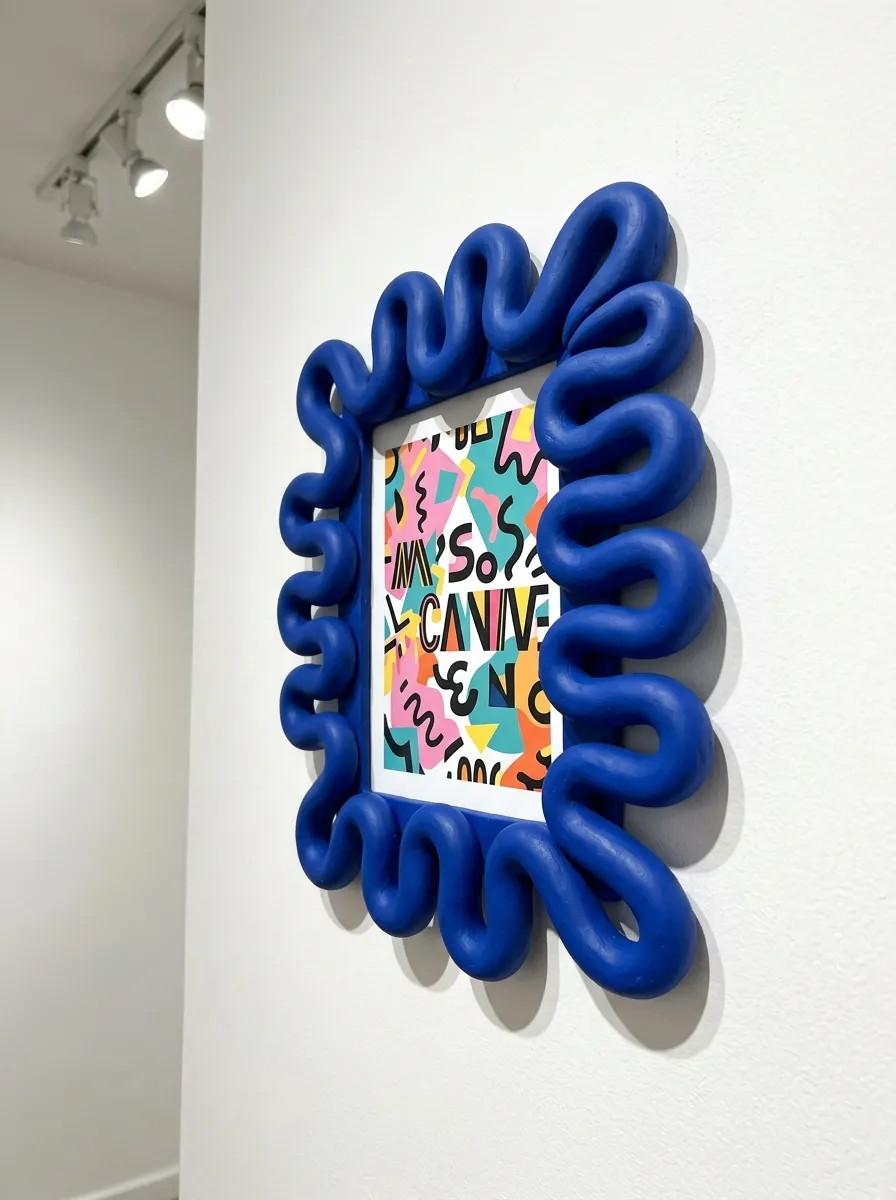
The chunky wavy squiggle frame celebrates post-modern Memphis design and modern art aesthetics through bold, ribbon-like curves and playful movement. Rather than adhering to straight, rigid frame borders, this concept features a thick, sculpted clay snake that bends in continuous, fluid S-curves around the frame perimeter. The undulating waves break outside the traditional rectangular frame boundaries, creating a dynamic, sculptural silhouette that commands attention on gallery walls. Rendered in saturated contemporary tones like cobalt blue, warm ochre, or burnt rust, the bold wavy ribbon provides a joyful contrast against neutral wall paint. This statement piece works exceptionally well with abstract art prints, typography posters, and colorful party snapshots. The substantial thickness of the clay snake provides structural stability, ensuring the undulating waves remain firm and impact-resistant once cured.
Select a simple, flat-faced wooden or MDF frame blank measuring five by seven inches, sanding the face lightly to improve mechanical grip. Roll out a long, uniform snake of cobalt-blue polymer clay measuring ten millimeters in diameter, keeping the cross-section perfectly circular along its entire length. Lay the clay snake along the top rail of the frame face, bending the rope back and forth in rhythmic, three-centimeter-wide horizontal waves that loop slightly beyond the frame edge. Continue the undulating wave pattern around all four sides of the frame, mitering and smoothing the corner joins with a silicone chisel tool to create an unbroken wavy loop. Apply small drops of liquid bakeable adhesive beneath every point where the clay snake touches the wooden frame surface, pressing down lightly to secure the bond. Bake the frame flat on a ceramic baking sheet for forty-five minutes at 130 degrees Celsius. Once cool, wipe down the smooth surface with a microfiber cloth and apply a protective coat of matte spray sealant.
8. Sunburst Art Deco Geometric Relief Frame
Setup Method
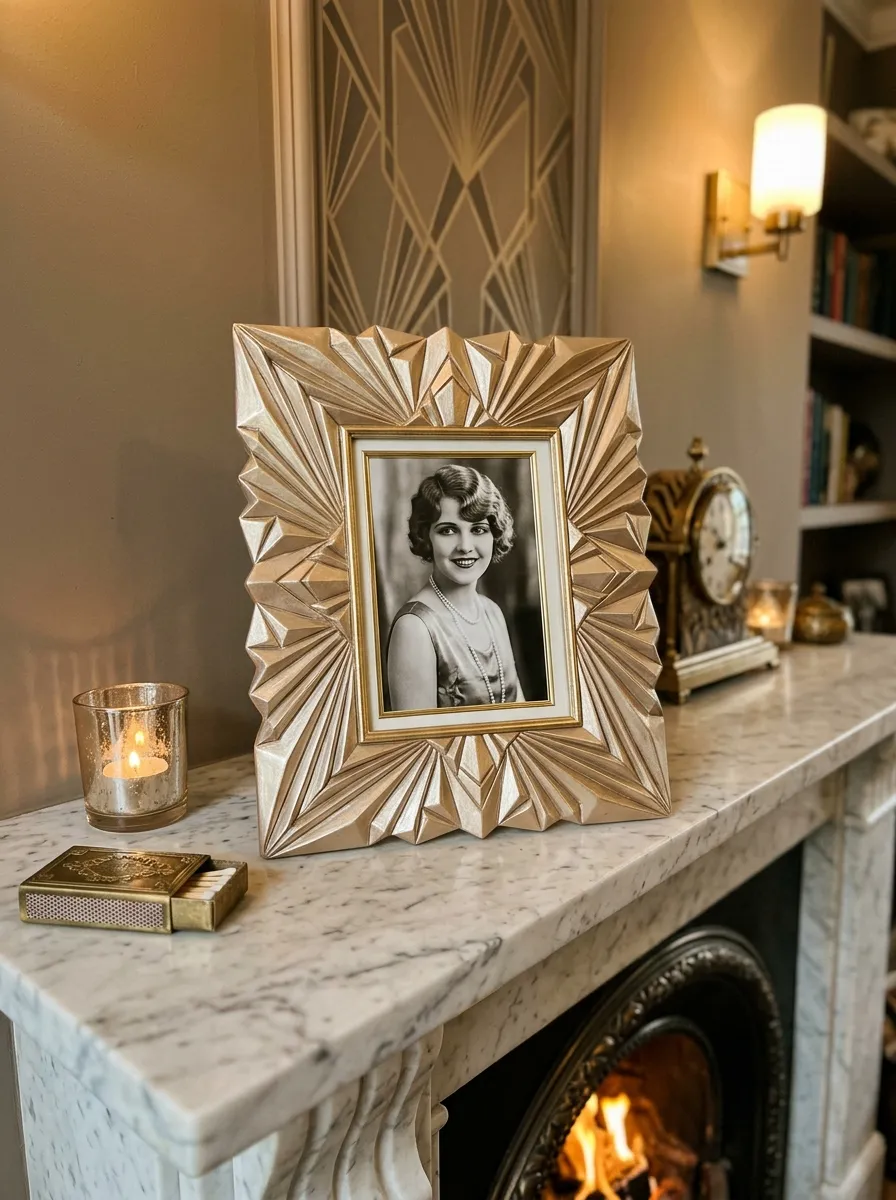
The sunburst Art Deco geometric relief frame channels vintage glamour and architectural symmetry through radiating dimensional rays and metallic finishes. The design features a series of triangular and trapezoidal clay facets that fan outward from the central photo aperture toward the outer corners like stylized sunbeams. Rendered in burnished antique bronze, rich copper, or metallic champagne gold clay, the geometric facets catch directional light, creating an interplay of highlights and shadows. The precise, angular relief brings structured, formal elegance to display surfaces, providing an elevated home decor accent for wedding portraits, historic prints, and graduation photos. The low-profile triangular segments create a durable surface that resists warping or cracking over time. This project teaches crafters how to execute clean straight-edge cuts, align radial angles symmetrically, and burnish metallic mica clays for maximum reflective shine.
Condition three blocks of metallic gold or bronze polymer clay thoroughly, rolling the material into a smooth four-millimeter sheet on a clean glass working tile. Cut a flat rectangular base sheet to fit the face of a wooden frame blank, adhering it with an even coat of liquid polymer adhesive. Using a metal ruler and a sharp scalpel, score light guidelines radiating outward from the four corners of the central photo window to the outer frame edges. Cut slender triangular wedges from remaining metallic clay sheets, arranging them along the scored guide lines so the pointed tips meet neatly at the photo opening. Press each triangular ray firmly into the base sheet, using a flat acrylic block to ensure the upper relief surfaces remain straight and uniform. Burnish the surface of the metallic clay gently with a dry fingertip to align the internal mica particles for an even metallic luster. Cure the frame in the oven for forty minutes, cool slowly, and finish with a coat of water-based gloss glaze.
9. Pressed Botanical Herbarium and Textured Clay Frame
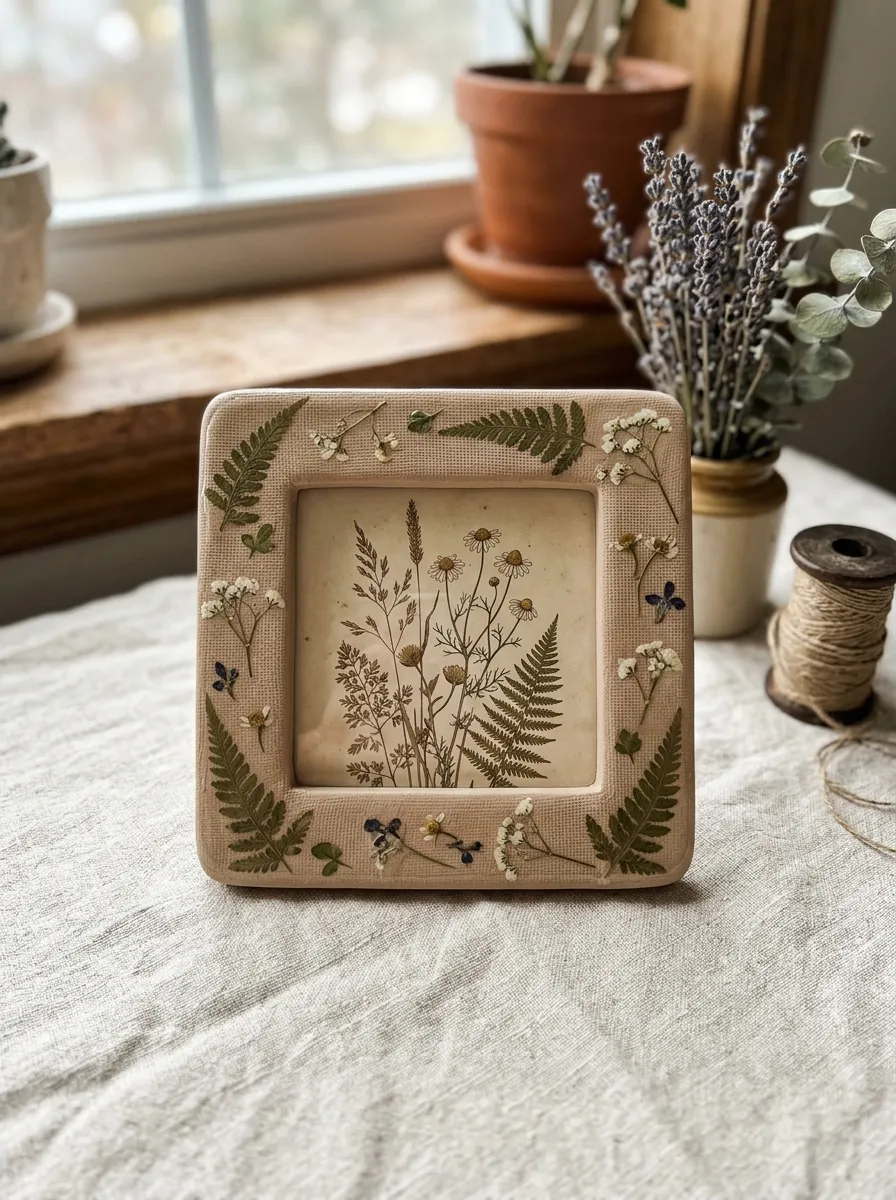
Step-by-Step Guide
The pressed botanical herbarium frame blends delicate natural flora with raw ceramic-like clay surfaces, creating an understated, cottagecore display piece. The frame face is wrapped in an unglazed, warm white or pale linen clay that features a subtle, matte linen canvas texture pressed into the surface. Embedded directly into the uncured clay borders are real, dried miniature botanicals, including tiny pressed ferns, delicate baby’s breath blossoms, and wild field grass sprigs. The organic botanicals are sealed within the clay surface using thin layers of translucent liquid clay, preserving their natural silhouettes, textures, and subtle autumnal colors permanently. This gentle, nature-inspired frame serves as a wonderful home for outdoor landscape prints, pressed flower wedding keepsakes, and vintage family portraits. The natural, earth-toned aesthetic pairs effortlessly with light oak furniture, raw linen textiles, and sunlit spaces.
Roll out a sheet of unbleached translucent-white polymer clay to a three-millimeter thickness, laying a piece of clean linen fabric over the top and rolling firmly to emboss a fine woven texture. Remove the linen carefully, trimming the textured clay slab to match the dimensions of a flat wooden frame blank coated with liquid clay. Arrange small, completely flat dried botanical specimens—such as tiny fern leaves and pressed white alyssum flowers—across the textured clay face in an asymmetrical, organic layout. Use a soft silicone brush to paint a paper-thin layer of clear bakeable liquid polymer clay over each dried botanical, sealing the delicate organic materials firmly against the clay slab. Smooth the outer edges of the liquid clay with a damp finger to blend the boundary lines seamlessly into the textured background. Bake the decorated frame on a parchment-lined tray for forty-five minutes at 125 degrees Celsius, keeping temperatures low to prevent scorched botanicals, and seal with matte varnish once cooled.
10. Sculpted Miniature Food and Confectionery Frame
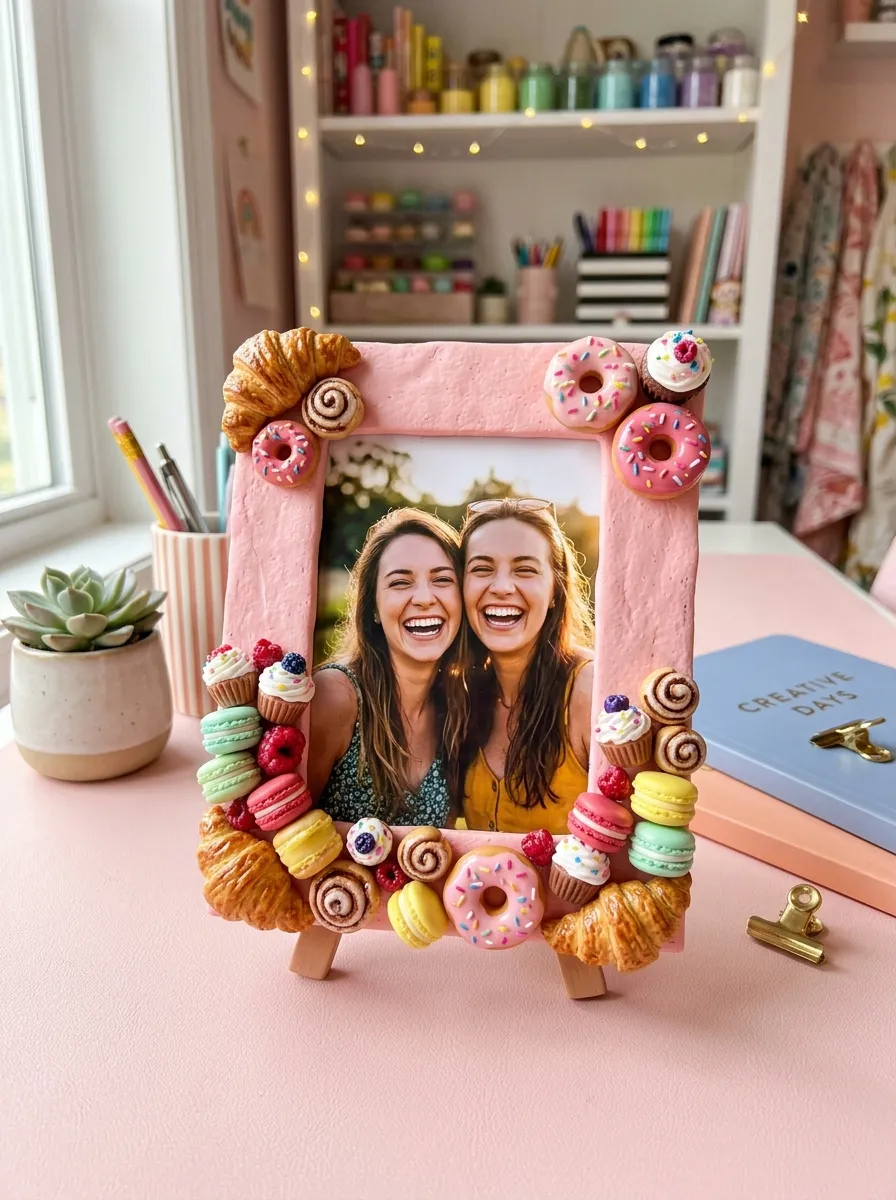
Execution Process
The sculpted miniature food frame introduces delightful kawaii whimsy and vibrant artisan personality through tiny, three-dimensional baked confections arranged around the border. The frame begins with a pastel background—such as soft strawberry pink, mint cream, or butter yellow—that acts as a clean, cheerful foundation. Arranged along the border are miniature, hand-sculpted clay food charms, including tiny croissants, glazed berry donuts, miniature strawberries, and tiny pastel macarons. The tiny treats are secured around the border in an abundant, celebratory arrangement that brings joy to study desks, kitchen memo boards, and children’s vanity spaces. This creative project is especially suited for framing vacation snapshots, birthday celebration prints, and candid portraits with friends. Crafting these miniature confections offers an excellent exercise in fine-detail micro-sculpting, realistic food texturing, and multi-color assembly.
Cover a flat wooden frame blank with a smooth, two-millimeter layer of pastel strawberry-pink clay using liquid polymer adhesive to anchor the sheet. Sculpt miniature food elements separately: roll tiny tan clay balls into miniature croissants with rolled folds, shape tiny donuts with pink liquid clay icing and micro-sprinkles, and form miniature layered macarons. Use a clean toothbrush and needle tool to stipple realistic pastry textures onto the surfaces of the croissants and donut bases before baking. Position the miniature confections along the bottom rail and lower corners of the pink frame face, pressing them gently into drops of liquid clay adhesive to secure their bonds. Weave tiny, hand-rolled white clay pearls and micro-strawberries between the larger pastries to fill the negative space with colorful detail. Bake the assembled frame on a flat ceramic tile for forty minutes, allowing it to cool fully inside the oven before brushing high-gloss glaze over the miniature fruit and pastry icing.
Common Beginner Mistakes and How to Avoid Them
The most critical mistake beginners make when crafting polymer clay photo frames is applying raw clay directly onto unfinished wooden or plastic frames without an adhesive bonding agent. Uncured polymer clay does not form a permanent chemical bond with porous wood or smooth glass during the baking process; without a bonding medium, the cured clay slab will peel away or snap off the frame once cool. Prevent this failure by always coating the frame blank with a thin, uniform layer of bakeable liquid polymer clay or heat-tolerant industrial adhesive before laying down the clay slabs. Another widespread error is failing to remove the glass insert, cardboard backing, and metal turn-buttons before placing the frame in the curing oven. Cardboard can warp and scorch, while sudden temperature changes can cause trapped moisture inside the glass to crack or shatter. Always disassemble the frame blank completely, baking only the bare wooden or metal substrate wrapped in clay. Beginners also frequently roll clay slabs with uneven thickness, which leads to lumpy borders, visible air pockets, and uneven heat distribution during curing. Always use calibrated thickness guide rings on your acrylic rolling pin, rolling smoothly from the center outward to ensure a uniform, planar surface across all four rails. Finally, avoid rushing the cooling process by submerging hot frames in cold water, as thermal shock causes delicate clay bonds to crack and separates the clay layer from the underlying substrate.
Practical Tips for Better Results
Achieving clean, boutique-grade results with polymer clay frames requires disciplined hygiene, precise edge alignment, and patient surface finishing. Always clean your hands, acrylic rollers, and cutting blades with isopropyl alcohol or lint-free baby wipes between colors to prevent dark lint and stray pigments from contaminating light pastel or white clay slabs. When mitering the corner seams of textured or patterned borders, use a rigid stainless steel tissue blade held at an exact forty-five-degree angle, smoothing the joined edges gently with a silicone color shaper to make the seam invisible. To eliminate unwanted fingerprints and subtle surface creases from raw clay, smooth the uncured surface gently using a cotton swab lightly moistened with rubbing alcohol before baking. When creating flat, modern designs like terrazzo or checkerboard, wet-sand the cured frame under running water using progressive grits from four-hundred to twelve-hundred, polishing the surface with a soft denim scrap to produce an authentic, stone-like satin sheen. If your design includes raised three-dimensional elements like flowers, ropes, or miniature confections, bake the decorated frame on a bed of raw cornstarch or polyfill batting to prevent the weight of the clay from flattening the back edges against the baking tray. Finally, always calibrate your oven with an independent standing metal thermometer placed directly beside the frame to ensure constant, accurate curing heat.
Styling, Presentation, or Organization Ideas
Styling handcrafted polymer clay photo frames effectively depends on creating a cohesive aesthetic relationship between the framed artwork, the frame design, and the surrounding room decor. When displaying frames on open shelves or bedside tables, cluster them in harmonious groupings of three, balancing one bold patterned design—such as a modern checkerboard or faux marble—with two understated neutral frames like the terrazzo slab or twisted rope border. Match the colors within the frame border to subtle accent shades in the photograph itself, such as pairing a botanical vine frame with an outdoor garden portrait to create a unified visual story. For gallery wall installations, mix clay-wrapped frames with traditional thin metal or natural wood frames to introduce rich tactile contrast across the vertical wall space. Present handcrafted clay frames as luxurious, personalized gifts by packaging them inside rigid kraft gift boxes lined with natural crinkle paper, accompanied by a small custom art print and a handwritten care instruction card. In home workspaces, use small clay frames to hold inspirational quotes, mini calendar cards, or delicate watercolor sketches on floating ledges to create an inspiring, modern visual moodboard. These thoughtful presentation methods highlight the unique artisanal qualities of each handmade frame while protecting the clay borders from accidental bumps and direct sunlight.
Budget or Time Planning
Creating custom polymer clay picture frames offers exceptional cost efficiency, delivering high-end artisan home decor at a fraction of boutique retail prices. Standard wooden frame blanks can be purchased inexpensively in multipacks, and a standard two-ounce block of polymer clay provides enough material to cover a complete four-by-six-inch frame, keeping material costs remarkably low per finished piece. Maximize your initial crafting budget by purchasing large economy blocks of white, translucent, and black clay, mixing your own custom pastel shades, stone colors, and muted neutrals using tiny pinches of primary pigments rather than buying numerous individual specialty colors. From a time management perspective, an experienced crafter can roll, wrap, and detail a complete picture frame in sixty to ninety minutes once the workspace is organized. To maximize your creative output, implement batch production methods: dedicate one focused afternoon session to sanding and priming ten wooden frame blanks with liquid adhesive, followed by a dedicated session for rolling slabs, cutting patterns, and assembling borders. Consolidate several decorated frames onto large ceramic tiles for a single, efficient baking cycle, saving electrical energy and minimizing oven monitoring time. Dedicate a quiet morning session to wet-sanding, hardware reassembly, and applying protective clear varnishes to ensure that finishing touches are executed with meticulous attention to detail.
Creative Expansion and Advanced Inspiration
Once you have mastered foundational slab wrapping and border detailing across these ten frame concepts, you can explore advanced variations that elevate your clay crafting into collectible decorative art. Experiment with mixed-media integrations by pressing raw faceted crystal points, genuine freshwater seed pearls, or flat brass charms directly into the uncured clay borders to add light-reflecting luxury. Explore translucent liquid clay techniques to create realistic stained-glass mosaic frames, layering colored liquid clays between raised polymer wire borders to produce luminous, light-catching effects when placed near sunny windows. You can also explore micro-carving by using fine dental linoleum gouges and rotary tools to carve intricate botanical patterns, geometric mandalas, or personalized family initials into the surface of cured, unglazed clay borders. Crafters interested in functional home organization can scale up these exact techniques to decorate wooden desktop organizers, wall-mounted key hook plaques, decorative light switch covers, and matching jewelry trays to create a cohesive, handcrafted room suite. Incorporating metallic leafing, iridescent mica powders, and delicate antiquing patinas expands the design possibilities even further, transforming humble polymer clay into timeless, heirloom-quality home decor that brings warmth and artistic personality to any interior space.
Leave a Reply