Polymer clay wedding jewelry has emerged as an exceptional accessory category, transforming bridal fashion with bespoke elegance and artistic versatility. Crafting bridal adornments using modern clay mediums allows brides, bridesmaids, and event guests to personalize accessories while ensuring lightweight comfort throughout the celebration. Readers will discover ten unique polymer clay design concepts that combine delicate floral sculpting, marble textures, metallic highlights, and timeless vintage inspirations. Each project emphasizes accurate proportions, structural durability, and contemporary styling suitable for diverse bridal silhouettes. Beyond its high visual impact, handmade bridal jewelry offers substantial practical advantages over traditional mass-produced metal accessories. Clay remains inherently featherlight even when formed into dramatic cascading statement pieces, preventing the ear fatigue and discomfort often associated with heavy gemstone wear. This comprehensive tutorial breaks down the essential finishing mechanics, hardware integration, and oven-curing parameters required to achieve salon-grade jewelry results. By learning these reliable techniques, makers can design unified accessory collections that reflect personalized wedding color themes without exceeding practical financial limits. The following step by step guidelines provide clear, actionable instructions, enabling crafters of all skill levels to produce professional bridal adornments that preserve cherished wedding day memories.
Why This Idea Is Trending or Useful
Handmade clay bridal accessories represent one of the most prominent trending ideas across modern Pinterest boards, catering directly to the rising demand for personalized event aesthetics. Modern brides prioritize unique styling details that complement contemporary minimalist gowns, bohemian lace silhouettes, and romantic garden celebrations. Polymer clay bridges the gap between affordable DIY crafting and high-end boutique couture, offering unlimited possibilities for customized shapes, textures, and bespoke color mixing. From an ergonomic standpoint, the material provides unparalleled everyday comfort, allowing wearers to display elaborate multi-tiered earrings or intricate hair accessories without painful heaviness. The medium also presents exceptional accessibility for novices, requiring basic hand tools, home oven baking capabilities, and modest studio space. Crafters can replicate expensive ceramic or natural stone finishes, such as polished Carrara marble or raw textured porcelain, using straightforward blending and carving methods. This accessibility transforms wedding party styling into an enjoyable, collaborative project where bridesmaids can wear matching, handmade accents crafted specifically for the occasion. The versatility of clay accessories ensures they remain wearable long after the wedding reception, transitioning effortlessly into timeless wardrobe staples.
Materials and Preparation
Achieving durable, professional bridal accessories requires deliberate material selection, methodical conditioning, and disciplined studio setup prior to sculpting. Premium oven-bake polymer clay brands formulated for flexibility and strength serve as the ideal baseline, preventing brittle breaks during active wear. A smooth non-porous working surface, such as a large ceramic tile, tempered glass cutting slab, or silicone craft mat, is essential for maintaining flat, lint-free sheets. Key shaping tools include an acrylic roller, stainless steel clay blades, precision micro-cutters, ball-stylus modeling tools, and high-grit wet-dry sandpaper ranging from four hundred to two thousand grit. Hypoallergenic jewelry findings, including titanium ear posts, surgical steel jump rings, gold-filled wire, and strong two-part epoxy paste, guarantee safe and enduring assembly. Work area cleanliness plays a pivotal role in bridal crafting, as white and translucent clays readily attract airborne fibers and dust particles. Clean your hands, tile surfaces, and cutting tools with isopropyl alcohol, and keep a sheet of clean parchment paper over unbaked pieces between assembly phases. Test-bake a thin strip of conditioned clay to verify oven thermostat accuracy using an independent oven thermometer.
1. Sculpted Alabaster Floral Drop Earrings

Execution Process
The sculpted alabaster floral drop earring concept highlights romantic multi-petaled blossoms designed to complement delicate lace gowns and garden settings. This design utilizes opaque white and translucent polymer clays blended in equal measures to emulate the soft depth of real flower petals. Individual petals are shaped by hand using miniature ball tools to produce natural ruffled edges that mimic real gardenias, dogwoods, or wild roses. The structural layout features an upper floral stud unit connected by delicate metallic jump rings to an elongated bottom petal cluster, creating graceful movement during motion. Incorporating small translucent clay elements introduces subtle light filtration, enhancing the delicate, organic bridal aesthetic. Unlike flat stamped shapes, these dimensional flowers rely on varied petal heights, subtle central depressions, and micro-grooves to achieve realistic depth. The monochromatic ivory finish ensures the earrings complement warm champagne, off-white, and classic ivory bridal gown palettes without overpowering the wearer’s facial features. This project offers brides a lightweight alternative to traditional crystal chandeliers, prioritizing sculptural texture over bright reflective shine.
To create this romantic floral pair, thoroughly condition equal portions of bright white and translucent clay until smooth and pliable. Roll the conditioned mixture through an acrylic roller to a thickness of two millimeters, cutting out ten small circles for the base petals and six smaller circles for the central bud layers. Place each circular disc into the palm of your hand, thinning the outer edges outward with a medium ball-stylus tool to create delicate, curved petal ruffles. Layer five thinned petals symmetrically around an underlying micro-dot of raw clay, pressing the centers lightly to establish a dimensional five-point flower cup. Repeat this petal arrangement for the smaller top stud component, securing an embedded eyelet pin into the underside of both units before baking. Bake the sculpted floral pieces on a clean ceramic tile at the clay manufacturer’s specified temperature for forty-five minutes. After cooling completely, apply two-part epoxy to secure hypoallergenic titanium flat posts behind the upper flower bases, linking the upper and lower sections using high-gauge gold jump rings.
2. Minimalist White Marble Arch Dangles

Step-by-Step Guide
The minimalist white marble arch dangle incorporates clean geometric lines with classic stone textures, making it an ideal accessory for modern urban bridal attire. This modern design features an inverted U-shaped arch framing a suspended round drop or pearl accent, celebrating architectural symmetry and balanced negative space. The marbling effect combines pure white clay, faint ribbons of granite gray, and subtle veins of metallic gold leaf to replicate luxurious Italian marble slabs. The finished surface displays a sleek, semi-matte finish that mimics honed interior stonework, providing an understated aesthetic contrast against silk bridal fabrics. The linear geometry of the arch elongates the wearer’s neck, offering a refined visual frame that pairs beautifully with strapless corsets, square necklines, and structured bridal jumpsuits. Crafters can modify the width and curvature of the arch cutter to match personal styling preferences, ensuring the jewelry feels custom-tailored to the individual wearer. This project demonstrates how minimalist style principles can elevate simple clay into a striking, sophisticated accessory piece.
To begin this geometric project, condition two large bars of pure white polymer clay until completely soft and pliable under hand pressure. Roll a small pencil-width coil of medium gray clay and several tiny flakes of genuine composition gold leaf across the conditioned white base block. Twist and fold the clay block repeatedly three times, compressing the mass into a dense rectangle to distribute the fine gray and gold veins throughout the core. Roll the marbled block through your roller until achieving a uniform three-millimeter slab, ensuring the veining pattern flows naturally across the surface. Press a sharp steel arch cutter firmly into the slab, followed by a smaller interior arch cutter to extract the central negative space. Pierce tiny connection holes near the bottom legs and top apex using a thin needle tool before transferring the shapes to an oven-safe baking sheet. Bake for forty-five minutes, wet-sand the cooled edges starting with six hundred grit paper, and secure gold-plated ball studs to the top arch using industrial jewelry adhesive.
3. Pearl Encrusted Botanical Hair Comb

How to Make
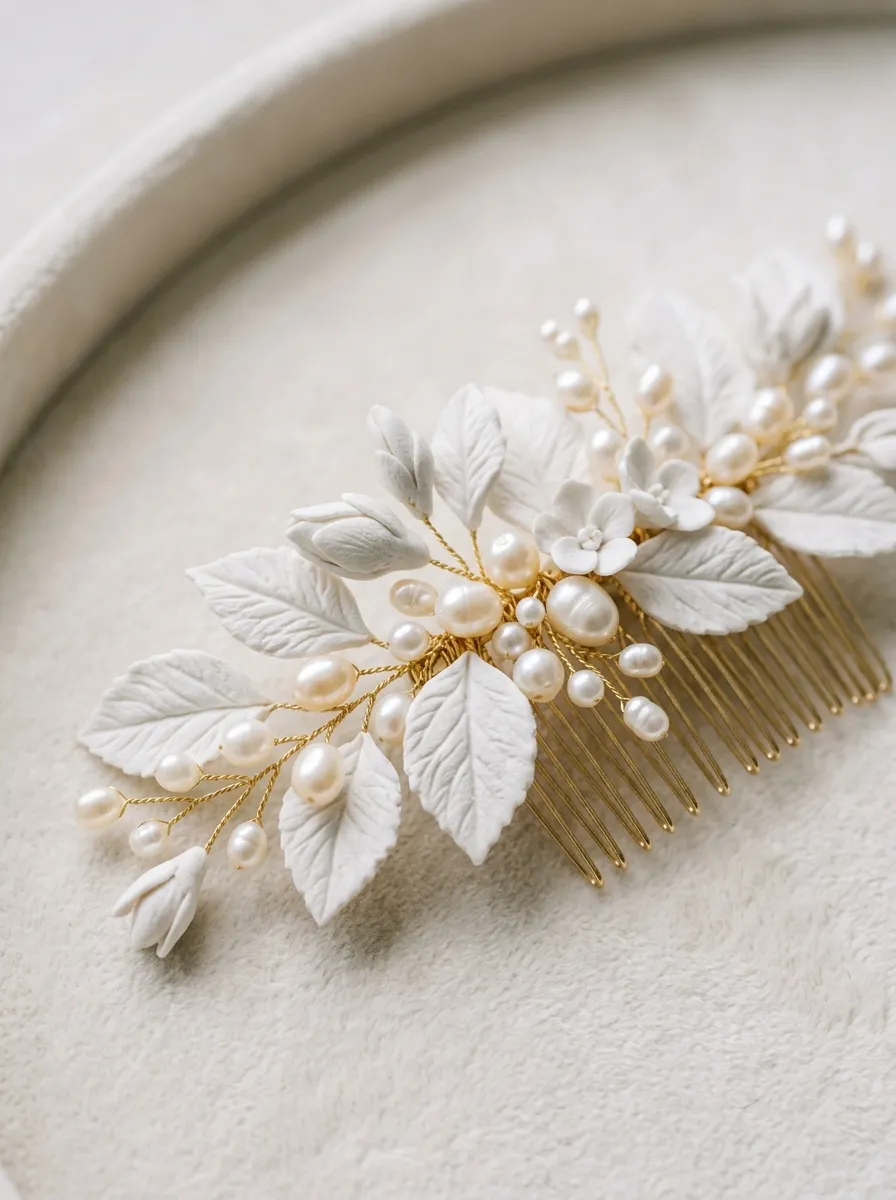
The pearl encrusted botanical hair comb transforms traditional bridal headpieces by fusing flexible clay sculpting with classic freshwater and faux glass pearls. This hair accessory features a crescent arrangement of sculpted white clay leaves, winding vine tendrils, and embedded metallic pearl clusters secured across a sturdy metal comb base. The clay leaves are individually textured with real leaf veining or custom silicone molds, producing an organic matte finish that contrasts against the lustrous surface of the pearls. This piece serves as an exceptional finishing element for bridal updos, romantic chignons, and loose bohemian waves, anchoring firmly into the hair without slipping. By crafting the leaves from flexible polymer clay, the finished comb retains slight give, allowing it to curve comfortably against the contours of the bride’s hairstyle. The botanical motif provides a cohesive design thread when paired with matching floral earrings, uniting the entire bridal jewelry ensemble with natural elegance. It represents an elevated handmade craft project that delivers high-end boutique impact at a fraction of commercial bridal boutique costs.
To construct the bridal comb, roll conditioned white clay into a uniform two-millimeter slab, utilizing a small pointed leaf cutter to produce twenty individual leaf blanks. Press each leaf onto a silicone botanical vein sheet to emboss realistic central veins and delicate lateral ribs onto the outer clay surfaces. Using floral crafting wire, thread several three-millimeter faux pearls onto individual stems, twisting the wire ends tightly to create clustered stamen elements. Arrange the textured leaves into overlapping pairs along a long, narrow strip of raw clay, pressing the pearl wire stems directly between the layers to lock the components together. Curve the raw floral assembly to match the arched contour of a silver or gold metal hair comb, anchoring the clay backplate directly over the comb’s upper teeth. Bake the entire assembled piece at the specified baking temperature for fifty minutes, shielding the delicate petal tips with a tent of aluminum foil to prevent scorching. Once completely cool, coat the leaves with a thin coat of matte water-based sealant, securing any loose wire accents with clear jewelry resin.
4. Gilded Leaf Cascade Statement Earrings

How to Create
The gilded leaf cascade statement earring design delivers dramatic bridal impact through cascading tiered layers that sway gently with every movement. This design features descending tiers of elongated clay leaves coated in genuine micro-thin gold metal leafing, mimicking the appearance of cast precious metal jewelry. The upper stud features a compact fan-shaped leaf cluster that conceals the ear lobe, while three progressively larger tiers suspend beneath via delicate chain links. Incorporating gold leaf directly onto raw clay before cutting yields a distinct cracked, antiqued surface texture when rolled flat, catching evening venue lighting beautifully. Despite its visual volume and substantial length, the polymer clay composition remains exceptionally light, allowing brides to dance comfortably throughout the reception without pulling on the ears. This bold design complements minimalist crepe gowns and sleek slip dresses, acting as a standalone statement accessory that eliminates the need for matching necklaces. The warm metallic tones harmonize effortlessly with traditional gold wedding bands, champagne florals, and warm sunset photography.
Begin by rolling out a three-millimeter sheet of ivory or warm beige polymer clay, smoothing the surface with a soft lint-free cloth. Lay a single sheet of delicate gold metal leaf directly over the clay surface, burnishing the foil gently using clean fingertips or a soft makeup sponge. Roll the gilded slab through your clay machine or under a hand roller, gently stretching the foil to produce subtle, elegant micro-cracks across the golden finish. Stamp out six cascading leaf silhouettes using graduated leaf cutters, punching linking holes at the top and bottom of each piece with a two-millimeter hole punch. Lay the cut pieces onto a curved ceramic tile to give each leaf a gentle three-dimensional wave during the oven-curing process. Bake the shaped leaves for forty-five minutes, allowing them to cool gradually inside the closed oven to avoid thermal shock. Link the cured leaf tiers together using three-millimeter gold jump rings, finishing the top leaf with a securely glued flat surgical steel ear post.
5. Terracotta and Sage Bohemian Bridal Hoops
Execution Process
The terracotta and sage bohemian bridal hoop design introduces warm, earthy color palettes into bridal party accessories, aligning with rustic outdoor celebrations. This style features large gold wire hoops adorned with sculpted crescent clay cuffs displaying hand-carved southwestern patterns and botanical sprigs. The color story combines muted desert terracotta with dusty sage green and creamy off-white, producing an organic palette suited for vineyard, forest, or desert ceremonies. Small textured balls, delicate crescent shapes, and pressed botanicals are layered across the hoop base, transforming ordinary metal hoops into customized works of fiber and clay art. This design appeals strongly to modern bridesmaids seeking non-traditional accessories that complement rich floral arrangements and textured linen dresses. The matte, terra-cotta finish provides an earthy, artisanal character that highlights the beauty of handmade jewelry craftsmanship. These hoop accents bridge contemporary design aesthetics with rustic warmth, offering an accessible crafting project that produces vibrant, photo-worthy event accessories.
To build these bohemian hoops, prepare conditioned blocks of terracotta, dusty sage, and warm ecru polymer clay, rolling each color into a thin two-millimeter sheet. Cut out two large crescent moon shapes from the terracotta sheet, sized to fit the lower half of thirty-millimeter gold wire hoop frames. Using a fine metal stylus, emboss repetitive geometric dash patterns and miniature sunburst motifs along the curved outer borders of the terracotta crescents. Roll tiny sage green clay teardrops, flattening them with a needle tool to create miniature eucalyptus sprigs, pressing them firmly onto the center of the terracotta base. Wrap the upper ends of the clay crescent securely around the gold hoop wire, using a drop of liquid polymer clay to ensure strong mechanical bonding during heat exposure. Bake the assembled hoops on a flat baking tile lined with parchment paper for forty minutes at the recommended temperature. Once cool, brush a light dusting of translucent sealing powder over the carved grooves to enhance depth and protect the matte surface from environmental oils.
6. Pressed Dried Floral Translucent Pendant

Setup Method
The pressed dried floral translucent pendant incorporates genuine dried wedding botanicals directly inside semi-clear clay, creating a lasting botanical keepsake. This necklace concept utilizes ultra-translucent liquid and solid polymer clays to suspend delicate dried baby’s breath, miniature fern fronds, and pressed petals within a glass-like bezel. The pendant is formed as an elegant oval, shield, or teardrop silhouette framed by a thin metallic or solid white clay border. When properly cured and sanded, the surrounding clay matrix achieves a soft frosted appearance, allowing the vibrant colors of the natural botanical inclusions to shine through clearly. This piece functions as a deeply meaningful bridal accessory, allowing brides to incorporate preserved flowers from heirloom gardens or sentimental family corsages directly into their bridal attire. Suspended from a dainty fourteen-karat gold-filled chain, the pendant rests gracefully along open collarbones, complementing sweetheart, V-neck, and scoop neckline wedding dresses. It represents an innovative intersection of botanical preservation and contemporary jewelry design, yielding a timeless heirloom that preserves the sentimental memory of the celebration.
To prepare this botanical pendant, press conditioned pure translucent clay to a thickness of two millimeters, cutting out an elongated oval base shape using a steel cutter. Roll a very thin coil of bright white clay, pressing it around the outer rim of the translucent base to form a neat, supportive bezel wall. Gently position tiny pieces of dried, pressed baby’s breath blossoms and miniature dried greenery across the surface using fine jewelry tweezers. Carefully deposit a few drops of clear liquid polymer clay over the botanicals, spreading the liquid smoothly with a needle tool to eliminate trapped micro-bubbles. Transfer the pendant onto a clean ceramic baking tile, tenting the piece with foil to prevent yellowing, and bake at the designated temperature for forty-five minutes. After cooling, sand the back and sides smooth using wet-dry sandpaper in ascending grits, finishing with twelve hundred grit for a soft, silky feel. Drill a clean hole at the top using a manual pin vise, inserting a gold pinch bail and threading your chosen delicate chain through the center.
7. Porcelain Lace Textured Chandelier Drops

How to Make
The porcelain lace textured chandelier drop mimics the delicate, intricate look of vintage heirloom lace pressed directly into crisp white porcelain ceramics. This vintage-inspired design relies on an openwork chandelier framework featuring teardrop cutouts, scalloped borders, and raised lace surface relief. High-definition impression mats or pieces of antique bridal lace are pressed firmly into the conditioned clay, transferring fine thread textures directly onto the piece. The finished pieces are finished with a delicate dusting of pearl mica pigment along the raised lace ridges, catching the light without the need for bright metallic foils. Chandelier earrings provide flattering vertical length and soft, frame-like movement, pairing naturally with traditional cathedral veils and ornate vintage lace wedding dresses. The pure ivory finish keeps the design sophisticated, blending seamlessly into traditional wedding ceremonies where understated elegance is preferred. This project offers intermediate crafters an opportunity to experiment with texture transfer techniques, creating heirloom-grade bridal accessories with everyday crafting tools.
Start by rolling conditioned ivory polymer clay through an acrylic roller into a uniform three-millimeter slab on a clean, dust-free tile surface. Lightly mist a piece of antique cotton lace or a silicone lace texture mat with water, pressing it evenly into the clay with an acrylic roller. Peel the lace back carefully in one smooth motion to reveal the sharp, raised floral lace impressions across the clay sheet. Align a chandelier-style cutter over the embossed pattern, pressing down firmly to extract the scalloped body and internal teardrop negative spaces. Use a needle tool to create clean connection holes at the top apex and along the bottom scalloped points for hanging delicate dangling accents. Bake the chandelier components for forty-five minutes, allowing them to rest undisturbed until completely cold to maintain structural flatness. Use fine jump rings to attach tiny white seed beads or micro-pearls to the lower connection points, securing a hypoallergenic post to the upper back using two-part epoxy paste.
8. Soft Quartz and Gold Clay Hairpins

Step-by-Step Guide
The soft quartz and gold clay hairpin set introduces subtle shimmer and structured styling into bridal updos, braids, and swept-back bridal hairstyles. Designed as a coordinated set of three or four decorative pins, each hairpin features a sculpted clay gem or raw mineral-cut nugget attached to a sturdy metallic bobby pin or U-shaped hair fork. The clay is blended using translucent base material mixed with tiny amounts of blush pink and pearl pigments to replicate the soft, romantic glow of natural rose quartz. Irregular faceted edges are carved using sharp hobby blades, mimicking natural stone cuts, while the rims are highlighted with liquid gold leaf paint. These decorative pins can be placed throughout elaborate braided updos, offering functional grip alongside delicate decorative sparkle. The soft pink and gold tones add warmth to blonde, brunette, and dark hair colors alike, bridging the aesthetic gap between raw mineral formations and polished bridal luxury. This beginner friendly project works up quickly, making it an excellent weekend creative project for wedding styling.
Begin by blending three parts translucent polymer clay with one part white clay and a tiny speck of deep magenta clay to produce a soft, semi-clear rose quartz tint. Form the blended mixture into four irregular organic nuggets, chilling them in the refrigerator for fifteen minutes to firm the clay structure for precision carving. Using a sharp, flexible tissue blade, slice flat angular facets across the outer surface of each nugget to replicate natural crystalline geometry. Press the flat back of each faceted clay gem firmly onto the circular mounting pad of a heavy-duty gold hairpin or metal hair fork. Reinforce the joint by applying a small amount of bakeable liquid clay adhesive between the metal base pad and the raw clay back. Bake the hairpins resting upright in an accordion-folded strip of cardstock for forty minutes at the specified temperature. Once cooled, use a fine detail brush to apply liquid gold gilding paint along the outer perimeter facets, sealing the gold paint with a clear water-based varnish once dry.
9. Sculpted Calla Lily Collarbone Choker
How to Create
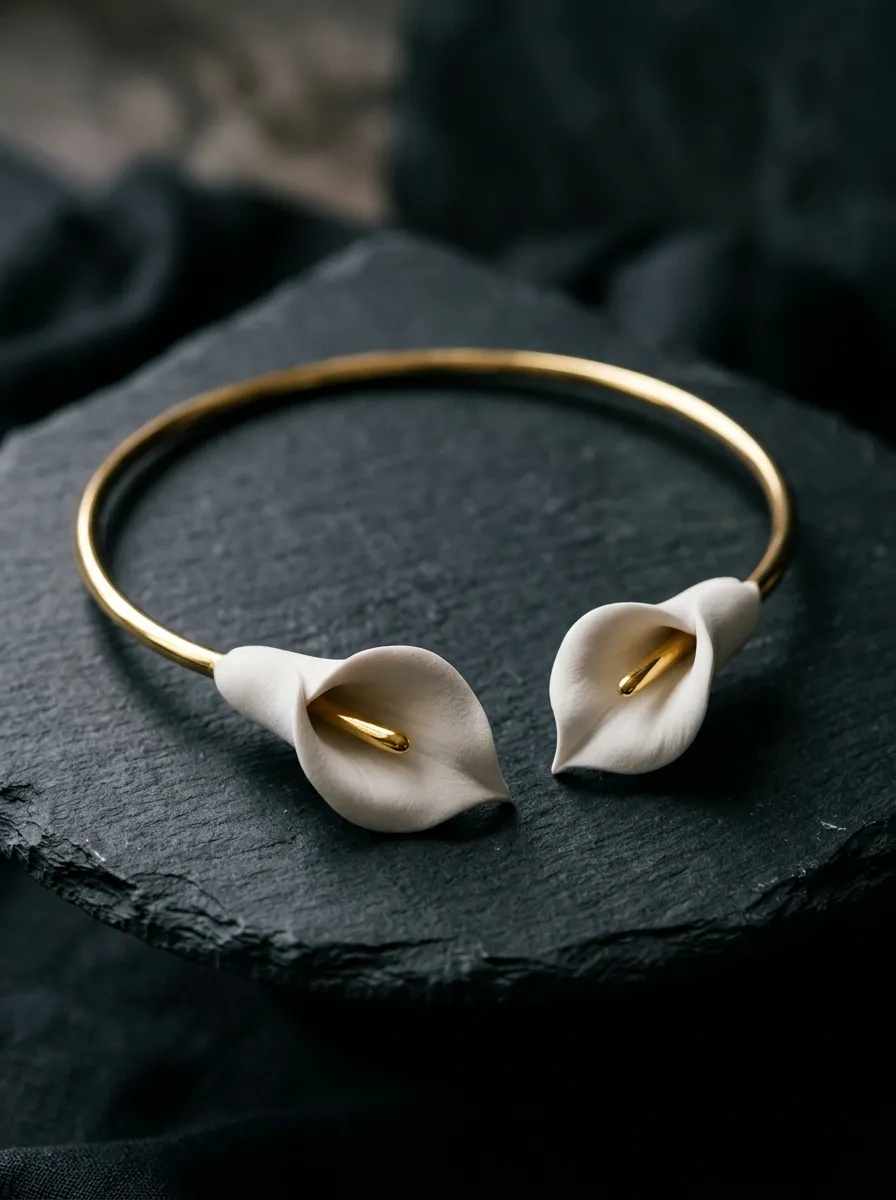
The sculpted calla lily collarbone choker is a refined statement necklace that frames the bride’s collarbones with fluid, modern elegance. This design features two minimalist calla lily blossoms sculpted from velvety white clay, curving naturally along the contours of an open-ended gold or silver collar torque wire. The lilies are sculpted with a seamless wrap-around petal construction, revealing a bright golden stamen at the center for a pop of luxury. Calla lilies traditionally symbolize magnificent beauty and purity, making them a meaningful floral motif for contemporary bridal celebrations. The open torque design sits flat against the skin, functioning as a modern piece of wearable sculpture that complements strapless, plunging, and off-the-shoulder gown designs. By focusing on smooth, unblemished surfaces and graceful organic curves, this necklace achieves a striking, modern look without visual clutter. It represents a practical jewelry project for makers looking to explore three-dimensional form wrapping, resulting in a bridal accessory that looks like it was designed in a high-end contemporary studio.
To construct this modern choker, condition white polymer clay thoroughly, rolling it to a uniform thickness of two millimeters using an acrylic roller. Cut out two teardrop shapes, smoothing the cut edges with a finger dipped in rubbing alcohol to eliminate minor burrs. Wrap the wider lower edges of the teardrop around a thin metal skewer to form the classic trumpet curve of a calla lily, leaving the pointed tip gently flared outward. Roll a tiny coil of bright yellow or gold clay to form the central stamen, inserting it directly into the throat of the sculpted white trumpet petal. Shape the base of each lily to fit snugly around the open ends of a pre-formed rigid metal collar torque, securing the raw joint with a drop of liquid clay. Support the floral tips with crumpled balls of aluminum foil during baking to maintain their three-dimensional curved profile during heat cure. Bake the supported flowers for forty-five minutes, let them cool, and secure them permanently to the torque terminals using industrial-grade metal adhesive.
10. Monogrammed Modern Bridesmaid Ring Dishes
Execution Process
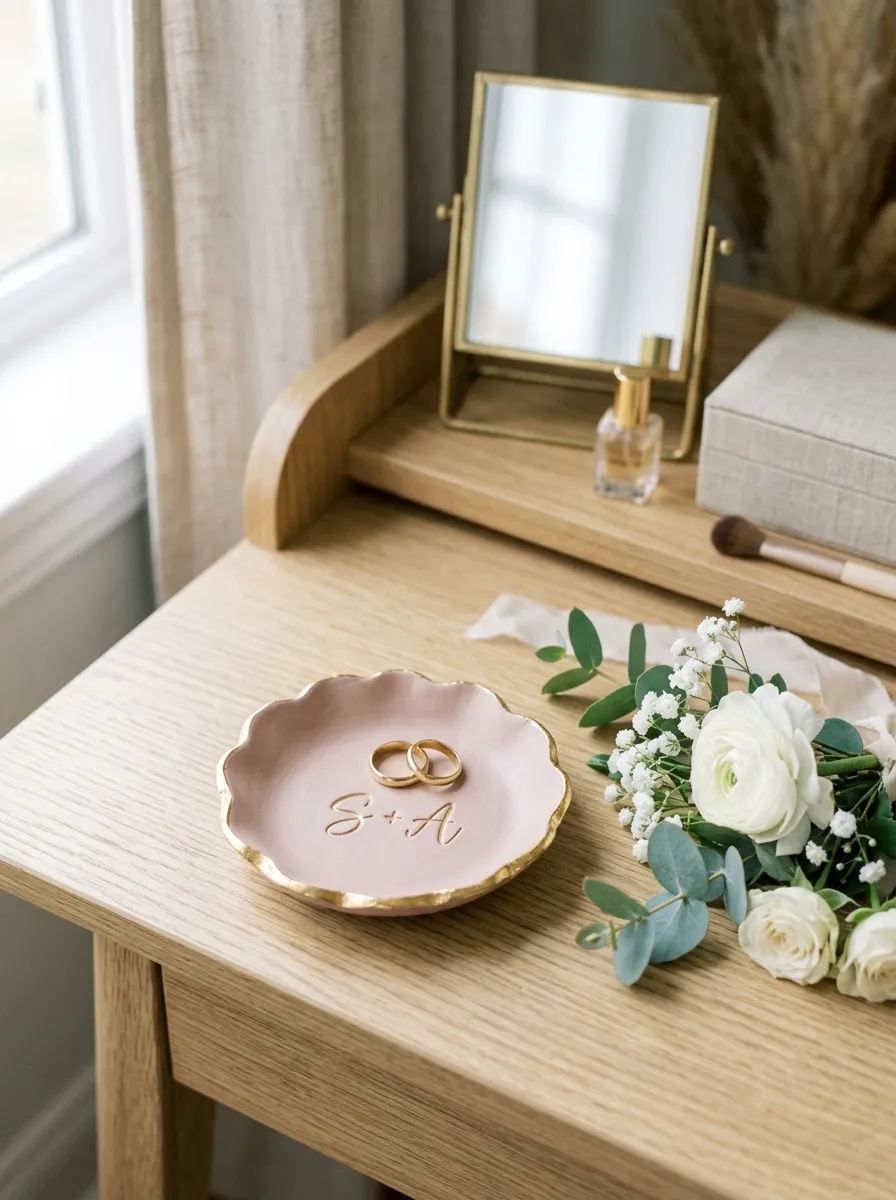
The monogrammed modern bridesmaid ring dish expands clay wedding crafting into personalized keepsakes designed for bridal party gifting and ceremonial ring display. These small catch-all bowls feature smooth rounded contours, subtle raised rims, and personalized metallic monogram lettering stamped directly into the center of the dish. A soft pastel palette—such as dusty rose, warm taupe, or soft French blue—pairs with hand-painted gold leaf borders to produce an elegant boudoir accent. Beyond functioning as decorative accents during getting-ready photo shoots, these dishes serve as practical bedside storage for wedding bands and delicate jewelry. Stamping each piece with the recipient’s initials creates a personalized, sentimental bridal gift that bridesmaids can keep for years. The crafting process is accessible and repeatable, making it simple to produce complete, matching sets for the entire bridal party in a single afternoon. These dishes demonstrate how polymer clay easily adapts to meaningful, functional wedding decor projects that elevate the entire bridal celebration experience.
To craft these personalized dishes, roll conditioned clay in your chosen shade through a roller to a thickness of four millimeters, ensuring a sturdy final structure. Cut out a perfect four-inch circle using a clean metal cookie cutter or circular clay template, smoothing the edge perimeter with damp fingertips. Gently drape the flat clay circle inside a shallow oven-safe ceramic dipping bowl or small glass saucer to create a soft, even dish curvature. Press metal alphabet stamps firmly into the center of the clay to emboss crisp, centered bridal monograms or meaningful wedding dates. Bake the clay dish inside its supporting ceramic form for fifty minutes at the manufacturer’s recommended temperature to prevent warping. Once cool, remove the clay dish from its form and paint the rim with liquid gold leaf paint using a steady hand and a fine flat brush. Finish the dish by brushing a thin coat of clear gloss glaze over the painted rim, allowing the personalized ring dish to cure completely before packaging.
Common Beginner Mistakes and How to Avoid Them
Crafting bridal jewelry requires a high level of technical precision, as minor imperfections like uneven baking, surface lint, and fragile joints become more noticeable against white bridal fabrics. The most frequent mistake beginners encounter is under-baking their clay, which leaves earrings brittle and prone to snapping during active wear. Polymer clay cures through heat-driven molecular fusion; always bake pieces at the exact temperature recommended by the manufacturer for the full recommended duration, using an independent oven thermometer to monitor heat stability. Another common issue is surface contamination from dust, hair, and lint fibers adhering to white and translucent clays during the rolling and conditioning phase. Maintain a clean work environment by wiping down tools, tiles, and hands with isopropyl alcohol, and use a dedicated piece of scrap white clay to clean rollers before working on bridal pieces. Rushed drilling is another frequent pitfall that can crack delicate, cured pieces; avoid applying heavy pressure with hand drills by creating connection holes with needle tools before baking, or using a high-speed micro-rotary tool with light pressure. Finally, avoid using weak fast-bonding craft glues for hardware attachment; use thick two-part jeweler’s epoxy paste to ensure ear posts stay anchored to the clay through the entire wedding day.
Practical Tips for Better Results
Achieving a clean, gallery-quality finish on handmade wedding jewelry relies on disciplined post-bake refining techniques that transform raw clay into smooth, ceramic-like accessories. Wet-sanding is the most effective way to eliminate imperfections; submerge your cured pieces in water mixed with a drop of liquid dish soap, sanding the edges methodically with high-grit wet-dry paper from six hundred to two thousand grit. Sanding underwater prevents microscopic airborne dust and produces an exceptionally smooth, satin finish that looks like unglazed porcelain. When working with translucent clays, keep your baking temperatures precise, as excess heat can cause translucent mediums to take on an unwanted yellow tint. Shield your accessories during baking by tenting a piece of clean aluminum foil or an inverted metal cake pan over your baking tile to diffuse heat evenly. To give flat sculpted flowers realistic movement, shape the petals on a slightly rounded surface, such as an inverted ceramic spoon or a ball of crumpled foil, before baking. Finally, use jump rings made from heavy-gauge wire, closing them with two pairs of smooth-jaw jewelry pliers until the ends meet flush to prevent jewelry layers from separating during wear.
Styling, Presentation, or Organization Ideas
Styling polymer clay wedding jewelry effectively requires balancing delicate handmade textures with the overall bridal look, hair choice, and gown details. Pair bold statement pieces, such as gilded leaf cascades or sculpted alabaster floral drops, with clean gown necklines like off-the-shoulder, sweetheart, or strapless cuts to give the earrings room to shine. For gowns with ornate lace sleeves or detailed illusion necklines, opt for simpler minimalist white marble arches or understated rose quartz hairpins tucked neatly into an updo. When presenting jewelry gifts to bridesmaids, mount the earrings on heavy-weight cotton paper cards stamped with gold foil lettering, enclosing them in textured linen boxes tied with torn silk ribbons. Organizing accessories for the wedding day requires careful handling; store finished clay pieces in flat, compartmentalized jewelry trays lined with soft velvet or unbleached muslin fabric to prevent scratching. Keep clay hair combs and delicate floral pieces separated from heavy metallic items to protect thin petal edges from chipping. Displaying the bride’s accessories on a personalized clay ring dish alongside the bridal bouquet creates photo opportunities for detail shots that showcase the handcrafted details of your wedding styling.
Budget or Time Planning
Crafting a complete bridal jewelry collection using polymer clay is a cost-effective alternative to purchasing designer accessories, but it requires thoughtful timeline management and material planning. Begin your project three to four months before the wedding date to allow ample time for color swatching, design testing, and trial fittings alongside your wedding gown. A single block of professional clay yields multiple pairs of statement earrings or accessories, keeping raw material costs low even when creating coordinated sets for an entire bridal party. Optimize your production schedule by grouping similar tasks together: dedicate one day to conditioning and color mixing, the next to cutting and sculpting, and a separate session to baking, wet-sanding, and hardware assembly. Allocate funds toward premium jewelry findings, including solid sterling silver or gold-filled jump rings and ear wires, to prevent allergic skin reactions during long days of celebration. Maintain a detailed project notebook tracking exact color recipe ratios and baking durations so you can recreate matching accessories later if the wedding party expands. Structuring your crafting schedule methodically eliminates last-minute stress, ensuring every accessory is finished, cured, and packaged well before the wedding rehearsal.
Creative Expansion and Advanced Inspiration
Once you master foundational clay sculpting and curing techniques, numerous advanced avenues open for expanding your handmade bridal accessory collection. Experiment with liquid polymer clay mediums to create flexible floral veils, translucent hair combs, or delicate lace hair vines that drape comfortably across intricate bridal hairstyles. Advanced crafters can incorporate fine metalsmithing skills, soldering custom brass and silver wire structures to anchor dimensional clay florals directly into one-of-a-kind tiaras or crowns. You can also explore custom textile matching by tinting translucent clay with alcohol inks, matching bespoke bridesmaid gown colors like dusty mauve, eucalyptus green, or slate blue with precision. Mixed-media additions, such as incorporating raw quartz crystals, baroque freshwater pearls, and genuine gold-leaf foil, add visual richness to the smooth, matte surface of the clay. Consider creating commemorative keepsake accessories for the broader wedding party, such as matching floral lapel pins for groomsmen or pearl-accented clay cuff links for the groom. These refined design variations demonstrate how polymer clay functions as an elevated artistic medium, capable of producing timeless, high-fashion accessories that reflect the distinct beauty of your wedding day.
Leave a Reply