Customizing personal tech accessories with polymer clay offers an exceptional way to turn everyday mobile devices into tactile, three-dimensional artworks that showcase individual style. Hand-sculpting dimensional elements onto phone covers allows makers to move beyond generic, factory-printed designs and explore rich surface reliefs, whimsical character motifs, botanical textures, and modern geometric compositions. This comprehensive tutorial details ten unique polymer clay phone case ideas, ranging from dimensional pastel florals and miniature baked pastries to faux terrazzo slabs, cottagecore mushroom patches, and sculptural modern checkerboards. Readers will discover the essential mechanical steps of surface preparation, clay conditioning, flat-slab baking, secure two-part epoxy bonding, and protective liquid resin coating. Creating your own clay phone case project grants complete control over color palettes, ergonomic grip contours, and tactile detailing without sacrificing device functionality. Beyond upgrading phone protection, mastering these small-scale clay sculpting and permanent adhesion methods provides practical crafting knowledge that easily translates into custom vanity trays, stationery cases, and decorative home accents. By utilizing fundamental crafting tools like acrylic rollers, detail needles, and texture sponges, makers of any experience level can achieve durable, professional-grade results. The upcoming sections outline essential preparation workflows, material inventories, ten two-paragraph instructional project breakdowns, and practical project planning strategies.
Why This Idea Is Trending or Useful
Handcrafted polymer clay phone covers continue to lead trending ideas across online design boards and Pinterest ideas because they merge practical daily utility with expressive, tactile aesthetics. In an era dominated by sleek, flat digital glass, consumers increasingly appreciate the warmth, grip, and physical texture provided by sculpted, three-dimensional surfaces. From a design perspective, polymer clay allows makers to experiment with contemporary trends—such as maximalist food charms, organic 1970s retro curves, and minimalist style earthy neutrals—at an accessible, handheld scale. As a rewarding DIY creative project, customizing a phone case requires minimal work space, functioning smoothly on an ordinary desk using an inexpensive hard-shell case as a structural blank. Because fundamental techniques rely on rolling uniform slabs, cutting simple geometric silhouettes, and baking flat on ceramic tiles, this medium serves as an exceptionally beginner friendly entry point into functional craft arts. Designing your own case also yields smart budget ideas, allowing decorators to achieve the look of expensive boutique designer tech cases for a fraction of retail prices. Furthermore, the completed cases serve as conversation-starting personal accessories that comfortably withstand daily pocket and purse storage.
Materials and Preparation
Thorough planning and disciplined supply acquisition form the essential foundation for producing durable, shock-resistant polymer clay phone cases that maintain their bond through months of handling. The primary medium consists of artist-grade, flexible-cure polymer clay brands, which retain slight pliability after baking to absorb mechanical drops without cracking. Pair this clay with a rigid, clear or opaque polycarbonate or hard-plastic phone case blank, avoiding flexible silicone cases that repel adhesives and flex away from rigid clay. Essential sculpting tools include an acrylic rolling pin, a sharp tissue blade, fine-point wooden toothpicks, ball stylus tools, and an independent freestanding oven thermometer to monitor baking heat. For long-lasting adhesion and surface protection, procure high-strength two-part epoxy glue, eighty-grit sandpaper, ninety-one percent isopropyl alcohol, and clear UV resin with a curing lamp. Preparation begins by scuffing the hard-plastic case back with eighty-grit sandpaper to create mechanical tooth, followed by a thorough alcohol wipe to remove fine plastic dust and skin oils. Condition your clay thoroughly until pliable and crack-free, and always bake decorative clay pieces completely flat on smooth ceramic floor tiles to ensure they sit flush against the phone case during the final gluing stage.
1. Dimensional Pastel Daisy Meadow Case
Step-by-Step Guide
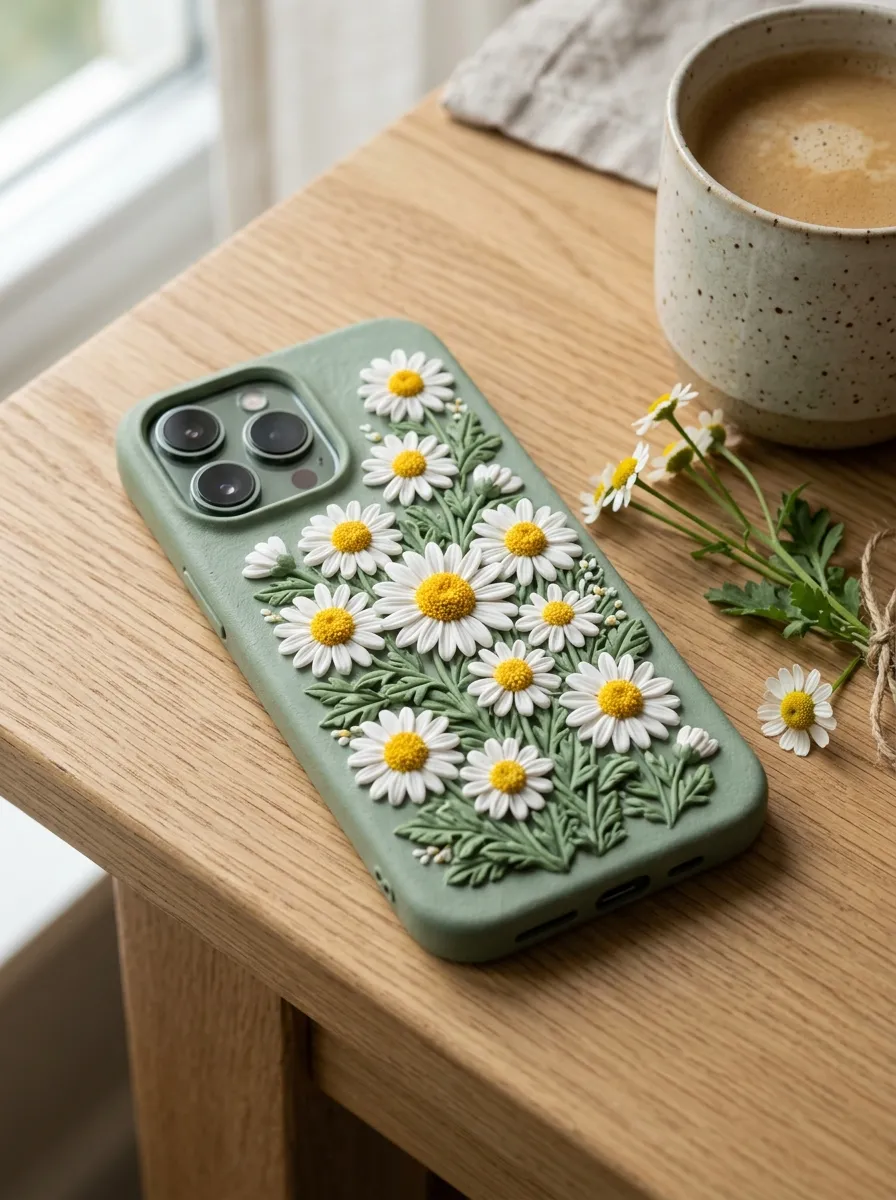
The dimensional pastel daisy meadow case brings gentle springtime romance, tactile petal relief, and cheerful garden aesthetics to handheld technology. This design arranges a lush cluster of miniature sculpted daisy blossoms across a soft sage-green or butter-yellow polymer clay background slab. Each flower features individual teardrop-shaped white petals radiating outward from a rounded, textured golden-yellow center, creating a rich three-dimensional canopy. The raised floral surfaces provide a natural, tactile non-slip grip that makes the phone comfortable and secure to hold during everyday communication. Leaving subtle negative space around the edges of the case allows the pastel background to frame the blossoms with clean visual margins. The durability of cured polymer clay ensures the petals maintain their perky upward curvature without snapping during frequent pocket transit. This cheerful botanical concept complements spring fashion palettes, outdoor lifestyle themes, and romantic cottage aesthetics.
To construct the daisy meadow case, roll a conditioned slab of soft sage-green clay to an even two-millimeter thickness, trimming it to match the rectangular back plate of your hard phone case. Shape dozens of miniature daisies by rolling tiny white clay spheres into tapered teardrops, arranging six to eight petals in a circular cluster on your ceramic tile and pressing the center down with a ball stylus. Roll a small ball of sunny yellow clay for each flower core, pressing it into the center indentation and texturing the surface with a toothpick point. Arrange the sculpted daisies across the sage-green slab in a dense, flowing composition, pressing them gently into the base clay with a smear of liquid polymer clay for maximum cohesion. Bake the entire floral slab on your ceramic tile for forty-five minutes at the temperature recommended on the clay package. Once fully cooled, sand the reverse side of the clay slab and the plastic case back, applying an even layer of two-part epoxy to bond the pieces together permanently under light clamp pressure.
2. Miniature Parisian Patisserie and Croissant Collage
Execution Process
Miniature food styling introduces whimsical storytelling, gourmet bakery charm, and delightful visual humor to modern tech accessories. This project covers the phone case with a delightful assortment of miniature French pastries, featuring golden flaky croissants, glazed fruit danishes, pastel macarons, and petite baguettes. Sculpted in warm dough-tan clay, the pastries display realistic baked crust coloration achieved through dry chalk pastel shading applied before baking. The tiny, scattered arrangement transforms the phone back into a boutique bakery display, celebrating culinary craftsmanship through intricate, small-scale details. The varied shapes and smooth, rounded contours of the pastries create a comfortable, ergonomic texture that feels natural against the fingers when texting. This charming conversation piece appeals to travel lovers, culinary enthusiasts, and collectors of kawaii miniature art, standing out vibrantly against neutral casual outfits.
Begin by blending translucent, white, and a pinch of raw sienna clay to create an authentic, unbaked pastry dough base color. To sculpt miniature croissants, roll a small ball of dough clay into a flat triangle, rolling the wide base up toward the narrow tip and curving the ends inward into a traditional crescent shape. Use a tissue blade to lightly score delicate horizontal flaky crust lines across the croissant layers. Shape tiny round macarons by sandwiching a textured cream-colored clay disc between two smooth pastel-colored shells, texturing the ruffled cookie edges with a needle tool. Dust the surfaces of the raw pastries with crushed brown and golden-yellow chalk pastels using a soft makeup brush to produce realistic golden-brown baking gradients. Bake all pastry miniatures flat on a parchment-lined tile for thirty-five minutes. After cooling, arrange and adhere the baked miniatures onto the pre-sanded phone case using two-part epoxy, sealing the entire layout with a brush-on coat of satin water-based varnish to protect the pastel shading from pocket friction.
3. Abstract Earthy Terrazzo Mosaic Slab

How to Create
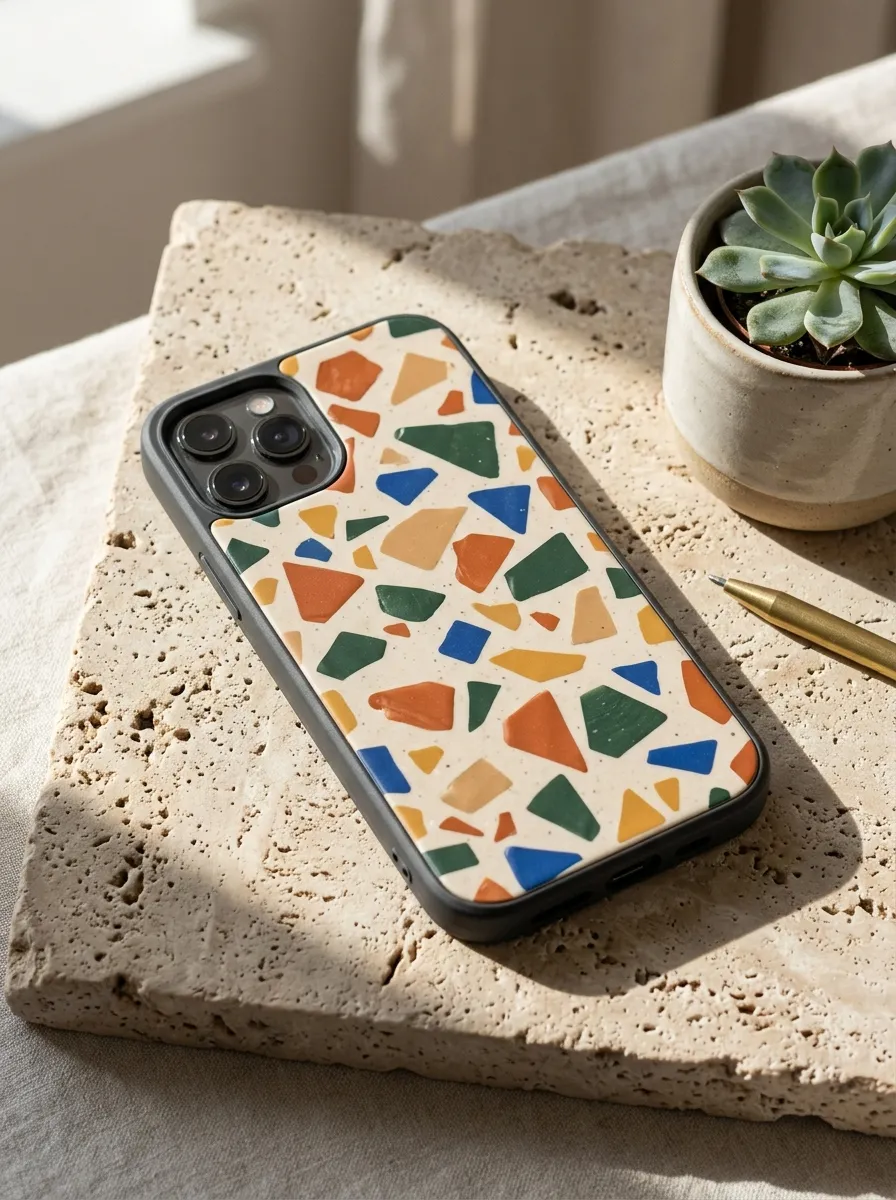
Inspired by mid-century Italian architectural tiling, the abstract terrazzo phone case introduces graphic stone textures, sophisticated color blocking, and a smooth, polished finish. This design features a flat, continuous polymer clay veneer made of an ivory or warm oatmeal base embedded with irregular geometric chips of terracotta, forest green, cobalt blue, and mustard yellow. The scattered, asymmetric placement of the faux stone fragments produces an authentic mosaic effect that looks effortlessly upscale and artistic. Unlike textured 3D designs, this flat-slab case maintains a sleek, low-profile silhouette that slides easily into tight pockets and vehicle phone mounts without catching. The smooth, wet-sanded surface provides a silky, stone-like feel that resists fingerprints and surface smudges throughout active days. This modern, minimalist aesthetic pairs beautifully with neutral linen clothing, contemporary office environments, and curated designer handbags.
To make the terrazzo slab, condition two ounces of unbleached cream clay and roll it out into a smooth sheet measuring three millimeters thick on your ceramic work tile. Condition small scraps of cured or firm raw clay in terracotta, forest green, and mustard, slicing them with a sharp craft blade into tiny, angular geometric chips of varying sizes. Scatter the colorful clay chips across the surface of the cream base sheet, spacing them randomly to mimic crushed marble aggregate. Lay a sheet of baking parchment over the mosaic, rolling firmly across the surface with an acrylic roller to press the colored chips completely flush into the cream base. Use a craft knife to trim the slab to your phone case dimensions, cutting out the camera lens aperture with clean, perpendicular strokes. Bake the slab flat on the tile for forty-five minutes. Once cooled, wet-sand the cured clay surface underwater using four-hundred through one-thousand grit sandpaper to achieve a polished stone texture, bonding it to the scuffed case using industrial epoxy adhesive.
4. Vintage Botanical Mushroom and Fern Woodland Case
Step-by-Step Guide
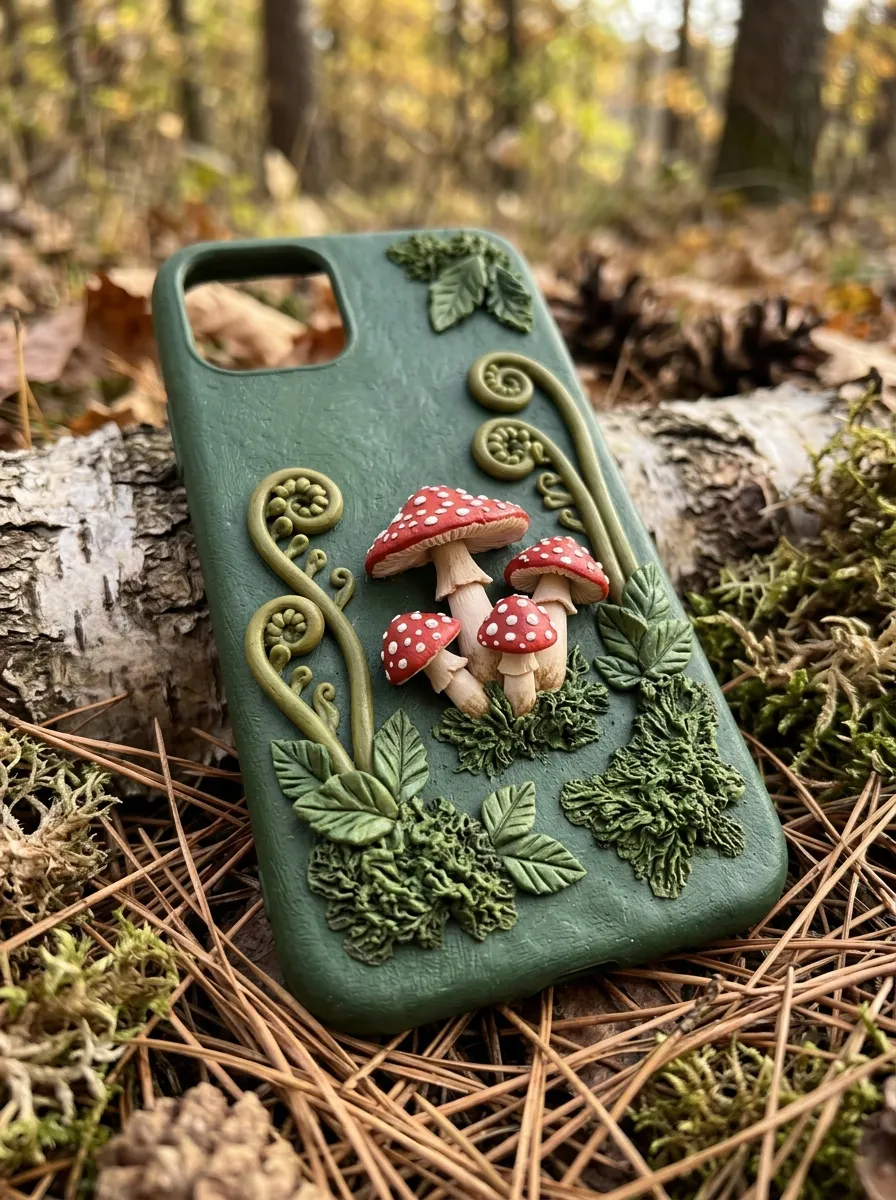
Woodland botanical designs bring earthy forest textures, fairytale folklore, and tranquil organic aesthetics to modern personal devices. This concept features a dimensional forest floor scene sculpted across a deep forest-green or bark-brown background slab, highlighted by clustered red-capped amanita mushrooms, curling fiddlehead ferns, and textured sheet moss. The plump, domed mushroom caps display raised white applique spots, emerging naturally from behind delicate green fern fronds and tiny acorn accents. The varied depths of the woodland components create an engaging, touchable relief that feels like a walk through an enchanted autumn forest. The earthy, muted color palette harmonizes with vintage leather goods, autumn outerwear, and rustic wooden desks. Its durable, interlocking sculptural elements provide a secure, comfortable hold that transforms phone handling into a soothing sensory experience.
To construct the woodland case, roll out a base slab of deep forest-green clay to an even two-millimeter thickness, tracing and cutting the perimeter to match your phone case blank. Shape several miniature mushrooms by rolling cream clay stems with wide, flared bases, topping them with domed crimson-red clay caps decorated with tiny flattened white clay polka dots. Form curling fern fronds by rolling thin tapered ropes of olive-green clay, coiling the tips tightly inward and indenting delicate leaf segments with the dull edge of a craft blade. To create realistic moss patches, place small chunks of moss-green clay onto the background slab, stippling the surface vigorously with the stiff bristles of a toothbrush or a coarse texturing sponge. Press the mushrooms, ferns, and moss clusters securely into the green base slab, baking the entire assembled piece flat on a ceramic tile for forty minutes. After cooling, secure the cured slab to the scuffed phone blank using high-strength two-part epoxy glue.
5. Sculptural Retro Wavy Checkerboard Case
Execution Process
Retro-inspired optical patterns offer vibrant 1970s nostalgia, geometric energy, and bold graphic presence within modern tech accessories. This design transforms the traditional checkerboard motif by curving the grid into undulating, liquid waves, executed in high-contrast tones like chocolate brown and cream, or lavender and olive green. The undulating grid lines create a sense of kinetic movement across the back of the phone, making the case an eye-catching fashion statement. The flat yet distinct seams between contrasting clay blocks provide subtle, satisfying tactile feedback under the fingertips. Maintaining a flat, continuous surface profile ensures the case remains practical for charging pads and tight pockets, while the bold wavy geometry elevates simple everyday mirror selfies. This stylish design appeals to lovers of vintage fashion, contemporary graphic design, and artistic streetwear aesthetics.
Begin by rolling out equal-sized slabs of chocolate-brown and unbleached cream polymer clay to an exact thickness of two millimeters using uniform rolling guides. Using a sharp tissue blade, slice both clay sheets into identical strips measuring eight millimeters in width. Alternate the colored strips side by side on your ceramic tile to create a striped sheet, pressing the seams together with a light roll of your acrylic pin. Slice across the joined stripes perpendicularly to create segmented checkerboard strips, then shift every other strip upward by one square to establish the classic grid pattern. To introduce the retro wavy effect, gently push the edges of the grid horizontally and diagonally using the curved side of a round tool, warping the straight grid lines into flowing, liquid waves. Trim the wavy checkerboard to fit your phone case dimensions, bake it flat on a tile for forty minutes, and finish by wet-sanding the cured surface before adhering it to the phone case with epoxy.
6. Frosted Animal Cracker and Funfetti Birthday Case
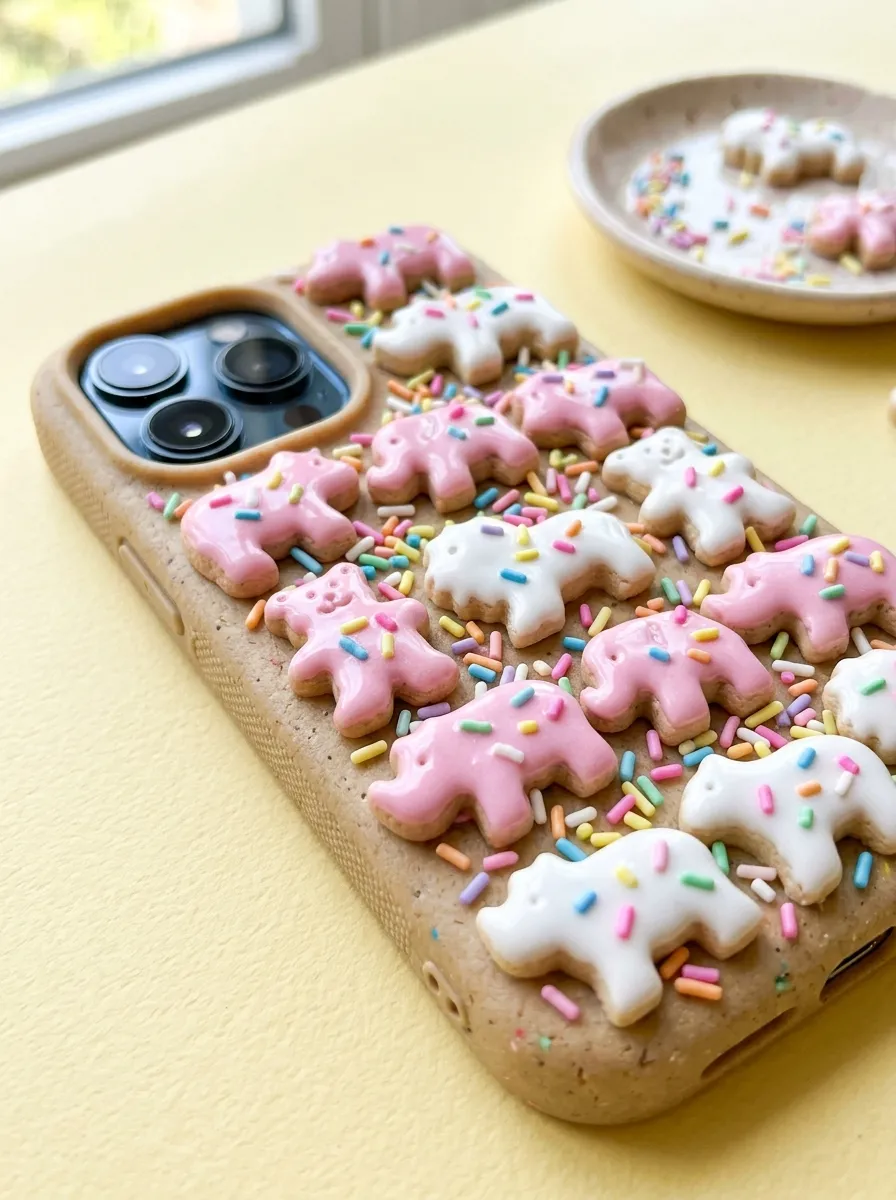
How to Create
Nostalgic confectionary designs capture playful childhood joy, sweet bakery textures, and vibrant party colors through charming faux-icing techniques. This design showcases a textured cookie-tan base slab decorated with hand-sculpted frosted animal crackers, complete with white and pink faux-royal icing and tiny multi-colored sprinkles. The miniature circus animals—such as bears, camels, and elephants—feature authentic crimped cookie edges and puffy, raised frosting layers that look good enough to eat. Scattered between the animal crackers are dozens of miniature cylindrical funfetti sprinkles in bright yellow, sky blue, lime green, and lavender. The raised, puffy textures provide an engaging, tactile surface that turns the phone case into an irresistible sensory fidget piece. This cheerful, dopamine-inducing accessory brings bright, humorous energy to daily phone routines, making it an instant conversation starter among friends and coworkers.
To assemble this sweet treat case, roll a conditioned slab of warm cookie-dough clay to a two-millimeter thickness, stippling the entire surface lightly with a clean texture sponge to mimic baked biscuit texture. Sculpt miniature animal crackers by stamping tiny animal silhouettes from dough-colored clay using micro cutters, baking them separately for twenty minutes to harden. Once cool, coat the top of each mini cracker with thick white or pastel-pink liquid polymer clay mixed with opaque pigments to simulate glossy royal icing. To make the funfetti sprinkles, roll hair-thin coils of brightly colored clay, bake them briefly, and slice them into tiny one-millimeter cylinders using a razor blade. Scatter the rainbow sprinkles generously across the wet liquid clay frosting on the crackers, curing the decorated cookies under a craft heat gun or in the oven for fifteen minutes to set the icing. Arrange and bond the finished animal crackers across your scuffed phone case using industrial two-part epoxy.
7. Minimalist Coastal Seashell and Pearl Relief Case
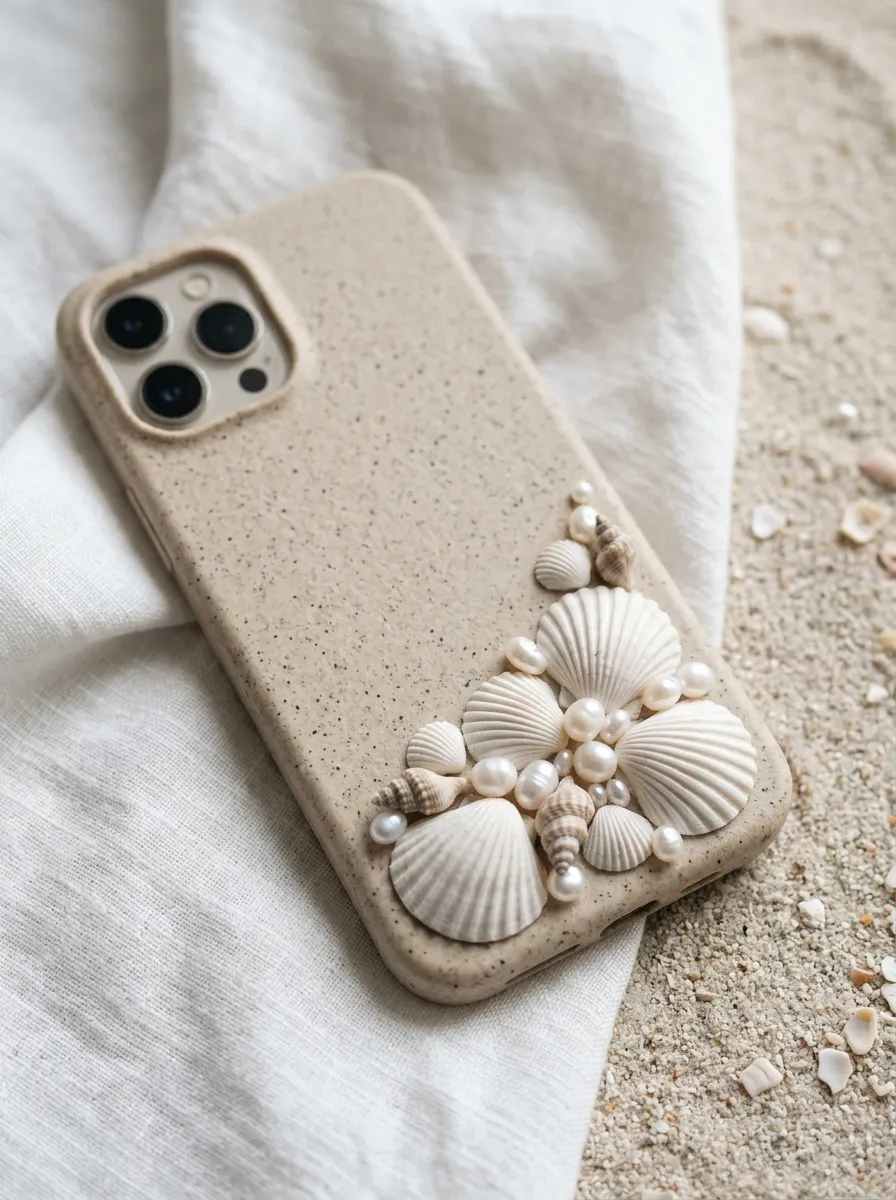
Step-by-Step Guide
Coastal-inspired minimalism brings serene ocean textures, graceful natural geometry, and luminous marine elegance to handheld devices. This concept features a clean, unglazed stoneware-look clay background slab in soft sand or warm oatmeal, decorated with delicate, hand-pressed scallop shells, whelks, and tiny faux freshwater pearls. The radiating ribs of the miniature seashells catch directional light, casting soft shadows that give the case an understated, sculptural elegance. The muted, sandy color palette keeps the beach theme sophisticated and modern, avoiding loud tropical cliches in favor of quiet seaside luxury. The gentle ridges of the shells provide subtle tactile interest that enhances grip security without feeling bulky in pockets. This refined design pairs seamlessly with coastal linen attire, summer vacation travel, and modern Mediterranean-inspired home decor.
To construct the coastal relief case, condition two ounces of oatmeal clay mixed with a pinch of dark granite-effect clay, rolling it into a flat two-millimeter base sheet and cutting it to fit your phone case dimensions. Sculpt miniature scallop shells by rolling small spheres of ivory clay into flattened teardrops, pressing a fine needle tool repeatedly from the narrow base toward the wide rounded fan to form radiating fluted ridges. Shape miniature spiral whelk shells by coiling tapered clay ropes around a toothpick core, smoothing the outer seams with a silicone tool. Arrange the sculpted shells in an organic, flowing wave along the lower right quadrant of the sandy base slab, pressing their bases firmly into the clay. Nestling tiny, lustrous faux pearl beads between the shell clusters adds soft iridescence, securing them with a touch of bakeable liquid clay. Bake the completed coastal slab flat on your tile for forty minutes, cooling it completely before bonding it to the scuffed phone blank with high-strength epoxy.
8. Whimsical Celestial Moon and Star Constellation Case

Execution Process
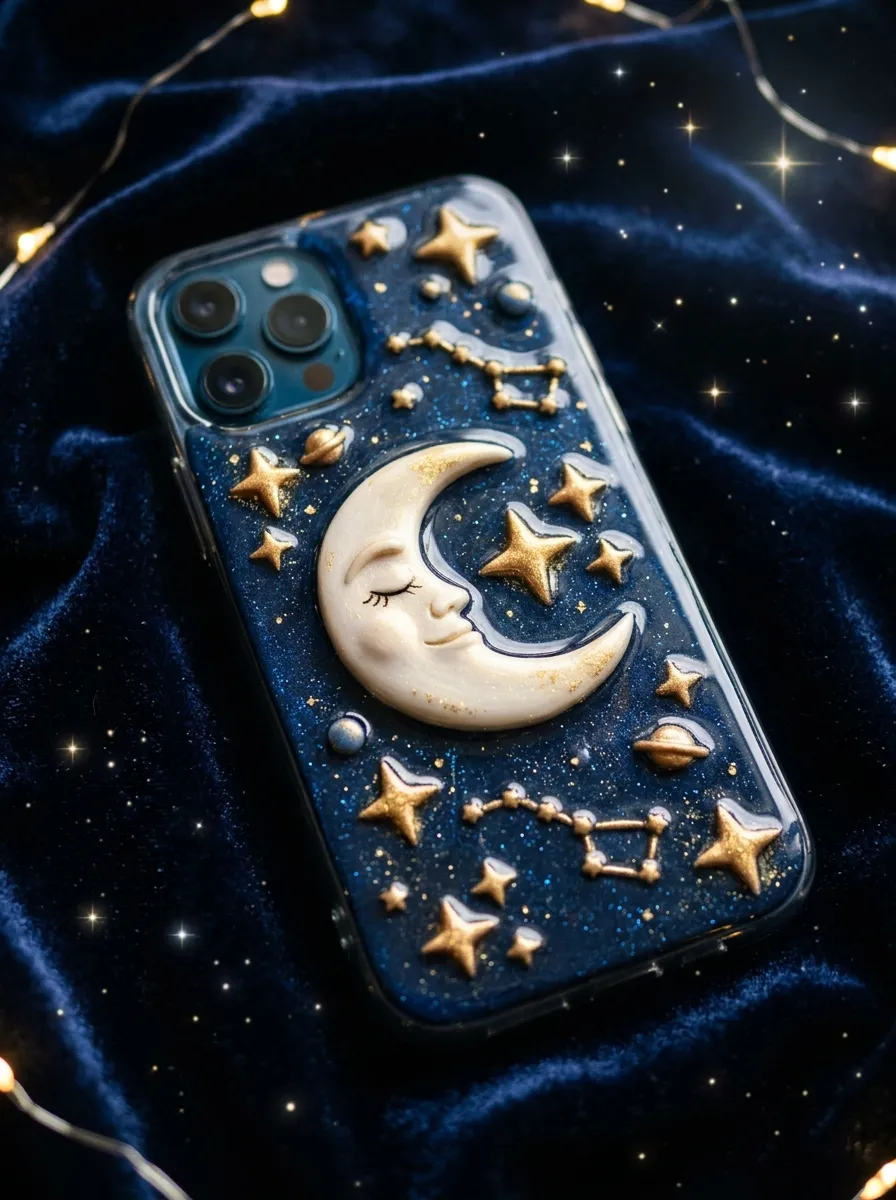
Celestial designs evoke nighttime wonder, astrological mystery, and starry romance through metallic lusters and deep midnight color blocking. This design features a rich midnight-blue or deep obsidian polymer clay base adorned with a sculptural crescent moon face and a constellation of tiny, raised golden stars. The crescent moon features a peaceful, sleeping face with closed eyelids and soft lips, sculpted with gentle organic volume that rests comfortably beneath the fingers. Surrounding the moon are dozens of miniature four-pointed stars and golden planetary spheres, highlighted with metallic gold mica powder that shimmers as the phone tilts under indoor lighting. The dark, glossy background provides dramatic contrast that makes the metallic gold celestial bodies stand out with brilliant clarity. This enchanting accessory appeals to astronomy lovers, dreamers, and admirers of mystical bohemian aesthetics, adding celestial elegance to evening gatherings.
Begin by rolling out a base sheet of dark midnight-blue polymer clay mixed with a pinch of fine blue cosmetic glitter to capture the shimmer of the night sky, trimming it to fit your phone case blank. Sculpt the crescent moon by rolling a tapered crescent from pale buttercup-yellow or ivory clay, using a fine ball stylus and toothpick to carve a serene sleeping profile along the inner curve. Stamp out tiny four-pointed stars from metallic gold polymer clay using micro plunger cutters, or shape them by pinching small clay spheres into diamonds. Arrange the sleeping moon and golden stars across the midnight-blue slab, using a soft artist brush to dust additional gold mica powder onto the raised celestial bodies to enhance their metallic shine. Bake the celestial slab flat on a ceramic tile for forty minutes. Once cooled, coat the entire surface with a thin layer of crystal-clear UV resin and cure under a lamp for two minutes to seal the mica powder and produce a glossy, durable finish. Adhere the slab to your phone blank using two-part epoxy.
9. 3D Succulent and Terracotta Garden Cluster Case

How to Create
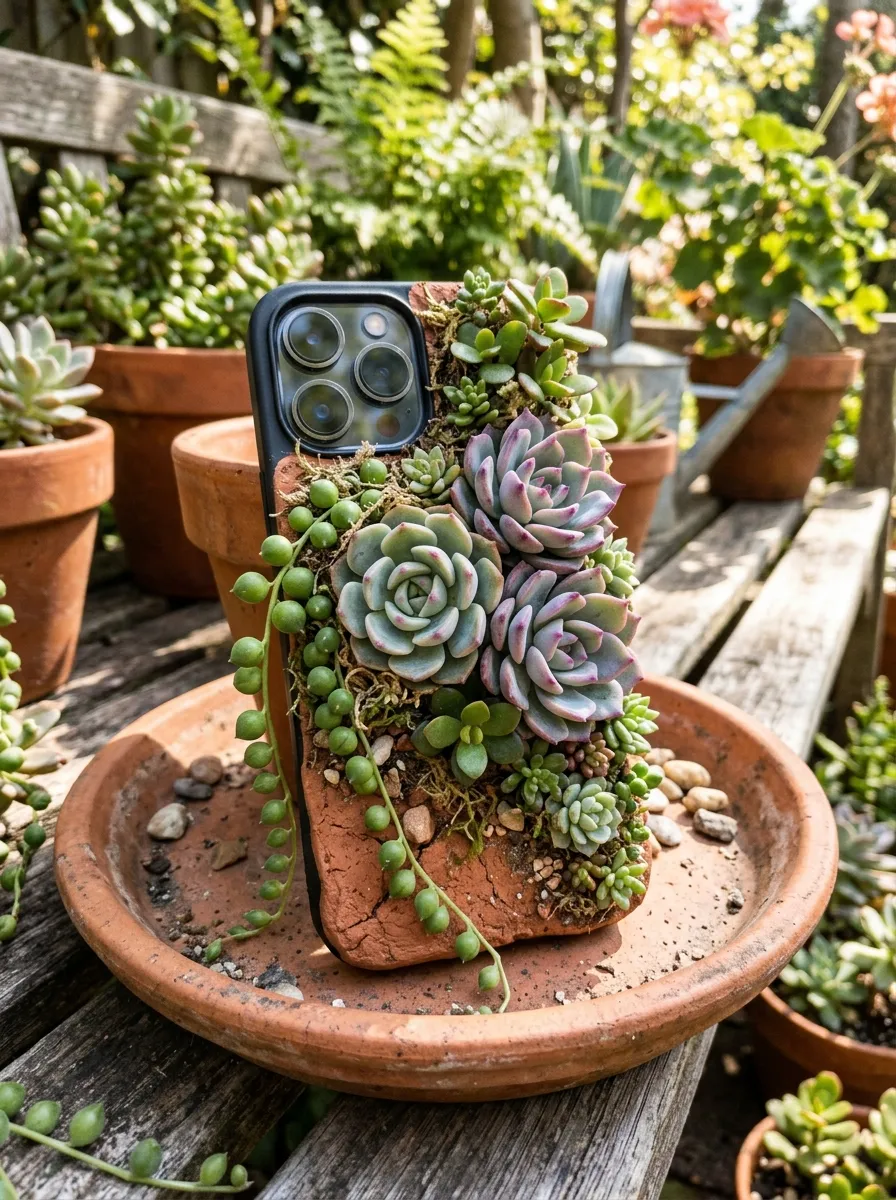
Miniature botanical gardens celebrate the geometric beauty of desert flora, botanical resilience, and organic greenery through clustered succulent rosettes. This design transforms the phone back into a lush vertical garden, showcasing an array of hand-sculpted echeverias, string-of-pearls, and jade leaves emerging from a cracked terracotta pot base. The plump, fleshy petals of the succulent rosettes display realistic color gradients, shifting from sage-green bases to blushing dusty-rose and violet tips. The dense, clustered arrangement provides a thick, tactile surface with an exceptional non-slip grip that prevents accidental drops. The natural botanical color palette brings calming, organic warmth to sleek modern smartphones, serving as a constant reminder of natural beauty throughout busy digital workdays. This botanical art piece is an ideal companion for plant parents, garden lovers, and fans of biophilic interior design.
To create the succulent cluster case, roll a base slab of muted sage-green clay to an even two-millimeter thickness, trimming the edges to fit your phone case blank. Sculpt several echeveria rosettes by forming dozens of tiny, spoon-shaped petals in dusty-green clay, pinching the tips into sharp points and dusting the outer margins with powdered purple chalk pastel. Assemble each rosette by overlapping the petals in concentric circles around a central core on your ceramic tile, working from small interior leaves outward to larger base petals. To make string-of-pearls vines, roll tiny spheres of lime-green clay, threading them along a thin green clay coil and draping the strands organically across the background slab. Cluster the completed succulent rosettes densely along the bottom half of the case, smoothing their contact points into the base sheet. Bake the entire floral composition flat on your ceramic tile for forty-five minutes. Once fully cured and cooled, sand the back and mount it securely to the scuffed phone blank using heavy-duty epoxy glue.
10. Cozy Chunky Cable-Knit Sweater Texture Case
Step-by-Step Guide
Emulating the tactile comfort of hand-knitted textiles in polymer clay brings cozy winter warmth, domestic craft nostalgia, and architectural symmetry to personal tech accessories. This design transforms the phone back into a miniature wool sweater, featuring raised central cable-knit braids flanked by vertical ribbed columns and textured moss-stitch panels. Sculpted in warm, comforting winter neutrals like oatmeal, heather gray, or creamy vanilla, the clay realistically mimics the twist and loop of wool yarn. The continuous vertical ridges provide a comfortable, ribbed texture that settles securely into the hand, offering dependable grip control without collecting lint like real fabric. The clean geometric repetition of the cables delivers a soothing, structured aesthetic that coordinates beautifully with winter coats, warm coffee mugs, and cozy fireside reading sessions.
To construct the cable-knit sweater case, roll a conditioned slab of oatmeal clay to a two-millimeter thickness, trimming it to match the rectangular dimensions of your phone case blank. To create the central cable braid, roll two long, uniform clay coils measuring two millimeters in diameter, twisting them tightly together in a clockwise direction to form a spiral rope. Roll a second identical pair of coils, twisting them in a counter-clockwise direction, and lay the two twisted ropes side by side down the center of the base slab to form an interlocking braided cable pattern. Create flanking ribbed columns by placing straight, untwisted coils alongside the braid, indenting horizontal lines along their length using the dull edge of a craft blade. Texturize the outer background panels by tapping a clean wire brush or coarse sponge across the clay surface to simulate wool fibers. Bake the textured slab flat on your tile for forty minutes, allowing it to cool slowly inside the oven before adhering it to the phone case with industrial two-part epoxy.
Common Beginner Mistakes and How to Avoid Them
The most critical technical error in polymer clay phone case crafting is attempting to sculpt and bake clay directly onto flexible silicone or rubber phone covers. Soft silicone cases flex constantly during daily handling, which breaks adhesive bonds and causes rigid clay components to pop off within days of completion. Prevent this by always using a rigid, non-flexible polycarbonate or hard-plastic case blank as your structural foundation, ensuring the plastic does not warp under low oven temperatures. Another frequent mistake is relying on standard instant superglue or hot glue to bond cured clay to plastic surfaces; these glues lack sheer strength and become brittle over time under temperature shifts. Always use high-strength, two-part industrial epoxy adhesive, mixing equal parts resin and hardener thoroughly and clamping the pieces evenly while the adhesive cures for twenty-four hours. Beginners also frequently forget to scuff the glossy plastic phone case prior to gluing; smooth plastic provides no mechanical grip for adhesives, leading to premature delamination. Always sand the case back thoroughly with coarse eighty-grit sandpaper and wipe away all plastic dust with isopropyl alcohol before applying glue. Finally, avoid sculpting elements that extend past the outer perimeter of the phone case or cover the camera lens cutout, as protruding edges snag on pocket linings and drop impacts.
Practical Tips for Better Results
Achieving boutique-grade, professional results on custom polymer clay phone covers relies on disciplined surface preparation, precise heat control, and strategic protective coatings. Always bake your clay designs completely flat on a polished ceramic floor tile or tempered glass sheet; this ensures the back of the cured clay slab remains perfectly level, maximizing surface contact with the flat phone case during gluing. To eliminate fingerprints and tool marks on raw clay components before baking, smooth the clay surfaces gently with a soft artist brush dipped in ninety-one percent isopropyl alcohol. If your design features delicate three-dimensional elements like flower petals or animal ears, use a clay brand known for high cured flexibility rather than brittle craft clays, ensuring the details can bend slightly under pressure without snapping. When applying UV resin as a protective topcoat over flat terrazzo or celestial designs, spread the resin slowly with a silicone spatula to avoid introducing micro-bubbles, and pass the flame of a lighter quickly over the surface to pop any rising air pockets before curing under a lamp. Finally, allow the completed, glued phone case to cure undisturbed for a full forty-eight hours before snapping it onto your mobile device, ensuring the epoxy reaches maximum structural bond strength.
Styling, Presentation, or Organization Ideas
Integrating custom handmade polymer clay phone cases into your daily lifestyle elevates your personal tech into an artistic statement that harmonizes with your personal fashion and home decor. Display your rotating collection of seasonal phone cases on a minimalist wooden pegboard, an acrylic vanity stand, or inside shallow velvet-lined organization trays alongside your favorite watches and jewelry pieces. This organized presentation protects the dimensional clay textures from getting scratched inside cluttered drawers while turning your tech accessories into charming room decor when not in use. When presenting a handcrafted clay phone case as a thoughtful, personalized gift, package the case inside a rigid natural kraft gift box lined with shredded crinkle paper, tying the exterior with torn-edge silk ribbon and a hand-stamped botanical gift tag. You can also coordinate your phone case design with your daily stationery essentials, matching your case color palette to your favorite leather notebook cover, planner pens, and keychains for a cohesive, intentional aesthetic. When photographing your completed phone cases for digital inspiration boards or social portfolios, capture the pieces in bright, indirect morning window light against raw travertine stone, washed linen textiles, or rustic wood surfaces to highlight the rich sculptural reliefs and delicate clay textures.
Budget or Time Planning
Executing a collection of custom polymer clay phone cases requires modest financial investment and structured time management to maximize creative productivity. Save on material expenses by purchasing clear hard-plastic phone case blanks in bulk multi-packs online, which reduces the per-unit cost significantly compared to retail electronic stores. Build your clay inventory around large economy blocks of foundational white, translucent, and black clays, custom-mixing an infinite spectrum of trendy pastel and earthy shades by blending tiny pinches of saturated primary colors into the neutral bases. Organize your production schedule using a modular, step-by-step workflow: dedicate an initial session to scuffing case blanks, conditioning clay, and blending custom color palettes; use a second uninterrupted block for rolling slabs, sculpting dimensional details, and baking the clay components; and reserve a final session for sanding, epoxy gluing, and resin sealing. A detailed floral meadow or miniature food case requires approximately two to three hours of active crafting time, making it an enjoyable, highly rewarding weekend project. Planning your handmade holiday gifts and birthday surprises several weeks in advance ensures ample time for thorough epoxy curing, resulting in durable, beautifully detailed tech accessories without the stress of rushed assembly.
Creative Expansion and Advanced Inspiration
Once you have mastered foundational phone case sculpting and permanent bonding techniques, explore creative variations to expand your functional tech art across wider device ecosystems. Translate your signature clay motifs onto coordinating accessories, sculpting matching covers for wireless earbud charging cases, magnetic power banks, pop-out phone grips, or laptop sleeve zipper pulls using identical color palettes. You can also experiment with incorporating mixed-media elements into your clay phone cases, such as embedding authentic dried pressed flowers, genuine freshwater seed pearls, metallic gold leaf foil, or raw crystal chips directly into the clay before curing. Consider designing interchangeable magnetic phone plates by embedding thin steel discs into the clay slab and utilizing magnetic phone cases, allowing you to swap out decorative covers to match different outfits and seasons in seconds. Document your custom color formulas, clay thickness measurements, and baking times in a dedicated creative studio journal, establishing a valuable personal reference archive that streamlines future creative projects and ensures consistent, long-lasting results across every handmade tech accessory collection.
Leave a Reply