Polymer clay remains an exceptionally versatile medium for contemporary craft enthusiasts, offering endless possibilities for tactile expression, color experimentation, and functional art. Transforming simple heart silhouettes into elevated decor pieces, wearable jewelry, and personalized keepsakes bridges timeless symbolism with modern design principles. This comprehensive guide details ten distinct polymer clay heart concepts designed to inspire and instruct makers across all skill levels. Readers will explore an array of decorative techniques, including faux stone marbling, layered botanical impressions, geometric checkerboard construction, and delicate dimensional modeling. The detailed tutorials provide actionable instructions for conditioning materials, executing specialized surface veneers, cutting clean profiles, and achieving professional-grade baked finishes. Incorporating these varied methods allows crafters to produce durable, high-quality items suitable for gift-giving, seasonal home decoration, or functional desk storage. Understanding structural stability, proper curing cycles, and clean finishing habits elevates simple hobby craft into refined, gallery-worthy pieces. By engaging with these structured projects, artisans will build a reliable technical foundation while discovering creative ideas that seamlessly integrate into modern minimalist, bohemian, and artisanal interior aesthetics.
Design Relevance and Enduring Utility of Sculpted Clay Accents
The widespread popularity of sculpted polymer clay hearts across visual platforms stems from their remarkable balance of nostalgic sentiment and chic contemporary styling. Rather than relying on juvenile craft aesthetics, modern interpretations incorporate muted earth tones, tactile mineral finishes, and architectural lines that complement sophisticated home decor. This craft provides exceptional practical value, as a single two-ounce block of oven-bake compound can yield several durable trinket dishes, wall hanging components, or jewelry pendants. For DIY enthusiasts, working with clay offers an accessible creative project that requires minimal financial investment and zero specialized heavy machinery. The medium is remarkably beginner friendly, allowing newcomers to master basic slab rolling, stamp texturing, and shape extraction within an afternoon. Because uncured polymer clay stays workable indefinitely until exposed to heat, makers can refine details, adjust color mixtures, and correct minor imperfections without time pressure. This stress-free workflow aligns with trending ideas celebrating slow crafting and mindful making. The resulting handmade pieces add authentic warmth and texture to contemporary living spaces.
Materials, Tools, and Studio Preparation Workflow
Achieving clean, durable results with oven-bake polymer clay requires disciplined studio preparation and appropriate tool selection. Primary materials include premium modeling compound known for strength after curing, liquid clay bond, and metallic powders. You will need an acrylic roller or calibrated manual clay pasta machine, stainless steel tissue blades, nested heart-shaped metal cutters, fine-grit wet-dry sandpaper, and smooth ceramic baking tiles. Useful secondary tools include ball styluses, textured impression mats, needle tools, and soft artist brushes. Preparation begins by sanitizing your work surface with isopropyl alcohol to remove ambient lint, oil, and dust particles. Condition each clay block thoroughly by slicing it into thin wafers, warming it between your palms, and rolling it repeatedly until the compound becomes smooth, pliable, and free from micro-fissures. When rolling foundational slabs, use calibrated depth guides to ensure uniform thickness across every sheet. Organize dedicated baking tiles lined with parchment sheets to transfer cut shapes directly into the oven without handling, preserving crisp silhouettes and smooth surface planes throughout the fabrication process.
1. Minimalist Terrazzo Stone Heart Trinket Dish

Step-by-Step Guide
The terrazzo stone heart trinket dish captures mid-century architectural appeal, translating the look of composite mineral flooring into a functional tabletop accessory. This design features a flat, smooth ivory base embedded with irregular geometric chips of contrasting jewel tones and earth shades. When curved gently into a shallow bowl, the piece becomes a catchall for rings, keys, and bedside essentials. The clean contrast between the neutral background and vibrant flecks brings an artful touch to entryway consoles, dressing tables, and nightstands. Producing this pattern teaches crafters the fundamentals of creating seamless composite slabs. The finished dish balances modern graphic lines with a warm, handmade finish that works beautifully in contemporary spaces.
Condition a block of white or translucent porcelain clay, rolling it out across parchment paper to an even four-millimeter thickness. Condition accent scraps in terracotta, olive green, mustard yellow, and charcoal, rolling each shade into paper-thin strips. Use a sharp tissue blade to chop these thin strips into tiny, irregular confetti shards measuring between one and three millimeters across. Scatter the multi-colored flecks across the white base slab, pressing them down lightly with clean fingertips. Lay a sheet of deli paper over the surface and roll an acrylic rod firmly across it to press the chips flush with the ivory base. Cut an oversized heart shape using a large metal cutter, then gently press the cutout into a shallow, oven-safe ceramic bowl to form raised edges. Bake the clay inside the ceramic form at 275 degrees Fahrenheit for thirty-five minutes, allowing it to cool completely before sanding the rim with 600-grit wet sandpaper.
2. Botanical Pressed Meadow Heart Ornament

How to Make
The botanical pressed meadow heart brings delicate garden textures to handcrafted clay keepsakes, capturing fine floral details in a permanent ceramic-style finish. Fresh or dried botanical sprigs—such as sweet alyssum, fern fronds, or miniature wild pansies—are pressed directly into pliable white clay to create intricate natural impressions. Highlighting the debossed veins and petals with a translucent wash of watercolor or mineral pigment creates the look of an antique botanical fossil. These lightweight hearts make sweet hanging decorations, thoughtful gift tags, or delicate wall accents. Working with delicate flora sharpens touch sensitivity and teaches beginners how to transfer fine surface textures without distorting the underlying clay form.
Condition a half-block of soft white or light sand-toned polymer clay, rolling it across a smooth ceramic tile to a uniform three-millimeter thickness. Gather small, flat botanical clippings with prominent veining, carefully arranging the stems across the clay surface in an asymmetric cascade. Place a sheet of wax paper over the botanical arrangement, using an acrylic roller with light, even pressure to press the stems firmly into the clay. Peel the foliage away slowly with fine craft tweezers to reveal the crisp, detailed impressions beneath. Align a metal heart cutter over the debossed pattern and press down firmly to produce a clean heart blank. Pierce a small hole through the upper center using a cocktail stick or leather punch for later hanging. Bake the shape on the tile at 275 degrees Fahrenheit for thirty minutes. Once cooled, brush diluted burnt umber acrylic wash into the grooves, wiping away excess surface paint with a damp sponge.
3. Retro Checkerboard Geometric Heart Pendant

Execution Process
The checkerboard geometric heart pendant draws inspiration from 1960s pop art, pairing bold checkered grids with the classic romantic heart profile. Alternating squares of rich espresso and clean cream create a graphic statement that feels modern, playful, and sharp. The clean geometric lines demand precise cane-building techniques, where square rods of clay are stacked, compressed, and sliced into identical checkered veneers. Slicing through the stacked block exposes a neat grid pattern that can be laminated seamlessly onto backing slabs. This pendant makes an eye-catching statement when strung on a waxed cotton cord or delicate gold chain. Mastering this structured cane builds confidence in measuring, slicing, and pattern alignment.
Condition equal portions of deep espresso brown and clean ivory polymer clay, shaping each into neat, rectangular blocks of identical thickness. Slice each block lengthwise into four long, square rods, arranging them into an alternating two-by-two checkered configuration to form a square cane. Press the four rods together firmly with your palms, compressing the cane evenly along all four sides to reduce its width without distorting the interior grid. Chill the finished cane in the refrigerator for fifteen minutes to firm the compound, ensuring clean cuts. Using an ultra-sharp, flexible tissue blade, slice thin cross-sections of the checkered cane and lay them side by side across a conditioned three-millimeter backing slab. Smooth the seams with an acrylic roller over parchment paper, then cut out your heart pendant using a sharp metal cutter. Pierce a jump-ring hole near the upper cleft, bake at 275 degrees Fahrenheit for thirty-five minutes, and finish the surface with a high-gloss glaze.
4. Sculpted Wild Rose Floral Heart Plaque

Setup Method
The sculpted wild rose floral heart transforms a flat silhouette into a rich, three-dimensional decorative relief. Hand-shaped petals, delicate leaf veins, and textured floral centers are layered onto a sturdy base, creating an intricate miniature garden scene. Choosing a monochromatic palette—such as layered tones of ivory, soft stone, and warm white—gives the piece an elegant, carved-limestone look that fits effortlessly into refined interior settings. Displayed on a mini easel or framed in an open shadowbox, this sculpted plaque serves as a tactile focal point. Building these miniature floral elements helps makers practice delicate clay manipulation, using simple hand tools to achieve organic curves without relying on store-bought molds.
Roll a conditioned slab of warm sandstone clay to a thickness of four millimeters, cutting out a broad five-inch heart to serve as the structural base. Lightly score the clay surface with a needle tool to create a textured foundation for the floral elements. Roll pea-sized spheres of matching clay, flattening each between your thumbs into thin, organic petal shapes. Arrange the petals in overlapping concentric circles directly onto the scored base, pressing the centers down with a ball stylus to form open, cupped wild rose blossoms. Add small teardrop-shaped clay leaves around the flower margins, pressing a fine needle down the center to score realistic leaf veins. Use a textured wire brush to stipple the central stamens, adding delicate contrast to the smooth petals. Bake the finished plaque flat on a ceramic tile at 275 degrees Fahrenheit for forty-five minutes to ensure the thick layers cure completely.
5. Faux Rose Quartz Swirled Heart Pocket Stone

Step-by-Step Guide
The faux rose quartz pocket stone recreates the soft, milky depth of natural semi-precious crystals using translucent and tinted clays. By swirling together translucent compound, soft petal pink, and fine lines of opaque white, the clay mimics the natural veining and cloudiness of raw quartz. Shaping the stone into a smooth, plump heart with rounded edges makes it a soothing, tactile palm stone or worry stone. Polishing the cured piece with fine wet-dry sandpaper brings out a soft, stone-like sheen without needing sticky varnishes. This project offers a wonderful introduction to working with translucent clays, demonstrating how light filters through layered materials to create authentic mineral depth.
Condition two parts translucent polymer clay with one part pastel pink clay, mixing until the color is soft and uniform throughout. Roll a thin snake of pure white clay and wrap it spirally around the pink log, then twist the combined cylinder to stretch the white lines into delicate, organic veins. Fold the twisted rope back onto itself, compressing it into a smooth sphere before shaping it into a plump, rounded heart using your fingers. Smooth away surface fingerprints by rolling the heart gently between clean palms, keeping the edges soft and rounded rather than sharp. Bake the stone suspended on a bed of baking soda or cornstarch inside an oven-safe dish at 285 degrees Fahrenheit for forty minutes, which helps prevent flat spots and maximizes clay translucency. Once cooled, wet-sand the surface under running water using 800, 1000, and 2000-grit sandpaper, finishing with a drop of mineral oil buffed in with a soft cotton cloth to achieve a natural, glassy sheen.
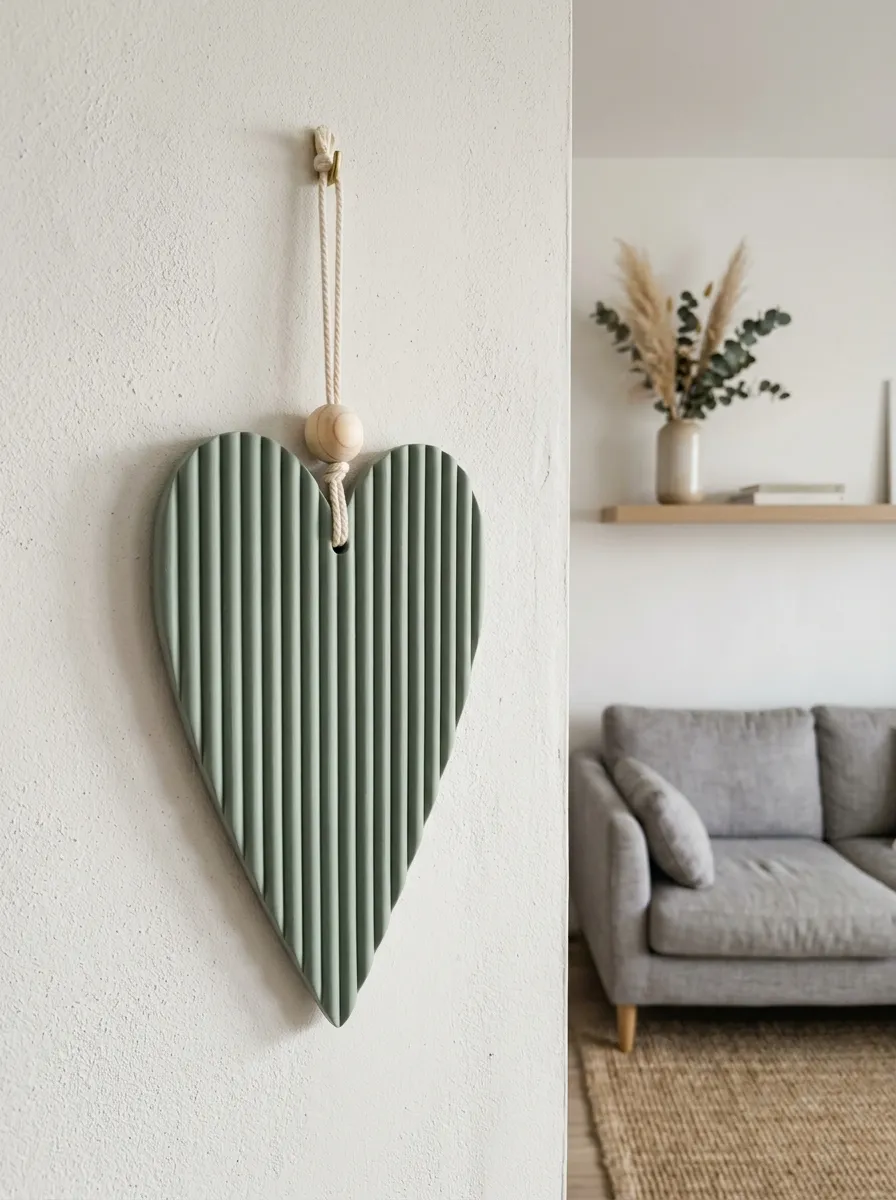
6. Monochromatic Fluted Ribbed Heart Wall Hanging
How to Make
The monochromatic fluted heart wall hanging brings modern architectural texture to nursery decor, gallery walls, and home studio spaces. Inspired by classical fluted columns, this design features straight, parallel grooves running vertically across an elongated, modern heart silhouette. Using a single muted shade—such as dusty sage, terracotta, or warm taupe—allows the raised ridges to catch ambient light and create subtle, natural shadows. The piece strikes a balance between clean mid-century lines and organic warmth, fitting comfortably in both contemporary and bohemian living areas. Constructing clean linear ridges teaches beginners how to create crisp, uniform textures using basic household items or specialized clay combs.
Roll a conditioned sheet of muted sage polymer clay across a ceramic tile to a uniform four-millimeter thickness. Press an acrylic texturing plate or the teeth of a wide-toothed styling comb firmly into the pliable clay, working in straight vertical passes to create deep parallel grooves across the entire slab. Align an elongated, modern heart-shaped cutter over the textured surface, making sure the ribbed lines run straight down through the center point. Press down firmly to cut the outer profile, then use a sharp craft blade to remove the excess clay around the edges without moving the heart. Pierce two small, balanced holes along the top curves to hold hanging cords later on. Bake the piece flat on the tile at 275 degrees Fahrenheit for thirty-five minutes, allowing it to cool inside the oven to prevent warping. Thread a length of natural cotton cord through the holes, finishing with a simple wooden bead to complete the wall hanging.
7. Chunky Woven Clay Knit Heart Coaster

Execution Process
The chunky woven knit heart coaster mimics the cozy, tactile texture of wool cable knitting in durable, waterproof polymer clay. Thin, extruded ropes of clay are twisted together in opposing directions to form classic knit braids, which are then laid side by side across a flat heart foundation. This design brings a cozy, warm feeling to coffee tables, desks, and nightstands while functioning as a sturdy coaster for hot and cold drinks. The woven pattern catches the light beautifully, hiding minor surface marks and adding artisanal texture to everyday home decor. This project offers great practice in extruding and twisting consistent clay strands, building steady hand control and rhythm.
Use a manual clay extruder fitted with a two-millimeter circular disc to produce long, even strands of warm ivory polymer clay. Take two strands and twist them together tightly in a clockwise direction to form a spiral rope, then twist a second pair in a counter-clockwise direction to create an opposing spiral. Lay the two twisted ropes side by side across a conditioned two-millimeter backing slab, pressing them gently together to form a braided knit stitch. Repeat this process, laying matching braided pairs side by side until the backing slab is completely covered with a knitted texture. Press an oversized heart cutter firmly through the textured slab to establish the coaster’s shape. Smooth the cut outer perimeter with a light pass of an acrylic roller over parchment paper, then bake flat on a ceramic tile at 275 degrees Fahrenheit for forty minutes. Once cooled, coat the coaster with a matte water-resistant varnish to protect it against drink spills.
8. Gilded Raw Edge Marbled Heart Keepsake

Setup Method
The gilded raw edge marbled heart combines the earthy beauty of natural stone with the refined shine of metallic gold leaf. Undulating swirls of charcoal, pearl white, and warm gray run across the heart, mimicking natural granite or tumbled marble slabs. The outer rim is intentionally torn or chipped to create a rough, natural edge, which is then gilded with shining imitation gold leaf. This combination of rough, stone-like textures and polished gold accents makes the piece look like a luxury geological specimen. It works wonderfully as a standalone display accent, an elegant paperweight, or a base for small candles on a coffee table. Crafting this piece teaches makers how to combine rough and refined techniques to achieve high-end artisanal finishes.
Condition separate portions of charcoal black, dove gray, and pearl white clay, rolling each color into thick, rounded cylinders. Stack the cylinders together, twisting the multi-colored bundle repeatedly to stretch and blend the contrasting colors into organic, marble-like swirls. Flatten the marbled cylinder into a four-millimeter slab, gently tearing the edges with your fingers rather than using a cutter to maintain an organic, broken-stone perimeter. Lightly press a heart template into the center to guide your shape while leaving the rough, hand-torn borders intact. Bake the shaped piece flat on a ceramic tile at 275 degrees Fahrenheit for thirty-five minutes. Once cooled, brush a thin layer of metal leaf sizing along the rough outer edges using a fine artist brush. Let the adhesive become tacky, then press sheets of imitation gold leaf along the rim, brushing away excess flakes with a dry, soft bristle brush.
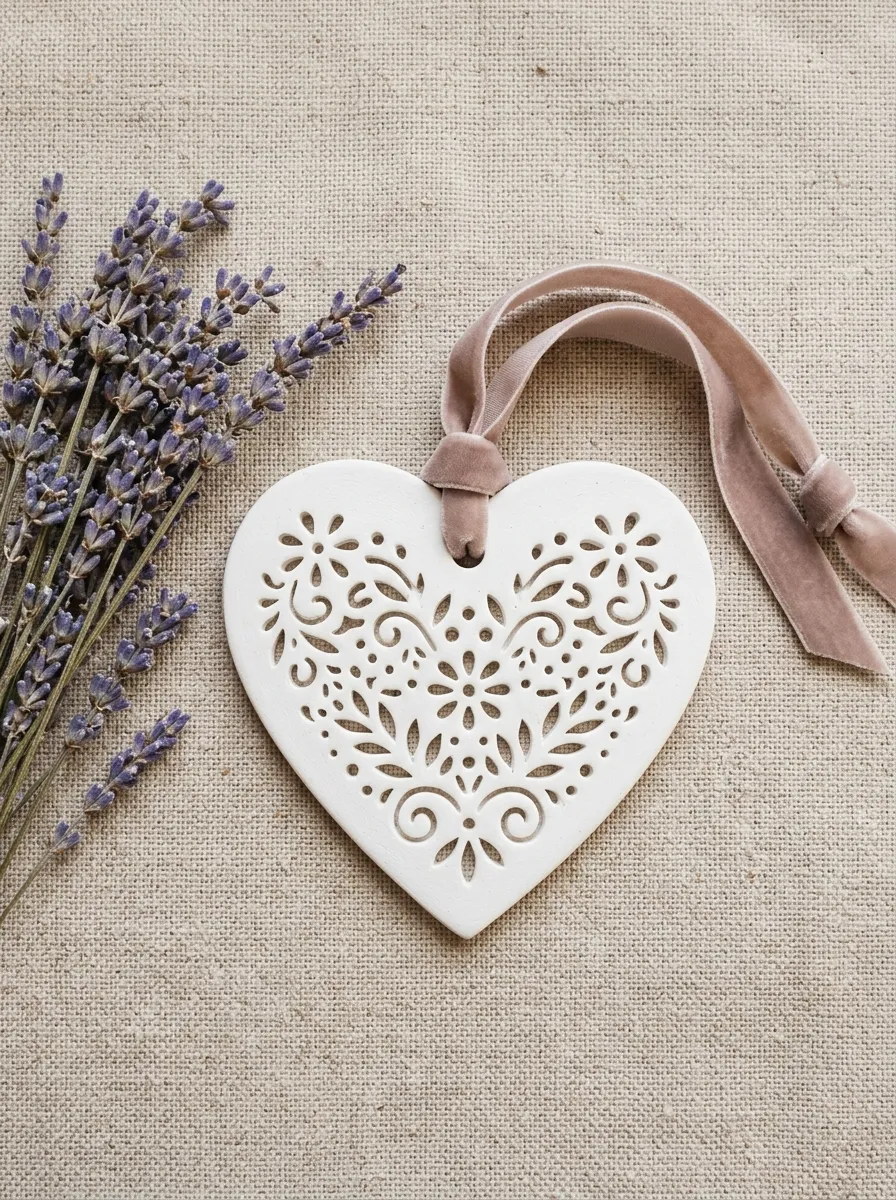
9. Scandi-Inspired Perforated Lace Heart Sachet

Step-by-Step Guide
The Scandi-inspired perforated heart sachet brings delicate Scandinavian folk patterns to life through geometric hole arrangements. Tiny holes pierced in neat, rhythmic patterns create a light, lace-like appearance on a flat clay base. Beyond its visual charm, the perforated design allows scents to pass through when the heart is backed with dried lavender, cedar chips, or scented wax. This dual function makes it a practical, lovely addition to linen closets, dresser drawers, or coat hangers. The clean, unglazed white finish keeps the look modern, fresh, and minimalist. Practicing these repeated pierced patterns helps beginners develop precision, spatial awareness, and steady hand-tool control.
Roll a conditioned sheet of pure white polymer clay to a uniform thickness of three millimeters across parchment paper. Cut a sharp, modern heart shape using a stainless steel cutter, keeping the cut shape flat on your work surface. Use a fine needle tool or a three-millimeter hole punch to pierce neat, geometric patterns into the clay, working outward from the center in radiating lines, floral stars, or concentric borders. Make sure each hole goes completely through the clay slab, gently clearing any displaced clay with the tip of your needle. Pierce a single hanging hole at the top cleft of the heart for hanging. Bake the perforated shape on a smooth tile at 275 degrees Fahrenheit for thirty-five minutes, allowing it to cool slowly inside the oven to prevent delicate bridges from cracking. Thread a narrow velvet or linen ribbon through the top hole, securing a small sachet of dried botanicals behind the piece for a fragrant closet accent.
10. Modern Abstract Split-Color Colorblock Heart
How to Make
The abstract split-color heart embraces colorblocking, dividing the classic heart silhouette into clean sections of contrasting solid tones. A crisp, straight diagonal or curved line separates two complementary shades—such as warm terracotta and pale ecru, or deep forest green and soft blush pink. This clean division offers a modern graphic look that moves away from traditional romance toward contemporary art. These flat colorblocked hearts can be used as stylish fridge magnets, modern drawer pulls, or chic wall hooks. Creating this sharp seam gives crafters valuable practice in splicing, joining, and smoothing separate clay slabs into a single, cohesive surface.
Condition two contrasting clay colors—such as warm terracotta and pale ecru—rolling each into a separate slab of identical three-millimeter thickness. Lay the two colored sheets edge-to-edge on a sheet of parchment paper, overlapping them slightly along the center seam. Cut cleanly through both overlapping layers at an angle using a sharp tissue blade and a metal straightedge, removing the cut ribbons of excess clay. Press the freshly cut edges together firmly, burnishing the seam flat by rolling an acrylic rod across the joined slabs beneath a sheet of deli paper. Position a large heart cutter over the spliced sheet so the color seam runs diagonally through the center of the shape. Press down firmly to cut your heart, then bake flat on a ceramic tile at 275 degrees Fahrenheit for thirty-five minutes. Once cooled, sand the perimeter smooth with fine wet sandpaper and attach a heavy-duty ceramic magnet to the back using two-part epoxy paste.
Common Beginner Mistakes and How to Avoid Them
Creating polished, professional polymer clay pieces requires avoiding several common crafting and baking pitfalls. A frequent mistake among beginners is under-baking the clay. Incomplete baking leaves polymer chains weak, resulting in brittle pieces that easily snap, chip, or crumble under light pressure. Always bake your pieces for at least thirty to forty minutes at the exact temperature recommended on the package, using a standalone oven thermometer to verify heat accuracy rather than trusting your oven’s built-in dial. Another widespread issue is trapping airborne lint and dust in light-colored clay slabs during rolling. Prevent this by cleaning your hands, work surfaces, and rollers with isopropyl alcohol before starting, and consider using a dedicated lint roller on your clothing. Crafters also run into issues with air bubbles forming beneath clay slabs during conditioning, which can expand and cause unsightly blisters in the oven. Prevent bubbles by feeding clay into your rollers folded edge first, and pop any visible surface bubbles with a sharp needle before cutting your shapes.
Practical Tips for Better Results
Applying thoughtful studio practices and finishing habits will quickly elevate your handmade clay projects from casual crafts to polished, store-quality pieces. Keep a bottle of ninety-nine percent isopropyl alcohol and a small lint-free cloth nearby to clean your tools and work tiles between color changes, preventing dark clay residue from muddying pale tones. When rolling out clay slabs, use calibrated depth guide rings on your roller or a manual clay machine to ensure uniform thickness across every sheet. If cutting intricate shapes, chill your rolled clay slabs in the refrigerator for ten minutes before cutting; firmer clay releases cleanly from metal cutters without dragging or distorting outer margins. For pieces requiring smooth, rounded edges, gently smooth the cut rims with a soft fingertip dipped in a drop of water or mineral spirit before baking, significantly reducing the amount of post-bake sanding needed. Finally, invest in a dedicated ceramic baking tile that transfers straight from your desk into the oven, keeping your raw clay shapes flat and undisturbed through the entire curing process.
Styling, Presentation, or Organization Ideas
Thoughtful styling and creative presentation turn handmade polymer clay hearts into elevated home decor accents and meaningful gifts. Arrange a collection of varied finishes—such as a fluted heart wall hanging, a terrazzo trinket dish, and a rose quartz palm stone—together on an entryway console or open shelving unit to create a tactile, curated display. In bedroom or dressing spaces, use shallow clay dishes to organize delicate rings, earrings, and daily jewelry pieces, grouping them alongside textured ceramic vases and natural linen runners for a balanced, modern look. When preparing pieces for gifting, package items inside sturdy kraft gift boxes lined with crinkled unbleached paper, tying the exterior with torn-edge silk ribbon or natural jute twine. For wall hangings and ornaments, pair muted clay tones with natural wooden beads, brass rings, or soft leather cords, bringing subtle bohemian warmth to modern spaces. Curating your projects into cohesive color collections—such as warm desert earth tones, cool coastal slates, or soft vintage pastels—creates a harmonious aesthetic that makes handmade gifts feel intentional, artistic, and beautifully coordinated.
Budget or Time Planning
Careful project planning and smart material management make crafting polymer clay accents both rewarding and budget-friendly. A standard two-ounce block of polymer clay yields multiple trinket dishes, hanging ornaments, or jewelry components, keeping material costs remarkably low per finished piece. Save your clay trimmings in airtight containers organized by color family; marbled scraps can easily be blended into speckled bases, terrazzo chips, or backing slabs, ensuring virtually zero waste. In terms of scheduling, plan your crafting in distinct batches to make the most of your studio time: condition, texture, and cut all your shapes in one dedicated afternoon session, bake multiple trays together in the evening, and reserve a separate morning for sanding, polishing, and hardware assembly. Working in batches keeps your tools organized, saves oven energy, and speeds up production without compromising on quality or attention to detail.
Creative Expansion and Advanced Inspiration
Once you master foundational slab rolling and simple surface textures, you can explore exciting new ways to personalize your polymer clay projects. Experiment with liquid polymer clays and alcohol inks to create translucent marbling, pearlescent highlights, or deep watercolor washes that elevate simple heart forms. Try incorporating mixed-media elements by embedding natural freshwater seed pearls, raw brass charms, or fine metallic threads into raw clay slabs before curing, creating elevated jewelry-inspired designs. You can also explore functional variations by mounting your sculpted clay designs onto different types of hardware, such as wall hooks, cabinet knobs, or desk organizers. Seasonal collections offer another wonderful avenue for creative growth: explore rich spiced hues and woodland botanicals for autumn, or vibrant citrus palettes and ocean-inspired textures for summer. These creative avenues allow you to continuously develop your signature style, building a versatile collection of functional art pieces that celebrate fine craftsmanship and contemporary design.
Leave a Reply