Handcrafted jewelry continues to occupy a prominent space across digital design boards, captivating crafters who appreciate customizable accessories and tactile arts. Exploring 10 polymer clay bracelet ideas introduces makers to practical techniques for shaping versatile modeling compound into durable, wearable adornments. Within this detailed tutorial, readers will examine core conditioning practices, uniform bead piercing methods, and reliable elastic and metal finishing systems. Polymer clay is an ideal medium for jewelry construction because it cures into a lightweight, water-resistant material that will not strain wrists during daily wear. This project allows crafters to produce bespoke personal accessories, coordinating gift sets, and modern jewelry collections using standard household ovens and basic modeling tools. The following sections outline the precise physical shaping sequences, curing temperatures, and stringing orders required to produce professional results with smooth surfaces and balanced dimensions. Whether your visual preference leans toward Scandinavian neutral palettes, vibrant botanical canes, or raw organic stone imitations, these concepts provide adaptable inspiration for every skill tier. By establishing firm foundational skills in polymer manipulation, enthusiasts acquire the technical confidence required to craft level discs, spherical beads, and custom geometric links.
Why Polymer Clay Jewelry Is Trending and Useful
Polymer clay jewelry maintains a strong presence across creative inspiration platforms because it bridges the gap between high-end studio jewelry and accessible domestic craft. Traditional metalsmithing and ceramic jewelry require expensive kilns, toxic soldering fluxes, and dedicated studio ventilation, presenting significant barriers for everyday enthusiasts. Conversely, oven-bake polymer clay provides immediate creative gratification within domestic living spaces, using simple handheld tools and standard kitchen facilities. This medium supports infinite color mixing possibilities, allowing makers to match seasonal wardrobe palettes, modern interior design trends, and wedding motifs precisely. The lightweight nature of cured polymer makes it exceptionally practical for multi-strand beaded bracelets and chunky statement cuffs that remain comfortable across long periods. Beginners can quickly practice consistent bead-rolling techniques without worrying about material waste, as uncured scraps can be blended repeatedly into marbled accents. Furthermore, handcrafted polymer accessories offer an approachable, mindful craft experience that produces tangible, long-lasting keepsakes. As contemporary fashion prioritizes artisan textures, custom colorways, and bespoke accents, polymer clay accessories remain functionally relevant, commercially viable, and endlessly engaging for modern makers.
Essential Craft Materials, Tools, and Preparation
Achieving durable, crack-free polymer clay bracelets demands deliberate material sourcing, proper tool selection, and careful prep work before clay conditioning begins. Quality polymer clay blocks in varied shades form the primary foundation; choose firm artist-grade brands that resist brittle snaps after baking. Essential tools include an acrylic rolling rod, high-carbon steel tissue blades, ceramic crafting tiles, metal needle tools, and precise jewelry pliers. For structural assembly, gather strong 0.7 mm elastic stretch cord, flexible beading wire, crimp beads, brass jump rings, and magnetic closures. Preparation begins with deep cleaning your working surface with isopropyl alcohol to remove dust and stray fibers that easily embed into light-colored clay. Condition the raw clay thoroughly by hand-kneading or passing it repeatedly through a dedicated manual pasta machine until the block becomes warm, flexible, and free of edge fissures. Measure wrist circumferences carefully with flexible sewing tape, adding half an inch of clearance to accommodate bead diameters during final stringing. Dedicate a flat, glazed ceramic tile as both your work surface and baking palette to prevent fingerprint indentations during oven transport.
1. Minimalist Terrazzo Slab Tube Bangle
Step-by-Step Guide
Paragraph 1
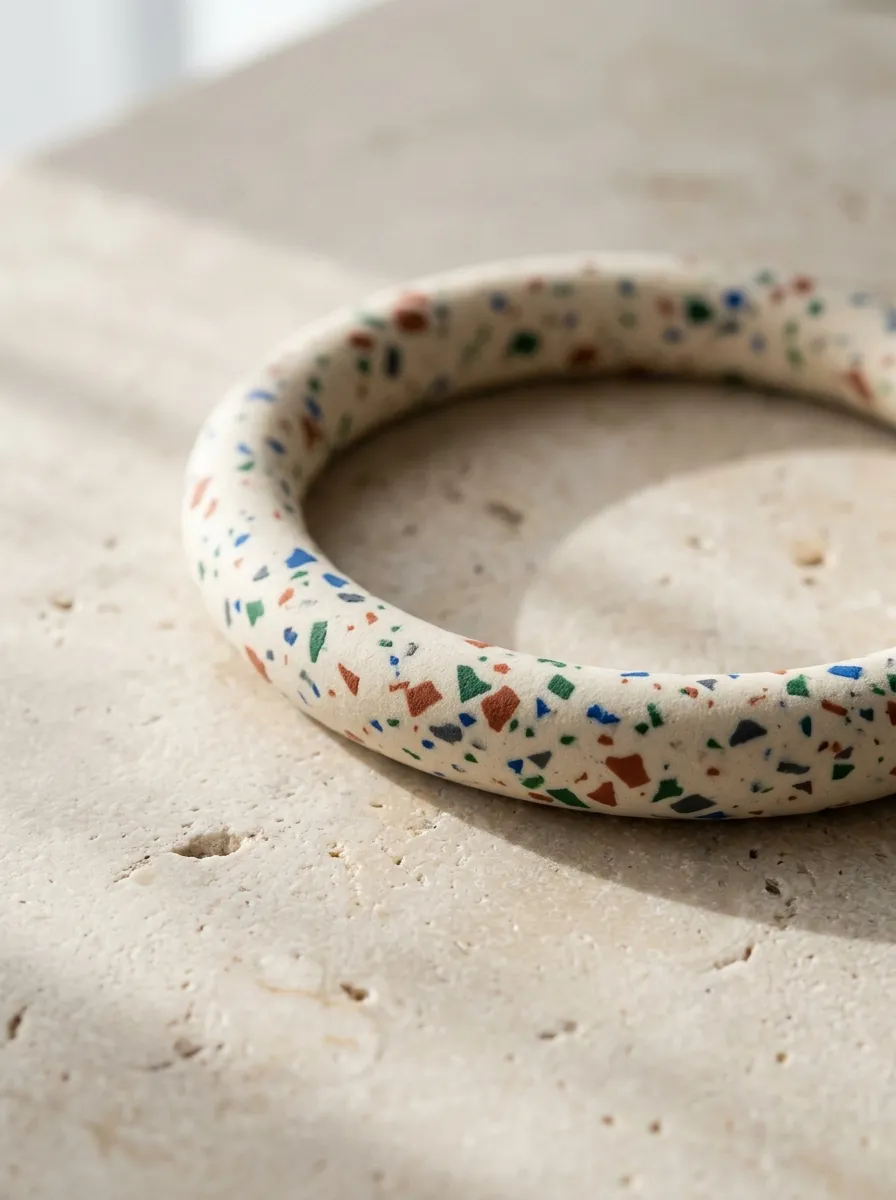
The minimalist terrazzo slab tube bangle adapts mid-century architectural composite stone techniques into sleek, curved wrist ornaments. This design utilizes a clean, neutral background base—such as warm oatmeal, chalk white, or raw linen—flecked with tiny, multi-colored geometric chips. The aesthetic relies on graphic contrast, featuring irregular flecks of terracotta, forest green, cobalt blue, and charcoal distributed across the smooth tube body. Rather than relying on separate strung beads, this style shapes the clay into a continuous hollow or solid curved tube that hugs the wrist cleanly. The flat, polished surface highlights the embedded colored fragments, creating an intentional, modern design statement suitable for contemporary wardrobes. This project serves as an approachable introduction to composite pattern building, teaching crafters how to embed secondary clay fragments into a primary sheet without smearing crisp edges or introducing trapped air bubbles.
Paragraph 2
Condition two ounces of ecru clay until pliable, flattening the mass into an even four-millimeter sheet using your acrylic roller on a glazed tile. Slice tiny, razor-thin shavings from pre-conditioned scraps of black, burnt orange, and sage clay using a rigid tissue blade. Scatter these miniature shavings across the ecru slab, pressing them flush into the surface by rolling the acrylic rod firmly across the composition. Cut a clean rectangle measuring seven inches in length and one inch in width, wrapping the strip around a cylindrical wooden dowel wrapped in foil. Smooth the longitudinal seam using gentle circular motions with an acrylic smoothing tool until the joint disappears into a unified tubular sleeve. Bake the assembly supported horizontally across a folded cardstock tent at 130°C for thirty-five minutes, allowing it to cool completely before sliding the cured tube off the dowel and polishing the exterior with 800-grit wet sandpaper.
2. Organic Faux Jade Heishi Disc Stack

How to Make
Paragraph 1
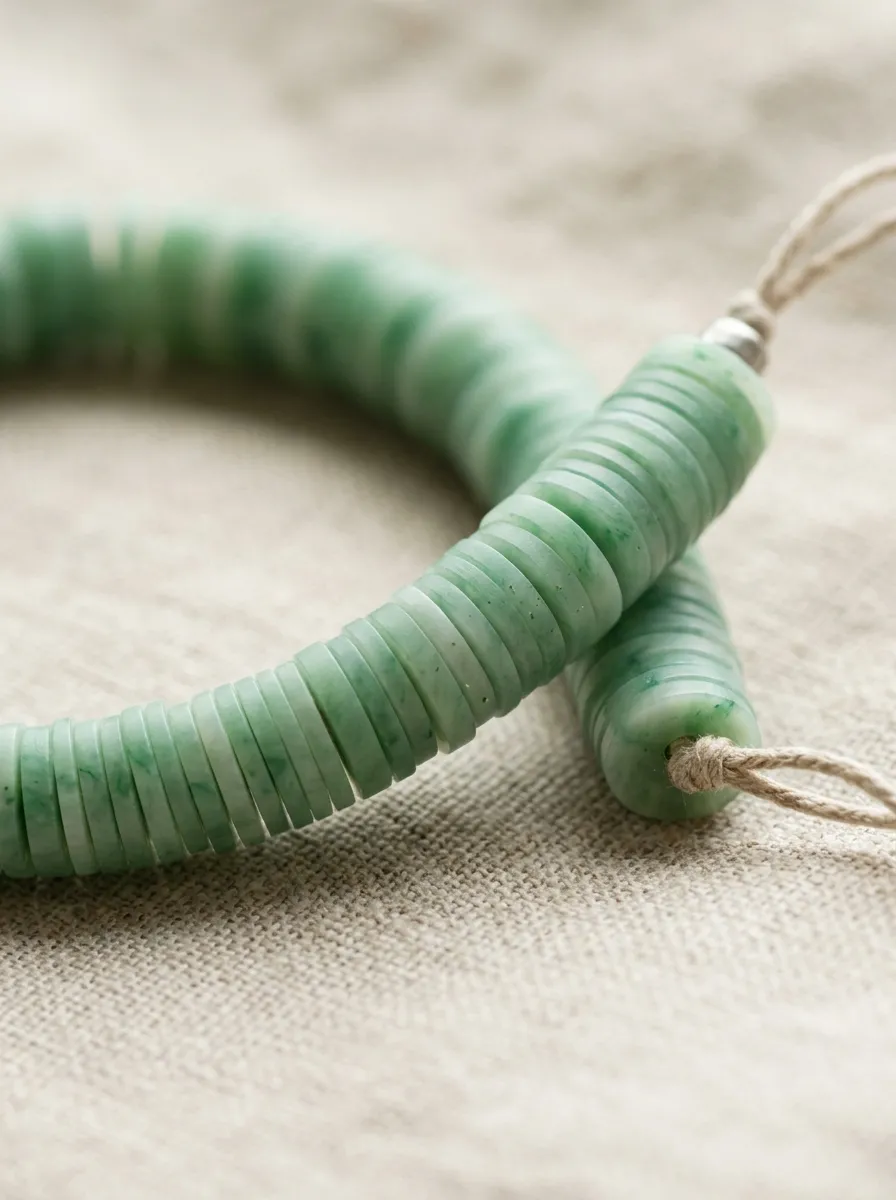
The organic faux jade heishi disc stack captures the luminous, semi-translucent quality of carved natural mineral stones in uniform flat discs. This concept utilizes translucent polymer clay blended with microscopic touches of emerald green and white pearlescent pigments to emulate genuine nephrite jade. The tiny disc beads, known traditionally as heishi beads, are stacked tightly along elastic cord to form a smooth, flexible cylinder that flexes easily around the wrist. The visual appeal comes from subtle internal marbling and varying degrees of light penetration across the stacked layers. Because each flat disc measures only two to three millimeters in thickness, the assembled bracelet delivers a fluid, snake-like drape that stacks comfortably alongside metal watches and chain bracelets. Crafters develop specialized skills in maintaining uniform sheet thickness, clean circular punch cutting, and consistent center-hole piercing.
Paragraph 2
Condition equal measures of translucent clay and pre-tinted emerald green clay together, stopping the blending process early to leave faint, misty veining throughout the block. Roll the blended mass through your clay machine at a two-millimeter setting, resting the thin sheet directly onto a glass tile. Use a small three-millimeter brass micro-cutter to stamp out approximately one hundred identical circular discs from the prepared clay sheet. Pierce the exact center of each stamped disc with a fine beading needle while the clay remains affixed to the tile, keeping the tool perpendicular. Transfer the tile directly to a preheated oven, baking the discs at 130°C for thirty minutes under a protective foil pan. After cooling, thread the discs consecutively onto pre-stretched 0.7 mm elastic cord, securing the ends with an overhand knot reinforced with a minute drop of jewelry adhesive tucked inside an enlarged bead hole.
3. Botanical Cane Wildflower Focal Beads

How to Create
Paragraph 1
The botanical cane wildflower focal bead design uses classical millefiori caning methods to build intricate floral motifs that run continuously through a solid clay rod. This pattern presents crisp daisy petals, slender green stems, and warm yellow stamen cores embedded cleanly within transparent or cream clay matrices. Thin slices cut from the cured cane reveal identical floral cross-sections, which are subsequently formed into rounded pebble beads or flat geometric focal links. This aesthetic aligns naturally with modern cottagecore fashion trends, celebrating artisanal complexity and pastoral botanical imagery. The design highlights the unique physical properties of polymer clay, demonstrating how two-dimensional layered constructions can be reduced into tiny, highly detailed wearable miniatures. Practicing this caning technique refines spatial planning skills, compression control, and delicate slicing techniques without distorting the internal graphic design.
Paragraph 2
Construct the floral cane core by rolling a cylindrical log of bright yellow clay measuring one-half inch in diameter. Surround this central cylinder with six equally sized white teardrop logs to form petals, pressing the components together gently along the lengths. Fill the triangular exterior gaps between adjacent petals with translucent clay strips, wrapping the entire bundled rod in a thin outer sheet of cream clay. Reduce the cane gradually by squeezing from the center outward, rolling the rod evenly until the diameter shrinks to eight millimeters without warping the interior design. Slice the reduced cane into three-millimeter discs using a sharp tissue blade, pressing the slices gently onto conditioned round clay cores. Pierce a horizontal threading hole through each decorated bead using a stainless steel needle, curing the pieces on a bed of cornstarch for thirty minutes at 130°C.
4. Sculpted Teracotta Arch Link Connector

Execution Process
Paragraph 1
The sculpted terracotta arch link connector bracelet steps away from conventional round beads, featuring interlocking geometric clay shapes connected by metallic jewelry findings. This design utilizes modern architectural arches, inverted U-shapes, and clean rectangular links inspired by contemporary structural design. Finished in a matte, unglazed terracotta or warm ochre hue, the piece emphasizes shape, line balance, and negative space over surface pattern. The rigid clay links lie flat against the skin, articulated by small metal jump rings that provide flexible movement around the wrist. This style serves as a bold, modern statement cuff that bridges the boundary between industrial product design and handmade clay craft. Makers gain direct experience in carving clean structural contours, drilling precise hardware holes, and balancing metal jump ring tolerances against polymer edges.
Paragraph 2
Roll an even slab of warm terracotta clay to a uniform three-millimeter thickness using depth guides on your clean ceramic work surface. Place a metal arch cutter measuring one inch in height by three-quarters of an inch in width firmly into the slab, extracting six identical arch shapes. Use a miniature circle punch to excise the interior material of each arch, leaving a clean four-millimeter structural border around the frame. Carefully drill two horizontal pilot holes through the base corners and apex of each arch link using an unheated two-millimeter needle tool. Bake the flat shapes between two ceramic tiles lined with parchment paper for forty minutes at 130°C to guarantee maximum flat stability. Once cooled, attach the links sequentially using six-millimeter heavy-gauge brass jump rings opened and closed with smooth flat-nose pliers, finishing the strand with a low-profile brass lobster clasp.
5. Antiqued Gilded Marble Pebble Strand
Step-by-Step Guide
Paragraph 1
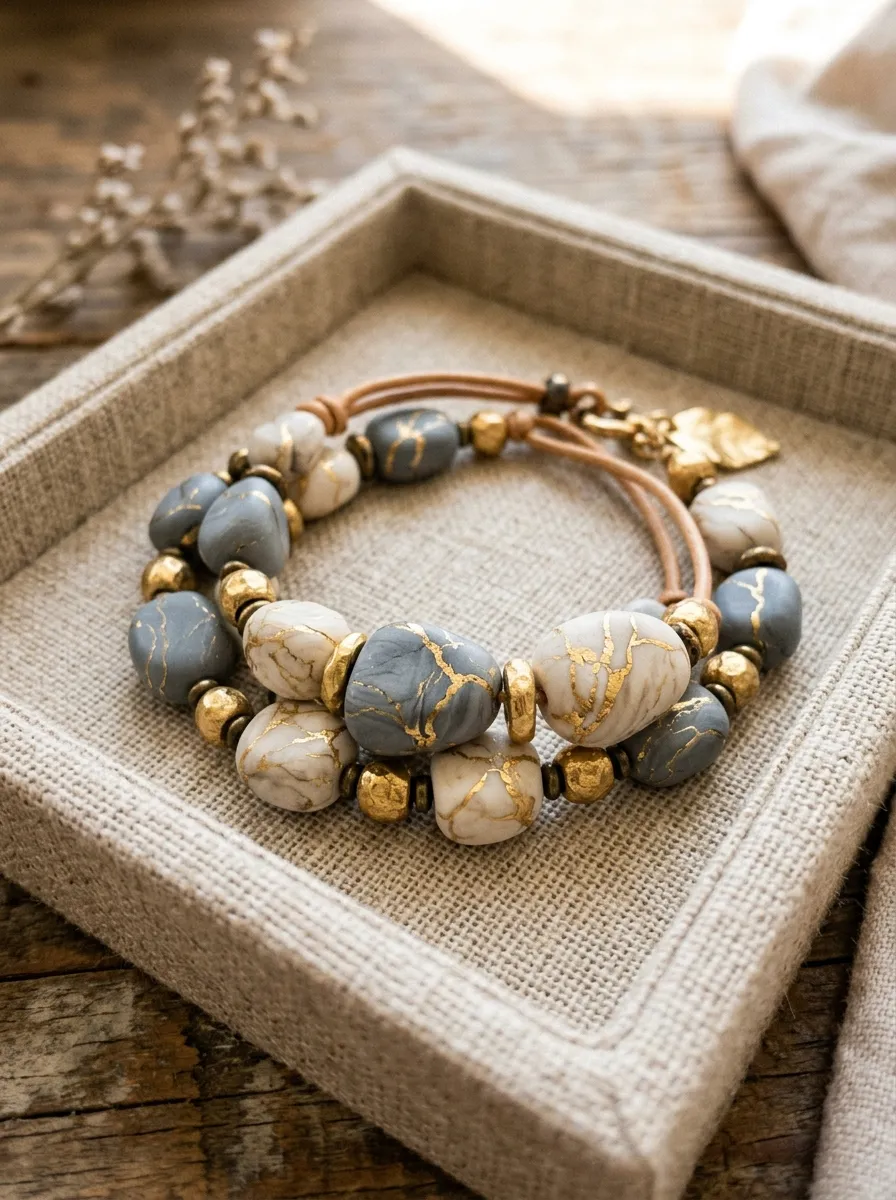
The antiqued gilded marble pebble strand combines organic rounded stone shapes with fine metallic veining, replicating the visual presence of raw river gems laced with gold ore. This concept features irregularly tumbled clay pebbles in shades of slate gray, alabaster, and soft quartz, crisscrossed by ultra-thin veins of genuine imitation gold leaf. The visual depth is achieved through controlled tearing and re-compressing of gilded clay layers, which exposes fractured metallic highlights along the bead curves. This design avoids rigid mechanical symmetry, celebrating organic variation where no two pebbles share identical veining or external shapes. The finished bracelet provides an elevated, bohemian aesthetic that pairs naturally with hammered gold bangles, raw linen textiles, and earth-toned seasonal wear. Crafters learn to balance metallic leafing foils, manage organic hand-forming methods, and seal metallic leaf against everyday handling.
Paragraph 2
Condition two ounces of slate gray clay, slicing the block into eight thin rectangular sheets using a tissue blade on your work tile. Lay sheets of imitation gold foil across the cut faces, stacking the sheets into a layered block to trap the metal within. Chop the laminated stack into tiny random cubes with your blade, then squeeze the pieces together into a unified sphere to fracture the gold lines. Divide the marbled mass into even half-inch segments, rolling each segment gently between your palms to produce smooth, slightly asymmetrical river pebbles. Pierce every pebble through its longest axis with a needle tool, twisting the tool gently to prevent flat spots from developing on the bead poles. Suspend the pierced beads on horizontal metal pins across an oven-safe rack, baking at 130°C for thirty-five minutes before coating each bead in a thin layer of protective water-based gloss.
6. Geometric Color-Blocked Tile Cuff
Execution Process
Paragraph 1
The geometric color-blocked tile cuff draws direct inspiration from modern graphic art, utilizing flat rectangular clay tiles assembled into an articulate, flexible wristband. Each individual tile features clean diagonal, horizontal, or quarter-circle color splits combining vibrant tones with contrasting muted neutrals. The structured, linear nature of the tiles forms a continuous band when strung along parallel rows of elastic cord, creating an organized, wide cuff appearance. The flat surface plane sits flush against the wrist, keeping the accessory secure without excessive bulk. This design provides an engaging platform for color theory exploration, allowing makers to experiment with complementary shades, triadic balances, and monochromatic tonal gradations. The construction refines precision slab cutting, exact seam matching between colored clays, and dual-channel parallel hole alignment.
Paragraph 2
Roll out contrasting sheets of mustard yellow, blush pink, and deep navy clay to a uniform two-millimeter thickness on separate ceramic work tiles. Cut straight strips from each color, piecing contrasting angles together along clean sliced seams to form a single multi-colored composite sheet. Smooth the joined seams with your acrylic roller, then use a square cutter to excise twelve identical one-inch square tiles from the color-blocked slab. Using a double-hole piercing jig, puncture two parallel horizontal channels through the width of each tile, spaced one-half inch apart to house double stringing lines. Bake the pierced tiles flat under parchment paper weighted with a ceramic tile at 130°C for thirty-five minutes to avoid edge curling. String the cured tiles consecutively onto two parallel lengths of 0.7 mm elastic beading cord, tying independent surgeon knots inside the recessed channel of the final anchor tile.
7. Textured Desert Clay Macramé Braid
How to Make
Paragraph 1
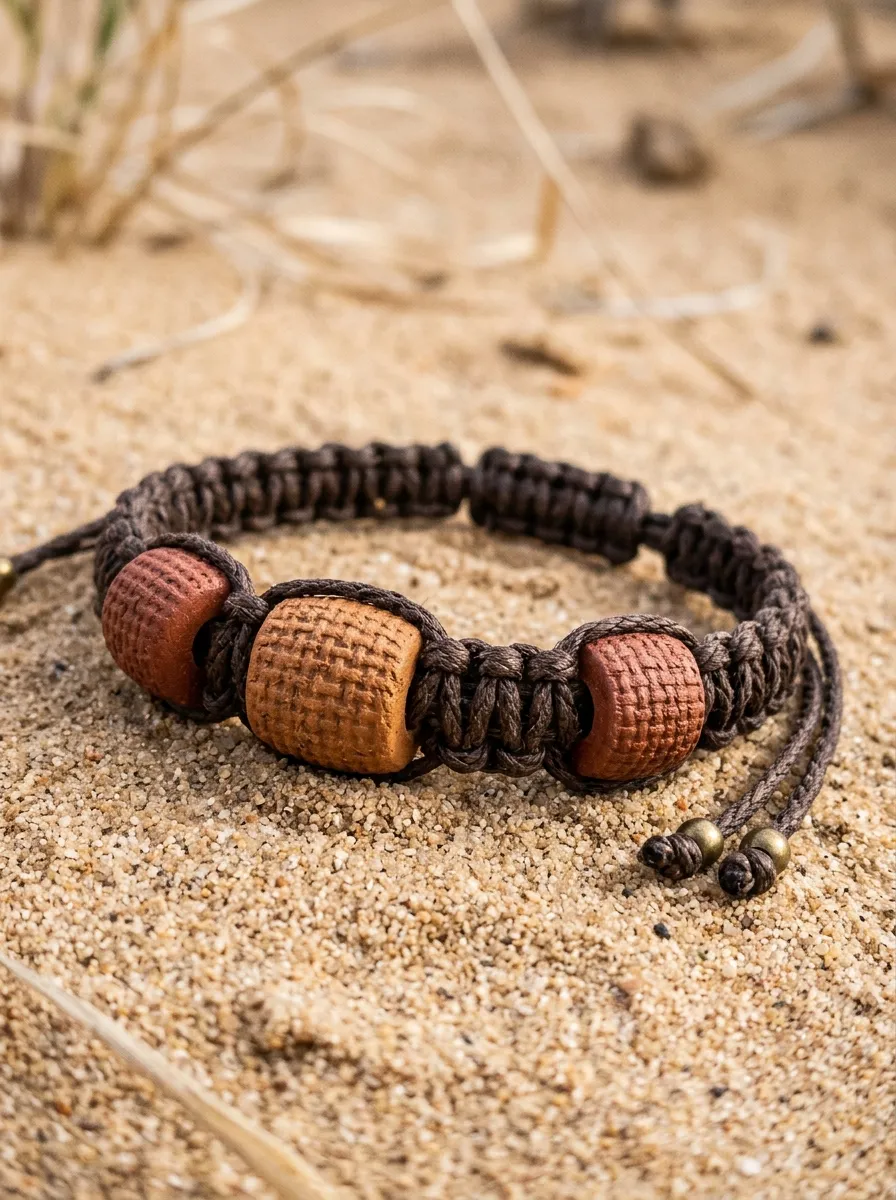
The textured desert clay macramé braid combines sculptural clay focal beads with traditional fiber knotting, establishing a multi-medium accessory rich in artisanal texture. In this design, handcrafted polymer clay beads—embossed with fine linen textures, geometric stamps, or dot patterns—serve as structural centerpieces woven directly into waxed cotton or nylon cord. The warm desert palette features rust, sienna, bleached sand, and charcoal, reflecting the natural landscapes of arid regions. The flexible woven cord contrasts pleasingly with the rigid, tactile clay elements, providing comfortable daily wear and adjustable sizing for varied wrist dimensions. This project introduces makers to the crossover between fiber arts and clay work, showing how custom focal pieces can be integrated into functional macramé sliding knots. Crafters develop skills in textile embossing, large-gauge bead coring, and secure knotting mechanics.
Paragraph 2
Condition desert sienna clay, rolling it into a uniform six-millimeter rod before cutting the length into three-quarter-inch barrel segments. Press a coarse piece of woven linen fabric firmly onto the outer perimeter of each barrel bead, rotating the shape to transfer a clear textile weave. Enlarge the central threading channel of each textured bead using a three-millimeter wooden skewer to ensure passage for thick braided cordage. Bake the barrel beads upright on their flat ends on a parchment-lined tray for thirty-five minutes at 130°C to preserve the textured surface relief. Cut two thirty-inch lengths of one-millimeter waxed cotton cord, threading the central clay barrel into the midpoint of the cord arrangement. Secure the clay beads in place using square macramé knots along both sides, finishing the bracelet ends with a braided sliding square-knot closure that allows for easy, one-handed wrist adjustments.
8. Pastel Confectionery Swirl Bracelet
How to Create
Paragraph 1
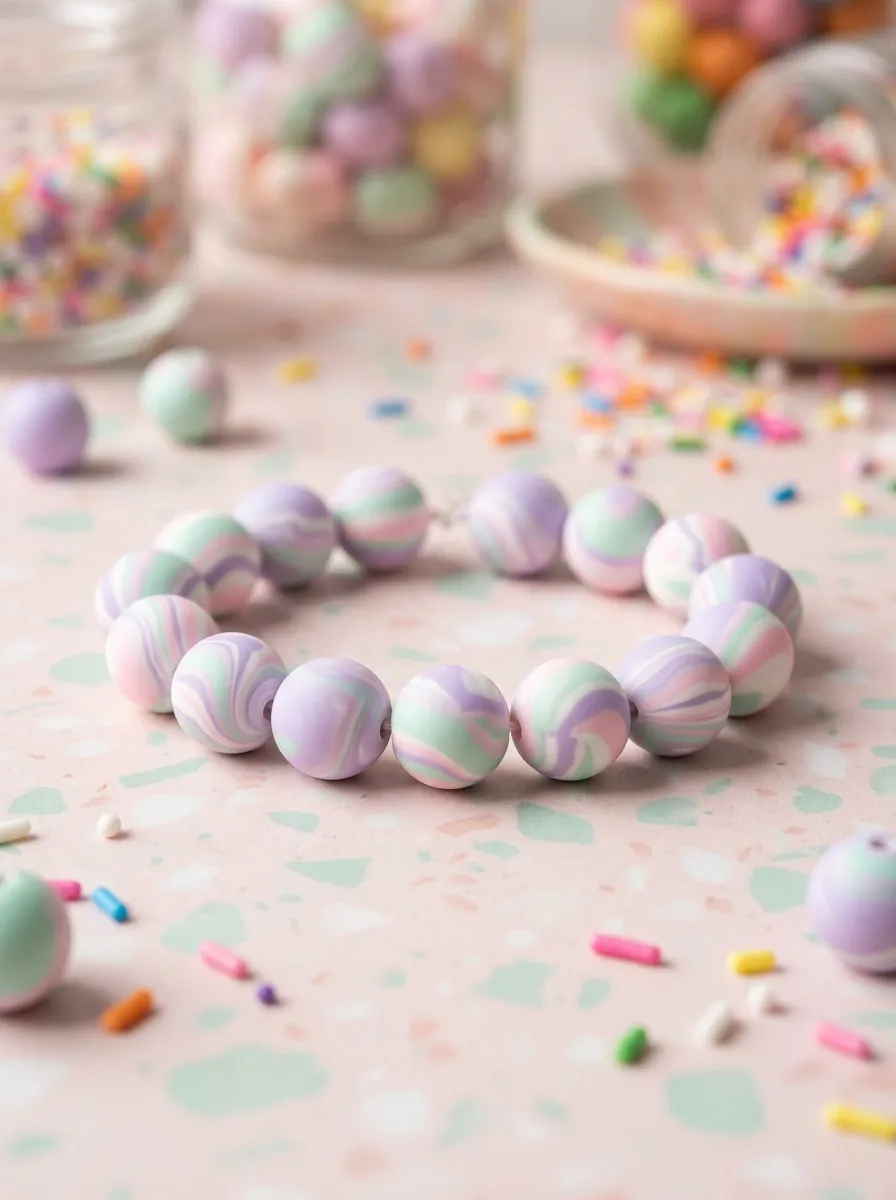
The pastel confectionery swirl bracelet embraces playful kawaii aesthetics, featuring round clay beads decorated with gentle, marbled pastel color blends reminiscent of fine candy. The color scheme combines soft lilac, mint green, baby pink, and lemon cream twisted together with opaque white clay. The swirling lines produce dynamic movement around the spherical beads, creating an energetic yet soft visual presentation. This design serves as a charming everyday accessory, pairing naturally with casual summer attire, pastel knitwear, and playful aesthetic fashion styles. The absence of sharp corners makes the beads comfortable against delicate skin, ensuring they do not catch on fine fabrics or clothing seams. Crafters practice consistent clay twisting, uniform bead mass portioning, and controlled spherical rolling to achieve uniform bead sizes across the entire assembled piece.
Paragraph 2
Prepare four pencil-thin ropes of clay in lavender, mint, pastel pink, and opaque white, pressing the ropes parallel to one another into a single bundle. Twist the combined rope tightly along its length like a spiral candy cane, folding the twisted rope in half and twisting it a second time to multiply the internal color layers. Slice the swirled rope into equal twelve-millimeter segments using your tissue blade, verifying that each portion holds identical volume. Roll each segment between cupped palms using light, circular pressure to form uniform spherical beads with seamless marbled swirl patterns across the exterior. Pierce the finished spheres with a fine beading needle, spinning the bead gently as the metal tool emerges to prevent surface distortion. Bake the spherical beads suspended on beading wires inside the oven for thirty minutes at 130°C, stringing them onto flexible elastic with alternating silver accent beads once cooled.
9. Monochromatic Matte Black Faceted Bead Strand
Step-by-Step Guide
Paragraph 1
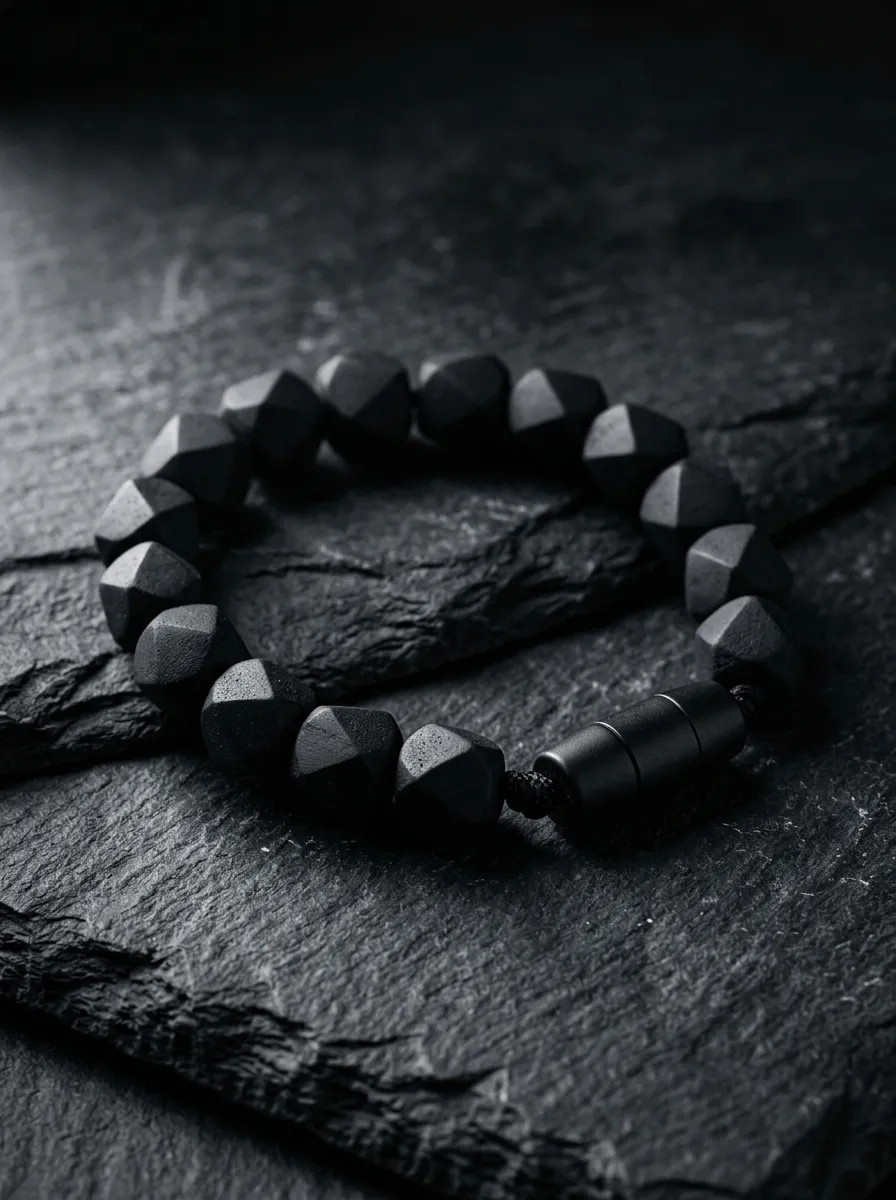
The monochromatic matte black faceted bead strand introduces contemporary edge and geometric sophistication through carved dark polymer clay surfaces. Rather than smooth spherical forms, each bead is individually hand-carved with flat, asymmetrical facets that catch and diffuse light across a velvety matte surface. The solid black or deep graphite tone gives the bracelet a sleek, sculptural aesthetic that matches modern industrial jewelry and minimalist styling. This design functions as a versatile unisex accessory that stacks naturally with raw silver bangles, black leather bands, and stainless steel watches. The tactile quality of hand-cut facets provides an interesting geometric feel that distinguishes handmade polymer work from mass-produced plastic beads. Crafters refine delicate hand-carving techniques, learn how to manage dark pigments without collecting surface lint, and achieve uniform matte finishes without applying chemical coatings.
Paragraph 2
Condition two ounces of premium black polymer clay, rolling the conditioned material into a thick rectangular slab measuring twelve millimeters in depth. Cut the slab into uniform twelve-millimeter cubes using a sharp, rigid tissue blade guided by a metal ruler on your working glass tile. Using a fresh, flexible craft blade, slice small diagonal shavings from each corner and edge of the cubes, creating an asymmetrical array of flat triangular and polygonal facets. Carefully pierce each faceted bead through opposing flat planes with a sharp needle tool, taking care not to crush or compress the newly cut facet edges. Bake the faceted beads on a ceramic tile covered with baking parchment for thirty-five minutes at 130°C, leaving the oven door closed until cool. Thread the beads onto durable forty-nine-strand nylon-coated stainless steel beading wire, finishing the ends with crimp beads, wire guards, and a matte black magnetic clasp.
10. Floating Half-Moon Collar Cuff

Execution Process
Paragraph 1
The floating half-moon collar cuff combines curved polymer clay elements with rigid metal wire armatures to create an open-cuff bracelet that hugs the wrist without clasps. This design features two sculpted clay half-moons or stylized crescent shields mounted to the opposing ends of a pre-formed brass or silver wire cuff. The clay terminals showcase delicate stamped textures, soft earth tones, or fine metallic edges that anchor the visual balance of the open wristband. The space between the two terminals creates an airy, modern jewelry silhouette that slides easily onto the wrist from the side. This structure provides direct practice in combining rigid metal jewelry wire with oven-bake clay, teaching makers how to form durable mechanical bonds between polymer compounds and smooth metallic bases.
Paragraph 2
Shape two identical half-moon clay cabochons measuring one inch across from conditioned sage green clay, flattening the backs against your glass tile to a three-millimeter thickness. Using a blunt pin tool, sculpt a deep horizontal receiving channel into the straight inner edge of both half-moon pieces, matching the diameter of your metal cuff wire. Test fit the ends of a six-gauge half-round brass wire cuff into the carved channels, ensuring the wire penetrates at least five millimeters into the clay body. Remove the wire cuff and bake the clay crescents flat on a parchment-lined ceramic tile for thirty-five minutes at 130°C until fully cured and cooled. Coat the interior wire ends with industrial high-strength two-part epoxy adhesive, reinserting the metal ends firmly into the cured clay channels. Allow the epoxy adhesive to cure undisturbed for twenty-four hours to establish a permanent bond between the metal core and clay elements.
Common Beginner Mistakes and How to Avoid Them
Working with polymer clay involves specific technical requirements that can result in broken or brittle pieces if ignored during construction. A frequent error is under-baking the clay, which occurs when makers pull pieces from the oven too early out of fear of scorching the colors. Polymer clay requires sufficient heat and time for its plasticizers to cross-link completely; under-baked clay remains weak, crumbly, and prone to snapping under everyday wear. Always use a dedicated freestanding oven thermometer to verify actual internal temperatures, baking pieces for the full manufacturer-recommended duration. Another common mistake is failing to remove dust, lint, and air bubbles during the initial conditioning process, which leaves visible surface blemishes on light-colored clays. Keep wet wipes, rubbing alcohol, and clean parchment paper at your workbench, wiping tools frequently to prevent cross-contamination between colors. In addition, beginners often stretch elastic stringing cord without pre-tensioning it, causing the finished bracelet to sag and expose knots after a few days of wear. Pre-stretch elastic cord firmly three to four times before stringing any beads, and always secure finishing knots with a flexible jewelry cement.
Practical Tips for Professional Finishing Results
Elevating polymer clay jewelry from amateur home crafts to boutique-quality artisan pieces depends on patient surface refinement and meticulous edge work. After slicing beads or stamping shapes with cutters, run your fingertip or a soft silicone shaper gently along all raw edges to smooth away micro-burrs before baking. This simple step eliminates hours of tedious sanding after the clay has cured, preserving clean geometry and sharp contours across all links. When sanding is required, always use wet-dry sandpaper submersed in water with a drop of liquid dish soap to prevent clay dust from becoming airborne while preventing deep scratches. Progress systematically through sandpapers from 400-grit up to 1500-grit to produce a natural, velvety matte sheen that feels smooth against the skin. For an ultra-glossy finish without sticky resin coats, buff cured, high-grit sanded clay against a clean cotton muslin wheel mounted to a rotary craft tool. Taking time to bury knot ends inside designated large-gauge bead channels ensures your bracelets display a seamless, unbroken perimeter suitable for high-end retail presentation.
Creative Styling, Layering, and Presentation Ideas
Handmade polymer clay bracelets offer exceptional styling versatility, functioning beautifully as standalone statement pieces or harmoniously layered within modern jewelry stacks. Create dynamic wrist arrangements by pairing a wide, colorful geometric clay tile cuff alongside two slim, neutral-toned heishi disc strands and a delicate metallic chain. This combination balances varied physical thicknesses, contrasting the matte, organic texture of polymer clay with the reflective shine of gold or silver jewelry metals. For seasonal home organization and aesthetic storage, display completed bracelets around unglazed ceramic cone stands, raw wooden bars, or within shallow linen-lined jewelry trays on your vanity table. When preparing these handcrafted items as gifts or retail products, mount individual bracelets onto custom Kraft paper cards stamped with hand-lettered care instructions and brand details. Wrapping display cards with natural jute twine or placing them inside sheer cotton drawstring pouches elevates the handmade appeal, presenting your work as a thoughtful, artisanal creation. You can also photograph your pieces alongside raw clay blocks, natural stones, and work-in-progress tools to share engaging behind-the-scenes stories across digital craft platforms.
Efficient Budgeting and Production Time Planning
Crafting polymer clay bracelets is an economical activity that provides an outstanding creative return on investment for hobbyists and small business owners alike. Because a single two-ounce block of clay yields dozens of miniature heishi discs, small tube links, or decorative cane slices, your material expenses per completed bracelet remain exceptionally low. To maximize your craft budget, purchase foundational colors like black, white, translucent, and primary tones in economical large-format blocks, mixing custom secondary shades manually to limit supply inventories. Maximize your production time by grouping tasks into dedicated assembly sessions: condition and mix custom color palettes on one day, shape and slice all beads on the next, and dedicate a single evening to baking and stringing. Working in structured batches develops muscle memory for identical bead rolling and slicing motions, substantially increasing your overall output speed while minimizing cleanup steps. A simple single-strand heishi or pebble bracelet typically takes between forty-five minutes and an hour to construct, making it an efficient weekend project. Storing conditioned clay scraps in clean, airtight polypropylene storage containers preserves freshness, preventing moisture loss and dust contamination between active crafting sessions.
Advanced Modifications and Creative Evolution
Once you master foundational rolling, piercing, and curing techniques, you can explore advanced structural variations to expand your polymer jewelry portfolio. Experiment with combining translucent clay with alcohol inks, liquid gilding, or crushed dried botanicals to create custom faux stone matrices like turquoise, lapis lazuli, and amber. Integrate multi-media components by baking clay directly around metal armature wires, incorporating glass seed beads into stringing patterns, or embedding natural crystals into raw clay cabochons before baking. You can also explore specialized surface carving methods like sgraffito, coating baked clay with dark acrylic paint and carving away geometric lines to expose contrasting clay colors underneath. For dynamic movement, engineer multi-tiered articulated links, joining three or four distinct cured clay shapes with delicate wire eyelet pins to build flexible, kinetic bracelet cuffs. As your technical mastery and artistic voice expand, blend these diverse methods to produce signature heirloom jewelry collections that showcase your distinctive design sensibilities.
Leave a Reply