Polymer clay jewelry continues to dominate modern crafting spaces as an accessible, versatile medium for creating wearable art. Among contemporary accessories, layered necklaces have gained significant traction, combining sculptural depth with personalized styling. This comprehensive tutorial explores ten distinct layered polymer clay necklace concepts, guiding makers through the planning, sculpting, baking, and assembly stages. Readers will learn essential clay conditioning techniques, precise cutting practices, multi-strand balance, and professional assembly methods using standard jewelry hardware. Layering necklaces allows crafters to play with contrasting textures, geometric silhouettes, and balanced color palettes that elevate everyday outfits. Beyond simple adornment, understanding how to construct multi-tiered necklaces provides practical problem-solving skills, such as weight distribution, cord spacing, and visual harmony. The structural concepts taught here apply across multiple jewelry styles, allowing beginners to transition from simple single-pendant projects to complex artisan pieces. By following these clear, step-by-step instructions, crafters can produce durable, lightweight, and balanced handmade statements suitable for daily wear, gift collections, or artisan showcases.
Why This Idea Is Trending or Useful
Layered clay jewelry has emerged as a cornerstone of modern design across social crafting boards due to its intersection of tactile craft and minimalist style. Modern fashion emphasizes modular, intentional accessories that offer visual interest without adding unnecessary physical weight or discomfort. Polymer clay provides an exceptionally lightweight base, enabling makers to design extensive multi-tier arrangements that remain comfortable to wear throughout the day. From an artistic perspective, layered arrangements invite unlimited creative ideas, allowing crafters to merge flat geometric slabs with dimensional beads, organic botanical imprints, and contrasting metallic accents. The DIY appeal is particularly high because professional, boutique-quality accessories can be fabricated at home using basic kitchen ovens and hand tools, eliminating the need for expensive metal-smithing equipment. Furthermore, the medium is beginner friendly, forgiving minor mistakes during the shaping phase since raw clay can be re-kneaded and re-rolled repeatedly. This blend of low startup barriers, modern aesthetics, and endless customization options makes layered polymer clay projects consistently popular among modern makers.
Materials and Preparation
Achieving clean, durable results requires systematic material selection and careful workspace setup before opening any clay packages. High-grade polymer clay blocks in coordinated color palettes serve as the foundational material, alongside essential tools including an acrylic roller, clay depth guide rings, miniature geometric shape cutters, a sharp craft blade, and non-porous ceramic work tiles. Assembly hardware requires sturdy jump rings, ball-pin headpins, lobster clasps, crimp beads, and jewelry-grade wire or waxed cotton cord, manipulated with flat-nose and round-nose jewelry pliers. Preparation begins by thoroughly sanitizing the work surface with isopropyl alcohol to remove loose dust, fibers, and natural oils that could discolor lighter clays. Condition the clay by kneading small portions by hand or running them through a dedicated clay roller until the clay bends smoothly without cracking or tearing. Careful planning requires sketching the multi-strand arrangement on paper first, noting the intended drop length of each tier to ensure proper vertical balance. Working directly on smooth ceramic tiles permits seamless transfer from workspace to oven without distorting cut clay components.
1. Geometric Terracotta Arch and Disk Cascade

How to Create
The geometric arch and disk cascade pairs clean mid-century lines with warm terracotta and sand tones, producing a balanced two-tier pendant assembly. The upper layer features a hollow, curved arch shape that sits close to the collarbone, while the lower layer suspends a larger solid circular disk that rests comfortably at mid-chest level. This structural division separates architectural negative space from solid form, creating visual harmony across the chest. The aesthetic draws inspiration from minimalist style architecture, prioritizing smooth surfaces, uniform edges, and balanced proportions over ornate surface embellishment. To ensure the piece sits flat against the body during wear, the clay components must maintain a consistent three-millimeter thickness. The earthy terracotta palette pairs naturally with neutral linen garments and basic monochrome tops, making it a versatile everyday staple. The clean separation between the arch and the circular drop prevents the tiers from tangling, establishing a dependable format for beginner jewelers learning proportional spacing.
Condition equal portions of warm terracotta and ivory polymer clay until pliable and smooth. Roll both colors onto a ceramic tile using an acrylic roller with three-millimeter guide rings to ensure completely uniform thickness across both slabs. Place a nested arch cutter onto the terracotta slab to extract the outer curved perimeter and the inner cutout, producing a crisp, hollow arch element. On the ivory slab, use a two-inch circular cutter to stamp out the clean lower disc, lightly buffing away surface imperfections with a cornstarch-dusted fingertip. Using a needle tool, pierce two vertical holes near the upper outer shoulders of the arch, and one central hole at the top edge of the ivory circle, keeping holes at least two millimeters away from edges to prevent structural tears. Bake the components flat on the ceramic tile in an oven preheated to the clay manufacturer’s exact specifications, typically 135°C for thirty minutes. After cooling, link the arch to a sixteen-inch gold chain via jump rings, and suspend the ivory circle beneath it on a twenty-inch chain using flat-nose pliers to ensure secure closures.
2. Organic Sage Pebble and Bar Arrangement

Step-by-Step Guide
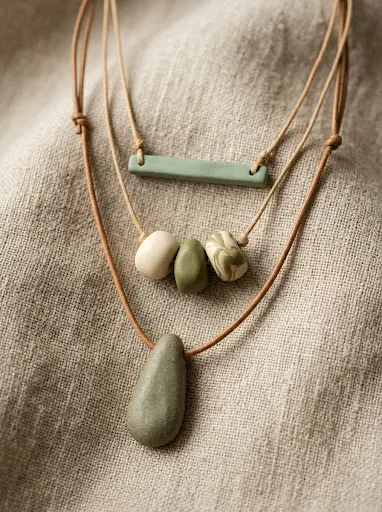
This organic arrangement draws inspiration from river stones and weathered shorelines, translating natural, asymmetrical forms into a structured three-tier composition. The shortest tier features a slim, horizontal rectangular bar in muted sage green, followed by a mid-length tier supporting three graduated, hand-rolled pebble pendants in cream, olive, and speckled gray. The longest tier concludes with a single, elongated water-drop pendant that grounds the entire collection. This deliberate progression from structured geometry to softened, organic contours gives the piece a relaxed, modern aesthetic that feels artistic yet understated. Because each pebble is formed by hand rather than stamped from rigid metal cutters, every completed necklace exhibits subtle individuality. The muted green and stone palette integrates seamlessly with earth-toned home decor inspirations and natural wardrobe choices, serving as an approachable introduction to freeform hand-sculpting techniques without demanding precise mathematical symmetry.
To craft the stones and bar, condition three separate blocks of polymer clay in sage green, deep olive, and translucent white mixed with granite speckles. Roll the sage green clay into a flat slab and use a straight craft blade to slice a clean rectangular bar measuring one-quarter inch wide by two inches long. For the second tier, pinch three small portions of the remaining clays into rounded, asymmetrical pebble shapes, flattening them gently between your thumbs to an even thickness of four millimeters. Roll the remaining speckled clay into an elongated teardrop shape to serve as the bottom pendant. Using a smooth craft pin, bore horizontal holes through the upper edge of the rectangular bar and through the top portions of all four organic stones, ensuring the pin passes completely through from side to side. Bake the components on a flat baking surface lined with parchment paper according to the clay manufacturer’s packaging instructions. Once cured and fully cooled, thread the horizontal bar onto an eighteen-inch natural leather cord, arrange the three intermediate pebbles along a twenty-two-inch cord separated by tiny brass spacer beads, and hang the bottom teardrop from a twenty-six-inch cord before securing all cords to a three-strand multi-clasp connector.
3. Celestial Crescent and Starburst Trio

How to Make
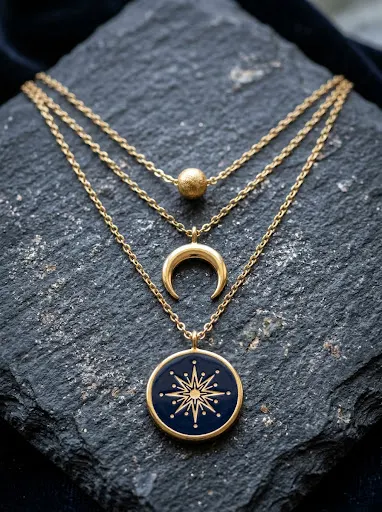
The celestial trio relies on astronomical motifs, balancing an inverted crescent moon, a textured starburst, and a tiny polished sun sphere across three separate chain tiers. The uppermost strand cradles a delicate quarter-inch sphere nestled right at the throat hollow, followed by a central tier holding a wide, upward-curving crescent moon. The lowest strand finishes the progression with an eight-pointed starburst medallion displaying fine radiating line textures. Rendered in deep midnight navy and shimmering metallic gold clay, this concept provides dramatic visual contrast suitable for evening wear or statement daywear. The interaction between sharp geometric points and sweeping curved silhouettes creates dynamic visual motion while maintaining clean compositional balance. The crescent serves as an anchor, framing the starburst below without creating visual clutter. This project offers practical training in combining metallic mica-infused clays with dark opaque pigments, teaching crafters how to handle fine surface embossing techniques effectively.
Begin by rolling conditioned midnight blue clay and metallic gold clay into separate slabs measuring two millimeters in thickness. Stamp out the starburst disc from the midnight navy sheet using a scalloped or star-shaped cutter, and immediately use the fine edge of a craft blade to impress delicate radiating lines stretching from the center outward to every point. Cut a sweeping crescent moon from the metallic gold slab using two overlapping circular cutters of slightly different diameters, carefully smoothing the tapered horns to prevent fragile weak points. Roll a small pea-sized portion of gold clay between your palms to form the uppermost smooth sphere. Pierce the center of the gold sphere with a thin headpin, create two suspension holes through the tips of the crescent horns, and puncture the top corner of the navy starburst medallion. Cure the pieces in a dedicated craft oven according to standard polymer clay baking guidelines, avoiding over-baking to preserve the bright gold finish. Once cooled, attach the gold bead to a fourteen-inch delicate chain, the crescent moon to an eighteen-inch chain, and the starburst to a twenty-two-inch chain, securing the outer ends into a multi-strand lobster clasp assembly.
4. Botanical Imprint Botanical Slab Stack

Execution Process
The botanical imprint stack incorporates natural textures by capturing delicate foliage veins directly into polymer clay, assembling them into a tiered, vertical cascade. Three rectangular slabs, graduated in size from small to large, hang consecutively from separate chains to create an aligned, rhythmic column. The clay surface displays realistic impressions of delicate ferns, eucalyptus leaves, or wild herbs, highlighted with a light wash of acrylic paint wiped into the recesses to accentuate fine botanical veins. The base clay remains an unbleached raw linen shade, offering an artisanal, handcrafted appearance reminiscent of studio ceramics and botanical paper crafts. This design demonstrates how surface treatment can add visual weight without requiring additional structural elements. The consistent rectangular perimeter provides modern boundaries that balance the organic, unpredictable nature of leaf impressions, making this project an excellent choice for crafters who appreciate botanical home decor and rustic, nature-inspired jewelry aesthetics.
Collect small, fresh sprigs of fine-textured foliage such as flat-leaf parsley, delicate fern fronds, or thyme. Roll conditioned unbleached ivory polymer clay to a uniform thickness of three millimeters directly onto an acrylic tile. Lay the botanical sprigs onto the clay surface and roll over them firmly with an acrylic roller to embed the plant material evenly into the sheet. Carefully peel away the plant matter using tweezers to expose the sharp vein imprints underneath. Using a straight-edge craft ruler and sharp hobby knife, cut three crisp rectangular tabs: one measuring one inch by one-half inch, the second measuring one and a half inches by three-quarters of an inch, and the third measuring two inches by one inch. Pierce two symmetrical holes along the upper edge of each rectangular slab. Bake the slabs flat on tile at the specified baking temperature for thirty minutes. After cooling, apply a drop of umber acrylic paint across the textured surface, immediately wiping it away with a damp cloth to leave pigment settled inside the embossed veins. String each slab onto independent gold-toned trace chains measuring sixteen, twenty, and twenty-four inches.
5. Monochrome Scalloped Arch Duo

Setup Method
The monochrome scalloped arch duo uses high-contrast design principles, uniting stark black and pure white polymer clay in a balanced two-tier statement accessory. The top layer displays a smooth, solid black semicircular arch, while the bottom tier showcases a larger white arch finished with a rhythmic scalloped outer perimeter. This stark visual dialogue between black and white provides a clean, modern design that pairs effortlessly with tailored business wear, casual sweaters, and monochrome outfits. The scalloped edge softens the rigid geometric construction, introducing a playful, vintage flair without compromising modern composition standards. Precision is vital in this design, as monochrome color schemes expose uneven edges and surface dust far more readily than textured or patterned surfaces. Crafting this piece builds essential skills in edge-finishing, cutter stabilization, and maintaining color purity across contrasting clays during the rolling and cutting processes.
To prepare the materials, thoroughly wipe all cutting tools, rollers, and hands with baby wipes between handling dark and light clays to avoid color transfer. Roll conditioned pure white clay to a depth of three millimeters, and stamp out a wide arch using a dedicated scalloped perimeter cutter. Next, condition and roll deep black clay to an identical three-millimeter thickness, cutting a smaller, smooth arch that nests comfortably within the visual radius of the white scalloped lower piece. Using a precision pin, bore two connection holes into the top edge of each arch, spacing them evenly to keep the pieces balanced when suspended. Position the pieces on an unglazed ceramic tile and bake at the temperature designated on the polymer clay package, monitoring the heat closely with an independent oven thermometer to prevent the white clay from yellowing. Once cured, allow the pieces to reach room temperature before handling. Connect the black arch to a sixteen-inch silver cable chain, and suspend the white scalloped arch from a twenty-inch silver chain, fastening all four endpoints to a double-loop sliding clasp.
6. Tortoiseshell Fan and Drop Duo

How to Create
This sophisticated two-tier necklace replicates classic amber tortoiseshell material through layered translucent and pigmented polymer clays. The upper tier suspends a broad, ribbed fan shape across the upper chest, while the lower tier carries a teardrop pendant that balances the wider element above. The faux tortoiseshell pattern features an organic distribution of amber, deep brown, and black flecks suspended in clear translucent clay, mimicking natural resin, horn, or vintage eyewear frames. Because polymer clay becomes slightly flexible and durable after proper curing, this fan-and-drop structure provides the warm, vintage look of traditional cellulose acetate without its brittleness. The translucent base catches the light as the wearer moves, lending rich visual depth to flat clay pieces. This necklace acts as a warm accent piece against neutral knitwear, cream blouses, and autumn wardrobes, making it an excellent project for crafters looking to move into specialty faux-stone techniques.
Create the tortoiseshell pattern by chopping small portions of raw translucent clay, amber-tinted clay, rich chocolate brown clay, and black clay into irregular pea-sized fragments. Gather these disparate fragments into a loose ball, compress them firmly, and roll the resulting composite into a solid log. Cut thin slices across the marbled log, align the slices edge-to-edge on a ceramic tile, and roll them smooth with an acrylic roller until they merge into a continuous patterned slab measuring three millimeters thick. Use a fluted fan cutter to stamp out the upper fan component, and a sharp teardrop cutter to extract the lower pendant. Create two suspension holes at the upper outer edges of the fan and a single hole at the apex of the teardrop. Cure the pieces on a flat baking surface for the full recommended baking time, as translucent clays require complete curing to reach optimal optical clarity and strength. Once cool, wet-sand the cured edges using 800-grit wet-or-dry sandpaper to produce a smooth, polished finish, then assemble the fan onto an eighteen-inch antiqued brass chain and the teardrop onto a twenty-four-inch chain.
7. Terrazzo Fragment Medallion Trio

Step-by-Step Guide
Drawing inspiration from mid-century Italian terrazzo flooring, this vibrant three-tier necklace incorporates colorful clay flecks into a creamy, stone-like background. The necklace features three round medallions graduated in diameter: a small three-quarter-inch disc on the top tier, a medium one-inch disc on the center tier, and a broad one-and-a-half-inch disc on the lowest tier. The surface of each pendant displays scattered flecks of mustard yellow, blush pink, cobalt blue, and forest green set against an off-white stone base, creating an artisanal mosaic effect. The progression of three matching discs establishes vertical rhythm, while the speckled pattern adds a lively, cheerful accent to neutral linen and cotton outfits. This concept helps crafters master pattern integration, teaching them how to roll mixed decorative elements flush into a unified base sheet without distorting the overall shape of the pendant.
Begin by rolling an off-white base clay mixed with a small pinch of black pepper or granite dust to a uniform thickness of four millimeters. Take cured or firm scraps of contrasting clay in mustard, blush, cobalt, and forest green, and slice them into tiny, irregular chips using a sharp craft blade. Scatter these colorful chips across the surface of the off-white base slab, pressing them down lightly with your fingers. Lay a sheet of parchment paper over the scattered pieces and roll firmly with an acrylic roller until all colored flecks lie completely flush with the surrounding base clay. Use graduated circular cutters to stamp out the small, medium, and large round medallions from the terrazzo sheet. Pierce a single clean suspension hole near the top perimeter of each circular medallion. Bake the three medallions flat on a tile inside a preheated oven at the clay manufacturer’s stated temperature for thirty minutes. Once cooled, coat the fronts with a matte water-based varnish to seal the surface, then suspend each medallion on individual fine ball chains measuring sixteen, twenty, and twenty-four inches.
8. Metallic Textured Bar and Chevron Cascade
How to Make
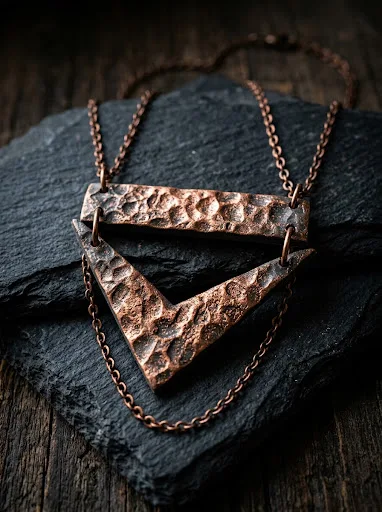
This dynamic two-tier necklace pairs industrial geometric styling with artisan metalwork finishes, combining a textured horizontal bar with an interlocking pointed chevron pendant. The upper horizontal bar sits evenly across the collarbone, featuring an embossed hammer-stroke or linen texture that catches the light across its flat surface. Directly below, a sharp V-shaped chevron echoes the horizontal line of the upper bar while pointing downward to draw the eye vertically. The piece uses slate gray clay coated with metallic copper or mica powder, providing the substantial look of hand-forged metalwork while keeping the necklace remarkably light to wear. The combination of horizontal and downward-pointing geometric elements creates an elegant frame for open-neck garments, collared shirts, and high-neck tops. This project introduces crafters to metal-powder surface gilding and silicone texturing mats, showing how to achieve authentic metallic finishes on flexible polymer foundations.
Roll conditioned graphite gray polymer clay onto a smooth tile to a consistent depth of three millimeters. Press a textured silicone sheet featuring a distressed linen or hammered-metal pattern firmly into one half of the slab to emboss the surface. Using a straight craft blade, cut a crisp horizontal rectangle measuring two and a half inches long by one-quarter inch wide from the textured section. On the smooth half of the slab, cut an angular chevron pendant using angled geometric rulers, keeping the arms of the chevron one-quarter inch wide. Using a soft makeup brush, dust high-shine copper mica powder over the entire surface of both pieces, brushing away excess powder so the pigment settles into the textured grooves. Pierce mounting holes at both ends of the horizontal bar, and at the two upper tips of the chevron. Cure the components in a preheated oven for the duration indicated on your clay package. Once cool, spray the pieces with a light coat of clear gloss glaze to seal the metallic powders, then mount the textured bar on a sixteen-inch antique copper chain and the chevron on a twenty-inch matching chain.
9. Color Block Half-Moon Collar
Execution Process
The color block half-moon collar features two nested semicircular shapes, juxtaposing bold complementary colors within clean, modernist profiles. The upper tier displays a broad, flat semicircular arch in warm ochre yellow, while the lower tier suspends a matching, inverted half-moon in deep dusty teal. The clean cut lines and color blocked design reflect Bauhaus-inspired principles, prioritizing primary geometric interactions and functional elegance. Because both pieces are semicircular, they sit smoothly together against the chest without shifting or overlapping uncomfortably during normal movement. The smooth, matte surfaces offer an attractive tactile quality that elevates casual everyday clothing, button-up shirts, and minimalist shift dresses. Constructing this piece sharpens skills in cutting clean radial curves and keeping adjacent complementary colors separated during handling, resulting in a bold, wearable piece of geometric pop art.
Condition ochre yellow and deep dusty teal polymer clays until soft and pliable. Roll each color into a uniform slab using depth guide rings set to three millimeters. Use a large round cutter paired with a straight craft blade to produce a wide semicircular shape from the ochre clay, then slice out a concentric smaller semicircle from its center to create an arched curve. Next, use a medium circular cutter to stamp out a solid circle from the dusty teal clay, slicing it cleanly in half to form the lower solid half-moon element. Pierce two symmetrical holes along the top corners of the ochre arch, and drill two holes through the straight top edge of the teal half-moon. Bake the parts flat on parchment paper in a preheated oven following the clay brand’s temperature guidelines. Allow the shapes to cool completely inside the turned-off oven to prevent thermal shock and warping. Attach the ochre arch to an eighteen-inch cord using tiny jewelry split rings, suspend the teal half-moon beneath it on a twenty-two-inch cord, and join all ends with a clean barrel clasp.
10. Sculpted Clay Bead and Shield Duo
Setup Method
This dimensional two-tier necklace pairs traditional bead-rolling techniques with flat slab construction, bringing varied sculptural forms together into one cohesive piece. The top tier features a symmetrical sequence of five hand-rolled round clay beads threaded along a flexible jewelry wire, while the bottom tier showcases an elongated medieval shield or curved triangular talisman. The design balances round, organic beads with a flat, structured pendant, creating rich visual depth through contrasting shapes. Using an earthy color palette of warm sienna, olive, and ivory, the necklace offers a warm, boho-inspired aesthetic that complements chunky knitwear, relaxed dresses, and casual layered outfits. This project introduces beginners to bead-making essentials, such as using depth guides for consistent bead sizing, drilling central stringing channels, and balancing bead strands above flat pendants.
To make the beads, roll conditioned ivory and olive clay into smooth ropes of identical thickness, slicing them into five equal segments. Roll each segment between your palms into a uniform round sphere, then gently pierce the center of each bead with a stainless-steel beading wire or craft needle, rotating slowly to keep the spheres round. For the bottom tier, roll rich sienna clay to a thickness of three millimeters and cut an elongated curved shield pendant measuring two inches long by one inch wide. Smooth the edges of the shield with a soft, damp sponge and pierce a single attachment hole centered at the top edge. Slide the beads onto a rack or suspend them on wire over a baking dish so they cure without flat spots, and lay the shield pendant flat on a ceramic tile. Bake all components according to the manufacturer’s recommended temperature and timing. After cooling, thread the five beads onto a fourteen-inch coated beading wire, securing the ends with crimp beads, and suspend the sienna shield on an eighteen-inch antiqued brass chain connected to the main clasp assembly.
Common Beginner Mistakes and How to Avoid Them
Beginners working with layered polymer clay necklaces often encounter balance, structural, and finishing challenges that can compromise the final piece. A frequent error is rolling clay slabs to inconsistent thicknesses, causing components to bake unevenly, warp, or snap under light tension. To avoid this, always use an acrylic roller fitted with standardized silicone depth guide rings, or roll between matching wooden craft dowels to ensure a uniform three-millimeter slab. Another widespread issue is improper hole placement, such as piercing connection points too close to the outer perimeter, which leads to cracked borders when opening and closing jump rings. Maintain at least a two-millimeter buffer between any pierced hole and the edge of the clay. Crafters also frequently under-bake their pieces out of fear of scorching the clay. Polymer clay cures through cross-linking, which requires the full recommended baking time to become strong and flexible; under-baked clay remains brittle and fragile. Always rely on an independent oven thermometer placed directly next to your baking tile rather than the oven dial, and maintain consistent temperatures throughout the entire curing cycle.
Practical Tips for Better Results
Achieving professional, boutique-quality finishes on polymer clay jewelry requires dedicated attention to pre-cure preparation and post-cure finishing techniques. Dust and stray lint pose constant challenges on light-colored clays; keep a roll of lint-free tape nearby and lightly tap the conditioned slab before cutting to lift away airborne fibers. If minor surface imperfections remain on raw clay, smooth them gently with a cotton swab lightly moistened with isopropyl alcohol before baking. For glass-smooth edges after baking, invest time in wet sanding your cured pieces under running water using graduated silicon carbide sandpapers, progressing from 400-grit to 600-grit and finishing at 1000-grit. This removes microscopic cutter marks and produces smooth, rounded edges that feel comfortable against the skin. When opening and closing metal jump rings, twist the ring ends sideways past one another rather than pulling them outward, which weakens the metal and ruins the circular profile. Finally, apply a water-based polyurethane or professional microcrystalline wax to bring out rich color saturation and protect surface-applied mica powders, acrylic washes, or metal leafing from everyday wear.
Styling, Presentation, or Organization Ideas
The versatility of layered polymer clay necklaces makes them rewarding to style, store, and present as artisan gifts. When wearing these multi-strand creations, consider the neckline of your clothing carefully: V-neck collars, wide scoop necks, and unbuttoned collared shirts provide ideal open backdrops that allow geometric tiers to hang straight without catching on fabric edges. For colder seasons, solid-colored turtleneck sweaters serve as striking, high-contrast backgrounds for bold terracotta, sage, and monochrome palettes. For jewelry storage and display, hang layered pieces vertically on wall-mounted wooden pegboards, t-bars, or framed linen pinboards rather than storing them flat in partitioned drawers where multiple chains can easily tangle. If presenting these necklaces as handmade gifts or packaging them for artisan markets, mount the pendants securely onto heavy cardstock backer boards. Cut small diagonal slits in the top corners of the card to hold the chains taut and prevent tangling during transit, and place the card inside a simple kraft jewelry box lined with unbleached cotton batting for a polished, professional presentation.
Budget or Time Planning
Creating layered polymer clay jewelry is an efficient, budget-friendly craft project that yields professional results with minimal initial investment. A standard multi-color set of polymer clay blocks costs very little and provides enough material to produce eight to ten complete layered necklaces, making the material cost per piece minimal. To manage your time efficiently, organize your workflow into focused assembly steps rather than completing one necklace from start to finish. Dedicate one crafting session to conditioning, color-mixing, cutting, and piercing all clay shapes. Fill a baking tile with these components to run a single, energy-efficient oven cycle. While the clay pieces cool, dedicate a separate work window to measuring, cutting, and organizing your chain lengths, cords, and jump rings. Assembling the hardware takes only ten to fifteen minutes per necklace once all the clay components are fully cured, sanded, and sealed. This batching method lets you make an entire coordinated jewelry collection over a single weekend, optimizing both material usage and creative focus.
Creative Expansion and Advanced Inspiration
Once you master these foundational layered necklace designs, explore advanced mixed-media techniques to add further dimension to your jewelry projects. Try incorporating custom wire-wrapped natural crystal beads, raw brass findings, or laser-cut wood pendants between your clay elements to create rich textural contrast. You can also explore complex cane-building methods, constructing intricate millefiori floral motifs, miniature landscapes, or layered geometric patterns that run through the entire clay block before slicing. Another exciting avenue involves pairing liquid polymer clay with soft chalk pastels or alcohol inks to create glossy, resin-like faux enamel coatings over baked clay bases. Advanced jewelers can scale these proportional layering principles to create coordinating jewelry sets, using matching shapes and colors for statement earrings, minimalist hairpins, and linked bracelets. By exploring different textures, materials, and layered structures, you can continue expanding your jewelry-making skills while developing a distinctive, personal design voice.
Leave a Reply