Hanging clay planters represent a foundational element in modern botanical interior styling, uniting organic ceramics with vertical spatial design. This comprehensive guide explores miniature to mid-sized clay suspensions engineered specifically to display trailing houseplants, succulents, and airy foliage without consuming floor area. Readers will acquire technical knowledge regarding clay slab rolling, pinch-pot sculpting, structural hole perforation, structural balance distribution, and durable cord assembly. Learning to handbuild suspended vessels offers an accessible gateway to mastering foundational ceramic techniques, including consistent wall thickness, shrinkage compensation, smooth edge finishing, and moisture management. Beyond decorative appeal, elevating plants off surfaces maximizes ambient light penetration, enhances air circulation around lower root foliage, and provides safe botanical placement away from curious pets. The self-contained scale of each planter makes it an approachable, highly practical creative project that transforms raw earth into functional vessels without demanding complex studio equipment. Whether your goal is assembling a curated vertical window display or crafting customized gifts, this tutorial equips you with systematic, actionable techniques to create durable, balanced, and visually refined handmade plant holders.
Why This Idea Is Trending or Useful
Vertical botanical displays have surged across contemporary Pinterest inspiration boards as urban living spaces embrace compact, multi-functional home decor. Suspended planters directly address spatial constraints by converting empty window frames, bare corners, and vertical wall planes into thriving indoor gardens. From an interior styling perspective, the rich tactile contrast between raw clay, metallic accents, and cascading green vines introduces a grounding natural aesthetic that complements minimalist style and modern design. As a DIY endeavor, handbuilding planters eliminates the high cost of mass-produced ceramics while allowing crafters to tailor dimensions to specific plant nursery pots. Beginners find this medium particularly rewarding because non-wheel techniques like slab construction and pinch potting tolerate natural imperfections and organic forms. Furthermore, the tactile process of shaping damp clay provides an engaging, screen-free creative project with tangible, lasting utility. The combination of minimal startup expense, flexible display locations, and immediate room enhancement ensures that hanging planter projects remain central to trending ideas in contemporary handmade living.
Materials and Preparation
Executing clean, structurally sound hanging clay planters requires selecting materials engineered to support soil weight, retain moisture, and hang plumb. Self-hardening air-dry clay or oven-bake polymer clay provides an excellent accessible medium for indoor decorative use, while kiln-fired stoneware clay yields fully vitrified, frost-resistant pots for outdoor installations. Essential handbuilding tools include an acrylic rolling pin, wooden guide slats measuring one-quarter inch thick, needle tools for precise trimming, flexible stainless steel rib scrapers, hole punch cutters, and a damp smoothing sponge. For suspension rigging, gather unbleached twisted cotton cord, durable hemp twine, or braided leather lace paired with solid brass O-rings and heavy-duty ceiling cup hooks. Preparation begins with clearing an expansive, non-porous work surface covered with canvas or parchment paper to prevent clay from sticking. Thoroughly knead the clay to eliminate internal air pockets that cause structural cracking during the drying or baking stage. Calculating the finished weight of the soil, plant, and pot ensures you select appropriately rated hardware and secure ceiling joists during your initial planning phase.
1. Minimalist Matte White Demi-Globe Vessel
Setup Method
The minimalist matte white demi-globe vessel uses a clean hemispherical silhouette that emphasizes negative space and architectural simplicity. The design concept focuses on a pure geometric half-sphere paired with recessed suspension points to keep the hanging cords sitting flush against the rim. The clean, unglazed white clay body presents an understated, powdery exterior that highlights the deep green tones of trailing plants like string of hearts or pearl succulents. Eliminating decorative surface patterns directs the eye entirely to the vessel’s curved contours and natural shadow transitions. This design functions exceptionally well in contemporary living spaces, matching Scandinavian and modern design interiors where clean lines and neutral palettes dominate. The balance of a rounded base with horizontal suspension rings creates an effortless visual floating effect that feels light and open in sunlit window apertures.
Begin by rolling conditioned white clay between two quarter-inch wooden guide slats on a canvas work surface to establish an even thickness. Drape the flattened clay slab carefully into the interior of a six-inch spherical plastic or ceramic mold lined with plastic wrap, pressing outward from the center to eliminate trapped air. Trim the excess clay flush along the mold rim using a taut wire cutter or needle tool, then smooth the rim with a damp sponge. While the clay remains pliable inside the mold, use a five-millimeter brass hole punch to cut three equidistant holes exactly one-half inch below the top rim. Allow the clay to firm up to a leather-hard state before gently turning the bowl out of the mold to air-dry or cure in the oven. Cut three equal thirty-inch lengths of three-millimeter braided cotton cord, knot each end inside the punched rim holes, gather the strands at the top, and tie them securely to a brass hanging ring.
2. Terracotta Cone Planter with Raw Leather Straps
Step-by-Step Guide
The terracotta cone planter combines the rustic warmth of baked earthenware with the utilitarian durability of natural vegetable-tanned leather rigging. The structural appeal of this concept originates from its inverted conical taper, which channels the plant root ball into a compact, secure pocket. The earthy orange-red clay body remains unglazed, providing an authentic porous surface that naturally wicks excess moisture away from delicate indoor plant roots. The rich caramel tones of thick flat leather straps contrast sharply with the raw ceramic texture, introducing an elevated artisanal quality suitable for transitional and mid-century modern spaces. The steep conical profile keeps the visual profile slender, making it an ideal choice for narrow wall gaps, bedside corners, or double-hung window casings where wide vessels would obstruct light or movement.
Roll a quarter-inch thick slab of terracotta clay into an expansive sheet, then cut a precise ninety-degree pie-wedge template using a metal ruler and craft blade. Lightly bevel both straight outer edges at opposing forty-five-degree angles, score the seam cross-hatch pattern with a needle tool, and apply a thin coat of water or clay slip. Roll the wedge around a conical cardboard armature, pressing the beveled edges together firmly with a wooden modeling tool to form a seamless cone. Cut two opposite five-millimeter holes through the upper walls one inch below the rim for strap placement. Once cured and fully dried, apply a non-toxic liquid acrylic sealer to the interior base to manage moisture containment. Thread two half-inch wide, twenty-four-inch long natural leather strips through the punched holes, folding each strap back onto itself and riveting the leather closed using heavy brass screw-post Chicago rivets.
3. Scalloped Rim Ceramic Pod

Execution Process
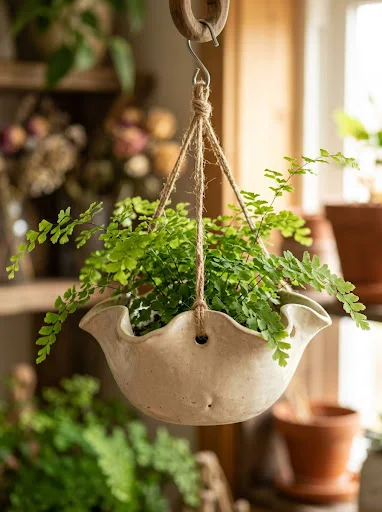
The scalloped rim ceramic pod takes inspiration from organic sea shells and botanical calyxes, incorporating a undulating wave along the upper edge of a bulbous base. The design concept shifts away from rigid geometric lines in favor of soft, natural contours that mimic unfolding flower petals. The flared rim catches natural ambient light, creating dynamic highlights that soften the transition between the suspended container and the green foliage emerging from within. Finished with an eggshell or satin-matte ceramic glaze, this vessel balances whimsical cottagecore elements with clean structural restraint. The scalloped perimeter provides functional benefits by creating natural resting notches for creeping vine stems, preventing delicate stems from kinking against sharp, straight ceramic edges as the plant trails downward toward the floor.
Form a solid softball-sized sphere of conditioned clay, then insert your thumb deeply into the center to initiate a traditional pinch pot. Systematically rotate the clay ball in one hand, pinching outward with even pressure between your thumb and fingers to thin the walls to a consistent five-sixteenths inch thickness. To shape the scalloped perimeter, gently press the top rim outward over the side of a rounded wooden dowel at regular one-inch intervals, carving soft sinusoidal waves along the entire upper edge. Use a hollow leather punch to create three suspension perforations situated within the lower valleys of the scallops to ensure optimal hanging stability. Smooth the interior and exterior surfaces with a flexible silicone rib to erase finger indentations. After drying and final curing, suspend the pot using four-ply natural jute twine threaded through the perforations, securing each strand with a neat figure-eight knot tucked along the inside wall.
4. Geometric Faceted Hanging Planter

How to Make
The geometric faceted hanging planter showcases an architectural, polygonal exterior achieved through careful angle carving and directional light refraction. Rather than presenting a smooth curved bowl, the exterior walls feature interconnected triangular and diamond facets that catch light at distinct angles. The design evokes contemporary origami forms, turning a simple indoor container into a sculptural art piece that commands visual interest even without foliage. This modern silhouette pairs seamlessly with trailing succulents, spider plants, or geometric air plants, enhancing clean urban apartments and modern design interiors. The contrast between crisp geometric facets and soft, flowing botanical leaves generates visual tension that anchors open vertical wall spaces, establishing an eye-catching focal feature in entryways, living rooms, or home workspaces.
Begin by rolling out a thick block of clay into a solid cylinder measuring five inches tall and five inches wide. Hollow out the central cavity using a metal loop wire trimming tool until you establish a consistent wall and base thickness of approximately three-eighths of an inch. Using a sharp modeling knife or razor tool, slice flat diagonal planes across the exterior wall surface, working sequentially in rows to produce rows of uniform triangular facets. Maintain a steady hand angle to ensure flat, crisp junction ridges between each cut plane. Perforate two pairs of parallel holes through the upper facet corners using a metal skewer, ensuring the holes line up precisely across the vessel diameter. Once the clay has dried completely and undergone firing or heat curing, thread thin, flexible steel wire or waxed nylon cord through the holes, securing the suspension harness with crimp beads hidden beneath the upper rim.
5. Textured Coil-Built Hanging Basket

How to Create
The textured coil-built hanging basket celebrates traditional ceramic manufacturing by showcasing raw stacked coil rings rather than smoothing them into a flat wall. The design concept turns the structural ribs of rolled clay cords into an intentional decorative pattern, producing an authentic, tactile ridged surface reminiscent of woven baskets. Subtle gaps between higher coils can be introduced to allow air circulation and provide integrated attachment points for hanging cords. The natural, hand-pinched ridges catch glazes in varying thicknesses, creating deep tonal variations across the pottery surface. This tactile approach honors traditional handcraft techniques, making it an excellent match for eclectic, bohemian, and modern rustic interior aesthetics that appreciate visible maker marks and honest material expression.
Extrude or hand-roll ten to twelve even clay coils, each measuring approximately one-half inch in diameter and sixteen inches long, storing them under plastic wrap to preserve flexibility. Roll a flat circular slab four inches in diameter to establish the vessel base, scoring the outer perimeter edge with a needle tool. Apply slip or water to the scored circle and mount the first coil along the edge, pinching it firmly downward onto the base slab while leaving the outer cylindrical face untouched. Continue spiraling the coils upward, scoring between each layer and lightly blending the inside walls flat for structural integrity while keeping the exterior stacked ribs prominent and defined. On the penultimate coil layer, loop the coil outward to form three raised loop handles spaced evenly around the perimeter. Cure the piece thoroughly, sand the inner joints lightly, and attach strong, four-strand macramé hemp cords directly through the integrated clay loop handles.
6. Speckled Stoneware Oval Canoe Vessel
Execution Process
The speckled stoneware oval canoe vessel features an elongated horizontal profile that accommodates multiple small trailing plants within a single suspended planter. The design concept departs from typical circular bowls, offering a stretched oval boat shape that fits neatly along window sills, above dining tables, or over console surfaces. The ceramic body incorporates rich manganese or iron speckles into a light sand clay matrix, producing an organic texture that looks handmade and natural. The horizontal silhouette allows crafters to create layered arrangements by planting varied species—such as contrasting jade vines with silvery pearls—side by side. This suspended trough design distributes visual weight horizontally, making it an effective choice for anchoring wider spaces where several individual small hanging pots would appear cluttered or visually chaotic.
Roll a rectangular clay slab measuring six inches wide, fourteen inches long, and three-eighths inch thick over a coarsely woven linen sheet to impart subtle textile texture. Cut an elongated oval template from the slab, then flare the long outer walls upward by six inches using a curved foam cradle support to maintain an even canoe contour. Score and reinforce the two pointed ends with small clay gussets on the interior to prevent the walls from slumping during drying. Cut two holes through the reinforced clay at each pointed terminal end, providing four suspension points that keep the elongated vessel balanced and level. Dry the vessel slowly under loose plastic wrap over five days to eliminate warping along the long bottom spine. Rig the planter using thin leather cords threaded through each end hole, joining them overhead into two paired apex loops hung from ceiling hooks.
7. Hand-Carved Sgraffito Hanging Orb

Step-by-Step Guide
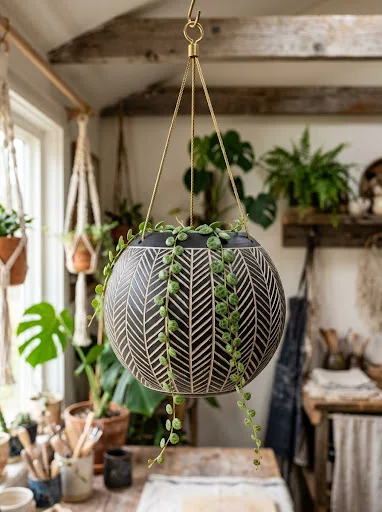
The hand-carved sgraffito hanging orb combines spherical ceramic sculpture with graphic surface pattern design through contrast carving. The concept centers on a spherical planter bowl with a restricted opening, coated entirely in an opaque layer of dark liquid slip or underglaze. Using a sharp loop carving tool, the maker cuts through the colored surface layer into the leather-hard clay, exposing the light-toned clay body beneath to create clean, permanent line art. Repeating geometric hatch marks, delicate botanical leaves, or abstract wave patterns can be etched across the exterior, generating high-contrast surface drama. This technique transforms a basic clay planter into an artful decorative accessory, bringing vibrant tactile energy to spaces influenced by modern eclectic and mid-century aesthetic designs.
Pinch two identical hollow hemispheres from buff-colored clay, smoothing the interiors until each bowl measures five inches across with a quarter-inch wall thickness. Score and slip the rims of both hemispheres, pressing them together to form a sealed, hollow sphere that traps air inside to maintain its shape while you work. Cut a circular plant opening measuring three inches across in the top quadrant, and carve three small drainage holes in the base. Coat the entire exterior with three layers of matte black liquid underglaze, letting the finish dry to a satin sheen. Using a fine-point loop sgraffito tool, gently etch rhythmic herringbone patterns through the black slip to reveal the pale buff clay underneath. Drill three hanging holes below the top rim, fire or bake the sphere to complete curing, and hang the vessel using thin, high-tensile stainless steel aircraft cable secured with brass ferrules.
8. Layered Terrazzo Slab-Built Cylinder

How to Make
The layered terrazzo slab-built cylinder introduces playful mosaic patterning into a clean, architectural drum silhouette. This design uses contrasting clay fragments—such as rich ochre, pastel mint, terracotta, and slate blue—embedded directly into a white polymer or porcelain base slab. Rolling the colorful chunks flush into the host clay produces an authentic terrazzo surface pattern with smooth transitions and flat planes. The straight vertical walls of the cylindrical drum create an architectural profile that highlights the random arrangement of the colorful terrazzo inclusions. This contemporary styling aligns with trendy Memphis modern and contemporary playful interior movements, offering a creative, lighthearted alternative to neutral earthware that suits creative workspaces, modern nurseries, and vibrant apartment corners.
Condition small blocks of colored clay, rolling them into small snakes and slicing them into irregular flakes measuring two to four millimeters across. Scatter the colored chips randomly across an expanded, quarter-inch thick slab of rolled white clay, pressing them lightly into the surface with your fingertips. Place a sheet of parchment paper over the scattered clay and roll an acrylic pin firmly across the surface until the colored fragments are pressed completely flush into the white field. Cut a clean rectangle measuring four inches high by twelve inches long, alongside a separate three-and-a-half-inch circle for the base. Score and wrap the rectangle around the circular base, fusing the vertical seam with a smooth wooden paddle tool to form an architectural drum. Punch two opposing suspension holes near the top rim, cure the vessel, sand the exterior smooth with wet sandpaper, and hang using vibrant, color-matched paracord.
9. Shallow Flying Saucer Air Plant Nest

Setup Method
The shallow flying saucer air plant nest provides an ultra-light, aerodynamic silhouette designed specifically for epiphyte plants that require no soil and maximum air circulation. The vessel features two shallow, wide-brimmed discs joined at the perimeter, with a generous circular void in the upper center to cradle air plants. Because these air plants draw nutrients and moisture directly from the air, the clay walls can remain remarkably thin and lightweight. The minimal profile of the hovering saucer brings a modern architectural look to windowpanes, catching subtle air currents to turn slowly in the breeze. This design is an ideal creative project for beginners and apartment dwellers, requiring minimal hanging hardware and zero mess from soil or drainage drips, making it a safe choice over electronics, desks, and fine furniture.
Roll a wide clay slab to a uniform thickness of three-sixteenths of an inch, using a compass or bowl to cut two matching seven-inch circles. Cut a three-inch circular window from the center of one disc to establish the open top seat for the plant. Place the solid bottom disc into a shallow concave paper plate to create a gentle upward curve, and gently flare the edges of the open top disc in an identical fashion. Score and slip the outer perimeters of both discs, pressing them together securely to form a hollow, disc-shaped saucer with an open central well. Use a fine needle tool to pierce three tiny suspension holes through the outer joined seam, spacing them symmetrically at 120-degree intervals. Once dry and cured, suspend the saucer using nearly invisible clear monofilament illusion cord connected to a ceiling hook, allowing the aerodynamic vessel to appear floating in midair.
10. Tiered Vertical Triple-Clay Planter Column

How to Create
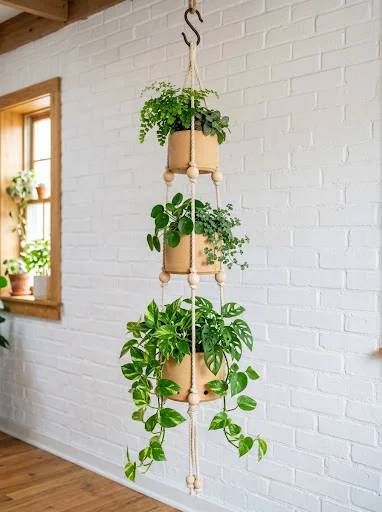
The tiered vertical triple-clay planter column uses vertical modularity to combine three distinct graduated clay pots into a single cascading plant tower. This design maximizes vertical wall space, holding multiple trailing and upright plant varieties in a compact vertical footprint. Each pot in the stack is scaled down proportionally, creating a balanced pyramid effect that looks organized and deliberate. Using identical clay across all three vessels establishes visual harmony, while varied plant textures—such as upright ferns on top and trailing pothos at the bottom—provide organic balance. This vertical column works beautifully on narrow structural pillars, balcony walls, or patio uprights, turning neglected vertical space into an eye-catching, floor-to-ceiling indoor garden.
Handbuild three open, flat-bottomed cylindrical pots measuring six inches, five inches, and four inches in diameter, maintaining consistent quarter-inch wall thicknesses across all three pieces. Cut three vertical hanging perforations through the floor and rim of each pot, aligning the holes along matching axes so a continuous cord can pass through the entire stack. After drying, curing, and firing the vessels, cut three heavy-duty ten-foot lengths of four-millimeter braided cotton cord, knotting all three cords together at an overhead brass ring. Thread the cords through the smallest top pot first, tying large, structural wooden beads onto the cords underneath the pot base to support its weight. Continue threading down through the middle and bottom planters, spacing the pots twelve inches apart with secure wooden support beads beneath each vessel. Mount the finished vertical column from a secure ceiling stud, populating each tier with lightweight potted plants.
Common Beginner Mistakes and How to Avoid Them
One frequent mistake among beginners is building planter walls with uneven thickness, which creates weak spots prone to cracking during drying or heat curing. When one section of clay dries faster than neighboring areas, internal stresses pull the clay apart, resulting in deep shrinkage fissures. Prevent this issue by using calibrated wooden guide slats on both sides of your rolling pin to ensure completely uniform slabs. Another common problem is punching suspension holes too close to the vessel rim. Placing a hole less than one-half inch from the edge leaves the clay wall too thin to support the combined weight of moist soil and ceramic material, often causing the rim to shear under load. Always position your suspension holes at least three-quarters of an inch below the rim, and soften the hole edges with a damp sponge so sharp cord friction does not wear down the clay. Finally, beginners often forget to account for hanging balance, ending up with vessels that tip forward and spill their contents when hung. Space your hanging points in an exact equilateral triangle, using a printed circular template to verify hole alignment before the clay hardens.
Practical Tips for Better Results
Achieving professional craftsmanship on hanging planters requires careful attention to clay moisture control, seam reinforcement, and dependable cord assembly. When joining clay slabs or structural components, thoroughly score both surfaces with a crisscross pattern and apply slip or water; simply pressing smooth clay pieces together will cause seams to separate as the clay shrinks. To achieve perfectly round, professional rims, lightly rotate a damp circular sponge over the edge while the clay is leather-hard to remove burrs and tool marks. If you plan to plant directly into the clay without interior plastic nursery pots, seal the inside with waterproof marine varnish or liquid rubber to prevent moisture from leaching through unglazed walls and causing mineral stains. For long-term hanging safety, use synthetic cords or waxed cords that will not rot from exposure to routine plant watering and humidity. Lastly, incorporate small swivel snap hooks at the top of your suspension cords; this allows you to rotate the planter smoothly, ensuring your plant receives balanced sunlight from all directions without tangling the hanging cords.
Styling, Presentation, or Organization Ideas
Hanging clay planters offer versatile styling potential across diverse architectural and interior spaces. Create an engaging window display by staggering three or five planters of varying shapes at different heights across a single window frame, forming a lush living curtain that filters sunlight. In small urban apartments, hang planters from sturdy ceiling brackets in unused corner nooks to add organic texture without cluttering walkways or valuable shelf space. You can also mount a horizontal birch branch or industrial black metal curtain rod across an accent wall, using it as an architectural rail from which to suspend multiple planters with matching brass S-hooks. When selecting foliage, match the plant’s growth habits to the shape of the pot: let cascading vines like string of nickels or trailing philodendron drape over low-profile bowls, and place upright architectural plants like snake plants or zebra haworthia in straight-sided modern cylinders.
Budget or Time Planning
Handcrafting hanging clay planters is a budget-friendly project that yields high-end decor accents at a fraction of retail boutique prices. A single ten-pound block of air-dry or ceramic clay costs very little and can produce three to five medium-sized hanging vessels, keeping your material investment minimal. The active crafting time for a single vessel typically spans one to two hours, making it an easy, manageable project to complete across a weekend afternoon. Plan your workflow across a systematic three-day timeline: spend day one shaping the clay forms, cutting clean hanging perforations, and refining surface textures; allow the clay to dry slowly and evenly on day two to prevent warping; and reserve day three for baking, sealing, threading cords, and potting your plants. Sourcing your suspension hardware—such as brass O-rings, leather laces, and ceiling hooks—in multipacks lowers your per-unit costs, making this project an economical way to create custom, personalized gifts for friends and family.
Creative Expansion and Advanced Inspiration
Once you master basic slab, coil, and pinch-pot methods, you can expand this craft into advanced designs and mixed-media projects. Experiment with integrating alternative raw materials, such as embedding polished quartz crystals into the exterior clay walls or wrapping planter necks in coiled wire or rattan reed. You can also explore multi-tiered kinetic mobiles by balancing horizontal ceramic spreader bars between stacked hanging bowls, creating dynamic, sculptural planters that turn gracefully in the air. For outdoor garden spaces, upgrade your clay body to a high-fire stoneware or porcelain fired in a professional kiln, creating weather-resistant planters capable of enduring freezing winter cycles without damage. Exploring varied textural finishes—such as hand-stamped botanical prints pressed directly from live garden leaves, or multi-layered reactive glazes applied over grogged clay—opens up limitless avenues for personal creative expression, allowing you to build an evolving collection of functional ceramic art.
Leave a Reply