Geometric polymer clay rings represent a vibrant intersection of sculptural craft and wearable contemporary style across current DIY inspiration channels. This comprehensive tutorial explores how to design, shape, and cure bold architectural finger rings using accessible modeling compounds and basic household tools. Many aspiring jewelry makers encounter difficulties with clay jewelry due to brittle structural seams, incorrect oven temperatures, and improper sizing around human fingers. Through this structured guide, you will master the principles of polymer clay conditioning, dimensional slab construction, seamless ring band shaping, and professional post-bake finishing methods. Learning these geometric principles allows you to transform humble blocks of clay into sophisticated statement pieces that showcase clean lines, angular facets, and striking color blocking. The project requires no expensive metalworking setups, torches, or industrial casting molds, making it an exceptional entry point for beginners and experienced artisans alike. Whether you intend to produce bespoke accessories to complement personal fashion collections or create thoughtful handcrafted gifts for friends, these practical ideas offer actionable techniques to achieve durable, gallery-quality results from your own workspace.
Why This Idea Is Trending or Useful
Sculptural polymer clay rings have gained significant popularity across modern design feeds because they offer an expressive, lightweight alternative to traditional cast-metal jewelry. Modern fashion continuously embraces chunky, expressive accessories that showcase playful geometry, retro Memphis motifs, and clean architectural aesthetics. Handcrafted clay enables makers to produce large, eye-catching silhouettes that remain comfortable for all-day wear without weighing down the hand. From a practical perspective, polymer clay is a non-toxic, highly forgiving material that cures rapidly in a standard home toaster oven without specialized kiln equipment. The accessibility of this medium empowers beginners to experiment freely with color mixing, marbling, and surface textures without major financial risk. Furthermore, custom ring fabrication allows for bespoke sizing that accommodates individual finger shapes, eliminating the sizing limitations of commercial fast-fashion jewelry. The balance of modern design relevance, functional wearability, low production costs, and limitless creative freedom makes geometric clay rings an enduringly popular creative project for makers seeking satisfying, quick-turnaround artistic results.
Materials and Preparation
Achieving durable, professional-quality polymer clay rings requires proper materials, ergonomic modeling tools, and meticulous preparation before unboxing your clay. Select professional-grade polymer clay blocks known for their high tensile strength and flexibility after baking, avoiding low-density novelty clays that become brittle when exposed to daily hand movement. Essential equipment includes an acrylic rolling rod or mechanical clay conditioning machine, precise stainless steel craft tissue blades, geometric micro-cutters, silicone shaping tips, and an aluminum or wooden ring mandrel for accurate finger sizing. Additional supplies encompass ceramic work tiles, wet-and-dry automotive sandpaper in assorted grits from four hundred to twelve hundred, rubbing alcohol, lint-free cloths, oven thermometers, and liquid polymer clay for strong bond reinforcement. Preparation begins by thoroughly washing and drying your hands and wiping down your work surface with rubbing alcohol to remove dust, lint, and residual skin oils. Proper planning involves measuring the target knuckle circumference with paper strips and matching it to corresponding mandrel steps, factoring in minimal post-cure shrinkage to ensure an exact, comfortable fit.
Idea 1: Architectural Hexagonal Arch Band

Step-by-Step Guide
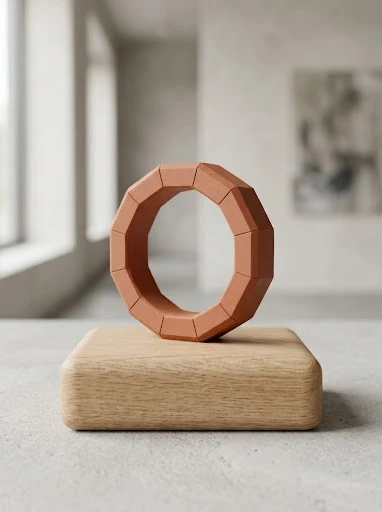
The architectural hexagonal arch band draws inspiration from brutalist architectural arches, featuring a wide, flat exterior perimeter structured into six precise, symmetrical facets around an inner circular finger cavity. This design replaces conventional cylindrical ring bands with a bold, flat-sided geometric profile that sits comfortably across the base of the finger while showcasing clean angles to the viewer. The hexagonal structure provides structural thickness along the upper bridge, preventing stress fractures across high-friction contact points without feeling overly bulky between adjacent fingers. By pairing an earthy neutral tone like terracotta or sandstone with sharp edges, this piece offers an understated modern aesthetic that complements everyday minimalist wardrobes. The uniform width of the band creates a balanced look suitable for standalone wear or clean stacking alongside slim metal bands.
To construct this ring, condition a portion of terracotta polymer clay until pliable and roll it into a uniform six-millimeter thick slab using depth guide sticks. Wrap a strip of parchment paper around a metal ring mandrel at your desired finger size to prevent sticking. Use a sharp tissue blade to cut a clean clay ribbon measuring twelve millimeters in width, then wrap the strip firmly around the prepared mandrel step, slicing the overlapping ends at a clean forty-five-degree angle to create an invisible mitered joint. Smooth the seam thoroughly using a flat silicone tool and a tiny drop of liquid polymer clay. Next, use a flat acrylic ruler to gently press six distinct, equal flat facets along the outer circumference while the ring remains mounted on the mandrel, checking the symmetry from the front profile. Bake the ring directly on the mandrel in a preheated oven at the manufacturer’s specified temperature for thirty-five minutes, let it cool completely, and wet-sand the outer facets to reveal crisp, geometric edges.
Idea 2: Cantilevered Prism Block Ring
How to Make
The cantilevered prism block ring explores asymmetrical balance by suspending an oversized, dimensional rectangular prism horizontally across an offset circular band. This design references modernist industrial structures, using deliberate asymmetry to draw visual focus toward the outer edge of the hand. The foundational band remains thin and low-profile, while the upper block extends past the knuckle in an intentional overhang that creates striking negative space between adjacent fingers. By choosing contrasting monochrome tones—such as a deep charcoal block perched atop a crisp chalk-white band—you highlight the clean geometric lines of the silhouette. The piece serves as a striking conversation-starter, proving that everyday modeling materials can yield high-end gallery aesthetics when approached with precise architectural planning.
Begin by rolling out a three-millimeter slab of chalk-white clay and wrapping a narrow five-millimeter ribbon around your sized ring mandrel, smoothing the underside joint to create the base band. To create the cantilevered block, condition a block of charcoal clay and compress it into a dense, solid brick measuring twenty millimeters in length, ten millimeters in width, and eight millimeters in height. Use an ultra-sharp tissue blade to trim all six faces of the brick, ensuring ninety-degree corners and flat, glass-smooth surfaces. Use a needle tool to score the contact point on top of the cured or raw white band and apply a small drop of bakeable liquid polymer clay adhesive. Press the charcoal prism firmly onto the band, offsetting it toward one side by five millimeters to create the dramatic cantilevered overhang. Bake the assembled structure supported by crumpled aluminum foil to prevent sagging, cool slowly, and finish the flat planes with dry microfiber polishing pads.
Idea 3: Stepped Art Deco Zigzag Ring
Execution Process
The stepped Art Deco zigzag ring incorporates tiered, ascending geometric levels that evoke the iconic glamour of 1920s skyscraper facades. The design features a central raised chevron or pyramid peak flanked by symmetrical descending steps cut into the top portion of the ring band. This tiered silhouette creates an illusion of elongation on the hand, making fingers appear longer and more slender through vertical directional lines. Combining rich jewel tones like deep emerald green, sapphire blue, or mustard ochre with metallic gold foil inclusions adds historic depth to the clean geometric profile. The structural rigidity of the stepped tiers reinforces the upper arch of the ring, ensuring exceptional resistance to bending or cracking during everyday wear.
Start by rolling out two slabs of emerald green polymer clay: one at four millimeters thick for the inner core and another at two millimeters for the layered exterior steps. Form the primary base ring around a glass or metal mandrel, smoothing the interior seam to ensure a round finger channel. Cut three pairs of narrow rectangular clay strips from the thinner slab, sizing each pair progressively shorter by three millimeters to form the tiered elevation. Stack the strips symmetrically on top of the base band, centering the longest piece and building upward to the smallest top cap to create stepped terraces. Use a sharp blade to trim the outer edges at a crisp sixty-degree angle, forming an ascending chevron peak. Gently burnish micro-sheets of gold leaf onto the vertical faces of the steps using a soft dry paintbrush to accentuate the dimensional geometry, bake thoroughly, and seal with a matte protective glaze.
Idea 4: Dual-Tone Interlocking Torus Ring

Setup Method
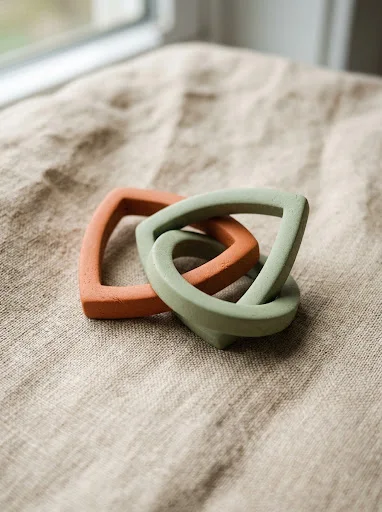
The dual-tone interlocking torus ring consists of two separate, perfectly circular geometric rings linked permanently through one another, creating kinetic tactile movement on the hand. Rather than using a static, rigid silhouette, this design embraces functional movement, allowing the two contrasting circular bands to roll smoothly over the knuckle during daily wear. The cross-section of each individual ring is shaped into a crisp flat-sided ribbon or an equilateral triangle rather than a rounded donut, reinforcing the geometric theme. Pairing contrasting hues, such as warm terracotta alongside cool sage green, produces visual interaction as the bands slide and shift positions with hand movement. This project provides an excellent lesson in multi-stage baking, as one band must be cured and finished before forming the second interlinked ring through its center.
Begin by conditioning a strip of sage green clay, extruding or slicing a triangular-profile rod with four-millimeter sides. Form this rod around your sized mandrel, join the seam with liquid clay, smooth the joint with a silicone rib, and bake it completely according to package instructions. Once the sage green ring has cooled and been sanded, condition a matching volume of warm terracotta clay and shape an identical triangular rod. Carefully thread the unbaked terracotta strip directly through the center opening of the cured sage green ring, wrapping it around the mandrel alongside its partner. Carefully seal the second ring’s connection seam using a tiny drop of liquid clay and an angled blade, ensuring the unbaked band moves freely around the cured ring without sticking. Return the linked pair to the oven, baking the entire assembly while supported on a bed of baking soda to prevent flat spots, resulting in a linked kinetic set.
Idea 5: Cylindrical Monolith Signet Ring

Step-by-Step Guide
The cylindrical monolith signet ring modernizes the traditional signet ring by replacing traditional rounded family crests with a flat, circular column rising from a thick tapered band. This design features substantial volume, creating an unbroken transition from the lower finger band into a wide, perfectly flat circular face. The flat face provides an ideal canvas for minimalist geometric surface techniques, such as contrasting terrazzo flecks, fine linear sgraffito carvings, or subtle two-tone color splits. The bold, monolithic weight gives the ring a substantial presence that grounds casual street-style outfits and minimalist tailored workwear. Its solid construction eliminates fragile overhangs or delicate connection points, resulting in an exceptionally durable ring that withstands active daily routines.
Condition a block of slate-gray clay and press it into a tapered ring band around your mandrel, keeping the underside five millimeters wide and thickening the top bridge to eight millimeters. Roll a separate two-millimeter slab of contrasting bone-white clay containing baked colored clay crumbs to create a graphic terrazzo sheet. Use a fifteen-millimeter circular stainless steel cutter to punch out a round medallion from the terrazzo slab, along with an identical circle from the gray clay to act as a backing pad. Secure the circular disk assembly directly to the thickened top platform of the ring band using liquid polymer clay, blending the lower edge smoothly into the band using a rounded wooden modeling tool. Inspect the top face with a small spirit level to ensure it rests flat and parallel to the finger hole. Bake the signet on a ceramic tile, let it cool completely, and sand the top face through wet grits up to twelve hundred to reveal the crisp embedded terrazzo chips.
Idea 6: Faceted Diamond-Cut Band

How to Make
The faceted diamond-cut band embraces a subtractive sculpting method where multiple triangular and rhomboid facets are carved directly into a thick, cured or leather-hard clay loop. This design breaks away from flat surfaces to mimic the precision facets of a cut gemstone, creating dynamic surface geometry that reflects ambient light at diverse angles. The thickness of the band allows for deep, deliberate slicing that reveals crisp internal planes, producing a tactile surface that feels textured and engaging to the touch. When created using deep jewel-toned translucent clays—such as smoky quartz, amber, or amethyst—the sliced facets capture light beautifully, giving the cured polymer a semi-precious stone appearance. This technique teaches precise blade handling, empowering crafters to transform simple extruded bands into complex geometric forms.
Roll out a thick, round sausage of translucent amber clay measuring eight millimeters in diameter, wrapping it around the mandrel and blending the seam thoroughly to form a heavy, uniform donut band. Bake this foundational band for twenty minutes to achieve a semi-cured, firm state that resists finger denting while remaining easy to carve with a fresh craft blade. Once cool enough to handle, use a brand-new scalpel or flexible tissue blade to slice off tiny triangular shavings from the outer corners and perimeter, working systematically around the circle to create alternating triangular facets. Maintain a consistent blade angle of thirty degrees during every cut to produce uniform geometric planes across the entire exterior. Inspect the band to ensure no cuts penetrate too deeply near the inner finger wall, return the faceted ring to the oven for an additional thirty minutes to complete the full cure, and polish each flat facet with dry denim to produce a natural satin luster.
Idea 7: Open-Ended Geometric Bypass Ring

Execution Process
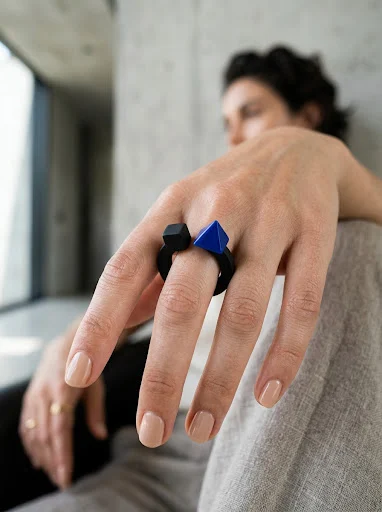
The open-ended geometric bypass ring abandons the closed circular loop in favor of an adjustable C-shaped silhouette where the opposing ends bypass one another across the top of the knuckle. Each terminal end is finished with a distinct three-dimensional geometric shape, such as a crisp cube on one side and a sharp triangular pyramid on the other. This open structural design provides slight flexibility, allowing the ring to accommodate seasonal knuckle swelling and fit multiple fingers comfortably. The contrast between the opposing geometric terminals adds visual intrigue, creating an asymmetrical composition that sits gracefully on the hand. Pairing bold, high-contrast colors like matte black and bright cobalt blue emphasizes the visual separation between the shapes, making it a standout modern accessory.
Begin by conditioning durable, high-flexibility polymer clay in matte black, rolling it into a four-millimeter square profile rod using a clay extruder or manual rolling guides. Form the rod around your mandrel into a loose spiral or open horseshoe, ensuring the two ends overlap horizontally across the top without touching. Sculpt two separate geometric terminals: hand-form a six-millimeter cube from black clay, and form an equilateral pyramid from bright cobalt clay using a tissue blade. Insert short half-inch segments of eighteen-gauge craft wire halfway into the base of each geometric terminal, securing them with a tiny drop of bakeable liquid clay. Insert the protruding wire ends into the cut ends of the open band to create a reinforced internal armature that prevents the shapes from snapping off during wear. Bake the open bypass ring on the mandrel supported by crumpled foil, cool thoroughly, and sand the geometric faces smooth.
Idea 8: Floating Rhombus Negative Space Ring

Setup Method
The floating rhombus negative space ring uses an open geometric silhouette to frame natural skin within its perimeter, producing an airy statement piece that feels light on the hand. Rather than using a solid plate, the focal point is an open diamond or rhombus outline that spans across the finger, supported by a dual-shank split band underneath. The open negative space in the center reduces the physical weight of the large geometric outline while preventing moisture buildup on the skin during warm weather. The clean diamond silhouette introduces bold diagonal lines that contrast beautifully with the horizontal lines of the fingers, creating a dramatic, contemporary jewelry profile. Finished in a minimalist matte black or crisp bone white, this design embodies modern Scandinavian and Bauhaus jewelry aesthetics.
Roll out a four-millimeter thick slab of conditioned clay and use nested diamond-shaped cookie cutters to punch out an open rhombus frame with three-millimeter wall borders. Lay the cut diamond flat on a smooth ceramic tile and use a tissue blade to refine the four external corners into crisp, sharp points. To construct the split supporting band, roll two thin two-millimeter clay snakes, joining them together at the base of the finger while allowing them to branch outward into a V-shape near the top bridge. Place the open rhombus frame directly across the twin branches of the band on the mandrel, reinforcing the contact joints with liquid polymer clay and smoothing the seams on the underside with a miniature ball-stylus tool. Bake the assembly flat on the tile with support under the ring band to prevent sagging, allow it to cool, and finish all edges with fine sandpaper.
Idea 9: Inverted Trapezoid Signet Ring
Step-by-Step Guide
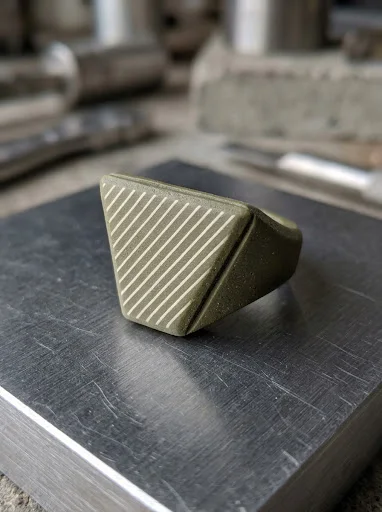
The inverted trapezoid signet ring updates vintage signet silhouettes through sharp angles, featuring a face that tapers inward toward the base of the finger to create an inverted wedge profile. The top horizontal surface remains wide and flat, while the side walls angle sharply downward toward a narrow lower band, giving the piece a tapered, industrial form. This inverse geometry focuses visual weight along the top edge, creating clean lines that look striking when viewed from above. The flat trapezoidal face can be left clean and unadorned, or detailed with contrasting linear clay inlays to create subtle geometric patterns. Using a muted, architectural palette like olive drab, warm slate, or deep sienna complements the industrial lines of the ring, resulting in an understated accessory suited for modern everyday styling.
Condition olive-drab clay thoroughly, rolling a section into a solid wedge block that measures twelve millimeters across the top edge and eight millimeters along the bottom, with a depth of six millimeters. Cut a corresponding four-millimeter wide flat band, wrap it around your sized mandrel, and join the seam securely. Center the trapezoidal block on top of the band, using a flat blade to press the side walls inward at a seventy-degree angle to establish the inverted trapezoid profile. Cut ultra-thin hair-like strips of white clay and lay them across the flat top face in diagonal intersecting lines, rolling gently with a smooth acrylic rod to embed the stripes flush with the olive surface. Trim the perimeter to ensure the trapezoid edges remain sharp and crisp. Bake the completed signet ring directly on the mandrel, cool slowly, and sand the top face to reveal the embedded geometric line work.
Idea 10: Stackable Triangular Chevron Trio
Execution Process
The stackable triangular chevron trio consists of three separate, V-shaped pointed ring bands designed to be worn nested together into a single wide geometric band or split across multiple fingers. Each individual band features a sharp forward-pointing apex that fits flush against its neighboring ring, creating an interlocking puzzle ring set. This modular design provides versatile styling options, allowing the wearer to change the arrangement daily—wearing all three nested together for a bold statement or wearing single chevrons across different fingers for a minimalist look. Utilizing an ombre color palette across the three rings, such as cream, taupe, and deep espresso, highlights the interlocking geometry of the set while providing natural visual depth.
Roll out a smooth, uniform three-millimeter slab of polymer clay for each of your three chosen ombre shades. Using a steel ruler and a sharp tissue blade, cut straight strips measuring four millimeters wide from each color slab. Wrap the first strip around the mandrel, using your fingers and an acrylic block to pinch and form a sharp ninety-degree V-shaped apex centered along the top bridge before trimming and joining the underside seam. Repeat this process for the second and third strips, fitting each uncured ring against the first to ensure the chevron points nest together with zero gap between them. Carefully separate the three matched rings and position them upright on a baking rack or bead-baking tray to prevent them from fusing together during the curing cycle. Bake for thirty minutes at the recommended temperature, let them cool completely, and lightly sand the interior and exterior contact edges to ensure the three rings slide together smoothly on the finger.
Common Beginner Mistakes and How to Avoid Them
A frequent mistake beginners make when crafting polymer clay rings is failing to condition the clay thoroughly before shaping the band. Unconditioned clay harbors brittle microscopic pockets and poorly integrated plasticizers, which causes completed ring bands to snap or crumble under normal finger flexion. Prevent this issue by kneading raw clay thoroughly until it becomes warm, soft, and flexible, passing it through a dedicated clay roller at least fifteen times before cutting shapes. Another widespread error is under-baking the finished pieces in an effort to avoid scorching the outer surfaces; under-cured polymer clay remains weak, rubbery, and prone to breaking. Always verify your internal oven temperature with a standalone analog oven thermometer rather than relying on oven dials, and bake pieces for at least thirty to forty-five minutes to allow the plastic compounds to cross-link into a durable structure. Crafters also frequently create ring bands with thin, razor-sharp edges that cut uncomfortably into adjacent fingers during everyday wear. Ensure long-term wearing comfort by gently beveling or rounding the interior edges of your bands using fine-grit sandpaper after curing. Finally, avoid applying thick liquid polymer clay adhesives without firm contact pressure, as loose seams can separate under daily tension.
Practical Tips for Better Results
To achieve clean, gallery-quality results with geometric clay rings, mastering precise cutting and post-bake finishing methods makes all the difference. When slicing geometric planes and trimming sharp faceted edges, always use a brand-new, ultra-thin stainless steel tissue blade rather than dull craft knives, which drag through soft clay and distort your straight lines. Keep a bottle of ninety-nine percent isopropyl alcohol and a lint-free cotton swab on hand to gently clean your raw clay forms before baking; this dissolves surface fingerprints, removes stray dust, and smooths out tiny imperfections without altering your geometric geometry. For flat-faced rings like signets or rectangular prisms, bake the pieces resting flat on a polished ceramic tile covered with a sheet of smooth deli paper; this prevents shiny glazed spots and prevents the underside from flattening unevenly. Embrace the wet-sanding process after curing, submerging your rings in a shallow bowl of lukewarm water with a drop of dish soap while progressing through four hundred, six hundred, eight hundred, and twelve hundred grit sandpapers. Finally, buff your cured, sanded rings vigorously with a scrap piece of raw cotton canvas or clean denim; this produces a gorgeous, natural satin sheen without requiring cloudy chemical liquid varnishes.
Styling, Presentation, or Organization Ideas
Styling your handcrafted geometric clay rings thoughtfully enhances their modern aesthetic, turning individual accessories into elevated statement accents. These architectural pieces look striking when worn as standalone thumb or index finger statement pieces, pairing beautifully with tailored wool blazers, minimalist linen apparel, and clean monochrome manicures. For a curated look, contrast the bold proportions of a chunky faceted ring with a few ultra-thin hammered gold or silver wire bands worn on adjacent fingers, balancing sculptural volume with delicate metallic accents. When presenting your rings for gifts or handmade craft market sales, mount them into custom slotted foam inserts nestled inside natural kraft cardstock boxes debossed with minimalist line art. In your home dressing area, display your ring collection on a tiered wooden ring cone rack, a stepped terrazzo tray, or a modern concrete jewelry dish; this keeps your accessories organized while showing off their clean geometric silhouettes as mini sculptures when not in use. You can also group your finished pieces by color families in divided acrylic organizers, protecting the matte surfaces from dust while keeping your favorite everyday accents ready to wear.
Budget or Time Planning
Crafting geometric polymer clay rings is an exceptionally affordable and time-efficient DIY project that delivers high-end accessories on a modest budget. A standard two-ounce block of artist-grade polymer clay costs just a few dollars and yields six to eight completed rings, keeping your material investment minimal per finished piece. To optimize your crafting hours, batch your production into organized, focused sessions: spend one evening conditioning clay, mixing custom color formulas, and cutting clean geometric bands, then bake the entire batch together in a single oven run. Curing takes roughly forty-five minutes per batch, during which you can clean your tools and prep your sanding station. Allocate a second evening for wet-sanding and buffing the batch while listening to music or podcasts, which keeps the repetitive finishing work relaxing and efficient. Using standard household items—such as metal drinking straws, razor blades, parchment paper, and wooden knitting needles for sizing—eliminates the need for costly jewelry tools early on. This efficient workflow allows you to produce a cohesive, eight-piece collection of custom rings over a single weekend, making it an ideal creative project for holiday gift making or starting an artisanal craft business.
Creative Expansion and Advanced Inspiration
Once you feel comfortable with foundational geometric shaping and clean slab assembly, you can explore limitless artistic possibilities to expand your jewelry collection. Experiment with surface texturing by pressing wire mesh, etched acrylic plates, or woven fabrics into damp clay slabs before cutting your bands, creating subtle textural contrasts across your geometric facets. You can also explore colored clay marbling, blending small amounts of contrasting clay colors into raw clay to produce swirled, stone-like patterns like faux agate, jade, or lapis lazuli running through the geometric planes. For advanced functional features, incorporate small recessed cavities into your geometric ring tops to hold tiny faceted glass crystals, dried botanical fragments, or metallic brass balls using UV resin after curing. Expanding into matching geometric accessories—such as coordinating faceted stud earrings, triangular pendants, or cuff bracelets—allows you to build cohesive, high-fashion accessory collections that showcase your distinctive design style. Mastering these sculptural clay techniques gives you the foundation to design bold, original jewelry pieces that bring modern design and handcrafted warmth to your everyday wardrobe.
Leave a Reply