Handcrafted clay containers have emerged as a prominent element in contemporary interior styling, uniting organic botany with intentional sculptural craft. Designing custom planters allows enthusiasts to tailor vessel proportions, surface textures, and color palettes to specific houseplants, indoor shelves, and architectural spaces. This detailed tutorial provides comprehensive instruction for ten distinct planter concepts centered on versatile clay mediums. Readers will explore structural hand-building techniques, including slab assembly, coil stacking, geometric faceting, and textural stamping methods. The guide outlines critical procedures for managing clay moisture levels, executing secure structural joins, carving integrated drainage channels, and applying durable waterproof sealants. Incorporating these techniques ensures that finished vessels maintain physical strength against moist potting soil while providing proper root aeration. By understanding how raw clay interacts with forming tools, drying environments, and protective coatings, makers can produce long-lasting containers suitable for desk greenery, window sills, or hanging displays. This resource provides the structural guidance and finishing advice required to transform basic modeling compound into functional, polished home accents that enhance contemporary plant styling with lasting visual appeal.
Modern Appeal and Creative Utility of Custom Planters
The widespread popularity of sculpted botanical vessels across modern design feeds stems from a growing appreciation for organic living accents and personalized living spaces. Mass-produced plastic nursery pots often lack aesthetic character and structural presence, driving home decorators toward tactile, artisan pottery that highlights natural warmth. For DIY creators, hand-building planters offers an accessible creative project with low barrier to entry and high practical utility. A single package of clay allows makers to build bespoke vessels that fit awkward window nooks or narrow display shelves where commercial pots rarely fit. The tactile engagement of manipulating earth-toned clay provides a restorative, mindful crafting rhythm that aligns with popular trending ideas celebrating slow living and handmade home decor. Furthermore, crafting customized planters empowers indoor gardeners to tailor vessel depths and root volumes to the specific horticultural needs of succulents, trailing vines, and tropical foliage. Because foundational hand-building relies on straightforward methods like rolling, cutting, and scoring, beginners can rapidly produce durable, visually balanced vessels that bring natural elegance to contemporary spaces.
Materials Selection, Studio Setup, and Preparation Principles
Achieving structurally sound, professional-quality planters requires disciplined material sourcing, organized studio setup, and thorough preliminary preparation. Beginners should select air-dry modeling clay with reinforced nylon fibers or premium oven-bake polymer clay, both of which allow home fabrication without an industrial pottery kiln. Essential shaping tools include a heavy acrylic rolling pin or wooden rolling dowel, canvas work mats, stainless steel scoring ribs, clay modeling knives, needle tools, and fine-grit sanding sponges. For assembly and protection, gather liquid clay slip, water spray misters, waterproof acrylic interior sealers, and self-adhesive felt surface pads. Prepare your work area by taping down an unprimed canvas mat over a flat, stable table to prevent wet clay from sticking to your work surface. Thoroughly knead and wedge your raw clay block to expel trapped air pockets that could otherwise cause structural cracks during the drying or baking phase. Utilize calibrated wooden guide sticks on either side of your roller to maintain uniform wall thicknesses between five and eight millimeters, establishing the structural durability required for reliable moisture-bearing containers.
1. Minimalist Terrazzo Mosaic Cylinder Pot

Step-by-Step Guide
The terrazzo mosaic cylinder planter translates mid-century composite stonework into a functional, clean-lined botanical container. This design features a smooth, straight-sided cylindrical base crafted from warm white or oatmeal clay, embedded with flat, colorful geometric clay chips. The contrasting mineral flecks—incorporating muted tones like burnt terracotta, forest green, mustard, and slate gray—create an engaging visual rhythm across the vessel surface. The flat, unadorned rim maintains a crisp contemporary profile that highlights delicate plant foliage, such as trailing string-of-hearts or miniature jade plants. Because the colored chips are rolled flush into the slab before assembly, the exterior surface remains smooth to the touch, resembling polished composite stone. This structured cylinder provides a balanced architectural accent for floating shelves, home office desks, and clean window sills.
Begin by rolling a slab of white air-dry or polymer clay across your canvas mat to a uniform thickness of six millimeters, using guide sticks to maintain consistent depth. Roll scrap clay in three contrasting colors into thin sheets measuring one millimeter thick, cutting them into small, irregular geometric fragments using a craft blade. Scatter these colored fragments across the main white clay slab, pressing them lightly into place with your fingertips. Place a sheet of parchment paper over the patterned slab and roll firmly with an acrylic pin until the colored chips are embedded flush with the white clay surface. Trim the slab into a clean rectangle measuring four inches high by twelve inches long, alongside a circular disc four inches in diameter for the base. Score the mating edges of the base disc and the rectangular wall with a needle tool, apply liquid slip, and wrap the wall around the circular base, burnishing the vertical seam flat with a wooden modeling tool. Allow the vessel to dry slowly away from direct heat for forty-eight hours, then seal the interior with three coats of water-resistant varnish.
2. Fluted Column Pedestal Planter

Setup Method
The fluted column pedestal planter takes inspiration from classical Greco-Roman architecture, using dimensional vertical ridges to create depth and shadow across a raised circular vessel. This design consists of a bowl-shaped planting cup elevated on a sturdy, narrower cylindrical pedestal, both wrapped in continuous vertical fluting. The repetitive parallel grooves catch natural room light, casting soft linear shadows that accentuate the planter’s handcrafted silhouette. Using a single monochromatic color—such as unglazed chalk white, warm limestone, or pale terracotta—keeps the focus on architectural form rather than surface coloration. This elevated design lifts small trailing plants, such as burro’s tail or creeping fig, allowing foliage to drape gracefully without crowding tabletop surfaces. Hand-carving or impressing straight linear grooves teaches makers valuable precision skills in measurement, spacing, and steady tool control.
Roll a conditioned clay slab to a seven-millimeter thickness, using a round template to cut out two circular bases and two rectangular wall panels for the upper bowl and lower pedestal. Construct the lower pedestal by wrapping a two-inch tall clay rectangle around a small circular base, blending the seam thoroughly from the inside. Build the wider upper planter bowl by wrapping a four-inch tall rectangle around the larger circular base, securing the join with scoring and liquid slip. Join the upper bowl securely atop the lower pedestal using cross-hatch scoring and firm downward pressure, blending the inner seam with a thin coil of clay. Create the fluted exterior texture by pressing a half-round wooden dowel or ceramic scoring tool vertically into the soft clay walls, working around the perimeter at quarter-inch intervals. Pierce a half-inch drainage hole through the center of both tiers using a brass hole cutter. Allow the assembled structure to cure completely, smoothing the outer ridges with fine sandpaper before applying a matte water-resistant sealer.
3. Scandi Organic Hanging Pod Vessel
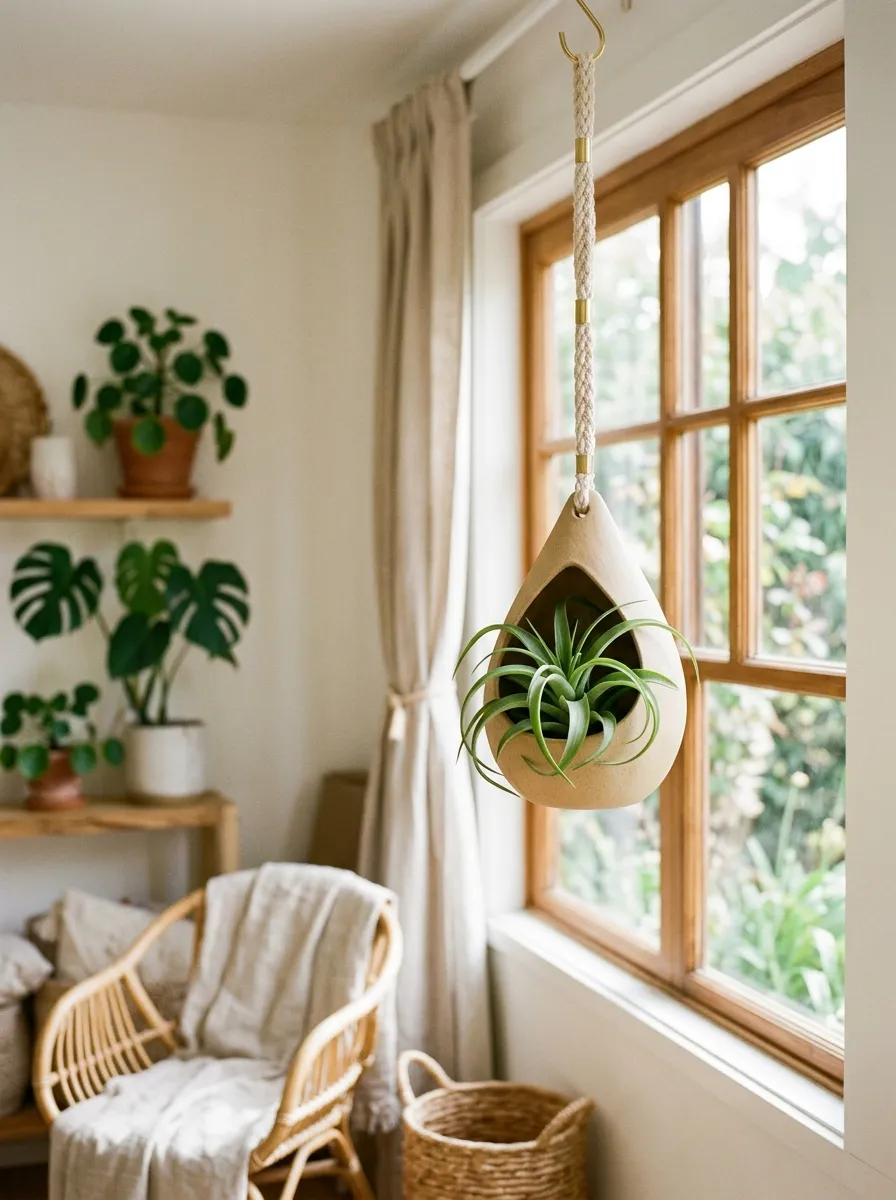
Execution Process
The Scandinavian hanging pod vessel blends organic, egg-shaped silhouettes with functional vertical storage, making it ideal for displaying trailing air plants or small succulents. This design features a gently tapered teardrop shape with a wide, scooped front opening that lets botanical foliage spill forward naturally. Suspended from natural braided cotton cords or vegetable-tanned leather thongs, this airborne vessel introduces living greenery into empty wall corners, window frames, and narrow architectural recesses. The smooth, unembellished exterior emphasizes gentle curves and organic asymmetry, bringing calm minimalist elegance into indoor settings. Because hanging planters rely on balance, maintaining uniform wall thickness is essential to ensure the vessel hangs level when filled with soil and root systems.
Shape a baseball-sized sphere of conditioned clay, holding it in the palm of your non-dominant hand while pressing your thumb deeply into the center to create an initial opening. Rotate the clay ball continuously in your palm, using your fingers to pinch the walls outward into an elongated, hollow egg shape with seven-millimeter thick walls. Use a flexible curved craft blade to slice an angled, oval opening into the front upper quadrant of the pod, creating a wide planting pocket. Smooth the cut rim with a damp sponge to eliminate sharp edges, checking that the base remains slightly weighted to keep the pod stable when suspended. Pierce two reinforced, aligned suspension holes on opposite sides of the upper rim using a thick wooden skewer. Allow the clay pod to dry thoroughly over three days, rotating it periodically to ensure even airflow. Sand the cured surface smooth, coat the interior with liquid rubber sealant, and thread natural cotton cord through the eyelets with knotted stopper loops.
4. Textured Bohemian Coil Basket Planter
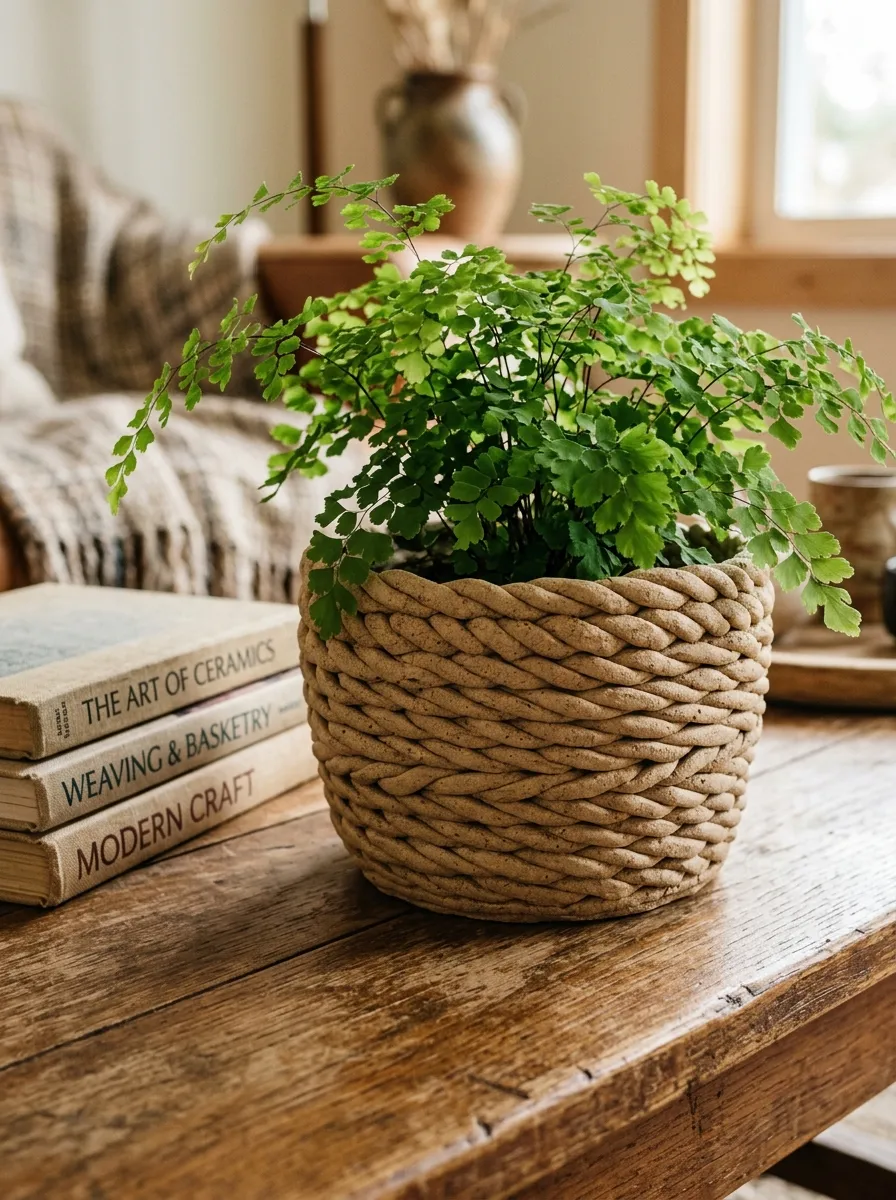
How to Make
The bohemian coil basket planter draws inspiration from traditional hand-woven baskets, using visible clay coils to create a rich, tactile surface. Rather than smoothing the exterior walls flat, this technique leaves round clay ropes exposed, forming a tiered, ribbed texture that resembles coiled rope or rush basketry. The natural grooves between stacked coils create horizontal lines that catch ambient light, adding warm, tactile interest to side tables and plant stands. This design works exceptionally well with leafy tropical foliage, such as calatheas, ferns, or fittonias, balancing lush green leaves with earthy, rustic clay work. Constructing stacked coil vessels helps beginners develop steady hand pressure, consistent rolling technique, and a solid understanding of structural clay seams.
Roll out a flat clay slab to an eight-millimeter thickness and cut a circular disc five inches in diameter to serve as the structural floor of the planter. Extrude or hand-roll multiple uniform clay coils measuring ten millimeters in diameter and sixteen inches in length, keeping spare coils covered under a damp towel to prevent premature drying. Score the outer perimeter of the base disc, apply a thin line of clay slip, and press the first coil firmly around the edge, trimming the ends at a diagonal angle to create a flush splice. Stack subsequent coils directly on top of the first ring, pressing downward with gentle, even pressure to ensure a secure bond between layers. Use a wooden modeling rib along the interior wall to blend the coils together into a smooth, waterproof structural surface, while leaving the exterior coils rounded and exposed. Continue building upward until the vessel reaches five inches in height, then carve a drainage hole through the base before leaving the pot to dry slowly.
5. Architectural Geometric Faceted Pot
Step-by-Step Guide
The geometric faceted planter merges modern polygon aesthetics with practical botanical housing, showcasing flat, angular planes that catch room lighting from multiple angles. Rather than displaying rounded contours, the exterior features triangular and diamond-shaped facets that form a dynamic, chiseled silhouette reminiscent of cut gemstones or origami papercraft. This sculptural design suits modern minimalist living rooms, urban lofts, and contemporary office spaces, bringing sharp geometric lines to tabletop displays. It pairs particularly well with upright, architectural plants like snake plants, haworthias, and small columnar cacti. Crafting clean facets requires intentional knife work and a good eye for spatial balance, challenging makers to create flat, crisp planes without crushing the hollow chamber inside.
Begin by rolling conditioned clay into a dense, solid block measuring approximately five inches on all sides, gently tapping each face against your work table to square the corners. Allow the clay block to rest uncovered for three hours until it reaches a firm, leather-hard consistency that holds its shape under gentle handling. Using a long, rigid stainless steel tissue blade, slice away clean diagonal planes from the corners and edges, cutting angled triangular and trapezoidal facets around the exterior. Hollow out the interior planting chamber by scooping clay out from the top using a curved loop tool, leaving uniform eight-millimeter thick walls behind the cut exterior facets. Smooth the interior basin with a damp sponge, checking that the bottom floor sits flat and stable on tabletop surfaces. Cut a central half-inch drainage hole through the base using a circular cutter. Let the faceted vessel cure fully before wet-sanding the planar edges with 400-grit sandpaper, finishing with a matte stone-effect sealer.
6. Raw Textured Sandstone Footed Bowl

Setup Method
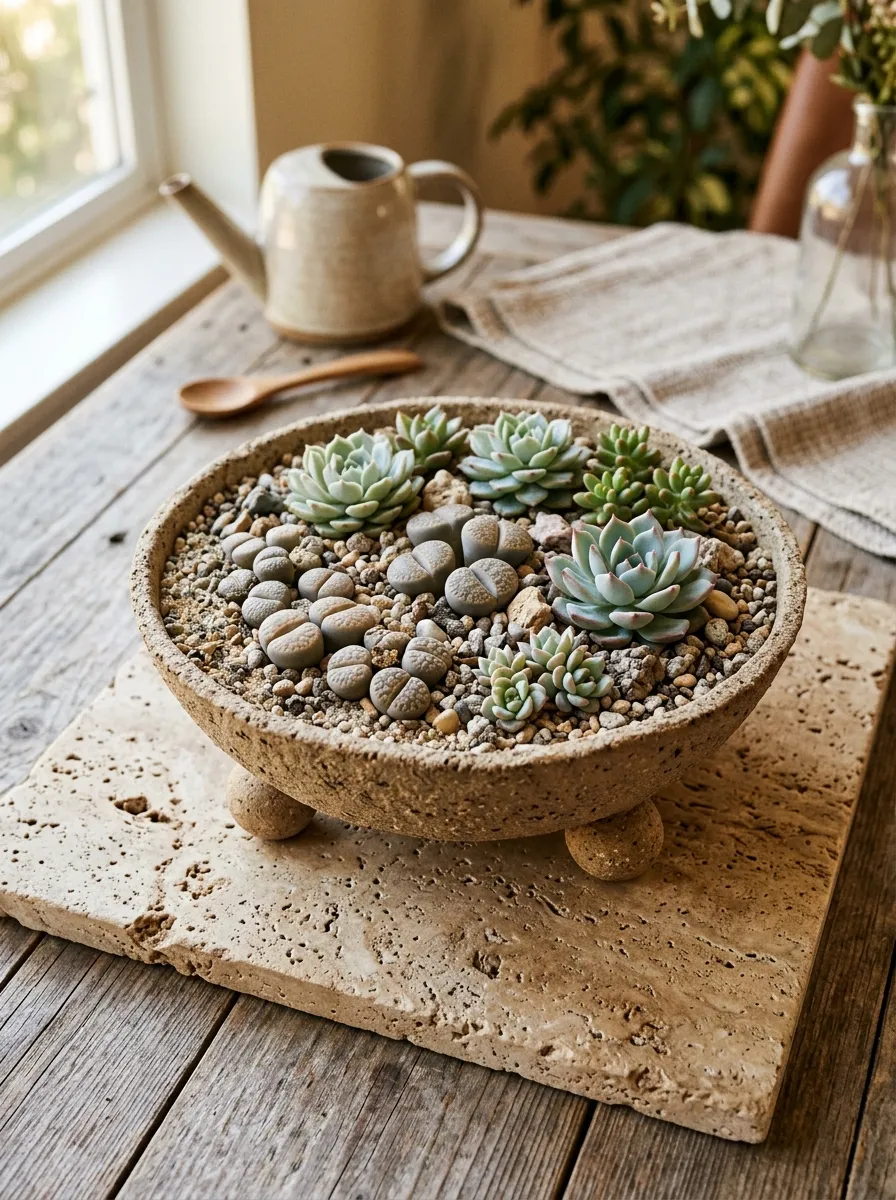
The raw sandstone footed bowl balances earthy organic textures with an elevated, low-profile profile, creating a grounded centerpiece for coffee tables and dining room credenzas. This wide, shallow vessel rests atop three small spherical clay feet, lifting the container slightly to cast soft shadows across the table linen below. The surface features a coarse, weathered stone finish achieved by blending gritty sand or fine pumice into the clay body before shaping. The soft, neutral stone color pairs beautifully with desert flora, such as flat succulent arrangements, clustering pincushion cacti, or living stone lithops. Elevating the wide bowl on small tripod feet protects furniture surfaces from trapped moisture while adding an elegant, handcrafted feel to modern organic interiors.
Knead two tablespoons of coarse silica sand or crushed granite dust into a two-pound block of gray or buff modeling clay until the minerals are distributed evenly throughout. Roll the textured clay into a seven-millimeter slab and gently press it into a shallow round kitchen bowl lined with plastic wrap to form a smooth, curved basin. Trim the clay rim cleanly along the bowl edge with a craft scalpel, smoothing the edge with a damp fingertip to create a soft, rounded lip. Roll three identical clay spheres measuring one inch in diameter to serve as tripod feet, flattening the top and bottom of each sphere slightly. Score the base of the shaped clay bowl and the tops of the three feet, join them in an equilateral triangle with liquid slip, and blend the seams securely with a modeling tool. Allow the vessel to firm up inside the mold for twelve hours before lifting it out. Once fully cured, brush the exterior with a stiff wire brush to expose the rough stone grit.
7. Botanical Leaf Relief Cylinder

How to Make
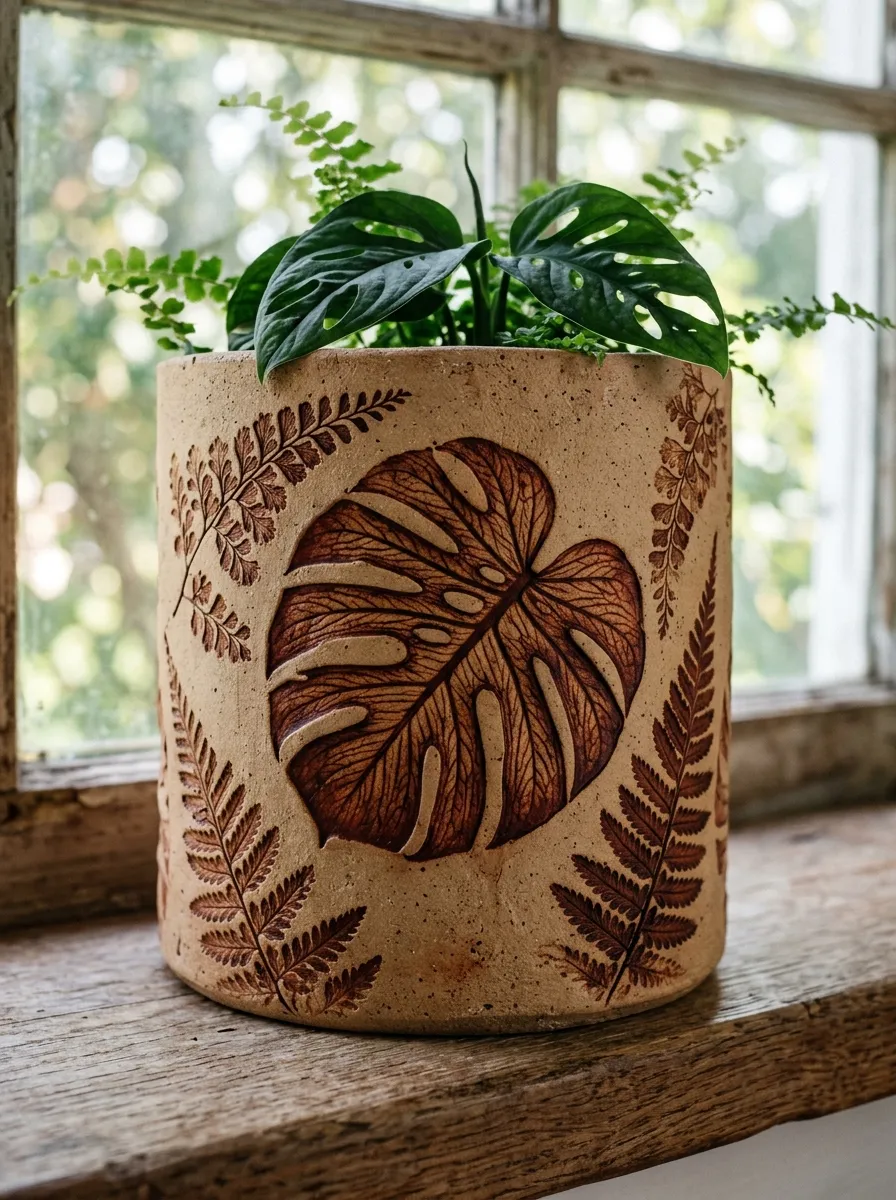
The botanical leaf relief cylinder captures the delicate textures of garden foliage, using nature pressings to create raised, organic patterns across the clay surface. Fresh, deeply veined leaves—such as monstera, maidenhair fern fronds, or scented geranium foliage—are pressed into pliable clay slabs to transfer realistic natural imprints. Washing the cured impressions with diluted earth-toned paints accentuates every delicate vein, creating a rich fossilized appearance. The simple cylindrical shape keeps the focus on the natural textures, making it a versatile decorative piece for nature lovers, rustic bookshelves, and bright kitchen window sills. This accessible printing method allows beginners to achieve intricate, lifelike botanical patterns without needing advanced freehand sculpting skills.
Roll a conditioned slab of light-toned clay to an even six-millimeter thickness on a canvas mat, trimming it into a rectangle measuring five inches high by fourteen inches long. Gather fresh, deeply veined botanical leaves, arranging them face-down across the moist clay surface in a balanced, cascading composition. Lay a sheet of parchment paper over the leaves, using an acrylic rolling pin with firm, even pressure to press the foliage deep into the pliable clay. Carefully peel the leaves away with fine tweezers to reveal the crisp, detailed impressions beneath. Score the short ends of the rectangular slab, form it into a cylinder around an empty glass jar wrapped in wax paper, and blend the internal seam with a modeling tool. Attach a matching circular base disc to the bottom using scoring and liquid slip, then remove the glass jar guide. Let the cylinder dry slowly, then wash the exterior with diluted burnt umber acrylic paint, wiping away surface paint with a damp sponge to leave color in the leaf veins.
8. Mid-Century Modern Arc Foot Planter
Execution Process
The mid-century arc foot planter reimagines iconic 1950s interior pottery, supporting a clean cylindrical pot on two intersecting, curved clay arches. This elevated design lifts the planting vessel two inches above table surfaces, creating negative space underneath that makes the arrangement feel light and airy. The smooth, untextured finish and clean geometric lines fit comfortably alongside walnut sideboards, vintage teak shelving, and minimalist Scandinavian furnishings. Pairing this raised stand with upright, broad-leaf plants—such as rubber trees or snake plants—creates a balanced, proportionate display that looks intentional and refined. Constructing the intersecting arched base challenges makers to cut accurate joinery notches, helping them build spatial awareness and woodworking-style clay fabrication skills.
Roll a six-millimeter clay slab, cutting out a four-inch by thirteen-inch wall rectangle and a four-inch circular disc to build the main cylindrical pot. Assemble the cylinder by joining the wall around the circular base with scoring and slip, smoothing the exterior seams flat with a flexible metal rib. To build the base, roll an eight-millimeter thick slab and cut two matching rectangular bridge pieces measuring two inches high by four inches wide. Cut a half-circle arch out of the bottom edge of each bridge piece, then cut a vertical half-depth slot into the center of both pieces to form a half-lap cross joint. Slide the two arched pieces together at their center slots to form a stable four-legged cross stand, securing the joint with liquid slip. Score the top of the cross stand and the bottom of the cylindrical pot, joining the two components firmly with liquid slip. Allow the complete unit to dry slowly under loose plastic wrap to prevent the joints from cracking.
9. Minimalist Two-Tone Dip Basin

Step-by-Step Guide
The two-tone dip basin combines clean geometric colorblocking with simple hand-built forms, creating an eye-catching, modern container for small houseplants. This design features a low, wide circular bowl where the upper half retains the natural, matte texture of raw clay, while the lower section is coated in a glossy, high-contrast hue like deep terracotta, matte black, or forest green. The sharp horizontal division between raw and finished surfaces adds visual balance and modern sophistication to simple desktop displays. This wide, shallow basin works particularly well for small clustering succulents, creeping herbs, or button ferns. Masking and painting cured clay helps beginners practice applying clean, crisp color boundaries without messy edges.
Form a wide, shallow bowl by rolling a seven-millimeter clay slab into a circular mold or shaping a flat-bottomed pinch pot to four inches in diameter and three inches in height. Smooth the interior and exterior walls using a damp finishing sponge, making sure the rim remains level and parallel to your work surface. Cut a clean half-inch drainage hole through the base using a small brass cutter. Allow the pot to dry completely over forty-eight hours, rotating it occasionally for balanced airflow, then sand the entire surface smooth with 600-grit wet sandpaper. Wrap a strip of low-tack painter’s tape horizontally around the exact midpoint of the dried vessel, pressing the tape edge down firmly to prevent paint bleed. Apply two coats of water-based gloss acrylic paint or ceramic enamel to the lower exposed half, allowing the paint to cure fully before peeling the tape away. Seal the entire inner basin with clear waterproof masonry sealer to protect the clay against moisture from potting soil.
10. Stacked Modernist Ring Totem Planter
Setup Method
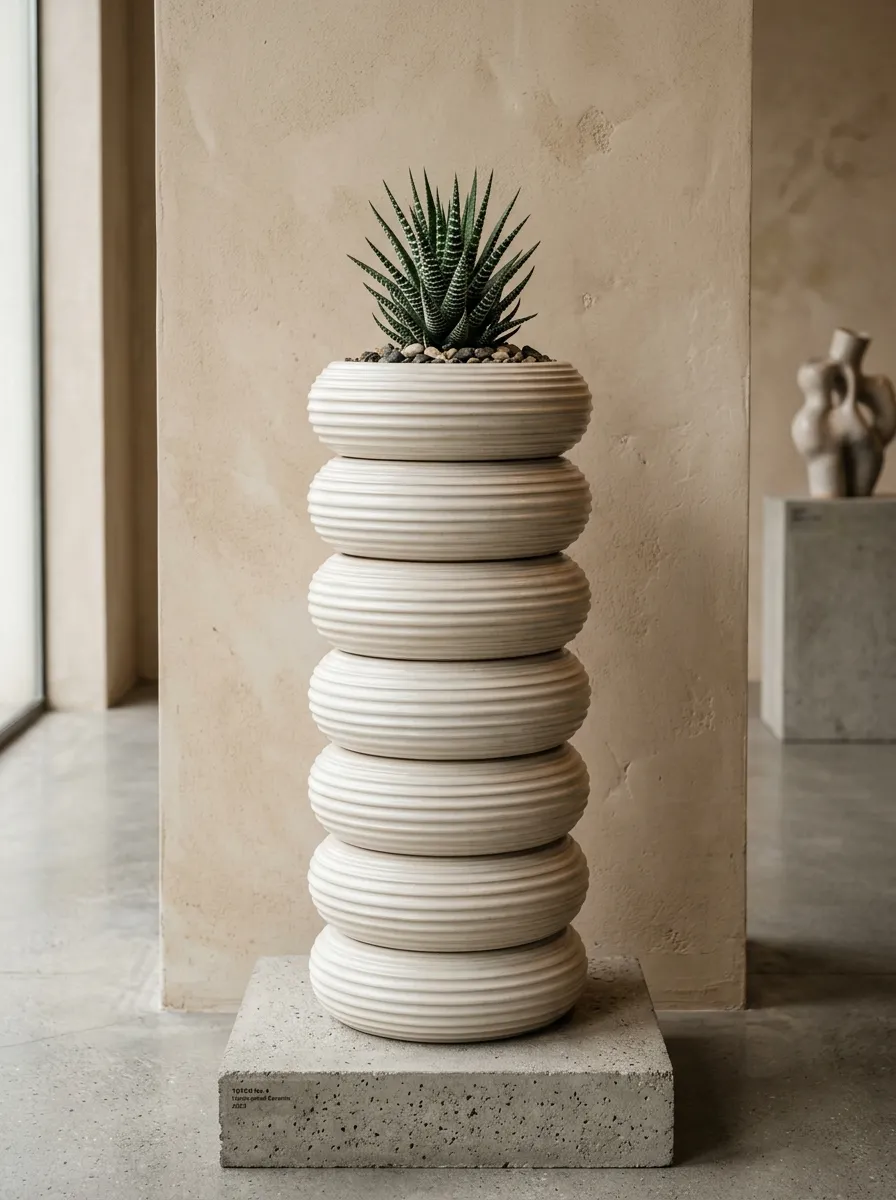
The stacked modernist ring totem planter draws inspiration from contemporary abstract sculpture, stacking hollow geometric rings to form an eye-catching, tall container. This design stacks distinct round toroidal rings of graduated diameters, creating a sculptural, ribbed silhouette reminiscent of art gallery ceramics. The rhythmic horizontal ridges catch room light, adding playful, architectural dimension to minimalist desks, open shelving, and plant stands. Executed in a calm, monochromatic tone—such as matte bone white, warm sandstone, or soft slate—the planter stands as a piece of art even before adding a houseplant. Building hollow stacked rings teaches makers advanced coil manipulation and careful weight distribution, ensuring the tall structure remains stable when filled with soil.
Hand-roll six thick, uniform clay coils measuring fifteen millimeters in diameter, curving each coil into a closed circular ring with smooth, blended end joints. Flatten the top and bottom of each clay ring slightly by pressing it gently against a flat table, ensuring the mating surfaces sit flush with one another. Cut a circular clay disc five inches across to serve as the planter floor, scoring the outer margin and securing the first clay ring with liquid slip. Stack the remaining five rings on top of one another, scoring each mating surface and blending the interior seams together with a wooden tool while leaving the exterior rounded ridges distinct. Lightly paddle the exterior walls with a flat wooden ruler to ensure the stacked silhouette rises straight and vertical without leaning. Cut a central drainage hole through the bottom floor with a circular tube cutter. Let the tall totem dry slowly under a plastic sheet for three days to prevent uneven shrinkage, then sand and seal the cured vessel with a waterproof matte finish.
Common Beginner Mistakes and How to Avoid Them
Hand-building functional clay planters requires avoiding several common crafting and curing pitfalls to ensure your finished vessels last. A frequent mistake among beginners is rolling clay walls too thin, producing fragile containers that easily crack under the weight of wet potting soil. Always maintain a consistent wall thickness of six to eight millimeters for small and medium planters, using calibrated depth guides during rolling to prevent weak spots. Another common issue is failing to score and slip joining seams properly; simply pressing wet clay edges together without cross-hatching will cause seams to split apart as the clay shrinks during drying. Always score mating surfaces thoroughly with a needle tool and apply liquid slip before joining parts together. Additionally, drying clay vessels too quickly in warm, sunny spots can cause warping, base separation, and hairline surface cracks. Dry your pieces slowly away from direct sunlight, covering them loosely with plastic wrap for the first twenty-four hours to ensure balanced, even moisture evaporation. Finally, never plant directly into raw, unsealed air-dry clay; always apply three coats of water-resistant acrylic varnish or liquid rubber sealant to the interior to prevent moisture from softening the pot walls.
Practical Tips for Better Results
Applying thoughtful workshop habits and finishing techniques will elevate your handmade planters from simple crafts to polished, professional-grade vessels. Keep a small spray mister filled with clean water nearby to lightly hydrate clay surfaces as you work, preventing surface cracks from forming along bent corners and rolled coils. When cutting slabs, hold your craft knife at a ninety-degree angle against a metal ruler to guarantee crisp, square edges that align cleanly during assembly. Smooth away finger marks and small imperfections with a damp, high-density cosmetic sponge while the clay is still pliable, significantly reducing the amount of post-dry sanding needed later. When creating drainage holes, cut the opening from the inside out to prevent the clay base from warping downward onto your work surface. Finally, place four small, self-adhesive silicone or felt pads onto the bottom of the cured planter; these pads lift the vessel slightly, allowing air to circulate beneath the drainage hole while protecting delicate wooden tabletops from accidental scratches and moisture rings.
Styling, Presentation, or Organization Ideas
Thoughtful styling and intentional presentation turn handcrafted clay planters into cohesive home decor accents that highlight your indoor greenery. Group three planters of varying heights and matching earth-toned finishes together on an entryway console or open shelving unit to create a balanced, organic vignette. Pair the soft, matte texture of raw clay with trailing foliage—such as English ivy, pothos, or string-of-pearls—allowing the green vines to drape over sculptural rims for an appealing contrast of leaf and stone. On modern work desks or minimalist sideboards, display a single architectural faceted planter alongside clean stationery, brass desk lamps, and linen-bound books to create an uncluttered, focused workspace. If presenting a handmade planter as a personalized gift, pot the vessel with an easy-care houseplant like a zebra haworthia or heartleaf philodendron, tucking a handwritten botanical care card into the soil. Organizing your finished containers into cohesive seasonal collections—such as warm desert terracottas, cool Nordic grays, or textured bohemian whites—creates a harmonious home aesthetic that celebrates artisan craftsmanship and mindful plant living.
Budget or Time Planning
Careful project scheduling and smart material sourcing make crafting handmade clay planters both economical and deeply satisfying. A standard ten-pound block of air-dry modeling clay provides enough material to build four to six small-to-medium planters, keeping your average production cost remarkably low compared to buying store pottery. Maximize your budget by repurposing common household items as shaping tools; use empty soup cans as circular cylinder molds, plastic bowls as curve forms, and wooden kitchen skewers as needle tools. Plan your crafting time across distinct, manageable stages: dedicate one afternoon to rolling, shaping, and assembling your vessels, allow forty-eight to seventy-two hours for slow, even drying, and reserve a final morning for sanding, painting, and applying waterproof sealers. Grouping tasks together—such as cutting multiple base discs or sealing several dry vessels at once—streamlines your workflow and keeps your studio tidy. This organized timeline prevents assembly rush, ensures proper clay curing, and results in durable, well-finished planters ready to house your favorite plants.
Creative Expansion and Advanced Inspiration
Once you master basic slab construction and simple coil shaping, you can explore exciting new ways to expand your planter projects. Experiment with tinted clay bodies by kneading powdered mineral pigments, iron oxides, or acrylic paints directly into raw clay before rolling, creating layered marbling and subtle color swirls. Try incorporating mixed-media elements by embedding natural wooden dowel legs, woven rattan rims, or raw brass hanging rings into your designs, creating elevated artisan pieces that bridge pottery and furniture craft. You can also explore functional variations by crafting matching drip saucers with integrated pour spouts, self-watering wick basins, or modular wall-mounted pocket planters that turn blank walls into vertical living gardens. Seasonal collections offer another wonderful avenue for creative growth: explore warm, fluted terracotta urns for autumn tables, or smooth white Scandinavian vessels for bright spring window sills. These varied avenues for creative customization let you build an expressive, ever-evolving portfolio of handcrafted ceramics that highlights your technical growth and individual aesthetic vision.
Leave a Reply