

Paper crafting serves as an accessible, highly expressive medium that bridges functional home enhancement with hands-on artistic design. Transforming flat sheets of cardstock, parchment, or tissue into three-dimensional structures allows makers to explore structural geometry, tactile textures, and balanced color palettes without substantial financial investment. This complete guide provides readers with ten distinct, charming paper craft projects designed to enhance indoor living spaces, elevate tabletop arrangements, and introduce functional desk organization. Throughout this comprehensive text, you will learn the precise mechanical steps needed to fold dimensional ornaments, cut intricate botanical garlands, shape sculptural display vessels, and construct modular storage containers. The instructional value lies in demystifying paper manipulation techniques, detailing exact grain alignment, scoring protocols, and optimal adhesive choices. By understanding how paper density, fiber direction, and adhesive chemistry interact, crafters can achieve clean, durable results on their very first attempt. Whether you seek to construct architectural paper plant sleeves, create hanging geometric lanterns, or assemble delicate quilled coasters, these projects transform standard stationery into purposeful household artifacts. Each tutorial delivers practical, repeatable procedures that equip both novice makers and experienced artisans with reliable structural skills.
+-------------------------------------------------------+
|  PAPER CRAFTING STRUCTURAL MATRIX                     |
|                                                       |
|   Paper Density: 65 lb text to 110 lb cover cardstock |
|   Creasing Axis: Scored strictly along grain fiber    |
|   Bonding Medium: Acid-free PVA or dry transfer tape  |
|   Cutting Plane: Self-healing mat with rotary / blade |
+-------------------------------------------------------+
Why This Idea Is Trending or Useful
Contemporary Pinterest ideas focusing on paper crafts highlight a growing preference for sustainable, biodegradable materials that replace mass-produced plastic decorations with personalized handmade decor. Modern design trends prioritize organic forms, clean geometric angles, and minimalist style accents that add visual warmth to interior environments without introducing heavy clutter. The practical value of working with paper stems from its broad accessibility, minimal storage requirements, and immediate adaptability to various aesthetic themes, from Scandinavian minimalism to whimsical cottage-inspired interiors. For beginners exploring creative outlets, paper crafts offer an encouraging, beginner friendly foundation that requires no expensive power tools or dedicated workshop space. A standard dining table provides adequate room to score, fold, and assemble complex decorative structures with ease. The widespread appeal of DIY paper projects also reflects an increased interest in mindful, screen-free activities that produce functional, tangible objects. Because paper remains one of the most versatile and cost-effective mediums available, mastering these techniques allows individuals to execute seasonal room updates, design thoughtful party decor, and produce custom gifts entirely on a modest budget.
Materials and Preparation
Achieving precise, professional results in paper construction requires gathering the correct foundational materials and understanding how paper behaves under mechanical stress before making your first cut. Essential materials include eighty-pound to one-hundred-ten-pound cardstock for structural items, Italian heavy crepe paper for organic florals, double-sided decorative origami sheets, and acid-free polyvinyl acetate adhesive. Your core toolkit must contain a self-healing rotary cutting mat, a stainless steel ruler with a non-slip cork backing, a precision craft knife, a dual-tip bone folder, and low-tack painter tape for temporary positioning. Preparation begins with testing the grain direction of your paper stock, which is determined by gently bending the sheet horizontally and vertically to identify the axis of least resistance. Scoring along the natural grain line produces crisp, sharp folds without cracking the outer surface sizing or exposing interior paper fibers. Clear your workspace completely of dust, pencil shavings, and adhesive residue to keep your paper pristine throughout the process. Taking time to measure components accurately and organize your adhesive applicators ensures a controlled workflow, prevents material warping, and delivers crisp, professional results.
1. Dimensional Folded Paper Honeycomb Ornaments
Execution Process
Dimensional honeycomb ornaments utilize repeating symmetrical paper layers joined at alternating anchor points to produce an expandable, three-dimensional sphere. This design relies on structural tissue paper or medium-weight text paper cut into uniform semicircular profiles. When the aligned leaves are glued in a staggered alternating sequence, opening the combined assembly produces an intricate grid of diamond-shaped open cells that interact dynamically with ambient room lighting. These sculptural spheres function exceptionally well as hanging holiday accents, festive party installations, or permanent minimalist mobile elements suspended from nursery ceilings. The visual charm comes from the delicate, repeating paper cells that expand smoothly into a continuous, symmetrical orb without requiring internal wire framing or synthetic stiffeners.
To construct these geometric ornaments, trace and cut forty identical semicircular paper leaves measuring four inches in diameter from seventy-pound text-weight paper. Lay down a gridded alignment guide marked with alternating glue lines spaced precisely one inch apart across the horizontal plane. Apply thin, controlled lines of acid-free liquid glue along lines one, three, and five on the first leaf, then press the second leaf firmly on top. On the second leaf, apply glue lines along lines two and four before placing the third leaf down. Continue this alternating bonding sequence until all forty sheets form a consolidated stack, clamping the assembly under a heavy book for thirty minutes to ensure full adhesion. Glue rigid cardstock half-circles to the front and back covers, insert a looped hanging cord along the straight spine, and gently pull the outer covers around three hundred sixty degrees to unfurl the spherical ornament, securing the end panels with magnetic tape closures.

2. Botanical Crepe Paper Ranunculus Stems
Step-by-Step Guide
Botanical crepe paper ranunculus flowers replicate the delicate petal architecture of fresh garden blooms using layered, cup-shaped paper petals wrapped around a firm center core. Heavyweight Italian crepe paper provides unique mechanical elasticity, allowing crafters to stretch, flute, and sculpt each individual petal into realistic, organic curves that hold their three-dimensional form indefinitely. Arranged in ceramic vases or combined into seasonal floral centerpieces, these handmade paper stems provide everlasting floral elegance for desks, mantels, and dining tables without wilting. The multi-tiered petal arrangement creates depth, as light filters through the outer translucent edges while settling into the deeply shaded interior core.
       .-''''-.
     .'  ~~~~  '.      <- Fluted Crepe Petals
    /   ======   \
   |   / \  / \   |
   |   \  \/  /   |    <- Shaped Spherical Calyx
    \   `----'   /
     '. ====== .'      <- 18-Gauge Floral Wire Stem
       `'----'`        <- Stretched Green Floral Tape
Begin by cutting a three-inch square of olive-green crepe paper, stretching it tightly around a one-inch compressed cotton craft ball, and twisting the bottom securely around an eighteen-gauge cloth-wrapped floral wire to establish the central ovary. Cut thirty small teardrop-shaped inner petals and forty-five larger rounded outer petals from blush-pink or cream ninety-gram crepe paper, ensuring the vertical paper grain runs parallel to the length of each petal. Cupping each petal between your thumbs and forefingers, gently pull outward across the center to create a hollowed bowl shape, while curling the top rim backward over a bone folder. Using a hot glue gun set to low temperature, attach the small petals in overlapping concentric tiers around the paper center, progressively transitioning to the larger cupped petals until a dense, rounded flower head forms. Finish by wrapping light-green floral tape down the wire stem, incorporating small paper calyx leaves at the flower base.

3. Geometric Kirigami Hanging Lantern Shades
How to Create
Geometric kirigami lantern shades integrate systematic paper cutting and creasing techniques to transform a flat sheet of cardstock into an expandable architectural lampshade for LED pendant lights. The design employs alternating offset parallel slits cut across a cylindrical or conical paper framework, enabling the paper to stretch downward under gravity to form an open, ventilated lattice. When placed over cool LED light sources, the faceted geometric apertures cast striking linear shadows across adjacent walls and ceilings, establishing an atmospheric focal point within modern living spaces. This lighting accessory embodies minimalist aesthetic principles, showcasing how deliberate incisions turn humble cardstock into dynamic architectural decor.
+-------------------------------------------------------+
|  KIRIGAMI LANTERN BLUEPRINT                           |
|                                                       |
|   Upper Collar: 1-inch solid structural cardstock rim |
|   Lattice Core: Alternating 2-inch horizontal slits   |
|   Lower Collar: Weighted retention ring for drop form |
|   Core Chamber: Compatible strictly with cool LED puck|
+-------------------------------------------------------+
To fabricate the lantern shade, cut a rectangular panel of eighty-pound matte white cardstock measuring twelve inches in height by twenty-four inches in width. Using a steel ruler and an embossing stylus, score horizontal guide lines spaced one-half inch apart down the full length of the paper sheet. Using a precision craft knife, make alternating two-inch parallel cuts along these score lines, leaving a solid one-inch un-slit border along the top and bottom margins to maintain structural integrity. Gently roll the sheet into a vertical cylinder, overlapping the short vertical edges by one-half inch, and bond the seam using heavy-duty double-sided acrylic tape. Attach an interior cardstock collar to the top opening to secure an LED cord fixture safely, allowing the weight of the bottom rim to expand the cut lattice into a modern, diamond-patterned hanging lantern.

4. Layered Papercut Shadow Box Landscapes
Setup Method
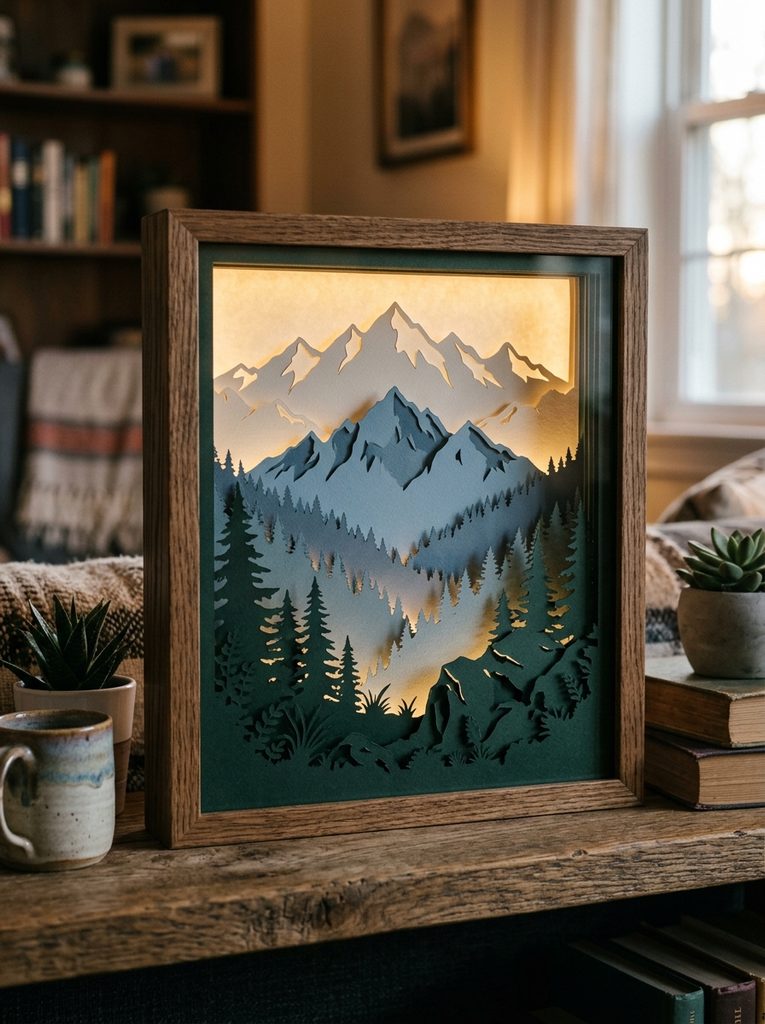
Layered papercut shadow boxes utilize several individual panels of precision-cut cardstock set at progressive depths to create an atmospheric, three-dimensional landscape or architectural scene. Each layer features silhouetted elements, such as mountain ridges, dense forest canopies, or urban skylines, that are cut away to reveal scenic details situated behind them. Spacers hidden between adjacent panels separate the paper sheets by several millimeters, producing natural shadow gradients that give the compact wooden display box remarkable visual depth. Positioned on an open bookshelf or mounted upon a bedroom wall, these illuminated paper vistas serve as modern design accents that celebrate traditional narrative paper-cutting arts.
        .---.
      .'     '.    <- Recessed Outer Box Frame
     /  |  \   \
    | [Layer 1] |  <- Foreground Silhouette Canopy
    | [Layer 2] |  <- Midground Mountain Ridge
     \_______'-'   <- Foam Core Structural Spacers
Select five sheets of heavy one-hundred-pound smooth white cardstock trimmed to match the interior dimensions of an eight-by-ten-inch deep shadow box frame. Sketch or print a progressive landscape design, reserving the lowest foreground details for sheet one, rolling hills for sheets two and three, and the distant horizon for sheet four, leaving sheet five solid to serve as the background sky. Cut out the silhouette sections using a fresh precision craft knife blade, working steadily on a self-healing mat to keep edges crisp and free of tears. Cut foam-core board into narrow quarter-inch perimeter strips to serve as hidden spacers, adhering them around the outer edges between each sequential cardstock layer with liquid glue. Insert the assembled stack into the shadow box frame, sealing the rear panel firmly to keep the dimensional paper layers aligned.
5. Quilled Modular Paper Snowflake Coasters
How to Make
Quilled paper snowflake coasters use tightly rolled and shaped strips of acid-free paper joined along geometric axes to form sturdy, decorative bases for tabletops. Paper quilling involves winding narrow paper filaments around a slotted metal needle, releasing the tension slightly, and pinching the resulting coils into teardrop, marquise, and diamond shapes. When multiple uniform quilled modules are glued together in a six-fold symmetrical radial pattern, the combined structure demonstrates surprising compression strength along its vertical edges. Sealed with a clear protective glaze, these intricate filigree coasters protect tabletop surfaces from condensation while showcasing detailed artisan craftsmanship.
+-------------------------------------------------------+
|  QUILLED MODULE GEOMETRY MATRIX                       |
|                                                       |
|   Center Hub: Solid tight circular coiled core        |
|   Spoke Tier: 6 symmetrical pinched marquise coils    |
|   Outer Ring: 12 interconnected teardrop modules      |
|   Protective Top: Water-resistant polymer glaze seal  |
+-------------------------------------------------------+
Cut sixty strips of heavy white or silver-gray paper measuring one-eighth of an inch in width by twelve inches in length using a rotary paper trimmer. Insert the end of a paper strip into a slotted quilling tool and rotate the tool to form a compact, circular disc, gluing the outer tip to create a central core ring. Wind twelve additional strips into loose coils using a plastic circle sizing guide, pinching the opposing edges of each circle with your fingertips to shape them into symmetrical marquise petals. Glue six marquise petals evenly around the perimeter of the center ring, then seat the remaining six petals in the outer valleys between the initial ring spokes. Apply an even coat of water-based clear polyurethane or decoupage sealant across the finished snowflake with a soft brush, allowing it to cure for twenty-four hours to make the coaster durable and water-resistant.

6. Accordion Pleated Paper Wall Rosettes
Execution Process
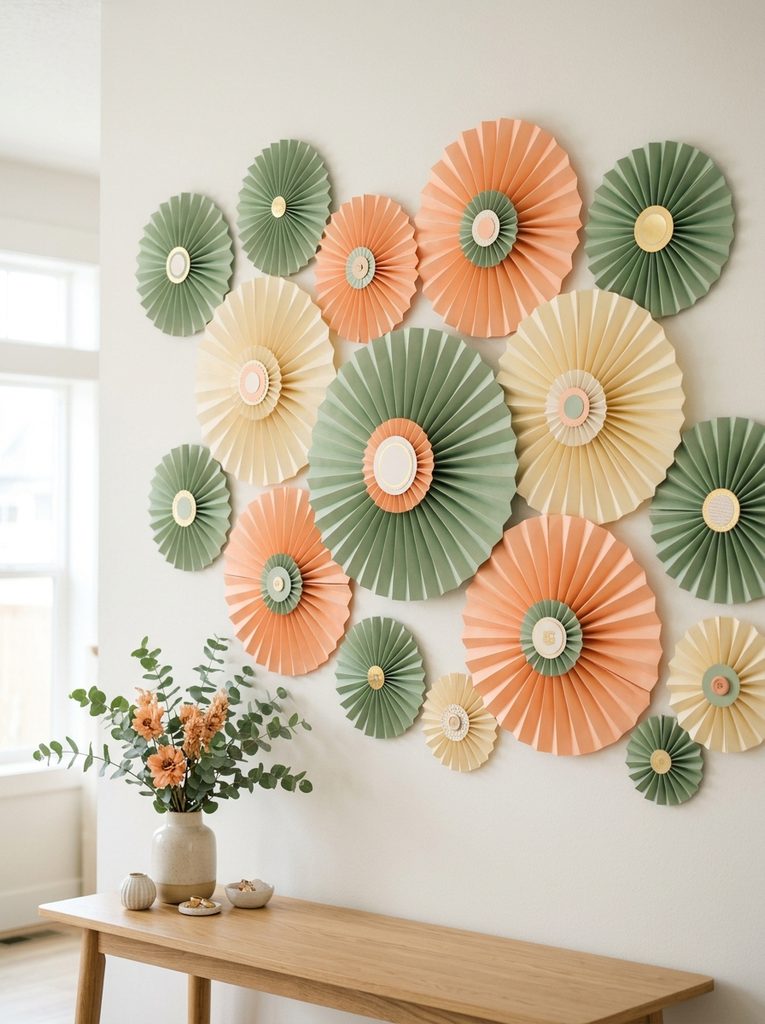
Accordion-pleated paper wall rosettes are striking circular medallions created by fan-folding strips of colorful decorative paper and joining the ends into a dimensional wheel. The crisp repeating folds catch direct and ambient room light, creating dynamic ridges and valleys across the paper face. When grouped in clusters of varying diameters and complementary hues, these rosettes turn blank accent walls into engaging gallery displays suitable for celebratory events or permanent studio styling. The strength of the design comes from its straightforward geometric construction, transforming standard flat cardstock into rigid, three-dimensional decorative wheels that mount flush against vertical wall surfaces.
      /\__/\      <- Uniform Knife Pleat Ridges
     /  ..  \
    (  <  >  )    <- Central Structural Reinforcement Disc
     \  --  /
      '----'      <- 360-Degree Circular Wheel Base
To create an eight-inch rosette, cut three matching strips of sixty-five-pound decorative paper measuring four inches in width by twelve inches in length. Place each strip on a scoring board and score crisp vertical lines every half-inch along the full length of the paper. Fold each scored strip into an accordion pattern, alternating between mountain and valley folds while pressing the creases flat with a smooth bone folder. Join the short ends of the three pleated strips together using narrow strips of strong double-sided tape, forming a continuous pleated cylinder. Press the upper edge of the pleated ring downward toward the center to flatten the structure into a round disc, securing the center point on both the front and back using a hot glue gun and a two-inch cardstock reinforcement circle.
7. Origami Desktop Geometric Storage Trays
Step-by-Step Guide
Origami desktop storage trays use traditional geometric paper-folding formulas to convert single square sheets of heavyweight craft paper into durable, compartmentalized desktop organizers. By executing sequential valley folds, corner squash folds, and locked side walls, the paper gains structural rigidity along its perimeter without requiring adhesive seams or mechanical fasteners. These versatile paper trays sit neatly inside desk drawers or atop workbenches, holding paperclips, binder clips, erasers, and delicate jewelry components in tidy order. Using heavyweight double-faced origami sheets or archival cardstock guarantees that the trays maintain their upright rectangular walls during daily office use.
+-------------------------------------------------------+
|  ORIGAMI TRAY PROPORTIONS                             |
|                                                       |
|   Paper Stock: 10x10 inch 90 lb double-faced cardstock|
|   Base Area: 5x5 inch reinforced square floor         |
|   Wall Height: 2.5-inch vertical double-fold walls    |
|   Corner Joins: Self-locking triangular pocket flaps  |
+-------------------------------------------------------+
Begin with a ten-by-ten-inch square sheet of heavy double-sided paper, placing the pattern side facing down on your cutting mat. Fold the paper in half along both diagonals, creasing sharply with a bone folder, and unfold to expose an X-shaped crease guide. Fold all four outer corners inward so their points meet at the exact center intersection, creating a smaller, reinforced square shape known as a blintz fold. Fold the top and bottom edges inward to meet at the center vertical axis, crease firmly, and unfold them; repeat this step with the left and right edges to establish wall boundaries. Unfold two opposing corner triangles, stand the remaining side walls upright at ninety degrees, and fold the top corner tabs inward over the diagonal wall corners, locking the flaps securely into the base of the tray.

8. Sculptural Rolled Paper Reed Decorative Bowls
How to Create
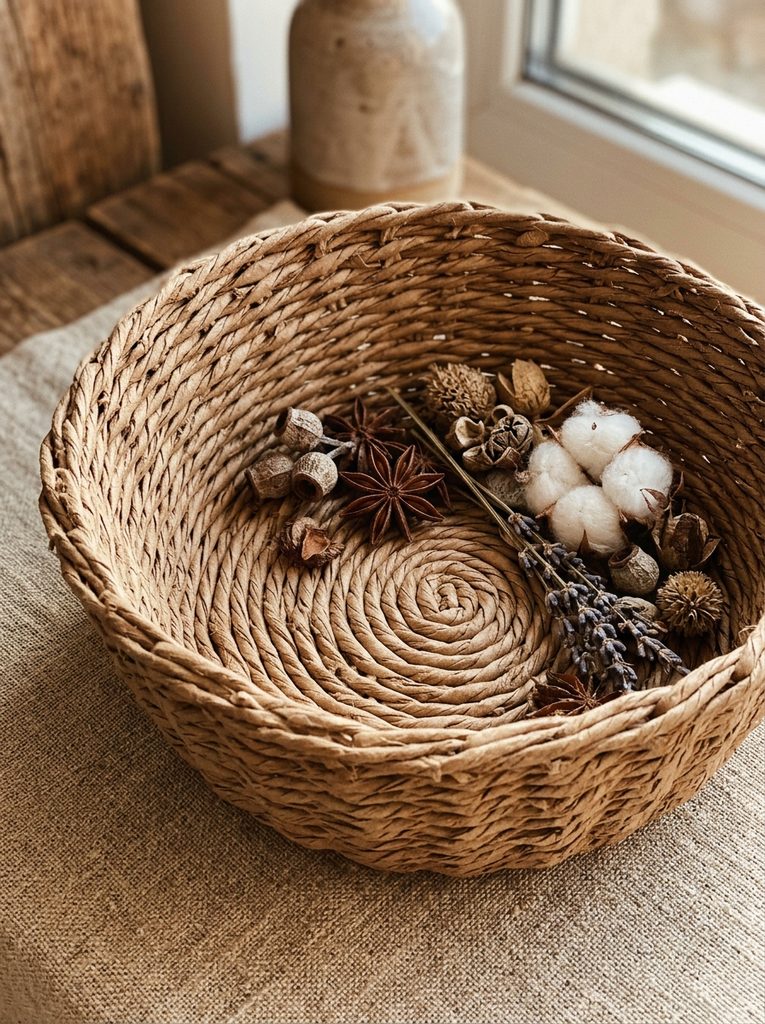
Sculptural rolled paper bowls use coiled paper rods shaped from recycled newsprint, book pages, or kraft paper to build textured, organic storage baskets. Slender paper tubes are woven together using coil-basketry techniques, turning flexible paper sheets into a rigid, load-bearing composite structure. The resulting coiled texture provides earthy, rustic charm that pairs naturally with contemporary home decor styles. These handcrafted vessels serve as functional entryway drop bowls for keys, decorative dining table centerpieces, or holders for wrapped candies, celebrating sustainable upcycling through structured basket-weaving methods.
       .---.
     .'     '.     <- Tightly Coiled Paper Rim
    /  ====== \
   |  [Reeds]  |   <- Interwoven Kraft Paper Struts
   |  =========|
    \  Coiled  /   <- Solid Concentric Spiral Base
     '-------'
Roll sixty sheets of seven-by-ten-inch newsprint or brown kraft paper around a thin three-millimeter wooden skewer, securing the outer paper corner with a drop of PVA glue to create long, uniform paper reeds. Flatten four reeds and cross them over four perpendicular reeds, securing the intersection with tacky craft glue to establish the base warp frame. Take an active, unflattened reed and weave it continuously over and under the base struts in a circular spiral, splicing in new reeds by sliding their tapered tips into preceding tubes as you work. As the woven circle reaches the desired base diameter, angle the vertical struts upward to shape the bowl walls, continuing the over-under weave until reaching the desired height. Trim the protruding strut ends flush, fold the remaining edges inward over the top row of weaving, and apply two coats of water-based sealant over the bowl to harden the paper structure.
9. Architectural Paper Plant Wall Envelopes
Setup Method
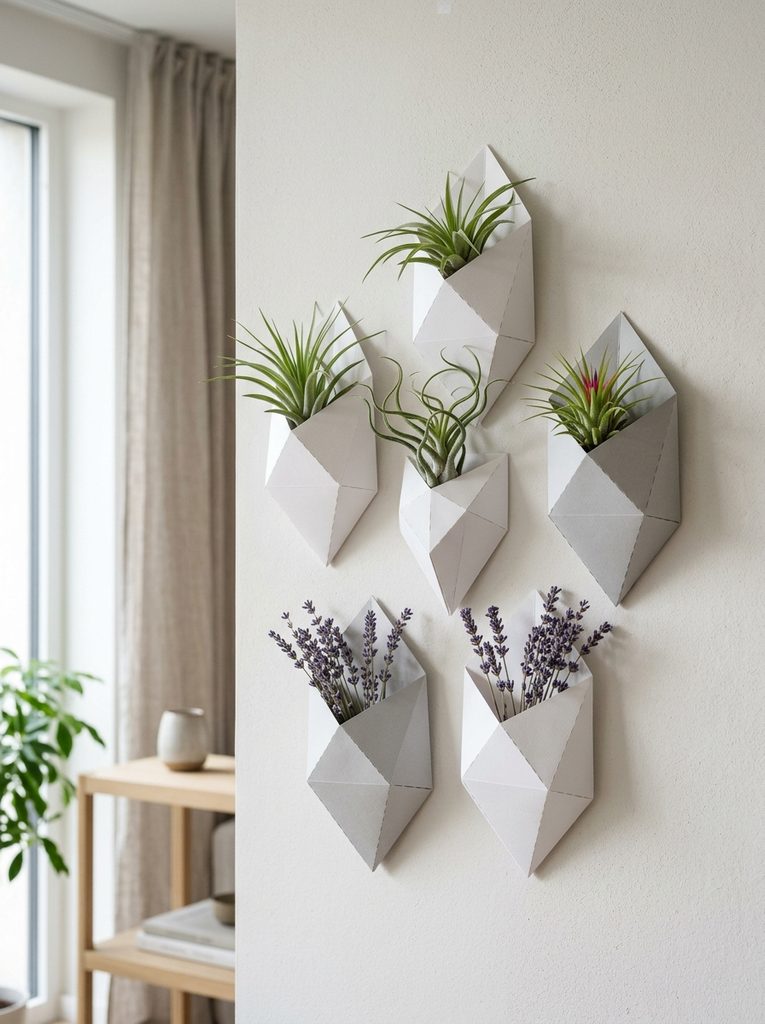
Architectural paper plant wall envelopes are clean-lined, geometric pocket vases designed to hold air plants, dried botanical sprigs, or faux succulents against interior accent walls. Constructed from thick, moisture-resistant parchment or laminated cardstock, these faceted geometric cones feature a flat rear wall with an integrated hanging hole for nail mounting. The angled front surfaces showcase crisp score lines that reflect ambient room lighting, serving as modern wall sculptures even when displayed without plants. This project is ideal for renters and small-space dwellers, adding organic botanical warmth to interior spaces without taking up valuable tabletop or shelf surfaces.
+-------------------------------------------------------+
|  PLANT ENVELOPE STRUCTURAL LAYOUT                     |
|                                                       |
|   Rear Face: 5x8 inch flat cardstock wall panel       |
|   Front Cone: 3D scored faceted geometric enclosure   |
|   Mounting Point: Reinforced eyelet punch on rear tab |
|   Contents: Dry stems, preserved moss, or air plants  |
+-------------------------------------------------------+
Cut an eighty-pound cardstock sheet into an eight-by-eight-inch square, placing it before you on your self-healing mat in a diamond orientation with a point facing upward. Using a steel ruler and bone folder, score two symmetrical diagonal lines extending from the bottom point upward to the left and right side corners. Fold the left and right flaps inward along these score lines so they overlap across the center, creating a sharp, faceted cone shape with a tall back support. Secure the overlapping front flaps using permanent high-tack adhesive tape, taking care not to crush the open dimensional chamber inside. Punch a quarter-inch hole near the top tip of the rear triangular flap, insert a metal reinforcement eyelet using an eyelet setter, and mount the finished envelope onto a small brass wall nail. Place an air plant or dried lavender sprigs inside to complete the display.
10. Intricate Paper Botanical Fern Garland
How to Make
An intricate paper botanical fern garland incorporates realistic, die-cut or hand-cut cardstock fronds strung along a slender twine core to bring nature-inspired greenery indoors. Multiple shades of forest green, olive, and sage cardstock replicate the natural variation found in woodland plant foliage. Scoring a central spine down the axis of each paper leaf allows you to bend the fronds into dimensional, lifelike shapes that resist falling flat against the wall. Draped across fireplace mantels, wrapped around stair banisters, or styled along table runners, this leafy paper garland provides an enduring botanical accent that stays vibrant through every season.
      \  ||  /      <- Hand-Scored Dimensional Leaf Spines
    .--. || .--.
   /    \  /    \   <- Alternating Green Tonal Shades
  |  /\  \/  /\  |
  | /  \    /  \ |  <- Flexible Hemp Twine Core String
  |/    \__/    \|  <- Natural Cascading Botanical Drape
Trace forty fern frond templates onto varying shades of sixty-five-pound green cardstock, incorporating differing leaf shapes such as maidenhair leaves and eucalyptus branches for botanical variety. Cut out the foliage carefully using a sharp precision craft knife or fine-point embroidery scissors, keeping edges crisp along the perimeter teeth. Score a light central line down the spine of each cut leaf with an embossing stylus, folding the leaf slightly upward along this score to create natural three-dimensional curvature. Cut an eight-foot length of natural hemp twine, knotting small mounting loops into both opposing ends. Using a low-temperature glue gun, attach the base stems of the paper leaves to the twine in small overlapping bundles, staggering your shades of green to produce a full, cascading botanical garland ready for display.

Common Beginner Mistakes and How to Avoid Them
When working on papercraft projects, beginners often make mechanical mistakes that can compromise the structural integrity and clean appearance of their work. The most common error is cutting across paper sheets without accounting for grain direction, which produces rough, cracked folds when creasing cardstock. Prevent this by testing paper flexibility beforehand and aligning critical structural folds parallel to the natural grain. Another frequent mistake is applying excessive liquid glue directly from the bottle, which over-saturates the paper fibers, causes unsightly bubbling, and warps delicate surfaces. Instead, dispense glue onto a scrap tray and apply it sparingly using a fine-tipped brush or a toothpick. Additionally, using dull craft knife blades causes the paper to drag, bunch, and tear along cut lines; replace your cutting blades frequently to ensure effortless, clean cuts through heavy cardstock.
Practical Tips for Better Results
Achieving professional, gallery-quality results in paper crafting depends on using dependable techniques, quality tools, and tidy work habits. Always use a dedicated bone folder rather than your fingernails to smooth folds; this creates sharp, even creases without transferring skin oils or leaving glossy marks on matte paper surfaces. When cutting long, straight edges, place a cork-backed steel ruler directly over the project piece while trimming along the scrap side, ensuring that any accidental blade slips cut into waste paper rather than your finished work. Maintain a clean, damp cotton cloth nearby to wipe excess adhesive from your fingers and tools before handling clean paper stock. Store specialty papers flat inside sealed portfolio boxes away from direct sunlight to prevent premature edge fading, fiber yellowing, and humidity-induced curling, ensuring your materials stay pristine and ready for your next creative project.
Styling, Presentation, or Organization Ideas
Styling paper crafts effectively transforms humble stationery projects into eye-catching, cohesive home decor accents throughout your living space. Group dimensional items—such as folded honeycomb ornaments, faceted geometric lanterns, and quilled coasters—in odd-numbered arrangements to create balanced, visually appealing vignettes on open shelves or mantels. Mix smooth, matte cardstock with contrasting textures, like rustic woven textiles, clear glass vases, and warm, unpainted wood, to bring out the delicate qualities of paper art. If you display paper crafts in high-traffic or dining areas, elevate them off surfaces by placing them under glass cloches or inside deep shadow boxes to protect delicate folds from airborne dust and accidental water splashes. To maintain an organized craft room, sort your cardstock collection by color family in vertical magazine holders, and store precision tools in upright desktop caddies for quick access during creative sessions.
Budget or Time Planning
Executing paper craft projects efficiently requires practical budget allocation and structured time management, especially when preparing large decor collections. Paper crafting is naturally economical, as a single package of multi-color cardstock and a bottle of archival glue can supply multiple projects without requiring costly specialty purchases. Save money by sourcing sturdy packaging boxes, clean newsprint, and discarded book pages from household recycling bins to make coiled bowls, paper beads, and structural project cores. When planning multi-step projects, divide the work into focused phases: dedicate the first session to measuring and cutting all paper pieces, the second to scoring and creasing, and the final session to assembly and gluing. Working in organized assembly-line batches streamlines your workflow, minimizes clean-up time, and helps you complete intricate paper projects without feeling overwhelmed.
Creative Expansion and Advanced Inspiration
Expanding your papercraft projects allows for ongoing creative personalization through mixed-media additions, surface treatments, and advanced geometric designs. Experiment with applying metallic gold leaf, pearl pigments, or diluted watercolor washes over cardstock edges before assembling your projects to introduce subtle, dynamic color gradients. Combine paper botanicals with natural dried branches, wire armatures, or small LED fairy lights to build illuminated wall sculptures and durable seasonal wreaths. As you become comfortable with fundamental paper mechanics, explore architectural kirigami patterns, tessellated origami crease maps, and custom digital cutting software to design complex, multi-tiered structural models. These creative techniques allow you to personalize each handmade design, transforming simple paper craft ideas into sophisticated, modern art pieces that elevate your home decor throughout the year.
Leave a Reply