Handcrafted jewelry allows makers to explore tactile art forms, and textured polymer clay bracelets have emerged as versatile, stylish statement pieces. Crafting your own bracelets gives you total control over shape, surface relief, color balance, and wrist ergonomics, turning raw oven-bake clay into durable wearable art. This detailed guide covers ten original, beginner friendly textured polymer clay bracelet ideas designed to elevate your everyday accessory collection. Readers will learn the precise mechanical steps needed to condition polymer clay, impress relief patterns, form curved cuff armatures, and drill or string articulated beads safely. You will discover practical methods to ensure clay flexibility and structural resilience, preventing premature cracking, bending, or snapping during regular wear. Learning proper thermal curing profiles, hole piercing alignments, and post-bake assembly methods will help crafters avoid common production errors and achieve a polished, boutique-quality finish. Whether you want to repurpose leftover clay scraps, design custom gifts, or experiment with modern design trends through tactile mediums, this tutorial delivers structured technical guidance. By following these clear, systematic instructions, you will gain the skills needed to design, cure, and assemble comfortable, visually striking bracelets with lasting appeal.
Why This Idea Is Trending or Useful
Artisan clay wristwear continues to gain traction across modern Pinterest inspiration because it combines eye-catching surface textures with a remarkably lightweight feel. Heavy stone bangles or rigid cast-metal cuffs often cause wrist fatigue or feel cold and awkward during daily routines. Polymer clay solves these ergonomic concerns by providing featherlight wearability, adapting quickly to body heat, and flexing slightly to absorb minor bumps. From an aesthetic perspective, clay provides unmatched versatility for creating tactile textures, such as linen weaves, raw stone stippling, geometric ridges, and embossed botanicals that cannot be duplicated easily with metals. The process requires no costly metalworking equipment, kilns, or specialty ventilation hoods, making it an accessible DIY activity to do at home. Beginners can achieve clean, sophisticated results using everyday hand tools, kitchen tiles, silicone texture sheets, and a basic domestic toaster oven. Its low cost per project and rapid turnaround from unconditioned block to finished, wearable accessory within two hours make it an ideal creative project for weekend crafters.
Materials and Preparation
Thorough planning and proper tool preparation are essential for producing smooth, durable textured bracelets with clean structural lines. Start by gathering high-density polymer clay blocks in your chosen seasonal colors, ensuring you use flexible, professional-grade formulations rather than brittle craft clays. Essential modeling tools include an acrylic rolling pin or stainless steel clay conditioning machine, rigid tissue blades, silicone texture stamps, sandpaper in graduated grits, and clean ceramic tiles to serve as both work surfaces and baking trays. For hardware assembly, keep stainless steel jump rings, elastic stretch cord, jewelry wire, curved cuff blanks, and flat-nose pliers close at hand. Ensure your hands, tools, and work surfaces are wiped down with isopropyl alcohol to remove dust particles that could embed in lighter clay tones. Calibrate your oven with an independent oven thermometer to verify the correct temperature, preventing scorched colors and undercuring. Measure your wrist circumference with a flexible tape measure to determine accurate cuff lengths and bead counts before cutting any raw clay.
Idea 1: Ribbed Terracotta Minimalist Cuff
Step-by-Step Guide
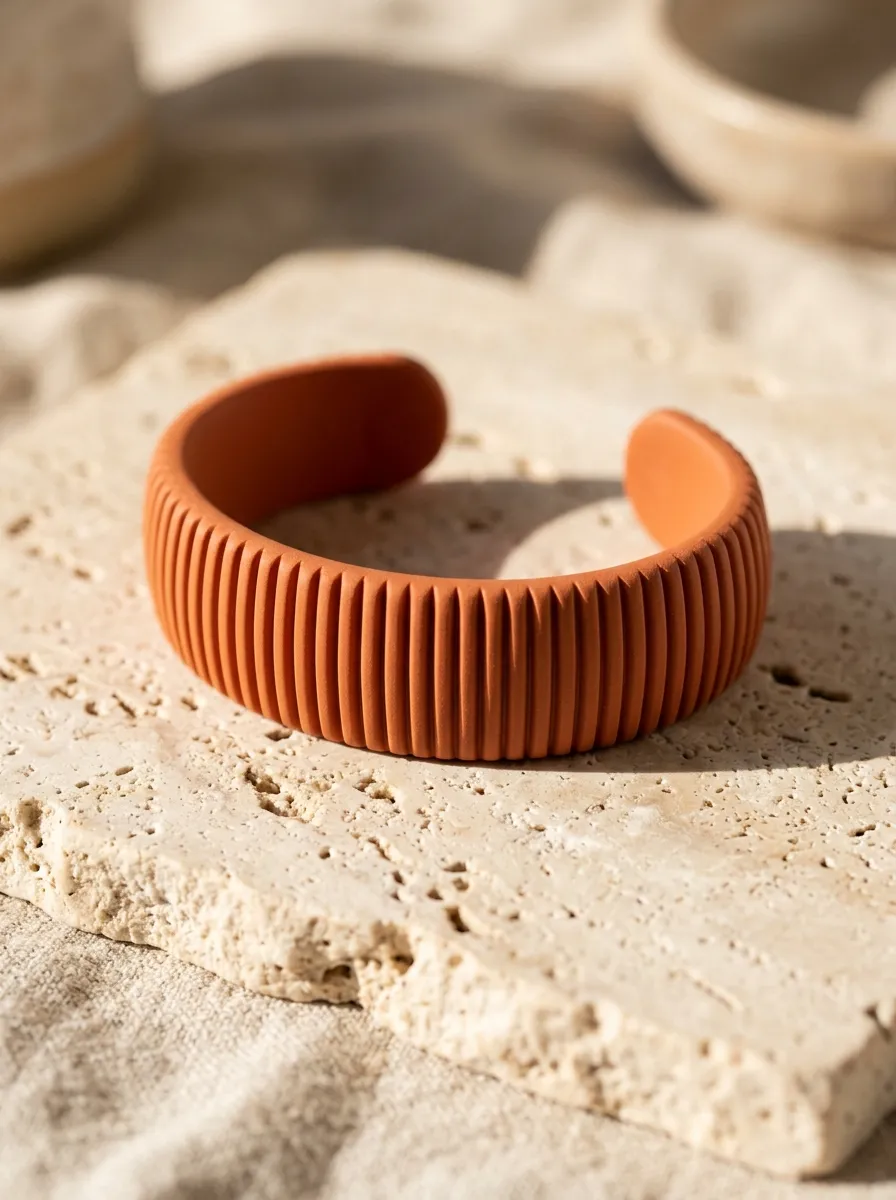
The ribbed terracotta minimalist cuff offers an architectural, modern look inspired by mid-century fluted columns and textured earthenware pottery. This open-cuff bracelet features fine vertical ridges running across its surface, creating a play of light and shadow along the wrist. The warm terracotta color brings an earthy, organic warmth that complements casual daytime clothing and neutral linen fabrics. Because the cuff is open-ended, it slides on and off easily over the hand while hugging the wrist closely. The linear ribs add structural stiffness to the clay, reinforcing the curved shape without requiring bulky interior supports. This project provides a practical introduction to shaping curved clay slabs, using straight-edge texture combs, and curing pieces around curved baking armatures. The clean geometric profile makes it an attractive, approachable piece for crafters interested in modern design and functional accessories.
Condition two ounces of warm terracotta polymer clay until it is soft, smooth, and pliable. Roll the clay through a pasta machine or with an acrylic rolling pin to form an even slab approximately three millimeters thick. Trim the slab into a neat rectangle measuring 1.5 inches wide by six inches long using a sharp tissue blade. Place a rigid fine-toothed clay comb or textured grooved mat over the slab, applying firm, even downward pressure to form clean, uniform vertical ribs along the entire length. Trim any uneven edges cleanly with your blade. Carefully lift the textured strip and drape it over a clean, heat-resistant glass soda bottle or metal can to set the curved bracelet shape. Bake the clay on the bottle in a preheated oven at 275 degrees Fahrenheit for thirty-five minutes. Once the piece is completely cool, gently slide the cuff off the armature, smooth the rounded outer tips with four-hundred-grit wet sandpaper, and apply a light coat of matte water-based varnish to finish.
Idea 2: Raw Slate Stippled Link Bracelet
Execution Process
The raw slate stippled link bracelet uses rich surface texture to turn basic geometric links into an earthy, stone-like chain accessory. This articulated bracelet consists of thick, rounded rectangular clay links connected by heavy-gauge brass jump rings. The surface features an uneven, stippled texture that mimics natural chiseled slate or porous basalt stone. Mixing charcoal gray clay with speckles of black and translucent clay yields an authentic mineral look that pairs well with casual denim, leather, and tailored jackets. Because the bracelet is constructed with individual connected links, it drapes smoothly around the wrist, providing comfortable movement that rigid cuffs cannot match. This design helps crafters develop essential skills in uniform link cutting, multi-point hole drilling, and balanced hardware assembly. The textured, matte surface also conceals minor handling marks or fingerprints, making it an forgiving, durable project for beginners.
Begin by mixing three parts charcoal gray clay with one part translucent clay and a small pinch of chopped black polymer clay scraps, conditioning until the pigments are evenly distributed into a mottled stone pattern. Roll the conditioned clay into a uniform four-millimeter sheet on your work tile. Use an oval or rounded-corner rectangular metal cutter to stamp out eight matching links measuring one inch in length. To add the stone texture, tap a stiff-bristled wire brush or crumpled sheet of heavy aluminum foil firmly across the surface of each link until the clay looks evenly weathered and porous. Use a 1.5-millimeter piercing tool to create clean connection holes at each end of the links, ensuring the holes sit at least three millimeters away from the outer edge. Bake the textured links flat on a tile lined with parchment paper for thirty-five minutes at the recommended temperature. After cooling, sand the back surfaces smooth, and link all eight segments together using ten-millimeter heavy-gauge brass jump rings and jewelry pliers.
Idea 3: Embossed Botanical Vine Wrap Bracelet

How to Create
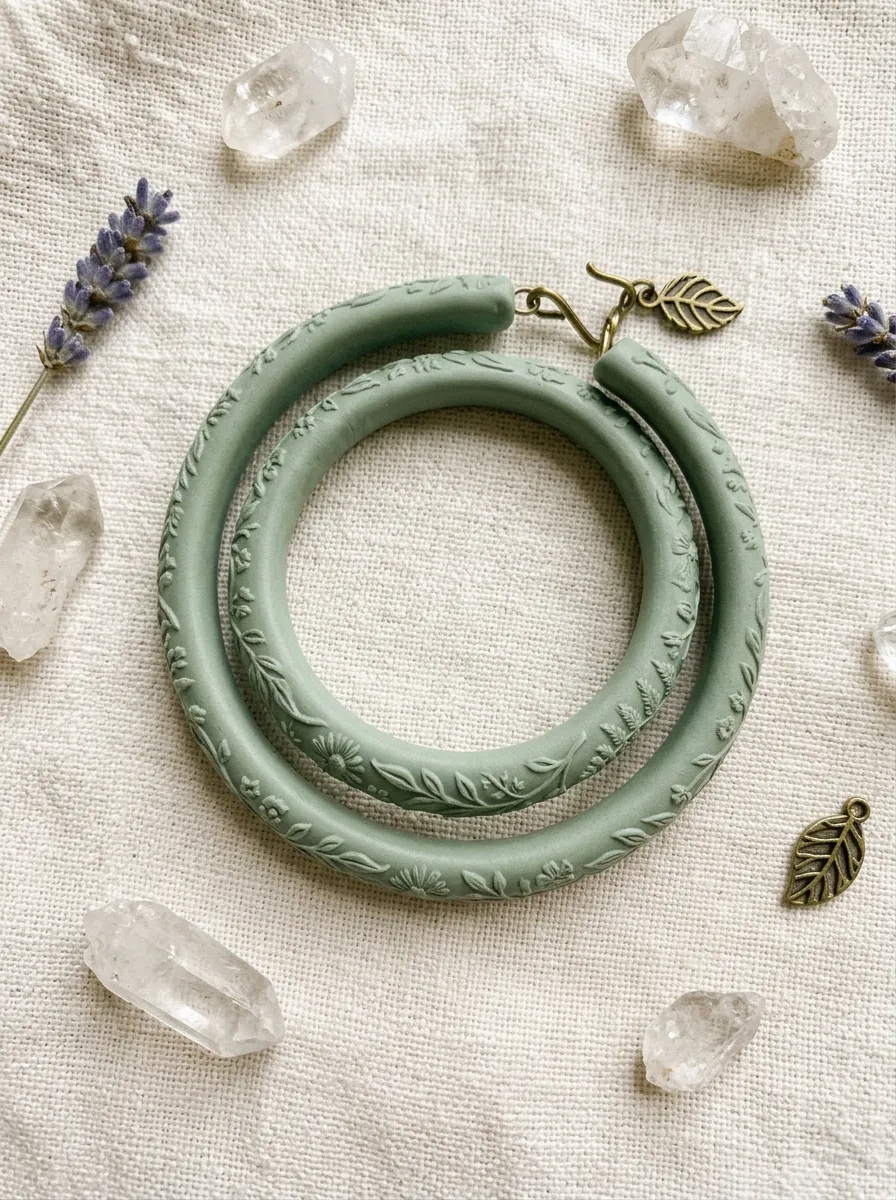
The embossed botanical vine wrap bracelet combines organic garden patterns with a secure, flexible spiral wrap silhouette. This multi-turn bracelet wraps comfortably around the wrist twice, featuring a continuous pattern of raised leafy vines and delicate floral details along its surface. A muted sage green or dusty olive palette highlights the botanical theme, creating an earthy accent that pairs nicely with flowy dresses and casual seasonal outfits. The wrap structure stays in place without requiring clasps or fasteners, relying on the natural flexibility of properly cured polymer clay. The embossed details can be highlighted with contrasting acrylic paint or left as a subtle monochromatic relief. This project teaches crafters how to handle long clay strips, apply continuous texture sheets without visible seams, and form multi-coil shapes around cylindrical forms.
Condition two ounces of sage green polymer clay and roll it into an elongated, narrow strip measuring twenty inches long, one-half inch wide, and 2.5 millimeters thick. Dust the surface of a flexible silicone botanical texture sheet lightly with cornstarch to act as a release agent. Press the texture sheet firmly into the clay strip using an acrylic roller, ensuring the raised leafy vine pattern presses into the clay without flattening the strip edges. Carefully peel away the silicone sheet and wash off any leftover cornstarch with cool water. Wrap the textured clay strip in a continuous spiral around a heat-resistant metal cylinder, leaving a quarter-inch gap between each coil to prevent the edges from fusing in the oven. Bake the wrapped cylinder at 275 degrees Fahrenheit for forty minutes to ensure the piece cures with optimal flexibility. Allow the bracelet to cool completely, slide the coiled clay off the cylinder, and smooth the tapered ends with a fine sanding block.
Idea 4: Hammered Metallic Geo-Tile Stretch Bracelet

Setup Method
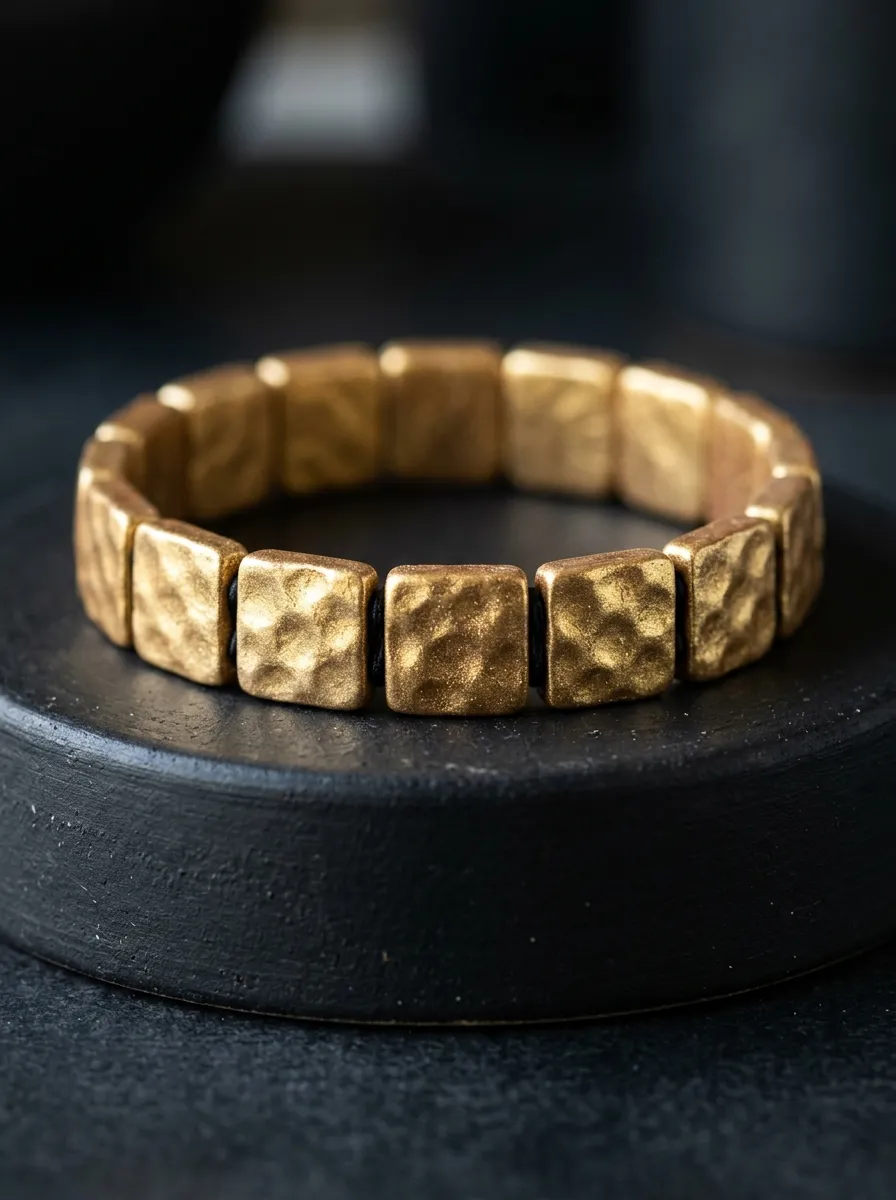
The hammered metallic geo-tile stretch bracelet pairs the look of hand-forged metal with the lightweight, comfortable feel of clay. This modular bracelet features square clay tiles that show a hammered surface texture, strung onto durable elastic cord. Coating the clay with gold, bronze, or copper mica powders before baking produces a realistic metallic sheen that catches the light like polished metal plates. The internal elastic cord allows the bracelet to stretch easily over the hand, removing the need for clasps while keeping the tiles seated flat against the wrist. The textured indentations add visual depth, breaking up reflections to mimic artisanal metalwork. This project introduces crafters to using mica powders on unbaked clay, texturing with ball-end tools, and drilling parallel two-hole channels for secure stretch-cord stringing.
Condition two ounces of black polymer clay, which provides a rich, dark base that helps metallic powders appear more vibrant. Roll the clay into an even four-millimeter slab on a smooth ceramic tile. Use a square metal cutter to stamp out fourteen uniform tiles measuring one-half inch on each side. Using the rounded end of a small wooden modeling stylus or ball tool, gently press overlapping indentations across the top surface of each tile to create a hammered metal texture. Dip a soft makeup brush into rich antique-gold mica powder and dust the surface of each tile, brushing away any excess powder. Use a rigid needle tool to pierce two parallel horizontal stringing holes through the side edges of each tile. Bake the tiles flat on cardstock for thirty minutes, allow them to cool, and wipe away any loose powder. Thread the tiles onto two parallel strands of 0.7-millimeter clear elastic cord, knot the ends securely with surgeon’s knots, and add a drop of jewelry glue to each knot.
Idea 5: Woven Linen-Textured Bangle Set
How to Make
The woven linen-textured bangle set uses subtle surface relief to turn simple circular bands into refined, tactile accessories. Designed as a stackable trio of closed circular bangles, this project combines soft neutral tones like cream, oatmeal, and warm stone gray. The surface of each bangle features a fine cross-hatch texture that mimics the weave of coarse linen fabric, giving the clay a soft, matte finish that avoids a plastic look. Stacking multiple slender textured bangles together creates gentle movement and a subtle, pleasant clicking sound on the wrist. Because closed bangles must slide over the widest part of the hand, maintaining consistent circular shaping during the baking process is critical. This project teaches crafters how to calculate wrist clearance, blend seamless circular joins, and use everyday woven textiles to emboss clay surfaces naturally.
Condition 1.5 ounces of cream-colored polymer clay and roll it into a snake measuring approximately nine inches long and five millimeters thick. Lay a strip of clean, open-weave linen fabric or burlap over the clay snake, rolling over it with an acrylic pin to press the woven texture around the entire circumference. Carefully peel away the fabric to reveal the cross-hatch pattern. Measure the widest part of your folded hand to determine the necessary bangle diameter, usually between 2.5 and 2.75 inches across. Trim the textured snake to the required length at an angled forty-five-degree cut, and join the ends together around a circular metal cookie cutter or baking ring, blending the seam carefully with a silicone tool to maintain the pattern. Repeat this process with oatmeal and stone-gray clay to build a set of three bangles. Bake the supported bangles at 275 degrees Fahrenheit for thirty-five minutes, let them cool on their forms, and smooth the inner rims with fine-grit sandpaper.
Idea 6: Geometric Faceted Tube Bead Cord Bracelet
Step-by-Step Guide
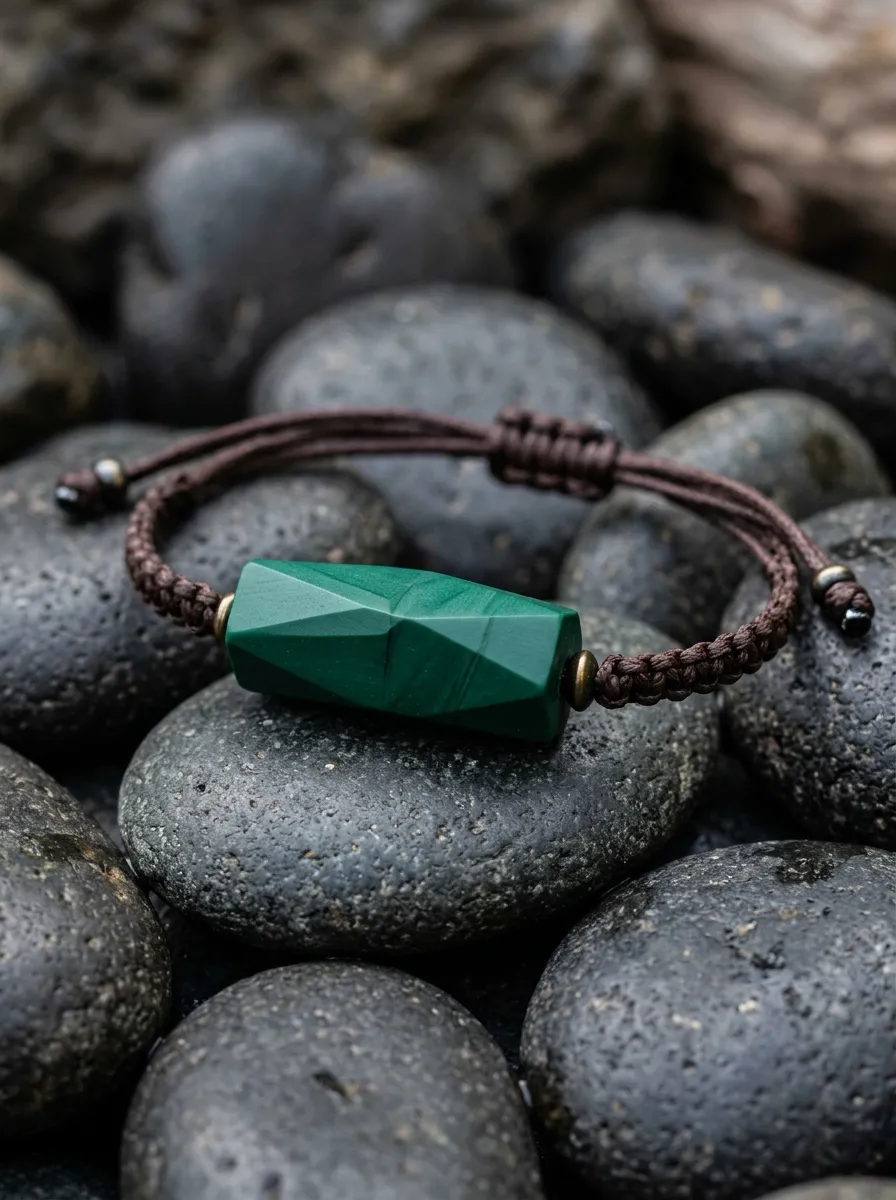
The geometric faceted tube bead cord bracelet pairs bold architectural forms with casual, adjustable cord stringing. The centerpiece features a hand-carved, multifaceted polymer clay tube bead that sits neatly along the outer wrist. Sharp, angled planes catch the light from different angles, showcasing the precise geometric carving. A rich jewel-toned clay, such as deep emerald green, cobalt blue, or plum, gives the faceted surface a modern look that complements woven nylon or leather cords. The sliding macrame knot closure allows the bracelet to be adjusted easily for different wrist sizes, making it an excellent design for handmade gifts. This project gives crafters practical experience in carving semi-cured clay, working with piercing mandrels, and tying adjustable sliding cord knots.
Roll an ounce of deep emerald green polymer clay into a smooth cylinder measuring two inches in length and one-half inch in diameter. Insert a 1.5-millimeter metal skewer straight through the long center axis of the cylinder to create the stringing hole, leaving the clay on the skewer to protect the channel while carving. Place the mounted clay cylinder in a freezer for ten minutes to firm the material, preventing it from squishing while you work. Using a sharp, flexible tissue blade, slice away thin, angled slivers along the edges to create a pattern of triangular and trapezoidal facets around the bead. Leave the bead on the metal skewer, suspend it over a baking rack, and bake at 275 degrees Fahrenheit for thirty minutes. Once cooled, slide the bead off the skewer and sand the faceted planes using wet eight-hundred-grit sandpaper to sharpen the edges. Thread the bead onto a twelve-inch length of one-millimeter waxed cotton cord, adding an adjustable sliding square knot closure at the ends.
Idea 7: Distressed Aztec Wave Cuff
Execution Process
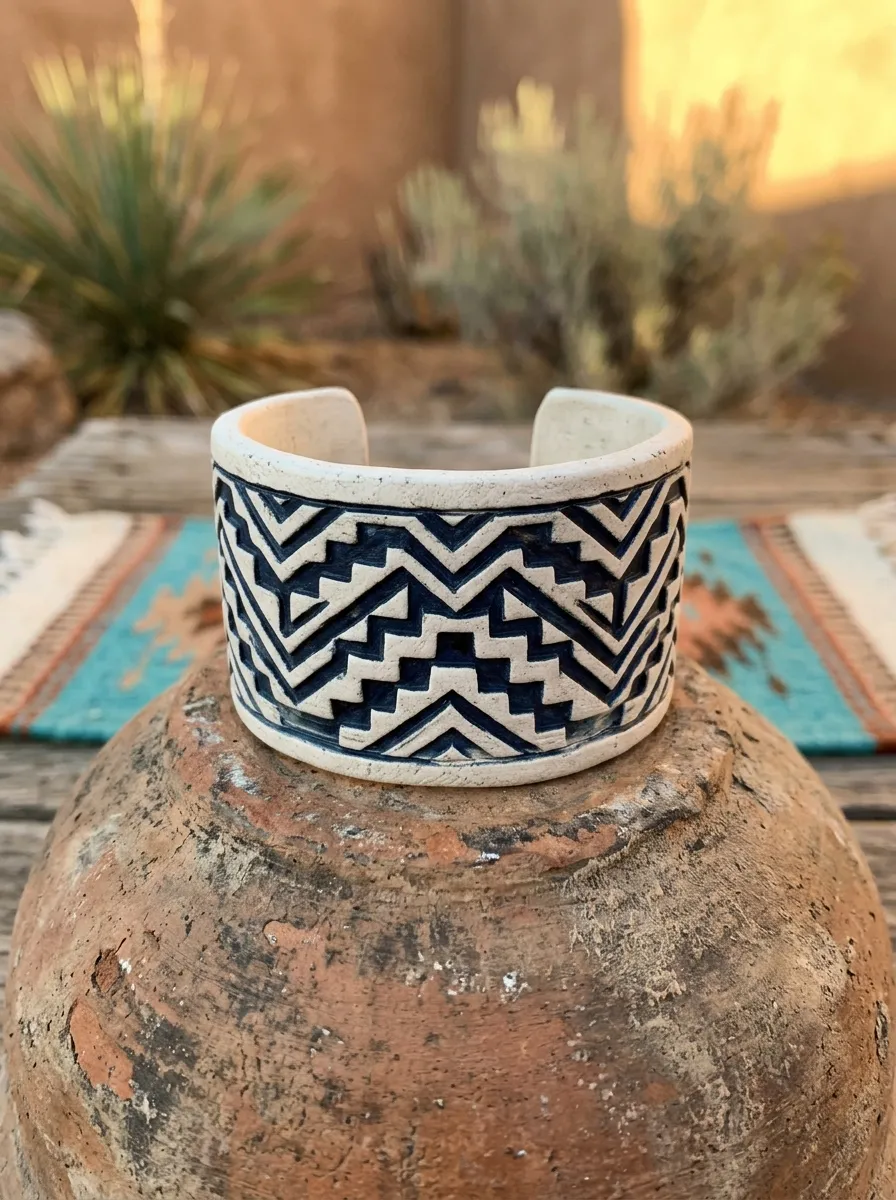
The distressed Aztec wave cuff uses dual-color surface carving and antiquing methods to achieve a weathered, artisan look. This broad open-cuff bracelet features an off-white base clay layer beneath a contrasting navy or black geometric pattern of step frets and zig-zags. The carved surface is lightly sanded and washed with dark paint, highlighting the recessed lines while leaving the raised sections crisp and clean. This Southwestern-inspired design pairs naturally with casual weekend wear, denim shirts, and silver jewelry. The flat, wide profile gives you plenty of surface area to display intricate carved designs, while the curved interior hugs the forearm comfortably. Crafters will practice applying secondary color washes, carving linear patterns into leather-hard clay, and using patina finishes to highlight fine surface relief.
Roll out an even slab of off-white polymer clay to a three-millimeter thickness, trimming it to two inches wide by six inches long. Coat the top surface with a thin, even layer of dark navy liquid polymer clay or dark acrylic paint, allowing the surface to dry until it is tacky. Using a fine-point linoleum carving gouge or clay modeling stylus, carve geometric zig-zag wave lines and repeating angular motifs through the dark top layer, revealing the pale clay beneath. Press the carved strip onto a curved metal cuff blank or heat-resistant tumbler to hold the curve during baking. Bake the shaped cuff at 275 degrees Fahrenheit for forty minutes to ensure thorough curing across the thick slab. After the piece cools completely, rub black acrylic paint into the carved grooves with a soft cloth, immediately wiping the raised surfaces clean with a damp towel to leave dark paint settled in the recesses. Finish with an ultra-matte sealant.
Idea 8: Concentric Circle Textured Disc Bracelet
How to Create
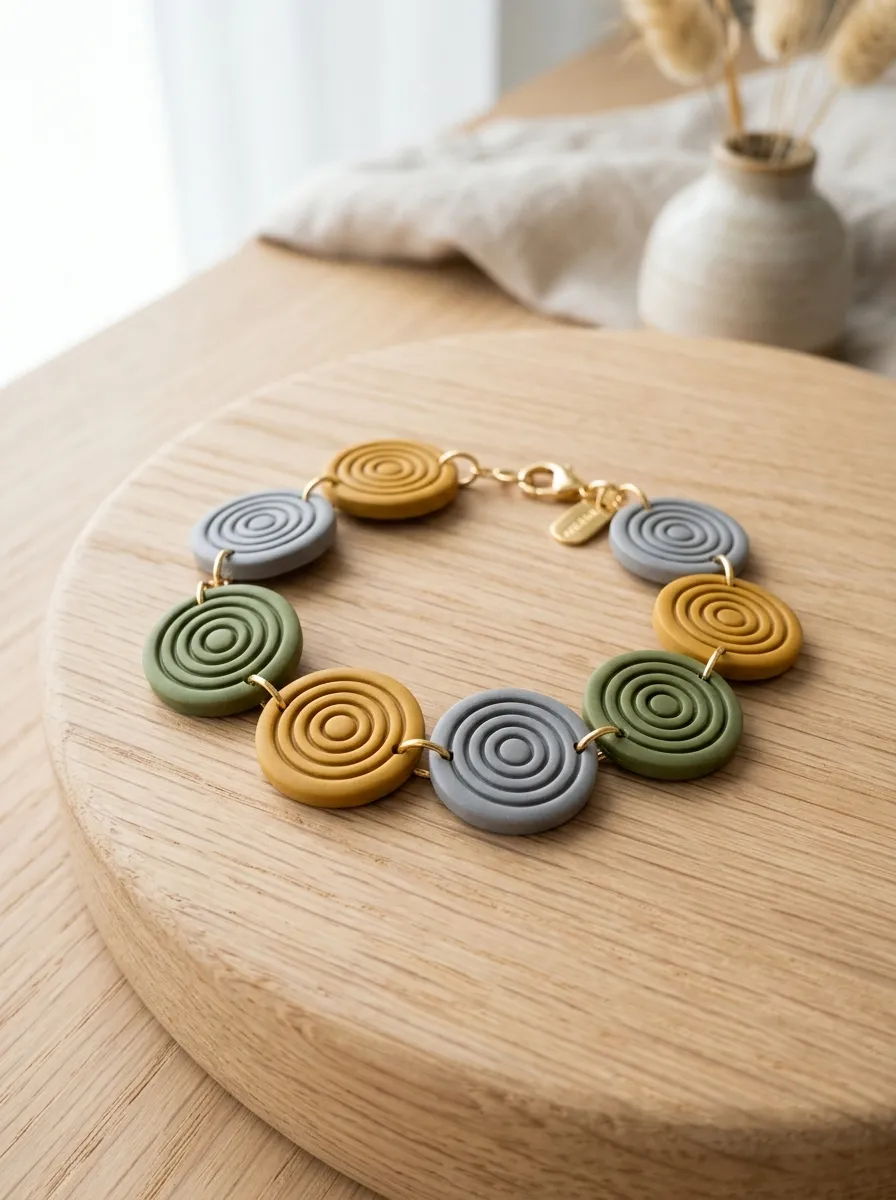
The concentric circle textured disc bracelet uses repeating circular shapes and radiating grooves to create a balanced, dynamic accessory. The design consists of overlapping circular clay discs that show deeply stamped concentric ring patterns, linked together with slender metal jump rings. A muted color palette of dove gray, olive, and mustard yellow keeps the arrangement looking cohesive and contemporary. The stamped concentric grooves catch the light, adding visual texture to the flat surface. The articulated multi-disc layout allows the bracelet to drape comfortably around the wrist without twisting or pinching the skin. This project provides a practical way to practice repetitive pattern stamping, using circle cutters without distorting edges, and assembling secure jump ring connections.
Condition three portions of polymer clay in dove gray, olive green, and mustard yellow. Roll each color into an even 2.5-millimeter slab on a smooth glass work tile. Use an assortment of nested metal circle stamps or household caps to press deep concentric rings into the slabs, pressing firmly without cutting all the way through the clay. After stamping the textures, use a three-quarter-inch circular cutter to stamp out nine discs centered around your concentric ring impressions. Use a fine needle tool to pierce two opposing holes on the edges of each disc, keeping the holes aligned through the center axis. Bake the discs flat on a tile lined with cardstock at 275 degrees Fahrenheit for thirty minutes. Once the discs are cool, wet-sand the back surfaces to remove any rough spots. Connect the discs in an alternating color sequence using six-millimeter gold jump rings, and attach a matching lobster clasp and extender chain to the ends.
Idea 9: Sanded Terrazzo Pebble Cluster Bracelet
Setup Method
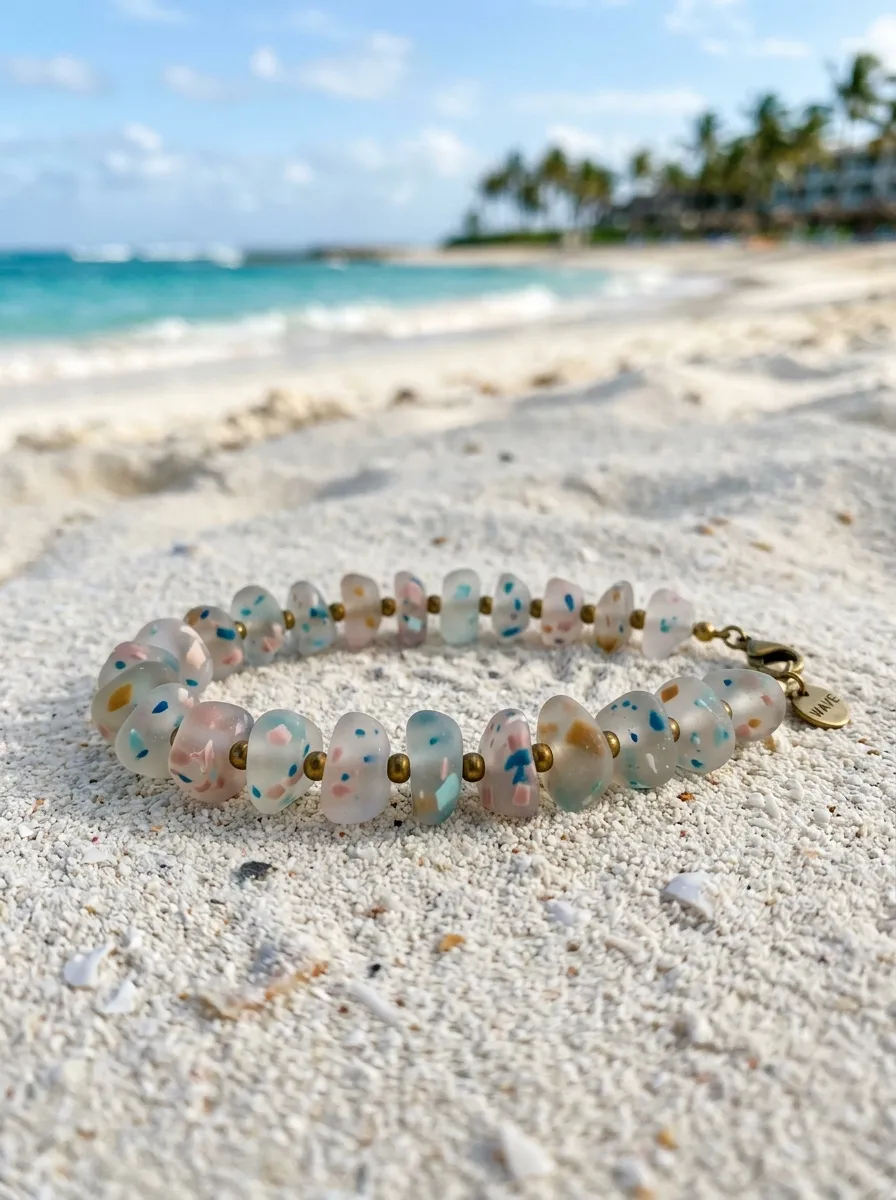
The sanded terrazzo pebble cluster bracelet turns irregular, smooth organic clay shapes into a tactile, beach-glass-inspired accessory. This design features flat, rounded pebble-shaped clay beads containing colorful scrap clay chips, finished with an ultra-smooth sea-glass texture. A soft background of translucent white filled with chips of blush pink, ocean blue, and golden ochre evokes tumbled coastal pebbles. Stringing these smooth, organic beads on a toggle-clasp wire produces an easy, relaxed drape that fits warm-weather and vacation styles. The smooth, rounded edges make the bracelet comfortable to wear against the skin throughout the day. This project teaches crafters how to make terrazzo slabs, shape freeform organic cabochons, and hand-sand clay under water to achieve a polished, silky-matte finish.
Condition two ounces of translucent polymer clay and roll it into a three-millimeter sheet on your work surface. Scatter chopped, miniature flecks of baked or raw clay in pink, blue, and ochre over the sheet, then roll with an acrylic pin to press the flecks flush with the surface. Use an oval cutter or freehand knife to cut out ten irregular pebble shapes measuring approximately three-quarters of an inch across. Gently roll each cut shape between your palms to round the crisp edges into smooth, river-worn pebble silhouettes. Pierce a horizontal stringing hole through the center of each pebble bead using a fine needle tool. Bake the beads flat on parchment paper at 275 degrees Fahrenheit for thirty-five minutes. Once cooled, submerge the beads in water and sand through 400, 600, and 1000 grit sandpapers to reveal the embedded terrazzo flecks with a smooth, matte finish. String the pebbles onto nylon-coated jewelry wire, add tiny brass spacer beads between each link, and secure with a toggle clasp.
Idea 10: Linear Carved Tribal Bar Bracelet
How to Make
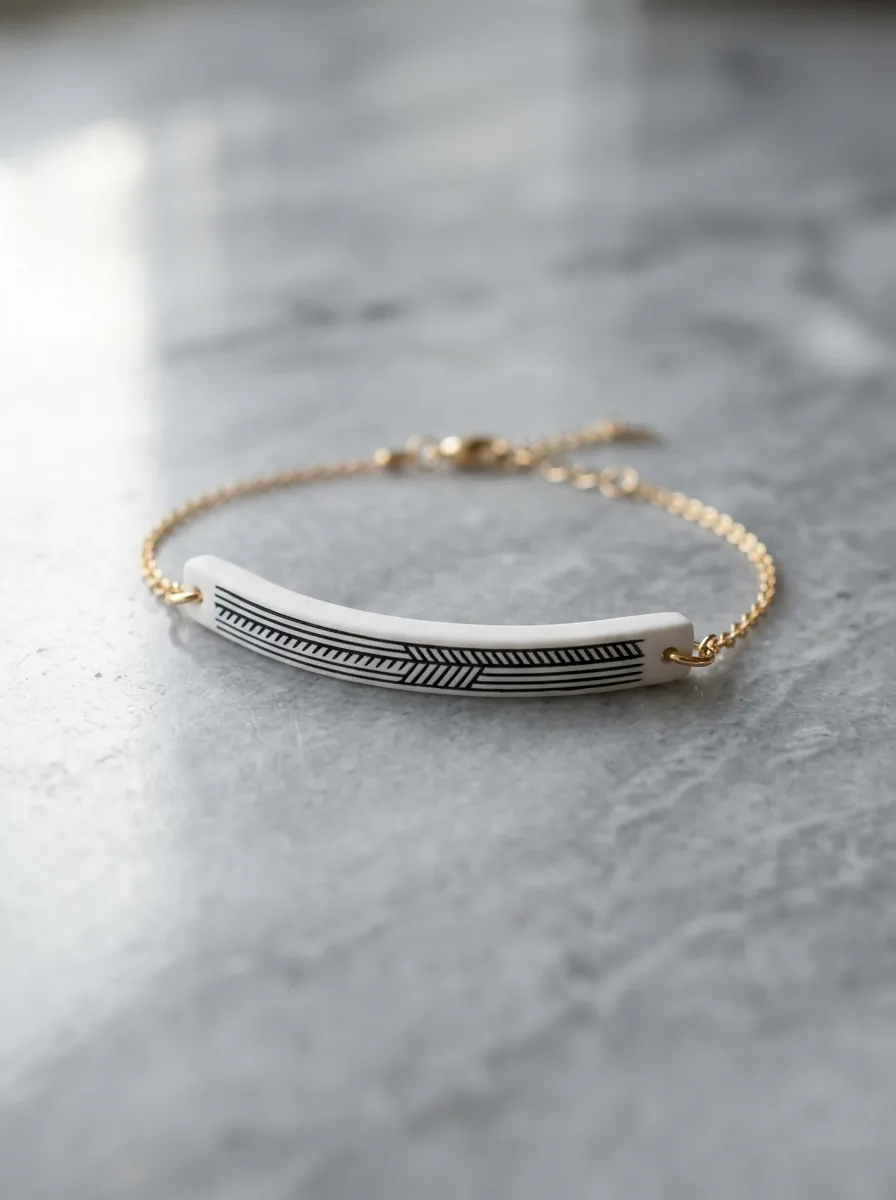
The linear carved tribal bar bracelet uses clean carved relief along a slender curved bar to create an understated, modern design. This minimalist bracelet features a single curved clay bar that sits across the top of the wrist, held in place by fine jewelry chain along the sides. The bar is decorated with hand-carved horizontal hatch marks, cross-hatching, and repeating chevrons that provide a crisp, geometric texture. A monochrome palette of white clay with black inlay, or black clay with gold accenting, gives the piece a tailored, jewelry-box feel. The curved clay bar rests flat against the wrist, while the delicate chain sides keep the profile light and unobtrusive. This project helps crafters develop precision carving skills, learn how to shape curved bar foundations, and connect delicate chain hardware to cured clay components.
Condition an ounce of pure white polymer clay and roll it into a smooth snake measuring three inches long and six millimeters thick. Flatten the snake gently with an acrylic roller to produce a flat-topped bar with slightly rounded edges. Using a fine-point needle tool or hobby knife, carve repeating geometric patterns—such as chevron arrows, parallel hatch marks, and dot clusters—into the flat top surface of the bar. Pierce a clean horizontal hole through each end of the bar from front to back to create attachment points for the chain. Bend the textured bar gently over a curved, heat-resistant cylinder so it matches the natural curve of the wrist, and bake at 275 degrees Fahrenheit for thirty minutes. Once cooled, rub black acrylic paint into the carved grooves, quickly wiping the raised surface clean with a damp cloth to highlight the lines. Attach two-inch lengths of fine gold trace chain to each end using jump rings, and finish with an adjustable lobster clasp.
Common Beginner Mistakes and How to Avoid Them
Creating textured polymer clay bracelets comes with unique mechanical and structural considerations that are less noticeable in smaller jewelry pieces like earrings. A frequent beginner mistake is underbaking the clay, which leaves bracelets brittle and prone to snapping when flexed over the wrist. Unlike flat earrings, bracelets handle regular movement and bending, so they require full baking times at the manufacturer’s recommended temperature to achieve proper molecular cross-linking and flexibility. Another common issue is applying texture stamps with uneven pressure, creating deep marks on one side while leaving the other end shallow and faint; apply steady, balanced pressure with an acrylic roller rather than pressing by hand. Beginners also frequently place stringing holes too close to piece edges, which can lead to tears under the tension of elastic cords or jump rings; always leave at least two to three millimeters of clay between the hole and the outer rim. Finally, skipping surface cleaning often embeds stray dust and lint into raw light-colored clay; keep your work area, tools, and hands clean with isopropyl alcohol to maintain crisp, vibrant colors.
Practical Tips for Better Results
Achieving a clean, professional finish on your textured clay bracelets comes down to careful surface preparation, clean stamping, and proper curing support. Lightly dust your texture sheets and stamps with cornstarch or water before pressing them into raw clay; this acts as a release agent and prevents the clay from sticking inside fine details. When making curved cuffs, always bake the clay directly on heat-resistant cylindrical forms, such as metal soda cans, glass tumblers, or dedicated metal cuff blanks, to help the piece hold a balanced, anatomical curve in the oven. For elastic stretch bracelets, use 0.7-millimeter or 0.8-millimeter high-strength elastic cord, and reinforce your finishing knots with a dab of flexible jewelry glue tucked inside a nearby bead hole. Use wet-sanding methods to smooth edges and back surfaces after baking; sanding your cured pieces in water with a drop of dish soap eliminates sharp edges without creating airborne clay dust. Finally, use two pairs of smooth, flat-nose pliers to twist jump rings open sideways rather than pulling them apart, preserving the round shape and strength of your hardware connections.
Styling, Presentation, or Organization Ideas
Styling and organizing your textured polymer clay bracelets thoughtfully can showcase their handcrafted details, whether you are coordinating your personal wardrobe or preparing pieces for an online shop. For a modern, balanced look, pair a broad ribbed cuff with a slender chain-link or hammered tile bracelet, combining different scale textures within a unified color family. When styling with everyday outfits, pair earthy terracotta or slate bracelets with neutral linen tops, rolled-up denim sleeves, and simple leather sandals to let the jewelry serve as the textured focal point. If you are preparing pieces for craft fairs or gifts, display bracelets around natural linen-covered display bars or textured wooden stands, which highlight the handcrafted feel of the materials. Keep your bracelets organized at home on a dedicated multi-tier wooden jewelry bar; storing bangles and cuffs upright prevents pieces from rubbing together and protects delicate textured details from scuffs. Grouping your bracelet designs into complementary collections—such as desert earth tones, cool mineral neutrals, or warm metallics—makes it easy to mix and match pieces for effortless daily wear.
Budget or Time Planning
Crafting textured polymer clay bracelets is an affordable, time-efficient hobby that yields durable accessories on a modest budget. A single two-ounce block of clay costs only a few dollars and can yield two large cuff bracelets or several modular beaded designs, keeping your production cost per piece low. Beginners can keep startup expenses down by using everyday household items for texturing, such as crumpled aluminum foil, old lace, woven burlap, coarse toothbrushes, and plastic caps, rather than buying commercial texture stamps right away. To make the most of your crafting time, batch your process into dedicated steps: spend one session conditioning clay, mixing custom palettes, and stamping textured sheets, and reserve a second session for cutting shapes and piercing holes. You can bake multiple bracelets and bead sets together on a single ceramic tile to save energy, followed by a dedicated session for wet-sanding, painting accents, and assembling hardware. A beginner can typically complete a simple ribbed cuff in under an hour of hands-on time, while multi-link or stamped disc designs take around ninety minutes from prep to final assembly.
Creative Expansion and Advanced Inspiration
Once you feel comfortable with basic clay conditioning, texturing, and cuff shaping, you can explore intermediate surface techniques and mixed-media designs. Experiment with subtle surface patinas by applying oil paints, pan pastels, or alcohol inks into deep textured grooves before sealing, creating a weathered, layered look on geometric and botanical patterns. You can also combine materials by embedding raw brass wire frames, leather cords, or natural wooden beads alongside your textured clay elements, adding varied textures that elevate the finished piece. Advanced crafters can try hollow-core bead construction, wrapping textured clay around removable cornstarch or paper cores to make large, statement beads that remain remarkably lightweight. Another interesting option is making double-sided reversible cuffs, applying different coordinating textures and colors to the front and back so the bracelet can be flipped to match different outfits. Trying these advanced variations allows you to build your artistic skills, transforming simple clay slabs into distinctive, durable accessories that highlight your personal style.
Leave a Reply