Miniature indoor botanical styling gains unique character through handcrafted clay additions, transforming ordinary plant containers into expressive focal points for living spaces. This comprehensive tutorial examines practical Pinterest ideas for enhancing indoor plant displays using sculpted clay embellishments, pot huggers, and soil picks. Readers will learn fundamental hand-building methods, surface conditioning techniques, moisture-resistant sealing steps, and precise assembly practices designed specifically for indoor houseplants. Incorporating sculpted characters into plant containers balances structural craft with natural greenery, giving decorators complete control over interior color schemes, container themes, and display dimensions. These techniques show decorators how to convert unbaked synthetic modeling compound into functional, water-resistant accents that withstand continuous contact with damp potting soil and regular watering routines. The step by step guidance provided across each section simplifies multi-part assembly, ensuring every decorative addition remains balanced, secure, and physically stable. Whether you want to refresh compact succulents, trailing vines, or broad-leaf tropical pots, these actionable creative ideas offer accessible ways to personalize indoor home decor without expensive specialized kiln equipment.
Why Sculpted Plant Accents Appeal to Modern Decorators
Combining sculpted miniature accents with domestic houseplant care has emerged as a prominent trend across visual inspiration boards, driven by an appreciation for personalized, playful design. Contemporary interior layouts frequently pair clean architectural lines with lighthearted, tactile details that introduce warmth and character into residential spaces. The Japanese design principle of kawaii emphasizes rounded contours, approachable proportions, understated pastel colorways, and simplified, expressive facial features. These design elements make character sculpting an exceptionally beginner friendly endeavor, as foundational forms rely on basic geometric primitives such as spheres, domes, and smooth cylinders. Beyond decorative charm, handcrafted clay plant markers and pot appendages provide functional utility by serving as gentle trellis supports, drainage anchors, and visual soil moisture reminders. Working with synthetic oven-bake clay requires no professional ceramic wheel or industrial furnace, making it an accessible creative project for small apartment workspaces and modest budgets. These durable decorations withstand humidity, keep their structural vibrancy over time, and bring a refreshing aesthetic into everyday indoor plant collections.
Essential Materials and Clay Conditioning Preparation
Long-lasting clay planter decorations require intentional workspace preparation, structural tool organization, and proper material conditioning before assembly begins. Core materials include blocks of oven-bake polymer clay in pastel and neutral tones, liquid polymer bonding adhesive, galvanized steel armature wire, water-resistant acrylic paints, and polyurethane sealing varnish. Crucial shaping tools consist of double-ended silicone shapers, stainless steel ball styluses, acrylic rolling pins, rigid tissue blades, needle tools, and smooth ceramic work tiles. Safe preparation begins with wiping down your entire workspace with isopropyl alcohol to remove stray dust, pet hair, and airborne fibers that adhere to pale modeling compounds. Conditioning is an essential preliminary phase: massage raw clay slices between palms or roll them repeatedly through a manual acrylic roller until the material transitions from brittle fragments into pliable, supple sheets. Thorough conditioning disperses plasticizers evenly through the synthetic resin base, preventing surface micro-fissures during manipulation and structural warping during thermal oven baking.
1. Peeking Panda Pot Rim Climber
How to Create
The peeking panda rim climber hooks directly over the upper rim of standard ceramic or terracotta pots, creating the visual impression of an adventurous bear peering into the foliage. The sculpture features a rounded white torso with curved forepaws shaped into firm hooks that grip the container’s outer edge without adhesive. Jet-black ears, oval eye patches, and short hind legs provide clean contrast, defining the classic panda silhouette through simplified geometric shapes. Because the body rests against the vertical exterior wall of the planter, the piece utilizes gravity and balanced weight distribution to remain stable during everyday watering. The smooth, rounded geometry of the limbs prevents snagging against leaves, making it a reliable accent for trailing pothos, compact jade plants, or upright snake plants. The clean monochrome palette complements modern minimalist style interiors, introducing character without clashing against vibrant natural foliage.
To construct the panda climber, condition three parts opaque white clay and one part dense black clay on a clean glass tile. Roll a white sphere measuring thirty millimeters across for the head, gently flattening the underside to create a resting shelf that sits flush against the pot edge. Shape two curved white cylinders for the arms, bending the paws inward into ninety-degree hooked brackets sized to match the wall thickness of your specific container. Blend the arms securely to the rear base of the head using a silicone shaper, smoothing the seams completely before adding tiny black paw pads cut from paper-thin clay sheets. Form two black teardrop eye patches, flattening them onto the facial plane before inserting one-millimeter black clay spheres into the center for eyes. Bake the completed sculpture while supported directly on an oven-safe ceramic cup or spare rim to ensure the hooks maintain their grip angle during thermal curing.

2. Sleeping Fox Succulent Mound Hugger
Step-by-Step Guide
The sleeping fox mound hugger rests flat across the exposed soil surface of succulent pots, creating an earthy woodland atmosphere among low-growing rosettes. The design features a curled, crescent-shaped body where a bushy tail wraps fully around a sleeping face, forming a compact, rounded unit without protruding limbs. Saturated burnt orange clay forms the main volume, balanced by creamy ivory along the muzzle and tail tip, with deep charcoal accents detailing the ears. This low, horizontal profile keeps the sculpture resting securely on gravel top-dressing or granular soil, preventing it from shifting when the pot is moved. Because succulents require infrequent, targeted watering, the flat underside of the fox remains dry, preventing fungal growth underneath the ornament. The peaceful expression and warm autumnal color palette introduce cozy charm to sunny windowsills, blending smoothly with green echeverias, haworthias, and stonecrop clusters.
Begin by rolling an oval of conditioned terracotta-colored clay measuring fifty millimeters in length, tapering one end into a curved point to define the tail. Bend the entire shape into a tight C-shaped curve, pressing the bottom surface flat against a smooth tile to form a stable resting base. Roll a smaller teardrop of ivory clay and blend it over the tapered tail tip, using a needle tool to drag fine fur indentations along the seam line. Shape a small triangular fox head, attaching an ivory muzzle to the lower half before pressing two delicate, closed eyelid curves into the face with an arched needle point. Blend the head into the inner curve of the body, wrapping the tail over the lower portion of the muzzle so only the sleeping eyes remain visible. Cure the piece flat on an unglazed ceramic tile in a preheated oven, cooling it completely before brushing a clear matte water-resistant varnish over the underside.

3. Sprouting Seedling Soil Moisture Stake
Execution Process
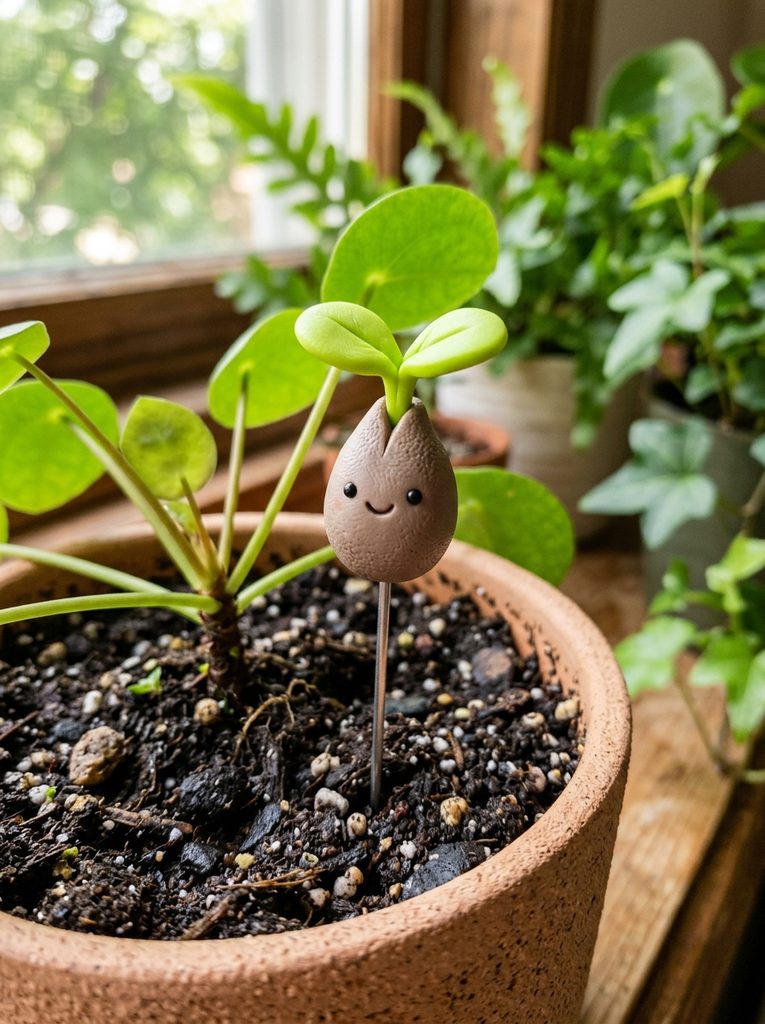
The sprouting seedling stake combines clean botanical styling with practical utility, serving as a visual accent that doubles as a soil-checking gauge. The design features a plump, smiling seed base that tapers upward into a bright green stem bearing two open cotyledon leaves. A twenty-gauge stainless steel craft wire core runs through the center of the sculpture, extending three inches below the clay base to anchor securely into potting mix. The smooth, cheerful face on the seed body brightens dark soil patches, while the upright green leaves mirror real plant growth within propagation trays. Inserting and withdrawing the metal stake allows indoor gardeners to inspect soil moisture levels clinging to the wire without disturbing delicate root systems. The minimalist design works across all planter sizes, from miniature three-inch starter pots to large floor containers, adding an understated, lighthearted touch to domestic plant collections.
Construct the internal support by cutting a five-inch length of stainless steel craft wire, bending the top half-inch into a tight loop with round-nose pliers to anchor the clay firmly. Roll a sphere of warm taupe or light brown clay around the wire loop, shaping it into an upright teardrop with a flattened base measuring twenty millimeters wide. Using a one-millimeter ball stylus, press two shallow eye sockets into the front of the seed body, inserting cured black clay beads before indenting a tiny upturned smile underneath. For the stem, roll an eight-millimeter cylinder of bright lime-green clay, splitting the top five millimeters into two halves and flattening each into an oval leaf shape. Blend the base of the green stem seamlessly into the upper crest of the brown seed using a pointed silicone tool, keeping the joint sturdy and clean. Bake the piece upright by pushing the exposed lower wire into a wad of aluminum foil, ensuring the stem remains vertical during heat curing.

4. Hanging Sloth Vine Branch Suspender
Setup Method
The hanging sloth suspender wraps its limbs around the sturdy stems of robust houseplants, introducing whimsical vertical interest among indoor foliage. The sculpture portrays a slow-moving sloth posed in a horizontal suspension, with elongated, curved limbs designed to hook around trailing stems, wooden stakes, or small bamboo trellises. Soft oatmeal-colored clay forms the textured body, complemented by a light cream facial mask, dark eye stripes, and detailed three-toed claws. This airborne arrangement uses the natural tensile strength of baked polymer clay to distribute weight across plant branches without bruising plant tissues. By elevating the decoration above the soil line, the piece stays free from watering splashes, keeping its surface pristine over long display periods. The gentle sloth persona pairs naturally with broad monstera vines, sturdy rubber tree branches, and climbing philodendrons, adding playful charm to vertical spaces.
Begin by cutting two identical three-inch pieces of sixteen-gauge aluminum craft wire, bending both into broad U-shapes to form the structural core for the front and rear limbs. Roll conditioned heather-beige clay into thick coils over the wire armatures, smoothing the clay uniformly while leaving the hooked wire tips exposed to receive the claws. Sculpt an oval torso around the center of both wire arches, using a coarse-textured sponge to press short, multi-directional fur textures across the entire back and side surfaces. Attach a rounded head to one end of the torso, blending a flat cream face plate over the front before adding horizontal chocolate-brown eye markings. Shape three tiny white clay claws onto each hooked foot, smoothing the seams securely around the inner wire tips to prevent detachment under load. Bake the sloth suspended across the edges of a metal baking rack so the curved limbs cure in their functional hanging shape without flattening.
5. Floating Cloud and Raindrop Trellis Charm
How to Make
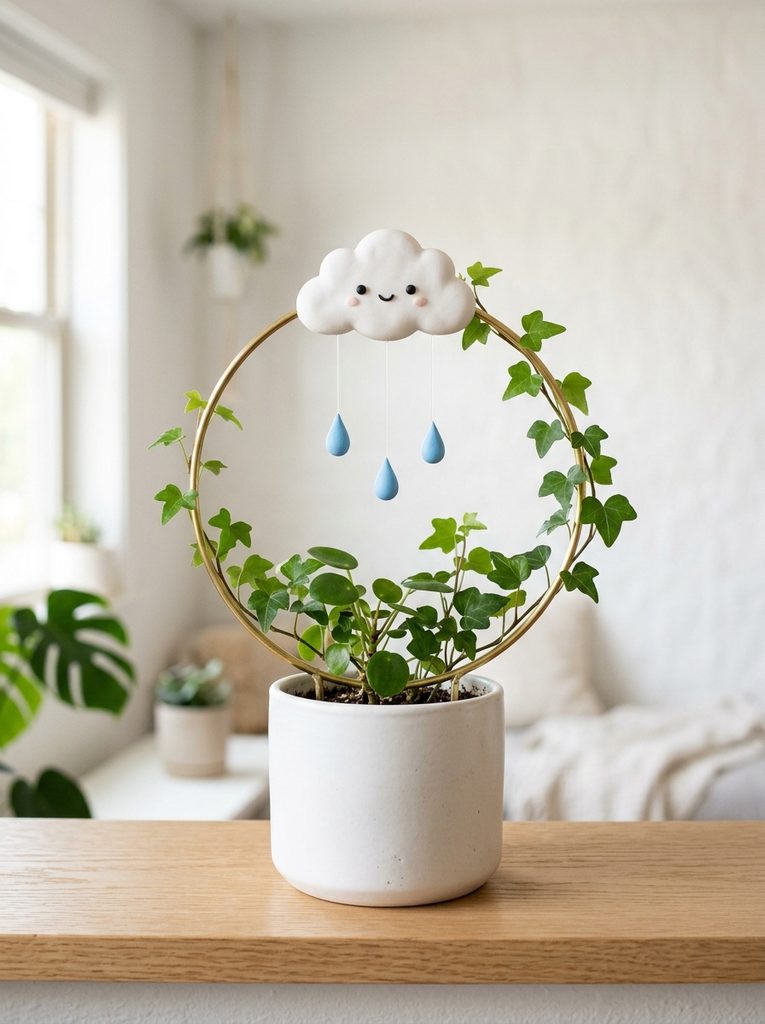
The floating cloud trellis charm brings a dreamy atmospheric motif to climbing houseplants, suspending delicate raindrops beneath a soft cumulus cloud. The sculpture consists of an unglazed white cloud with a smiling face, attached to the upper junction of a circular or U-shaped brass wire trellis. Three miniature sky-blue raindrops hang beneath the cloud on short monofilament lines, catching ambient room light and swaying with gentle room drafts. This overhead placement maximizes vertical sightlines, drawing the viewer’s eye upward along climbing vines like string of pearls or English ivy. The clean white and soft blue tones provide a refreshing visual break against dark green leaves, aligning with modern minimalist style aesthetics. The lightweight construction ensures the trellis remains upright within small containers without tipping, providing both reliable climbing support for new vine shoots and an eye-catching decorative focus.
Roll conditioned white clay into five connected spheres of varying sizes, pressing them together on an acrylic tile to form a puffy, twenty-millimeter-thick cumulus cloud silhouette. Smooth the perimeter seams with a flat silicone chisel, using a ball stylus to indent gentle cheek hollows and two sleeping eye arcs across the center sphere. Form three small teardrops from pale aqua clay, piercing a vertical hole through each pointed tip with a fine sewing needle to accommodate hanging threads. Bake the cloud and raindrops flat on a parchment-lined tray, allowing the pieces to cool completely inside the oven to prevent thermal shock fractures. Thread clear six-pound monofilament through each raindrop, securing the upper ends to tiny eye pins embedded into the lower curve of the cloud with liquid polymer glue. Fasten the completed cloud assembly to the top apex of a curved brass plant trellis using clear structural craft epoxy, pressing firmly until cured.

6. Playful Calico Cat Peeking Planter Pin
Execution Process
The calico cat planter pin is an expressive pot-edge accent that perches securely on the exterior wall of ceramic containers. The visual layout features a curious cat head with two front paws resting flat against the rim, giving the appearance of an inquisitive feline watching indoor plant growth. Clean white clay serves as the primary base, accented by asymmetric patches of soft peach and slate grey that define the calico patterning. The sculpture uses a compact horizontal footprint that hugs the container surface, preventing accidental dislodgement when watering or pruning plants. Placing this friendly feline accent against plain white or terracotta pottery softens utilitarian containers, turning basic windowsill arrangements into cohesive, artistic displays. The smooth, sealed clay surface wipes clean easily, keeping the piece bright and fresh within indoor garden areas.
Condition pure white clay alongside small portions of muted apricot and slate-grey clay, keeping your hands clean to preserve bright, crisp color boundaries. Roll a slightly flattened oval sphere measuring thirty-five millimeters wide for the cat head, shaping two perky triangular ears along the upper brow with pinched fingertips. Blend irregular calico spots onto the head using thin clay wafers, smoothing the edges flush into the white base with an acrylic blending tool. Sculpt two rounded paws from white clay, carving three delicate toe separations on each with a sharp needle point before positioning them flush under the lower chin. Indent two large, round eye sockets on the face, inserting glossy black clay spheres before adding fine white highlight dots and thin pink triangle noses. Bake the sculpture positioned over an oven-safe curved ceramic bowl rim, verifying that the rear curvature matches standard indoor plant pots before heat curing.

7. Pastel Snail Shell Mini Air Plant Holder
Step-by-Step Guide
The pastel snail mini air plant holder functions as both a freestanding sculpture and a living planter vessel designed specifically for small tillandsia air plants. The sculpture features a soft, stylized snail body in warm lavender clay, carrying a broad, hollowed spiral shell finished in pastel buttercup yellow. The opening of the shell cavity holds the base of an air plant securely, letting its green tendrils emerge like natural botanical plumes. Because air plants require no soil, this desktop sculpture can be positioned anywhere—on office desks, bathroom vanities, or sunny bookshelves—without messy potting dirt. The balanced base prevents the sculpture from tipping, even when displaying leafy, top-heavy plant specimens. The combination of modern pastel tones with living greenery introduces an approachable, handmade look that brightens compact living areas.
Roll an elongated cylinder of lavender clay, tapering the back into a tail while curving the front upward to form a friendly snail head measuring twenty millimeters wide. Indent two small smiling eyes on the face with a fine dotting tool, adding two short antenna stalks with rounded tips to the top of the brow. For the shell, roll a long, tapered coil of buttercup-yellow clay, winding it into a broad spiral while keeping the inner cavity open and hollowed. Use a rounded wooden modeling tool to expand the central opening of the yellow shell until it accommodates a fifteen-millimeter air plant base comfortably. Blend the base of the hollowed spiral shell onto the back of the lavender snail body using liquid clay, smoothing the join along the bottom. Bake the hollow structure supported by crumpled tissue paper or foil, cooling it thoroughly before resting a healthy miniature air plant inside the shell opening.

8. Honey Bee Hive Pot-Side Accent Clip
Setup Method
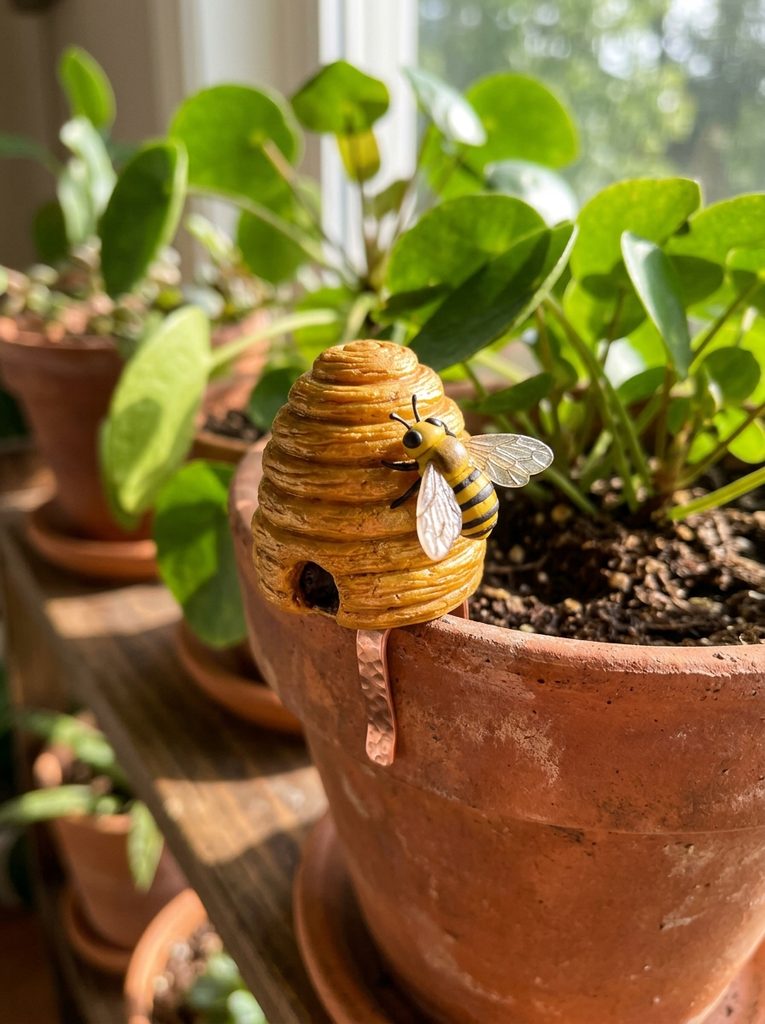
The honey bee hive clip adds sunny warmth to indoor plant pots by pairing an architectural beehive with an animated, resting honeybee companion. The design features a miniature golden-yellow skep hive adorned with horizontal ridges, attached securely to the outside of a planter using a flexible copper rim bracket. A plump miniature bee with delicate translucent wings perches on the side of the hive, introducing charming animal life to the display. The warm amber tones of the clay contrast vividly against deep green foliage, catching the eye and brightening low-light indoor corners. Because the bracket clips onto the container wall without penetrating the soil, this accent works well on shallow bonsai trays, hanging baskets, and self-watering pots alike. The durable baked clay structure resists indoor humidity, maintaining its structural integrity throughout seasonal indoor temperature changes.
Roll a smooth cone of golden-amber clay measuring thirty millimeters tall, pressing the base flat to form the classic dome shape of a traditional skep hive. Using a round stylus or smooth cord, press five horizontal grooves around the circumference of the cone at equal intervals to create realistic woven hive tiers. To build the bee, roll an eight-millimeter oval of bright yellow clay, wrapping two ultra-thin black clay strips around the abdomen before adding a rounded black head. Shape two teardrop wings from frosted translucent clay, scoring delicate vein lines across the surface with a needle tool before attaching them to the thorax. Bend an eight-centimeter strip of flat craft copper into a snug U-clip, pressing the front prong deeply into the back of the clay hive with liquid clay. Bake the hive with the metal clip in place, cooling completely before clipping the finished accent securely over the rim of your chosen planter.
9. Smiling Mushroom Cluster Soil Pick
How to Create
The smiling mushroom cluster soil pick brings whimsical woodland charm directly into indoor potting soil, creating an imaginative forest floor scene beneath tall houseplant stems. The sculpture features a cluster of three connected toadstools of varying heights, with broad terracotta-toned caps decorated with raised white spots. Each mushroom stem features an understated smiling expression, giving the cluster a friendly, animated personality that brightens potting containers. Mounted on a single concealed structural wire, this compact unit presses easily into potting soil, remaining upright without disturbing root networks. The earthy terracotta and crisp white colorway matches traditional clay pots and modern ceramic vessels, unifying different container materials across an indoor plant collection. This durable accent provides an imaginative, long-lasting touch that breaks up flat soil surfaces, adding vertical depth beneath large-leaf tropical plants.
Shape three individual mushroom stems of varying lengths between twenty and forty millimeters using conditioned ivory clay, flattening the bottoms onto a common connection slab. Insert a four-inch piece of galvanized wire through the central stem, leaving two inches extending from the base to serve as the soil anchor. For the caps, shape three domed circles from terracotta-red clay, hollowing out the undersides with a ball stylus to fit snugly over the ivory stem tops. Roll twenty tiny spheres of bright white clay, flattening them randomly across the red caps to create classic woodland mushroom speckles before mounting the caps onto the stems. Indent closed crescent eyes and tiny smiling mouths onto the ivory stems using a precision needle point, brushing soft pink chalk blush onto the cheeks. Bake the entire connected cluster upright in an oven, using a foil stand to keep the caps balanced and level throughout the curing process.

10. Resting Hedgehog Mini Plant Marker
Step-by-Step Guide
The resting hedgehog plant marker combines sweet character sculpting with functional label utility, identifying botanical varieties while adding gentle charm to container gardens. The sculpture portrays a small, rounded hedgehog lying flat on its belly, carrying a smooth, banner-like clay sign across its textured quills. Warm taupe clay forms the body, detailed with fine carved quill textures that contrast against a smooth, pale cream snout and pink paw pads. The integrated horizontal banner provides an erasable surface where plant owners can write botanical names, watering schedules, or propagation dates using a fine permanent marker. Resting directly on top of the soil, this low-profile accent remains stable without needing tall stakes, making it an ideal addition for compact windowsills, herb planters, and indoor seed-starting boxes. Its durable construction handles moist soil environments easily, providing functional plant organization wrapped in approachable handmade design.
Roll an egg-shaped core of warm taupe clay measuring forty millimeters in length, tapering the narrower front end into an upturned snout to shape the head. Using a pair of micro-embroidery scissors, make hundreds of tiny angled snips across the back and sides of the clay body, lifting the cut edges upward to create realistic raised quills. Blend a smooth, flat oval of ivory clay over the front of the head to form the face, pressing two black glass seed beads into the sides for eyes. For the plant label banner, roll a thin rectangular strip of white clay measuring ten millimeters wide by thirty millimeters long, smoothing it across the upper quills with liquid polymer adhesive. Indent two small rounded ears behind the facial boundary, using a dot of pink chalk pastel to highlight the inner ear hollows and the tip of the nose. Bake the hedgehog flat on an oven tile, allowing it to cool before writing the plant variety name across the white banner using an acrylic-safe permanent pen.
Common Beginner Mistakes and How to Avoid Them
A frequent mistake when creating polymer clay planter accents is neglecting to use an internal wire armature for extended limbs and stakes, causing delicate parts to bend or fracture under light handling. Thin clay sections, such as sloth arms, plant leaves, or long mushroom stems, become brittle when baked without a metallic wire core; always reinforce protruding structural elements with sixteen-to-twenty-gauge galvanized or aluminum wire. Another common issue is moisture degradation caused by direct, long-term contact with wet potting soil, which can soften poorly cured clay and encourage mineral deposits. Prevent water absorption by baking clay pieces for the full duration recommended by the clay manufacturer at an accurate, verified temperature, and seal surfaces touching the soil with two coats of clear, water-resistant polyurethane varnish. Beginners also struggle with visible fingerprints, dust particles, and lint marring light-colored clay surfaces. Eliminate surface imperfections by smoothing raw pieces with a cotton swab dipped in isopropyl alcohol before baking, and maintain a pristine, lint-free workspace by wiping tools and hands frequently with moist cleansing wipes.
Practical Tips for Achieving Professional Results
Achieving clean, refined results in clay miniature sculpting requires careful temperature monitoring, intentional texture development, and thoughtful post-bake finishing. Always place an independent, freestanding analog oven thermometer directly beside your baking tray to monitor true baking temperatures, as domestic ovens often experience heat spikes that can scorch delicate pastel colors. When texturing organic components like animal fur, mushroom caps, or foliage, avoid uniform, mechanical tool marks; vary the pressure, angle, and depth of your needle tools and sponges to produce an organic, natural surface finish. For pieces designed to hook over planter rims, measure the target container wall with a digital caliper or cardboard template before baking, shaping the clay directly over an oven-safe vessel of identical thickness to ensure a custom fit. After curing and cooling, apply high-grade acrylic paints with an ultra-fine detail brush to add eye highlights and blush details, sealing those painted accents with a durable UV-resistant matte or satin varnish. These careful finishing techniques turn simple clay figures into durable, professional-quality home decor accents.
Styling, Presentation, and Tabletop Organization
Thoughtful arrangement of your sculpted clay accents elevates an indoor houseplant collection into a cohesive, design-conscious botanical display. Group decorated plant containers in odd-numbered clusters of three or five on plant stands, floating display shelves, or wide windowsills to build visually dynamic vignettes. Vary the heights of the chosen containers and their accompanying clay accents—such as pairing a tall climbing sloth on a trellis with a low sleeping fox resting on succulent soil—to create pleasing vertical movement across the display area. Maintain aesthetic balance by matching clay color palettes to the room’s broader interior decor; neutral beige, terracotta, and soft sage tones coordinate naturally with Scandinavian, modern minimalist, and bohemian living spaces. Ensure adequate breathing room between containers so each miniature clay sculpture remains clearly visible without getting hidden behind dense neighboring foliage. For organized propagation stations, position uniform plant marker pins systematically down matching test-tube racks or ceramic starter trays to combine clean desktop organization with charming, handmade artistry.
Budget Considerations and Production Timeline Planning
Creating custom clay planter decorations is an economical home decor project that requires minimal financial outlay when planned and executed with clear workflows. Maximize budget efficiency by purchasing primary colors alongside large blocks of neutral white and translucent clay, mixing your own custom pastels, earthy terracottas, and sage tones rather than buying specialized pre-mixed shades. A standard two-ounce block of polymer clay yields multiple miniature planter accents, keeping material costs exceptionally low compared to store-bought ceramic figurines. To manage your crafting time efficiently, break production into organized batch sessions: spend the first work session conditioning clay, blending color palettes, and cutting internal wire armatures. Dedicate the second session to sculpting and detailing the character bodies, and use the third session for batch baking, cooling, detailing, and applying protective clear varnishes. Working in organized assembly stages saves time on tool cleanup, keeps your workspace tidy, and ensures consistent proportions and quality across your entire collection of handmade planter decor.
Creative Expansions and Advanced Variations
Once you have mastered foundational hand-building techniques, you can expand your plant decor projects into more intricate functional garden elements and multi-piece sets. Try integrating porous terracotta clay segments or unglazed ceramic wicks into your sculptures to create decorative self-watering probes that deliver moisture gradually from adjacent water reservoirs into potting soil. Explore mixed-media designs by embedding tumbled river stones, raw quartz points, or polished sea glass into the clay forms to introduce rich mineral textures alongside smooth character silhouettes. You can also craft modular, seasonal character sets featuring interchangeable seasonal accessories—like tiny winter hats, spring blossoms, or autumn pumpkins—secured with small neodymium magnets embedded beneath the clay surface. Advanced sculptors can scale up these methods to construct full-coverage decorative planter pot wraps, building textured brick, tree bark, or cobblestone facade rings that slide neatly over basic plastic nursery pots. These versatile hand-building techniques provide endless opportunities to develop unique, long-lasting accents that bring personality, color, and handmade charm to every corner of your indoor garden.
Leave a Reply