Polymer clay cuff bracelets provide an accessible, fashionable, and remarkably versatile medium for contemporary jewelry making, studio crafting, and bespoke wardrobe styling. Exploring fresh Pinterest ideas for handmade wrist accessories allows artisans to translate architectural curves, sculptural textures, and custom color harmonies into wearable statement pieces. This extensive guide outlines the structural foundations, baking science, surface patterning, and finishing methods required to build durable, comfortable cuffs that retain their curved tension without cracking. Readers will learn how to condition clay properly for flexibility, prepare metal blanks or heat-resistant armatures, construct seamless veneers, and seal surfaces against daily wear. Embracing this creative project offers exceptional practical utility because polymer clay produces lightweight, non-tarnishing bracelets that can be customized to match any wrist circumference. Unlike rigid cast metals or heavy carved stone, cured polymer clay provides slight ergonomic flex, allowing the wearer to slip cuffs on and off effortlessly without breaking the band. By understanding proper curing temperatures, structural thickness guidelines, and slab construction, beginners and seasoned crafters alike can produce boutique-quality accessories from a home workspace.
Why This Idea Is Trending or Useful
Handmade cuffs have gained immense traction across digital design boards because they merge accessible DIY fabrication with high-end runway aesthetics. From a practical standpoint, polymer clay wristwear provides an affordable alternative to traditional metalwork, bypassing the need for specialized jewelry torches, soldering stations, or expensive casting equipment. In modern design circles, bold organic accessories, earthy mineral surfaces, and sculptural geometric silhouettes continue to lead fashion styling, making oven-bake clay an ideal medium for rapid artistic experimentation. A beginner friendly cuff tutorial eliminates the intimidating barrier to entry in metalsmithing, offering an easy project pathway with minimal tools. The tactile pleasure of mixing custom pigments, rolling uniform slabs, and texturing malleable surfaces appeals strongly to makers drawn to tactile, mindful crafting. Furthermore, these wearable pieces take up very little studio space and utilize compact storage solutions, supporting simple home decor and desk organization. Trending ideas consistently highlight minimalist style lines, terrazzo flecks, faux stones, and gilded accents that seamlessly complement casual and formal outfits alike.
Materials and Preparation
Thorough planning and deliberate materials preparation establish the necessary structural integrity for durable, long-lasting cuff bracelets. Essential supplies include premium oven-bake polymer clay blocks, an acrylic rolling pin with depth guide rings, a smooth glass or ceramic work tile, and an ultra-sharp carbon steel tissue blade. Armature components require aluminum or brass cuff blanks, heat-resistant glass bottles, or aluminum foil forms to support curved profiles during the thermal curing cycle. Surface manipulation tools include micro-cutters, silicone sculpting shapers, sandpaper sheets spanning from four-hundred to two-thousand grit, and dedicated clay adhesives. Workspace preparation begins with wiping down all rolling surfaces, knives, and ceramic work tiles using isopropyl alcohol to eliminate static lint and residual dust. Wash hands thoroughly or wear non-powdered nitrile gloves to prevent transferring skin oils and stray fibers onto light-colored clays. Accurate temperature management is essential; place an independent internal oven thermometer inside your baking chamber, as standard kitchen dials often show inaccurate temperatures that could scorch delicate pigments.
1. Terrazzo Mosaic Wide Band Cuff
Step-by-Step Guide
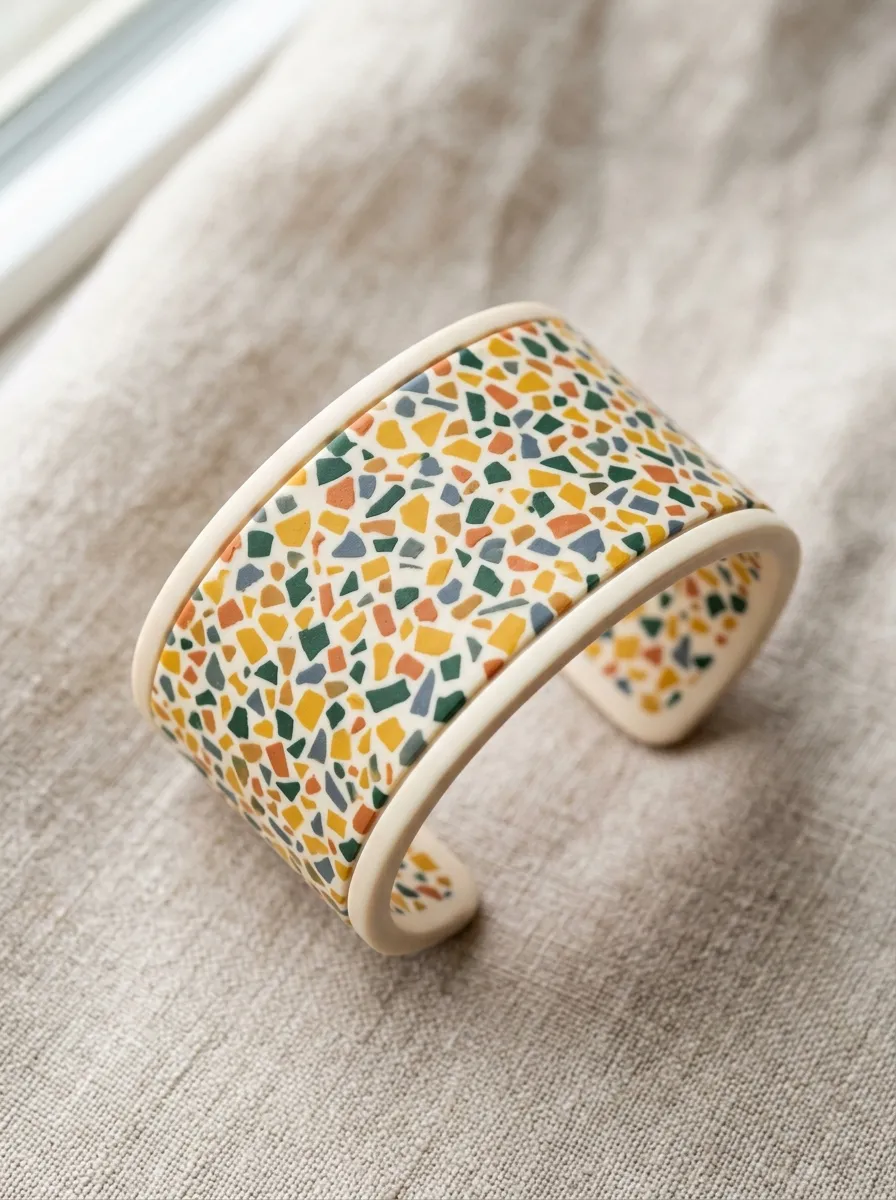
The terrazzo mosaic wide band cuff translates ancient Italian stone surfacing into an eye-catching, modern wrist accessory. This design features a wide, flat profile embedded with multicolored, irregular geometric clay fragments that sit flush within an off-white or neutral base slab. The contrast between crisp geometric perimeters and spontaneous, scattered micro-chips creates an artistic balance suitable for both minimalist style wardrobes and vibrant statement dressing. Because the terrazzo fragments are rolled completely flat into the foundation clay, the cuff maintains a smooth, continuous surface without snagging knitwear or fabric sleeves. The wider silhouette, measuring between one and a half to two inches across, provides generous visual impact while evenly distributing the bracelet weight across the wrist. This piece is particularly resilient because the double-layered slab construction creates a reinforced core that bends gently during wear without fracturing. Creating this mosaic cuff builds foundational skills in color balancing, veneer leveling, and trimming clean parallel edges.
Begin by conditioning an ivory or porcelain-colored clay block for the foundation slab, rolling it to an even three-millimeter thickness using depth guide rings on an acrylic roller. Gather cured or uncured clay scraps in mustard yellow, dusty terracotta, forest green, and slate gray, slicing them into flat, angular chips using a flexible tissue blade. Scatter these colored fragments across the surface of the raw ivory slab, leaving deliberate negative space between the pieces to highlight the composite stone effect. Lay a sheet of clean deli parchment paper across the assembled surface and burnish firmly with your acrylic roller until all fragments merge flush into the base. Trim the leveled slab into a rectangle measuring six inches long by one and a half inches wide using an aluminum ruler and razor blade. Mold the flat strip smoothly over an aluminum cuff blank coated with liquid polymer clay, burnishing the edges to prevent air bubbles. Bake at 130 degrees Celsius for forty-five minutes, cool completely, and wet-sand the surface to reveal crisp, vibrant terrazzo contours.
2. Sculpted Botanical Foliage Open Cuff

How to Create
The sculpted botanical foliage open cuff incorporates three-dimensional relief sculpting, bringing delicate garden vines and layered leaves into contemporary jewelry design. This concept utilizes an open C-shaped cuff base adorned with low-relief leaves, overlapping flower petals, and slender vine tendrils sculpted from muted earthy clays. The visual appeal centers on the interplay of light and shadow across the dimensional organic textures, contrasting with the smooth, comfortable inner band that sits against the skin. Sage greens, eucalyptus tones, and soft olive shades create an organic palette that pairs naturally with linen apparel and flowing warm-weather garments. Because the botanical elements are anchored along the exterior spine, the interior band remains completely flat and smooth to prevent skin irritation. The open-gap cuff configuration allows for slight manual adjustments, making it easy to slip the bracelet over the wrist bone. Crafting this botanical design develops fine motor control in shaping micro-sculptures, scoring join seams, and balancing dimensional relief without creating fragile, protruding edges.
Roll out a dense, three-millimeter strip of slate gray or deep olive clay to form a smooth base strap measuring six inches in length. Condition small portions of sage green, moss, and pale cream clay, shaping them into teardrop leaf beads by rolling tiny balls between your fingertips and pinching the tips. Flatten each leaf slightly, scoring a central stem line and delicate diagonal veins using a needle tool or the thin edge of a craft blade. Lightly brush the exterior of the base strap with liquid polymer clay to serve as a thermal bonding agent for the decorative overlay. Arrange the sculpted leaves along the base strip in a winding, overlapping botanical pattern, pressing the base of each leaf firmly onto the strap with a silicone-tipped tool. Wrap the assembled band carefully around a clean, heat-resistant glass jar or an aluminum bracelet mandrel to form a rounded C-curve. Bake the curved assembly at 130 degrees Celsius for forty minutes, allowing the piece to cool fully inside the oven before gentle removal.
3. Faux Turquoise Split-Band Wire Cuff

Execution Process
The faux turquoise split-band wire cuff combines the rustic appeal of Southwestern silversmithing with the lightweight versatility of polymer clay. This design features a central faux turquoise stone set within an open, dual-strand band that mimics soldered sterling silver wire. The simulated turquoise is crafted by blending translucent cyan, teal, and brilliant white clays with dark metallic acrylic veining to replicate natural mineral matrix lines. Surrounding the faux gemstone with a silver-pigmented clay bezel frame gives the finished piece the appearance of heavy metal jewelry without the excessive wrist fatigue. The split-band design reduces material bulk around the sides of the wrist, allowing better airflow and enhanced comfort in warm weather. This project appeals to crafters who love vintage bohemian accessories, turquoise jewelry, and heritage artisan aesthetics. Making this hybrid accessory teaches advanced techniques in faux-stone formulation, metallic clay imitation, matrix distressing, and structural wire armature wrapping.
To make the turquoise stone, blend cyan, mint, and translucent clay into an uneven cylinder, then tear the cylinder into irregular chunks. Roll the clay chunks in dark brown acrylic paint or black mica powder, allow the coating to dry completely, and compress the chunks firmly back into a solid block. Slice thin cross-sections from the block with a sharp tissue blade to expose realistic mineral matrix veins, shaping the slices into a smooth oval cabochon. Form two twelve-gauge aluminum craft wires into parallel C-curves, wrapping them neatly with thin strips of silver-pigmented polymer clay to mimic silver wire bands. Join the two parallel bands at the center with a flat oval clay platform, securing the faux turquoise cabochon on top with liquid clay. Add a narrow, rope-textured clay border around the cabochon perimeter to simulate a traditional jeweler’s serrated bezel. Bake the entire wire-supported structure at 130 degrees Celsius for forty-five minutes, and finish by buffing the central stone with denim fabric to achieve a high-gloss natural polish.
4. Architectural Ribbed Column Cuff
Setup Method
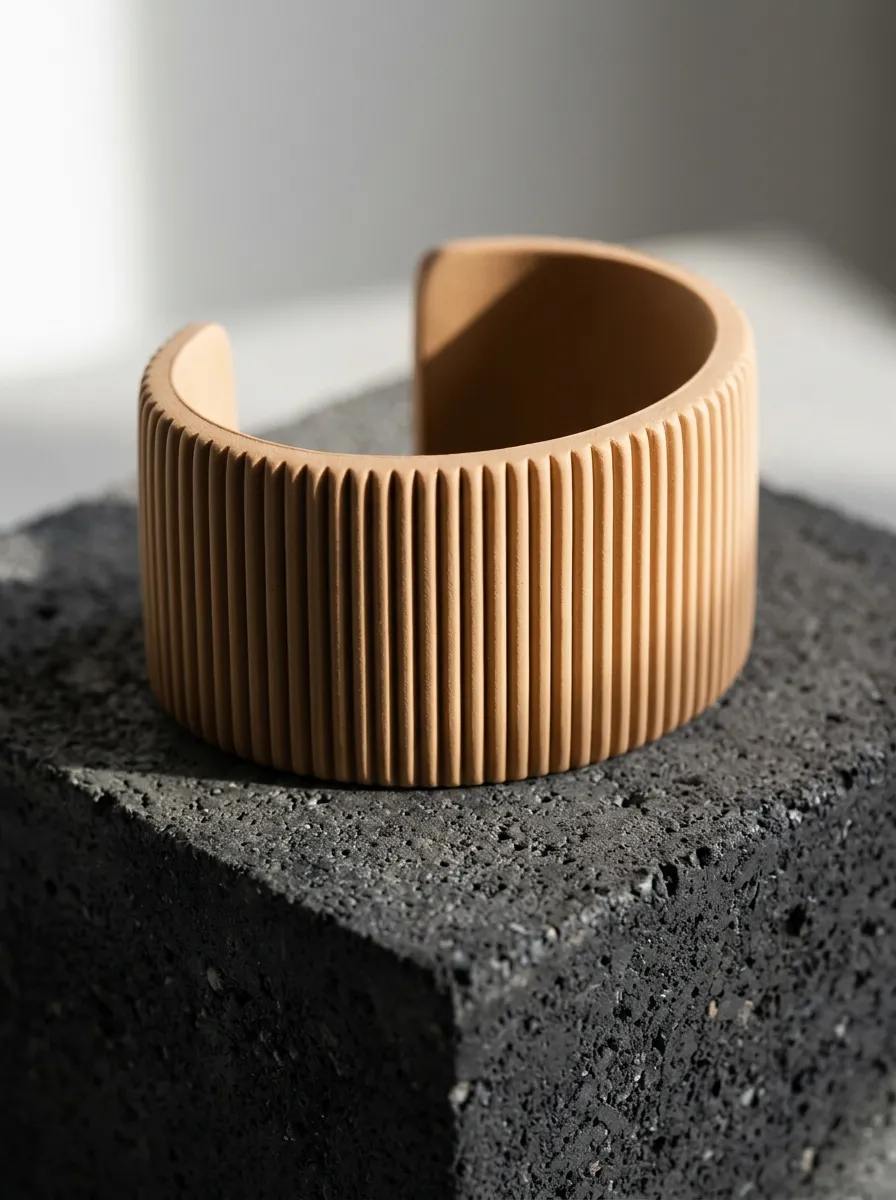
The architectural ribbed column cuff draws inspiration from classical Greco-Roman fluting and modern Scandinavian interior paneling. This minimalist style bracelet features parallel, vertical linear ridges that run cleanly across the exterior surface of a thick, rounded band. The linear repetition creates a refined play of light and shadow, giving monochrome palettes like bone white, warm sandstone, or charcoal slate a striking tactile presence. Its structured silhouette looks bold and tailored, making it a natural complement to crisp blazers, poplin button-downs, and minimalist outfits. By engineering the interior surface with a flat, continuous lining, the cuff rests comfortably against the wrist while the raised exterior ridges provide structural rigidity. The thickness of the band gives it substantial visual presence, ensuring it holds its form during daily movement. Building this architectural cuff sharpens precision cutting skills, straight-edge alignment, and methods for embedding uniform linear textures onto curved accessories.
Roll a conditioned sheet of sand-colored clay to an exact four-millimeter thickness using plastic depth rings, smoothing the surface on a clean glass tile. Press a flexible linear ribbing texture mat firmly across the slab with an acrylic roller, or score parallel vertical grooves at three-millimeter intervals using a blunt metal ruler. Trim the textured slab into a clean rectangle measuring six inches long by one and a quarter inches wide, ensuring the vertical ribs run perpendicular to the long edges. Cut a second, smooth clay strip of matching dimensions at a two-millimeter thickness to serve as an interior backing layer. Sandwich a thin, flexible brass cuff core between the textured exterior and the smooth interior lining, burnishing the perimeter seams together with a silicone tool to encase the metal completely. Gently bend the laminated band into an ergonomic oval wrist profile, smoothing the end margins with a damp finger to eliminate rough corners. Bake the curved cuff on a bed of baking soda at 130 degrees Celsius for fifty minutes to prevent flat spots on the base.
5. Sunset Gradient Ombre Statement Cuff
How to Make
The sunset gradient ombre statement cuff captures the radiant transition of evening skies through a smooth blend of warm, glowing colors. This concept uses the Skinner blend technique to merge rich crimson, burnt orange, golden marigold, and soft blush pink into an unbroken horizontal gradient. The seamless transition of shades creates an eye-catching focal piece that adds warmth and energy to simple, neutral clothing. The cuff features an asymmetric tapered profile, widening to nearly two inches on one side while narrowing to an inch on the opposite end, creating a dynamic diagonal flow across the wrist. Because the colors are blended directly within the clay rather than painted on the surface, the vivid gradient will never chip, fade, or wear away from skin contact. This project teaches essential color theory, continuous sheet folding, and how to use a clay conditioning machine to create flawless gradient veneers.
Prepare two triangular clay sheets of equal thickness: one composed of deep crimson clay and the other of bright marigold yellow. Place the two triangles together to form a square, and feed the sheet through a clay conditioning machine folded edge first, repeating the folding and rolling process twenty-five times until the seam blurs into a smooth gradient. Roll the blended sheet to a thickness of two point five millimeters, then lay it over an uncolored backing slab to add structural strength. Trim the layered slab into an asymmetrical trapezoid that widens from one inch at one end to two inches at the other, maintaining a total length of six and a half inches. Smooth the edges with a tissue blade, then wrap the tapered band around a parchment-lined ceramic mug to preserve its curved shape during curing. Bake the piece at 130 degrees Celsius for forty minutes, allowing it to cool gradually inside the oven. Once cool, wet-sand the surface with ultra-fine twelve-hundred-grit sandpaper and polish with a soft cotton cloth for a satin sheen.
6. Faux Horn and Tortoiseshell Bangle Cuff

Step-by-Step Guide
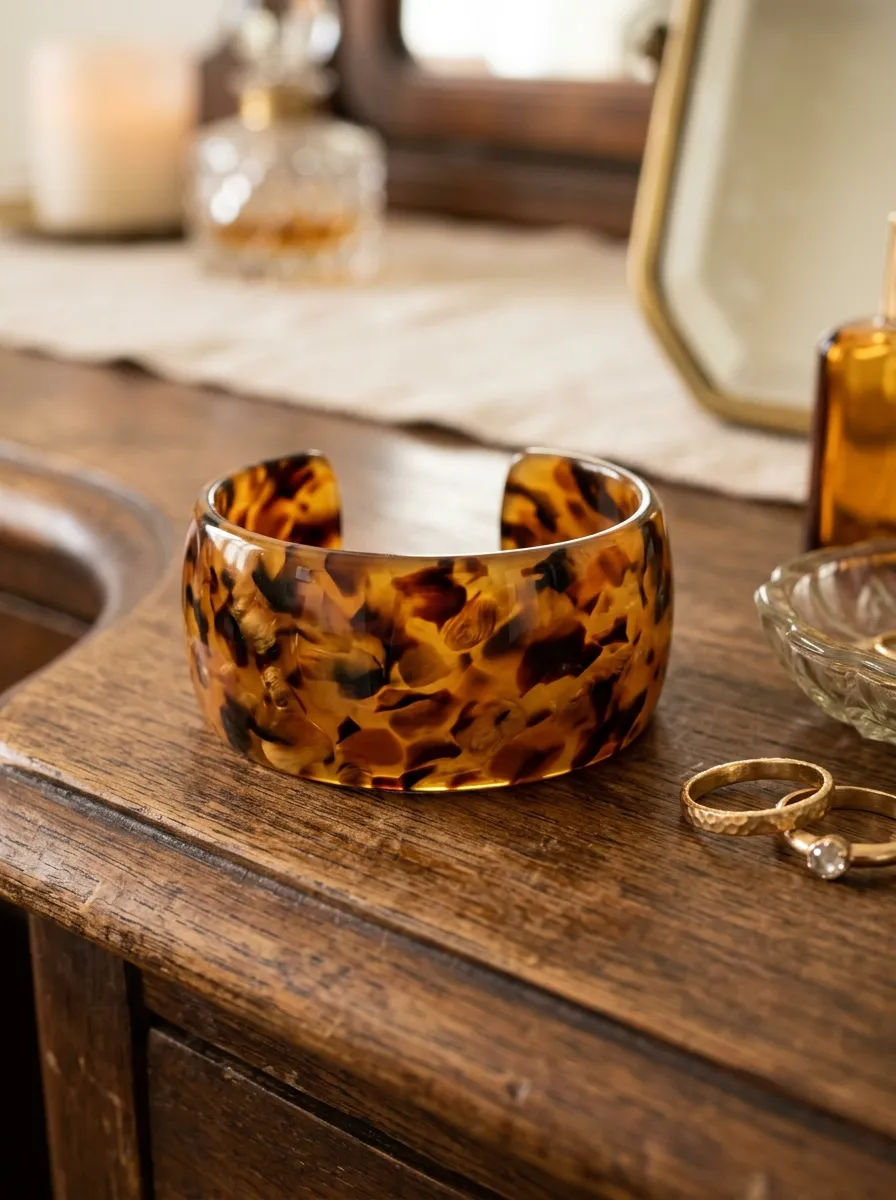
The faux horn and tortoiseshell bangle cuff brings timeless luxury and mid-century warmth to everyday jewelry collections through translucent, amber-toned patterns. This design replicates natural tortoiseshell and polished horn by layering translucent amber, warm caramel, and rich espresso clays into an organic, dappled pattern. The resulting material possesses luminous optical depth, allowing ambient light to pass through the lighter amber areas while dark brown flecks float beneath the polished surface. Styled with an open-back cuff silhouette rather than a closed circle, this bracelet is easy to slide on and off, offering a comfortable fit for diverse wrist sizes. Its neutral, warm-toned palette coordinates effortlessly with autumn knits, leather handbags, and gold jewelry accents. Crafting this classic pattern helps makers master translucent clay behavior, avoid pigment clouding during heating, and use layering techniques that simulate genuine horn without utilizing animal products.
Condition four parts translucent clay, two parts amber-tinted translucent clay, and one part rich chocolate brown clay until completely pliable and free of air bubbles. Tear the chocolate brown clay into paper-thin, irregular flakes, pressing them randomly across a rolled sheet of amber translucent clay. Fold the slab over onto itself three times, compressing the layers into a dense block, and slice thin horizontal veneers from the top to expose suspended, organic color spots. Lay these patterned veneers over a sturdy, three-millimeter-thick core slab of translucent amber clay, rolling the combined surface smooth with an acrylic pin. Cut a straight band measuring six inches in length by one and a quarter inches in width, softening the sharp corner edges with a fine craft blade. Form the strip over a curved aluminum bracelet blank, smoothing the edges with a drop of isopropyl alcohol to remove surface fingerprints. Bake at 130 degrees Celsius for forty-five minutes, let the piece cool completely, and coat with two layers of water-based gloss glaze to maximize amber translucency.
7. Geometric Color-Blocked Mod Cuff

How to Create
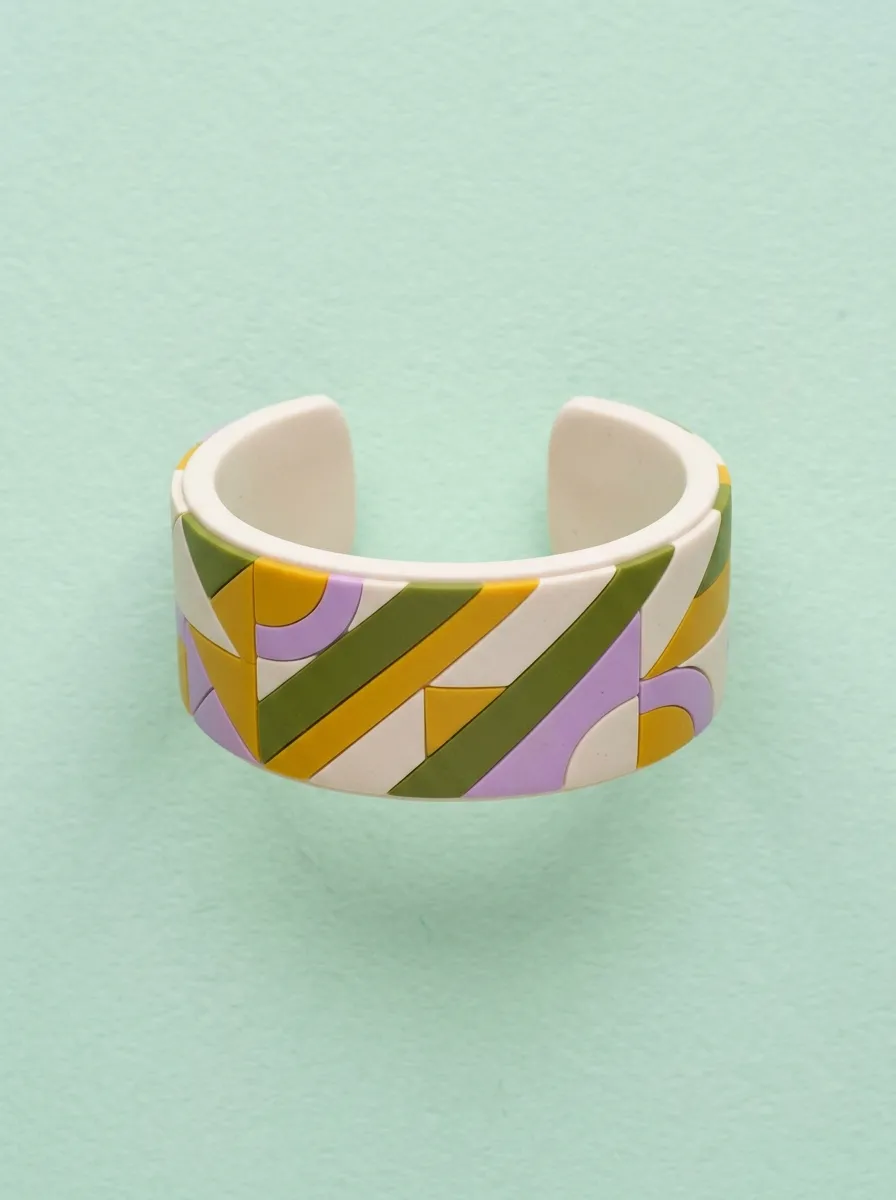
The geometric color-blocked mod cuff draws inspiration from 1960s pop art and retro graphic design, utilizing clean, contrasting geometric color fields. This piece features crisp diagonal, triangular, and semicircular sections of clay laid edge-to-edge across a flat band, forming an eye-catching graphic pattern. High-contrast pairings like olive green, mustard yellow, bright lavender, and off-white establish a playful yet refined aesthetic that pops against neutral clothing. The seamless, flush-inlaid construction ensures that all color blocks sit on an identical plane, creating a smooth finish that won’t catch on delicate fabrics. The medium-width silhouette provides a balanced visual anchor on the forearm, working equally well on bare wrists or styled over the cuff of a fitted long-sleeve top. Constructing this retro mod cuff builds precision cutting skills, straight-edge alignment, and the gentle burnishing techniques required to join contrasting clay components without distorting adjacent color blocks.
Condition four contrasting colors of clay, rolling each color into a flat sheet measuring an exact three-millimeter thickness using depth guide rings. Using an acrylic cutting ruler and a sharp scalpel, cut sharp geometric tiles, including forty-five-degree triangles, parallelograms, and rectangular stripes. Arrange these colorful geometric tiles on a smooth ceramic tile, fitting the cut edges tightly together like puzzle pieces to form a continuous patterned band measuring six by one and a half inches. Place a sheet of smooth deli parchment paper over the assembled layout, burnishing it in small circles with an acrylic roller until all seams fuse flush together. Trim the outer borders into a clean rectangle with gently rounded corners to prevent sharp points from digging into the skin. Wrap the flat mosaic strip around an oven-safe aluminum cuff form, smoothing the inner curve with a silicone tool to eliminate air gaps. Bake the cuff at 130 degrees Celsius for forty minutes, allowing it to cool slowly to room temperature before handling.
8. Hammered Metallic and Matte Clay Hybrid Cuff
Execution Process
The hammered metallic and matte clay hybrid cuff pairs the refined look of hand-beaten metalwork with the velvety finish of modern polymer clay. This design is visually split down its length: one half features a smooth, matte finish in deep charcoal, while the other showcases a textured, hammered surface treated with rich copper or gold metallic mica powders. The subtle boundary between smooth clay and reflective metallic texture creates an appealing high-low contrast that feels contemporary and upscale. The hammered texture catches directional light beautifully, while the dark matte section grounds the accessory with architectural minimalism. The band is reinforced with an embedded metal strip, giving it structural resilience and allowing the wearer to gently adjust the curve to their wrist. Making this hybrid cuff teaches techniques for applying mica powders, sculpting faceted dimples with ball tools, and encasing structural metal inserts inside clay slabs.
Roll out two separate sheets of black or charcoal clay to a thickness of two millimeters, ensuring both sheets are completely free of surface dust. Cut a strip of thin, flexible brass or aluminum craft metal measuring five and a half inches long by one inch wide to serve as the internal support core. Sandwich the metal strip between the two black clay sheets, burnishing the outer seams with a silicone tool to seal the metal securely inside. Along one longitudinal half of the exterior face, press a small, rounded ball-end stylus repeatedly into the clay to create an irregular, hand-hammered dimple texture. Using your fingertip or a soft makeup sponge, gently buff radiant bronze or copper mica powder across the hammered dimples, leaving the adjacent smooth half unpowdered. Form the layered strip into an ergonomic oval cuff shape around a wooden bracelet mandrel, checking that the edges remain neat and symmetrical. Bake the cuff at 130 degrees Celsius for forty-five minutes, allowing it to cool completely before applying a matte sealant over the smooth charcoal section.
9. Monochromatic Braided Cable Cuff

Setup Method
The monochromatic braided cable cuff reinterprets chunky knitwear and nautical ropes through sculpted, interwoven clay strands. This dimensional design incorporates three or four round clay ropes braided tightly together, framed by clean, smooth border rails that protect the delicate braided pattern. Choosing a single, uniform shade—such as terracotta, soft ecru, or deep forest green—highlights the physical texture of the twisted strands rather than relying on color contrast. The raised braided relief adds tactile depth, catching ambient light gracefully along the curves of the wrist. Despite its chunky, dimensional appearance, the hollow interior spaces beneath the braids keep the bracelet lightweight and comfortable for all-day wear. The cuff makes a stylish companion to cozy sweaters, denim jackets, and tailored autumn outerwear. Creating this braided cable cuff develops skills in extruding uniform clay coils, braiding multi-strand ropes evenly, and fusing textured elements securely onto a stable foundation base.
Use a hand-held clay extruder fitted with a three-millimeter circular disc to extrude three long, uniform snakes of conditioned clay in your chosen color. Anchor the top ends of the three strands to a ceramic work tile, braiding them together carefully while maintaining consistent tension to ensure even, uniform twists. Roll a separate flat clay backing strip measuring six inches long, one inch wide, and two millimeters thick to serve as the supporting base. Brush the top surface of the backing strip lightly with liquid polymer clay, then center the braided rope assembly along the length of the base. Extrude two additional thin, two-millimeter clay coils and place them along either side of the central braid to create clean outer containment rails. Trim the ends flush with a sharp razor blade, then curve the assembled bracelet smoothly around a parchment-covered aluminum can. Bake the curved assembly at 130 degrees Celsius for forty-five minutes, allowing the braided structure to cure fully and cool to room temperature before wear.
10. Abstract Terrazzo and Raw Brass Inset Cuff

How to Make
The abstract terrazzo and raw brass inset cuff blends modern polymer clay with polished metallic hardware for a luxurious, mixed-media finish. This design features a molded polymer clay cuff body with an open front gap, accented by a solid raw brass geometric bar embedded securely into the top face. The clay body can be finished in an understated stone-like terrazzo or solid neutral hue, serving as an organic, matte pedestal for the gleaming metal accent. The combination of industrial brass and warm, tactile clay reflects modern mid-century architecture and boutique jewelry trends. The brass insert provides structural rigidity across the center of the band, while the clay curves comfortably around the sides of the wrist. This piece is particularly appealing for elevated evening wear, art gallery openings, and modern professional settings where unique artisan jewelry stands out. Making this mixed-media cuff teaches techniques for embedding metal components, accounting for differing thermal expansion rates, and securing long-lasting mechanical bonds.
Roll out a conditioned slab of oatmeal-colored clay mixed with fine black sand to an even four-millimeter thickness on a glass work tile. Cut a rectangular band measuring six inches long by one and a quarter inches wide, smoothing the outer perimeter and corners with an alcohol-dampened sponge. Press a flat, polished raw brass bar—measuring one and a half inches long and a quarter inch wide—firmly into the center face of the raw clay band until it sits flush. Carefully remove the brass bar to leave a clean recessed cavity, then coat the indentation with heat-resistant industrial craft adhesive or liquid polymer clay. Reinsert the brass bar into the coated channel, smoothing the surrounding clay borders neatly against the metal edges with a flat sculpting tool. Bend the assembled band around a curved, heat-resistant metal bracelet mandrel, keeping the brass insert centered along the top arc. Bake the cuff at 130 degrees Celsius for forty-five minutes, cooling it slowly inside the oven to prevent stress fractures from differing material expansion rates.
Common Beginner Mistakes and How to Avoid Them
Beginners crafting polymer clay cuff bracelets often face issues with structural brittleness, surface cracking, and improper sizing that can affect the finished piece. The most common error is underbaking the clay; polymer clay requires sufficient baking time at a steady, accurate temperature to complete its cross-linking process and become strong and flexible. Using an uncalibrated residential oven can lead to underbaked, brittle clay that snaps when bent around the wrist. Always use an independent oven thermometer to verify the internal temperature, curing your cuffs for at least thirty-five to fifty minutes at the manufacturer’s specified heat. Another frequent mistake is rolling slabs too thin; a cuff made under two millimeters thick will lack the structural strength needed to hold its shape over time. Maintain a core thickness between three and four millimeters, or reinforce the clay with an embedded metal strip. Additionally, trapping air bubbles between laminated clay layers can cause visible blisters or surface cracks during the baking cycle. Always roll clay slabs in a single direction, burnishing layers carefully with parchment paper, and prick any visible air pockets with a needle tool before shaping.
Practical Tips for Better Results
Achieving professional, boutique-quality results with polymer clay cuffs comes down to mindful preparation, clean construction, and careful post-bake finishing. Chill conditioned clay slabs in the refrigerator for ten minutes before cutting; cold clay cuts cleanly without dragging or distorting your straight edges and right angles. When smoothing raw clay perimeters and seams, use a silicone shaper lightly dampened with ninety-nine percent isopropyl alcohol to dissolve minor surface scratches, tool marks, and fingerprints before the piece goes into the oven. For comfortable daily wear, round off the interior and exterior edges of your cuff with fine sandpaper; softening the corners prevents sharp margins from digging into the skin when putting the bracelet on. Wet-sand your cured cuffs in a shallow bowl of water using silicon-carbide sandpaper, progressing sequentially from six-hundred-grit up to two-thousand-grit to achieve a silky, stone-like texture without needing chemical varnishes. Finally, if you are crafting open C-cuffs without an internal metal core, shape the uncured band over an oval form rather than a round one; an oval profile mirrors the natural anatomy of the wrist, providing a more secure, ergonomic fit.
Styling, Presentation, or Organization Ideas
Curating how you display and style your polymer clay cuffs can transform everyday accessories into striking design statements. When styling these cuffs, pair bold, textured statement pieces with clean, minimalist clothing like crisp linen shirts, monochrome knitwear, or structured shift dresses to let the artisan details stand out. Alternatively, create an eclectic, curated look by stacking a slender ribbed cuff alongside delicate metal chain bracelets, leather wraps, or minimalist rings. For bedroom organization and studio display, store your cuffs on a cylindrical wooden jewelry bar, a vertical linen-wrapped bracelet tower, or an open ceramic vanity tray. Storing cuffs upright preserves their curved tension and protects textured surfaces from abrasive contact with other metal jewelry. If you are preparing these bracelets as handmade gifts or for craft markets, mount each cuff on a sturdy, custom cardstock sleeve stamped with care instructions and gentle cleaning guidelines. Include a soft microfiber storage pouch with each piece to protect the smooth finish from dust and friction during travel.
Budget or Time Planning
Crafting polymer clay cuff bracelets is an affordable, time-efficient hobby, making it an ideal creative project for budget-conscious makers. A standard two-ounce block of polymer clay can yield one to two medium-width cuffs, while purchasing value-sized multipacks provides an economical way to experiment with custom color palettes and matching accessory sets. To keep initial tool costs low, make use of common household items: smooth glass drinking jars work well as rolling pins, clean aluminum food cans serve as curved baking mandrels, and craft utility knives can replace specialized clay blades. You can also organize your production time into efficient, enjoyable stages: spend one afternoon conditioning clay, mixing custom color recipes, and rolling base slabs; dedicate the next session to cutting shapes, applying textures, and molding curves; and reserve a final window for baking, wet-sanding, and polishing. Most individual cuffs require only thirty to forty-five minutes of hands-on shaping time, offering quick, satisfying creative results. Batching similar steps helps minimize material waste, allowing you to save excess scraps in airtight containers for future terrazzo or marbled projects.
Creative Expansion and Advanced Inspiration
Once you feel confident with basic slab-building and curved forming techniques, you can explore exciting new creative variations by combining mixed media, advanced textures, and dynamic finishes. Experiment with surface treatments by applying metallic gold leaf, alcohol ink washes, or silk-screen acrylic patterns across raw clay slabs before cutting, unlocking intricate decorative designs that go beyond simple sculpting. You can also incorporate genuine semi-precious stone chips, faceted glass beads, or woven embroidery threads directly into the clay base to create rich, multi-textured statement jewelry. Think about adapting these cuff construction methods into matching accessory sets, translating your cuff patterns into coordinated dangle earrings, pendant necklaces, or sculptural hairpins. Advanced makers can also explore complex cane-building techniques, stacking colored clay logs to produce detailed floral, retro, or geometric patterns that run through the entire depth of the band. Pushing beyond traditional techniques allows you to turn humble modeling clay into functional, wearable art that expresses personal creativity and elevates your everyday style.
Leave a Reply