Handmade artisan jewelry offers an expressive, accessible outlet for personal styling, and polymer clay earrings for summer have become essential statement accessories. Crafting wearable clay pieces combines color theory, tactile sculpture, and mechanical assembly into a rewarding creative project. This comprehensive guide details ten original, beginner friendly polymer clay earring designs tailored specifically for warm-weather styling, tropical vacations, and sunlit gatherings. Readers will learn the precise steps required to condition polymer clay, execute clean slab cuts, incorporate mixed-media components, and cure pieces to optimal structural flexibility. You will discover practical ways to balance lightweight wearing comfort with physical durability, ensuring that every handmade pair withstands daily movement and summer heat without warping or snapping. Understanding proper curing temperatures, hole-drilling techniques, and hypoallergenic hardware assembly helps crafters bypass common manufacturing hurdles and achieve boutique-quality results. Whether you are seeking budget ideas to start a handcrafted jewelry line, refreshing your personal warm-weather wardrobe, or exploring modern design concepts through tactile craft, this tutorial delivers structured technical guidance. By mastering these foundational methods, you will understand how to transform raw oven-bake clay into enduring, professional jewelry pieces that elevate your seasonal aesthetic.
Why This Idea Is Trending or Useful
Polymer clay jewelry continues to dominate modern Pinterest inspiration because it pairs bold visual scale with negligible physical weight. Traditional metal or resin statement earrings often pull heavily on the earlobes, causing discomfort during active summer outings and outdoor events. Polymer clay solves this ergonomic challenge completely; even oversized geometric statement drops weigh only a few grams, allowing comfortable day-long wear in warm weather. From a creative perspective, oven-bake polymer clay provides unmatched color customization, enabling makers to mix custom summer palettes featuring citrus neons, terracotta neutrals, coastal seafoam, and pastel tones. The medium requires no specialized studio infrastructure, kiln, or toxic chemical solvents, making it remarkably accessible for home crafters working on kitchen countertops. Beginners can start crafting with minimal upfront financial investment using basic cutting blades, household tile baking surfaces, and domestic ovens. The rapid satisfaction of moving from raw clay block to fully cured, wearable accessory within two hours drives widespread DIY appeal. Furthermore, clay jewelry effortlessly complements light linen garments, sun hats, and seasonal swimwear, securing its status among trending ideas for contemporary accessory design.
Materials and Preparation
Thorough planning and proper tool preparation are critical to achieving smooth surfaces and durable finishes in polymer clay crafting. Gather high-density polymer clay blocks in targeted seasonal colorways, ensuring you select brands known for post-bake flexibility rather than brittle formulations. Assemble essential modeling equipment: an acrylic rolling pin or stainless steel clay conditioning machine, rigid tissue slicing blades, precision craft knives, micro-geometric cutters, silicone texture sheets, and an acrylic work tile. For hardware assembly, prepare stainless steel or titanium ball posts, hypoallergenic jump rings in multiple millimeter gauges, silicone earring backs, flat-nose jewelry pliers, and a hand drill fitted with micro drill bits. Work on an ultra-smooth, lint-free surface such as a glazed ceramic tile or tempered glass cutting board to prevent surface marring. Clean your hands, cutting tools, and work surface thoroughly with isopropyl alcohol before handling light-colored clay to remove stray dust particles. Calibrate your domestic oven using a standalone internal oven thermometer; accurate thermal control prevents scorching lighter pigments while ensuring complete molecular cross-linking for long-term durability.
Idea 1: Citrus Sunset Terrazzo Arches
Step-by-Step Guide
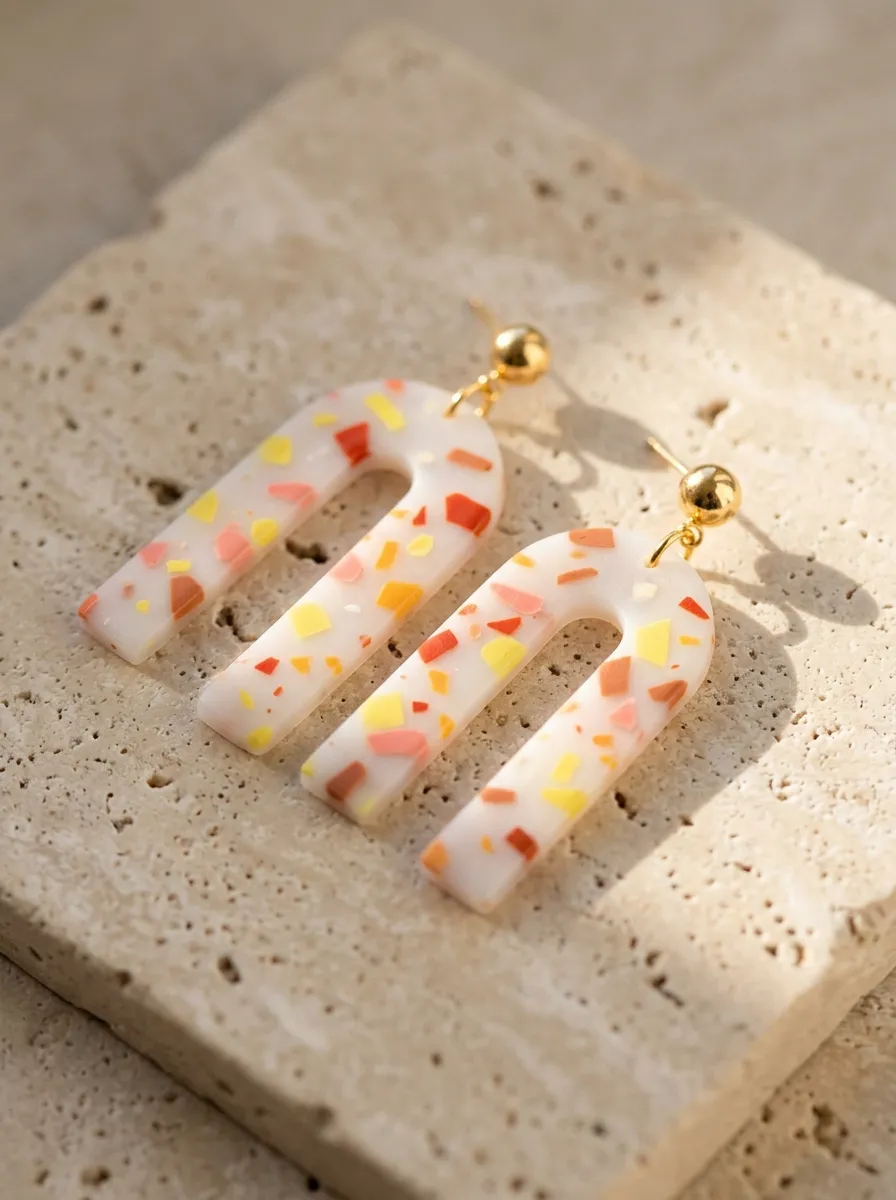
The citrus sunset terrazzo arch earring design captures the energetic, warm atmosphere of midsummer twilights through bold geometric framing. This design uses an elongated arch silhouette constructed from a translucent white base clay embedded with multi-colored angular flecks. Saturated hues of blood orange, lemon zest, golden ochre, and soft peach are scattered across the neutral slab, mimicking mid-century architectural composite stone. The translucent base allows ambient daylight to filter softly through the earring body, producing a luminous quality that enhances bright summer resort wear. The structural arch shape provides generous visual presence while remaining structurally rigid and stable against the earlobe. Because the internal terrazzo chips are rolled flush into the background clay, the surface retains a sleek, two-dimensional plane that requires no heavy clear-coat sealers to look finished. This project serves as an ideal beginner friendly introduction to composite slab building, scrap-clay repurposing, and clean vertical symmetry.
Begin by conditioning two ounces of translucent white polymer clay through a rolling machine until it forms a pliable, uniform sheet approximately two millimeters thick. Next, gather pea-sized scraps of conditioned clay in bright tangerine, sunny yellow, vibrant coral, and warm terracotta. Roll each colored scrap into a fine micro-snake, cut the strands into irregular fragments with a rigid blade, and scatter the tiny flecks randomly across the prepared translucent sheet. Place a sheet of clean parchment paper over the prepared slab and roll gently with an acrylic roller in alternating directions until the colored fragments fuse flush with the background surface. Using a clean metal arch cutter measuring two inches in length, press firmly downward onto the terrazzo slab on your ceramic tile. Carefully peel away the negative excess clay around the cut shapes, leaving the arches undisturbed. Pierce a 1.2-millimeter suspension hole near the top curve using a needle tool, and bake the pieces at the manufacturer’s specified temperature for thirty-five minutes. Once cooled, attach gold-plated jump rings and secure earring posts to the top reverse side using two-part epoxy adhesive.
Idea 2: Textured Monstera Leaf Dangles
Execution Process
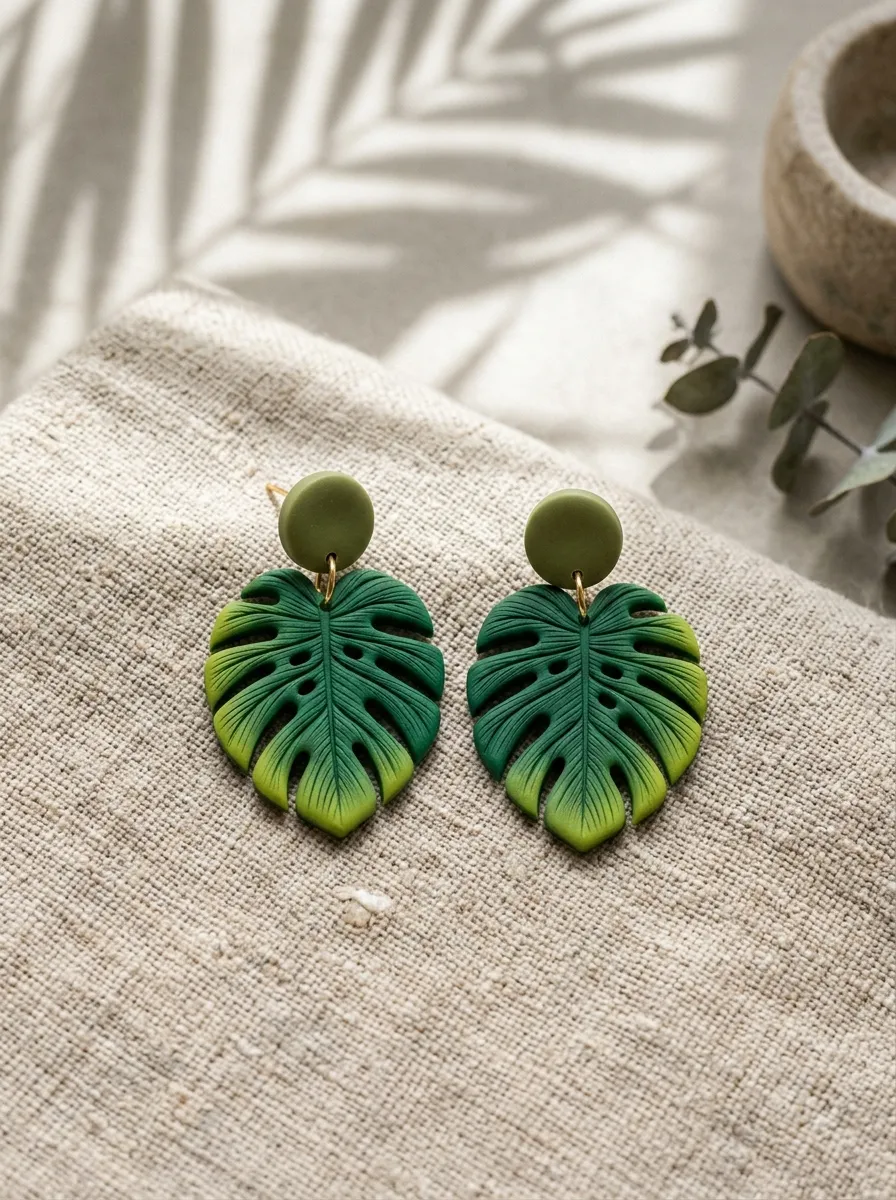
Textured monstera leaf dangles incorporate botanical elements into tropical vacation wardrobes, capturing lush jungle foliage in sculptural clay form. This concept features a two-piece articulated earring consisting of a small circular ear stud linked to a detailed, perforated monstera leaf pendant. Using a custom blend of deep forest green, olive, and chartreuse produces a natural foliage gradient that complements breezy linen sundresses and woven straw accessories. The distinctive leaf fenestrations—the open slits characteristic of real monstera leaves—provide open negative space, reducing both the visual heaviness and actual physical weight of the finished earring. The subtle veining pressed into the clay surface catches sunlight, adding organic depth and eliminating the artificial, plastic appearance common to mass-produced accessories. Crafting these leaf components allows makers to practice botanical cutouts, negative space balance, and multi-segment jump ring assembly.
Start by mixing emerald green and cadmium yellow polymer clay to establish an authentic tropical leaf hue, conditioning the mass thoroughly until no color striations remain. Roll the conditioned green clay into a flat slab measuring two millimeters in uniform thickness across a smooth ceramic tile. Place a monstera-shaped metal cutter over the slab and press down firmly to produce the outer leaf outline. Use a precision craft knife to cut out small interior oval fenestrations along each side of the central leaf axis, smoothing cut edges with a damp, lint-free cotton swab. Lightly score a central vertical stem vein and angled secondary veins using the dull edge of a modeling needle tool to introduce botanical texture. Cut two small half-inch circular clay studs from the remaining slab to serve as the upper earlobe anchors. Puncture connection holes at the base of each stud and at the stem apex of each leaf using a fine piercing tool. Bake the flat components on parchment paper, cool completely, and join the studs to the leaves using four-millimeter gold jump rings handled with dual pliers.
Idea 3: Marbled Coastal Wave Hoops
How to Create
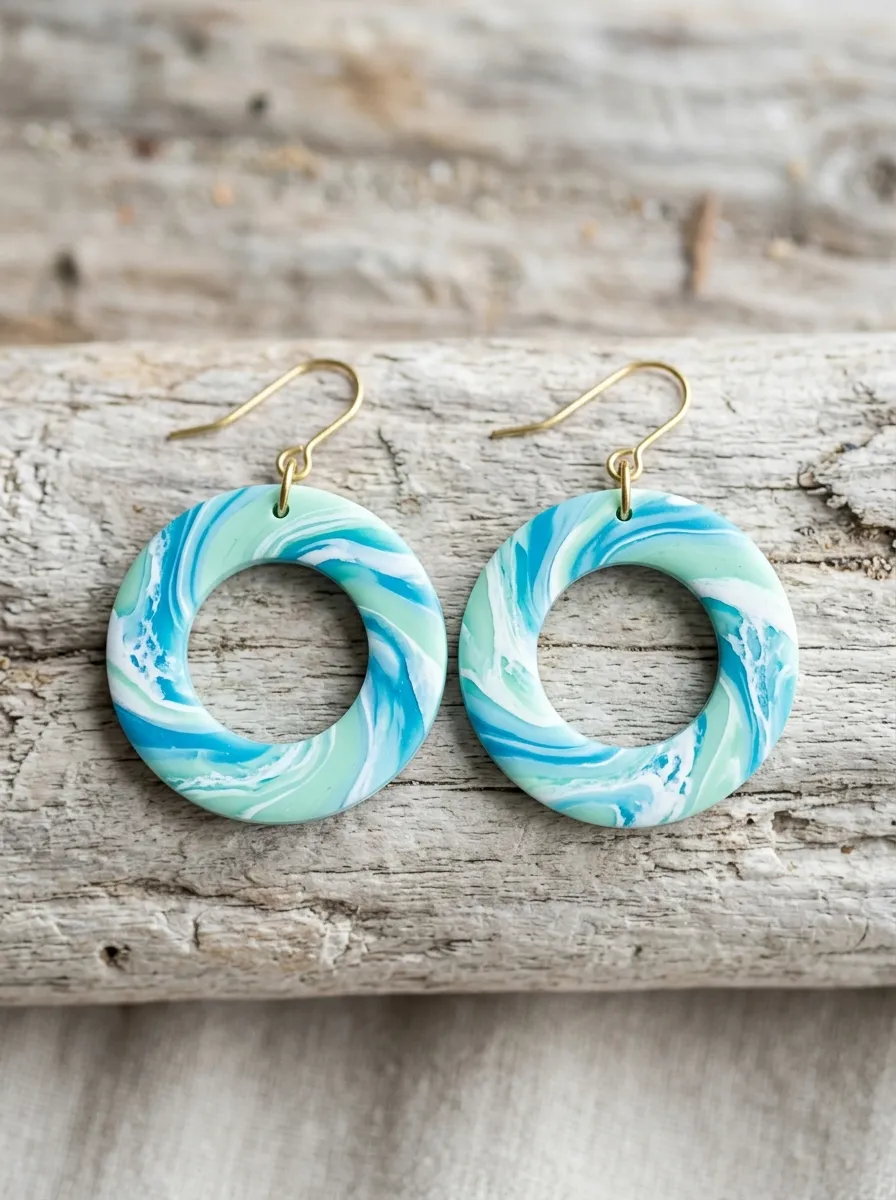
Marbled coastal wave hoops draw direct inspiration from rolling ocean surf, combining seafoam hues with crisp minimalist style. This design features a flat, open circular hoop profile decorated with an organic marbled swirl pattern that mimics crashing ocean water and white foam crests. The color palette blends Mediterranean blue, aqua green, soft jade, and opaque titanium white, producing a continuous fluid pattern without muddying individual pigment boundaries. The open-circle hoop format creates a lightweight, airy profile that complements warm coastal climates and casual beach outings. Because the marbling process produces naturally unique color distributions, every single earring cut from the slab remains entirely one of a kind. This design teaches essential clay marbling control, twisting techniques, and concentric circular cutting mechanics, making it an engaging creative project for crafters looking to move beyond solid colors while maintaining clean, modern geometry.
Begin by rolling four separate half-inch thick ropes of conditioned clay in ocean blue, pale aqua, mint green, and bright white, sizing each rope to approximately four inches in length. Twist the four colored ropes together into a tight spiral column, fold the twisted length directly in half, and roll it smooth on your ceramic work tile. Repeat this twisting, folding, and rolling sequence three times to create fine, undulating lines of color without overmixing the clay into a solid shade. Flatten the marbled block with your palm, then pass it through a clay conditioning machine set to a three-millimeter thickness. Inspect the slab surface to select the most visually dynamic wave patterns for your cuts. Using a concentric two-inch outer circle cutter and a one-inch inner circle cutter, stamp out your open hoop rings cleanly. Pierce a single mounting hole through the top perimeter of each hoop. Bake the cut hoops on a tile lined with cardstock to prevent surface shine, sand the finished edges with wet eight-hundred-grit sandpaper, and link each hoop to an open brass wire ear hook.
Idea 4: Sunburst Half-Moon Statement Drops
Setup Method
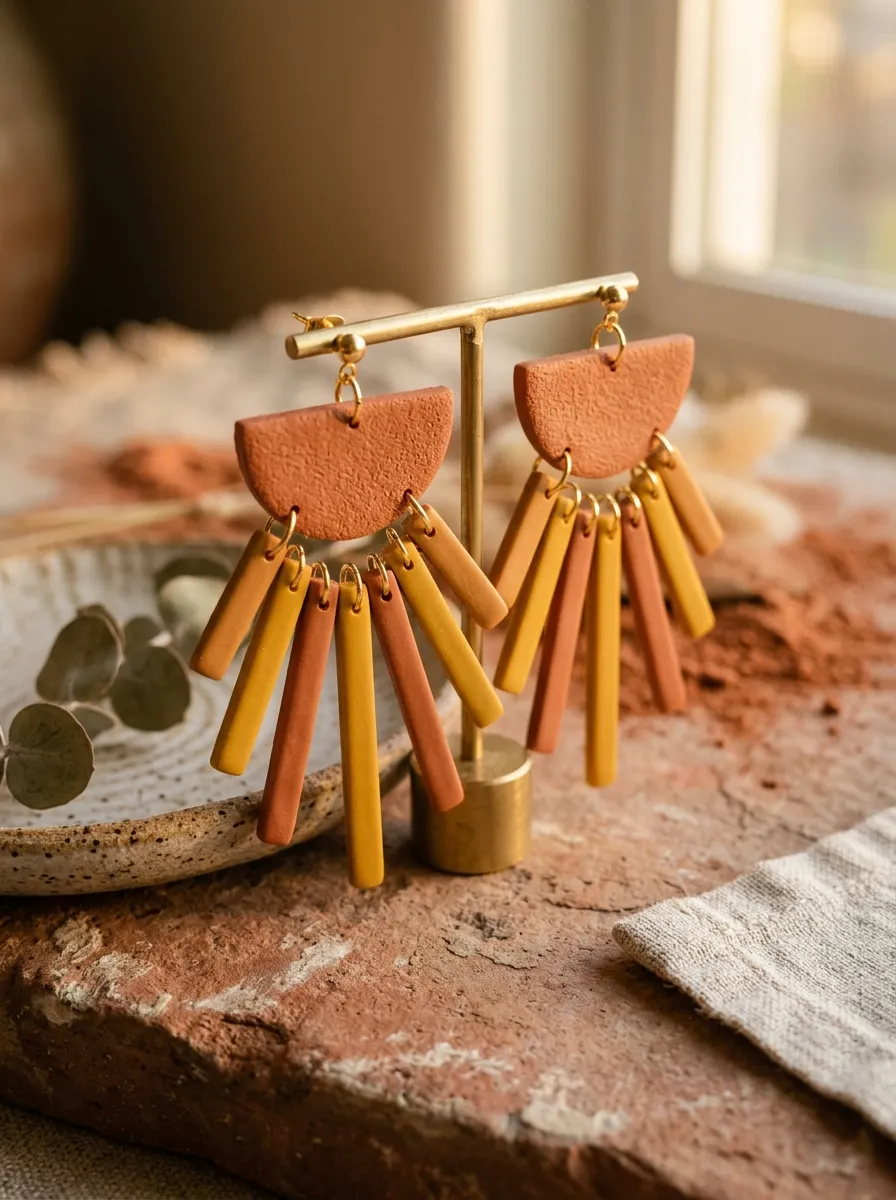
Sunburst half-moon statement drops channel radiant celestial energy through tiered, fan-shaped geometric layers. This design pairs an inverted half-moon stud with a tiered fringe of radiating linear rays, framing the jawline with sharp, dynamic symmetry. A warm desert palette of mustard yellow, terracotta clay, raw sienna, and cream brings earthy warmth to casual summer wardrobes. The alternating lengths of the lower sunburst rays add textural movement that sways gently with natural body motion. Precision cutting is central to this piece; sharp, clean edges emphasize the crisp radial lines, while the upper semicircular stud anchors the visual composition securely on the earlobe. This project builds foundational skills in multi-part modular layout, repetitive geometric cutting, and multi-point jump ring alignment, producing an eye-catching statement accessory that transitions effortlessly from afternoon picnics to evening outdoor gatherings.
Condition rich mustard yellow clay and warm terracotta clay separately until both sheets are soft and pliable, rolling each slab to a uniform thickness of 2.5 millimeters. Using a two-inch semi-circle cutter, stamp two half-moon shapes from the terracotta sheet to establish the top base anchors. Next, take the mustard yellow slab and use a rigid stainless steel tissue blade to slice even, two-millimeter-wide strips measuring 1.5 inches in length. Line up five yellow strips side-by-side beneath each terracotta crescent, trimming their lower ends at graduating angles to establish an expanding sunburst silhouette. Using a small hand drill or piercing tool, punch five evenly spaced connection holes along the straight bottom edge of the half-moon piece, and mirror those hole placements at the top of each individual ray. Bake all pieces on flat parchment paper at 275 degrees Fahrenheit for thirty minutes. After cooling, sand the straight edges using a fine grit sanding block, connect each individual ray to the half-moon base with three-millimeter jump rings, and mount surgical steel flat posts to the back of the studs.
Idea 5: Abstract Pastel Geo-Collage Drops

How to Make
Abstract pastel geo-collage drops bring contemporary post-modern artistry to warm-weather accessory collections through layered shapes and soft colors. This design features an asymmetric assembly of overlapping squares, trapezoids, and circles joined into a dynamic vertical drop. A refreshing sorbet palette of lavender, mint green, pale peach, and butter yellow adds a playful, modern accent to monochrome summer linen outfits. By varying the physical thickness and surface textures across the different geometric components, the earrings achieve visual depth without adding excess bulk. This design emphasizes negative space and proportional balance, proving that statement jewelry can feel sculptural without relying on symmetry. Crafting these abstract collage pieces helps makers develop creative composition skills, learn balanced assembly arrangements, and experiment with mixed surface treatments such as subtle stippling and matte finishes.
Condition quarter-ounce portions of lavender, butter yellow, soft mint, and blush peach clay, rolling each distinct color into an even two-millimeter slab. Use various small geometric cutters to stamp out two three-quarter-inch squares, two long slender rectangles, and two miniature circles across your pastel color range. To create textural contrast, press a fine-mesh silicone texturing mat onto the peach rectangles while leaving the mint squares and lavender elements completely smooth. Arrange one square, one rectangle, and one circle per earring in a balanced, off-center vertical cascade on your work board to map out hardware connections. Use a micro leather punch or heavy needle tool to pierce connection holes at every structural overlap point, ensuring holes are placed at least two millimeters away from clay borders to prevent tearing. Bake the pieces on a flat ceramic baking tile for thirty minutes, cool fully, and link the components together using six-millimeter silver jump rings. Secure hypoallergenic ear wires to the top geometric anchor to complete the assembly.
Idea 6: Gingham Check Picnic Dangles
Step-by-Step Guide
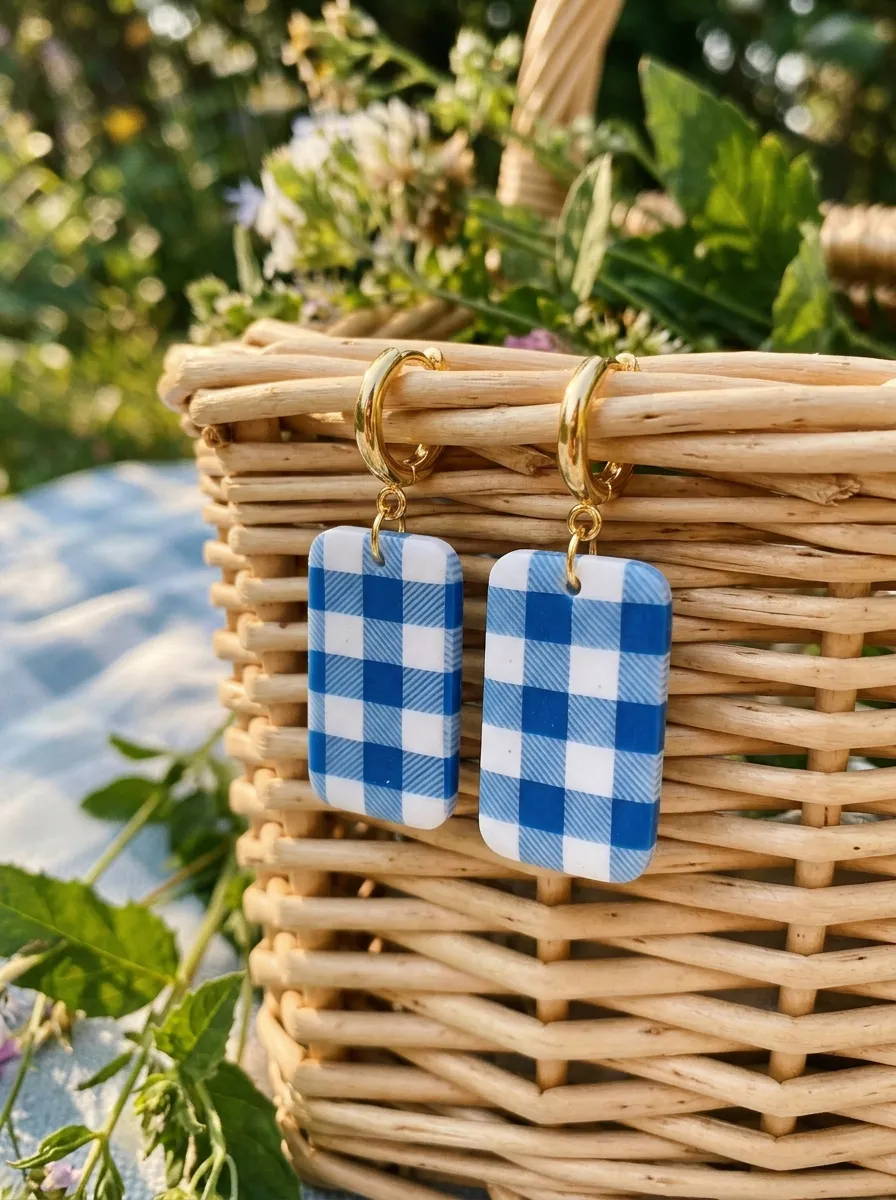
Gingham check picnic dangles bring vintage Americana appeal to summer styling, reimagining classic woven textiles in precision polymer clay. This design features a two-tiered rectangular drop displaying a classic gingham check pattern formed by interlocking squares of varying opacity. A timeless French blue or cherry red paired with semi-translucent white captures the nostalgic charm of summer garden parties, farmers’ markets, and park outings. Unlike surface-painted checks, this cane-based construction ensures the woven pattern runs completely through the clay body, producing crisp color divisions that will never chip, flake, or rub off with wear. The rectangular silhouette mirrors the structured nature of woven fabric, while rounded corners soften the outline against the neck. This project provides a practical way to learn clay cane construction, precise grid reduction, and systematic cross-section slicing, making it an engaging step by step challenge for intermediate crafters ready to expand their technical repertoire.
Begin by mixing three distinct shades from the same primary color family: a saturated primary red, a fifty-percent tinted pink, and a pure opaque white. Form each color into four uniform square logs measuring three inches in length and one-half inch square. Assemble the logs into a four-by-four checkerboard grid cane: position pure red at two opposite corners, opaque white at the alternating corners, and fill the remaining intermediate positions with tinted pink logs to replicate woven light transmission. Gently compress the assembled square block from all four sides using uniform finger pressure, reducing the cane until the cross-section measures one inch square. Chill the cane in a refrigerator for fifteen minutes to firm the clay, then use a razor-sharp tissue blade to slice thin, one-millimeter-thick veneers across the cane face. Lay these patterned slices side-by-side onto a thin backing sheet of white clay, roll flush with an acrylic roller, and cut out rectangular drops using a rounded-corner cutter. Pierce suspension holes, bake the pieces for thirty-five minutes, sand the perimeter lines smooth under running water, and mount with gold huggie hoop findings.
Idea 7: Sculpted Summer Bloom Clusters
Execution Process
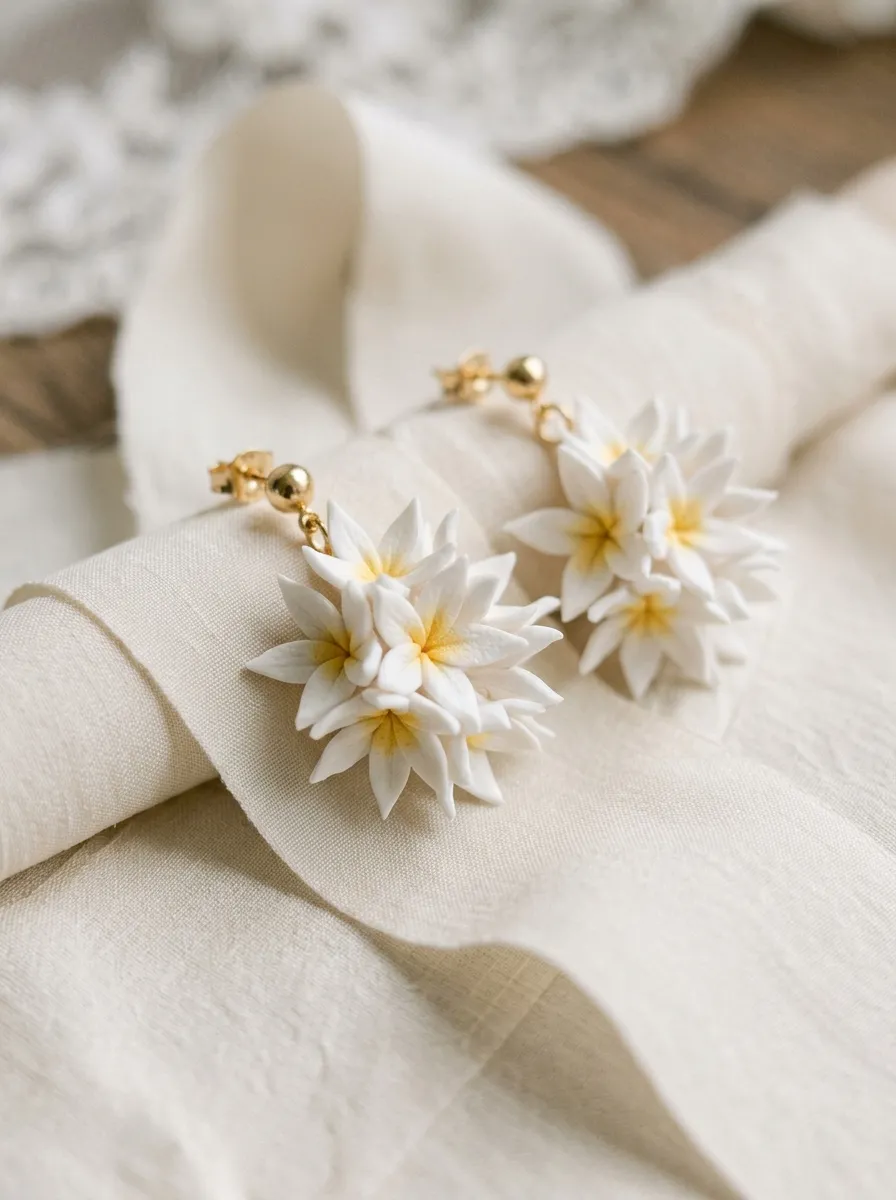
Sculpted summer bloom clusters embrace three-dimensional floral modeling, translating delicate garden blossoms into tactile wearable art. This design features a central ear stud supporting an open cluster of sculpted plumeria or jasmine petals, creating an elegant organic silhouette for outdoor weddings and formal dinners. A soft monochromatic palette of pearlized ivory, pale cream, and subtle champagne gold brings a sophisticated touch that highlights fine sculptural details. Each tiny petal is shaped by hand and layered directly onto a flat base disc, producing dimensional depth that catches natural ambient light. Because the petals taper to thin, delicate margins, using a high-grade, flexible polymer clay ensures the blooms flex under pressure rather than breaking. This project helps crafters develop freehand sculpting skills, petal shaping techniques, and chalk pastel dusting methods, resulting in boutique-quality floral jewelry.
Condition two ounces of premium pearlized white polymer clay, rolling half of the mass into a flat base disc measuring 1.5 millimeters in thickness. Take the remaining conditioned clay and roll it into dozens of uniform, three-millimeter spheres between your palms. Place each sphere on your ceramic tile and flatten it outward with a silicone-tipped shaper tool to form tapered teardrop petals with thin, natural edges. Cluster five overlapping petals together in a circle over a circular clay foundation base, pressing their center points together while curving the outer petal tips slightly upward. Using a dry, soft makeup brush, dust a tiny amount of warm yellow powdered chalk pastel into the deep center core of each flower to add natural botanical shading. Pierce a connection hole between the lower petals, bake the sculpted pieces on a concave baking tray to preserve their curved dimensions, and allow them to cool completely. Seal the pastel centers with a water-based matte varnish, drill a top hole, and join the floral clusters to gold ball-post studs.
Idea 8: Mediterranean Painted Tile Mini-Drops

How to Create
Mediterranean painted tile mini-drops capture the historic charm of southern European coastal architecture through crisp ceramic-style jewelry. This design features petite square studs showcasing cobalt blue and bright white patterns inspired by Portuguese azulejos and coastal mosaic art. The cool blue-and-white color scheme evokes seaside travel, making these lightweight studs a versatile pairing for casual denim, breezy button-downs, and warm-weather travel outfits. Applying a high-gloss baked glaze or liquid polymer clay finish gives the pieces the glassy sheen of kiln-fired ceramic tiles, elevating them from casual crafts to polished accessories. Their compact, square footprint ensures they sit close to the earlobe, making them a comfortable, low-profile choice for active outdoor days. This project introduces crafters to silkscreen stenciling on raw clay, acrylic paint transfer methods, and high-shine gloss finishing techniques.
Condition an ounce of pure white polymer clay thoroughly and roll it into an even, three-millimeter slab across a smooth glass tile. Lay a finely detailed Mediterranean mosaic silkscreen stencil flat across the clay surface, gently burnishing the mesh with an old plastic card to eliminate air pockets. Apply a thin, uniform line of deep cobalt-blue water-based acrylic paint across the top border of the stencil, and draw the paint downward using an acrylic squeegee held at a forty-five-degree angle. Immediately peel the silkscreen away from the clay and rinse the screen in warm water to prevent paint from drying inside the fine mesh. Allow the painted clay slab to dry completely for fifteen minutes. Use a sharp, one-inch square metal cutter to cut out the individual tile shapes, aligning the borders with the geometric pattern. Bake the square tiles on cardstock for thirty minutes. Once cooled, coat each tile surface with a thin layer of clear liquid polymer clay, bake for an additional fifteen minutes to cure the glaze to a glass-like finish, and attach surgical steel stud posts to the back.
Idea 9: Desert Sunset Arch and Fringe Tassels
Setup Method
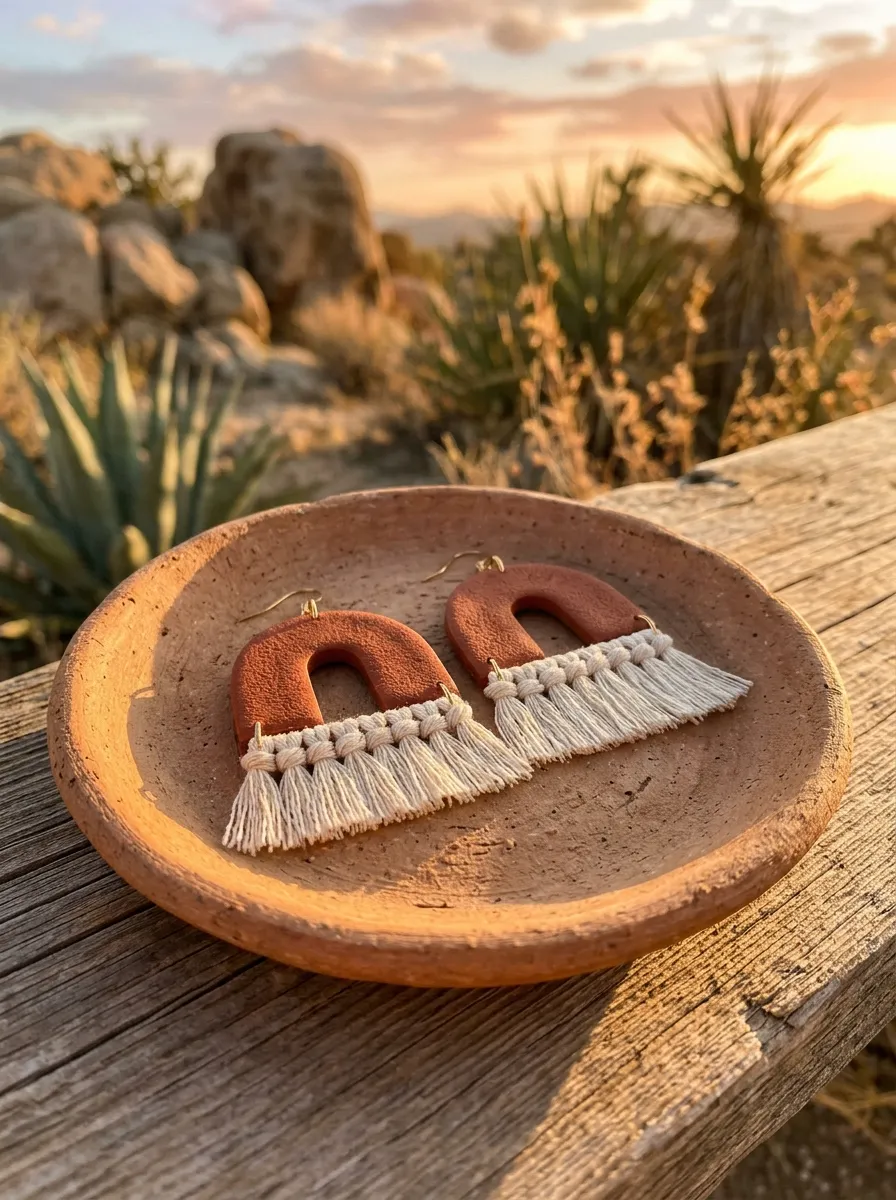
Desert sunset arch and fringe tassels blend structured clay forms with soft fiber elements to produce a striking bohemian statement piece. This design features an earthy clay arch pendant supporting a row of densely knotted cotton fringe along its lower base. Warm hues of canyon rust, sandy beige, and soft desert sage ground the visual aesthetic, making it an earthy accent for warm summer evenings, music festivals, and casual gatherings. The contrast between the rigid, smooth clay frame and the soft, swinging cotton thread introduces tactile variety that moves naturally with the wearer. By incorporating open thread fringe, the earring gains dramatic vertical length while keeping physical weight minimal. This project provides a practical introduction to mixed-media construction, teaching crafters how to coordinate fiber accents with cured clay elements using simple knotting techniques.
Condition rich canyon rust clay until pliable and pass it through a clay roller set to a thickness of 2.5 millimeters. Stamp out two curved horseshoe arches measuring two inches in height and 1.25 inches across the outer base using a metal arch cutter. Using a micro leather punch, punch a row of five evenly spaced 1.5-millimeter holes along the lower horizontal bottom bar of each arch, keeping holes three millimeters away from the bottom rim. Punch a single suspension hole at the top curved apex of each piece. Place the arches on parchment paper and bake at the manufacturer’s recommended temperature for thirty-five minutes. Once cooled, sand the outer perimeter smooth with four-hundred-grit wet sandpaper. Cut ten three-inch lengths of fine natural ecru cotton embroidery floss. Fold each floss strand in half, insert the looped end through a bottom hole using a latch hook tool, and draw the thread ends through the loop to form a secure lark’s head knot. Comb out the fringed ends with a small comb, trim the threads evenly with fabric shears to a one-inch drop, and assemble with gold French ear wires.
Idea 10: Translucent Botanical Confetti Drops
How to Make
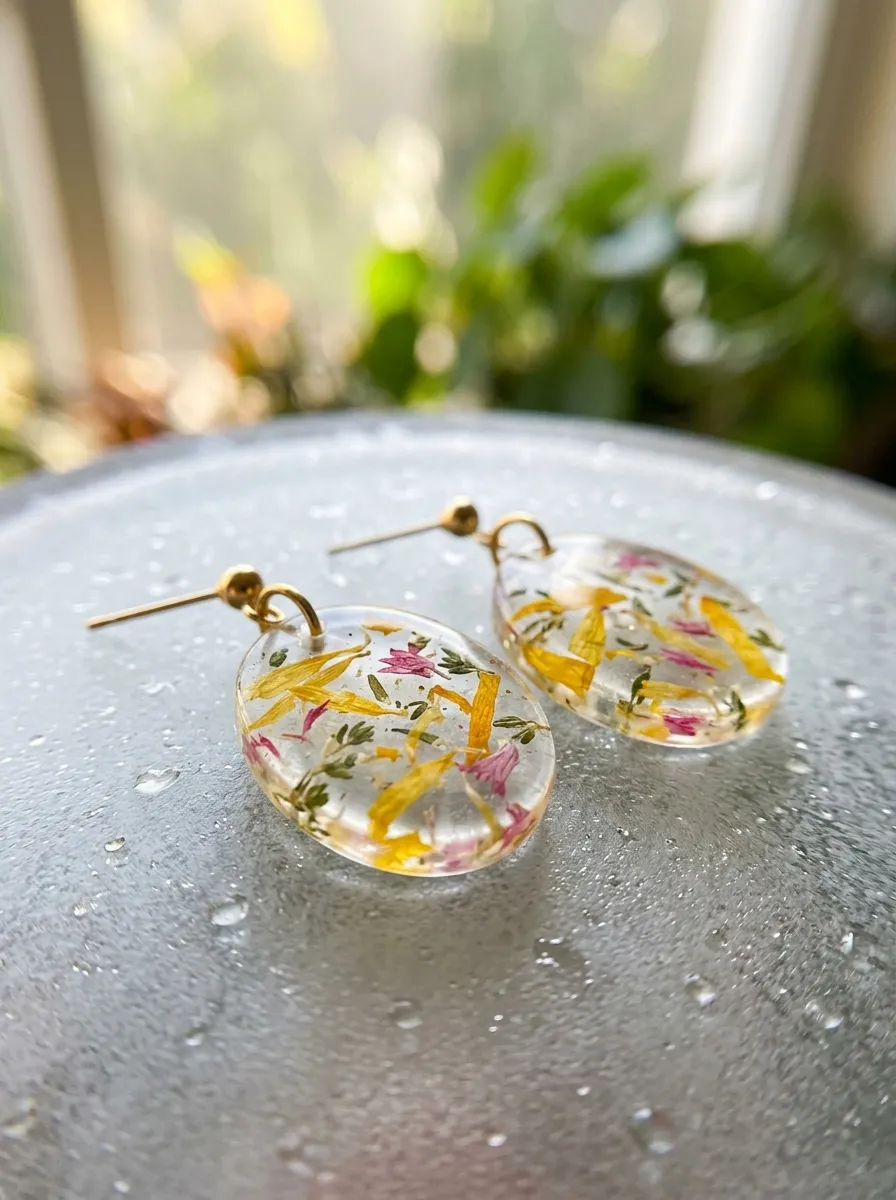
Translucent botanical confetti drops capture the delicate beauty of summer flora inside a suspended, glass-like pendant. This design features flat oval dangles made from ultra-clear translucent polymer clay embedded with real dried flower petals and green foliage flecks. Slices of preserved yellow marigold, pink cornflower petals, and tiny sprigs of thyme are pressed inside the clay, producing an organic mosaic that glows when illuminated by natural sunlight. The smooth, glass-like finish showcases the natural plant textures, offering a refined, modern look for outdoor garden parties and casual daily wear. Because the real botanicals are sealed within the clay body, they stay protected from air exposure, preventing the crumbling and discoloration common to open-air dried flora. This project teaches crafters how to properly condition translucent clay to eliminate internal air bubbles, balance organic inclusions, and sand pieces to a soft, sea-glass finish.
Gather small, completely dried petals from cornflowers, marigolds, and baby’s breath, crumbling them into small fragments measuring two to three millimeters. Condition two ounces of ultra-translucent polymer clay thoroughly, folding it gently in the same direction to prevent trapping tiny air bubbles within the clear mass. Roll the translucent clay into a sheet measuring two millimeters in thickness on a clean glass plate. Scatter the dried flower fragments evenly across the slab, lay parchment paper on top, and roll with an acrylic roller to press the botanicals flat into the clay surface. Use an elongated oval cutter measuring 1.5 inches in length to stamp out matching pairs from the confetti sheet. Punch a single suspension hole at the upper apex of each oval using a needle tool. Bake the cut pieces between two ceramic tiles lined with parchment paper for forty minutes; baking under light tile weight prevents the thin ovals from curling in the oven. After cooling, sand the perimeter edges under running water through graduated grits from four-hundred to twelve-hundred, buff with a soft denim cloth to bring out the translucent shine, and attach minimalist gold wire studs.
Common Beginner Mistakes and How to Avoid Them
Creating professional polymer clay jewelry requires avoiding a few common mechanical and thermal mistakes that can compromise your finished pieces. A frequent beginner misstep is underbaking the clay, which results from relying on inaccurate oven dials rather than an independent oven thermometer. Underbaked polymer clay remains chemically incomplete, leaving cured pieces brittle and prone to snapping under gentle pressure; always bake your items for the full recommended duration, allowing the clay to complete the molecular cross-linking that yields true flexibility. Another common mistake is leaving trapped air pockets inside clay slabs, which expand in the oven and cause unsightly surface bubbles; prevent this by rolling and folding clay in consistent directions and pricking visible bubbles with a sharp needle before cutting. Beginners also often place piercing holes too close to piece perimeters, leading to torn margins when jump rings are attached; always position holes at least two millimeters away from the outer edge to protect structural strength. Finally, working on uncleaned surfaces can transfer dark lint and dust onto light summer palettes; clean all equipment and ceramic tiles with isopropyl alcohol before handling clay to keep colors crisp and clean.
Practical Tips for Better Results
Achieving a clean, professional finish with polymer clay earrings comes down to consistent slab preparation, clean cuts, and thorough post-bake finishing. Always condition your clay thoroughly until it bends smoothly without cracking along folded edges, as well-conditioned clay rolls out evenly and cuts cleanly without tearing. When stamping with metal or three-dimensional printed cutters, place a thin sheet of plastic wrap over the raw clay slab before pressing down; this simple technique rounds the cut edges naturally and prevents raw clay from sticking inside intricate cutter walls. Use wet-sanding methods to refine rough edges after baking: sand your cured pieces submerged in a shallow dish of water with a drop of liquid dish soap, progressing systematically from four-hundred-grit through twelve-hundred-grit sandpaper to eliminate micro-ridges without creating airborne clay dust. Use two pairs of flat-nose pliers to open jump rings with a gentle lateral twist rather than pulling them apart outward, preserving the circular tension of the metal hardware. Finally, secure your metal post findings to the back of cured clay studs using an embedded mechanical hold or high-grade two-part epoxy adhesive rather than basic instant glues, ensuring posts stay firmly attached through seasons of regular wear.
Styling, Presentation, or Organization Ideas
Styling and presenting handmade summer earrings thoughtfully helps highlight their artisan quality, whether you are coordinating your personal wardrobe or packaging pieces for an online shop. Pair vibrant citrus terrazzo or abstract geo drops with neutral linen dresses, woven sun hats, and leather sandals to let the accessories serve as the colorful focal point of your outfit. If you are preparing pieces for craft markets or retail displays, mount each pair on custom textured kraft-paper earring cards stamped with your branding, listing hypoallergenic hardware specifications clearly for shoppers with metal sensitivities. Organize your jewelry collection at home using an open wooden jewelry frame fitted with linen mesh; hanging clay earrings openly prevents delicate parts from tangling and protects clay surfaces from scratching against hard metal pieces in crowded jewelry boxes. For visual consistency on social platforms, photograph your finished earrings in natural morning daylight against neutral, textured backdrops such as travertine stone, bleached linen fabric, or raw architectural plaster. Grouping earrings by color palettes—such as ocean blues, desert warm tones, or sun-drenched pastels—creates cohesive visual collections that help customers choose complementary pairs for seasonal gifts.
Budget or Time Planning
Crafting polymer clay earrings is an affordable, time-efficient hobby that offers high creative returns on minimal upfront investment. A standard two-ounce block of polymer clay costs only a few dollars and yields three to four complete pairs of statement earrings, keeping your per-unit production costs remarkably low. Beginners can keep initial startup costs down by purchasing versatile primary colors, a large block of white clay for custom pastel tints, and a small starter set of stainless steel jump rings and ball posts. To manage your crafting time efficiently, batch your creative process into dedicated stages: spend one focused session conditioning clay, mixing custom color formulas, and rolling slabs, and a second session cutting out shapes and piercing hardware holes. You can bake multiple trays of cut pieces simultaneously to maximize energy use, reserving a separate session for wet-sanding, buffing, and assembling hardware components. A beginner can typically complete a simple pair of geometric studs in under forty-five minutes, while multi-tiered dangles or detailed cane-sliced designs take roughly ninety minutes from start to finish. This modular approach helps crafters build an expansive jewelry collection or prepare stock for craft markets without feeling overwhelmed by multi-step finishing workflows.
Creative Expansion and Advanced Inspiration
Once you feel confident in foundational clay conditioning, cutting, and assembly techniques, you can explore intermediate artistic methods and creative mixed-media combinations. Experiment with incorporating liquid polymer clays to build raised enamel-style details, glossy drip accents, or fluid marbled surface glazes across cured geometric slabs. You can also explore metal leaf inclusions by rolling delicate sheets of genuine gold leaf, silver foil, or variegated copper leaf directly into raw clay surfaces before cutting, creating elegant veined accents that shimmer under the summer sun. Another striking technique involves integrating wood accents, pairing laser-cut walnut or raw birch wood shapes with vibrant polymer clay components using small jump rings for rich textural contrast. Advanced crafters can try miniature carving techniques, using linoleum gouges or micro-woodcarving tools to carve intricate floral relief patterns directly into cured, flat clay surfaces before highlighting the carved lines with oil-based antiquing paints. Exploring these advanced modifications helps makers expand their creative boundaries, turning simple polymer clay pieces into unique, collectible works of wearable art that showcase advanced craftsmanship.