Handmade jewelry projects continue to dominate craft inspiration boards, offering a tactile way to express personal style through custom wearable art. This comprehensive guide explores ten creative polymer clay charm bracelet concepts designed to help makers craft durable, aesthetic, and professional-looking accessories. Readers will learn the core techniques required to condition oven-bake clay, sculpt uniform miniature charms, bake pieces safely without discoloration, and assemble balanced link bracelets. Understanding the mechanics of polymer clay jewelry provides practical benefits for both novice crafters and experienced designers. Rather than purchasing mass-produced metal trinkets that easily tarnish, working with clay allows you to produce lightweight, customized charms tailored to specific color schemes, seasons, or personal interests. This project teaches fundamental craft competencies including color blending, texture transfer, wire armature insertion, and secure jump ring closure. By focusing on structured methods, precise tool handling, and proper hardware selection, you can build a versatile charm collection that holds up to daily wear while remaining cohesive and visually appealing.
Why This Idea Is Trending or Useful
Miniature clay jewelry has seen a major resurgence in contemporary DIY spaces because it merges nostalgic charm bracelet traditions with modern minimalist aesthetics. In contemporary fashion, personalized accessories that tell an individual story are highly valued over standardized retail items. Polymer clay provides an exceptional medium for this creative project due to its remarkable versatility, lightweight nature, and wide range of specialty finishes, including translucent, metallic, and stone effects. Finished charms do not weigh down wrists like heavy pewter or zinc components, making them comfortable for everyday wear. For beginners, clay charm crafting offers high accessibility and low startup barriers. You do not need expensive jewelry casting machinery, soldering torches, or specialized kiln setups to achieve polished results; a standard kitchen oven and basic hand tools are sufficient. Furthermore, the modular nature of charm bracelets makes them ideal for phased crafting. Makers can complete one miniature charm in an afternoon, gradually building an intricate, multifaceted accessory over time that reflects genuine handmade artistry.
Materials and Preparation
Achieving smooth, durable, and crack-free polymer clay charms requires deliberate preparation and the right materials before modeling begins. Select premium oven-bake polymer clay blocks that cure with flexible durability rather than brittle hardness. Essential hand tools include an acrylic rolling roller, a rigid tissue slicing blade, double-ended ball stylus tools, needle tools, and fine-grain sandpaper sheets ranging from 400 to 1000 grit. For metal assembly, gather stainless steel or brass eye pins, open jump rings in four-millimeter and six-millimeter sizes, sturdy cable link chain, lobster claw clasps, and two pairs of smooth needle-nose pliers. Work surface preparation is critical for clean results. Always work on an ultra-smooth, non-porous ceramic tile or tempered glass sheet to prevent lint and fingerprint transfer. Clean your work tile and hands thoroughly with isopropyl alcohol before handling lighter clay blocks. Conditioning the clay thoroughly by hand kneading or rolling through a craft conditioning machine ensures plasticizers distribute evenly, eliminating internal air pockets that cause structural breakage during the baking cycle.
Idea 1: French Bakery Pastry and Croissant Charm Bracelet
Step-by-Step Guide
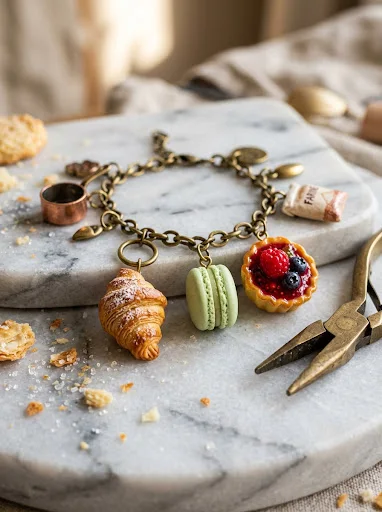
The French bakery charm collection celebrates miniature patisserie art, featuring iconic baked treats rendered with realistic crust textures and golden-brown pastry tones. This bracelet concept incorporates butter croissants, pastel French macarons, sliced fruit tarts, and braided brioche loaves evenly spaced along an antique brass chain. The key design element is realistic baked shading, which brings flat-toned clay to life by mimicking caramelization and flaky pastry layers. Using warm cream, golden ochre, and soft biscuit shades as a base, surface chalk pastels add depth and contrast across the ridges. The resulting charms offer high textural variety, ranging from the smooth gloss of fruit tart jelly glazes to the porous crumb of open pastries. When paired with warm brass or yellow gold hardware, this theme delivers a chic, European culinary aesthetic suitable for food lovers and cafe enthusiasts alike.
Begin by mixing raw clay into a light ivory dough shade, conditioning it thoroughly until pliable. For the croissant, roll a flat triangle of clay, slice tiny horizontal ridges along the surface using a needle tool, and roll the triangle forward from the wide base toward the tip before bending the ends into a crescent. To create a macaron, form two flattened rounds in pastel pistachio or raspberry clay, texture the lower borders with a needle tool to create ruffled feet, and sandwich a thin disc of white cream clay between them. Shave dry brown and ochre chalk pastels into a fine powder with a craft knife, then lightly brush the pigment across the raised edges of the pastries using a soft dry makeup brush to replicate oven baking. Insert a two-inch stainless steel eye pin coated in liquid clay directly into the top center of each miniature pastry. Bake the charms on a tile at the manufacturer-recommended temperature for thirty minutes, allow them to cool completely, apply a matte water-based glaze, and attach each piece to a bracelet chain using six-millimeter jump rings.
Idea 2: Botanical Succulent and Terracotta Pot Charm Cluster
How to Create
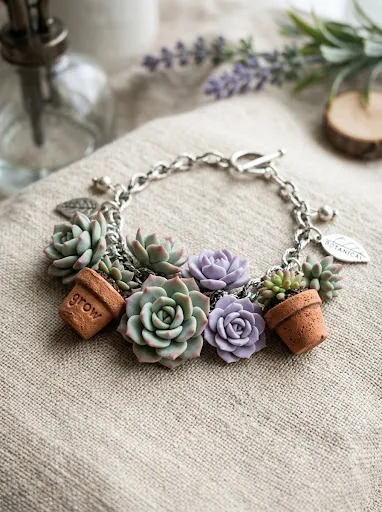
The botanical succulent charm bracelet captures the geometric elegance of desert houseplants within a wearable micro-garden format. This design features an alternating sequence of miniature rosette succulents, hanging string-of-pearls beads, and tiny textured terracotta planters. Color choice is essential for this design: utilize muted sage greens, dusty eucalyptus teals, and soft lavender purples, finished with subtle rose-tinted tips that replicate sun-stressed succulent foliage. The miniature terracotta pots provide warm, earthy contrast against the cool green rosettes, anchoring the collection with rustic charm. Because botanical charms feature delicate petal structures, the leaves must be supported properly to withstand movement on the wrist. Stacking petals tightly around a central core ensures the finished charms remain compact, robust, and resistant to snapping during wear, making them ideal for everyday garden-inspired styling.
Start by forming the miniature planting pots using rich terracotta-toned clay, rolling a short cylinder and tapering the bottom edge slightly before hollowing the interior with a round ball stylus. For the succulent rosettes, condition sage green clay, roll eight to twelve tiny teardrop-shaped balls, and flatten each teardrop into a pointed leaf petal between your fingertips. Assemble the plant by securing the largest petals in an overlapping circular base, gradually stacking smaller petals toward the center to build a full three-dimensional flower formation. Lightly dust the tips of the petals with powdered magenta pastel using a micro detailing brush to simulate natural botanical pigmentation. Insert an eye pin vertically through the center of the rosette, pushing the head down flush with the bottom. Bake the pieces on a bed of baking polyester fiber to prevent petal flat spots, let them cool, coat with an ultra-matte varnish to maintain an organic look, and secure the finished charms along a textured silver link bracelet.
Idea 3: Vintage Fruit Orchard and Citrus Slice Bracelet
Execution Process
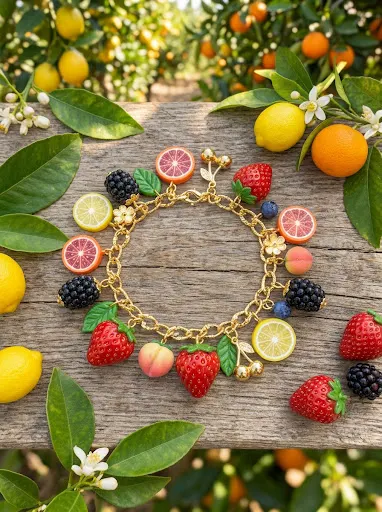
The vintage fruit orchard bracelet showcases bright, colorful summer produce through detailed translucent clay layering techniques. This collection features miniature strawberry drops, whole peaches with velvety fuzz, plump blackberries, and translucent citrus wheel slices, including lemon, lime, and blood orange. The defining technique of this design involves building a cane for the citrus slices, using semi-translucent clay for the pulp segments surrounded by opaque white pith lines and a solid outer rind. When sliced with a rigid blade, the cane yields identical, paper-thin fruit sections that transmit light gracefully. Pairing rich glossy red berries with frosted matte stone fruits introduces dynamic tactile contrast. Suspended from a bright gold-plated cable chain, this vibrant charm layout provides an energetic, cheerful pop of color that pairs naturally with summer sundresses and casual linen outfits.
To construct the citrus fruit cane, roll six elongated teardrop logs of translucent yellow or orange clay, wrapping each log in an ultra-thin rolled sheet of opaque white clay to represent the internal segment membranes. Bundle the six wrapped segments into a cylinder, fill the central void with a thin white clay cord, and wrap the entire exterior with a thin sheet of bright rind-colored clay. Gently roll and compress the large cane from the center outward until it reduces to an eight-millimeter diameter, then slice clean two-millimeter wheels using an unbent tissue blade. For strawberries, shape pointed red cones, impress uniform seed divots across the exterior with a needle tool, and attach a five-point green clay calyx to the crown. Insert silver eye pins into the tops of all fruits, using a dab of liquid polymer clay on the pin shafts to ensure a permanent bond. Bake according to package instructions, seal the berry and citrus surfaces with a clear UV gloss resin, and mount them onto an open-link charm bracelet.
Idea 4: Coastal Sea Life and Shell Treasure Keepsake
Step-by-Step Guide
The coastal sea life charm bracelet evokes the treasures of a secluded shoreline, incorporating miniature oceanic motifs with sandy, organic textures. This concept features realistic scallop shells, spiral auger shells, tiny starfish, and polished sea glass nuggets in oceanic blues and seafoam greens. Realism is achieved by using specialty translucent clays mixed with tiny flecks of brown granite clay or fine decorative craft sand to imitate ocean tumbled surfaces. The shells feature delicate linear fluting pressed directly into the clay with sculpting tools, giving the components realistic organic relief. Rather than using high-gloss plastic finishes, this piece relies on a smooth satin or frosted matte finish to evoke ocean-tumbled sea pottery and weathered shells. Displayed on a shimmering silver or surgical steel chain, this nautical design offers a refined, seaside accessory perfect for coastal vacations and warm-weather styling.
Begin by rolling seafoam green, aqua, and translucent white clay into smooth slabs, cutting freeform organic pebble shapes with a craft knife to create sea glass beads. To form scallop shells, roll a teardrop of ivory clay, flatten it slightly onto your tile, and press radiating linear grooves from the narrow base to the wide rounded fan using the thin edge of a steel needle tool. To make miniature starfish, shape a small flattened disc of sand-colored clay, pinch five radiating arms outward, and texture the dorsal surface by gently pressing the tip of a fine-toothed mechanical pencil into the clay. Thread a stiff stainless steel headpin through each sea glass bead and shell, forming a clean wire loop at the top using round-nose pliers. Bake the components supported on a ceramic baking sheet dusted with cornstarch to preserve fine textural details. Once cool, wash off residual powder, coat lightly with diluted satin glaze, and hang the sea charms along a silver oval link chain.
Idea 5: Whimsical Cottagecore Forest Mushroom and Acorn Bracelet
How to Create
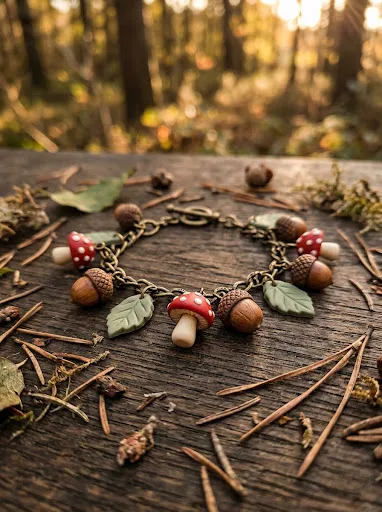
The whimsical cottagecore charm bracelet captures woodland magic through earthy, forest-floor botanicals, featuring speckled toadstools, textured acorns, and tiny woodland leaves. The design centers around miniature red fly agaric mushrooms with raised white polka dots, paired with earthy brown cupule acorns and muted moss-green oak leaves. This aesthetic leans into natural, rustic textures: the mushroom stems display gentle organic curves rather than rigid straight cylinders, while the acorn caps feature crosshatched textures pressed into deep umber clay. The deep forest palette—consisting of scarlet red, chocolate brown, deep forest green, and unbleached linen—provides an earthy aesthetic that coordinates well with knit sweaters and vintage clothing. Suspended from an antique bronze or oxidized copper chain, this woodland arrangement adds a storybook charm to seasonal autumn ensembles.
Start by shaping the mushroom stems using unbleached ivory clay, rolling slightly tapered cylinders with wider bases and curving them gently to suggest organic growth. To craft the caps, form small domes of bright crimson clay, hollow the bottoms slightly to fit over the stem tops, and attach them using a thin drop of bakeable liquid clay. Roll micro-sized spheres of white clay, flattening them firmly across the red mushroom dome to form flat, durable polka dots that fuse during baking. For acorns, form an oval bead from warm beige clay, shape a small cup of dark chocolate clay, impress a detailed crosshatch pattern across the cup using a dull craft knife, and seat the cap onto the acorn bead. Pierce each woodland charm with a bronze eye pin from bottom to top, forming a secure loop at the crest. Bake on a ceramic tile, let cool, brush with a non-yellowing protective matte varnish, and connect the charms to an antique bronze chain using heavy-gauge jump rings.
Idea 6: Celestial Starlight and Crescent Moon Talisman
How to Make
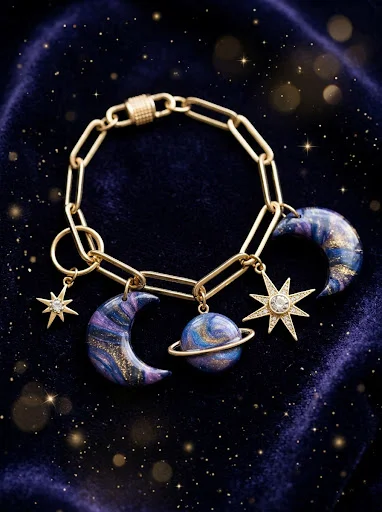
The celestial starlight charm bracelet translates the mystery of the night sky into a refined, mystical accessory featuring crescent moons, eight-point starbursts, and miniature marbled planetary spheres. This piece utilizes deep cosmic tones, incorporating midnight navy blue, deep amethyst purple, and shimmering pearl clays accented with metallic gold mica powder. The crescent moons feature graceful, sweeping profiles with tapered horns, while the stars incorporate centered micro-sized crystal rhinestones pressed directly into the raw clay prior to baking. Swirling translucent clay with metallic pearl and tiny amounts of fine gold glitter produces a dimensional galaxy effect within the planetary orbs. Styled along an understated gold paperclip chain, this celestial bracelet serves as an elegant, talisman-inspired accessory suited for both casual daytime layering and evening occasions.
To create the celestial elements, roll out a flat, uniform three-millimeter slab of midnight blue clay mixed with a pinch of gold mica powder. Use miniature metal cookie cutters or a sharp scalpel to stamp out sharp crescent moon shapes and symmetrical starburst silhouettes from the slab. To form the galaxy planets, twist thin snakes of black, pearl white, and deep purple clay together, fold the blend twice, and roll the marbling into tight, spherical beads between your palms. Gently press a heat-safe glass crystal or flat-back metallic rhinestone into the center of each starburst, embedding it flush within the raw clay walls. Pierce eye pins through the vertical axis of the moons and planets, ensuring the loops sit upright and aligned. Bake the pieces at the specified temperature, taking care to tent foil over the tray to prevent the mica-rich clay from scorching. After cooling, brush on a coat of high-gloss polyurethane varnish to amplify depth, and link the charms to a gold paperclip chain.
Idea 7: Retro Pop Diner and Sweet Dessert Bracelet
Execution Process
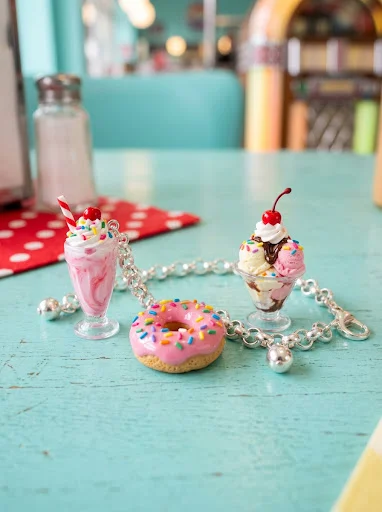
The retro pop diner charm bracelet channels mid-century ice cream parlor nostalgia through playful miniature sweets, including swirled milkshakes, frosted ring donuts, and cherry-topped sundaes. This design utilizes a bright pastel palette consisting of cotton candy pink, mint green, banana yellow, and creamy milk white, accented with vibrant confectionery details. The donuts feature textured pastry bases topped with wavy coats of glossy pink glaze and multi-colored clay sprinkle rods, while miniature sundae glasses are crafted from translucent clay filled with swirled ice cream layers and micro fruit slices. The lively, high-contrast colors and rounded shapes give this bracelet an animated aesthetic. Assembling these cheerful dessert charms on a shiny silver rolo chain creates a conversational piece that brings lighthearted joy to everyday casual wear.
To make the miniature donuts, roll a small ball of tan-colored clay, flatten it slightly into a thick disc, and pierce the center with the rounded back end of a small paintbrush to create an even hole. Texture the exterior perimeter with a stiff-bristle toothbrush to replicate fried dough, then apply a thin layer of liquid polymer clay tinted with bright magenta pigment across the top face to form melted icing. Roll microscopic strands of primary-colored clay, slice them into tiny sprinkle lengths, and scatter them across the wet liquid icing. For the milkshake charm, build a tapered cone of translucent clay, crown it with a textured white swirl of whipped-cream clay, and insert a two-millimeter segment of striped plastic craft wire to serve as a retro drinking straw. Insert silver eye pins into the pastry tops, cure the charms in the oven, apply high-gloss glaze over the iced surfaces while leaving the dough matte, and fasten each charm onto a sturdy silver rolo bracelet chain.
Idea 8: Southwestern Desert Terracotta and Turquoise Mosaic
Setup Method
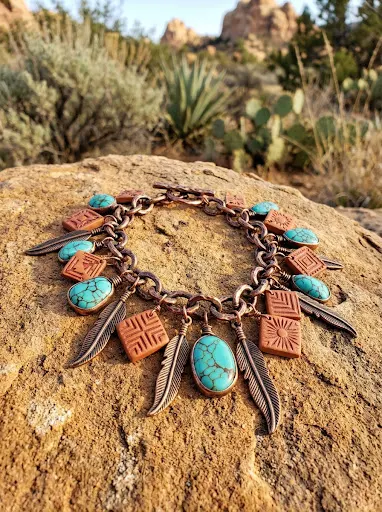
The Southwestern desert bracelet brings together earthy geology and tribal jewelry traditions, pairing faux turquoise stones with rustic terracotta tiles and carved feather charms. This concept relies on specialty clay manipulation techniques that imitate natural mineral stones, utilizing turquoise-colored clay veined with acrylic paint to mimic real spiderweb matrix webbing. These faux mineral stones are paired with raw geometric clay slabs stamped with Aztec or Southwestern patterns, finished with dry metallic patinas. The balance between cool, bright turquoise and warm earthen clay creates a grounding color harmony inspired by arid desert landscapes. Suspended along a burnished antique copper or dark oxidized brass chain, this artisanal charm bracelet adds a rustic, handcrafted focal point that pairs naturally with denim, silver cuffs, and bohemian styling.
To create the faux turquoise stones, chop a conditioned block of vibrant turquoise clay into irregular rough chunks, dust the exposed edges generously with dark umber acrylic paint, and let the paint dry to a tack. Recompress the coated clay chunks into a solid block, roll the mass into organic nugget beads, and slice through the block to reveal natural-looking matrix veins running through the stone. For the decorative tiles, roll a thin sheet of terracotta clay, stamp geometric southwestern borders into the surface using carved craft stamps, and cut out uniform diamond and rectangle shapes. Shape slender leaf pendants from terracotta clay, carving fine linear feather ribs along the surface with a scalpel. Drill holes through the top of each charm using a steel needle tool before curing. Bake according to instructions, sand the faux stones smooth under running water with 800-grit sandpaper, buff with a soft denim cloth to a natural sheen, and assemble along an antique copper chain using heavy jump rings.
Idea 9: Modern Monochrome Marble and Geometric Bead Cluster

Step-by-Step Guide
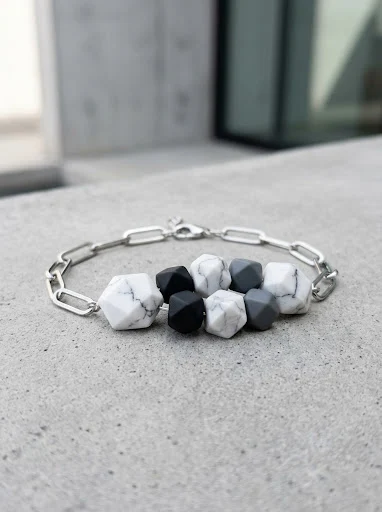
The modern monochrome marble charm bracelet focuses on refined architectural balance, clean lines, and neutral interior styling principles. This minimalist design features a curated mix of sharp geometric charms—including cubes, flat hexagonal tablets, and clean disc beads—rendered in white Carrara marble, slate grey, and matte basalt black. The faux marble effect is achieved by gently twisting stark white clay with thin threads of translucent and charcoal clay, producing soft stone veins that flow across the geometric forms. The absence of bright color allows the clean geometric silhouettes and surface textures to command visual attention. Paired with polished rhodium or sleek matte black jewelry hardware, this contemporary charm bracelet functions as a sophisticated, versatile accessory suitable for professional workwear and modern minimalist outfits.
Begin by conditioning a large portion of pure white clay until soft and pliable. Roll a micro-thin snake of soft black clay, lay it randomly across the white clay block, and fold the clay three times, rolling the block into a cylinder to stretch the black veins into delicate marbling patterns without blending the colors into solid grey. Flatten the marbled slab between two guide rails to achieve an even four-millimeter thickness, then use metal geometric cutters to stamp out crisp hexagons, squares, and circles. For dimensional interest, roll a few solid slate grey and basalt black clay cubes, slicing the corners cleanly with a rigid tissue blade to produce multifaceted geometric prisms. Carefully drill vertical suspension holes through each geometric bead using an unheated steel pin. Bake the pieces on a smooth ceramic tile, wet-sand the cured edges with 1000-grit sandpaper for a smooth finish, apply a satin stone sealant, and string the charms onto a minimalist paperclip chain.
Idea 10: Whimsical Honeybee and Daisy Blossom Garland
How to Make
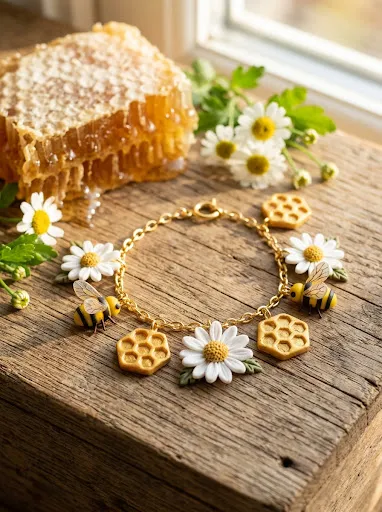
The whimsical honeybee and daisy bracelet captures the freshness of a sunny spring meadow through charming garden insect and floral sculpting. This design pairs adorable three-dimensional honeybees with clean white daisy blossoms and textured golden honeycomb hex tiles. The bees feature plump striped bodies in golden amber and black clay, accented by translucent pearl wings angled backward as if in mid-flight. The accompanying daisies feature layered white petals surrounding textured yellow seed centers, creating a bright botanical contrast against the amber tones. The sunny color scheme—consisting of honey gold, daisy yellow, soft pearl, and bright white—brings cheerful seasonal energy to everyday outfits. Suspended from an interconnected bright gold cable chain, this sunny botanical accessory provides an uplifting touch of handcrafted springtime charm.
To sculpt the miniature honeybees, roll an eight-millimeter oval body using rich golden-yellow clay, then roll micro-thin strings of black clay to wrap around the abdomen to form clean horizontal bee stripes. Form two small, paper-thin drop shapes from translucent pearl clay, pressing them together onto the bee’s back to establish delicate resting wings. To create the daisies, form ten tiny teardrop petals from bright white clay, arrange them in a flat circle, and press a flattened dome of yellow clay into the center, texturing the seed core with a needle tool. For the honeycomb charms, cut flat hexagons from warm honey clay, impressing clean hex grids into the face with a miniature geometric stamp. Insert stainless steel eye pins along the horizontal axis of each bee and through the top petal of each flower. Bake the pieces carefully, let them cool, apply a clear gloss varnish over the yellow honeycomb and bee abdomens, and fasten them along a bright gold-plated link chain.
Common Beginner Mistakes and How to Avoid Them
Novice clay crafters often encounter structural issues that cause charms to snap, discolor, or fall off bracelet hardware during wear. The most frequent error is under-baking polymer clay. Many beginners remove charms from the oven early out of fear of scorching, but insufficiently baked clay remains brittle, causing thin sections like flower petals or animal limbs to break under light pressure. Always use an independent oven thermometer to verify true internal temperatures, baking charms for the full thirty to forty-five minutes recommended on the packaging; clay cures through time and proper heat, not by drying out. Another common mistake is inserting smooth metal eye pins directly into raw clay without an anchoring agent. Metal does not chemically fuse with polymer clay during baking, meaning straight pins often pull out over time. Prevent this by bending the bottom tip of your eye pin into a tiny hook or zigzag before insertion, or coat the pin shaft with liquid polymer clay to create a secure mechanical lock within the cured charm. Finally, working on dusty or unwashed surfaces introduces lint, dust, and fingerprints into light-colored clays; always clean your hands, blades, and work tiles with rubbing alcohol before starting.
Practical Tips for Better Results
Achieving professional, boutique-quality finishes on polymer clay jewelry requires dedicated attention to refining techniques and surface preparation. One effective method for eliminating surface fingerprints before baking is gently smoothing raw clay surfaces with a cotton swab lightly dampened with ninety-percent isopropyl alcohol. The alcohol dissolves surface binder residue, leaving a clean, satin-smooth finish that requires far less sanding later. When cutting out precise geometric charms or slicing canes, cool your conditioned clay in the refrigerator for fifteen minutes prior to cutting. Chilling firms the plasticizers, preventing the blade from compressing round profiles into distorted ovals. When assembling charms onto bracelet links, always open jump rings using a lateral twisting motion with two pairs of smooth-jaw pliers, rather than pulling the ends outward. Twisting preserves the circular integrity of the metal loop and prevents metal fatigue, ensuring jump rings close flush with no gap for the chain link to slip through. Additionally, apply baking polyester batting or a mound of cornstarch on your baking tile to support dimensional, multi-layered charms, preventing flat contact spots from developing on curved surfaces during heating.
Styling, Presentation, or Organization Ideas
Handcrafted polymer clay charm bracelets offer broad styling versatility, functioning as playful standalone accents or layered complements within curated jewelry stacks. When styling a statement charm bracelet, pair it with simple, minimalist metal bangles or smooth stone bead bracelets in matching metal finishes to create a textured wrist stack that does not compete visually with the charms. If presenting a finished charm bracelet as a handmade gift, mount the piece across a branded kraft-paper jewelry card, securing the chain behind the card with gentle washi tape before sliding it into an embossed cotton-filled gift box. For organized home storage, avoid tossing clay charms loosely into tangled jewelry drawers where metal clasps can scratch delicate surfaces. Instead, hang charm bracelets individually from a vertical wooden jewelry stand, or store them flat in partitioned velvet-lined tray organizers away from direct sunlight and excessive humidity. When coordinating outfits, draw upon one or two secondary colors found within the miniature charms—such as matching a forest green sweater to a woodland mushroom charm—to tie your accessories and wardrobe together into a cohesive look.
Budget or Time Planning
Crafting a full ten-piece charm bracelet can be managed efficiently on a modest budget through structured batch processing and material planning. Polymer clay is an economical craft medium, as a standard two-ounce block yields dozens of miniature charms. To maximize your budget, purchase a core set of primary colors alongside large blocks of translucent and white clay; mixing custom shades from a basic palette is far more cost-effective than buying individual pre-mixed novelty specialty blocks. From a time management perspective, approaching charm creation in sequential production stages accelerates completion. Dedicate your first session to planning scale, sketching designs, and conditioning color mixtures. Spend a second session sculpting all clay components, adding surface textures, and inserting eye pins in a continuous assembly line. Bake all elements together in a single oven batch to save time and energy, using the cooling interval to prepare your metal chain, cut jump rings, and set up assembly tools. Setting aside two to three hours for sculpting followed by one hour for baking and metal assembly allows you to finish a complete, high-quality charm bracelet over a single weekend.
Creative Expansion and Advanced Inspiration
Once you master the basic modeling and assembly techniques detailed in this guide, you can expand your clay charm crafting into more complex, multi-media designs. Experiment with liquid polymer clay finishes, using tinted translucent liquid gels to create hyper-realistic dripping fruit syrups, miniature latte foam art, or crystalline honey drizzles that cure with high gloss. You can also explore incorporating mixed materials, such as embedding raw semi-precious crystal chips, freshwater seed pearls, or tiny dried flower petals directly into raw clay charms before baking. For advanced structural variety, learn how to build complex miniature canes featuring kaleidoscope mandalas, intricate citrus segments, or detailed floral cross-sections that can be sliced repeatedly to produce matching sets of earrings, necklaces, and phone charms that coordinate with your bracelet. You might also experiment with applying gold metal leafing across raw clay, then gently distressing the surface with a stiff brush to create vintage crackled gilded effects, transforming simple clay beads into luxurious, heirloom-quality jewelry components that showcase advanced craftsmanship.