Pastel clay planters have become a staple among modern craft enthusiasts seeking soft color palettes and functional home decor accents. These miniature vessels combine understated hues such as mint, blush, lavender, and butter yellow with the tactile quality of sculpted clay. Readers will discover ten distinct techniques for designing, shaping, and finishing small indoor vessels tailored specifically for succulents, cacti, and propagation cuttings. Crafting these decorative pots allows makers to tailor container dimensions, surface textures, and color saturation to complement existing interior aesthetics without purchasing expensive ceramic collections. Working with accessible mediums like polymer clay or air-dry clay provides a direct entry into pottery fundamentals without requiring high-temperature kiln firing. Understanding proper conditioning, structural support, drainage management, and protective sealing transforms basic sculpting compounds into durable plant holders. This tutorial covers necessary materials, workspace setup, methodical assembly guidelines, and troubleshooting techniques. By mastering basic hand-building methods such as pinch pots, slab rolling, coiling, and mosaic marbling, crafters can produce uniform collections or eclectic display sets. The resulting decorative planters introduce natural greenery into living areas, office desks, and windowsill gardens while showcasing original artistic craftsmanship.
Why This Idea Is Trending or Useful
The widespread popularity of pastel clay planters across digital design boards stems from their balanced combination of minimalist style and practical home utility. Modern interior aesthetics frequently highlight gentle muted tones that introduce calming color accents without visually cluttering compact living spaces. These projects address the demand for customizable indoor plant styling, offering an affordable path toward custom interior decoration. As indoor gardening continues to engage apartment dwellers and urban plant collectors, compact vessels designed for small root systems fulfill an ongoing lifestyle need. From a crafting standpoint, clay hand-building remains highly accessible because it eliminates the technical barriers of traditional ceramics. Novices do not need industrial wheels, specialized glaze formulas, or high-fire kilns to achieve smooth, porcelain-like finishes at home. The creative process is therapeutic, repeatable, and adaptable to varying personal skill levels, making it ideal for introductory weekend projects. Furthermore, these miniature planters make thoughtful handmade gifts, sustainable desk organizers, and modular decorative objects that can be adjusted in size or pattern. Because raw clay accepts various pigments, chalks, and sealing coats, makers can adapt trending color palettes directly into functional, tangible pieces.
Materials and Preparation
Successful clay crafting depends on thorough workspace preparation, correct tool selection, and careful consideration of potting requirements. Start by acquiring your preferred sculpting medium, selecting either oven-bake polymer clay for water resistance or premium air-dry clay for classic matte finishes. Gather a smooth acrylic rolling pin, non-stick craft mat, rigid tissue blades, precision modeling tools, and circular cutters for uniform edges. Color formulation requires soft pastel chalks, water-based acrylic paints, or pre-tinted colored clay blocks in complementary blush, sage, peach, and soft lilac tones. Proper planning involves establishing interior vessel dimensions based on the target plant’s nursery container, ensuring sufficient clearance for root expansion and soil moisture. Protect surfaces with silicone baking sheets or ceramic tiles, which double as non-warping curing bases during oven heating. Sanding blocks ranging from medium to ultra-fine grits allow makers to smooth out minor seams, thumbprints, and surface imperfections after hardening. For functional planting, include a masonry drill bit or handheld clay hole punch to create functional bottom drainage points. Finally, secure a moisture-resistant matte or satin acrylic sealer to shield finished surfaces from routine watering, soil stains, and sun exposure.
1. Idea 1: Fluted Mint Ribbed Vessel

Step-by-Step Guide
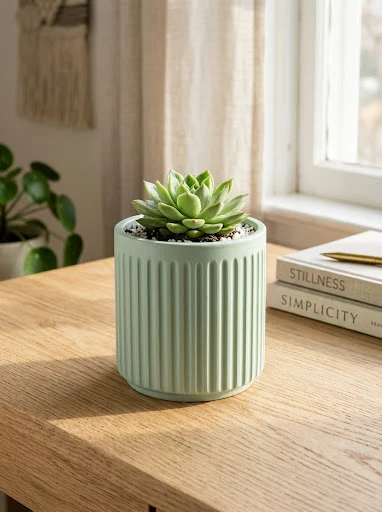
The fluted mint ribbed vessel features a cylindrical body accented with vertical channels that catch light evenly across soft green clay. This design draws inspiration from classical architectural columns, reinterpreted through a contemporary Scandinavian lens suited for compact succulent varieties. The subtle pastel mint shade provides an organic foundation that balances vibrant indoor foliage without overwhelming the surrounding room styling. Uniform vertical grooves create textural contrast, transforming a simple cylindrical silhouette into a polished statement piece. Uniform wall thickness ensures structural stability throughout curing, preventing warping or uneven heat absorption during final processing. This shape functions exceptionally well on office desks, bookshelves, and narrow window ledges where directional daylight accentuates the dimensional fluting. Maintaining parallel vertical ridges requires deliberate alignment and consistent depth along the outer perimeter. The resulting container exhibits a structured architectural charm that complements modern indoor aesthetics.
Begin by conditioning pale mint clay thoroughly until pliable, then roll it into a flat, uniform slab measuring six millimeters thick. Cut a rectangular strip measuring twenty-two centimeters long and eight centimeters tall, along with a circular base five centimeters across. Wrap the rectangular strip around the circular bottom, joining the edges with a smooth vertical seam blended using a flat silicone tool. Once the primary cylinder stands upright, use a wooden scoring tool or round clay stylus to impress straight vertical channels spaced five millimeters apart. Maintain light, steady downward pressure from the upper rim down toward the base to achieve identical depth across all vertical ridges. Smooth the top edge with a damp sponge or finger to remove raised clay burrs before final hardening. Allow the form to cure fully according to your specific clay guidelines, then sand the base flat using fine sandpaper. Apply a thin layer of protective clear matte sealer to preserve the soft mint hue from moisture contact.
2. Idea 2: Soft Peach Pinch Pot with Scalloped Edge
How to Create
The soft peach pinch pot utilizes an elemental hand-forming technique enhanced by a decorative, wavy scalloped perimeter along the top opening. This approach celebrates traditional ceramic forms, delivering a gentle handmade aesthetic characterized by organic curves and subtle warmth. Peach tones introduce inviting warmth into interior spaces, serving as a complementary backdrop for dark jade or silver-toned succulent leaves. The scalloped upper lip softens geometric room layouts, introducing playful motion to table centerpieces or multi-tiered plant stands. Because pinch pots do not require specialized measuring templates, each iteration develops distinct character while maintaining standard volumetric proportions. The thickness of the clay walls provides thermal insulation for delicate root systems, shielding plants from drafty windowsills. This charming silhouette bridges classic artisan pottery and modern pastel trends, making it an accessible project for beginners seeking quick structural satisfaction.
Condition a tennis ball-sized sphere of peach-toned clay until soft, rotating it between your palms to eliminate internal air pockets. Press your thumb straight down into the center of the sphere, stopping approximately one centimeter above the bottom plane. Gently pinch the surrounding clay upward and outward between your thumb and fingers, rotating the mass continuously to build even perimeter walls. Once the pot reaches eight centimeters in height with uniform wall thickness, flatten the bottom against your work surface to ensure stability. Form the upper scalloped rim by pressing the side of a round wooden dowel or thumb into the top edge at equidistant intervals. Support the backside of the rim with your index finger during pressing to prevent the wall from bowing outward or tearing. Inspect the inner base, smoothing any deep finger indentations with a damp sculpting sponge before baking or drying. After complete hardening, apply an ultra-fine sanding block to the scallops, finishing with a moisture-resistant protective clear coat.
3. Idea 3: Marbled Lavender and Cream Pedestal Bowl
Execution Process
The marbled lavender and cream pedestal bowl elevates indoor potting arrangements by pairing swirling fluid patterns with an elevated footed platform. Swirled ribbons of soft lavender and warm cream mimic natural polished marble, producing unique organic veining across every centimeter of surface area. Elevating the planting basin on a tapered pedestal lifts trailing foliage, allowing string-of-pearls or cascading sedums to drape naturally over the sides. The muted purple tone contrasts handsomely against rich potting soil while harmonizing with light timber furniture and neutral stone accents. Crafting this planter develops valuable assembly skills, particularly in joining multiple pre-shaped components securely without distorting the outer marbled figure. The low-profile wide basin facilitates multi-plant arrangements, accommodating clusters of small cacti in a single cohesive vessel. The final composition functions as an eye-catching focal centerpiece suitable for dining tables, entryway consoles, and display credenzas.
Prepare two equal portions of clay, one tinted pastel lavender and the other left natural cream, rolling each into elongated ropes. Twist the two colored ropes tightly together, fold the twisted length in half, and gently roll the mass into a unified cylinder. Repeat the folding and twisting process three times to distribute delicate marbling, ensuring you do not overmix the colors into a solid tint. Slice the combined clay into slabs and press them into a shallow spherical mold, trimming the perimeter flush to establish the bowl. Next, shape a separate smaller ring of solid cream clay, tapering the profile slightly outward to serve as the structural base pedestal. Score both the underside of the bowl and the top rim of the pedestal before applying liquid clay or slip to bond them. Bake or dry the unified assembly upright, supporting the bowl underneath if working with soft-curing formulas to avoid slumping. Polish the fully cured exterior with high-grit abrasive paper to reveal clean marble contrast, then apply a satin topcoat.
4. Idea 4: Pale Butter Yellow Geometric Hexagon
Setup Method
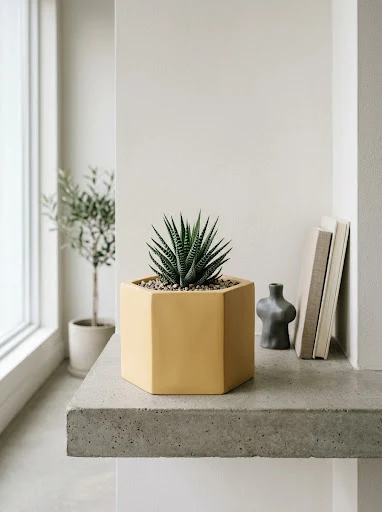
The pale butter yellow geometric hexagon provides sharp angular lines that contrast cleanly with the soft, delicate nature of pastel coloring. Inspired by clean mid-century design, this hexagonal container incorporates crisp beveled edges, straight vertical planes, and flat reflective faces. Butter yellow injects gentle optimism into room styling, mirroring morning sunlight and accentuating the deep forest tones of compact indoor plants. The faceted geometry introduces visual interest to plant clusters, functioning as an anchor piece alongside rounded pots and organic glass terrariums. Assembling flat, leather-hard clay slabs into precise polyhedral shapes sharpens measuring skills, requiring disciplined edge trimming and square jointing. The wide hexagonal profile creates stable footing, preventing taller succulent varieties or heavy jade branches from tipping accidentally. This design demonstrates how gentle pastel tones can soften bold industrial silhouettes for balanced, contemporary home styling.
Roll out a smooth, six-millimeter thick slab of butter yellow clay across a rigid surface, checking thickness consistency with guide rails. Using a metal ruler and craft knife, cut six identical rectangular side panels measuring six centimeters wide by seven centimeters high. Bevel the long vertical edges of every panel inward at a precise thirty-degree angle to enable seamless corner joints upon assembly. Cut a matching regular hexagonal base piece whose outer side lengths correspond exactly to the six-centimeter width of the wall slabs. Assemble the vessel by aligning the beveled edges around the hexagonal base, pressing the corners together firmly from bottom to top. Run a narrow bead of scrap clay along internal seams, smoothing the material thoroughly to reinforce joints against outward soil pressure. Ensure the exterior corners remain sharp and plumb by squaring them against an acrylic block while the compound is pliable. Once cured and fully set, sand each exterior facet flat using cross-directional strokes, sealing the finished product thoroughly.
5. Idea 5: Dual-Tone Powder Blue Dipped Planter

Step-by-Step Guide
The dual-tone powder blue dipped planter unites raw clay textures with modern color blocking, yielding an effortless coastal-inspired aesthetic. This design pairs the natural buff or sand tone of exposed earthy clay on the bottom half with powdery sky blue above. The visual split creates a horizon line across the planter, grounding foliage while introducing refreshing color into neutral living rooms. By maintaining clean demarcation lines, this two-tone aesthetic mirrors high-end studio pottery techniques while remaining entirely achievable on home worktables. The minimalist shape highlights plant morphology, allowing broad-leaf varieties or structural rosette succulents to take center stage without visual distraction. The lower unglazed band provides practical handling grip, while the sealed colored band resists dirt marks and moisture stains during regular maintenance. This project provides an ideal platform for mastering clean masking lines, edge blending, and layered pigment applications.
Form a classic straight-sided cylindrical planter using neutral, uncolored clay rolled to an even thickness of approximately seven millimeters. Cut a base circle, wrap a rectangular wall strip around the circumference, and smooth the internal and external joining seams completely flat. Smooth the exterior surface with an acrylic smoothing tool to remove all visible fingerprints and minor surface undulations before setting aside. Roll out a thin secondary sheet of powder blue clay, measuring half the height of the original cylinder and just two millimeters thick. Carefully wrap this colored sheet around the upper half of the cylinder, aligning the top edge flush with the main rim. Blend the bottom seam of the blue clay downward using light strokes, or trim it sharply with a straight razor for clean definition. Cure the two-layer vessel according to package directions, allowing it to cool slowly to avoid separating the bonded clay layers. Once cool, apply a matte waterproof sealant exclusively across the blue portion, leaving the lower natural clay raw for textural contrast.
6. Idea 6: Terracotta-Flecked Blush Terrazzo Cylinder
How to Make
The terracotta-flecked blush terrazzo cylinder reimagines Mediterranean composite stone through modern polymer sculpting techniques, resulting in a lively patterned vessel. A background of muted blush pink hosts scattered geometric chips of terracotta, sage, and ivory clay embedded directly into the matrix. This composite appearance adds depth and visual movement to flat surfaces, echoing high-end artisanal decor elements found in designer spaces. The warmth of blush tones complements both light-wood shelving and dark metal plant stands, integrating smoothly into varied residential spaces. Because terrazzo chips distribute randomly throughout the rolling process, every completed container features an entirely original pattern across its perimeter. The smooth, flat cylinder form showcases the internal stone-fleck effect without distracting ridges or complex contours. This project teaches precision slab integration, flat rolling mechanics, and advanced surface leveling methods without specialized shop machinery.
Condition pale blush pink clay thoroughly, rolling it out into a flat sheet approximately eight millimeters thick on a non-stick craft tile. Chop cured or firm scraps of terracotta, forest green, and white clay into tiny irregular geometric chips using a sharp blade. Scatter these multi-colored clay chips evenly across the surface of the blush slab, pressing them down lightly with your fingertips. Place a sheet of parchment paper over the scattered pieces, using an acrylic rolling pin to press the fragments flush into the base. Roll the combined slab until it reaches a uniform thickness of six millimeters, stretching the chips into realistic terrazzo flecks. Cut a rectangular wall section and a circular bottom disc from this prepared terrazzo sheet, assembling them into an upright cylinder. Carefully smooth the single vertical wall seam from the inside, maintaining the continuity of the outer terrazzo pattern without smearing flakes. After curing the vessel, wet-sand the exterior with progressing grits to reveal crisp chip boundaries, finishing with an all-weather matte protective sealer.
7. Idea 7: Sage Green Woven Lattice Pot

Execution Process
The sage green woven lattice pot utilizes basketry techniques adapted for pliable clay, resulting in an intricate, open-textured indoor planter. Slender ribbons of soft sage clay are interwoven systematically, wrapping the exterior walls in a rhythmic diamond-grid pattern that introduces depth. The muted sage color references natural foliage, creating an organic harmony between the handmade container and the green leaves inside. This textural basketweave catches ambient light from various angles, casting delicate micro-shadows that enrich plain minimalist decor displays. The layered construction produces a reinforced wall structure that resists physical deformation during day-to-day handling and seasonal plant potting. Working through the lattice arrangement builds dexterity, encouraging careful alignment, precise spatial planning, and gentle surface manipulation. The finished vessel suits trailing ivy, compact ferns, or trailing jades that benefit aesthetically from a textured, artisan-crafted planting base.
Begin by rolling out several dozen long, uniform clay strips in soft sage green, keeping dimensions at four millimeters wide and two thick. Form a solid structural inner core by shaping a thin-walled, low-profile cylinder from scrap clay to serve as the supporting wall. Lay half of your prepared clay strips vertically along the outer wall of this supporting cylinder, securing them along the top rim. Weave the remaining horizontal strips alternately over and under the vertical strands, working downward row by row toward the base plate. Gently press each overlapping intersection with the tip of a silicone tool to bond the lattice layers together without flattening curves. Trim excess ribbon lengths flush with the bottom perimeter, folding the ends neatly underneath and securing them with a flat base disc. Smooth the top rim by capping it with a single continuous folded clay strip to conceal raw strip ends cleanly. Cure the woven pot thoroughly, taking care to inspect deep crevices for complete hardening before coating with an invisible protective moisture barrier.
8. Idea 8: Matte Lilac Arch-Relief Planter

Setup Method
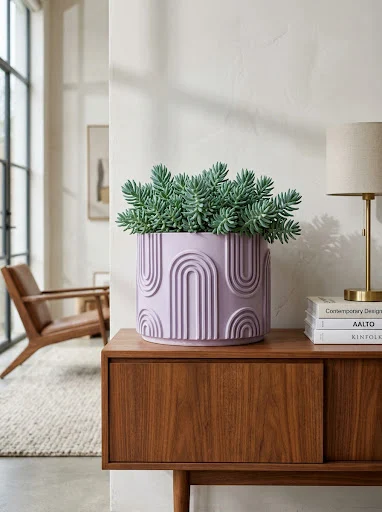
The matte lilac arch-relief planter introduces architectural motifs through stacked, dimensional portals layered directly onto a clean, flat vessel body. This aesthetic draws inspiration from modern desert modernism and classic arcade architecture, translating structural silhouettes into a compact interior decor accessory. Soft lilac provides an unexpected yet calming pastel tone, pairing beautifully with blue-tinted succulents like echeveria or trailing string-of-bananas. The raised concentric arches create dynamic depth, catching daylight across their smooth curved borders to cast architectural shadow lines. This style suits contemporary gallery walls, mid-century sideboards, and sleek floating display shelves where graphic forms draw appreciation. Crafting these relief elements teaches layering techniques, requiring careful air pocket removal and edge finishing to produce clean, professional lines. The finished planter functions as functional sculpture, elevating standard home flora into a curated artistic display.
Construct a primary cylindrical vessel from pale lilac clay, targeting an eight-centimeter diameter with clean, vertical walls seven millimeters thick. Roll out a matching lilac slab four millimeters thick, using nested arch-shaped cookie cutters or paper templates to cut four arch sets. Each arch set should feature two concentric bands and a solid inner pillar, creating a graduated stair-step architectural detail. Lightly mist the back of each relief piece with water or brush with liquid clay to promote adhesion against the primary vessel. Position the four arch elements at equidistant quarter intervals around the planter’s exterior, pressing outward from their centers to banish trapped air. Use a fine needle tool to clean any excess bonding slip that oozes along the contact perimeter between arches and walls. Carefully blend the bottom edges of the arch motifs into the base of the pot to establish structural continuity. Allow the form to cure fully according to material specifications, then buff the matte arches with steel wool for a velvety, non-reflective finish.
9. Idea 9: Bubble-Textured Buttercup Sphere Pot
Step-by-Step Guide
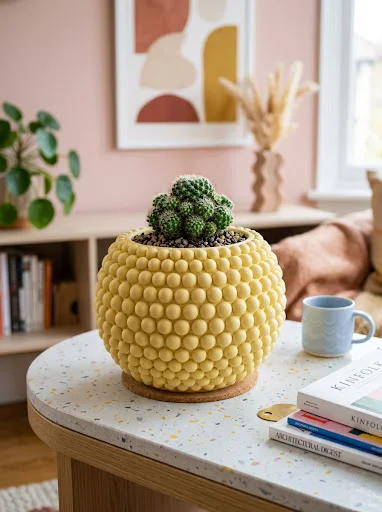
The bubble-textured buttercup sphere pot features playful tactile geometry achieved through dozens of smooth hemispherical spheres clustered across a rounded base. This rounded profile moves away from rigid linear cylinders, introducing soft sculptural volume that accents small, trailing indoor plants. Buttercup pastel yellow delivers a gentle, creamy radiance that brightens dimly lit room corners and neutral office desks. The repetitive spherical surface invites touch, delivering sensory engagement alongside dependable housing for delicate plant root systems. Constructing this globular silhouette challenges builders to maintain interior bowl integrity while applying exterior elements evenly across a curved plane. The clustered bubbles create substantial wall thickness, producing a heavy, grounded pot that resists tipping over when supporting asymmetric plant growth. This expressive design bridges modern pop art aesthetics and functional plant care, serving as an engaging focal point for interior plant collections.
Create an interior spherical vessel by shaping two matching pinch pots from pale butter yellow clay and joining their openings horizontally. Cut away the top third of this unified sphere with a tissue blade to create an open circular plant aperture. Roll several dozen small, identical spheres of yellow clay, ensuring their diameters remain consistent at approximately twelve millimeters each. Lightly score the spherical pot’s exterior, brushing the surface with clear liquid polymer medium or clay slip to assist bonding. Press the small clay spheres onto the pot starting in a ring around the base, moving upward in tight concentric rows. Settle each bubble securely against adjacent neighbors, pressing gently to bond contact points without flattening the rounded outer contours. Continue placing spheres until the entire exterior is coated, terminating the pattern evenly along the open top planting rim. Bake or air-dry the vessel thoroughly, inspecting between bubbles after cooling to apply an even protective coat of semi-gloss moisture-resistant sealant.
10. Idea 10: Pale Rose Pink Ribbed Hanging Pod

How to Make
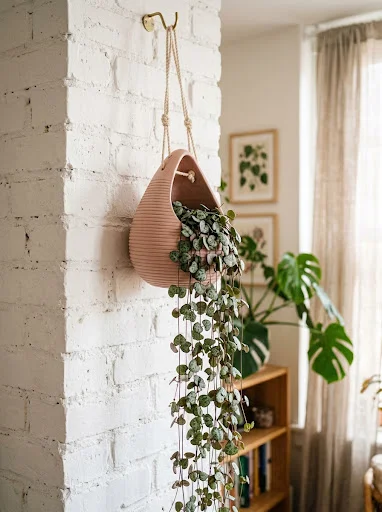
The pale rose pink ribbed hanging pod frees up valuable table space by suspending delicate climbing or trailing greenery at eye level. This design features an organic drop-shaped silhouette accented with fine horizontal ribbing, designed to balance securely when hung from natural cords. Pale rose pink introduces gentle romance and warmth to plant styling, contrasting against vibrant green leaves and neutral macrame cordage. The hanging format suits trailing plants like donkey’s tail or ivy, whose downward stems benefit from vertical clearance. Building integrated suspension holes requires planning clay density, as mounting points must support damp soil weight without tearing over time. The rounded base softens surrounding architectural lines, catching ambient daylight evenly across its ribbed, circular perimeter. This aerial planter serves as an adaptable decorative feature for window frames, patio ceilings, and sunny indoor reading nooks.
Begin by rolling out an elongated egg-shaped pinch pot using pale rose pink clay, keeping the base rounded and walls eight millimeters thick. Mount the base gently onto a ring-shaped support stand to preserve its curved bottom while shaping the upper body upward. Use a grooved modeling comb or notched scraper tool to etch horizontal parallel ridges around the entire circumference while turning the pot. Ensure these horizontal lines stay level, carving them into the clay at two-millimeter depths from the bottom upward to the rim. Measure three equidistant points along the upper perimeter, using a circular hollow brass punch to cut neat five-millimeter suspension holes. Reinforce the interior area surrounding each suspension hole with an extra pad of clay, smoothing edges thoroughly to prevent line friction. Once fully cured, sand the interior rim smooth, ensuring no sharp clay edges remain that could fray hanging ropes or twine. Seal the entire planter with heavy-duty waterproof clear sealer, threading natural cotton or leather cords through the eyelets for hanging.
Common Beginner Mistakes and How to Avoid Them
Beginner clay crafters frequently encounter structural issues that compromise both aesthetic appeal and the long-term health of potted plants. A common mistake involves rolling clay walls unevenly, which creates structural weak spots that crack during moisture loss or curing cycles. Prevent this by utilizing uniform guide slats on either side of your rolling pin to maintain constant slab depth throughout. Another frequent oversight is omitting drainage holes, which traps excess irrigation water at the bottom, causing fungal rot in delicate roots. Always punch a clean eight-millimeter drainage hole in the base while the clay is soft, or use nursery liners inside. Crafters also frequently skip surface preparation, leading to trapped air pockets that expand and rupture wall structures during the baking process. Knead your medium thoroughly through methodical conditioning, and inspect layered components for seamless adhesion before committing to the curing step. Beginners also sometimes apply heavy acrylic paints directly to raw clay surfaces, causing flaking or uneven drying across the piece. Tint your clay body directly with pigments prior to sculpting, or apply thin, uniform washes once pieces have hardened completely. Finally, neglecting to apply an interior waterproof sealant allows moisture to seep through permeable clay walls, degrading your work surface over time.
Practical Tips for Better Results
Achieving professional, store-quality finishes on homemade pastel clay planters requires attention to material handling, cleanliness, and finishing mechanics. Pastel clays readily attract airborne lint, dust particles, and residue, which can dull soft shades like blush, mint, and pale cream. Keep your immediate workspace clean by wiping tiles, tools, and hands with alcohol-based cleaning wipes between handling different colored clay blocks. If stray dust particles embed into soft surfaces during shaping, gently lift them away using a small scrap of white clay. When smoothing visible seams and edges, use flexible silicone-tipped shaping tools dampened with light mineral oil or water to eliminate visible lines. Baking polymer clays should be completed under an inverted aluminum foil roasting pan to deflect direct oven element heat, preventing unwanted scorching. Invest in a dedicated standalone oven thermometer, as integrated kitchen appliance dials often fluctuate significantly beyond their indicated temperatures. For air-dry variants, slow down the moisture loss rate by tenting drying projects loosely with plastic wrap to minimize cracking. Sand hardened containers wet rather than dry, utilizing automotive-grade high-grit abrasive paper submerged in shallow water to yield satin-smooth, uniform outer textures.
Styling, Presentation, or Organization Ideas
Presenting pastel clay planters effectively relies on intentional placement, balanced scale, and complementary natural lighting within your home environment. Grouping three planters of varying heights and complementary pastel tones—such as pale peach, sage, and cream—creates an appealing, balanced vignette. Position these arrangements on natural blonde wood credenzas, white floating shelves, or raw linen table runners to highlight their soft color palettes. Pair each planter with plants whose leaf shapes complement the container’s structural geometry; match ribbed vertical pots with spiky haworthias, and rounded vessels with soft echeverias. Elevating one container upon a small turned wooden stand or stacked art books introduces vertical variation, preventing linear table arrangements from feeling static. For functional desk organization, these vessels can double as stylish storage cups for artist brushes, precision pens, or desktop accessories. Incorporate warm, indirect daylight from north-facing windows to cast soft, directional shadows across textured surfaces, accentuating fluted and relief elements. Using matching neutral gravel top-dressings over potting soil unifies varied planter shapes into a cohesive, curated container garden. Swapping standard plastic nursery inserts directly into clay containers makes it easy to rotate plants between vessels without messy soil transfers.
Budget or Time Planning
Planning your clay crafting project around structured timelines and realistic budgets ensures an enjoyable, cost-effective creative experience. A starter toolkit containing a multi-color pastel clay assortment, basic modeling tools, acrylic roller, and craft sealer generally requires minimal initial expense. Polymer clay blocks can be purchased in economical bulk packs, and everyday household items like wooden dowels, bottle caps, and cookie cutters provide affordable texture tools. To optimize time investment, schedule work across distinct, sequential phases: material conditioning and shaping on one afternoon, followed by curing, sanding, and sealing. Batch-processing multiple vessels simultaneously lowers setup overhead and ensures uniform wall thickness and matching color formulations across full sets. Allow air-dry clay pieces three to four full days to cure completely before attempting decorative painting or applying protective surface coatings. Oven-cured polymer projects require approximately thirty minutes of active heat processing per quarter-inch of wall thickness, followed by gradual ambient cooling. Preparing your own custom pastel blends by kneading concentrated pigments into neutral white base clay cuts costs compared to buying pre-mixed specialty packs. Managing material waste by gathering trimmed scrap clay into marbled accent panels ensures maximum utility from every block of crafting clay.
Creative Expansion and Advanced Inspiration
Once you master fundamental pinch, slab, and coiling methods, you can explore more advanced pottery techniques and mixed-media accents. Try incorporating metallic leaf accents along the rims of pastel vessels, pairing warm gold or copper foil against matte mint or blush surfaces. You can also explore sgraffito decoration, painting a contrasting pastel slip over hardened clay and carving fine line illustrations through to the base layer. Integrating complementary materials like turned hardwood bases, brass dowel legs, or wrapped leather hanging straps introduces dynamic architectural contrast to simple ceramic forms. Experimenting with two-part silicone molding compounds lets you capture complex hand-sculpted shapes, enabling exact casting duplicates using liquid clay slip or resin. You can also scale up these structural concepts to produce larger complementary vessels, including bulbous watering carafes, matching propagation stands, and stepped drainage saucers. Exploring micro-mosaic surface work by embedding hand-cut clay tesserae into damp outer walls provides limitless creative options for geometric designs. Advanced crafters can also build integrated internal self-watering reservoirs with wicking cords, merging delicate pastel artistic styles with automated plant care.