Nature-inspired polymer clay jewelry has established a distinct presence across contemporary craft circles, offering makers an accessible medium to capture organic botanical forms, geological textures, and earthy color palettes. Polymer clay is an oven-bake modeling compound composed of polyvinyl chloride, plasticizer, and color pigments, known for its structural malleability and exceptional post-cure durability. When molded into wearable jewelry, this versatile material allows artisans to recreate natural details, from delicate veined foliage to banded mineral stones. This detailed tutorial outlines ten actionable concepts designed to guide readers through every phase of constructing botanical, floral, and geological clay ornaments. You will learn foundational techniques such as color blending, texture transfer, cane construction, and hardware assembly using everyday tools and hypoallergenic jewelry findings. Developing these tactile crafting methods allows creators to produce custom, lightweight earrings, pendants, and rings without the requirement of expensive specialized metal-casting machinery. By exploring these structured design ideas, you will develop the practical skills needed to transform raw clay blocks into refined, wearable art that reflects the balance and beauty of the outdoors.
Why This Idea Is Trending or Useful
The enduring visibility of natural jewelry designs across modern Pinterest ideas stems from an increased appreciation for modern design, organic textures, and sustainable personal aesthetics. Modern consumers and makers frequently seek out earthy, handmade alternatives to mass-produced accessories, prioritizing unique craftsmanship and authentic visual storytelling. Polymer clay is lightweight, making it ideal for creating large statement earrings and tiered pendants that remain comfortable during extended wear. For beginners, botanical clay crafting serves as an approachable creative project because natural forms feature gentle imperfections, asymmetrical lines, and variable curves, which makes minor beginner errors look intentional. The practical value of this craft lies in its low barrier to entry; basic kitchen ovens, standard rolling pins, and simple craft blades are sufficient to achieve gallery-quality results. Furthermore, natural motifs harmonize effortlessly with contemporary minimalist style wardrobes, making these pieces dependable accents for casual daytime wear or formal evening attire. Learning these techniques provides immediate creative satisfaction while cultivating valuable artisan skills.
Materials and Preparation
Proper studio preparation, clean surfaces, and suitable tools form the structural foundation of durable, professional polymer clay jewelry. Core materials include premium-grade oven-bake polymer clay in earthy shades such as sage green, terracotta, warm ochre, raw umber, translucent white, and charcoal black. Essential equipment comprises a smooth acrylic rolling rod, a rigid stainless steel tissue blade, a set of miniature geometric cutters, needle modeling tools, and an assortment of silicone ball styluses. Jewelry hardware requires jump rings, ball-post earring studs, fishhook wires, and headpins crafted from surgical stainless steel or titanium to ensure hypoallergenic wear. Preparation begins by scrubbing the work surface with isopropyl alcohol and a lint-free towel to remove dust and stray fibers. Knead raw clay thoroughly between warm palms or pass it through an acrylic roller until it becomes pliable, elastic, and free of air bubbles. Establishing an organized workspace and testing oven temperatures with an independent thermometer ensures consistent curing without scorching fragile pieces.
Idea 1: Textured Monstera Deliciosa Dangle Earrings
Step-by-Step Guide
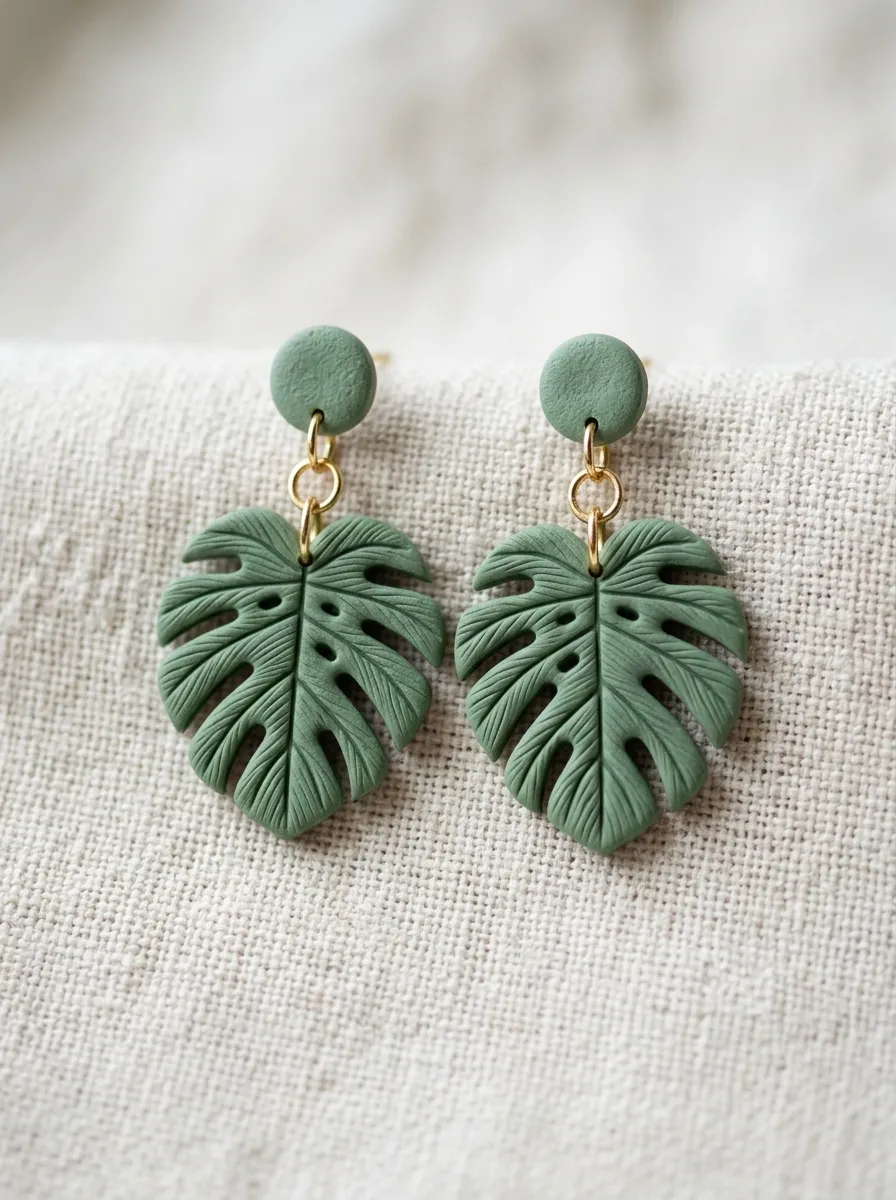
The textured monstera deliciosa dangle earring design translates the split-leaf foliage of tropical plants into clean, lightweight statement accessories. The composition pairs a solid sage or forest green leaf silhouette with cut-out fenestrations, capturing the natural architecture of tropical foliage without excess bulk. A smooth, round clay stud at the top anchors the piece, while the dangling leaf hangs below via a metallic jump ring to introduce subtle kinetic movement during wear. Surface textures, such as fine vein imprints and soft matte finishes, elevate the piece from a flat cutout into a dimensional, sculpted accessory. This project offers beginners an approachable lesson in freehand blade carving and negative-space detailing. The resulting pair complements neutral linen outfits, bringing a modern botanical touch to everyday wardrobes while remaining comfortable on the earlobe throughout the day.
Condition a block of deep olive or sage polymer clay until supple, then roll it out across a smooth tile to an even thickness of two millimeters. Cut out two identical spade silhouettes measuring four centimeters in length using a teardrop cutter or a sharp craft scalpel. Using the tip of a fine craft blade, carve four to five smooth slits into the outer leaf margins, rounding the inner notches to replicate characteristic monstera fenestrations. Press a real leaf or a textured silicone stamp gently onto the clay surface to transfer fine vein patterns down the central stem. Pierce a clean one-millimeter hole through the top stem using a needle tool, leaving sufficient margin from the edge to prevent tearing. Bake the leaves flat on parchment paper at 130°C for thirty-five minutes, let them cool completely, and link each leaf to a baked circular stud using an open jump ring closed with flat-nose pliers.
Idea 2: Wildflower Meadow Slab Pendant
Execution Process
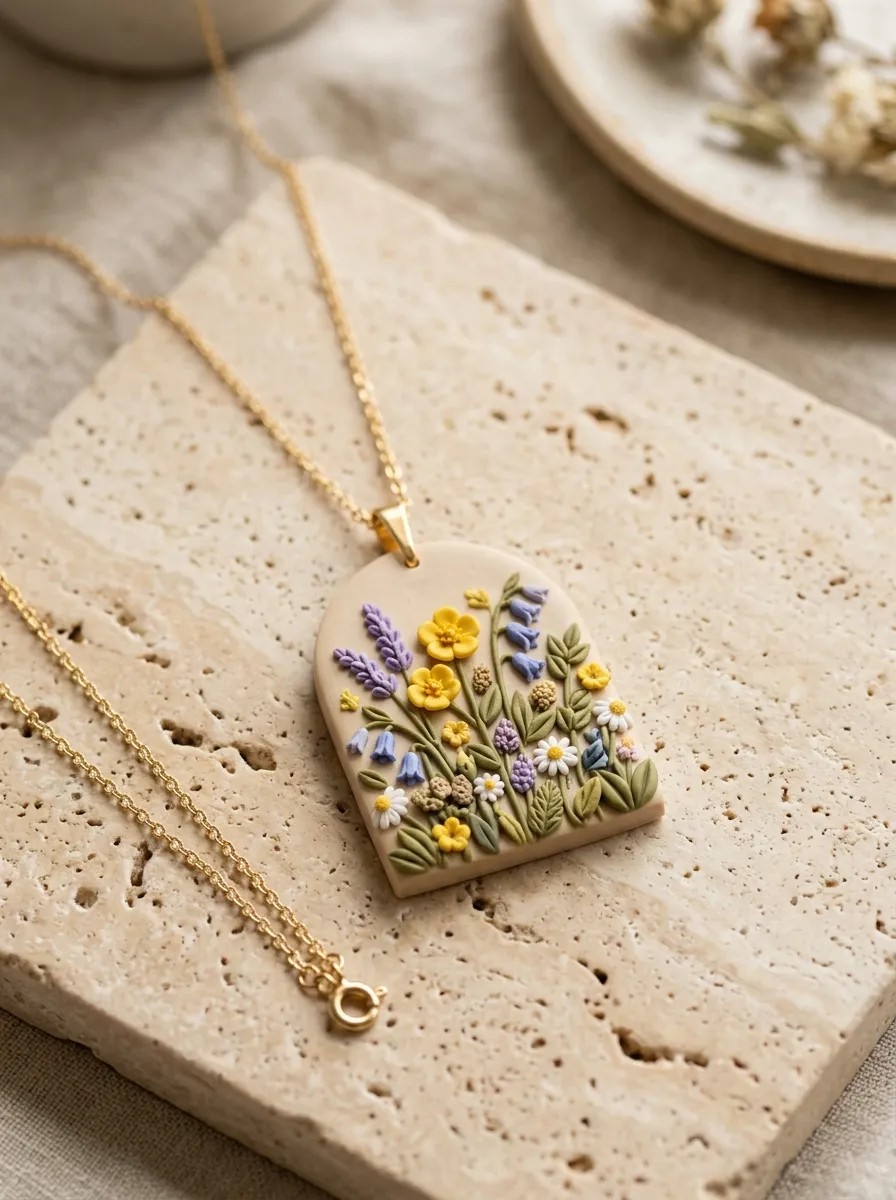
The wildflower meadow slab pendant captures the delicate arrangement of rural prairie blossoms within a geometric, wearable frame. The concept relies on the decorative slab method, where miniature hand-sculpted floral components—including buttercups, lavender sprigs, and clover blossoms—are pressed onto a solid neutral clay sheet. The resulting textured sheet is cut into clean rectangular or arched forms, framing the botanical landscape within modern, balanced lines. Translucent and pastel clays add optical depth, making the miniature flower petals stand out against a soft ecru or terracotta background. This design is an ideal exercise in miniature sculpting, helping makers develop fine motor control and micro-component attachment without messy adhesives. The finished pendant acts as a wearable miniature garden, serving as a focal accessory that brings handmade charm to understated outfits.
Roll out an ecru or warm stone clay base to three millimeters in thickness, trimming the edges to form a working rectangular slab. Roll micro-portions of golden yellow, lavender, dusty rose, and olive clay into tiny spheres, cylinders, and threads. Assemble five-petaled blossoms by grouping five tiny yellow balls together, pressing their centers with a miniature ball stylus to splay the petals outward. Form lavender sprigs by overlapping small violet clay ovals along a thin green clay stem laid directly onto the ecru base sheet. Once the slab is filled with floral arrangements, lay a sheet of parchment paper over the top and roll an acrylic roller lightly across the surface to level the components without flattening their textures. Cut out two arched pendant shapes using a metal cutter, pierce a hole at the top of each arch, bake at the recommended temperature, and thread onto a delicate gold chain.
Idea 3: Faux Fringed Gilded Gingko Leaf Studs

How to Create
The faux fringed gilded gingko leaf stud captures the fan-shaped geometry of autumn gingko leaves, pairing organic lines with metallic accents. The silhouette features a scalloped upper crest with a central cleft, supported by fine radial ridges that draw the eye outward toward the perimeter. Incorporating rich mustard yellow or terracotta clay warmed with subtle metallic mica powder brings out the autumnal feel of the design. The back of the fan features a flat surface for securing earring posts, making the finished piece an understated, low-profile accessory suitable for professional work environments. This project helps crafters practice radial texture scoring and surface pigment application, proving how simple geometric adjustments turn basic shapes into refined botanical jewelry.
Begin by conditioning warm ochre clay, rolling it into a smooth sheet measuring 2.5 millimeters thick on a ceramic tile. Cut out two fan shapes using a fluted oval cutter, or trace a paper template using a needle tool, cutting a distinct V-notch into the center of the top edge. With the blunt side of a craft blade or a fine silicone wedge, score delicate, straight lines radiating outward from the bottom point to the upper scalloped edge. Lightly dip a soft dry brush into gold metallic mica powder, sweeping it across the raised ridges to highlight the texture. Smooth the bottom point flat to serve as a neat base, and cure the clay pieces flat on a tile at 130°C for thirty minutes. After the pieces cool completely, sand the back surfaces with medium-grit paper, apply a drop of two-part epoxy, and embed stainless steel flat-pad earring posts securely into place.
Idea 4: Marbleized River Stone Ring Bands

Step-by-Step Guide
The marbleized river stone ring band translates the banded patterns and smooth contours of water-worn pebbles into a minimalist jewelry staple. The design incorporates a palette of slate gray, cool white, charcoal, and translucent clay swirled together to mimic natural sedimentary strata. The resulting ring features a smooth, rounded band with no sharp edges, ensuring comfort during wear. Because polymer clay cures into a durable yet slightly flexible material, it is well-suited for seamless rings that resist chipping under daily handling. This project teaches crafters how to build structured clay canes, regulate marbleizing twists, and size ring bands accurately to account for post-cure thermal cooling. The finished piece functions as an understated unisex accessory that pairs well with other minimalist jewelry pieces.
Condition four equal portions of charcoal, slate gray, pure white, and translucent polymer clay, rolling each into a narrow cylinder of equal length. Twist the four strands together into a single rope, fold the rope back onto itself, and twist again, repeating this process four times until fine marbling appears throughout the mass. Roll the marbled block into a smooth sheet four millimeters thick, then cut a straight strip measuring eight millimeters wide and seventy millimeters long. Wrap the strip around an aluminum ring mandrel sized to your target finger, overlapping the ends at a forty-five-degree angle and slicing cleanly through both layers to form a flush joint. Smooth the seam with a silicone shaper, cure the ring on the metal mandrel at 130°C for forty minutes, and allow it to cool slowly inside the oven. Wet-sand the interior and exterior with 800-grit sandpaper under running water to produce a smooth, satin river-stone finish.
Idea 5: Layered Agate Geode Slice Earrings

How to Make
The layered agate geode slice earring design captures the concentric banding and crystalline cores of sliced natural stones. The piece features organic, irregular contours built from alternating layers of translucent, milky white, deep indigo, and raw umber clay. At the center lies a faux crystalline hollow, formed by embedding rough quartz-like granules of translucent baked clay or coarse sea salt that dissolves during washing. This project highlights the technique of cane wrapping and organic shaping, showing how stacked sheets can be sliced to reveal layered internal patterns. The high-contrast color banding mimics genuine semi-precious gemstones while maintaining the lightweight comfort of polymer clay. These earrings deliver a bold, earthy statement that complements bohemian dresses, chunky knitwear, and modern casual ensembles.
Prepare four thin sheets of clay in deep indigo, sky blue, opaque white, and pure translucent, rolling each to a one-millimeter thickness. Shape a core from a small ball of translucent clay rolled in coarse sea salt grains to simulate crystalline quartz textures. Wrap the core sequentially with the thin clay sheets, alternating between colored and translucent layers until reaching eight total wraps. Gently pinch and press the circular cylinder into an irregular, asymmetrical geode profile, rolling it lightly to fuse the layered seams. Using a sharp tissue blade, slice thin cross-sections measuring 2.5 millimeters thick, inspecting each slice to confirm clean concentric banding around the hollow center. Puncture a small hole near the top outer edge of each slice, bake on a ceramic plate at 130°C for thirty-five minutes, soak in warm water to dissolve the surface salt crystals, and attach sterling silver ear wires.
Idea 6: Minimalist Eucalyptus Branch Bar Necklace

Execution Process
The minimalist eucalyptus branch bar necklace interprets organic stems into a horizontal architectural bar suspended from a fine metallic chain. The design features a slim central branch supporting alternating pairs of round, disc-like silver dollar eucalyptus leaves in muted gray-green and dusty blue tones. The leaves are layered slightly over one another, creating a clean linear composition that rests flat against the collarbone. This layout offers a contemporary alternative to bulky pendants, prioritizing horizontal balance and low-profile elegance. The project develops skill in working with fine clay armatures, securely embedding metal eye pins, and layering micro-elements without distorting their shape. The finished necklace serves as an everyday signature accessory, pairing easily with crewneck sweaters, silk blouses, and casual open-collar button-downs.
Roll a thin strand of bronze or chocolate brown clay into a five-centimeter cylinder measuring 1.5 millimeters in diameter to form the central stem. Cut out twelve miniature circular discs from a one-millimeter-thick sheet of sage green clay using a straw or a tiny five-millimeter round punch. Press the leaves in overlapping pairs along the brown branch, alternating their angles slightly to mimic the growth habit of fresh eucalyptus. Using a flexible needle tool, score a subtle central vein down each leaf, blending the base of each disc securely into the underlying branch. Insert a small metal eyelet or bent headpin into each end of the clay stem, burying the wire shafts deep within the clay to ensure a strong anchor. Bake the piece flat on a ceramic tile dusted with cornstarch for thirty minutes at 130°C, let it cool completely, and attach the end loops to a forty-centimeter fine cable chain.
Idea 7: Terracotta Succulent Rosette Brooch

Step-by-Step Guide
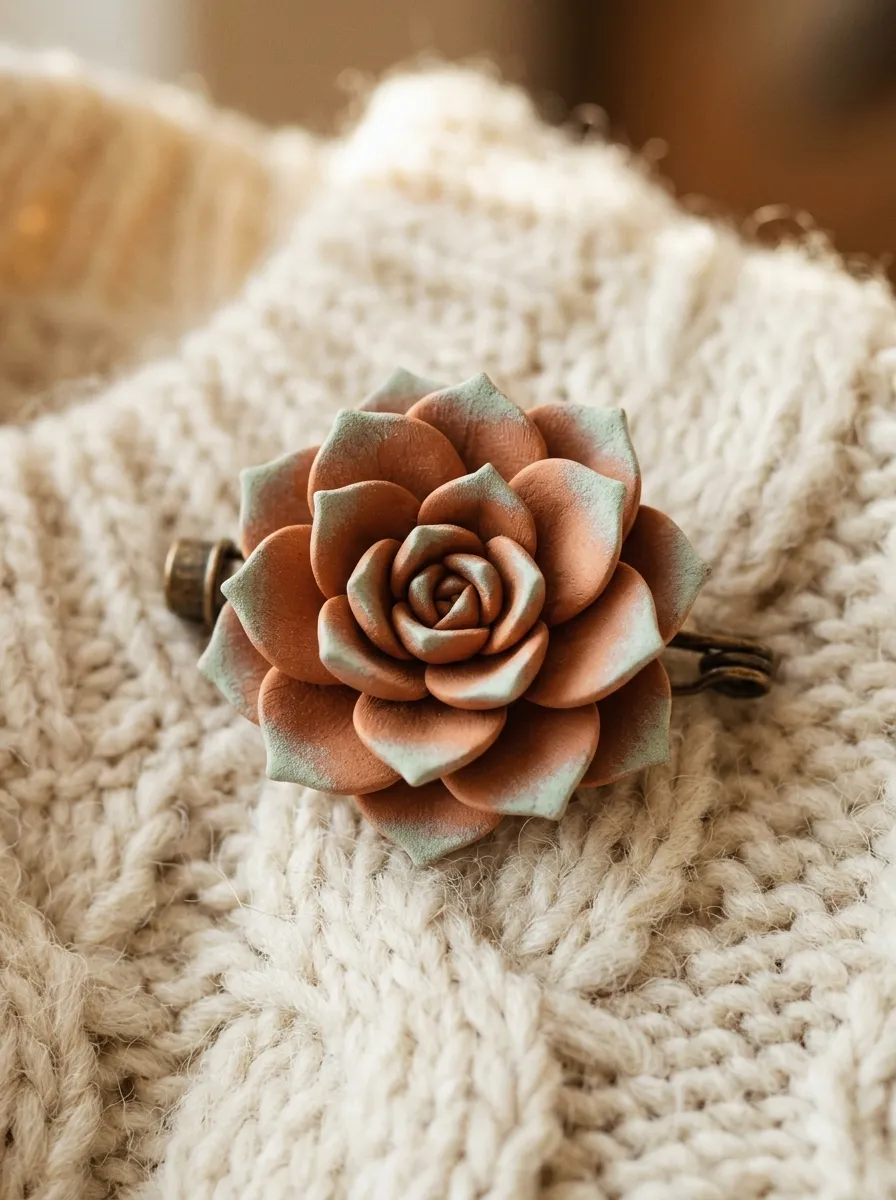
The terracotta succulent rosette brooch translates the fleshy, spiraling form of an echeveria succulent into a dimensional, wearable pin. The sculpture features concentric tiers of spoon-shaped petals that expand outward from a tight central bud, creating a rosette shape with realistic depth. Using raw terracotta clay accented with dusty seafoam green chalk pastels around the petal tips captures the natural powdery coating found on living succulents. The broad, flat base provides a secure foundation for adhering a locking pin back, ensuring the finished brooch fastens neatly onto denim jackets, wool coats, or fabric bags. This project provides hands-on practice in petal shaping, progressive dimensional assembly, and soft pastel shading, demonstrating how basic clay teardrops can be assembled into complex botanical structures.
Condition a block of terracotta polymer clay, rolling it into fifteen small spheres of graduated sizes ranging from three to eight millimeters in diameter. Flatten each sphere between your thumb and index finger into a tapered, spoon-shaped petal with a thick base and a delicate, pointed tip. Begin assembling the rosette by rolling the smallest petal into a tight central cone, then layer the next four petals around it in an overlapping spiral. Continue attaching the remaining petals in expanding concentric rings, bending the outer tips slightly downward to replicate a fully opened succulent plant. Brush the outer edges of the raw petals with a soft bristle brush dipped in powdered sage-green chalk pastel to simulate a powdery botanical sheen. Cure the rosette upright in a small bowl of baking soda at 130°C for thirty-five minutes, allow it to cool, and attach a metal bar pin to the flat reverse side using two-part epoxy adhesive.
Idea 8: Fern Frond Embossed Drop Earrings
How to Create
The fern frond embossed drop earrings combine clean geometric framing with detailed botanical relief textures, yielding a sophisticated pair of mixed-finish accessories. The design features an elongated rectangular or oval clay drop, embossed with an intricate, raised silhouette of a woodland fern leaf. The base clay is mixed in a soft, semi-translucent ivory or warm sand hue, while the recessed or raised fern details are accentuated with dark green pigment or an antiquing wash. This combination provides an approachable study in surface texture transfer, teaching makers how to use natural plant cuttings or rubber stamps to emboss fine relief textures into raw clay. The clean geometric border contrasts against the organic frond design, creating a balanced accessory that complements rustic weddings, outdoor events, or modern casual outfits.
Roll out a smooth sheet of ivory polymer clay to a uniform three-millimeter thickness using an acrylic roller over a smooth glass slab. Place a fresh, clean fern cutting or a botanical rubber texture sheet face-down onto the clay, rolling over it firmly once to press the leaf veins into the surface. Carefully peel away the botanical material using tweezers to reveal the crisp frond impression embedded in the clay. Cut out two elongated rectangular drops measuring five centimeters long by two centimeters wide using a clean metal cutter, centering the fern impression within the frame. Pierce a small hole centered three millimeters below the top edge using a needle tool, then bake the drops flat between two parchment-lined tiles at 130°C for thirty-five minutes to prevent warping. Once cooled, apply an olive-green oil paint wash over the surface, wipe away the excess with a soft cloth to leave color only in the grooves, and assemble with gold-plated earring hooks.
Idea 9: Desert Cactus Blossom Statement Ring
Setup Method
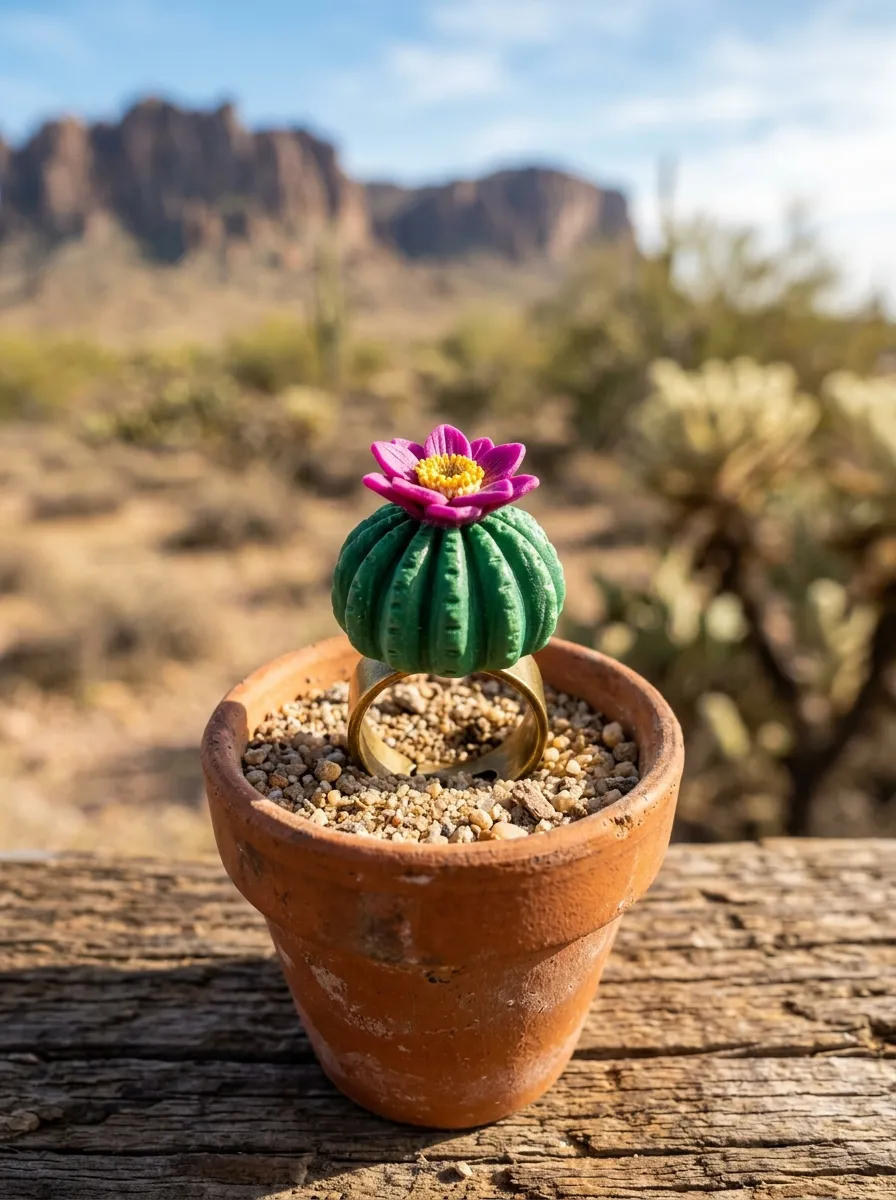
The desert cactus blossom statement ring combines the fluted ribs of a desert cactus with the delicate, contrasting petals of a miniature crown blossom. The primary ring crown features a domed half-sphere of rich emerald or sage clay, detailed with deep vertical ridges and white fiber spines that mimic desert flora. Resting atop the cactus dome is a small, multi-petaled bloom sculpted in vibrant magenta or sunny yellow clay, which introduces a bold focal pop against the green base. The assembly is anchored to an adjustable metal ring pad, providing a stable foundation that resists twisting on the finger during wear. This project teaches crafters how to build compact, self-supporting domes, carve clean fluted ridges, and attach contrasting accent blossoms without crushing the underlying structure. The resulting ring makes a playful statement, celebrating arid landscapes through rich colors and tactile textures.
Roll a portion of forest green clay into a firm dome measuring fifteen millimeters in diameter, pressing the flat base against a glass work tile. Using the edge of a plastic modeling tool, press eight deep vertical grooves around the dome from apex to base to form the ribbed cactus folds. To make the blossom, roll six tiny teardrop petals from bright magenta clay, arranging them in a circle at the top center of the green dome, and press a tiny yellow ball into the middle. With the tip of a fine sewing needle, texture the yellow center with small pricks to simulate realistic floral pollen. Place the entire cactus assembly onto an adjustable metal ring blank fitted with a textured glue pad, pressing the raw clay firmly over the metal base. Bake the assembly upright in the oven at 130°C for thirty-five minutes, cool completely, and apply a light coat of matte water-based varnish over the cactus ribs to protect the piece.
Idea 10: Pressed Pinecone Scale Collar Necklace
Step-by-Step Guide
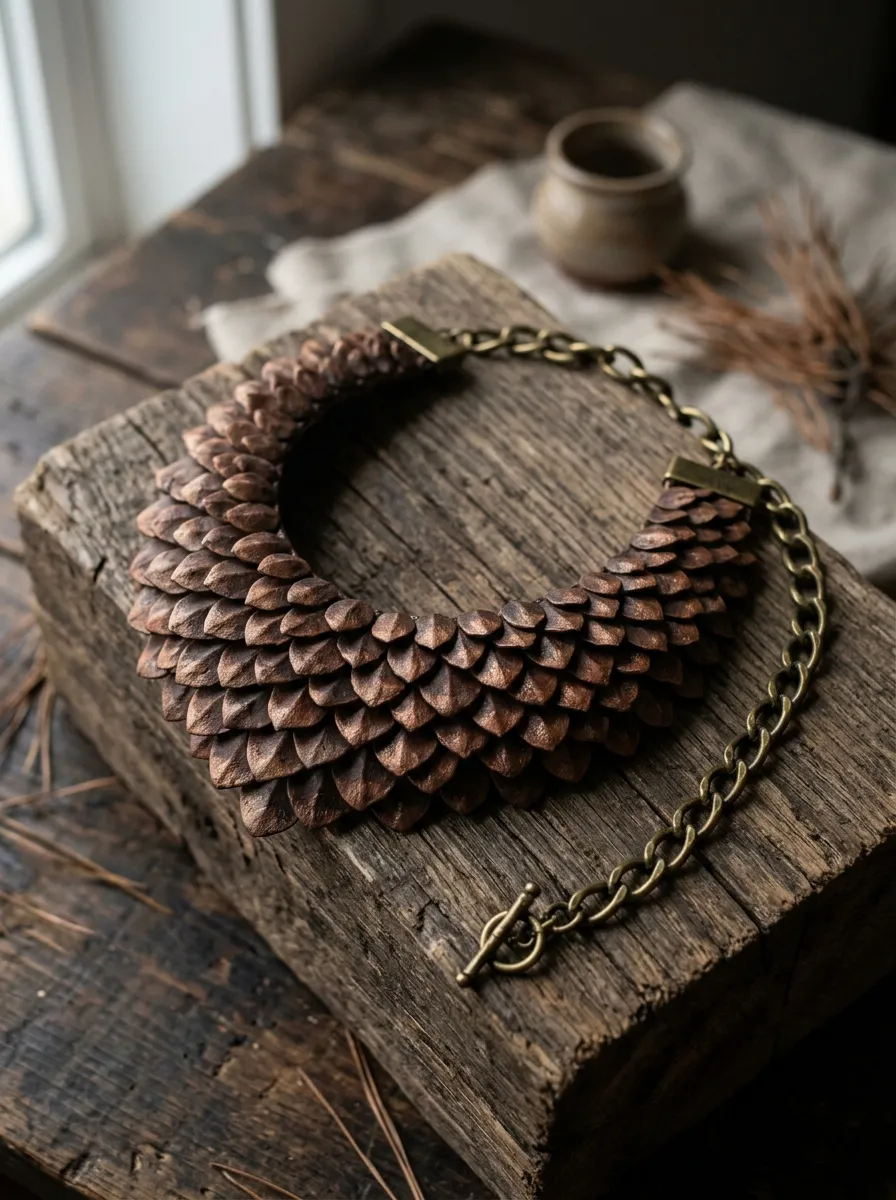
The pressed pinecone scale collar necklace transforms woodland textures into a sophisticated, repeating geometric collar that rests flat against the neckline. The design uses dozens of individually shaped, overlapping clay scales that mirror the protective petals of an open pinecone. Hand-mixed in tones of raw umber, bronze, and warm chocolate brown, the layered scales form a curved mosaic that drapes naturally across the upper chest. This design offers valuable practice in modular construction, requiring uniform piece shaping, secure overlapping seams, and calculated curvature to ensure the collar sits comfortably against the body. The resulting necklace brings earthy, woodland-inspired character to autumnal sweaters, evening wear, and high-collared jackets, showing how simple repeating natural elements can create an elegant, architectural statement piece.
Condition deep walnut brown clay mixed with a small touch of bronze mica powder, rolling it into a uniform two-millimeter sheet on your work tile. Using a small teardrop punch, cut out thirty identical scales measuring twelve millimeters in length, smoothing the rounded edges lightly with your fingertips. On an arched template drawn on parchment paper, arrange the scales in overlapping rows, placing each new tier slightly over the previous layer to form a crescent collar that spans fifteen centimeters. Press the overlapping edges together gently using a silicone blending tool, ensuring all contact points are bonded without flattening the raised petal profiles. Punch two small hanging holes through the upper outer tips of the collar using a needle tool, and bake the piece draped over a curved ceramic mug at 130°C for thirty-five minutes to set a natural anatomical contour. Once cooled, attach jump rings to each hole and connect a sturdy curb chain fitted with a lobster clasp closure.
Common Beginner Mistakes and How to Avoid Them
A frequent mistake beginners make when creating polymer clay jewelry is under-baking the finished pieces, which leaves the cured clay brittle, weak, and prone to snapping under light pressure. Polymer clay requires sustained heat to fully fuse its vinyl molecules; under-curing prevents this fusion, leaving pieces fragile. To avoid this, always use an independent oven thermometer to verify the interior temperature, baking your pieces for at least thirty to forty minutes at the exact temperature specified on the clay packaging. Another common issue is surface contamination from dust, clothing lint, and residual pigments, which quickly shows on lighter clay colors. Prevent contamination by wiping down work surfaces, acrylic rollers, and hands with isopropyl alcohol, and keep baby wipes nearby during your crafting session. In addition, beginners often attach metal earring posts using standard superglue, which often fails over time because the smooth metal and clay do not form a strong bond. Instead, use a two-part epoxy adhesive, or embed the metal pad directly beneath a thin patch of raw clay and bake it in place for a permanent mechanical bond.
Practical Tips for Better Results
Consistently high-quality polymer clay jewelry relies on disciplined studio habits, thorough clay conditioning, and careful finishing techniques. Always condition your clay until it is supple, elastic, and folds without cracking along the edges, which prevents surface brittleness and air pockets in your finished designs. When cutting out delicate leaf silhouettes or small geometric shapes, place a sheet of thin plastic wrap over the clay before pressing your metal cutters down; this rounds the upper edges naturally and ensures the pieces release cleanly from the cutter. To eliminate visible fingerprints on character pieces or smooth botanical surfaces, buff the unbaked clay gently with a cotton swab dipped in rubbing alcohol, which dissolves surface oils and creates an even, velvety finish. When combining multi-layered elements—such as miniature wildflower petals on a background slab—use pinpoint dots of bakeable liquid polymer clay as a heat-activated bond to ensure parts stay together after baking. Finally, finish all cured pieces by wet-sanding the edges under running water using graduated sandpaper grits from 400 to 1200, creating silky, professional margins that will not snag on clothing.
Styling, Presentation, or Organization Ideas
Presenting and organizing your handmade natural jewelry thoughtfully protects delicate clay elements while highlighting their organic textures and earthy palettes. Store your finished earrings, rings, and pendants in divided wooden display trays, linen-lined shadow boxes, or hanging wall organizers fitted with brass hooks to keep pieces separated and prevent hardware from scratching clay surfaces. When styling these accessories for daily wear, pair bold botanical earrings—such as the monstera drops or geode slices—with minimalist neutral outfits like ecru linen shirts, charcoal knitwear, or warm oatmeal blazers, allowing the handmade shapes to serve as the visual centerpiece. For retail displays, craft fairs, or gift presentations, mount your jewelry on heavy, unbleached Kraft paper cards or textured cotton rag paper stamped with botanical ink motifs. You can also display pieces against natural staging props—such as raw cedar wood slices, smooth river stones, or rough slate tiles—to reinforce the organic, nature-inspired theme of your collection. This cohesive presentation protects your craftsmanship and highlights the authentic, artisan quality of every piece.
Budget or Time Planning
Developing a focused, cost-effective workflow allows you to produce intricate nature-inspired clay jewelry without overspending or wasting valuable materials. Rather than purchasing dozens of specialized clay colors, invest in economy blocks of primary colors along with pure white, translucent, and raw umber, mixing your own custom pastels, muted greens, and earthy tones to keep upfront costs low. Organize your creative time into structured stages: dedicate the first session to sketching designs, mixing custom color palettes, and conditioning clay slabs. Reserve a second session for cutting, detailing, and baking all your components in batches, which conserves energy and keeps your workspace clean. A third, final session can be focused entirely on sanding, drilling, and assembling hardware components using jewelry pliers. An individual pair of botanical earrings typically requires twenty minutes of sculpting, thirty-five minutes of baking, and fifteen minutes of assembly. Following this structured workflow keeps your creative projects manageable, prevents hand fatigue, and makes the most efficient use of every block of clay.
Creative Expansion and Advanced Inspiration
Once you master these ten foundational nature-inspired jewelry projects, you can easily adapt the techniques into more complex, mixed-media accessories. Experiment with incorporating real natural materials into your designs, such as embedding dried pressed florals directly into raw clay under a layer of clear liquid polymer clay, or dusting botanical impressions with pearlescent mica powders to simulate morning dew. Advanced crafters can also scale these sculpting techniques up into functional home decor pieces, producing matching botanical wall hangings, decorative drawer knobs, or organic trinket dishes using the same leaves and texture transfers. You might also explore combining polymer clay with other craft disciplines, such as wire-wrapping raw crystal points into clay pendants, or integrating soft macrame cords into multi-tiered statement necklaces. Pushing the boundaries of traditional clay modeling helps you cultivate a distinctive artistic style, turning simple natural observations into durable, timeless wearable art.