Handmade polymer clay sculpting offers an accessible and versatile medium for creating playful, light-catching accessories and miniature decorative objects. Designing miniature kawaii figures allows crafters to blend soft pastel tones with shimmering particulate inclusions, resulting in balanced, durable keepsakes with high aesthetic appeal. This comprehensive tutorial details ten unique kawaii polymer clay glitter design concepts, ranging from pastel celestial charms to miniature bakery treats, dimensional aquatic creatures, and cheerful nature motifs. Readers will discover clear methods for conditioning clay, encapsulating polyester glitters without clouding, sculpting expressive facial details, and curing pieces to achieve shatter-resistant durability. Mastering these foundational techniques eliminates common beginner frustrations such as burnt projects, embedded lint, brittle appendages, or uneven glitter dispersion. Beyond crafting simple trinkets, building skills in clay modeling provides functional capabilities that easily transition into crafting custom jewelry, personalized desk accessories, and modern design home decor accents. By utilizing straightforward modeling actions like rolling uniform spheres, pulling soft teardrops, and embossing minimal facial expressions, makers of any skill level can produce boutique-quality art. The subsequent sections outline essential preparation workflows, material guidelines, step-by-step assembly guides for ten individual designs, and practical planning frameworks to execute an inspiring DIY creative project safely and efficiently.
Why This Idea Is Trending or Useful
Miniature clay crafting continues to dominate digital inspiration boards as crafters seek tactile, low-waste creative ideas that produce immediate, usable decorative items. The kawaii style, defined by rounded contours, simplified facial features, and gentle pastel palettes, introduces an uplifting, nostalgic visual element to personal accessories and workstation decoration. Integrating fine cosmetic and solvent-resistant glitters into translucent or opaque polymer bases gives flat clay surfaces multidirectional depth, sparkling vibrantly under ambient indoor lighting. As a self-contained creative project, clay sculpting requires minimal studio equipment, allowing crafters to operate on a standard desk without investing in expansive workbenches or heavy machinery. Because foundational kawaii forms rely almost entirely on basic geometric volumes like spheres, ovals, and soft cones, the medium serves as an exceptionally beginner friendly avenue for learning three-dimensional sculpting. Furthermore, producing handcrafted clay pins, phone charms, and desk figurines provides sustainable budget ideas, transforming small, economical blocks of raw compound into durable, high-value keepsakes. The finished cured creations can also be incorporated into home decor organization systems, such as decorative paperclips, custom pushpins, and magnetic bulletin board markers.
Materials and Preparation
Thorough planning and careful material selection establish the foundation for durable, visually striking polymer clay creations. Begin by procuring premium polymer clay in translucent, bright white, and assorted pastel shades, as translucent formulations allow internal glitter flakes to catch light through multiple cured layers. Collect solvent-resistant polyester glitters in ultra-fine, hexagonal, and iridescent chunky cuts; standard craft glitters often bleed color or melt under curing temperatures. Crucial sculpting tools include acrylic rolling pins, rigid tissue blades, double-ended silicone shaping tools, fine-point tweezers, and stainless steel ball styluses. For mechanical assembly, gather stainless steel eye pins, jump rings, ceramic baking tiles, liquid polymer clay, and water-based gloss varnishes. Preparation requires establishing a clean, dust-free workstation; wipe your glass or ceramic work tile with isopropyl alcohol and wash hands thoroughly to prevent dark fibers from contaminating pale clay. Condition the raw clay by rolling, folding, and kneading it repeatedly until it becomes completely pliable without cracking along its folded edges. Finally, calibrate your dedicated craft oven with an independent oven thermometer to guarantee accurate temperature regulation throughout the curing cycle.
1. Shimmering Starlight Cloud Charm with Golden Droplets
Step-by-Step Guide
The smiling cloud motif is a cornerstone of kawaii art, embodying comfort, whimsy, and cheerful minimalism through soft, billowy outlines. This design pairs an ultra-soft pastel blue or translucent white base with iridescent ultra-fine glitter, mimicking the gentle glow of a sunlit morning sky. By combining several rounded clay spheres into an overlapping cluster, makers create a puffy, dimensional cloud form that feels substantial yet lightweight. Three miniature dangling golden glitter teardrops hang from the cloud base on fine jump rings, introducing kinetic motion and dynamic light reflection to the finished charm. The simplified face, characterized by widely spaced, glossy black eyes and subtle pastel pink blush marks, delivers an immediate sense of warmth and character. This charm functions exceptionally well as a decorative zipper pull, planner accessory, or minimalist pendant. The gentle, rounded contours ensure there are no sharp edges that could snag on clothing or chip off during everyday handling.
To begin assembly, condition two ounces of translucent polymer clay and knead in one-eighth teaspoon of iridescent ultra-fine polyester glitter until evenly distributed. Divide the clay into five graduated spheres, ranging from a half-inch to one-quarter inch in diameter. Press the spheres together in an overlapping row on a ceramic tile, gently smoothing the interior seam lines with a silicone shaper while leaving the outer curves rounded and plump. Flatten the entire assembly slightly using an acrylic roller until it reaches a uniform thickness of four millimeters. Insert three small stainless steel eye pins into the bottom edge of the cloud, spaced evenly, and insert one centered eye pin into the top rim for suspension. Form three tiny teardrop beads from golden glitter clay, inserting a small eye pin into the pointed end of each. Bake all components on the tile according to the clay manufacturer instructions, let cool, and connect the dangling droplets to the base eye pins using miniature jump rings.

2. Glazed Strawberry Donut Bear with Rainbow Sprinkles
Execution Process
Merging sweet bakery confections with miniature animal anatomy produces an endearing, playful collectible that appeals across generations. This concept features a plump, circular donut body crafted from warm golden-tan clay, topped with an undulating layer of glossy pink strawberry glaze infused with fine holographic glitter. Two small, rounded bear ears emerge seamlessly from the top curve of the donut, integrating the animal character directly into the pastry silhouette. Tiny, multi-colored clay cylinders act as dimensional rainbow sprinkles, scattered irregularly across the shimmering frosting to introduce tactile surface contrast. The centerpiece of the design is the expressive bear muzzle, rendered with a tiny white clay oval, a black triangular nose, and two closed, smiling eyes. The interplay between the matte baked dough texture and the glittering, high-gloss glazed icing creates visual richness that makes the miniature figure look authentically edible and sweet.
Start by rolling a three-quarter-inch sphere of warm tan clay, flattening it slightly into a thick disc, and piercing the exact center with a silicone blending tool to form a classic donut aperture. Roll two pea-sized tan spheres and attach them to the upper curve to form the bear ears, smoothing the joints thoroughly with a curved stylus. Next, roll a sheet of soft pastel pink clay mixed with fine holographic glitter down to a one-millimeter thickness, cutting a wavy, organic perimeter to represent dripping glaze. Drape the pink glaze over the donut face, pressing the edges flush against the tan base and piercing through the central hole. Adhere a miniature white oval across the lower middle of the glaze layer, detailing the nose and eyes with black acrylic paint or tiny raw clay dots. Cut cured scrap clay into microscopic rainbow cylinders and press them lightly into the pink glaze with tweezers. Bake the assembled bear figure, and apply two coats of clear gloss glaze over the pink icing section once cooled.

3. Iridescent Crystal Star Wand with Pastel Ribbons
How to Create
Magical celestial accessories provide an enchanting, nostalgic aesthetic that works wonderfully in miniature clay formats. This project centers on a faceted, five-pointed star crafted from soft lavender clay saturated with medium-cut iridescent flakes that refract magenta and cyan light. The star sits mounted atop a slender, pearlescent white clay handle detailed with a spiral groove that resembles carved bone or twisted glass. Directly beneath the star head, a small, hand-sculpted pastel mint bow with trailing ribbon tails introduces a soft textile contrast to the rigid geometry of the wand. The central focal point features a tiny, smiling face stamped into the star center, framed by miniature embossed rosy cheeks. The balanced scale of the slender wand combined with the broad star top creates an elegant vertical silhouette ideal for decorative bookmarks, shadowbox wall art, or novelty charm bracelets.
To construct the wand, roll a two-inch coil of pearl white clay to a uniform diameter of three millimeters, twisting it carefully between your palms to generate an even spiral texture along its length. Condition two ounces of lavender clay, thoroughly fold in chunky iridescent flakes, and flatten the slab to a five-millimeter thickness using an acrylic roller. Cut out a crisp five-pointed star using a miniature metal cutter, gently softening the sharp points with your fingertip to maintain the rounded kawaii look. Coat a two-inch segment of 20-gauge floral wire with liquid clay, insert it halfway into the pearl handle, and press the exposed end securely into the bottom point of the star. Sculpt two small loop ribbons and two flat tails from mint green clay, assembling them into a miniature bow positioned at the junction where the star meets the handle. Bake the wand upright in an unglazed ceramic bead stand, and seal the star with a glossy UV-cured resin layer to maximize the crystal-like glitter depth.

4. Sparkling Sakura Blossom Bunny with Pearl Accents
Step-by-Step Guide
Floral motifs combined with woodland animal designs create a gentle, nature-inspired decorative accessory suited to spring celebrations and delicate jewelry. This project depicts a snow-white bunny head resting peacefully inside the cupped petals of a delicate pink cherry blossom. The bunny features elongated, floppy ears with shimmering pastel pink inner linings, paired with sleeping eyes rendered in delicate arched strokes. The surrounding five-petal sakura flower is blended from a gradient of translucent pink clay saturated with ultra-fine champagne glitter, producing a soft luminous effect toward the petal tips. Nestled between the bunny ears sits a tiny, hand-rolled pearl bead accent that introduces an elevated, refined touch to the playful figure. The compact, circular composition provides structural strength, as the surrounding flower petals cradle the head and protect the delicate ears from mechanical stress during use.
Begin by rolling five equal pea-sized spheres of translucent pink clay, mixing each with a dusting of ultra-fine champagne glitter. Flatten each sphere into a teardrop shape and press the narrow points together on your working surface, using a needle tool to create a central indentation and a small notch at the broad tip of each petal. Roll a three-quarter-inch sphere of pure white clay to form the bunny head, pressing it into the center of the sakura blossom array. Sculpt two flat, tapered teardrops for the ears, pressing a thin layer of glittery pink clay down the center of each before smoothing them onto the head crown. Add microscopic black clay beads for closed curved eyes and apply dry soft pink pastel powder to the cheeks with a small blending brush. Place a tiny faux pearl into a drop of liquid clay between the ears, pressing it firmly into place. Bake the entire floral bunny assembly flat on a ceramic tile, applying a satin varnish over the petals after cooling.

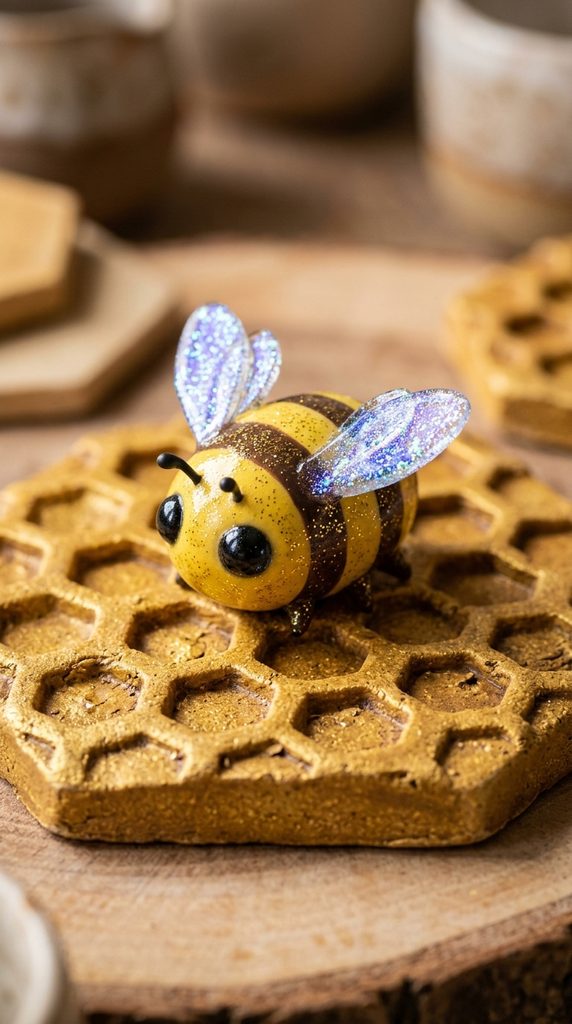
5. Radiant Golden Honeycomb Bee with Sparkly Wings
Execution Process
Insects and garden pollinators provide charming subject matter for miniature art when reimagined with exaggerated, friendly kawaii proportions. This design showcases a plump, rounded bumblebee resting on a textured golden-amber hexagonal honeycomb base. The bee body consists of alternating horizontal stripes of bright yellow and dark espresso brown clay, dusted with golden micro-glitter to simulate a natural, sunlit shimmer. The defining visual element of this piece is the pair of wide, translucent wings crafted from clear polymer clay saturated with fine blue-violet color-shifting glitter flakes. These shimmering wings rest flat along the bee back, catching light while remaining structurally reinforced against the body. The honeycomb base features precisely embossed hexagonal cells filled with translucent liquid amber gel, producing a wet, glistening honey effect. This charming figurine functions perfectly as a decorative desk paperweight, magnetic kitchen accent, or cheerful brooch.
Fabricate the base by rolling a slab of warm mustard clay to a three-millimeter thickness, using a clean hexagonal cutter to punch out a sharp geometric tile. Lightly press an authentic wire mesh or wooden hex-stamp onto the surface to emboss realistic honeycomb indentations, filling several cells with liquid polymer clay tinted with yellow alcohol ink. For the bee, roll an oval from vibrant yellow clay, wrapping two ultra-thin coils of dark brown clay around the middle to establish crisp body stripes. Form two paper-thin, rounded teardrop shapes from translucent clay kneaded with iridescent blue-violet glitter, attaching them smoothly across the upper dorsal stripe with a dab of liquid clay. Sculpt two tiny white circles and black pupils for the friendly eyes, adding a faint, joyful smile line with a micro-stylus. Mount the bee securely atop the prepared honeycomb base, pressing down gently to ensure a broad contact bond. Bake the composite piece thoroughly, and brush clear gloss over the honey pockets once cool.

6. Glistening Galaxy Jellyfish with Floating Tendrils
How to Create
Marine life designs offer extraordinary opportunities for creative color blending, translucent layering, and flowing organic silhouettes. This project centers on a domed, bell-shaped jellyfish sculpted from a gradient of deep violet, magenta, and translucent clay heavily infused with mixed-size cosmic glitters. The deep, space-inspired palette contrasts with fine silver star glitter suspended within the translucent dome, giving the creature the appearance of containing a tiny, glowing nebula. Suspended beneath the glittering bell are several spiraling, ribbon-like tentacles crafted from twisted strands of translucent clay and metallic thread. The wide, smiling face sits centered on the lower rim of the bell, delivering the classic kawaii aesthetic against an atmospheric, celestial backdrop. This design is exceptionally suited for hanging suncatcher mobiles, seasonal holiday ornaments, or statement drop earrings, where light can pass directly through the translucent canopy.
To construct the jellyfish, blend equal parts translucent clay, violet clay, and magenta clay using a clay conditioning machine to produce a smooth, cosmic gradient strip. Fold a generous measure of silver holographic star glitter and ultra-fine shimmer into the blended clay, rolling the compound into a solid three-quarter-inch hemisphere. Smooth the lower edge with your thumb, creating a hollow, cupped cavity inside the bell while preserving the exterior dome profile. Extrude fine threads of translucent and white clay through a miniature extruder, twisting them into loose, flowing corkscrew spirals to serve as oceanic tentacles. Group six twisted tentacles together inside the bottom cavity of the bell, anchoring them securely with several drops of high-temperature liquid polymer clay. Detail the exterior face using black liquid clay lines cured with a heat tool or applied with fine acrylic paint. Bake the completed jellyfish suspended in an oven-safe armature, finishing the exterior dome with high-gloss resin for maximum optical clarity.

7. Pastel Mint Frosted Cupcake Cat with Sparkly Cherry
Step-by-Step Guide
Pastry miniatures with animal features are deeply rooted in kawaii crafting traditions, blending detailed culinary textures with expressive character art. This design showcases a sweet sleeping cat head disguised as a swirl of pastel mint frosting, resting neatly inside a ridged, golden-brown pastry wrapper. The base cupcake case features realistic vertical ridges and a matte, baked texture, providing an earthy foundation that anchors the whimsical topping. The mint green frosting swirl tapers upward into two pointed cat ears, adorned with fine crystalline iridescent glitters that mimic sprinkled granulated sugar. Perched atop the swirling crown sits a vibrant, translucent red cherry coated in ruby micro-glitter, topped with a delicate brown wire stem. The sleeping facial features, rendered with soft brown lines, give the confection a peaceful, endearing presence. This self-contained miniature works beautifully as a decorative novelty pushpin, ring holder focal point, or tiered-tray accent.
Begin by pressing a small cone of raw tan clay into a flexible silicone miniature cupcake wrapper mold, trimming the top rim flush with a flat blade to form the ribbed base. Roll a long, tapered coil of pastel mint clay mixed with iridescent sugar glitter, tapering the snake from four millimeters down to one millimeter. Coil the mint snake around the top of the tan cupcake base in three diminishing concentric tiers, smoothing the tip into two tiny, upturned ears on opposite sides of the swirl. Roll a three-millimeter sphere of translucent red clay, knead it with ruby micro-glitter, and insert a short, curved length of brown craft wire into the top to complete the miniature cherry. Position the cherry firmly between the cat ears with a dot of liquid clay. Use a curved needle tool to emboss subtle whisker indents into the lower frost tier, painting thin sleeping eyes beneath. Bake the finished cupcake sculpture on a level ceramic tile, applying a matte varnish to the wrapper and a high-gloss finish to the cherry.

8. Luminous Pastel Toadstool with Iridescent Polka Dots
Execution Process
Folkloric woodland themes take on a sweet, modern aesthetic when reimagined through gentle pastel color stories and sparkling surface embellishments. This project features an adorable woodland toadstool figurine with a bulbous, milky-white stem and a broad, domed cap rendered in soft peach or pastel lilac clay. The cap is lavishly decorated with hand-placed hexagonal iridescent glitter flakes that serve as stylized, shimmering polka dots, replacing traditional matte white mushroom spots. A tiny, friendly face with wide-set black eyes and a blushing smile sits on the thick stem, giving the botanical figure an approachable, lively personality. The substantial, flared bottom of the mushroom stem provides excellent structural stability, allowing the finished piece to stand independently on desks, windowsills, or inside miniature terrariums. The contrast between the smooth, satin-finished stem and the glittering, reflective cap creates rich textural diversity within a compact, beginner friendly footprint.
To build the toadstool, roll a one-inch teardrop from opaque white clay, flattening the broad bottom firmly against your work tile so the stem stands upright without wobbling. Shape a three-quarter-inch sphere of pastel peach clay, pressing the center of your thumb into the underside to cup it into a wide, domed mushroom cap. Brush a microscopic film of liquid clay or water-based craft glue over the exterior of the peach dome, using fine-point tweezers to arrange individual hexagonal iridescent glitter flakes across the surface in a balanced, organic pattern. Mount the glittered cap securely atop the narrow point of the white stem, pressing downward gently while supporting the base to ensure a permanent structural connection. Add two tiny, rounded black clay eyes to the upper half of the stem, using pink chalk pastel dust to create soft, diffused blush marks on either side. Bake the standing toadstool figure on a ceramic baking sheet, sealing the cap with two coats of gloss varnish to anchor the glitter flakes.

9. Kawaii Sleepy Boba Milk Tea with Holographic Tapioca
How to Create
Trendy cafe beverages translated into miniature clay collectibles provide instantly recognizable, highly giftable items that celebrate modern pop culture. This design captures a miniature cup of classic boba milk tea, featuring a warm beige milk-tea base visible through a translucent, frosted tumbler. The defining visual highlight of this piece is the layer of spherical boba pearls resting along the bottom, sculpted from jet-black clay mixed with intense holographic micro-glitter to simulate glistening, caramelized tapioca. The cup is topped with a pillowy layer of white whipped cream, detailed with fine, embossed ridges and a sprinkle of rainbow micro-beads. An oversized pastel purple straw punctures the whipped cream dome, positioned slightly off-center to preserve realistic beverage proportions. The smiling face, painted on the front of the cup, features curved, happy eyes that reinforce the comforting, relaxed coffeehouse aesthetic.
Begin by rolling a slightly tapered cylinder of creamy tan clay to a height of one inch, rolling it lightly on your work tile to keep the exterior walls straight and smooth. Roll twelve microscopic spheres from black clay blended with intense holographic micro-glitter, pressing them gently around the lower third of the tan cylinder to form the submerged tapioca pearls. Wrap the cylinder in an ultra-thin sheet of translucent white clay to simulate the cup container, smoothing the vertical seam with a flat acrylic blade until completely invisible. Roll a small ball of bright white clay and use a star-tipped silicone modeling tool to texture it into a swirling mound of whipped cream, attaching it flush across the top cup rim with liquid clay. Trim a straight segment of pastel purple clay coil to serve as the boba straw, inserting it diagonally through the whipped cream down into the cup core. Paint two curved, smiling eyes on the front wall using black acrylic ink. Bake the cup upright, sealing the tapioca zone with high-gloss glaze.

10. Shimmering Ocean Narwhal with Swirled Golden Horn
Step-by-Step Guide
Whimsical marine creatures bring fluid, dynamic silhouettes to clay crafting, and the mythical narwhal represents an enduring favorite across kawaii art styles. This design features a streamlined, bean-shaped narwhal body crafted from pastel aqua clay infused with ultra-fine turquoise glitter, capturing the luminous shimmer of shallow ocean waters. Two diminutive pectoral flippers extend outward from the sides, alongside a wide, flat tail fin that helps balance the figurine on level surfaces. The defining centerpiece is the elongated, spiraled golden tusk protruding gracefully from the narwhal forehead, hand-sculpted from bright yellow clay coated in metallic gold mica powder and fine sparkle. A sweet, understated face with large, glossy anime-style eyes and tiny white catchlights introduces emotional warmth to the aquatic silhouette. This sturdy, low-profile design serves as an ideal desk companion, keychain bauble, or decorative pocket charm.
Construct the narwhal by rolling a one-and-a-quarter-inch oval from pastel aqua clay thoroughly kneaded with ultra-fine turquoise glitter. Gently pinch and taper the posterior end upward, flattening the tip horizontally with your thumb and notching the center with a craft knife to form the bifurcated tail fluke. Sculpt two small, flat teardrop flippers from matching aqua clay, attaching them securely to the lower lateral quadrants with a silicone blending tool. For the horn, roll an eight-millimeter tapered cone from golden yellow clay, gently twisting it while rolling along your tile to introduce a spiral groove down its length before dusting it with gold metallic mica pigment. Anchor the horn firmly to the upper forehead of the narwhal using a drop of high-temperature liquid clay. Add two black clay discs to the sides of the head for the eyes, placing a microscopic speck of white clay in the upper corner of each to create an expressive catchlight. Bake the finished narwhal flat on the tile, coating the entire body with a durable gloss varnish.
Common Beginner Mistakes and How to Avoid Them
The most prevalent technical error in glitter clay crafting involves using plastic craft glitters that are not rated for oven exposure. Incompatible craft glitters degrade, warp, or release unpleasant fumes when subjected to standard polymer baking temperatures; always purchase solvent-resistant polyester glitters specifically formulated for heat applications. Another frequent mistake is over-kneading raw clay with warm hands, which causes the material to turn sticky and trap dust, pet hair, and airborne fibers. Prevent this contamination by wiping all work surfaces and tools with isopropyl alcohol and keeping wet wipes close at hand while sculpting pale pastel clays. Beginners also tend to bake their finished pieces for too short a duration out of fear of scorching the pale colors. Under-baked polymer clay remains weak, crumbly, and prone to snapping under minimal tension; cure your pieces for the full recommended duration at an accurately measured temperature, tenting the baking tray with aluminum foil to prevent surface discoloration. Finally, avoid applying thick layers of solvent-based sealants or nail polish over cured pieces, as non-compatible varnishes turn sticky, yellow, and tacky over time; utilize certified water-based polymer glazes or UV resin exclusively.
Practical Tips for Better Results
Achieving professional, gallery-grade finishes relies on subtle technical habits that refine the structure and look of your clay creations. Always utilize a high-density ceramic floor tile or thick glass slab as both your primary sculpting surface and your baking tray; this eliminates the need to move fragile, uncured clay figures before baking, preventing accidental distortion. When integrating loose glitters into solid clay, fold the material inward rather than rolling it violently, which minimizes air bubble entrapment within the dense clay body. Invest in a modest assortment of soft silicone-tipped clay shapers, which allow you to erase seams, smooth out accidental fingernail marks, and blend delicate joints without altering surrounding fine details. If working on tiny facial features, apply black liquid polymer clay with a metal needle tool instead of trying to roll microscopic clay dots, ensuring razor-sharp eye and mouth definition. After curing and cooling, gently wash your pieces with warm soapy water to remove any surface release agents before applying protective topcoats. Finally, applying an ultra-thin coat of UV-curing craft resin over glittered focal zones magnifies the optical depth, making embedded glitters sparkle with remarkable intensity.
Styling, Presentation, or Organization Ideas
Integrating handcrafted clay designs into cohesive displays elevates their visual impact, whether for craft fair merchandising, home staging, or creative social sharing. Arrange your finished kawaii miniatures on tiered pastel ceramic dessert stands, light-colored wooden display ledges, or shallow marble trays to highlight their diminutive scale and intricate details. For practical home decor applications, securely attach heavy-duty neodymium magnets to the backs of flat figurines using two-part industrial epoxy, turning your creations into cheerful organizational tools for refrigerators and magnetic office boards. If preparing pieces as wearable gifts, mount the clay elements onto silver-plated keychain clips, ball-chain necklaces, or delicate pastel phone straps accented with matching glass crystal beads. Present your handcrafted creations inside clear, miniature acrylic gift boxes lined with pastel shredded crinkle paper, tying the packaging with iridescent organza ribbon to echo the sparkling theme within. When styling scenes for photography, use diffused morning daylight, clean linen fabrics, and complementary craft materials like loose pastel ribbons and vintage glass jars to create an inviting, aesthetic composition.
Budget or Time Planning
Executing a comprehensive collection of kawaii clay miniatures requires structured time management and smart material purchasing to maintain high creative efficiency. Minimize raw material expenses by purchasing large economy blocks of white, translucent, and primary colored clays; you can easily custom-mix any desired pastel shade by blending small amounts of colored pigment into neutral white clay. Organize your crafting time into focused, modular production stages: reserve the first session for cleaning tools, blending custom pastel palettes, and folding in glitters; use a second uninterrupted session for sculpting and baking; and dedicate a final session to detailed painting, assembling metal hardware, and applying protective clear coats. Simple designs like the starlight cloud or toadstool require approximately twenty minutes of active sculpting, whereas complex, multi-layered confections like the boba tea or cupcake cat require forty minutes per piece. Store uncured custom clay mixtures inside labeled, air-tight polypropylene plastic containers or clean wax paper wraps, shielding the material from heat and direct sunlight to prevent premature hardening. Planning your creative batches around unified color palettes ensures minimal clay waste, streamlined tool cleanup, and consistent aesthetic harmony across all finished pieces.
Creative Expansion and Advanced Inspiration
Once you have mastered foundational kawaii sculpting and glitter integration techniques, explore advanced variations to expand your designs across broader home and lifestyle elements. Transform simple freestanding figurines into practical home accessories by pressing deep central holes to house miniature air plants, or embed threaded metal screw eyes to produce custom cabinet pulls and wardrobe drawer handles. Experiment with advanced surface embellishments, such as applying gold leaf foil, chameleon mica pigments, and glow-in-the-dark phosphorescent powders alongside your polyester glitters to achieve otherworldly lighting effects. You can also explore multi-media crafting by incorporating cast resin water effects, miniature dried florals, and embroidered textile bases into your clay displays to produce rich mixed-media dioramas. Consider scaling up your favorite miniature characters into functional desk organizers, such as sculpted ring holders, business card easels, and stationery pen rests that brighten everyday workspaces. Following your creative exploration, document your unique clay formulas, custom color ratios, and dimensional sketches in a dedicated studio journal, building a personalized design archive that inspires future artistic projects.