

Polymer clay jewelry crafting is one of the most dynamic craft categories on visual platforms, capturing attention through charming palettes, petite silhouettes, and miniature artistic details. This comprehensive tutorial covers ten distinct kawaii polymer clay earring designs that balance cheerful aesthetics with wearable durability. Readers will discover clear fabrication methods, essential baking parameters, structural assembly techniques, and finishing treatments required to produce high-quality handmade accessories at home. Crafting miniature clay earrings provides a deeply satisfying creative outlet because it transforms basic modeling compounds into polished, wearable art with minimal space and equipment requirements. Mastering this craft allows makers to personalize their jewelry collection, design thoughtful bespoke gifts, or establish an inventory of handmade pieces for craft markets and online storefronts. The following sections outline the essential tools, structural considerations, and design fundamentals necessary to execute each project with precision. Whether you are handling polymer clay for the first time or seeking fresh creative ideas to expand your portfolio, this guide provides an actionable roadmap from raw clay conditioning to the final assembly of secure, expressive accessories.
Why This Idea Is Trending or Useful
The popularity of kawaii polymer clay earrings stems from a broader cultural appreciation for playful nostalgia, customizable fashion, and accessible home-based craft hobbies. Online visual feeds regularly showcase pastel tones, miniature food replicas, and whimsical character motifs, making these accessories central to current aesthetic fashion trends. Beyond visual appeal, polymer clay presents an exceptionally beginner-friendly medium that cures in a standard household oven without requiring industrial kiln equipment. Crafters can achieve intricate, professional-grade results on an accessible budget because raw clay blocks yield dozens of finished components at a low unit cost. Furthermore, wearable miniatures bridge the gap between traditional sculpture and functional everyday fashion, giving creators instant utility from their creative endeavors. The tactile nature of working with clay also offers therapeutic benefits, allowing crafters to focus on fine motor coordination and mindful color composition. As modern fashion embraces individuality, handmade kawaii accessories allow wearers to display distinct personality traits through lightweight, vibrant, and conversation-starting jewelry pieces.
Materials and Preparation
Thorough planning and organized workspace setup directly impact the structural durability and visual cleanliness of polymer clay earrings. Begin by assembling essential materials, including oven-bake polymer clay blocks in pastel, primary, and translucent formulations. Required tools comprise an acrylic rolling pin, non-porous ceramic work tiles, tissue-slicing blades, miniature geometric cutters, needle modeling tools, and dotting styluses for fine detail work. For hardware assembly, secure stainless steel jump rings, hypoallergenic stud posts, ball-end ear wires, silicone backings, and rapid-curing two-part epoxy. Cleanliness represents the most critical preparatory factor when working with light clay shades, as airborne lint and surface residue readily transfer to uncured clay. Wash hands thoroughly and wipe work surfaces with rubbing alcohol before unwrapping fresh clay blocks. Condition each block by hand kneading or running the clay through a dedicated manual roller machine until the texture is smooth, pliable, and free of air pockets. Establish uniform clay sheet thickness using depth guide rings on rolling pins to guarantee even baking and reliable structural stability across every component.
Idea 1: Smiling Strawberry Studs
How to Create
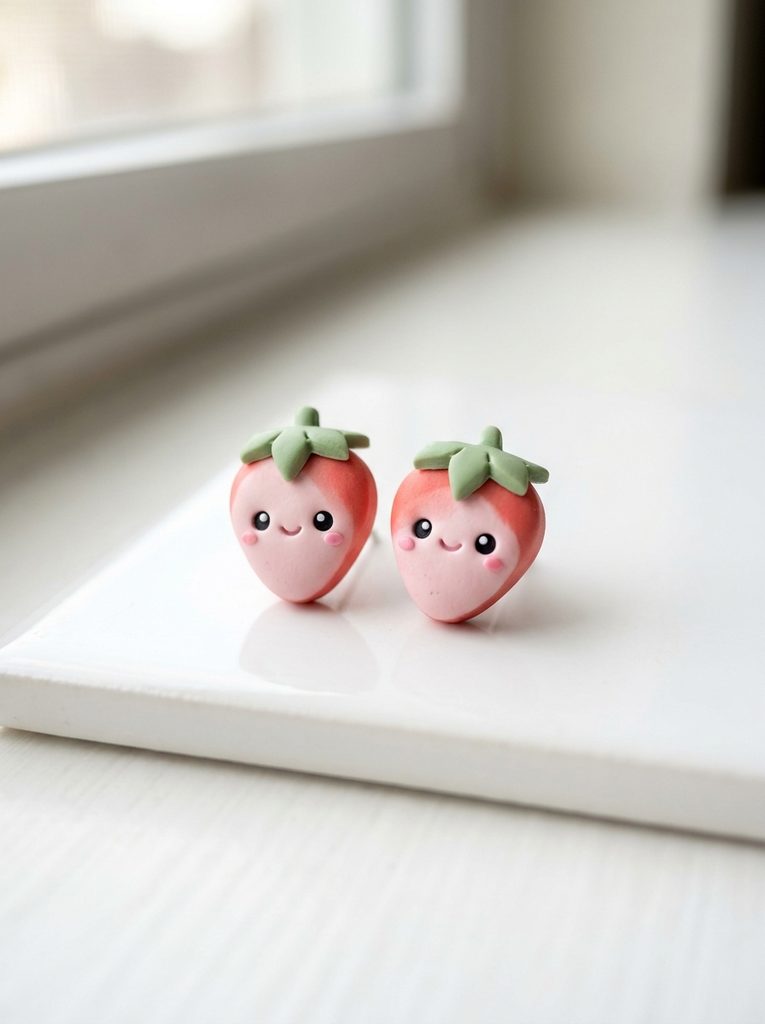
The smiling strawberry stud combines classic summer fruit motifs with the minimalist facial expressions typical of traditional Japanese character design. This concept utilizes a rich strawberry red or soft pastel pink base shaped into a tapered, rounded teardrop silhouette, finished with a bright green leafy cap. The defining kawaii element relies on tiny, inset facial features positioned low on the fruit body, which emphasizes youthful proportions and endearing visual balance. Small textured indentations replicate natural seed patterns across the fruit surface without compromising the structural integrity of the stud base. Measuring approximately fifteen millimeters in length, these miniature studs remain lightweight and comfortable on the earlobe throughout extended daily wear. By pairing flat backing surfaces with dimensional front contours, the design provides an ideal canvas for securing hypoallergenic metal posts with liquid adhesive after the curing stage. The simplicity of the strawberry geometry makes it an exceptional foundational project for practicing symmetrical shaping, miniature component attachment, and delicate surface detail application.
To produce the strawberry studs, condition two marble-sized balls of red clay, ensuring identical mass for visual symmetry across the pair. Flatten the base of each sphere against your ceramic work tile, gently pinching the opposite end upward to form a clean, tapered strawberry teardrop roughly four millimeters thick. Roll a sheet of green clay to a one-millimeter thickness and stamp out two five-pointed miniature calyx stars using a micro metal cutter, then press one star securely across the broad top of each strawberry form. Use a micro-fine dotting tool to impress subtle seed dimples along the exterior red perimeter in alternating diagonal rows. Next, apply two microscopic spheres of black clay to form wide-set eyes, gently flattening them into the surface, followed by a tiny curved segment of black clay thread to establish a delicate smiling mouth. Bake the assembled pieces directly on the ceramic tile at the clay manufacturer’s specified temperature, usually 130°C for thirty minutes. Once cool, sand the flat back lightly and bond a stainless steel earring post using a drop of high-strength two-part epoxy adhesive.
Idea 2: Sleeping Cloud Dangles
How to Create
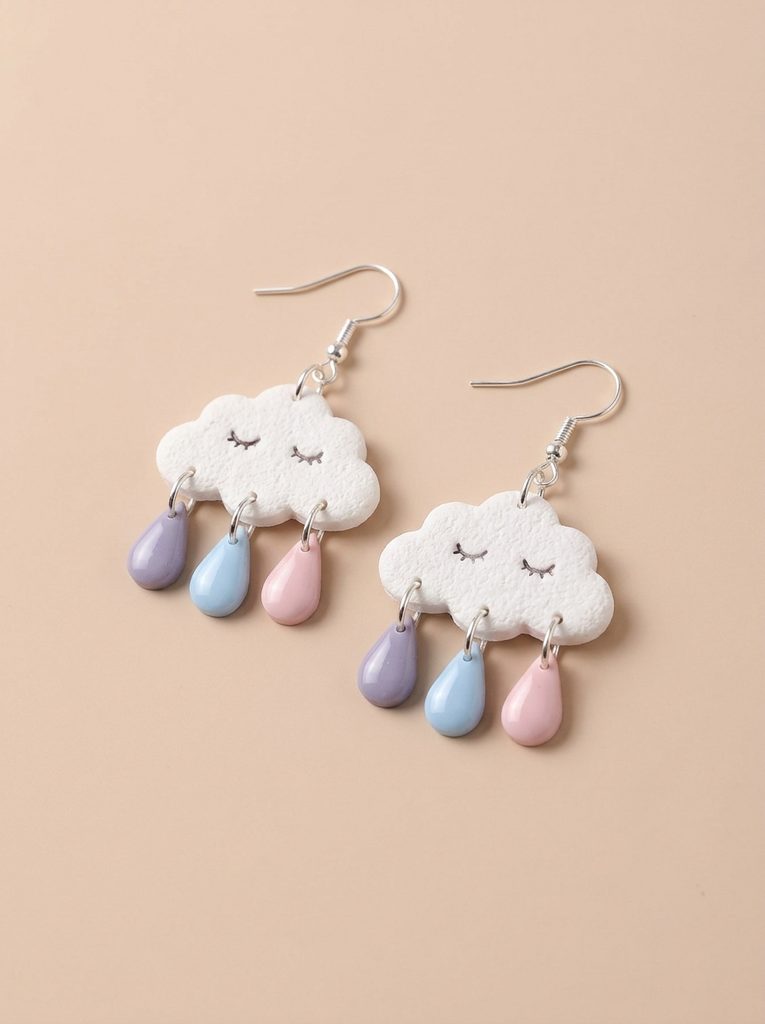
Sleeping cloud dangles incorporate calming pastel aesthetics with dynamic movement, creating an elegant yet playful statement piece. The focal point features a soft, billowing cloud segment crafted from pure white or subtle pearl clay, displaying serene closed eyes rendered with delicate curved lines. Suspended beneath the main cloud body are three miniature pastel droplets representing gentle rain, suspended via individual metallic jump rings to provide fluid kinetic motion during movement. This multi-tiered construction technique introduces beginners to intermediate assembly mechanics, teaching makers how to balance weight distribution across articulated jewelry links. The contrast between the matte, opaque cloud body and the light-catching metallic connectors creates a refined finish suitable for both casual daily outfits and elevated aesthetic styling. The overall length reaches approximately forty-five millimeters, offering dramatic visual impact without the heavy physical weight often associated with traditional metal or stone statement earrings.
Begin by conditioning pure white polymer clay until fully pliable, then roll it into a flat sheet measuring three millimeters in thickness across your clean work tile. Using a scalloped oval cutter or a fluid freehand modeling technique with an acrylic blade, cut out two matching cloud silhouettes measuring approximately twenty-five millimeters across. Roll three miniature teardrop shapes from sky blue, soft lavender, and pale pink clay to serve as the kinetic rain droplets for each finished earring. Pierce neat attachment holes through the bottom rim of each cloud and through the pointed apex of each droplet using a straight craft needle before curing. Add two arching curved lines of ultra-thin black clay thread onto the upper surface of the cloud to depict tranquil closed eyes, applying gentle pressure to bond the clay securely. Transfer the pieces to the oven, bake according to material guidelines, and allow them to reach room temperature naturally. Link the droplets to the base of each cloud using four-millimeter jump rings, then secure an ear wire through a centered top hole.
Idea 3: Swirled Milk Tea Boba Pendants
How to Create
The swirled milk tea boba pendant transforms a popular modern beverage into a tactile miniature charm featuring rich dimensional depth. The primary container segment uses translucent clay blended with a hint of warm ochre or caramel pigment to emulate creamy milk tea, while small black clay pearls sit clustered at the base to represent tapioca pearls. A pristine white polymer layer crowns the top to resemble whipped foam, punctuated by a vibrant colored clay straw segment serving as an eye-catching focal accent. This design highlights the aesthetic possibilities of translucent polymer clay, demonstrating how layered interior components create realistic visual depth within miniature sculpting. The cylindrical pendant measures twenty millimeters in height, providing a substantial tactile weight while remaining comfortable when suspended from standard earring wires. Capturing realistic beverage swirls introduces crafters to advanced blending practices, elevating simple geometric forms into detailed miniature representations.
Condition translucent clay combined with a small speck of raw sienna clay, rolling it into a cylindrical rod twelve millimeters in diameter and cutting two matching twenty-millimeter lengths. Flatten the base of each cylinder against your ceramic tile, then roll several dozen microscopic black clay spheres to serve as individual tapioca boba pearls. Press these black spheres around the lower third of each cylinder, allowing the translucent body to partially overlap the dark spheres to replicate pearls settling in liquid. Blend a trace of pure white clay into the upper perimeter of the cylinder using a silicone modeling tool to simulate whipped topping, pulling gentle peaks upward for realistic volume. Roll a slender cylinder of pastel pink clay, cut a six-millimeter length, and insert it diagonally into the whipped crown to form the straw. Insert a metal headpin through the vertical center of the entire drink assembly from base to top before baking, creating a built-in structural wire. Bake thoroughly, allow the charms to cool, and loop the exposed top wire into a neat attachment eyelet.

Idea 4: Pastel Frosted Donut Drops
How to Create
Pastel frosted donut drops merge classic confectionary elements with cheerful retro styling through precise multi-layered clay construction. The base component features a warm, golden-tan pastry ring with a softly rounded profile and a clean central void, mimicking freshly baked pastry dough. The decorative upper face showcases a thick layer of pastel frosting in baby pink, mint green, or soft lavender, engineered with gentle wavy margins that simulate pooled confectionary glaze. To complete the aesthetic, micro-scale cylindrical sprinkles in contrasting bright shades are scattered organically across the glazed surface, adding detailed tactile interest. This circular donut design measures approximately twenty millimeters across, providing balanced symmetry that works beautifully as a standalone drop charm suspended beneath an earring post. The construction process teaches essential layering fundamentals, showing how distinct clay densities and surface treatments combine to create convincing food miniatures.
Form two identical globes of dough-colored clay by blending raw ecru clay with a minute quantity of warm brown and yellow ochre. Flatten both spheres into uniform discs approximately five millimeters thick, rounding the exterior margins with your thumb before piercing the center with an eight-millimeter round cutter to create the central donut hole. Roll a sheet of soft pink clay to a thin one-millimeter profile, cut a matching outer circle, and use a dull needle tool to distress the perimeter into fluid, wavy scalloped borders. Press the pink frosting layer onto the tan dough base, smoothing the joint along the interior hole and outer contours with a silicone sculpting brush to remove trapped air. Extrude thread-thin clay strands in white, yellow, and sky blue, slice them into one-millimeter rods, and scatter these sprinkle components across the tacky surface of the frosting. Pierce a clean vertical hanging hole through the upper margin of the donut ring using a fine needle. Bake the pieces, cool completely, and coat the frosting with clear gloss glaze before attaching ear wires.

Idea 5: Blooming Sunflower Faces
How to Create
The blooming sunflower design introduces vibrant organic motifs paired with expressive character features, producing a bright and energetic aesthetic. The base structure consists of a deep chocolate-brown central disc surrounded by a complete halo of radiating golden-yellow petals, each sculpted with subtle natural veining. Wide-set black eyes and soft blushing cheeks sit in the center of the brown seed disc, softening the botanical subject into a friendly, approachable companion. This concept focuses on rotational symmetry, requiring uniform petal shaping and consistent radial alignment around the central core. Measuring twenty-five millimeters across, the finished flower serves as an eye-catching earring centerpiece that anchors firmly to ear posts or hangs gracefully from short decorative drop links. Crafting these blossoms allows makers to refine delicate leaf-shaping methods and explore the visual contrast produced by pairing rich earthy tones with saturated, luminous yellow hues.
Roll out a sheet of golden-yellow clay to a two-millimeter thickness and use a small teardrop-shaped cutter to stamp out twenty-four identical petal components. Arrange twelve petals in a radial circle on a polished ceramic tile, overlapping their tapered base margins to establish the bottom flower petal tier. Position the remaining twelve petals directly over the gaps of the first layer, pressing their bases firmly to secure a dense, multi-dimensional floral perimeter. Roll two eight-millimeter discs of chocolate-brown clay, texturize their surfaces using a stiff toothbrush to simulate organic seed heads, and press them firmly over the petal centers. Craft two tiny black eyes and a subtle upward curved smile, applying them to the center of each textured brown face with a micro dotting tool. Add two flat discs of soft pink clay to the cheek areas to introduce a signature blushing kawaii finish. Bake the completed blossoms flat on the tile, let them cool, and affix stainless steel flat-pad posts to the smooth backs using jewelers’ epoxy.

Idea 6: Kawaii Kitty Toast Studs
How to Create
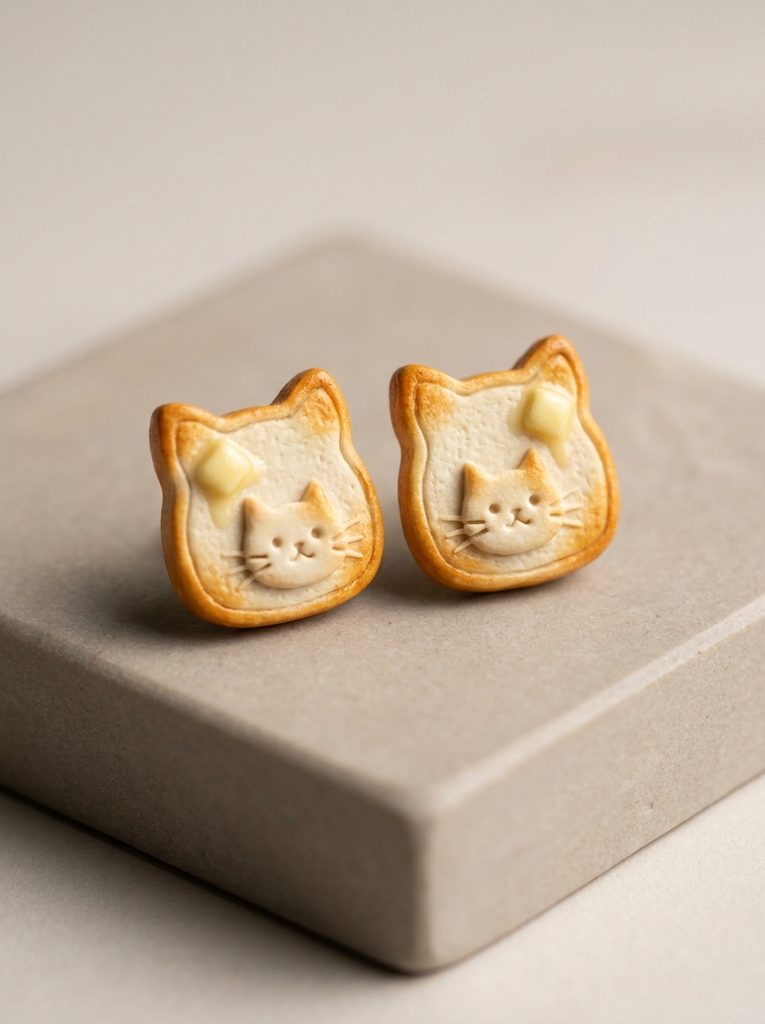
Kawaii kitty toast studs present an imaginative culinary concept that combines breakfast staples with endearing feline silhouettes. The foundational shape mimics a slice of artisan sandwich bread, modified with two pointed feline ears extending organically from the upper crust margin. A light golden-tan clay core is bordered by a slightly darker brown outer perimeter strip, precisely replicating the natural coloration of a baked bread crust. Centered upon the toasted surface is an ultra-fine character face, accented by an optional miniature melted butter pat or a tiny strawberry jam dollop positioned in the corner. Sized at approximately twelve millimeters across, these micro-scale studs deliver exceptional novelty appeal in a compact, wearable format. Working on this project sharpens precision knife work, seamless edge-wrapping methods, and clean two-dimensional graphic layout techniques on miniature clay canvases.
Condition a block of cream clay for the interior bread crumb and a separate smaller batch of medium-caramel clay for the outer crust. Form the cream clay into a rectangular log, gently pinching two distinct triangular ridges along the top edge to sculpt the integrated cat-ear profiles. Wrap a one-millimeter sheet of the caramel clay completely around the exterior of the shaped log, smoothing the seam meticulously with an acrylic roller to fuse the clay layers. Slice the log crosswise using a sharp tissue blade to reveal clean bread slices four millimeters thick, maintaining consistent ear geometry across both earrings. Impress subtle porous bread textures onto the cream surface using the tip of a fine brass wire brush or textured sponge. Affix two minute black spheres for eyes, a delicate pink triangle for the nose, and short black clay whiskers using needle placement tools. Bake the sliced toast charms according to package instructions, allow them to cool, and bond durable surgical steel stud backings to the reverse side.
Idea 7: Celestial Little Stars
How to Create
The celestial little star design introduces a magical, dreamy dimension to the jewelry collection by utilizing pastel neon hues and soft rounded contours. Unlike sharp, geometric celestial shapes, these stars feature gentle, rounded points and slightly puffed bodies that evoke a soft, cushion-like quality. Soft pastel yellow, shimmering iridescent, or glow-in-the-dark polymer clay serves as the body, creating an enchanting accessory that captures light effectively. The face features serene, sleepy, or cheerful expressions, occasionally embellished with a subtle coating of ultra-fine holographic glitter applied prior to the baking cycle. Measuring eighteen millimeters from tip to tip, these celestial charms are exceptionally lightweight and suitable for daily wear. This project teaches crafters how to soften angular geometric shapes into approachable forms while maintaining crisp facial feature placement and professional surface finishes.
Condition pastel yellow clay combined with a small ratio of translucent clay to impart a soft, milky depth to the finished star body. Roll the clay to a four-millimeter thickness and stamp out two matching stars using a rounded-point cookie cutter or dedicated polymer clay cutter. Gently rub the perimeter of each cut star with a finger dipped in a drop of water or rubbing alcohol to soften sharp cut edges into smooth, rounded borders. Press two tiny black clay cylinders flat to create happy, upward-arching closed eyes, situating them centrally between the horizontal star points. Apply two soft pink blush discs directly below the eye lines, blending their outer edges slightly into the yellow base with a silicone blending tool. If a subtle shimmer is desired, dust the front surface lightly with pearlescent mica powder using a soft, dry makeup brush. Pierce an attachment hole through the top point of each star, bake on a flat ceramic tile, and attach silver ear wires using small jump rings.

Idea 8: Miniature Matcha Teacups
How to Create
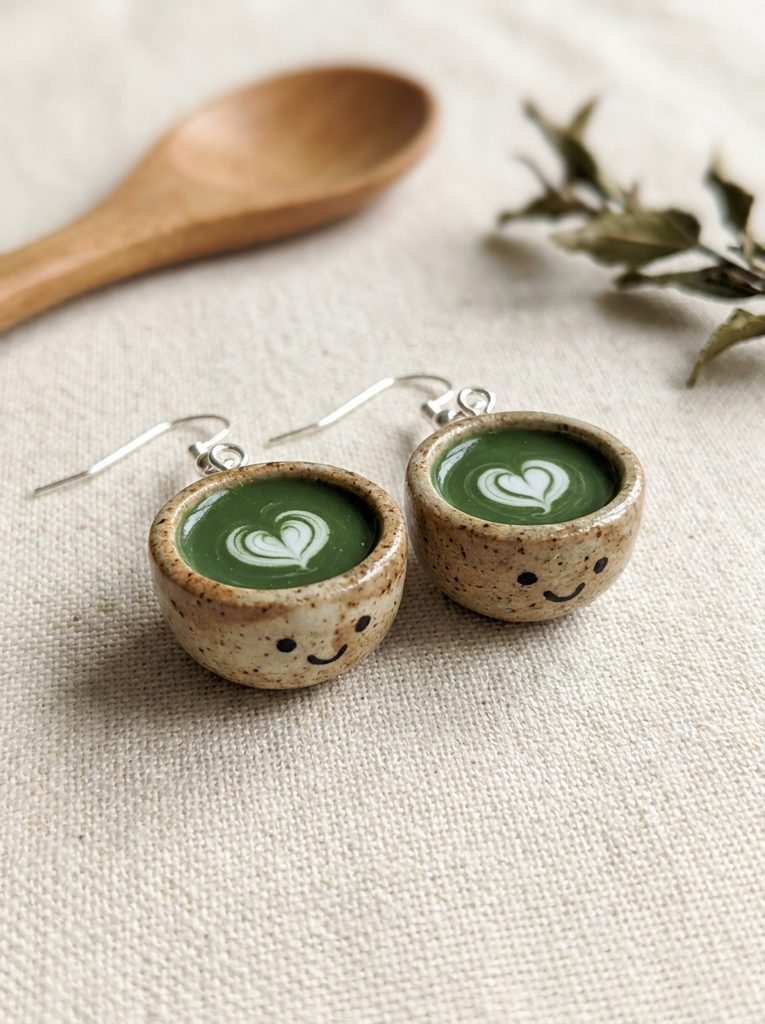
Miniature matcha teacups translate traditional ceramic culture into an adorable, wearable format through structural hand-sculpting and contrasting liquid simulations. The earring centerpiece depicts a tiny, handle-less chawan tea bowl formed from speckled ecru clay, evoking a rustic handmade pottery aesthetic. Inside the cup cavity sits a vibrant, moss-green clay fill representing frothy matcha green tea, complete with microscopic white clay foam bubbles or a delicate latte-art heart motif. An optional tiny handle or exterior graphic face bridges the gap between classic miniature dishware and expressive kawaii character design. These three-dimensional sculptural earrings measure approximately twelve millimeters in diameter and eight millimeters in height, suspended below delicate jump rings. The project provides an excellent introduction to miniature vessel construction, showing makers how to hollow out forms while maintaining strong walls that resist deformation during handling and baking.
Shape two identical spheres of speckled clay measuring ten millimeters in diameter, pressing the base of each ball against your tile to create a stable flat bottom. Press a rounded ball-end stylus into the center of each sphere, rotating the tool smoothly to hollow out a neat interior cavity while keeping the sidewalls two millimeters thick. Roll a sheet of deep matcha-green clay to a two-millimeter thickness, cut round discs matching the inner diameter of the cups, and seat them snugly inside the hollow cavities. Decorate the green surface with a micro-scale white clay heart, smoothing it level with the green tea line using a flat silicone tool to resemble latte art. Use a curved needle tool to impress two subtle smiling eyes and blush cheeks onto the front curved exterior of the speckled cup wall. Insert an eye pin vertically through the back rim of each teacup to ensure balanced suspension during wear. Bake the assembled vessels upright on the tile, cool, and connect them directly to hypoallergenic ear hooks.
Idea 9: Happy Avocado Halves
How to Create
Happy avocado halves provide an instantly recognizable, vibrant aesthetic by layering complementary shades of green around a dimensional center element. The earring presents an elongated pear-shaped body featuring a dark forest-green outer skin rind, an interior flesh layer of pale lime-green, and a raised cocoa-brown seed center. The rounded brown seed forms the dimensional focal point, protruding outward from the flat fruit flesh and carrying a cheerful, smiling expression. This construction uses concentric color layering, challenging the crafter to build smooth color gradations and neat structural joints without distorting the outer profile. Measuring approximately twenty millimeters in length, these drop earrings offer an ideal combination of surface interest, color contrast, and comfortable wearing balance. Mastering this design reinforces essential slab-layering techniques and teaches how to manipulate multi-part components into seamless organic finished shapes.
Condition dark green, light lime-green, and warm chestnut-brown clay blocks, ensuring all formulations share an identical pliable consistency. Roll the lime-green clay into a four-millimeter sheet and cut two teardrop silhouettes, smoothing the outer edges to create the primary avocado fruit base. Roll a thin snake of dark green clay, flatten it into a ribbon, and wrap it precisely around the exterior edge of the teardrop to form the protective outer skin. Roll two identical spheres of brown clay, slice each in half with a tissue blade, and press the flat cut sides into the lower rounded portion of the lime-green face to create the dimensional seed. Apply two micro black clay dots for eyes and an arching clay mouth across the curved surface of the brown pit, anchoring them with gentle stylus pressure. Pierce a vertical hanging passage through the narrow top neck of the avocado using a steel needle tool. Bake the pieces thoroughly, cool, coat the pit with high-gloss glaze for realistic shine, and install jump rings and earring hooks.

Idea 10: Smiling Gummy Bear Drops
How to Create
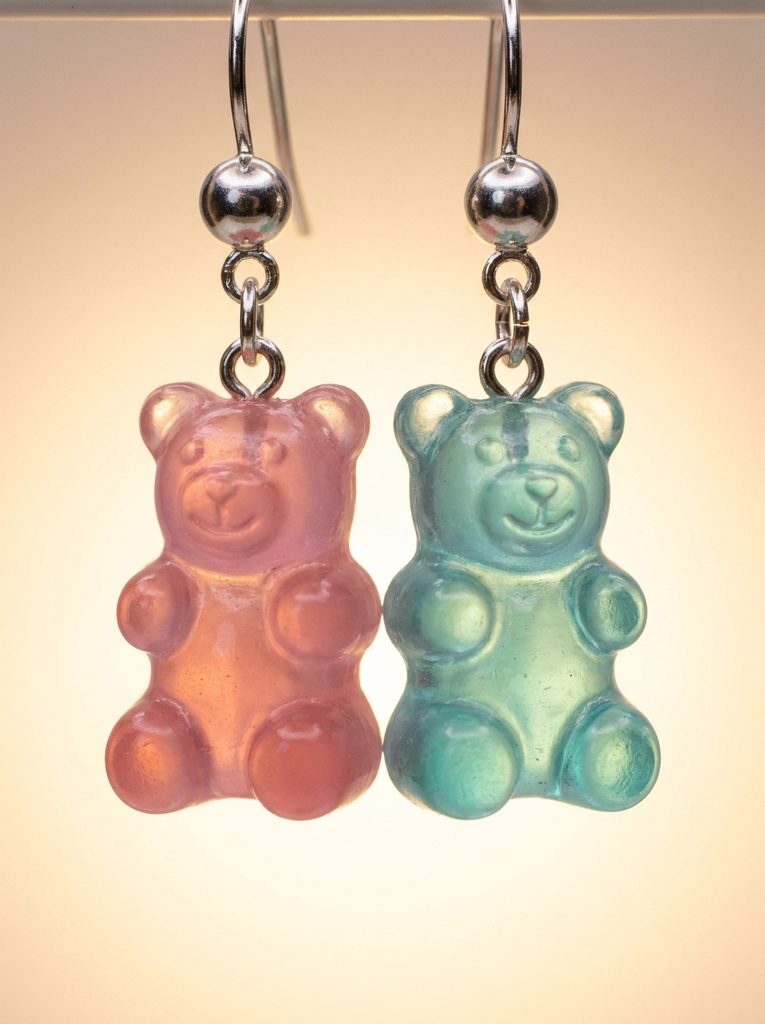
Smiling gummy bear drops replicate the beloved nostalgic confection through translucent polymer formulations and rich candy-colored tones. The design features a miniature seated bear silhouette with rounded ears, small paws, and a soft muzzle, finished with a subtle satin sheen that mirrors real confectionery. Crafted in vibrant tones like cherry red, lemon yellow, or translucent aqua, these charms catch ambient light dynamically while remaining completely solid and durable. Adding a tiny smiling expression directly onto the candy muzzle elevates the classic treat into an expressive kawaii statement accessory. With dimensions of approximately fifteen millimeters in vertical height, these charms are ideally suited for lightweight dangle earrings that sway comfortably with natural body movement. Crafting these bears sharpens miniature sculptural modeling skills, teaching makers how to shape expressive organic anatomy consistently across multiple matching components.
Mix your chosen saturated primary clay shade with an equal proportion of pure translucent clay to achieve a vibrant, light-catching candy appearance. Sculpt two uniform pear-shaped torsos eight millimeters long, and attach two round head spheres to the narrower upper shoulders, smoothing the neck seam completely with a silicone tool. Attach four tiny clay spheres to represent the seated paws, smoothing their attachment points into the lower torso, and press two small flattened discs onto the head to form ears. Create a raised oval muzzle on the lower face using a pale tint of the base color, adding micro-sized black clay eyes and a tiny smiling mouth across the muzzle surface. Pierce a small pilot hole into the top of the head and insert an open eye pin coated with a drop of liquid polymer clay to ensure permanent hardware anchorage. Bake the gummy bears suspended or resting on a soft polyfill batting bed to prevent flat spots from developing on their backs. Once cooled, apply a single coat of satin polyurethane varnish to achieve an authentic gummy candy texture before attaching ear wires.
Common Beginner Mistakes and How to Avoid Them
Novice clay crafters frequently encounter structural fragility, surface contamination, and uneven curing, all of which compromise the longevity of handmade earrings. A prevalent error involves underbaking clay due to an unfounded fear of scorching the piece. Insufficient baking leaves polymer chains unlinked, causing the cured earrings to snap easily under minimal stress. Always utilize an independent oven thermometer to verify chamber temperatures accurately, baking pieces for the full duration specified by the clay manufacturer. Another common challenge is lint and dust accumulation on delicate pastel clay surfaces. Prevent contamination by wiping work surfaces, tools, and hands with isopropyl alcohol, and reserve a block of scrap white clay to roll between your palms before handling project materials to pick up stray lint. Crafters also encounter failing adhesive joints between metal stud posts and cured clay backs. Avoid relying exclusively on standard superglues, which become brittle over time and release from smooth surfaces. Instead, lightly abrade the clay back with medium-grit sandpaper to create physical tooth, clean the area with alcohol, and secure the hardware using a high-strength, two-part epoxy adhesive.
Practical Tips for Better Results
Achieving refined, commercial-quality results with polymer clay requires strategic tool manipulation and thoughtful finishing practices. Invest in a smooth ceramic tile or glass sheet to serve as both your cutting surface and your baking tray. Working directly on a movable tile eliminates the need to peel delicate, uncured clay shapes off your desk, preserving clean geometry and preventing unintended distortion. When cutting shapes with metal cutters, cover the conditioned clay sheet with a layer of plastic food wrap before pressing the cutter down. This technique softens sharp cut perimeters into naturally rounded, professional-looking edges that mimic molded factory components. Additionally, keep a bottle of liquid polymer clay on hand to act as a heat-cured structural bond between small raw components, such as attaching miniature ears or facial features to larger bases. For pieces requiring smooth surface refinement after baking, implement progressive wet sanding using waterproof abrasive papers from 400 to 1200 grit, submerged in water to suppress airborne dust. This smoothing process eliminates micro-blemishes, producing an exceptional satin-smooth surface texture that feels balanced and durable to the touch.
Styling, Presentation, or Organization Ideas
Effective presentation and intentional styling transform handmade polymer clay earrings from simple craft creations into cohesive lifestyle accessories. When wearing these whimsical pieces, balance their vibrant colors by pairing them with neutral clothing palettes, such as cream knit sweaters, relaxed denim jackets, or monochromatic linen shirts. Alternatively, embrace playful maximalist trends by coordinating the pastel accents in the earrings with matching hair accessories, enamel pins, or patterned canvas tote bags. For crafters seeking to gift or market their designs, presentation packaging is critical for reinforcing quality. Mount finished pairs onto custom-printed cardstock earring cards displaying custom hand-drawn motifs or clean, modern typography. House completed collections within clear compartmentalized acrylic craft organizers, sorting finished accessories by color family or design theme to safeguard delicate components from dust and abrasive friction. If merchandising at craft fairs or staging photos for social media portfolios, photograph the jewelry against natural stone tiles, pastel linen fabrics, or wooden risers in soft, indirect morning light to capture true color fidelity and structural detail.
Budget or Time Planning
Crafting polymer clay earrings offers high creative output with minimal upfront financial investment, making it accessible for budget-conscious makers. Beginners can launch a fully functional workspace with a modest starter kit including five primary clay blocks, a basic acrylic roller, a craft tissue blade, and fundamental jewelry pliers. Maximize material economy by storing leftover scrap clay conditioned into custom neutral blending blends, which work well for concealed structural cores or interior design foundations. For efficient time management, adopt a batch-production workflow rather than building individual earrings from start to finish. Dedicate distinct, focused work sessions to specific phases of the process: allocate the first session entirely to conditioning clay, mixing custom color palettes, and cutting base geometric shapes. Reserve a second session for sculpting detailed facial features and texturizing, followed by a consolidated baking session that maximizes oven capacity. Finally, assemble metal findings, apply surface glazes, and secure stud hardware in a single assembly line stage. This structured production method reduces total cleanup intervals, minimizes tool changeovers, and significantly accelerates overall project completion times.
Creative Expansion and Advanced Inspiration
Once you master foundational sculpting and assembly techniques, expand your creative practice by exploring advanced design concepts and hybrid mixed-media applications. Experiment with specialized finishing mediums, such as applying colored UV resin topcoats cured under a lamp to introduce glossy, water-drop textures or protective domed surfaces over delicate hand-painted facial features. Explore liquid polymer clay techniques by filling miniature silicone molds or executing precision piping effects that mimic realistic cake decorating and confectionery art. Consider incorporating alternative materials directly into the clay composition, such as embedding silver leaf flakes, mixing in natural dried botanicals, or dusting raw surfaces with contrasting chameleon pigment powders for dynamic shifts in color. You can also expand your product line beyond traditional ear jewelry by adapting these ten miniature concepts into complementary lifestyle accessories. The same sculpts convert easily into functional charm keychains, stationery bookmarks, decorative planner paperclips, or sculpted magnets with minimal hardware adjustments, providing endless opportunities to share your distinctive handmade aesthetic.