Fall color polymer clay jewelry represents an engaging branch of wearable art, blending warm autumnal palettes with durable, lightweight sculptural mediums. When the seasons shift, personal styling moves toward rich organic tones like burnt terracotta, mustard ochre, deep olive, and spiced cinnamon. Polymer clay serves as an accessible canvas for capturing these seasonal transitions, allowing makers to create bespoke earrings, pendants, and bracelets with crisp geometric balance. This tutorial guides crafters through the fundamental principles of mixing custom fall palettes, conditioning clay slabs, cutting precise shapes, curing components, and assembling secure jewelry hardware. Readers will learn how to achieve professional, gallery-grade finishes through proper baking temperatures, wet-sanding methods, and clean hole-drilling techniques. Exploring these concepts provides practical strategies for crafting coordinated accessories that withstand regular wear while maintaining visual appeal. Rather than requiring complex equipment, this medium uses basic tabletop tools to achieve high-end artisanal results. By understanding how to balance color theory, structural thickness, and mechanical connections, makers of all skill levels can complete sophisticated collections that celebrate the textures, tones, and timeless elegance of seasonal handmade design.
Why This Idea Is Trending or Useful
Handmade polymer clay accessories continue to dominate modern Pinterest inspiration boards due to their exceptional versatility, comfortable weight, and accessible crafting techniques. As contemporary fashion embraces minimalist style and personalized statements, clay jewelry bridges the gap between affordable craft and elevated fashion. These creative ideas offer substantial practical value because cured polymer clay creates statement earrings that remain feather-light, eliminating the earlobe strain typically caused by heavy metal or stone components. The DIY appeal lies in the complete customization of shapes, textures, and color values, allowing crafters to produce bespoke pieces tailored to their seasonal wardrobes. For beginners, this craft presents an approachable entry point into small-scale jewelry fabrication; the material remains pliable until baked in a standard home oven, giving makers unlimited time to refine silhouettes. Furthermore, making jewelry provides excellent budget ideas for handmade gift-giving, small studio businesses, and creative wardrobe refreshes. By translating rich autumn palettes into clean geometric forms, makers can craft timeless, durable accessories that capture the natural warmth of autumn while maintaining modern design sophistication.
Materials and Preparation
Crafting durable, professional polymer clay jewelry requires systematic materials sourcing, proper workspace hygiene, and disciplined clay conditioning. The core materials consist of professional-grade polymer clay blocks in primary autumn hues, including raw sienna, cadmium yellow, sap green, cadmium red, and translucent blending clay. Essential tools include an acrylic roller, rolling depth guide rings, stainless steel jewelry cutters, ceramic baking tiles, parchment paper, a hand drill with micro-bits, and jewelry pliers. Structural hardware requires hypoallergenic stainless steel or brass jump rings, flat earring posts, silicone earring backs, and specialized jewelry adhesive. Preparation begins with workspace sanitization; wipe your non-porous glass or ceramic work surface with isopropyl alcohol to remove ambient dust and stray fibers. Condition each clay block by hand-kneading or passing it through a dedicated clay roller machine repeatedly until the sheet becomes smooth, pliable, and crack-free. Plan your slab thickness carefully, maintaining an even three-millimeter depth to ensure the final pieces resist snapping while staying lightweight. Organize your findings and plan each piece’s balance points before cutting to ensure seamless post-bake assembly.
1. Terracotta and Ochre Geometric Arch Earrings
Step-by-Step Guide
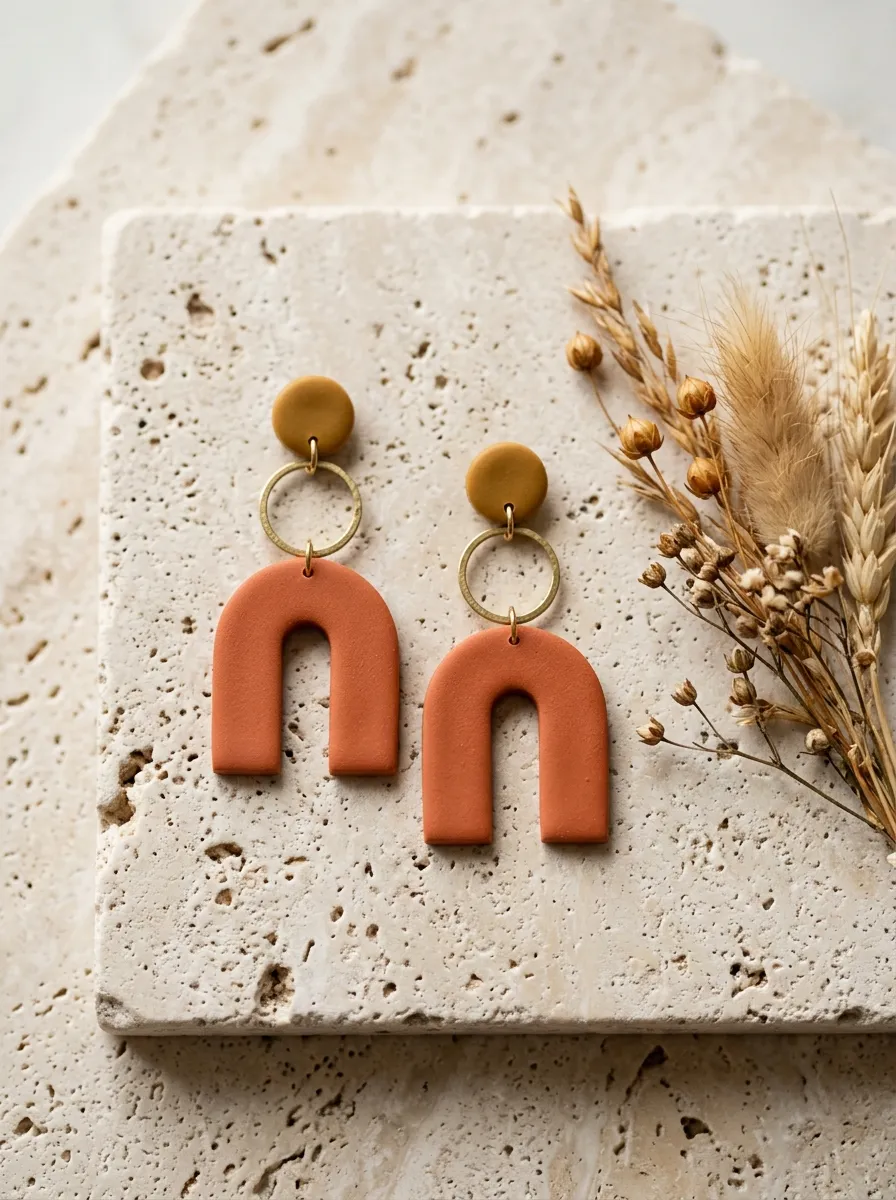
Terracotta and ochre geometric arch earrings combine mid-century modern architectural silhouettes with warm, grounding autumn hues. The design features a smooth, inverted U-shaped arch pendant suspended beneath a solid circular stud top. A two-tone palette pairs deep terracotta with soft mustard ochre, creating a visual balance that flatters warm seasonal sweaters and structured outerwear. The simplicity of the arch silhouette highlights the flat, unblemished surface of the clay, demanding clean edges and uniform slab thickness. Because the arch design incorporates open interior negative space, the earrings remain exceptionally lightweight while creating a bold visual outline. The contrast between the grounded circular stud and the fluid, swinging arch adds subtle kinetic movement that catches the eye without overwhelming the wearer’s jawline. This project teaches beginners how to maintain clean symmetry and balanced proportions, serving as a reliable template for exploring varied geometric pairings across seasonal collections.
To create the arch earrings, begin by conditioning equal portions of terracotta and mustard ochre polymer clay. Roll both colors into smooth, uniform slabs measuring three millimeters thick using acrylic rolling guides. Use a nested stainless steel arch cutter to cut two matching U-shaped frames from the terracotta slab, ensuring the outer and inner cutting edges slice cleanly through to the work tile. Next, cut two twelve-millimeter circular discs from the ochre slab using a round cutter to serve as the stud tops. Use a needle tool to pierce a one-millimeter hole at the top crest of each arch and a corresponding hole at the bottom rim of each ochre circle, maintaining a two-millimeter margin from the edges. Transfer the raw components on a ceramic tile lined with parchment paper into an oven preheated to the manufacturer’s exact specifications, curing for forty minutes. Once cool, connect the studs to the arches using four-millimeter brass jump rings, and attach surgical steel posts to the backs with jewelry glue.
2. Marbled Cinnamon and Ecru Statement Pendants
How to Create
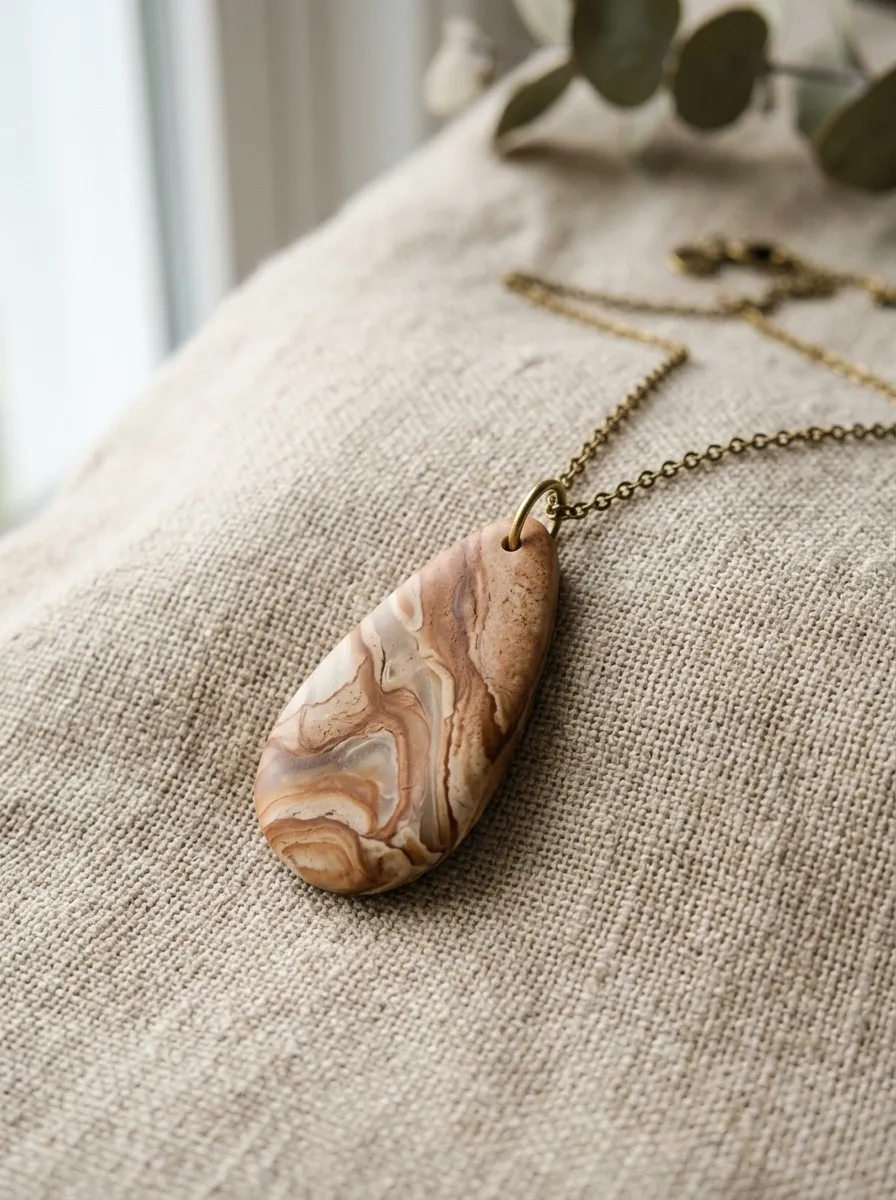
The marbled cinnamon and ecru statement pendant translates natural geological striations and swirled stone patterns into a sophisticated focal necklace. This concept combines rich, spicy cinnamon-brown clay with creamy ecru and translucent white, creating an organic marbled slab that yields entirely unique pendants from every cut. The design relies on controlled twisting and folding rather than complete blending, preserving crisp, visible boundaries between the contrasting color veins. A clean teardrop or elongated rectangular silhouette frames the organic swirl pattern, giving the fluid marbling a structured, modern presentation. When suspended from a delicate brass cable chain or natural leather cord, the pendant serves as an anchor piece for layered autumn outfits. This design provides an approachable way to practice color integration without needing specialized carving tools. The natural variation in the marbling gives every piece an artisanal, one-of-a-kind quality that mirrors real natural jasper or agate stone.
Begin by rolling thin coils of cinnamon, ecru, and translucent clay, keeping the ratio at two parts cinnamon, two parts ecru, and one part translucent. Twist the coils together into a single striped rope, fold the rope in half, and twist again to compress the colors without muddying them. Roll the twisted clay into a compact ball, then use an acrylic rolling pin to flatten it into a three-millimeter slab, revealing the marble veins across the surface. Place a long teardrop cutter over the most visually compelling section of the marbled pattern, pressing down firmly to slice the pendant shape. Smooth the outer rim using a damp fingertip to eliminate sharp tool marks. Use a micro-drill or needle tool to bore a clean horizontal hole through the upper neck of the teardrop to accommodate a bail. Bake the pendant flat on a smooth ceramic tile for forty-five minutes, let it cool completely, and polish the surface with a soft denim cloth to bring out the depth of the translucent marbling.
3. Olive Branch Imprinted Botanical Drops
Execution Process
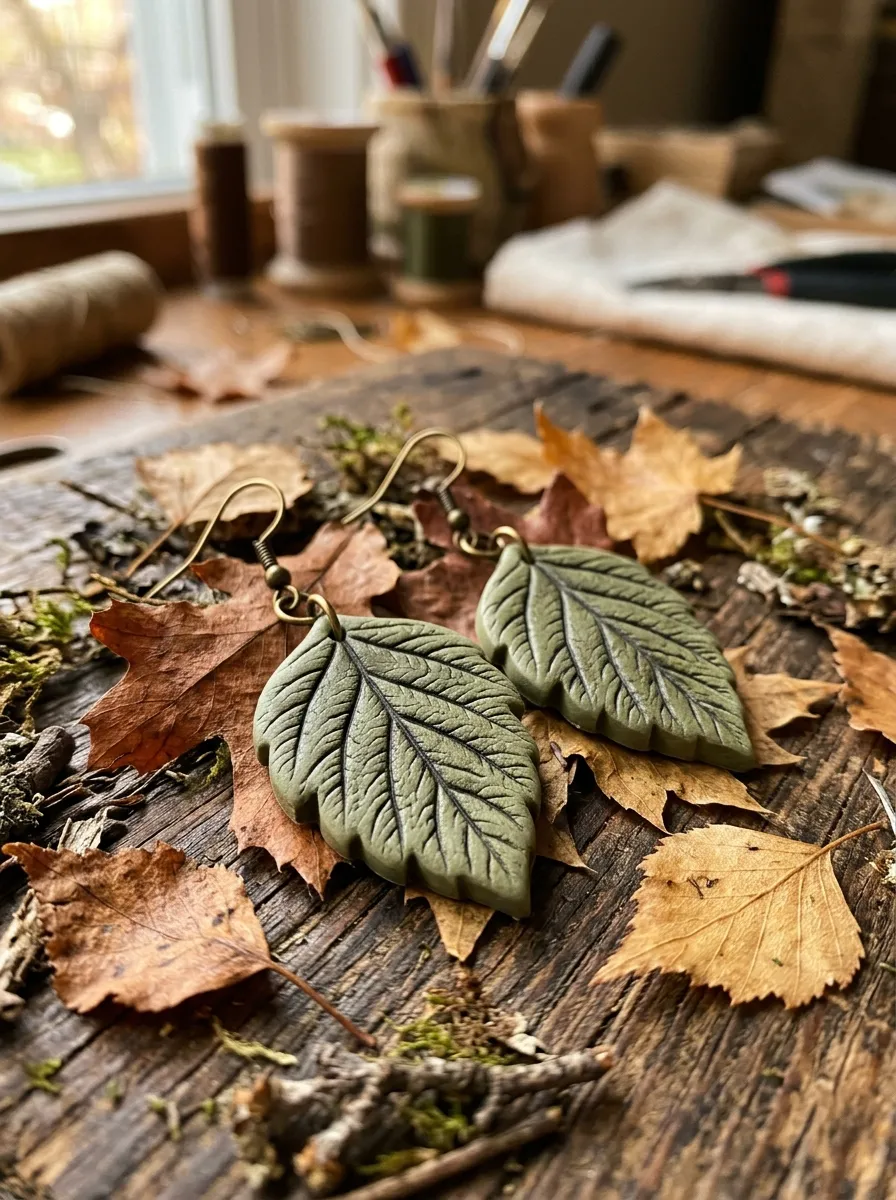
The olive branch imprinted botanical drop earrings use direct nature-casting techniques to preserve fine plant venation into permanent clay jewelry. The design features elongated oval or spade-shaped drops rendered in a muted olive-green tone, carrying delicate surface impressions of real autumn foliage or carved botanical stamps. The soft, mossy green color provides an earthy backdrop that highlights the intricate veins and serrated margins of the pressed leaves. Applying a micro-thin wash of antique gold powder or burnt umber acrylic paint into the recessed leaf grooves accentuates the textural relief, giving the pieces an antique, botanical-illustration character. The slender profile of the drop elongates the neck, while the organic texture softens the clean cut of the clay. This project introduces crafters to relief texturing and surface antiquing, offering a practical way to capture the fleeting textures of autumn botanicals in durable, wearable everyday jewelry.
Condition a block of olive-green clay and roll it out into a uniform three-millimeter slab across a non-porous ceramic work surface. Gather small, fresh foliage cuttings with prominent underside veins, placing them face down onto the raw clay slab. Roll an acrylic pin firmly over the leaves to embed the natural textures into the clay, then carefully peel away the botanical material using fine tweezers. Position an elongated oval cutter over the clearest leaf impressions and press down cleanly to cut out the earring pair. Use a fine needle tool to punch a clean suspension hole two millimeters below the top edge of each drop. Bake the pieces on a flat tile for thirty-five minutes at the recommended temperature. After cooling, brush dark brown water-based acrylic paint into the textured leaf grooves, immediately wiping the raised surfaces with a damp paper towel to leave pigment only in the recesses. Attach brass ear wires through the suspension holes to complete the drops.
4. Spiced Pumpkin Textured Stud Sets
How to Make
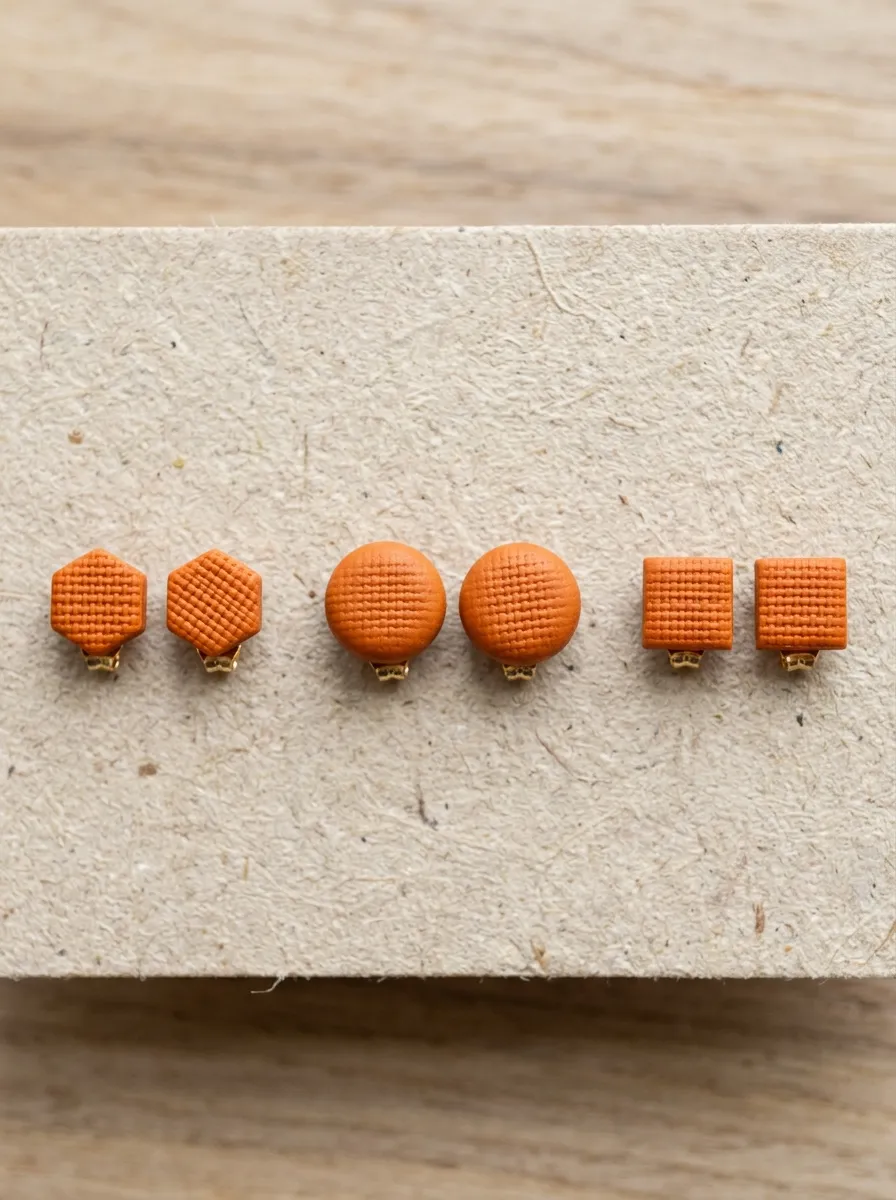
The spiced pumpkin textured stud set focuses on compact, minimalist style everyday earrings that celebrate rich autumn warmth through subtle tactile surfaces. Rather than featuring flat, unadorned surfaces, these studs incorporate fine linen, woven canvas, or micro-stippled textures pressed directly into a warm pumpkin-orange clay base. The design encompasses three complementary miniature shapes—such as tiny hexagons, pillowed circles, and minimalist squares—providing a versatile capsule set for daily wear. The vibrant, warm orange hue brightens neutral knitwear, while the tactile matte texture prevents the bright color from appearing overly glossy or synthetic. Because studs sit directly against the earlobe with no hanging parts, they are practical for active daily wear, sports, and casual layering. This beginner friendly project emphasizes precision cutting, edge finishing, and secure mechanical stud embedding, forming an essential foundation for any handcrafted jewelry collection.
Roll conditioned spiced-pumpkin polymer clay into a three-millimeter sheet on a clean glass cutting board. Lay a piece of clean, textured linen fabric across the clay sheet, rolling firmly with an acrylic pin to transfer the cross-hatch fabric weave across the surface, then peel the linen away cleanly. Use miniature geometric cutters measuring eight to ten millimeters across to stamp out pairs of small hexagons, circles, and squares from the textured clay. Lift the studs carefully from the board using a thin, flexible tissue blade to avoid distorting the textured tops. Place the raw pieces on a baking tile lined with parchment paper. Bake for thirty minutes at the correct temperature, allowing the studs to cure thoroughly to maximize structural durability. After cooling, lightly sand the base of each stud with medium-grit sandpaper to create a rough surface, apply high-strength jewelry adhesive, and press stainless steel earring posts firmly onto the backs, allowing twenty-four hours for the glue to cure.
5. Golden Amber Translucent Dangle Hoops
Setup Method
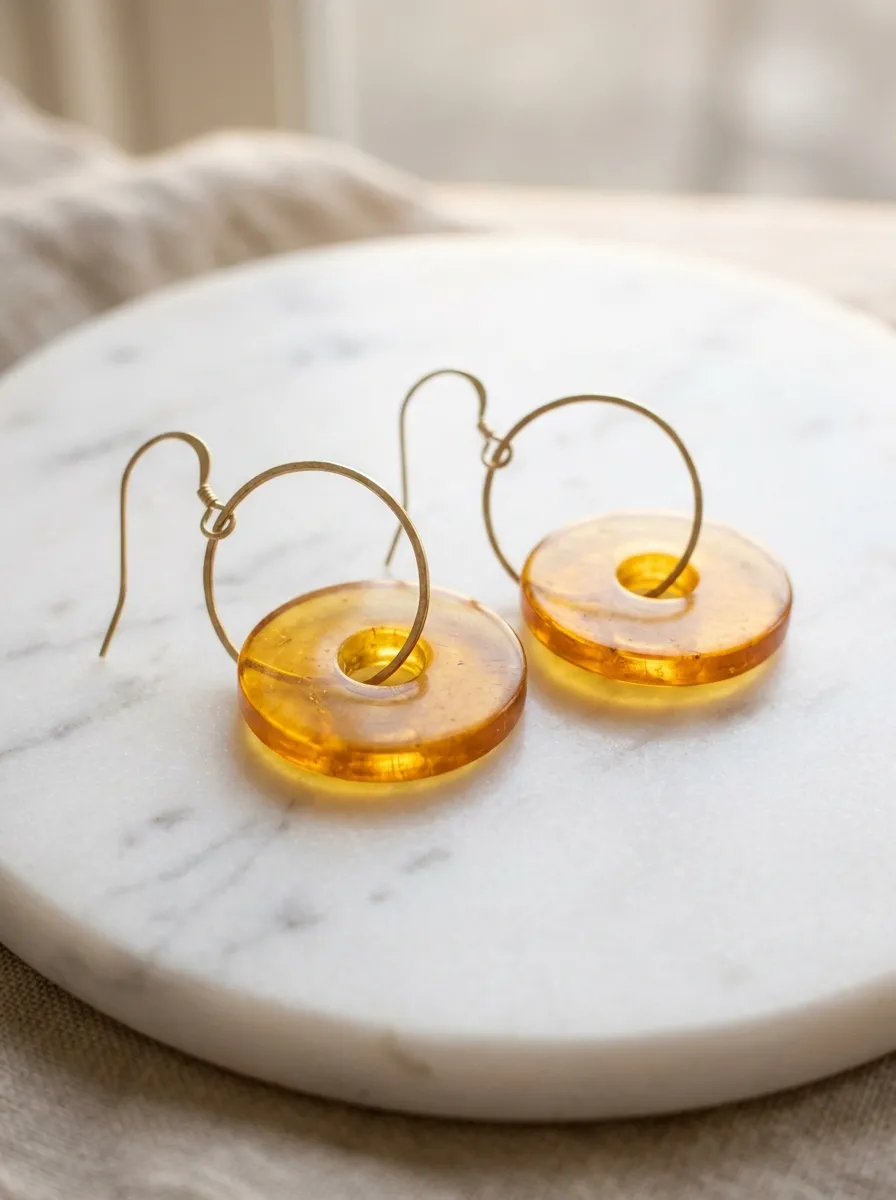
The golden amber translucent dangle hoops combine the warm, light-catching clarity of fossilized tree resin with clean, contemporary hoop mechanics. This design utilizes a custom blend of translucent polymer clay and rich amber-yellow pigment, producing components that glow with warm golden light when illuminated from behind. The silhouette features a flat, hollow ring or donut suspended within or alongside raw brass wire hoops, creating an appealing contrast between polished metal and glowing clay. When worn, the translucent clay interacts with ambient daylight, shifting in visual depth throughout the day much like real amber or tortoiseshell. The circular geometry provides an open, airy visual weight that flatters diverse face shapes without dragging on the earlobes. This project allows crafters to explore the unique working properties of translucent clays, teaching how controlled baking temperatures preserve clarity without causing scorching or cloudiness.
Blend four parts translucent polymer clay with one part cadmium yellow and a pinhead-sized crumb of warm brown clay, conditioning thoroughly until the color is uniform. Roll the amber blend into a three-millimeter slab on a clean ceramic tile, using guide rings to maintain an even thickness throughout. Use a two-inch circular cutter to stamp out the outer boundary, then center a one-inch circular cutter inside to remove the inner core, leaving a flat, hollow clay donut. Pierce a tiny suspension hole through the top edge of the ring using a fine needle tool. Cover the pieces with a clean sheet of cardstock on the baking tile to shield them from direct oven element heat, curing for fifty minutes at the exact temperature indicated on the clay packaging to achieve maximum clarity without yellowing. After cooling, buff the cured rings with a soft flannel cloth, then connect each clay hoop to an open brass ear wire using a five-millimeter brass jump ring.
6. Rustic Clay and Raw Wood Beaded Necklace
Step-by-Step Guide
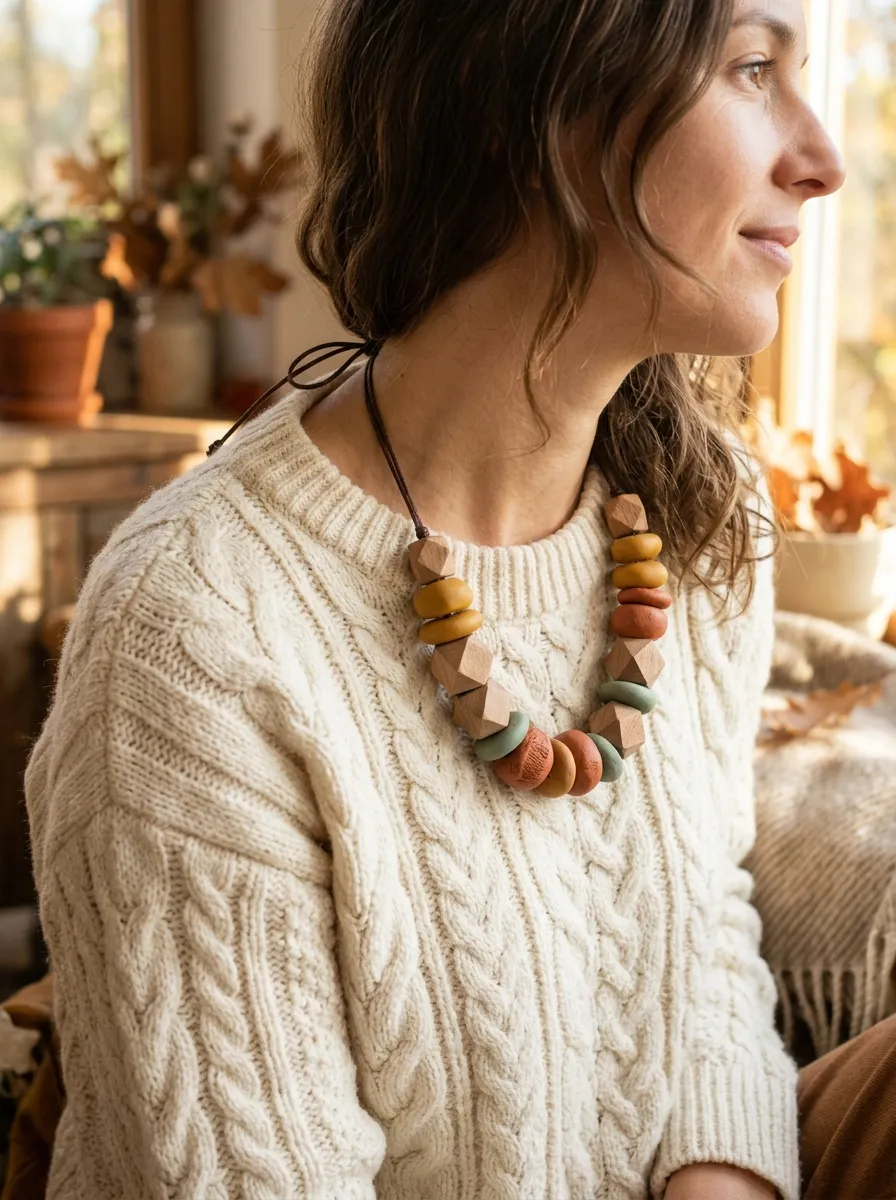
The rustic clay and raw wood beaded necklace bridges sculptural clay crafting with organic woodwork, creating a bold, textural collar necklace. The design features hand-rolled polymer clay beads in muted fall tones—such as mustard ochre, burnt orange, and sage green—interspersed with natural, unvarnished geometric wooden beads. The clay beads are shaped into varied geometric forms, including flattened discs, faceted polyhedrons, and smooth round spacers, creating a rhythm of varied shapes along the cord. The contrast between the velvety matte finish of cured clay and the porous grain of natural wood produces an organic, tactile aesthetic that pairs naturally with linen shirts, denim jackets, and chunky knit scarves. Strung on durable waxed cotton or natural leather cord, this necklace provides comfortable everyday durability. The project allows makers to practice hand-forming and bead-piercing techniques without requiring cookie cutters or flat slab tools.
Begin by rolling conditioned clay in autumn shades into smooth, uniform spheres measuring fifteen millimeters in diameter. To create faceted polyhedrons, use a sharp craft blade to slice tiny flat planes around the perimeter of several spheres, creating clean geometric facets. To make flat spacer discs, roll smaller clay balls and flatten them gently between two smooth acrylic blocks to a four-millimeter thickness. Pierce a two-millimeter hole through the center of every raw bead using a pointed metal skewer, rotating the skewer slowly to prevent flattening the three-dimensional shapes. Stand the skewers across an oven-safe ceramic baking rack so the beads suspend in mid-air without touching any flat surfaces, curing for forty minutes. Once cool, slide the clay beads onto a one-meter length of two-millimeter waxed cotton cord, alternating with raw beechwood beads. Finish the necklace ends with clean barrel knots or brass cord crimps fitted with an adjustable lobster clasp.
7. Deep Plum and Mustard Layered Fan Earrings
How to Create
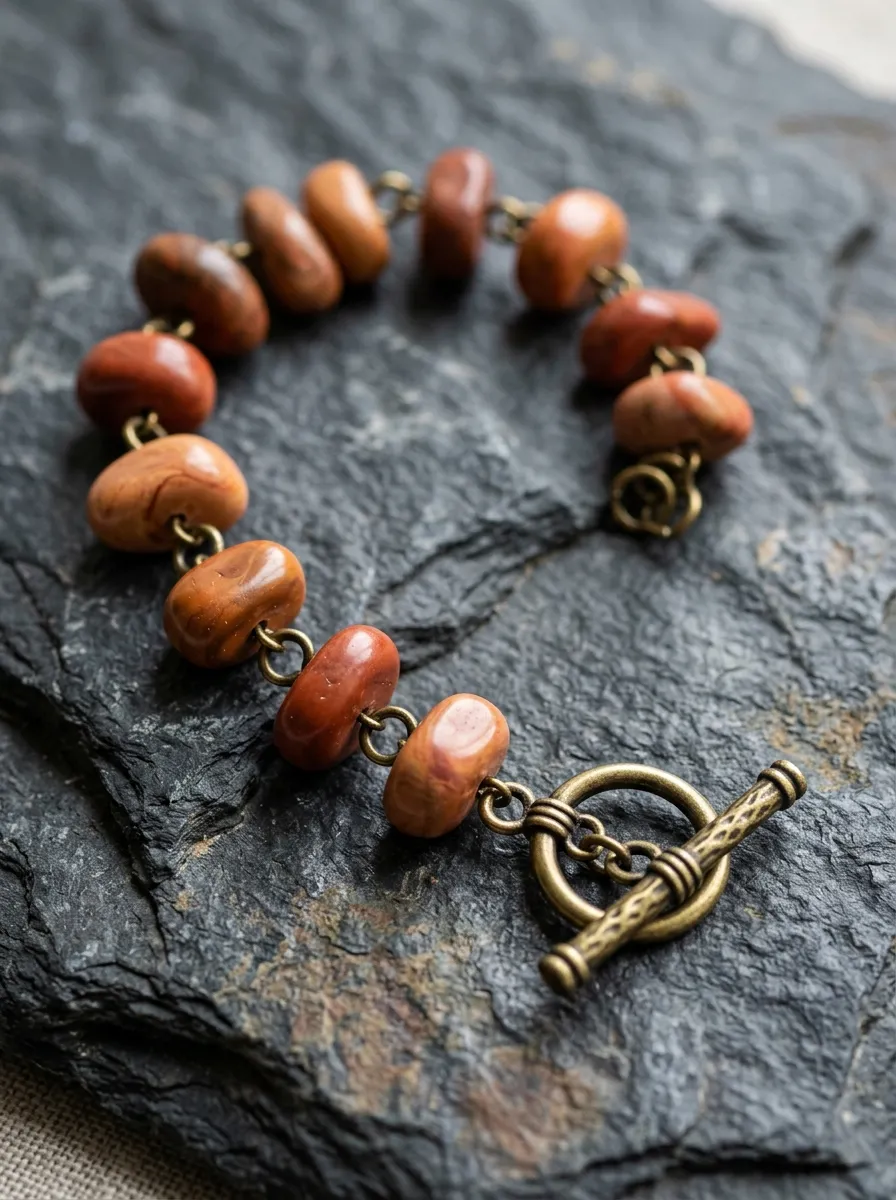
The deep plum and mustard layered fan earrings explore color blocking and stacked tiers, using art deco architectural inspiration to create dramatic movement. The design features a semi-circular fan base in rich, dark plum clay, overlaid with a smaller, scalloped or ribbed fan in warm mustard ochre. The contrast between the moody purple tone and the vibrant yellow hue creates visual energy that enlivens dark fall and winter clothing palettes. The lower edge of the plum fan can be left smooth or detailed with subtle radial stamped lines that extend outward from the center, emphasizing the fan geometry. Because the two pieces are linked with metal jump rings rather than glued rigidly together, the lower tier swings independently with every movement of the head. This project teaches crafters how to coordinate multi-piece articulated jewelry, balancing component scale and connection spacing to ensure the earrings hang straight.
Condition deep plum and mustard ochre polymer clay, rolling each into separate three-millimeter slabs on your work surface. Use a semi-circular cutter measuring thirty millimeters wide to cut the base fans from the plum slab, smoothing the curved perimeter with a silicone blending tool. Next, use a smaller twenty-millimeter semi-circular cutter to cut the top fan overlays from the mustard slab. On the mustard pieces, use a dull craft blade to press fine radial lines radiating from the flat top edge toward the curved rim, creating a pleated fan texture. Punch two suspension holes along the flat bottom edge of the mustard fan, and two corresponding holes along the top edge of the plum fan, maintaining even spacing. Bake all components flat on parchment paper for thirty-five minutes. Once cured, connect the two tiers using four-millimeter brass jump rings, and attach a brass ball post to the top mustard fan with jewelry adhesive.
8. Burnt Sienna Organic Pebble Link Bracelet
Execution Process
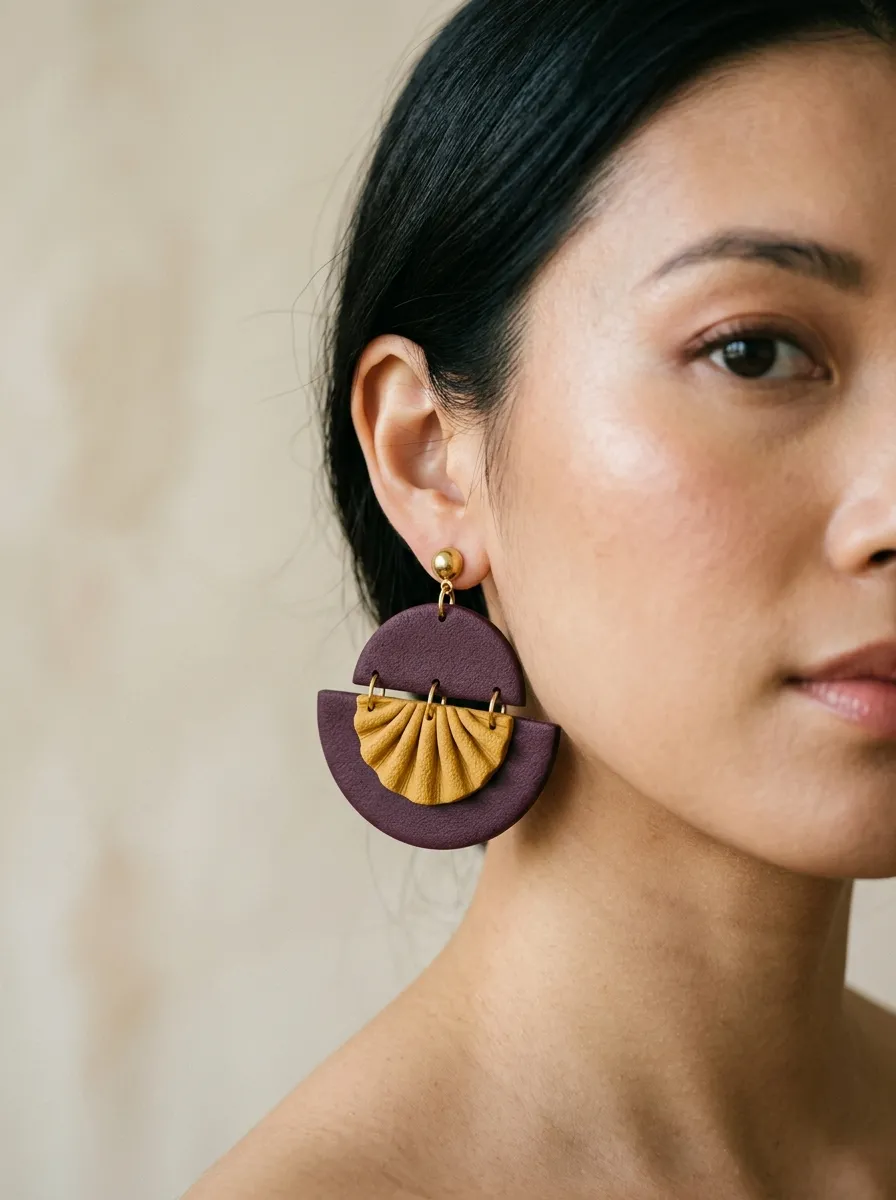
The burnt sienna organic pebble link bracelet translates the smooth, weathered shapes of river stones into a flexible, tactile wrist accessory. The design consists of five to seven asymmetrical, softly rounded clay stones in graduated shades of burnt sienna, rust, and warm terracotta, linked together with sturdy metal jump rings. Each pebble is individually shaped by hand, giving the bracelet an organic, artisanal quality that departs from rigid geometric symmetry. The edges of each clay link are rounded and softened before baking, creating a smooth feel against the skin during movement. The warm rust tones complement gold, bronze, and leather jewelry, making this piece a versatile accent for seasonal bracelet stacks. This project teaches makers how to drill precise double holes through curved surfaces, ensuring the bracelet lays comfortably flat against the wrist without flipping or binding.
Roll small portions of conditioned burnt sienna clay into flattened ovals and rounded pebble shapes, varying their sizes between fifteen and twenty millimeters across. Gently rub the perimeter of each raw pebble with a damp thumb to remove sharp edges, creating a soft, tumbled stone silhouette. Use an acrylic block to press each pebble flat so both sides remain parallel, ensuring a uniform thickness of three millimeters. Use a two-millimeter needle tool to bore two horizontal holes through opposite ends of each pebble, checking that the holes run parallel to the flat surface. Cure the pebbles on a ceramic tile dusted with cornstarch to prevent flat, shiny spots from forming on the undersides. After cooling, rinse away any residual cornstarch and buff the pebbles with a denim cloth. Link the pebbles together using heavy-duty six-millimeter brass jump rings, and attach an antique brass toggle clasp to the ends.
9. Autumnal Terrazzo Chunky Hoop Earrings
How to Make
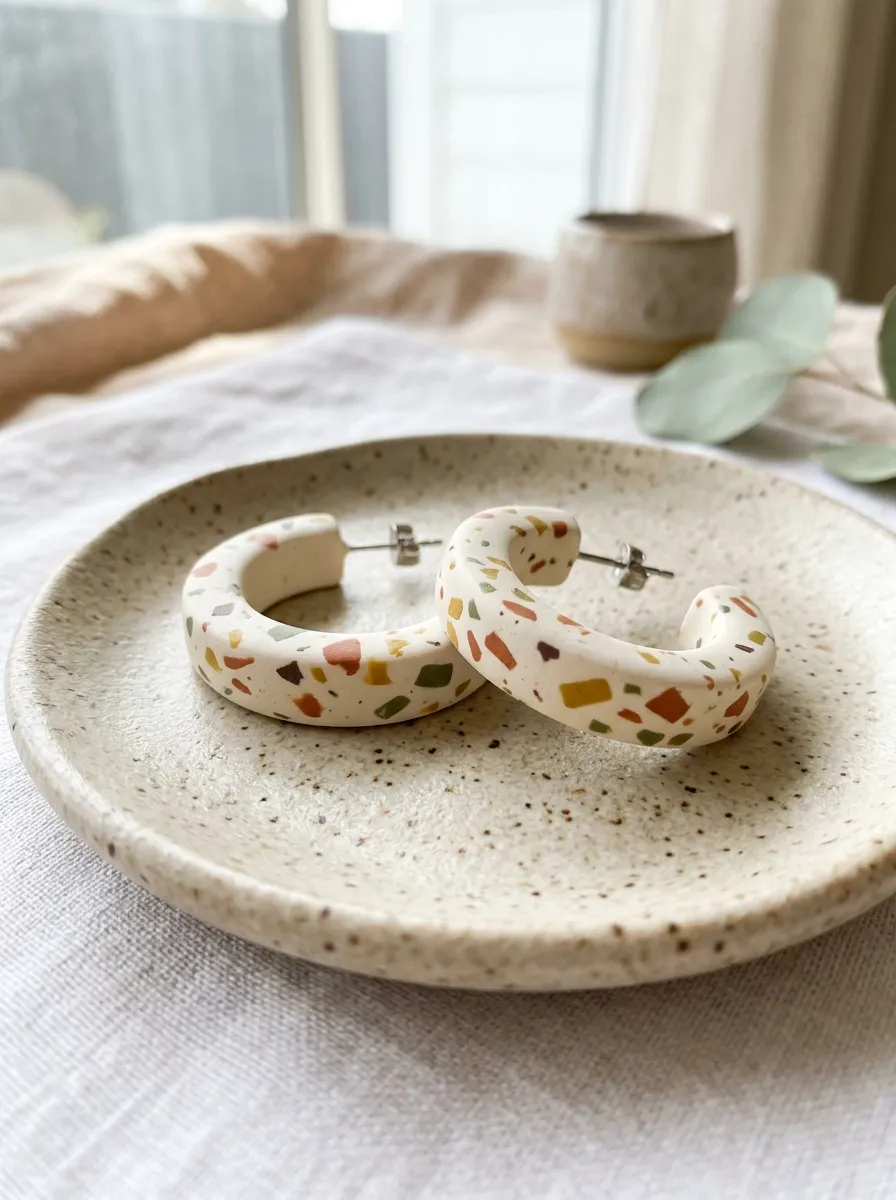
The autumnal terrazzo chunky hoop earrings bring playful composite stone patterning into a bold, sculptural hoop format. This design utilizes a thick C-shaped hoop silhouette crafted from an ivory or warm oatmeal clay base embedded with tiny, irregular flecks of terracotta, olive green, mustard yellow, and deep chocolate brown. The terrazzo pattern distributes color across the entire curve of the hoop, creating a rich visual texture that coordinates with diverse autumn wardrobe pieces. Because the hoop forms a three-dimensional open ring rather than a flat cutout, it catches the light across multiple planes, highlighting the embedded colorful flecks. The chunky proportions provide a high-end, boutique aesthetic while remaining comfortable for all-day wear due to the lightweight nature of polymer clay. This project introduces crafters to curved mandrel baking techniques, showing how to shape and cure dimensional hoops without flattening their rounded profiles.
Condition an ivory clay base, rolling it into a four-millimeter slab. Chop baked scraps of terracotta, mustard, olive, and brown clay into microscopic, irregular flakes using a sharp craft knife. Scatter the colorful flakes across the ivory slab, rolling firmly with an acrylic pin to press the flecks flush into the base sheet. Cut the patterned slab into straight strips measuring ten millimeters wide by sixty millimeters long, smoothing the long edges with a silicone shaper. Carefully wrap each strip around an oven-safe wooden dowel or metal tube measuring one inch in diameter, curving the strip into an open C-shaped hoop. Trim the ends cleanly, leaving a half-inch gap between the tips. Cure the hoops directly on the dowel in the oven for forty minutes to preserve their circular curvature. After cooling, slide the hoops off the dowel, drill a tiny hole near one tip, and secure a flat titanium earring post to the interior edge using strong jewelry adhesive.
10. Forest Green and Gold Foil Bar Brooch
Setup Method
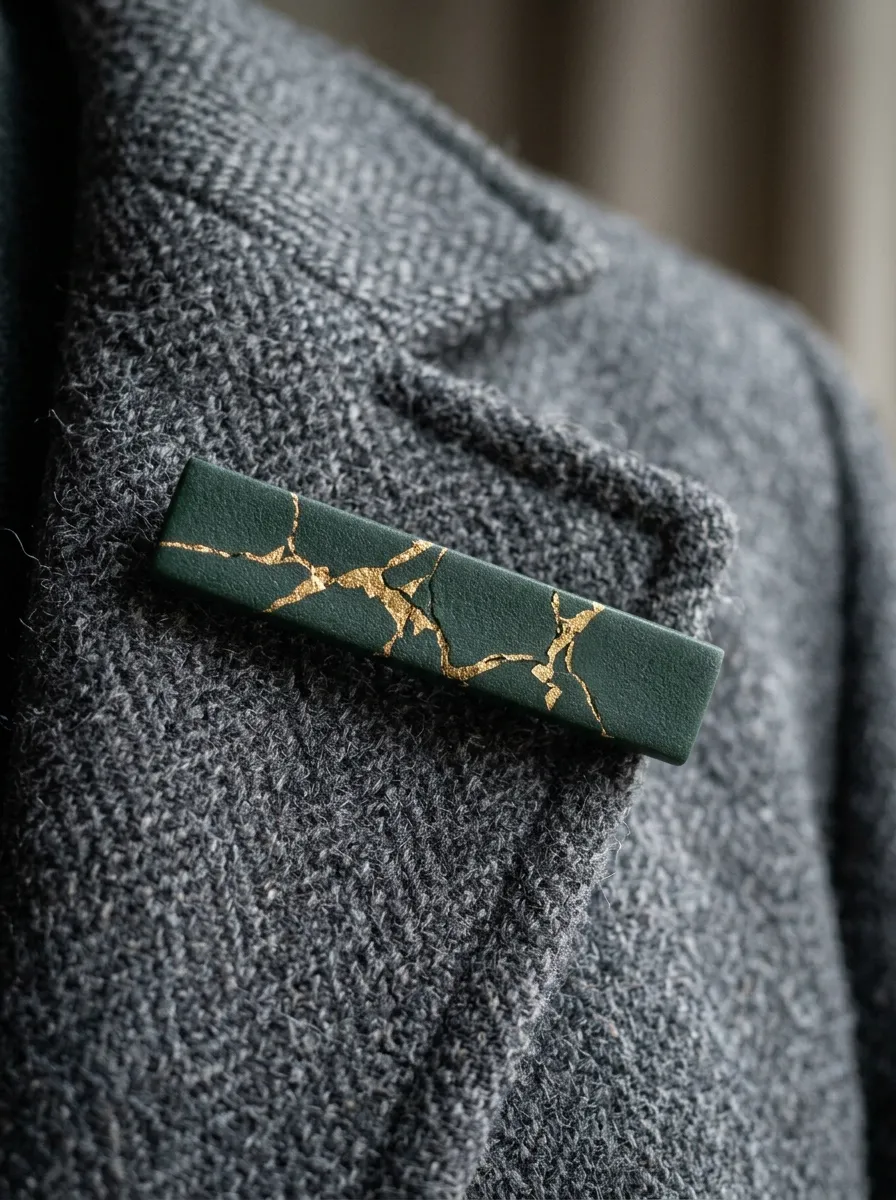
The forest green and gold foil bar brooch reimagines vintage lapel pins into a modern minimalist accessory for autumn coats, blazers, and thick knit scarves. The design features a slender, elongated rectangular clay bar in deep, saturated forest green, accented with delicate flecks of genuine imitation gold leaf pressed into the surface. The deep green tone provides a moody, sophisticated background that allows the fractured gold foil to catch ambient light, mimicking the appearance of natural mineral veins running through dark emerald stone. The narrow bar silhouette provides an understated, tailored accent that secures lapels or stabilizes heavy wool scarves without pulling or damaging the fabric. This project teaches crafters how to apply delicate metallic leaf foils to raw polymer clay, opening creative possibilities for incorporating reflective metallic elements into seasonal jewelry and outerwear accessories.
Condition deep forest-green polymer clay thoroughly and roll it into an even four-millimeter slab across a smooth glass tile. Lay a sheet of imitation gold leaf over the clay slab, patting it gently with a dry, soft makeup brush so the foil adheres across the surface. Use an acrylic roller to stretch the slab slightly, causing the gold leaf to fracture naturally into delicate, irregular veins and flecks that reveal the green clay beneath. Use a steel ruler and a sharp tissue blade to cut a clean, straight bar measuring twelve millimeters wide by sixty millimeters long. Smooth the cut perimeters with a flat silicone tool to remove any slight edge burrs. Bake the bar flat on a parchment-lined ceramic tile for forty minutes to ensure maximum strength and rigidity. Once cool, coat the top surface with a micro-thin layer of matte water-based varnish to seal the gold leaf, and attach a brass safety-catch bar pin to the reverse side using industrial jewelry glue.
Common Beginner Mistakes and How to Avoid Them
A frequent mistake beginners encounter when crafting polymer clay jewelry is under-baking their components, which results in brittle pieces that snap easily under light stress. Polymer clay requires sustained heat to fuse the plasticizers completely; baking for too short a duration leaves the core under-cured and fragile. Always cure pieces for the full time recommended by the manufacturer—typically thirty to forty-five minutes for three-millimeter slabs—using an independent oven thermometer to verify internal temperatures. Another common error is rolling slabs with uneven thickness, which leads to warped pieces during baking and imbalanced weight distribution in hanging earrings. Use acrylic rolling guides or matching stacks of playing cards on both sides of your rolling pin to ensure consistent thickness across every slab. Additionally, crafters often handle uncured clay with dusty hands, embedding lint and fingerprints into light-colored pastels; keep a pack of baby wipes nearby, and clean your hands and work surface between color changes. Finally, avoid using weak jewelry jump rings; choose sturdy, heavy-gauge rings and close them with a slight twisting motion rather than pulling them apart, preserving their structural tension and circular shape.
Practical Tips for Better Results
Achieving professional, boutique-quality finishes on handmade clay jewelry relies on careful surface preparation, clean cutting, and deliberate post-bake finishing. To achieve perfectly clean cutter releases without dragging or tearing clay edges, dust your cutters with a light coating of cornstarch before pressing them into the slab, or place a thin sheet of plastic wrap over the clay before cutting. If minor fingerprints or surface marks appear on raw clay, smooth them gently using a cotton swab dipped in isopropyl alcohol before baking, which dissolves surface imperfections without altering the shape. After curing, wet-sand the edges of your components underwater using four-hundred, six-hundred, and eight-hundred grit wet-or-dry sandpaper; wet sanding eliminates airborne clay dust while producing exceptionally smooth, rounded borders. When drilling connection holes, support the cured component flat on a scrap piece of wood and drill slowly using a hand pin vise rather than high-speed rotary tools, preventing friction heat that can melt the clay. Finally, when gluing metal posts to clay backs, score both surfaces with a needle tool to create mechanical texture that helps the jewelry glue bond permanently.
Styling, Presentation, or Organization Ideas
Styling handmade fall polymer clay jewelry thoughtfully enhances its visual warmth, integrating it into seasonal wardrobes and elevated retail displays. When wearing warm terracotta, mustard, or olive earrings, pair them with cream cable-knit sweaters, charcoal wool coats, or natural linen button-downs to let the rich earthy tones serve as the focal color accent. For jewelry makers presenting their work at seasonal craft markets or creating content for digital inspiration boards, mount finished pieces on custom unbleached kraft paper cards stamped with clean, minimalist branding. Display collections on natural materials—such as raw oak risers, smooth river stones, or linen-covered trays—to complement the organic, handmade aesthetic of the accessories. To keep your personal collection organized at home, hang statement earrings on a wall-mounted brass mesh frame or store them flat in velvet-lined drawer organizers, protecting delicate clay edges from scratching against metal chains. When photographing completed jewelry, shoot under soft, indirect morning daylight against clean, neutral backgrounds like travertine stone or textured paper, capturing subtle surface textures and true color values without harsh reflections.
Budget or Time Planning
Creating a complete collection of autumn polymer clay jewelry is an economical creative project that delivers high artistic returns with minimal upfront investment. A single block of polymer clay costs very little and yields multiple pairs of statement earrings, allowing crafters to produce an extensive accessory collection from just four or five core colors. To keep startup costs manageable, avoid purchasing expensive motorized equipment early on; manual acrylic rollers, basic stainless steel cutters, and hand pin vises provide complete control at a fraction of the cost. When planning your production schedule, organize your workflow into structured, assembly-line stages: dedicate the first session to color mixing, slab conditioning, and shape cutting. Reserve the second session for baking, allowing pieces to cool thoroughly overnight, and use the third session for wet-sanding edges, drilling holes, and assembling findings. Completing projects in organized batches maximizes your efficiency and keeps your workspace clean, enabling you to finish a cohesive collection of ten to twelve finished jewelry pieces over a single relaxing weekend.
Creative Expansion and Advanced Inspiration
Once you feel confident with foundational slab cutting, curing, and assembly techniques, you can explore advanced variations that incorporate mixed media, dynamic surface carving, and complex assembly methods. Experiment with the Sutton slice technique, pressing contrasting clay colors into detailed texture plates, shaving the raised excess flush with a tissue blade, and transferring the intricate pattern onto a flat base slab. You can also explore adding cold-connection metals, such as riveting hand-cut brass geometric plates directly onto cured clay components using miniature eyelets to introduce mixed metallic shine. Another compelling direction involves carving cured clay surfaces with linoleum gouges or micro-woodcarving chisels, creating geometric grooves that can be filled with contrasting liquid clay or metallic wax pastes. Furthermore, you can expand beyond jewelry by using these exact color palettes and texturing methods to craft coordinating accessories, such as hair slides, minimalist bookmarks, compact trinket dishes, or decorative button sets. Exploring these multi-disciplinary methods expands your creative range while keeping the warm, comforting essence of seasonal color design at the center of your crafting journey.