Chunky polymer clay bead necklaces provide a dynamic way to integrate sculptural form, expressive color palettes, and handmade craftsmanship into contemporary personal styling. Modeling oven-bake clay into oversized beads allows makers to produce lightweight, customized jewelry that makes a bold aesthetic statement without the excessive physical weight of solid ceramic or natural stone. This detailed tutorial presents ten unique chunky polymer clay bead necklace ideas, ranging from geometric terrazzo barrels and organic river stones to fluted discs, marbled bobbins, and metallic leaf focal spheres. Readers will learn the precise mechanical requirements for proper clay conditioning, symmetrical bead piercing, balanced stringing tension, and dependable oven curing. Crafting your own jewelry pieces eliminates reliance on mass-produced fashion accessories, granting complete creative control over color formulation, bead scaling, and structural durability. Beyond elevating your daily wardrobe, developing these three-dimensional clay forming skills provides valuable technical knowledge that transitions naturally into home decor accents, decorative curtain ties, and creative craft storage organization. By practicing accessible forming techniques like hand-rolling, caning, and wet sanding, crafters of all backgrounds can achieve boutique-quality results. The subsequent sections outline essential preparation workflows, comprehensive material inventories, step-by-step guides for ten individual designs, and strategic project planning frameworks.
Why This Idea Is Trending or Useful
Sculptural statement necklaces continue to lead trending ideas across modern digital style boards and Pinterest ideas because they balance artistic expression with everyday functionality. Modern fashion enthusiasts frequently seek tactile, three-dimensional accessories to elevate minimalist style linen tunics, plain crewneck t-shirts, and tailored blazers. From a design perspective, polymer clay translates bold mid-century modern and Memphis art aesthetics into wearable objects that remain comfortable during all-day wear. As an engaging DIY creative project, fashioning custom clay beads requires minimal initial equipment, functioning seamlessly on a standard craft table without demanding an industrial studio setup. Because fundamental bead shaping relies on basic geometric forming, straightforward rolling, and uniform piercing, this medium serves as an exceptionally beginner friendly entry point into jewelry making. Furthermore, building your own handmade necklaces delivers dependable budget ideas, as a few standard two-ounce clay blocks can yield several high-value, coordinated accessories at minimal unit cost. Completed clay bead necklaces also serve as attractive display pieces within bedroom organization systems, hanging from wall hooks as vibrant decorative accents when not actively worn.
Materials and Preparation
Thorough planning and disciplined supply procurement ensure that handmade polymer clay bead necklaces achieve structural durability, clean hole alignment, and professional finishes. The primary medium should center on artist-grade oven-bake polymer clay in opaque, translucent, and metallic formulations. Essential shaping and assembly tools include an acrylic roller, rigid carbon steel tissue blades, bead piercing pins or stainless steel needles, bead-baking racks, and multi-grit wet-or-dry sandpaper. For necklace construction, select durable stringing materials such as braided nylon cord, waxed cotton twine, natural leather lacing, or flexible multi-strand nylon-coated stainless steel wire, paired with crimp beads, heavy-duty jump rings, and magnetic or lobster clasps. Preparation begins by thoroughly cleaning your work tile or glass cutting mat with ninety-one percent isopropyl alcohol to eliminate lint, oils, and airborne dust particles. Condition the clay thoroughly by hand-kneading or passing it through a dedicated clay conditioning machine until it becomes pliable and bends without tearing along folded edges. Calibrate your household oven with an independent, freestanding oven thermometer, verifying temperature stability before baking to prevent discoloration or scorching of lighter pigments.
1. Sculptural Terrazzo Geometric Barrel Necklace

Step-by-Step Guide
The geometric terrazzo barrel necklace combines architectural mid-century modern aesthetics with the playful, aggregate look of composite stone flooring. This design features a central sequence of elongated, cylindrical barrel beads crafted from an opaque cream or unbleached porcelain clay base. Suspended within the neutral foundation are tiny, angular chips of contrasting clay in terracotta, cobalt blue, forest green, and mustard yellow. The cylindrical geometry provides a modern, structured silhouette that sits flat against the collarbone, creating a clean focal point for open-collar shirts and crewneck sweaters. Wet-sanding the cured beads reveals the embedded mosaic chips, producing a smooth, stone-like surface without the heavy weight of real aggregate masonry. The graphic contrast between the light neutral ground and the scattered colorful chips gives the necklace an authentic artisanal character that transitions effortlessly between casual daywear and professional office styling.
To create the terrazzo barrels, condition three ounces of white or cream polymer clay to form the main bead bodies. Roll thin sheets of terracotta, cobalt, mustard, and green clay, cutting them into microscopic, irregular geometric chips using a sharp craft scalpel. Scatter the colorful fragments evenly across the conditioned cream clay slab, lightly pressing them into the surface with an acrylic roller until the chips sit flush with the base. Roll the clay into an even rod measuring twenty millimeters in diameter, then slice the rod into thirty-millimeter segments using a rigid tissue blade. Smooth the cut ends with a silicone tool, then slowly insert a two-millimeter stainless steel piercing pin through the central longitudinal axis of each barrel, rotating gently to avoid flattening the cylindrical profile. Suspend the pierced barrels on a bead-baking rack and cure them for forty-five minutes at the temperature indicated on the clay packaging. Once cooled, wet-sand the barrels under running water using four-hundred to one-thousand-grit sandpaper, stringing five barrels along a thick natural leather cord with knotted spacers.
2. Organic Asymmetrical River Stone Pebble Collar
Execution Process
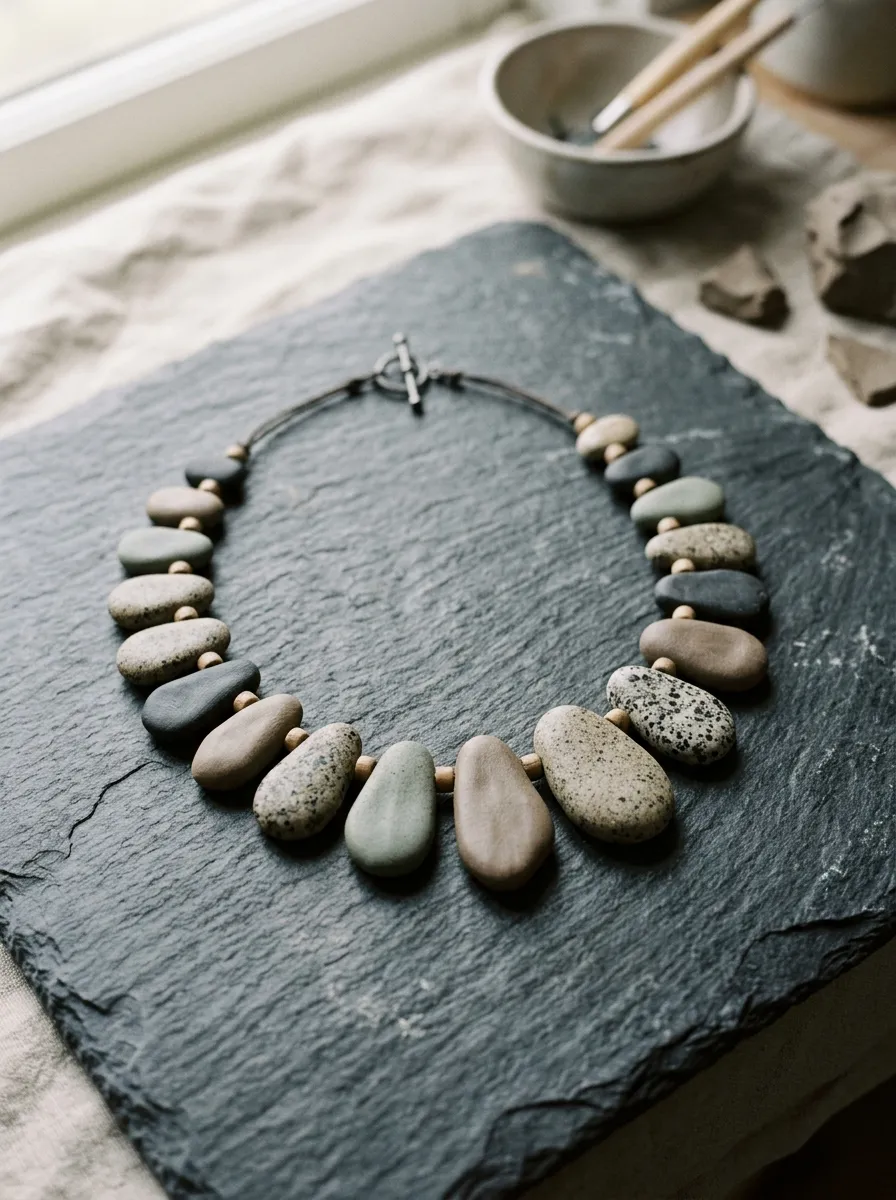
Organic river pebble designs embrace natural asymmetry, tactile curves, and the calming minimalism of smoothed natural minerals. This project showcases a graduated collar composed of flattened, irregular pebble beads that mimic stones tumbled smooth by river currents. Sculpted in a soothing palette of charcoal slate, warm taupe, dusty sage, and speckled granite clay, each bead possesses a unique, hand-formed contour that catches light softly. The beads are designed with broad, flat profiles that rest flat against the chest, preventing unwanted twisting or rolling during movement. By varying the dimensions from large focal stones at the center to smaller tapered pebbles near the closure, the necklace establishes balanced visual weight. The smooth matte finish highlights the subtle color shifts, delivering a grounded, earthy sophistication that coordinates naturally with unbleached linen garments and raw silk scarves.
Begin by blending black, white, and translucent clays with pinches of black pepper or dried herbs to generate custom speckled granite effects alongside solid earth tones. Roll the conditioned clay into assorted spherical balls ranging from fifteen to thirty millimeters in diameter. Gently press each ball between your palms to create an irregular, flattened pebble silhouette, softening any sharp outer edges with your fingertips while maintaining an asymmetrical profile. Use a stainless steel needle to pierce a horizontal hole across the upper third of each pebble, rotating the tool slowly to create a clean two-millimeter channel without distorting the organic curves. Rest the pebbles on a bed of cornstarch or crumpled parchment paper to prevent flat spots from developing during baking. Cure the beads for forty minutes, allow them to cool completely, and wipe away residual cornstarch with a damp cloth. String the graduated pebbles onto a dark gray waxed-cotton cord, placing small wooden spacer beads between each stone to ensure comfortable drape and fluid movement.
3. Fluted Accordion Disc Necklace with Metallic Spacers
How to Create
Linear surface textures and sharp geometric ridges bring an elevated, architectural rhythm to statement beadwork. This concept features a series of oversized, coin-shaped disc beads featuring radiating fluted ribs or accordion pleats across their visible faces. Sculpted from rich monochromatic tones like deep ochre, burnt sienna, or midnight navy, the fluted ridges catch directional light, casting dynamic shadow lines that shift as the wearer moves. Interspersing the large clay discs with thin, brushed brass or raw silver spacer rings introduces a refined mixed-media element that accentuates the matte texture of the clay. The flat, wide profile of the fluted discs provides substantial visual scale along the neckline without adding excessive bulk or weight. This sophisticated accessory delivers high visual impact, making it an exceptional statement piece for simple high-neck sweaters and structured architectural jackets.
To fabricate the fluted discs, roll conditioned polymer clay into a flat slab measuring four millimeters in uniform thickness. Use a thirty-millimeter circular metal cutter to punch out seven identical clay discs, smoothing the perimeter edges with a damp fingertip. Using a dull blade, straight needle tool, or specialized grooved clay texture plate, press deep, evenly spaced radial lines extending outward from the center of each disc to form sharp accordion pleats. Carefully pierce each disc through its side profile, passing a two-millimeter pin horizontally from edge to edge behind the textured surface. Bake the discs supported on a slotted bead rack for thirty-five minutes, allowing them to cool slowly inside the oven to maintain structural stability. After baking, buff the raised ridges lightly with a dry microfiber cloth to produce a soft satin sheen. Assemble the necklace by threading the fluted clay discs onto flexible nylon-coated stainless steel beading wire, alternating each clay disc with two thin metallic spacer rings, and secure the ends with crimp beads and an industrial lobster clasp.
4. Marbled Memphis Bobbin Bead Choker

Step-by-Step Guide
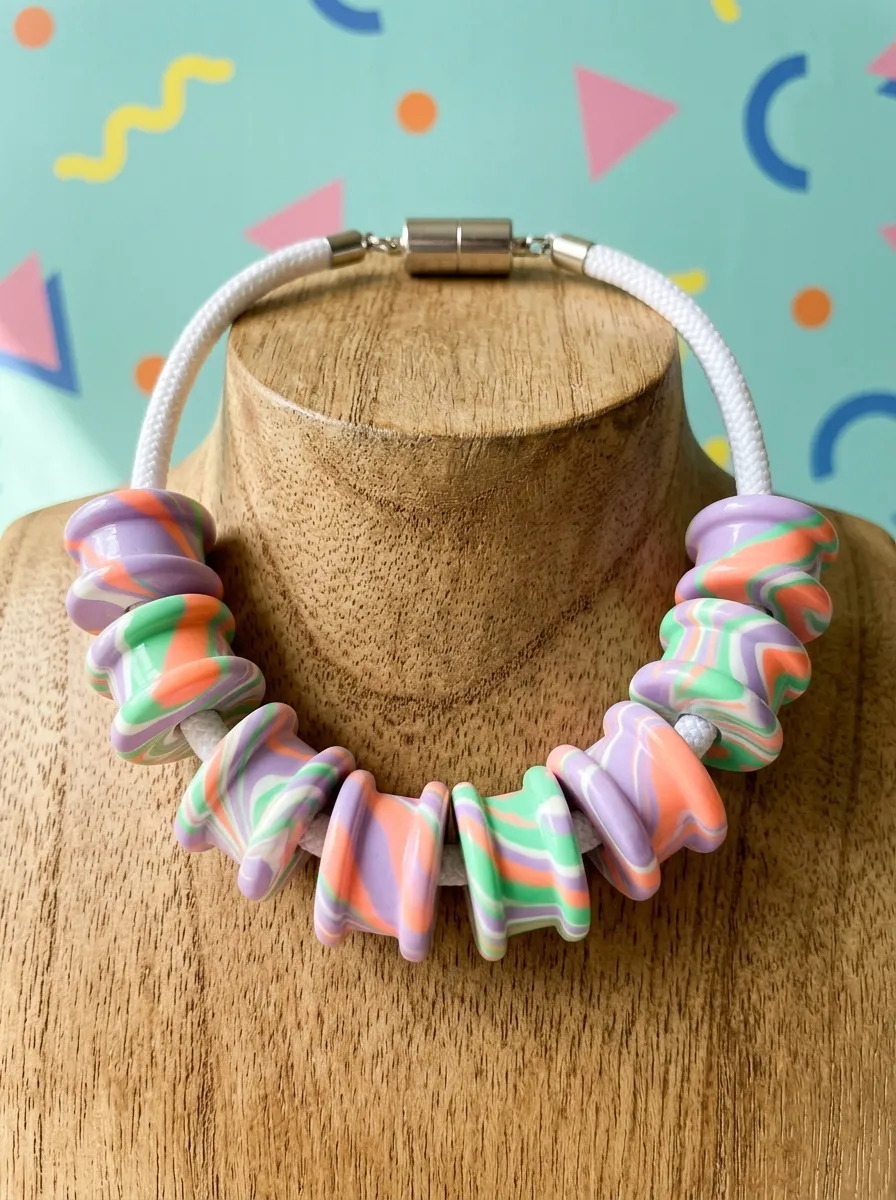
Drawing inspiration from the radical geometric forms and energetic color combinations of the eighties Memphis design movement, this project utilizes chunky bobbin-shaped beads adorned with bold, graphic marbling. The bobbin silhouette features a thick central cylinder flanked by raised outer rims, creating a playful, tactile shape that introduces dynamic relief to the neckline. The beads are decorated with contrasting swirls of pastel lilac, electric peach, bright mint, and crisp white clay, folded just enough to produce dramatic, flowing striations without muddying the individual shades. Strung closely together along a short choker length, these chunky bobbins sit neatly above the collarbone, delivering an energetic pop of color that enlivens monochrome streetwear and casual denim. The defined outer rims of each bobbin catch and reflect ambient light, highlighting the organic marbling running across the sculpted surfaces.
To make the marbled bobbins, condition separate equal portions of lilac, peach, mint, and white polymer clay. Roll each color into a rope measuring eight millimeters in diameter, align the four ropes side by side, and twist them tightly together into a single spiral rod. Fold the spiral rod in half, roll it smooth, and repeat the twisting and rolling motion three times until fine, distinct color ribbons emerge across the clay mass. Cut the marbled rod into twenty-millimeter segments, gently rolling each segment between two flat wooden dowels wrapped with tape to compress the center while leaving the outer ends raised, producing the classic bobbin contour. Pierce each bobbin straight through its central longitudinal axis with a steel baking pin. Cure the beads on a bead rack for forty minutes at the prescribed temperature. Once cool, wet-sand the outer surfaces with eight-hundred-grit sandpaper to reveal the vibrant marbling, then string the bobbins onto a sturdy braided nylon cord secured with a magnetic barrel clasp.
5. Monochrome Faceted Polygon Statement Beads

Execution Process
Faceted geometric forms celebrate crisp planar angles, sharp light reflections, and minimalist digital aesthetics within tactile jewelry art. This design consists of a dramatic progression of multifaceted polygon beads hand-carved in a clean monochrome palette of jet black, warm slate, and stark white clay. Each bead resembles a precision-cut gemstone or geometric boulder, featuring five to eight asymmetrical flat facets that catch ambient room light at varying angles. The sharp transitions between adjoining facets introduce architectural shadow lines that emphasize the volumetric density of the clay. Strung in an alternating tonal sequence, this necklace brings an industrial, modern edge to tailored formalwear, crisp white collared shirts, and minimalist knit dresses. The flat planar cuts keep the beads comfortable against the skin while projecting a confident, contemporary aesthetic.
Begin by conditioning dense black, gray, and white polymer clay, shaping the masses into firm, symmetrical blocks measuring roughly twenty-five millimeters on each side. Before carving the facets, use a two-millimeter steel pin to pierce a clean hole through the center of each clay cube, as piercing after carving could deform the flat surfaces. Chill the pierced clay cubes in a refrigerator for twenty minutes; cold clay provides superior resistance to distortion, allowing for razor-sharp tissue blade cuts. Using a rigid, clean carbon steel blade, slice away thin slivers of clay from the corners and edges of each cube at varied diagonal angles, turning the cubic shapes into faceted polygons with crisp, flat planar faces. Smooth any minor edge burrs with a light touch, keeping the facet boundaries sharply defined. Bake the faceted beads supported on their piercing pins for forty-five minutes. After baking, sand each facet individually against a flat ceramic tile lined with fine-grit wet sandpaper to achieve a flawless, smooth stone texture, then string the finished polygons onto a stainless steel cable.
6. Distressed Gold Leaf Ancient Terra-Cotta Beads

How to Create
Combining earthy, porous ceramic textures with luxurious metallic leafing evokes the timeless beauty of excavated ancient Mediterranean jewelry. This design features large, spherical clay beads sculpted from warm terracotta or rust-red clay, coated with genuine or imitation gold leaf foil that has been intentionally distressed to reveal the warm clay beneath. The organic cracking of the gold leaf produces an authentic weathered patina that looks both storied and opulent. The spherical beads measure between twenty and twenty-five millimeters in diameter, presenting a bold, weighty appearance that remains remarkably lightweight and comfortable around the neck. The contrast between the brilliant metallic gold reflections and the matte, unglazed terracotta ground complements bohemian styling, rich jewel-toned velvets, and earthy linen garments.
Start by rolling conditioned terracotta-colored polymer clay into uniform spheres using a commercial bead roller or the palms of your hands. Take a sheet of gold leaf foil, laying it flat onto your work surface, and roll each raw clay ball directly across the foil until the surface is completely covered in metallic leaf. Lightly compress the foil into the clay with your fingertips. Next, roll the coated ball gently between your palms to stretch the surface, causing the gold leaf to fracture and crack into an organic web of fine metallic veins that expose the terracotta base beneath. Carefully pierce each bead through its center with a fine steel pin, smoothing the exit holes to maintain a clean spherical profile. Bake the beads on a bead-baking rack for forty minutes. After cooling, apply a durable coat of water-based gloss or satin varnish over each bead to seal the delicate gold leaf against skin oils and environmental wear, then string the beads onto a rich brown leather cord with knotted loops.
7. Chunky Tubular Arc Collar with Wooden Bead Accents
Step-by-Step Guide
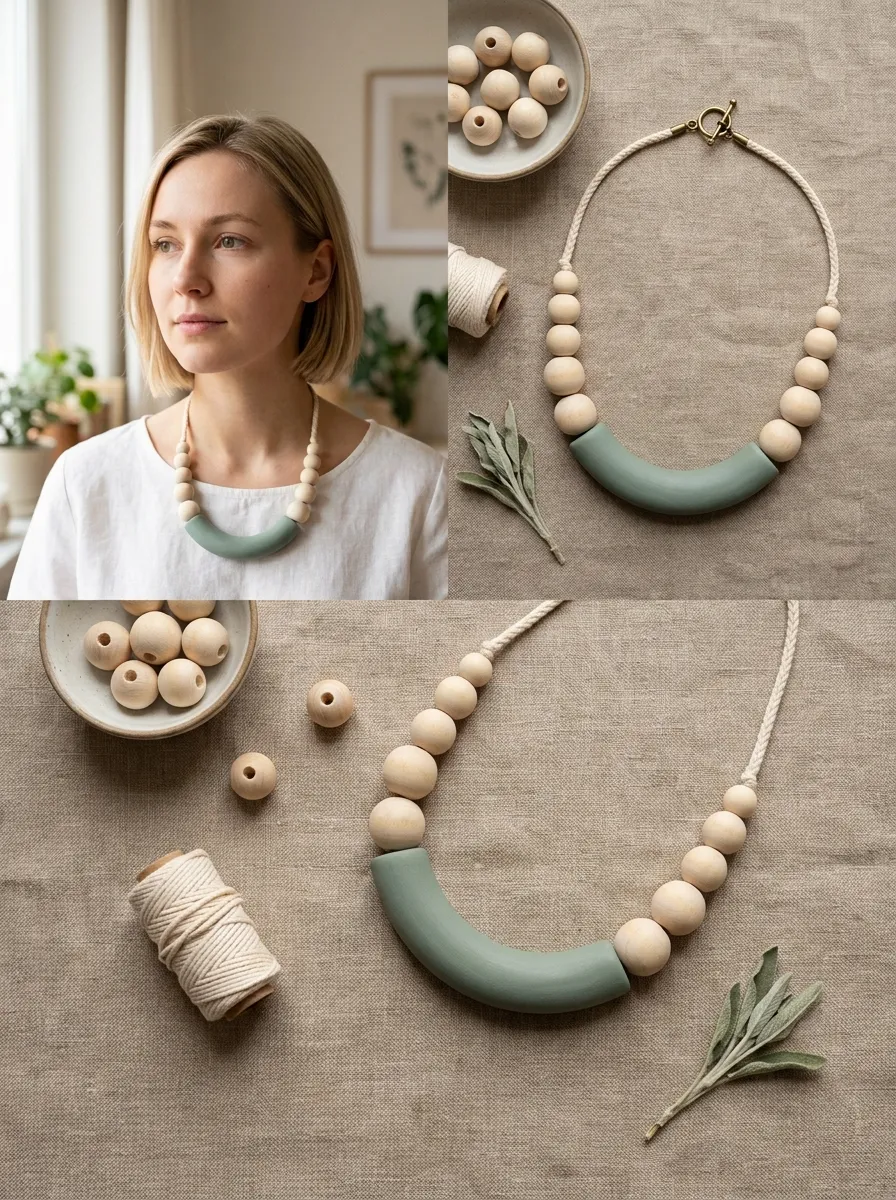
The tubular arc collar represents a seamless fusion of mid-century modern Scandinavian styling and contemporary jewelry engineering. This concept features a single, oversized curved tubular arc sculpted from smooth matte polymer clay that rests cleanly along the hollow of the throat, flanked by a series of graduated natural hardwood beads. Rendered in a soothing tone such as dusty sage, warm bone white, or muted mustard, the central clay tube serves as an architectural anchor that guides the eye along the collarbone. The natural wood grain of the flanking beads introduces organic warmth that softens the clean lines of the central clay arc. Because the central element is formed into a rigid, ergonomic curve that matches the body’s natural anatomy, the necklace stays properly centered without sliding or shifting during active daily wear.
To construct the central curved arc, condition three ounces of polymer clay and roll it into a smooth, uniform cylinder measuring fifteen millimeters in diameter and four inches in length. Carefully bend the cylinder into a gentle, continuous crescent arc that matches the curve of an open collarbone. To create a clean stringing channel, push a flexible piece of coated brass wire through the length of the curved cylinder from one end to the other, or mold the clay directly around a hollow curved metal tube that remains inside permanently. Smooth away all fingerprints and surface marks using a soft brush dipped in isopropyl alcohol. Bake the curved arc flat on a bed of baking soda or cornstarch to support its curved profile without flattening the underside. After baking and cooling, wet-sand the tube to a smooth finish. String the central arc onto a sturdy cotton cord, adding graduated raw birch or beechwood beads on either side, and secure the necklace with adjustable sliding knots.
8. Swirled Retro Agate Slice Slab Beads
Execution Process
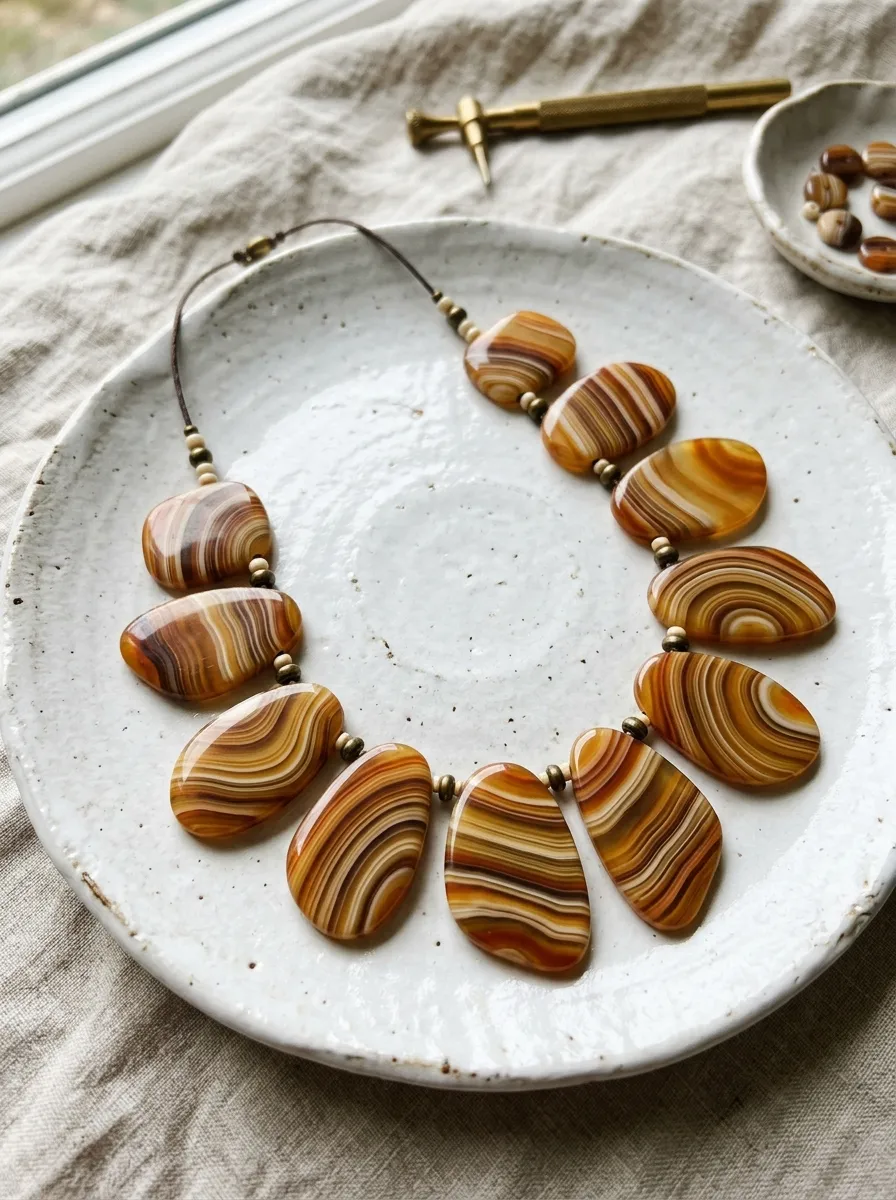
Translucent clay formulations combined with organic layering techniques replicate the mesmerizing depth, banded striping, and mineral glow of natural sliced agates. This necklace design features a collection of large, flat, irregularly shaped slab beads that display swirling concentric bands of translucent amber, rich ochre, soft cream, and dark brown. When held up to natural light, the translucent layers permit light to penetrate deep into the beads, creating an authentic gemstone luminescence without the brittle fragility of real quartz minerals. The flat slab format showcases broad expanses of the intricate agate patterns, turning each individual bead into a unique piece of wearable miniature art. Suspended as a graduated frontal cluster, these lightweight agate-style slabs lay comfortably against the chest, adding rich visual warmth to neutral knitwear, tailored coats, and autumn styling.
To create the agate pattern, condition equal portions of translucent, amber, dark brown, and white polymer clays, rolling each into paper-thin sheets using the thinnest setting of a clay conditioning machine. Stack the colored sheets together in an irregular, undulating stack of ten to twelve layers, pressing them firmly to eliminate trapped air pockets. Roll the layered stack into a tight, irregular cylinder, distorting the exterior by pinching ridges along the length to create organic, wavy internal banding. Chill the cane in the refrigerator for twenty minutes, then use a razor-sharp tissue blade to slice thin cross-sections measuring five millimeters in thickness. Gently stretch and manipulate the outer edges of each slice to create organic, asymmetrical slab contours. Pierce two small horizontal holes through the upper edge of each slab using a fine needle. Bake the slabs flat between parchment paper sheets under a ceramic tile for forty minutes to keep them perfectly flat, then wet-sand and polish the surfaces to a high-gloss stone sheen before stringing onto a fine jewelry wire.
9. Tactile Speckled Donut Rings on Chunky Cotton Braid

How to Create
Donut-shaped beads provide an engaging exploration of negative space, rounded contours, and tactile surface finishes. This design utilizes a series of chunky, torus-shaped donut rings crafted from warm oatmeal clay speckled with natural dark granite flecks. Each donut bead features a generous central hole, allowing the thick strands of a custom braided cotton rope to pass directly through the beads rather than relying on thin, hidden beading wires. The contrast between the smooth, rigid ceramic-like clay rings and the soft, textured fibers of the thick cotton braid introduces rich mixed-media appeal. The open center of each donut creates visual lightness, balancing the substantial exterior diameter of the beads. This versatile statement piece sits comfortably against the collarbone, pairing effortlessly with denim jackets, oversized linen tops, and relaxed modern streetwear.
Begin by blending unbleached white polymer clay with a pinch of dark brown or black clay flakes to create an authentic speckled stoneware effect. Roll the conditioned clay into a uniform sheet measuring eight millimeters in thickness. Use a two-inch circular cutter to stamp out five large discs, then use a three-quarter-inch circular cutter to punch out the center of each disc, creating smooth donut rings. Soften the inner and outer cut edges with your fingertips and a silicone shaping tool, rounding the rims until the beads resemble plump, seamless ceramic toruses. Place the donut rings onto a ceramic tile lined with parchment paper and bake them for forty minutes at the prescribed curing temperature. Once cooled, wet-sand the edges with fine-grit abrasive paper to achieve a smooth, matte stoneware finish. Complete the necklace by threading the five finished donut rings onto a thick, multi-strand braided cotton cord, tying decorative overhand knots between each ring to hold them securely in place.
10. Textured Stamped Mandala Medallion Necklace
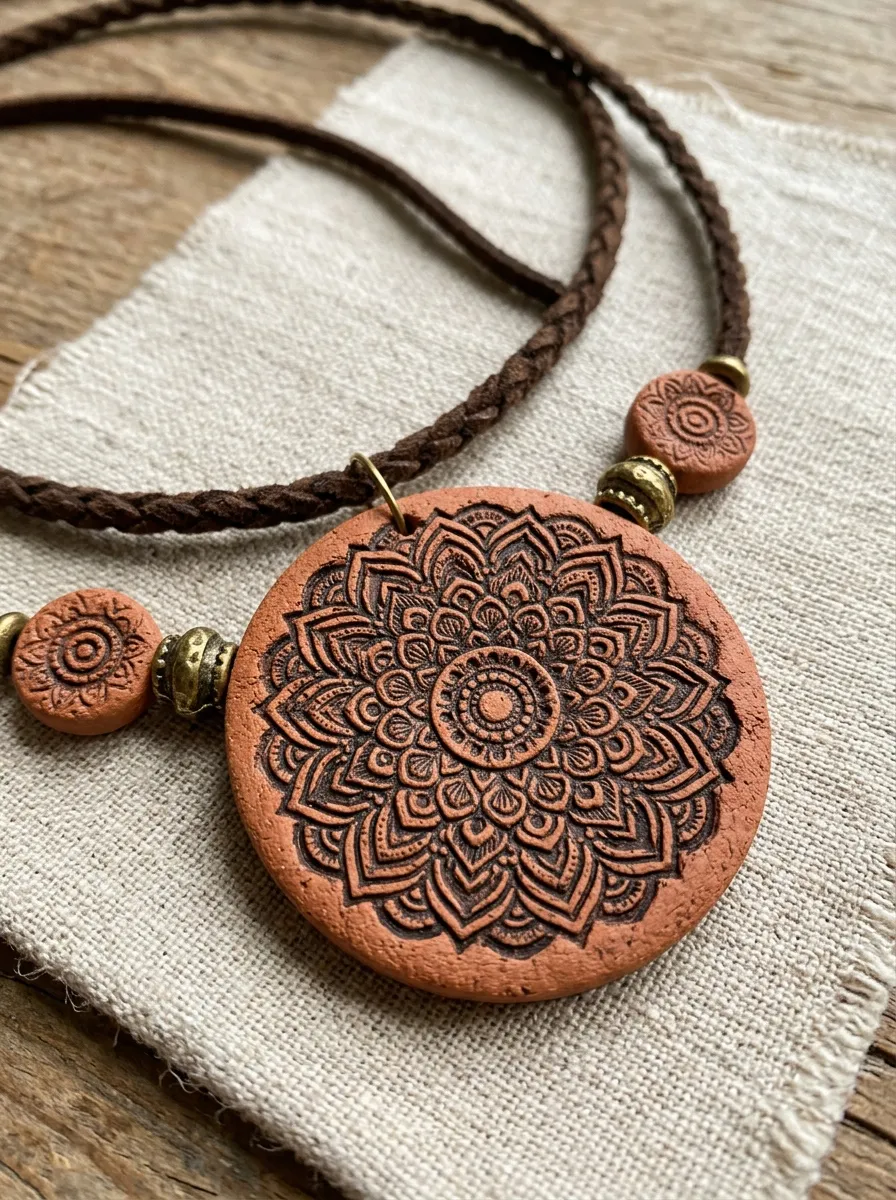
Step-by-Step Guide
Embossed medallion beads celebrate historic artisanal metalwork and intricate textile printing through detailed surface relief and rich antiquing techniques. This project features a large, circular pendant bead flanked by smaller matching saucer beads, crafted from deep terracotta or olive green polymer clay. The surface of each bead is impressed with intricate geometric mandala patterns using etched stamps, which are subsequently highlighted using metallic mica powders or dark acrylic antiquing washes. The antiquing wash settles into the recessed crevices while the raised surface planes remain clean, creating dramatic contrast and historical depth. The bold circular medallion serves as an eye-catching visual anchor along the neckline, drawing the eye inward and anchoring bohemian tunics, wrap dresses, and layered autumn outerwear. The durable, flat profile provides reliable structural stability, ensuring the piece maintains its beauty through years of wear.
To make the medallion necklace, roll conditioned polymer clay into a flat slab measuring five millimeters in thickness. Dust an etched rubber or silicone mandala stamp lightly with cornstarch to act as a release agent, pressing the stamp firmly and evenly into the clay slab using an acrylic roller to transfer the detailed pattern. Use a two-and-a-half-inch circular metal cutter to punch out the central medallion, cutting four smaller one-inch discs to serve as flanking beads. Smooth the perimeter edges, then pierce a horizontal stringing hole through the top edge of each piece using a stainless steel needle. Bake the stamped pieces on a flat ceramic tile for forty minutes, allowing them to cool completely. Brush black or dark burnt umber acrylic paint over the stamped surfaces, wiping the paint off the raised areas immediately with a damp paper towel so the dark pigment remains only in the recessed lines. Apply a clear matte varnish over the pieces, then string them onto a braided suede cord with coordinating metal spacer beads.
Common Beginner Mistakes and How to Avoid Them
The most critical technical error in polymer clay bead crafting involves under-baking the finished pieces out of fear of scorching delicate clay pigments. Under-cured polymer clay remains brittle and fragile, causing heavy chunky beads to crack or shatter when dropped or subjected to everyday wear. Prevent this by using an independent oven thermometer to verify temperature accuracy, curing high-density beads for the maximum duration recommended by the clay manufacturer. Another frequent mistake is piercing beads without adequate internal support, which crushes hand-rolled geometric shapes and leaves distorted, lopsided forms. Always chill your beads in the refrigerator for fifteen minutes before piercing, rotating the needle slowly back and forth rather than forcing it through in a single motion. Beginners also frequently overlook the importance of hole diameter relative to their stringing material; piercing pins that are too small create narrow channels that cannot accommodate thick leather cords or multi-strand jewelry wire. Choose piercing pins that match your intended stringing cord, and test-fit your materials before baking. Finally, avoid using quick-drying superglues or incompatible solvent-based varnishes over finished beads, as non-compatible chemicals can become sticky or yellow over time; use certified water-based polymer glazes or UV resin exclusively.
Practical Tips for Better Results
Achieving professional, boutique-quality finishes on chunky clay necklaces relies on disciplined surface finishing and careful curing practices. Always utilize a high-density ceramic floor tile or thick glass cutting mat as both your primary sculpting surface and your baking tray; this eliminates the need to peel delicate raw clay shapes off your desk, preventing unwanted fingerprint indentations and warped outlines. To eliminate tedious post-bake sanding, smooth away tool marks and finger impressions on raw clay beads using a soft artist paintbrush dipped lightly in ninety-one percent isopropyl alcohol before placing items in the oven. Invest in high-grade wet-or-dry sandpaper, and always sand your cured beads submerged in a shallow bowl of warm water containing a single drop of dish soap to suppress airborne dust and prevent the abrasive paper from clogging. Progress through four-hundred, six-hundred, eight-hundred, and one-thousand grits to achieve a satin-smooth finish. When curing spherical or irregularly shaped beads, suspend them on stainless steel wire racks over an aluminum pan or rest them on a bed of dry cornstarch to prevent flat, shiny contact marks from forming on the undersides.
Styling, Presentation, or Organization Ideas
Integrating chunky polymer clay bead necklaces into your personal wardrobe requires thoughtful styling balance, pairing bold, sculptural accessories with clean, understated foundational garments. Pair oversized terrazzo barrels or monochrome polygon beads with minimalist staples like crisp linen tunics, neutral knit turtlenecks, or structured denim jackets to let the artistic forms stand out. For an authentic artisan presentation, display your handcrafted necklaces hanging from natural wood wall pegs, modern brass hooks, or sleek jewelry stands inside your bedroom or dressing area. This open, visible storage method prevents long cords from tangling while turning your wearable art into vibrant home decor accents when not in use. When presenting these pieces as gifts or retail inventory, mount each necklace onto an unbleached kraft paper backing card stamped with your maker’s mark, tucking the piece inside a reusable cotton drawstring pouch. When photographing your creations for digital portfolios or inspiration boards, use soft morning daylight, natural linen fabrics, and neutral stone backdrops to highlight fine clay textures, crisp geometric facets, and rich metallic leaf details.
Budget or Time Planning
Executing a collection of chunky polymer clay bead necklaces requires minimal financial investment and structured time management to maximize creative efficiency. Save on startup expenses by purchasing large economy blocks of foundational colors—such as white, translucent, and black—hand-mixing custom pastel and earthy shades by blending small pinches of saturated primary pigments into neutral bases. Organize your production schedule using a modular assembly-line workflow: dedicate the first session to conditioning clay, blending custom color palettes, and rolling uniform rods or slabs; use a second uninterrupted block for shaping, texturing, and piercing beads; and reserve a final session for baking, wet-sanding, and necklace stringing. Simple single-form designs like the terrazzo barrels or organic river pebbles require approximately forty-five minutes of active shaping, making them ideal high-efficiency weekend projects. Store uncured custom clay mixtures in clean polypropylene containers or wax paper wraps, shielding the material from heat and airborne dust to prevent premature firming. By batch-curing multiple bead designs together on a single ceramic baking tile, you conserve household energy and produce an entire coordinated jewelry collection in a single afternoon.
Creative Expansion and Advanced Inspiration
Once you have mastered foundational bead rolling and assembly mechanics, explore advanced creative variations to expand your decorative portfolio across wider applications. Transform simple necklace concepts into complete matching jewelry suites by crafting coordinating drop earrings, statement rings, or minimalist stud sets using the exact same clay colors and surface textures. You can also translate chunky bead-making techniques into functional home decor accents, scaling up designs like the fluted disc or terrazzo barrel to fashion decorative wooden bead garlands, sculptural curtain tiebacks, or textured lamp pull cords. Experiment with incorporating mixed-media elements into your clay beads, such as embedding raw crystals, natural wood slices, or recycled glass fragments directly into the raw clay before baking. Consider designing custom wearable lifestyle items, such as bohemian lanyard necklaces for workplace keys, decorative sunglasses straps, or interchangeable purse charms. Document your unique clay formulas, successful baking times, and dimensional design sketches in a dedicated studio journal, establishing a valuable personal archive that streamlines future creative projects and ensures consistent, professional results across every handmade collection.