
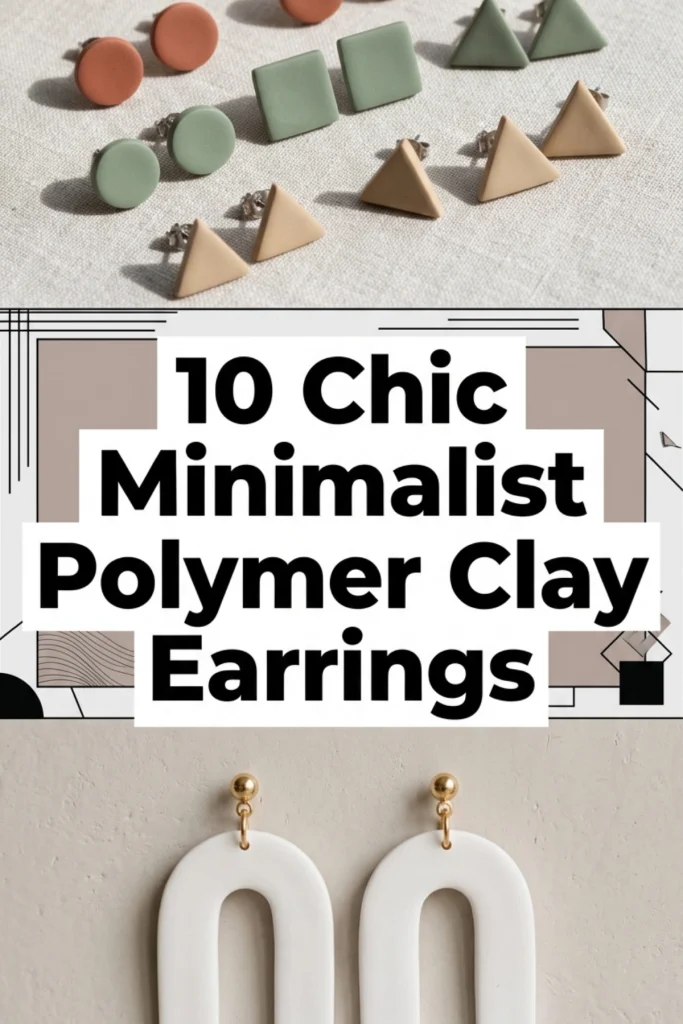
Handmade jewelry offers a distinct intersection of functional craft and contemporary personal style. Crafting minimalist polymer clay earrings has become a premier creative project across modern lifestyle communities, driven by the desire for refined accessories with an understated aesthetic. This comprehensive guide provides step by step instructions to master the design, sculpting, curing, and assembly of lightweight, professional-grade jewelry. Readers will learn the essential mechanics of polymer manipulation, including proper conditioning techniques, precise geometric cutting methods, smooth edge refinement, and durable hardware connection. In addition to technical execution, this tutorial highlights the foundational principles of minimalist style, focusing on intentional forms, clean negative space, balanced proportions, and neutral color palettes. Polymer clay is an ideal medium because it remains flexible yet sturdy after baking, allowing makers to achieve bespoke, high-end looks with straightforward kitchen and craft tools. Whether you are seeking budget ideas for personal wear, assembling thoughtful gifts, or launching an artisanal collection, mastering these core methods ensures consistent, gallery-quality results that celebrate modern design.
Why This Idea Is Trending or Useful
Modern Pinterest ideas increasingly favor minimalist polymer clay jewelry because it bridges accessible home crafting with high-end designer aesthetics. As capsule wardrobes and neutral fashion palettes gain prominence, consumers look for subtle, architectural accessories that complement daily attire without creating visual clutter. The medium itself provides remarkable practical value, as cured polymer clay produces featherlight statement pieces that do not pull or fatigue delicate earlobes during extended wear. From a DIY perspective, polymer clay represents an exceptionally beginner friendly craft requiring minimal workspace and no specialized kiln equipment; conventional household ovens deliver completely cured, durable results. The medium fosters endless creative ideas through custom color blending, allowing artists to replicate natural stone, raw ceramic, and brushed metal finishes at home. This project has broad appeal because makers can produce a sophisticated, retail-worthy set of earrings in just an afternoon using straightforward, repeatable actions. The combination of design relevance, low barrier to entry, and practical durability ensures that handcrafted clay earrings remain an enduring favorite among modern lifestyle trends.
Materials and Preparation
Careful planning and thorough material preparation are critical to achieving pristine, professional results with polymer clay jewelry. You will need premium oven-bake polymer clay in your chosen neutral or earth tones, such as terracotta, ecru, slate, or soft granite. Essential tools include an acrylic rolling rod or craft pasta machine, sharp stainless steel clay cutters in basic geometric profiles, an ultra-thin tissue blade, craft ceramic tiles or smooth glass work surfaces, and fine-grit wet-or-dry sandpaper ranging from 400 to 1000 grit. For assembly, gather hypoallergenic stainless steel or brass jump rings, flat-pad ear posts, butterfly backs, heavy-duty industrial jewelry adhesive, two pairs of smooth flat-nose jewelry pliers, and a hand drill or needle tool for puncturing jump ring holes. Begin preparation by completely sanitizing your non-porous workspace, wiping down all rolling surfaces and cutters with isopropyl alcohol to remove stray dust and fibers. Thoroughly wash and dry your hands, and prepare a dedicated sheet of parchment paper or an oven-safe ceramic tile on which your pieces can be shaped and directly baked without distortion.
Idea 1: Raw Terracotta Geometric Arches
How to Create
The raw terracotta geometric arch relies on architectural simplicity, drawing direct inspiration from classic Mediterranean and Southwestern motifs. The design features a smooth, inverted U-shaped arch that frames negative space, creating an elongated silhouette that flatters the jawline while remaining remarkably lightweight. Using an unglazed, matte terracotta shade introduces an earthy warmth reminiscent of traditional kiln-fired pottery. The beauty of this piece comes from its crisp perimeter and uniform thickness, which together evoke a clean, modern aesthetic. By avoiding surface embellishments, the design directs all attention to the balance of the curve, the symmetry of the parallel columns, and the rich depth of the clay’s natural hue. It fits seamlessly into a minimalist wardrobe, pairing effortlessly with crisp linen shirts, textured knitwear, and understated neutral clothing.
To build this piece, condition several ounces of terracotta clay by kneading it by hand or passing it through a roller until soft and pliable. Roll the slab across a smooth tile to an even thickness of three millimeters, using guide strips to maintain uniform depth. Align your arch-shaped metal cutter over the slab and press down vertically with firm, even pressure, avoiding sideways rocking to prevent edge distortion. Carefully lift away the surrounding excess clay, leaving the cut arch undisturbed on your work tile. Use a small hand drill or pointed needle tool to create a clean hole centered two millimeters from the top edge of each arch. Bake the pieces on the tile in an oven preheated to 275 degrees Fahrenheit for thirty-five minutes, allowing them to cool completely before sanding the outer rims with damp 600-grit sandpaper. Connect a hypoallergenic flat-pad stud to the top hole using a jump ring.
Idea 2: Organic Oval Drop Studs
Step-by-Step Guide
The organic oval drop design merges relaxed, fluid lines with balanced proportions, offering an approachable alternative to rigid geometric silhouettes. This style consists of a small circular ear post supporting a gently irregular oval pendant, yielding a two-piece composition that swings naturally with movement. The softly softened edges produce a handmade, stone-tumbled feel that avoids appearing machine-stamped. Executing this concept in soft oatmeal, warm sand, or flecked ecru clay mimics the appearance of weathered shoreline pebbles. The understated connection between the upper stud and the lower oval adds subtle visual rhythm without overwhelming the wearer. Its timeless silhouette makes it an exceptionally versatile accessory, suitable for casual daywear as well as formal, refined evening events.
Start by mixing a pinch of translucent clay with solid ecru and a minute trace of brown pigment to yield a flecked stone tone. Condition the mixture thoroughly, then roll it into a clean slab measuring two and a half millimeters thick. Use a small round cutter, roughly ten millimeters across, to create the two upper post bases, and an organic oval cutter to punch out the main dangling elements. Dip your index finger into isopropyl alcohol and lightly stroke the raw perimeter of each cut shape to round out any harsh corners prior to curing. Pierce a clean connecting hole near the bottom rim of each small circle, along with a matching hole centered at the top crest of each oval drop. Bake the pieces on parchment paper at 275 degrees Fahrenheit for thirty minutes. Once cooled, attach an ear post to the back of each circle with jewelry glue, then connect the components using an open jump ring.

Idea 3: Monochromatic Stacked Discs
Execution Process
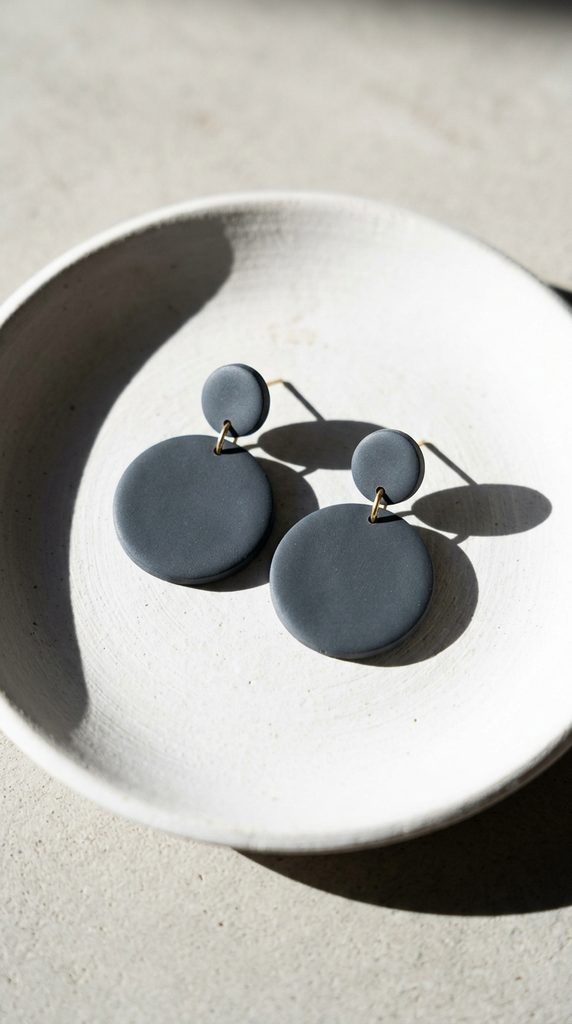
The monochromatic stacked disc earring showcases balanced proportions by layering varied circular elements into a clean, linear arrangement. This concept features a compact circular stud anchored directly to the earlobe, connected to a larger, flat clay disc that hangs freely below. Sticking to a single shade—such as stark chalk white, deep charcoal, or muted olive—places all emphasis on the relationship between the circles. The absence of contrasting colors or busy patterns highlights the pure geometry, aligning with contemporary gallery aesthetics. The subtle gap between the upper and lower discs creates a clean negative space line that enhances its architectural silhouette. Its simple, graphic footprint makes it an easy project that still delivers an elevated, fashion-forward look.
Begin by rolling out thoroughly conditioned clay to a uniform depth of three millimeters on a high-gloss ceramic tile. Using two circular metal cutters—one measuring twelve millimeters in diameter and the other twenty-five millimeters—cut two pairs of discs from the slab. Lift away the leftover scrap clay using an ultra-thin tissue blade, taking care to preserve the precise round shapes of the remaining cutouts. Using a precise metal ruler as your visual guide, punch a small hole through the bottom edge of each small disc and through the top edge of each large disc. Cure the components in an oven at 275 degrees Fahrenheit for thirty-five minutes to achieve optimal durability and flexibility. After the baked clay cools completely, smooth any minor surface imperfections with 800-grit wet sandpaper. Secure an ear post to the back of each upper disc using an industrial two-part epoxy, and connect the lower disc using a flat brass jump ring.

Idea 4: Linear Bar and Ring Dangles
How to Make
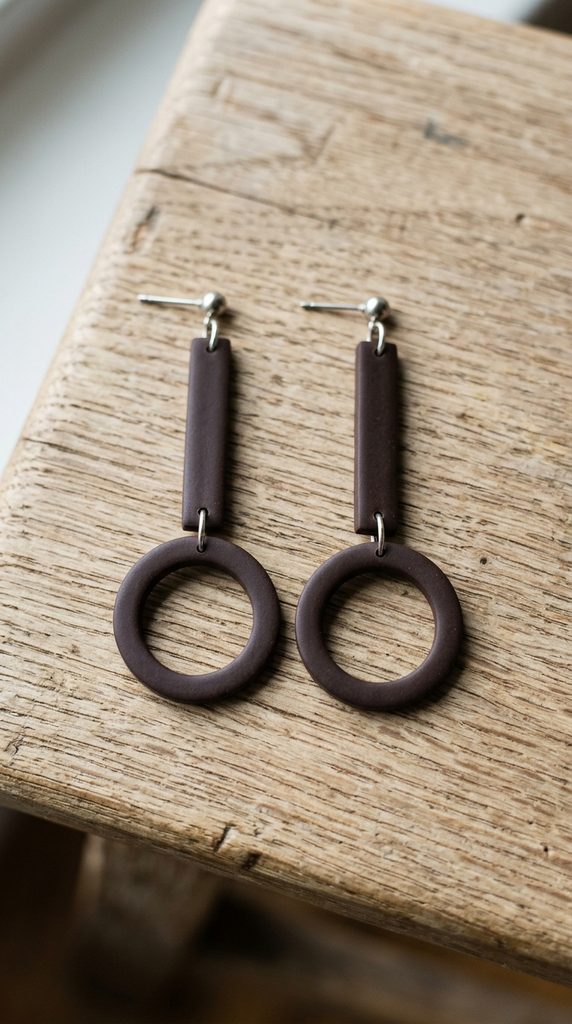
Linear bar and ring dangles blend straight, structural lines with open circular profiles to create a kinetic, visually dynamic accessory. This design utilizes a slender vertical rectangular bar that holds an open circular hoop suspended beneath it, providing eye-catching movement with minimal physical mass. The contrast between the rigid vertical spine and the curving hoop below yields a refined visual balance that flatters the neck and jawline. Rendered in matte black, deep espresso, or neutral taupe, this earring captures the essence of contemporary industrial design. Its open interior keeps the piece light and comfortable, while the extended drop creates a striking profile suitable for high-neck shirts and minimalist dresses.
Prepare a slab of deep charcoal clay rolled precisely to a two-and-a-half-millimeter thickness. Using a sharp tissue blade and a metal straightedge, slice two slender rectangular bars measuring six millimeters wide and twenty-five millimeters long. Next, take two concentric circular cutters—such as a thirty-millimeter and an eighteen-millimeter ring—to punch out two open, hollow hoop elements from the same slab. Carefully pierce a tiny suspension hole through the lower base of each bar and through the top crest of each hollow clay ring. Bake the components flat on a ceramic baking sheet at 275 degrees Fahrenheit for thirty-five minutes, ensuring the thin rectangular bars remain perfectly straight while heated. Once the parts are fully cured and cooled, sand the outer contours under running water with 1000-grit paper to achieve an ultra-smooth, satiny finish. Fasten an ear post to the upper back of each bar, and join the pieces with a jump ring using your flat-nose pliers.

Idea 5: Sculpted Half-Moon Hoops
Step-by-Step Guide
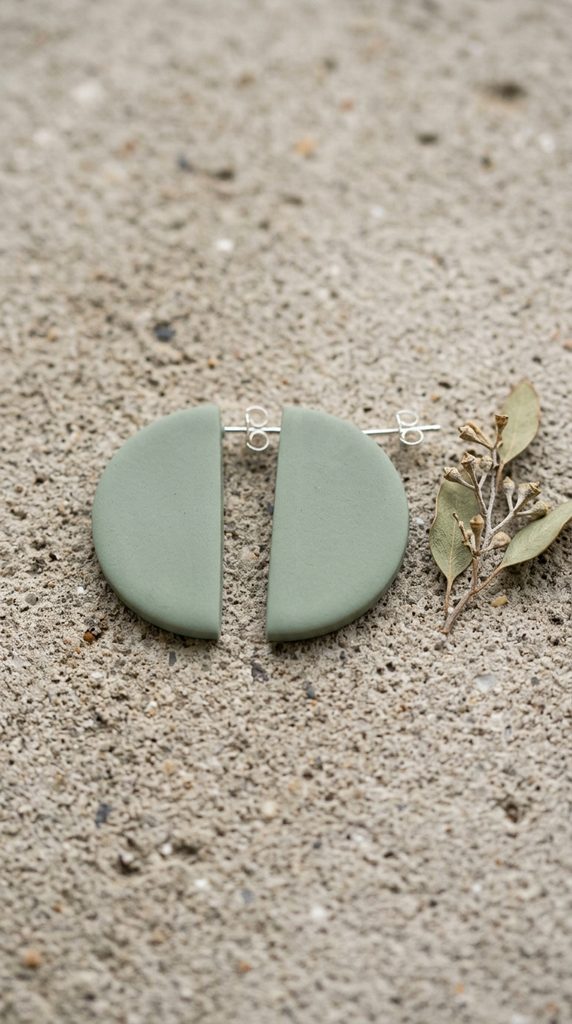
The sculpted half-moon hoop presents a modern take on standard circular ear loops by pairing flat crescent profiles with an integrated stud structure. The design features a semi-circular disc with a straight top edge and a sweeping curved bottom, sitting flush against the earlobe like a bold, sculpted shield. This continuous profile avoids dangling jump rings, creating a solid, architectural appearance that highlights the clay’s flat, uniform texture. Using muted, understated tones like sage green, soft lavender, or warm gray keeps the semi-circular shape calm and balanced. Its minimalist design relies purely on strong geometry and clean edges, turning a simple cutout into an eye-catching, self-contained statement earring.
Condition a block of sage green clay until it is supple and free of internal air pockets, then roll it across your working surface to a three-millimeter thickness. Using a medium circular cutter measuring thirty millimeters across, cut two complete circular discs from the slab. Align your tissue blade across the exact horizontal diameter of each disc and slice cleanly through the middle to yield four identical half-moon shapes, reserving two for your earrings. Inspect the straight cut edges and smooth away any rough burs using a small clay-shaping tool or a finger dipped in alcohol. Bake these pieces directly on a smooth baking tile at 275 degrees Fahrenheit for thirty minutes to prevent warping. After the pieces cool completely, lightly sand the perimeters to a velvety finish. Apply industrial adhesive to attach a flat stainless steel post to the upper center of the reverse side, and clamp it gently until the bond cures completely.

Idea 6: Asymmetrical Geo Shapes
How to Create
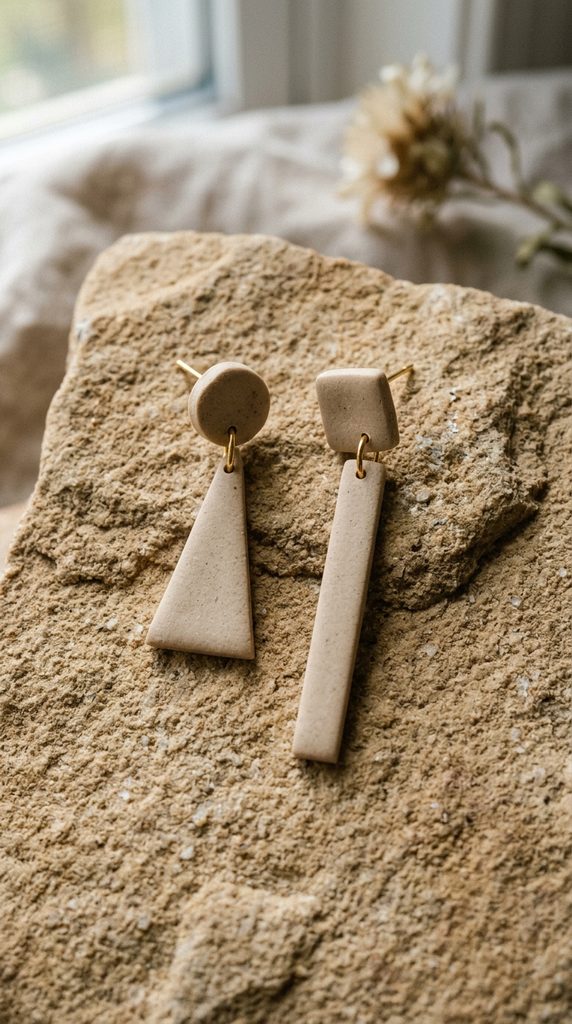
Asymmetrical geometric earrings celebrate modern abstract art by pairing different yet balanced shapes across the left and right ears. Rather than crafting identical twins, this concept uses a cohesive color story to harmonize contrasting components, such as a triangle-and-circle set on one side and a square-and-rectangle set on the other. Keeping the clay’s color, surface texture, and thickness identical unites the contrasting silhouettes into an intentional, visually engaging pair. A neutral palette, such as warm beige, soft stone, or pale biscuit, grounds the eclectic shapes in minimalist restraint. This style appeals to creative dressers looking for subtle self-expression that remains refined, balanced, and adaptable to everyday wear.
Select your preferred neutral clay tone and roll out a uniform slab to an exact depth of three millimeters. Choose four distinct geometric cutters of similar scale, such as a tiny square, a small drop circle, a narrow trapezoid, and an elongated triangle. Cut one of each shape from the prepared clay sheet, setting aside the scrap material for future projects. Lay the shapes side by side on your tile to check that the overall lengths and surface areas of the left and right combinations balance comfortably. Pierce connecting holes through the intended meeting points using a needle tool, maintaining a two-millimeter clearance from every perimeter edge. Bake the pieces at 275 degrees Fahrenheit for thirty-five minutes, then let them cool gradually inside the oven to maintain structural strength. Sand the pieces smooth, attach ear posts to the top anchors, and link each pair with jump rings to finish the layout.

Idea 7: Raw Ceramic Textured Hoops
Setup Method
The raw ceramic textured hoop replicates the rough, tactile surface of unglazed porcelain or volcanic stoneware through simple, hands-on surface manipulation. This design forms an open circular hoop featuring an intentionally mottled, porous surface texture that absorbs light and shows off matte depth. Using warm cream, off-white, or sand clay with natural flecks gives the accessory an authentic artisanal, handmade finish. The absence of glossy glazes or shiny coatings keeps the piece understated, letting the organic, stone-like texture shine through. This concept pairs well with natural fiber clothing, raw denim, and relaxed, breathable, nature-inspired styles.
Condition white or cream clay thoroughly and blend in a tiny pinch of baked, ground brown clay shavings or clean craft sand to introduce fine speckled flecks. Roll the conditioned clay into a uniform snake or rope measuring four millimeters in diameter. Cut two matching sections of rope, each seventy millimeters in length, and gently wrap them around an oven-safe wooden cylinder to set their circular shape. Press a clean natural sea sponge or a stiff-bristle brush lightly across the raw clay surface to imprint a fine, stone-like texture along the entire outer rim. Carefully trim the ends of each curve at a crisp ninety-degree angle, leaving a ten-millimeter gap at the top to create a clean open-hoop silhouette. Bake the curved pieces on the form at 275 degrees Fahrenheit for thirty-five minutes. Once cooled, attach a stud post directly behind one flat end using industrial adhesive, transforming the textured loop into an architectural post hoop.

Idea 8: Elongated Trapezoid Drops
How to Make
The elongated trapezoid drop earring relies on sharp diagonal lines and tapering proportions to create a slimming, architectural profile. This design features a slender trapezoid with a narrow top edge that widens gradually toward its base, producing a clean tapered silhouette that hangs straight down. The sharp, straight boundaries create a bold profile while preserving a restrained, uncluttered footprint. Styling this design in deep slate gray, navy blue, or charcoal provides a crisp contrast against light-toned tops and simple necklines. The simple silhouette ensures that the earrings never look overdone, embodying the understated elegance that defines practical minimalist fashion.
Roll a smooth slab of slate gray polymer clay down to a uniform two-and-a-half-millimeter thickness on your glass work surface. Using a clear acrylic ruler and a thin tissue blade, measure and cut two long rectangular strips measuring forty millimeters in length. Position your ruler diagonally along the long sides of each strip, slicing off a thin wedge to narrow the top width down to six millimeters while leaving the bottom base at twelve millimeters wide. Pierce a neat suspension hole centered two millimeters below the narrow top edge of each trapezoid. Carefully slide your blade beneath the cut shapes to release them from the glass, then place them directly onto an oven-safe baking sheet lined with clean cardstock. Bake at 275 degrees Fahrenheit for thirty minutes to ensure complete curing. After cooling, sand the straight edges with 600-grit wet sandpaper, wash away the residue, and attach an ear hook through each top hole.
Idea 9: Floating Concentric Hollow Ovals
Step-by-Step Guide
The floating concentric hollow oval earring explores interior negative space, producing a bold silhouette with minimal physical material. The design features a large, hollow open oval framing a smaller, suspended oval shape positioned directly inside its open interior, creating an engaging frame-within-a-frame look. Using an earthy, muted palette like dusty terracotta, warm ochre, or olive green gives the thin perimeter ribbons an organic, natural feel. Because the interiors are hollowed out, these earrings weigh very little and flutter gently with body movement. The clean, open layout introduces breathing room to the jewelry, keeping the overall composition light, airy, and visually interesting.
Condition your chosen clay and roll it out to a precise three-millimeter thickness. Use two nesting oval cutters—a large exterior cutter and a smaller interior cutter—to punch out the outer clay ribbon. Carefully punch out a second, smaller hollow oval to suspend inside the main frame, keeping the width of both clay borders at an even four millimeters. Punch a small hole through the top and bottom interior edges of the outer oval, and a corresponding hole through the top edge of the inner oval. Bake all parts flat on a clean ceramic tile at 275 degrees Fahrenheit for thirty-five minutes to achieve a strong, resilient cure. Once the pieces have fully cooled, wet-sand the inner and outer perimeters to smooth out any handling marks. Thread a single jump ring through the top hole of the inner oval and loop it through the upper interior hole of the outer oval, locking them into a floating concentric arrangement.
Idea 10: Mixed-Media Clay and Metal Discs
Execution Process
The mixed-media clay and metal disc earring pairs the warm, matte texture of handmade clay with the sleek, reflective sheen of raw brass or silver accents. This design features a flat, hand-rolled clay circle hanging beneath or behind a matching polished metal disc, yielding an eye-catching contrast in surface textures. The juxtaposition of smooth industrial metal against natural, earthy clay embodies modern mid-century and Bauhaus design ideals. Executing the clay component in a deep neutral, such as forest green, soft sand, or matte bone, prevents the piece from competing with the metallic shine. The understated contrast adds an upscale, retail-quality presence suitable for business attire, formal occasions, or elevated daily wear.
Roll a sheet of conditioned forest green clay out to an even two-millimeter depth. Using a twenty-millimeter circular metal punch, cut two clean round discs from the slab, keeping the edges crisp and distortion-free. Punch a clean connecting hole two millimeters inward from the edge of each clay disc. Bake the clay parts on a tile at 275 degrees Fahrenheit for thirty minutes, letting them rest until completely cool before handling. Smooth the rim of each clay disc with 800-grit wet sandpaper to ensure a clean, rounded contour. Clean a pair of matching twenty-millimeter pre-drilled raw brass disc charms with a jewelry polishing cloth to remove surface oils. Align each cured clay disc flush against its brass counterpart, threading a single open jump ring through both holes to unite the elements. Attach an ear post to the upper section of the metal ring, creating a layered, professional finish.
Common Beginner Mistakes and How to Avoid Them
Crafting polymer clay jewelry involves several technical hurdles that can lead to brittle, flawed, or rough finished accessories. One of the most common mistakes is underbaking the clay, which occurs when makers pull pieces out early because they fear burning the material. Underbaked clay cannot fully cross-link its internal vinyl chains, leaving earrings fragile and prone to snapping under slight pressure. Always use an independent oven thermometer to verify your oven’s internal temperature, and cure pieces for thirty to forty minutes at the exact temperature specified by your clay brand. Another frequent issue is embedding airborne dust, surface lint, and fingerprints directly onto the raw clay while shaping it. You can prevent this by wiping down your hands, cutting tools, and work surface with rubbing alcohol, and gently smoothing cut pieces with an alcohol-soaked cotton swab before baking. Finally, pressing through raw clay with dull or tilted cutters leaves pinched, uneven perimeters that demand long, tedious sanding sessions later. Prevent edge distortion by holding sharp cutters strictly perpendicular to your slab and cutting down directly onto a smooth, firm ceramic tile.
Practical Tips for Better Results
Achieving a clean, gallery-ready finish on your handmade earrings relies on consistent conditioning, sharp tools, and careful post-bake surface care. Use high-quality acrylic depth guides or a pasta machine when flattening your clay to ensure your slabs maintain a uniform thickness from edge to edge. Uneven clay pieces cool with internal stress points, leaving finished earrings prone to warping over time. When creating holes for jump rings, twist your needle tool or drill bit slowly rather than punching through with force, which avoids warping the surrounding geometry. If you discover minor surface flaws after baking, wet-sand your pieces under cold running water using graduated silicon-carbide paper, progressing smoothly from 400 grit up through 1000 grit. The water carries away loose particles, prevents surface scratches, and keeps fine clay dust from floating into the surrounding air. To achieve an exceptionally strong post bond, roughen the back of your cured clay and the face of your metal stud with coarse 220-grit paper before applying a high-grade, two-part epoxy adhesive.
Styling, Presentation, or Organization Ideas
A well-curated presentation enhances the visual appeal of minimalist jewelry, whether you are staging photos for social media or organizing your private collection. Photograph your earrings against complementary natural surfaces, such as raw travertine stone slabs, light linen canvas, weathered cedar blocks, or smooth unglazed ceramics. These neutral, tactile backdrops echo the organic quality of the clay without distracting from its clean geometry. Use bright, indirect natural sunlight angled from the side to cast soft shadows that highlight the three-dimensional profiles and smooth textures of your designs. For private storage and organization, mount an open linen-covered pinboard on your dressing wall, or use an acrylic organizer lined with natural felt to keep individual pairs separate and safe from scratches. When packaging your earrings for gifts or boutique retail, mount them onto thick, unbleached kraft paper cards printed with understated, simple typography. These thoughtful touches elevate the overall aesthetic, reinforcing the care, craftsmanship, and quiet luxury behind your handmade collection.
Budget or Time Planning
Careful planning helps you keep material costs low while maximizing the quality and output of your creative work sessions. A standard block of polymer clay costs just a few dollars yet yields six to eight complete pairs of minimalist earrings, making this an exceptionally affordable craft. Save money by purchasing basic starter supplies—such as a versatile neutral color palette, a handful of stainless steel jump rings, and a pack of basic circular cutters—before investing in elaborate tools or rare specialty cutters. Organize your studio time into focused, efficient blocks to make the most of your creative energy. Spend an initial sixty-minute session conditioning your clay, blending custom neutral colors, and rolling out uniform slabs. Use a second dedicated block to stamp out your shapes, pierce clean connection holes, and bake all pieces on a shared tray to conserve energy. Dedicate a final sixty-minute session to wet-sanding edges, assembling hardware with pliers, and gluing earring posts. This structured batch approach keeps your workspace organized and ensures consistent, professional quality across your entire collection.
Creative Expansion and Advanced Inspiration
Once you master basic shapes and assembly methods, you can begin exploring advanced clay techniques that add depth to your minimalist designs. Experiment with subtle surface marbling by loosely twisting together contrasting clay ropes—such as ecru, translucent, and warm slate—and rolling them flat to create fine stone veining that mimics polished granite or carrara marble. Alternatively, introduce hollow sculptural profiles by curing your clay ribbons over curved, heat-resistant glassware or metal tubes, yielding bold three-dimensional loops that hold their form. You can also explore surface patinas by rubbing small amounts of powdered chalk pastels or mica powders along the edges of raw clay cutouts before baking, introducing a gentle gradient that draws the eye. Another striking approach involves pairing cured clay components with different jewelry materials, such as woven linen threads, bent silver wire, or hand-carved wooden beads. These creative expansions give you fresh artistic avenues to explore, helping you evolve your jewelry making while staying rooted in timeless minimalist style.