Establishing an orderly, functional workspace is a vital pursuit for makers, crafters, and artists who want to maximize their creative efficiency and home productivity. A disorganized craft room leads to misplaced supplies, damaged raw materials, and lost creative momentum, while a structured storage layout protects delicate tools and keeps essential items accessible. This comprehensive guide details ten distinct craft room organization systems designed to transform chaotic supply collections into streamlined, functional zones. Readers will discover how to implement vertical wall-mounted pegboards, mobile storage carts, color-coordinated ribbon and yarn racks, customized drawer partition systems, and expansive modular cutting tables. The concepts address diverse creative needs, from small-space closet transformations to expansive multi-station studios, integrating minimalist style lines with durable storage fixtures. Learning the core principles of supply categorization, weight distribution, and label hierarchy enables crafters to turn standard furniture into efficient project hubs. Implementing these structured systems ensures your workspace remains tidy, protects handmade inventory, and enhances your daily crafting routine across every creative project.
Why This Idea Is Trending or Useful
Craft room organization systems consistently rank among the most sought-after trending ideas across modern Pinterest inspiration feeds because they offer high practical value and visual harmony for hobbyists and creative entrepreneurs. Unorganized crafting spaces often suffer from cluttered surfaces and hidden inventories that cause duplicate supply purchases, whereas visible vertical storage keeps every tool within arm’s reach. The modern design relevance focuses on blending purposeful organization with home decor aesthetics, transforming colorful threads, paper stocks, and art supplies into curated displays. From a DIY appeal standpoint, organizing a craft room serves as an easy project that can be completed in stages using basic materials and accessible hardware. Beginners can readily convert basic shelving and repurposed containers into functional storage units without extensive carpentry skills. Establishing systematic storage zones reduces cleanup time and provides functional clarity for daily crafting. By combining practical functionality with inspiring visual structure, structured craft room planning provides a dependable foundation for creative projects.
Materials and Preparation
Building a well-structured, functional craft room requires gathering durable organizational fixtures, specialized sorting containers, precision installation hardware, and surface-clearing supplies before beginning the setup. Core hardware components include heavy-duty wall-mounted pegboard panels, adjustable melamine shelving tracks, multi-tier rolling metal utility carts, acrylic drawer dividers, and clear airtight plastic storage bins. Essential sorting materials encompass printable thermal labels, silicone cord organizers, magnetic tool holding strips, clear stacking shoeboxes, and color-coded file folders for cardstock. Preparation begins with a complete space declutter: clearing all work surfaces, testing dried glues and markers, and sorting raw supplies into distinct functional categories like sewing, paper crafts, painting, and vinyl fabrication. Planning considerations require measuring wall dimensions, checking electrical outlet access for heat guns and cutting machines, and verifying that storage furniture allows comfortable walking clearances around primary workstations. Completing these physical preparations and mapping storage zones beforehand ensures a smooth setup workflow, resulting in an efficient, long-lasting craft studio layout.
Vertical Modular Pegboard Wall System
Step-by-Step Guide
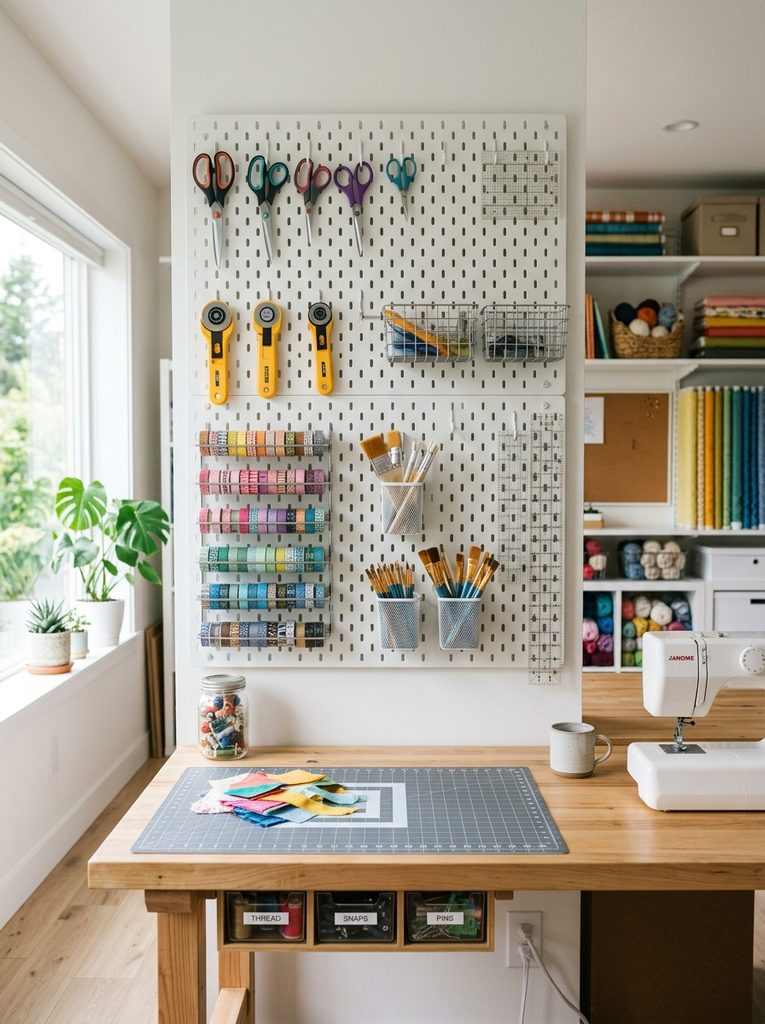
The vertical modular pegboard wall system utilizes open wall real estate above workbenches to keep frequently used hand tools off desktop surfaces while keeping them visible and accessible. By installing high-density metal or painted wooden pegboard panels directly onto wall studs, makers can create a customizable grid system that adapts to changing creative tools. Specialized peg attachments—such as straight hooks, plier holders, hanging cups, and narrow wire baskets—securely hold scissors, rotary cutters, paintbrushes, and rolls of tape. This vertical storage approach frees up flat desk space for active assembly, preventing clutter from accumulating on primary project surfaces while turning functional crafting tools into a visual centerpiece.
       +---------------------------------------------+
       |   Upper Hooks: Rulers, T-Squares & Mats     |
       +---------------------------------------------+
                              |
       +---------------------------------------------+
       |   Mid Grid: Wire Baskets & Hanging Tool Cups|
       +---------------------------------------------+
                              |
       +---------------------------------------------+
       |   Lower Bar: Tape Spools & Scissor Brackets |
       +---------------------------------------------+
To install this modular pegboard system, begin by locating wall studs using an electronic stud finder, marking the vertical anchor points with a level and pencil. Mount horizontal wood spacer furring strips directly into the wall studs using heavy-duty wood screws to establish a three-quarter-inch standoff gap behind the board for hook clearance. Fasten the pegboard panel firmly to the furring strips with washer-head screws, verifying that the perimeter is square and stable. Group your tools by crafting category, placing heavier items like shears, staplers, and tape dispensers on heavy-duty double-prong hooks near the lower center. Position lighter accessories, such as paintbrushes, markers, and small craft tweezers, inside hanging wire baskets or clear acrylic cups hung along the upper grid.
Mobile Multi-Tier Rolling Utility Cart
Execution Process
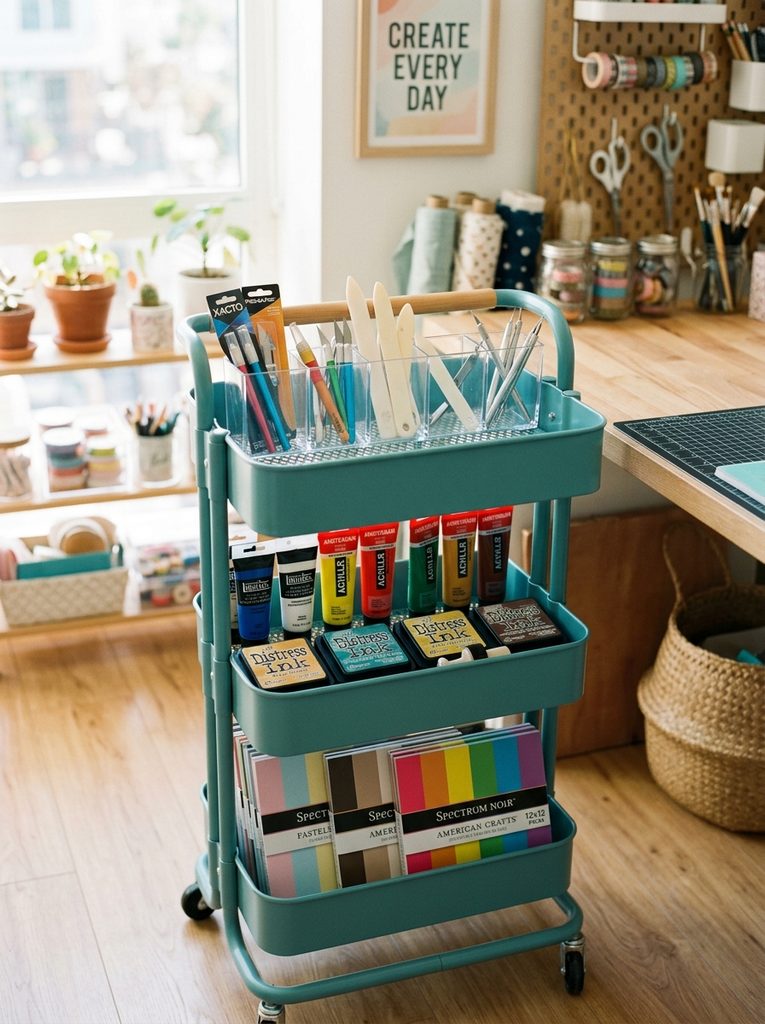
The mobile multi-tier rolling utility cart provides a compact, flexible storage solution that travels easily between different workstations, cutting tables, and closet storage zones. Constructed with durable powder-coated steel and smooth-rolling locking casters, a three-tier utility cart organizes project-specific supplies into an easily accessible vertical unit. Crafters can dedicate individual tiers to active project phases, such as placing vinyl cutting tools on top, transfer tapes in the middle, and raw vinyl rolls at the bottom. This rolling station keeps essential supplies within reach during complex assemblies, moving aside quickly when floor space is needed for larger builds.
To assemble and organize a multi-tier utility cart, begin by attaching the rolling casters firmly to the base frame, ensuring the locking wheel mechanisms face the outer front for easy foot access. Place modular plastic or metal bin dividers inside the top tier to create dedicated compartments for quick-grab items like craft knives, glues, rulers, and bone folders. Fill the middle tier with medium-sized supplies, such as acrylic paint tubes, stamp pads, or adhesive tape runners, arranging them in upright clear cups for quick color identification. Use the deeper bottom basket to hold heavier, bulky materials like cardstock packs, heat press mats, or yarn skeins. Finish by snapping magnetic hooks onto the metal side frames to hang measuring tapes and small scissors.
                 +---------------------------------+
                 |  Top Tier: Divided Tool Trays   |
                 +---------------------------------+
                                  |
            +-------------------------------------------+
            |  Middle Tier: Paint Tubes & Ink Pads      |
            +-------------------------------------------+
                                  |
            +-------------------------------------------+
            |  Bottom Tier: Bulk Cardstock & Heavy Mats |
            +-------------------------------------------+
Clear Acrylic Divided Drawer Layout
How to Create
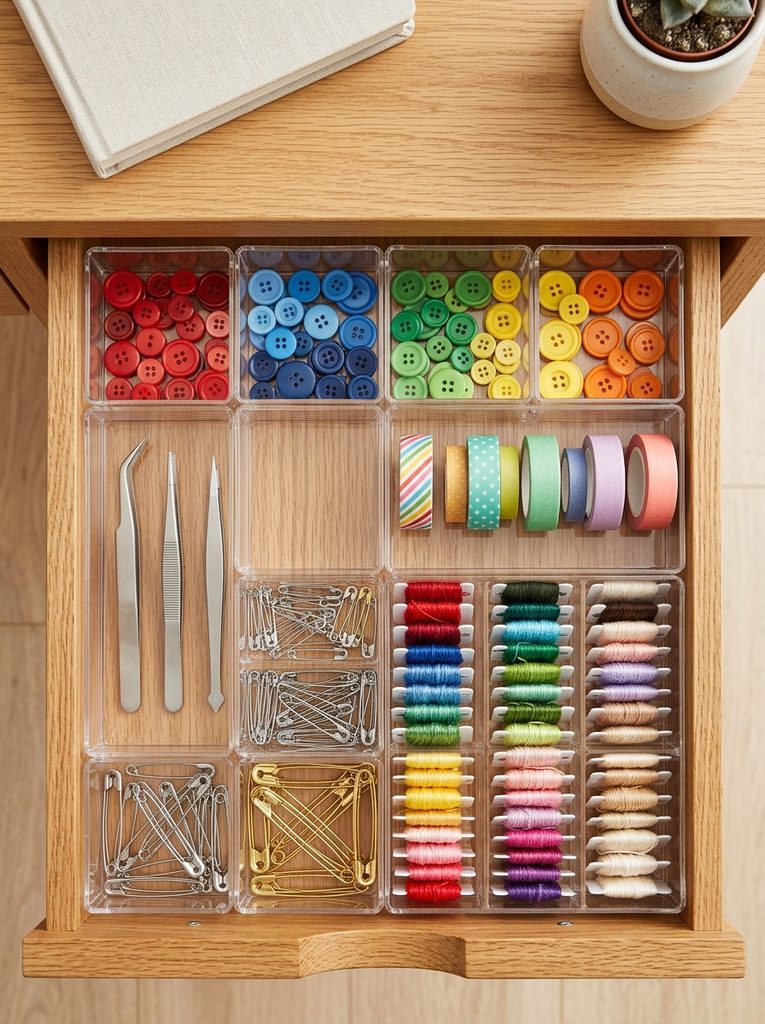
The clear acrylic divided drawer layout transforms deep, cluttered workstation drawers into organized grids where small embellishments and fasteners stay separated and accessible. By utilizing interlocking clear acrylic divider trays, makers eliminate messy jumbles of loose supplies and prevent small items from shifting during drawer movement. Clear acrylic containers provide full visibility of contents from above, making it simple to locate specific buttons, brads, eyelets, safety pins, and embroidery bobbins at a glance. This internal organization system protects delicate tools from scraping against metal findings, preserving tool edges and keeping crafting stations tidy.
| Drawer Zone | Storage Hardware Choice | Stored Inventory Items |
|---|---|---|
| Front Row | Shallow 3×3-Inch Acrylic Squares | Buttons, beads, safety pins, and loose clasps |
| Middle Section | Narrow 3×9-Inch Rectangular Trays | Fine-tip pens, precision tweezers, and bone folders |
| Back Row | Deep 6×9-Inch Acrylic Bins | Adhesive tape refills, glue guns, and staple boxes |
To set up this divided drawer system, remove the drawer from the cabinet carcass and wipe down the interior base with a damp microfiber cloth to remove dust. Lay a non-slip silicone drawer liner across the floor of the drawer, trimming the edges with a rotary cutter for an edge-to-edge fit that prevents plastic trays from sliding. Arrange modular acrylic bins starting from the front right corner, placing small square trays near the front for micro-embellishments and longer rectangular bins toward the back for pens and rulers. Sort your crafting supplies into dedicated bins by item type and color, securing the bottom corners of each acrylic tray with small dots of museum gel to lock the layout in place.
Color-Coordinated Open Ribbon and Washi Rack
Setup Method
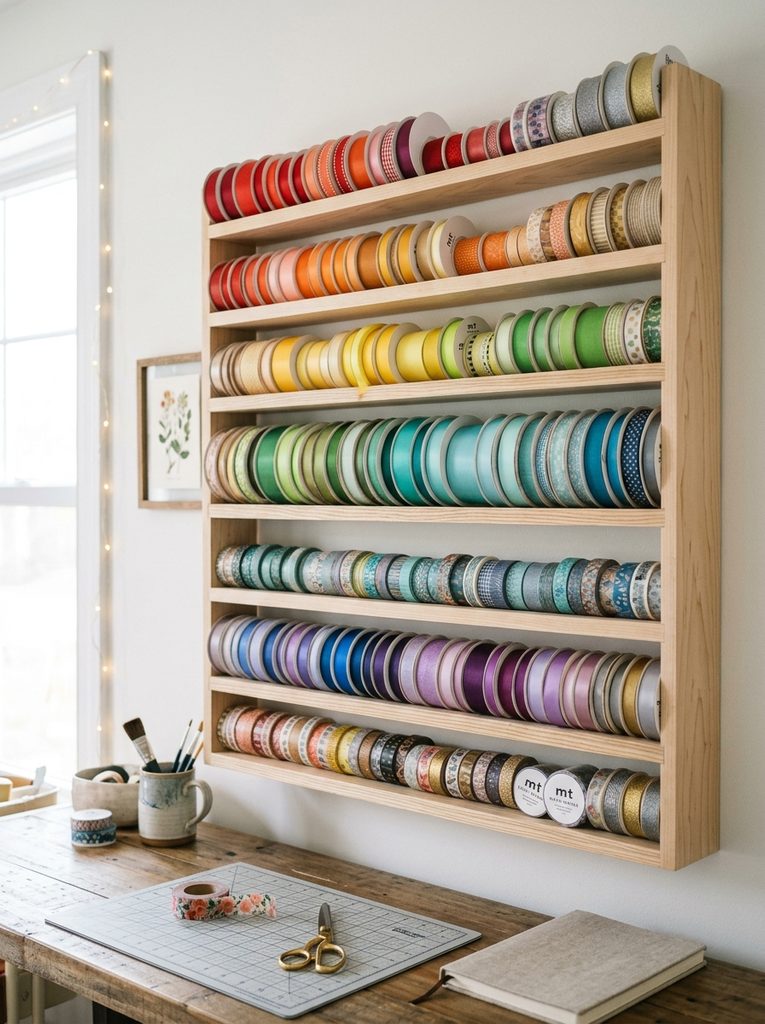
The color-coordinated open ribbon and washi tape rack converts messy drawers of spools into an organized, functional wall installation that serves as an inspiring display. By mounting multi-tiered wooden dowel rods or specialized slotted metal wire racks to an open wall, crafters can arrange hundreds of ribbon spools, lace trims, and patterned washi tapes by color spectrum. The open-rod design allows users to unroll and measure specific lengths of ribbon directly from the wall without removing the spool from its mount. This visual arrangement prevents spool unwinding, protects delicate silk and satin textiles from crushing, and adds an aesthetic splash of color to the room.
       +---------------------------------------------+
       |   Top Rod: Pastel & Neutral Washi Tape Spools|
       +---------------------------------------------+
                              |
       +---------------------------------------------+
       |   Mid Rod: Vivid Grosgrain & Satin Ribbons  |
       +---------------------------------------------+
                              |
       +---------------------------------------------+
       |   Lower Rod: Wide Burlap & Heavy Jute Twines|
       +---------------------------------------------+
To build this open ribbon dispenser rack, install two vertical slotted wood support brackets onto a cleared wall space using wall anchors and drywall screws. Cut three-eighth-inch wooden dowel rods to match the horizontal span between brackets, sanding the cut ends smooth to prevent snagging delicate fabric ribbons. Thread your ribbon spools and washi tape rolls onto the dowels, arranging them across the color wheel from light pastels to deep jewel tones. Slide the loaded dowels into the slotted wall brackets, leaving a two-inch vertical clearance between rods to allow free rotation when pulling lengths. Mount an adhesive-backed measuring tape along the trim board directly beneath the lowest dowel for quick ribbon measuring.
Fabric Stash Filing and Mini-Bolt Storage
Step-by-Step Guide
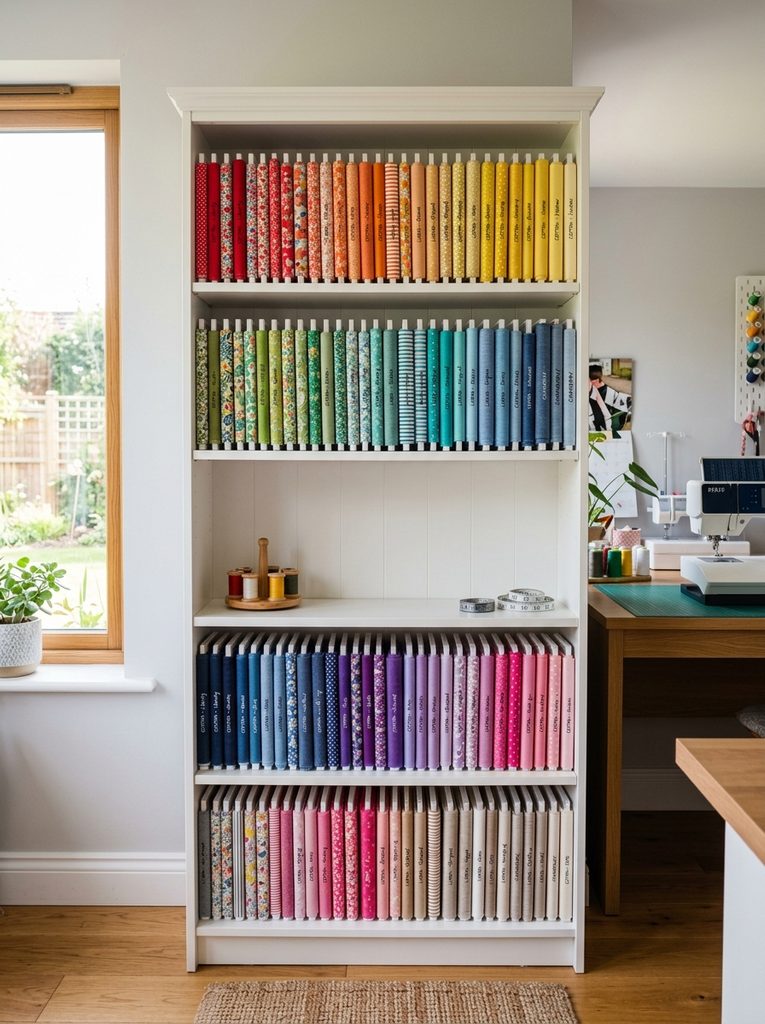
The fabric stash filing and mini-bolt storage system introduces commercial textile organization into home sewing spaces, preventing folded fabric piles from toppling over. By wrapping individual fabric cuts around acid-free corrugated plastic boards or heavy comic book backing boards, crafters create uniform mini-bolts that stand neatly upright on open bookshelf ledges. This vertical filing method provides clear visibility of every fabric pattern, yardage print, and textile weight without disturbing adjacent pieces. Storing fabric as mini-bolts prevents deep permanent creases, shields textiles from fiber distortion, and eliminates the frustration of pulling a bottom piece from a towering stack.
To create this mini-bolt storage system, measure your shelf height and cut acid-free corrugated plastic sheets into uniform rectangles measuring seven by ten inches using a utility knife. Fold a piece of fabric in half lengthwise along the grain, place the mini-bolt board at one end, and roll the fabric snugly around the board until the entire yardage is wrapped. Secure the loose end of the fabric using two nickel-plated plastic-headed quilting pins or clear fabric clips inserted into the top edge. Arrange the wrapped fabric boards vertically on open deep shelves, sorting them by fiber type such as quilting cottons, linens, knits, and upholstery remnants. Group each category by color and pattern scale to create an organized textile library.
                 +---------------------------------+
                 |  Patterned Cotton Mini-Bolts    |
                 +---------------------------------+
                                  |
            +-------------------------------------------+
            |  Solid Color Linen & Chambray Boards      |
            +-------------------------------------------+
                                  |
            +-------------------------------------------+
            |  Heavy Canvas & Upholstery Roll Base      |
            +-------------------------------------------+
Modular Island Workbench with Built-In Cube Shelving
Execution Process
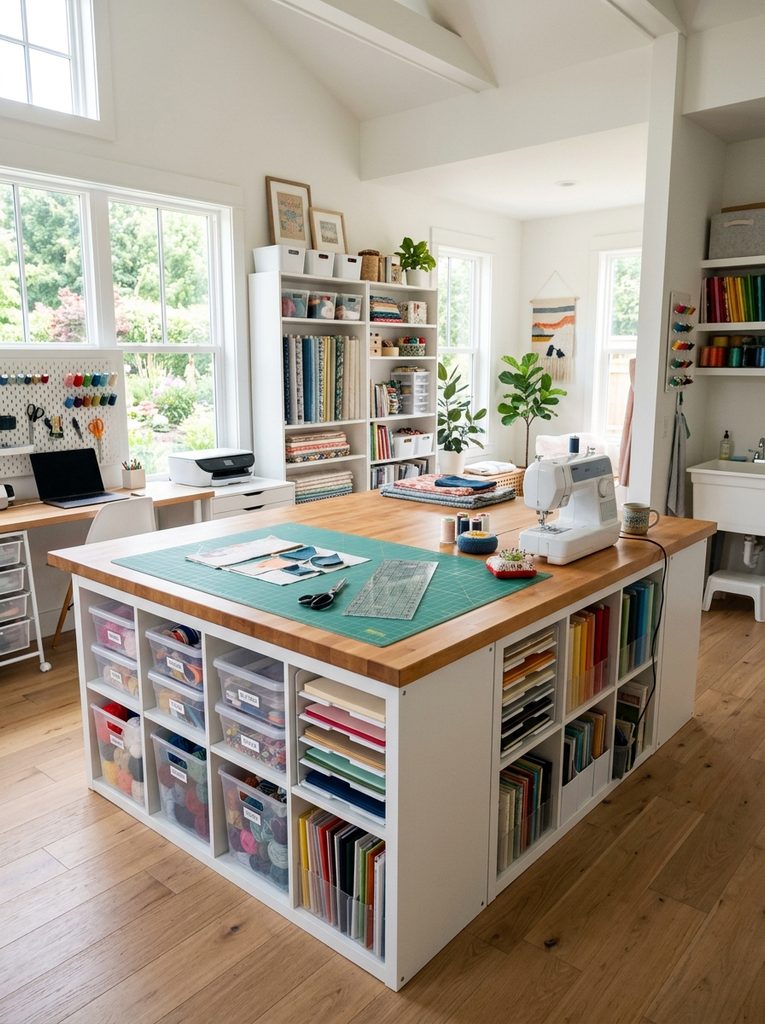
The modular island workbench with built-in cube shelving combines an expansive, counter-height flat cutting surface with accessible open storage around its perimeter. By joining two or four standard cube-shelf storage units back-to-back and topping them with a sealed butcher block or laminate countertop, crafters create a 360-degree workstation. The perimeter cube openings hold fabric bins, paper organizing trays, and heavy crafting machines, keeping heavy equipment off the main workspace when not in use. The counter-height design provides an ergonomic working posture for standing tasks like fabric cutting, vinyl weeding, and gift wrapping, reducing lower back strain during long creative sessions.
To construct this modular craft island, arrange four two-by-two cube storage organizer units in a rectangular layout on a level floor, joining their interior side walls using connector bolts and washers. Secure a smooth, pre-cut maple butcher block or heavy MDF top—measuring at least four by five feet—over the joined cube base, fastening from underneath with two-inch wood screws driven through corner braces. Slide clear plastic cube bins and front-loading cardstock trays into the open compartments, reserving the lowest tiers for heavy dies and die-cutting machines. Place a self-healing rotary cutting mat across the top workbench surface, securing the corners with double-sided removable tape to create a stable cutting and assembly hub.
Wall-Mounted Hanging Mason Jar Hardware Organizer
How to Create
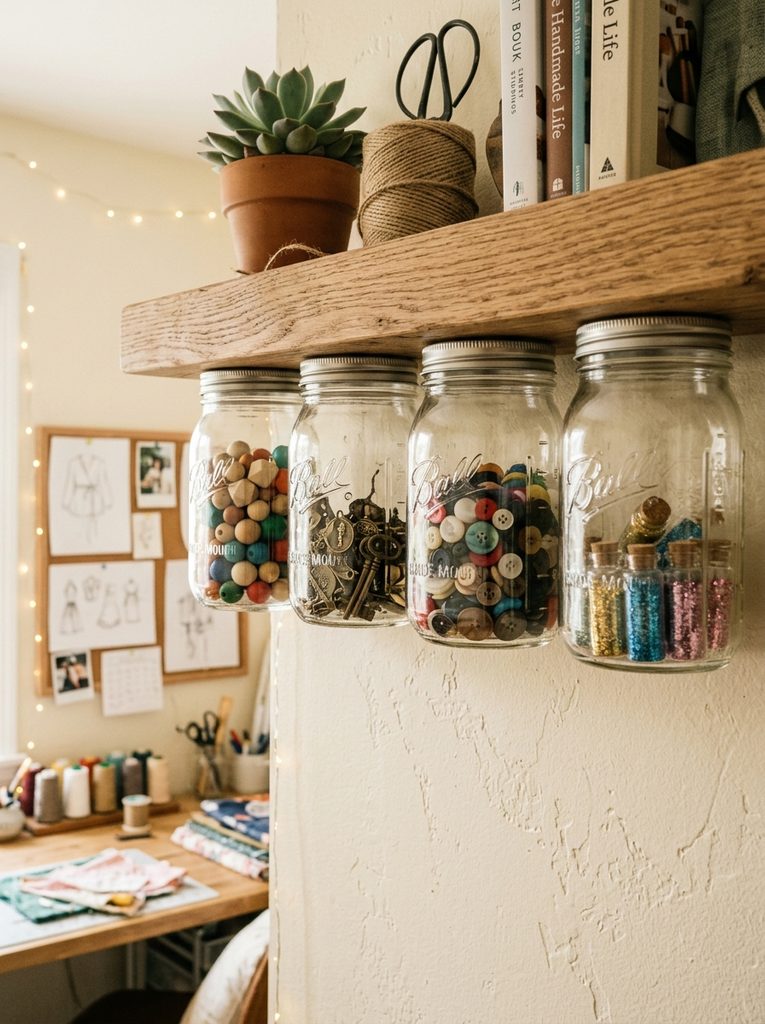
The wall-mounted hanging mason jar hardware organizer utilizes under-shelf space to store micro-findings, small fasteners, and loose crafting hardware in transparent containers. By fastening the metal screw lids of wide-mouth mason jars directly beneath a wooden floating shelf, crafters create suspended storage that keeps desktop surfaces clear. The clear glass jars provide full visibility of colorful beads, buttons, brads, safety pins, and sequins from all angles. Accessing materials requires a simple one-handed unscrewing motion, allowing makers to retrieve small findings quickly without rummaging through opaque boxes or opening deep cabinet doors.
| Installation Step | Tool & Hardware Requirement | Practical Outcome |
|---|---|---|
| Lid Preparation | Center Punch & 1/8-Inch Metal Drill Bit | Creates clean pilot holes through two-piece lids |
| Under-Shelf Mount | 1/2-Inch Wood Screws & Magnetic Driver | Secures metal ring and flat disc firmly under wood |
| Jar Suspension | 8-Oz or 16-Oz Glass Wide-Mouth Jars | Threads smoothly onto fixed lids for suspended storage |
Begin creating this under-shelf hanging storage by removing the flat metal inserts and threaded rings from six eight-ounce wide-mouth glass mason jars. Place a flat lid insert inside each threaded metal ring, securing them together with two drops of metal epoxy glue, and drill two pilot holes through the top of the lid assembly. Hold a lid assembly against the underside of a sturdy wooden floating shelf, driving half-inch wood screws through the pilot holes into the shelf bottom. Repeat this spacing at three-inch intervals along the underside of the shelf. Fill the glass jars with sorted small embellishments—such as wooden beads, metal charms, snaps, and glitter vials—and screw each jar into its mounted lid.
       +---------------------------------------------+
       |   Solid Wooden Floating Wall Shelf Core     |
       +---------------------------------------------+
                              |
       +---------------------------------------------+
       |   Under-Mounted Screwed Metal Jar Lids      |
       +---------------------------------------------+
                              |
       +---------------------------------------------+
       |   Suspended Clear Glass Jars with Findings  |
       +---------------------------------------------+
Cardstock and Vinyl Roll Tower Organizer
Setup Method
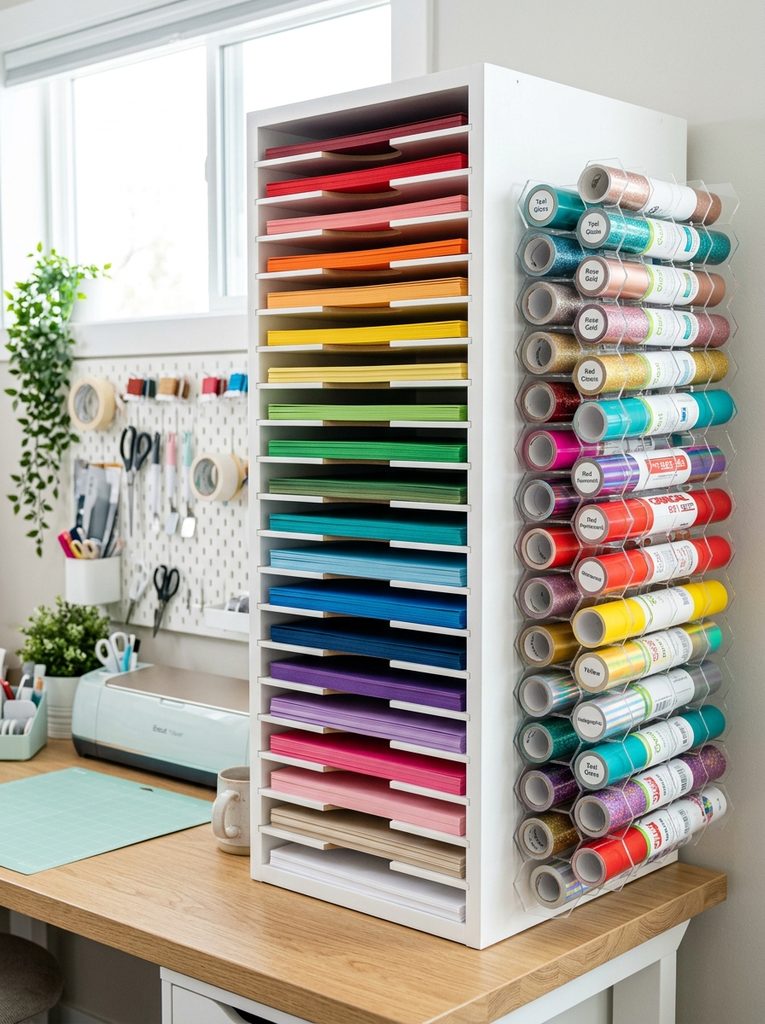
The cardstock and vinyl roll tower organizer provides dedicated vertical storage for flat paper sheets, scrapbook albums, and rolled adhesive vinyls. Utilizing slotted vertical paper trays and honeycomb acrylic roll racks, this setup prevents twelve-by-twelve-inch cardstock from bowing and protects heat-transfer vinyl rolls from creasing. Storing paper flat in open front-loading shelves prevents bent corners and fiber cracking, while honeycomb tube racks keep vinyl rolls neatly separated and color-visible. This dedicated storage system is essential for paper crafters, cardmakers, and digital cutting machine operators who need rapid access to delicate sheet materials.
To set up this paper and vinyl tower, place a sturdy vertical shelving cabinet adjacent to your digital cutting machine table. Insert horizontal plastic or wooden paper divider trays into the cabinet shelving at one-inch vertical intervals, creating individual slots for each cardstock weight and texture. Sort your flat paper collection by finish—separating glitter cardstock, metallic foils, smooth solids, and watercolor papers—and label the edge of each shelf with paper weight and color names. Mount a vertical honeycomb acrylic roll rack on the side of the cabinet, sliding rolled vinyl, iron-on transfer sheets, and transfer tapes into the circular openings with outer color swatches facing forward for fast identification.
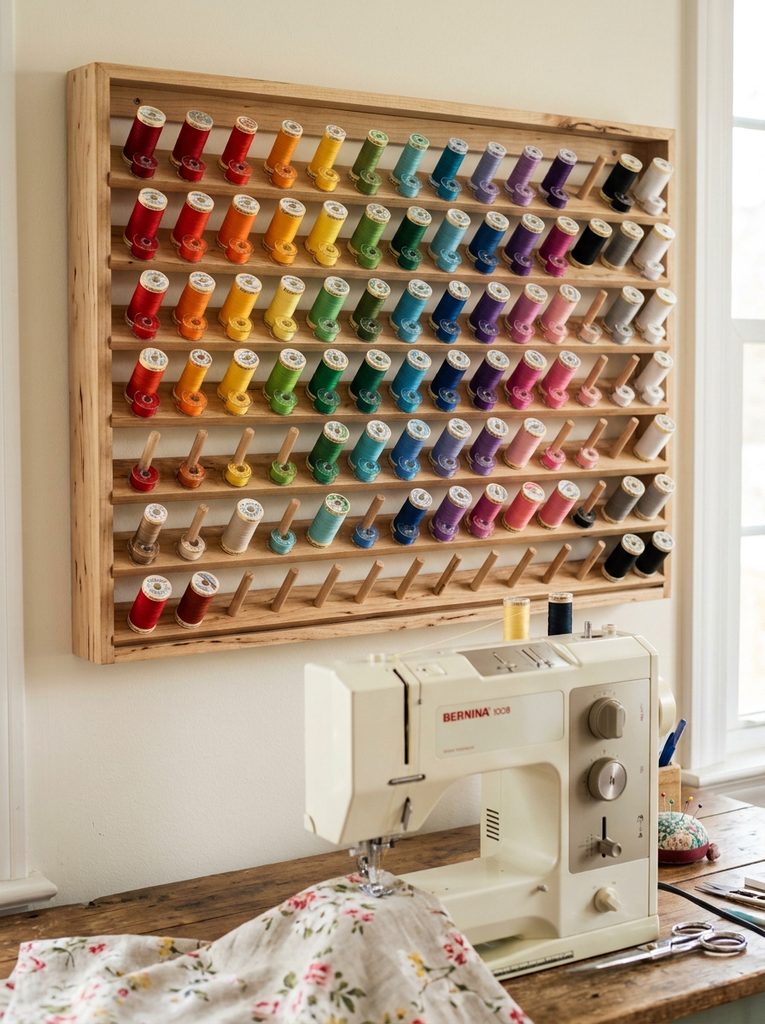
Thread Spool and Bobbin Wooden Display Board
Step-by-Step Guide
The thread spool and bobbin wooden display board mounts sewing threads and their matching pre-wound bobbins on an open wall grid for quick matching and tangle-free storage. Featuring evenly spaced birch wood pegs angled slightly upward, this storage board accommodates diverse spool sizes, ranging from small embroidery threads to large serger cones. Storing matching bobbins directly above or below their corresponding thread spools eliminates the frustration of searching through tangled sewing boxes for coordinated colors. The wall-mounted layout protects delicate thread fibers from friction damage and adds a decorative, rainbow-like accent to sewing studio walls.
To construct this sewing thread organizer, purchase an unfinished birch wood thread spool rack featuring sixty to one hundred upward-angled spindle pegs. Sand the frame lightly with fine 220-grit sandpaper, wiping away sawdust before applying two coats of clear polyurethane or white satin furniture paint to prevent wood splinters from snagging fine threads. Mount two keyhole hangers on the back corners of the wooden frame, securing the rack to wall anchors at eye level above your sewing machine table. Slide thread spools onto the wooden pegs, pairing each spool with its matching wound bobbin slipped onto the same spindle peg. Arrange the spools in a chromatic gradient from light neutrals to deep tones.
                 +---------------------------------+
                 |  Upward-Angled Birch Wood Pegs  |
                 +---------------------------------+
                                  |
            +-------------------------------------------+
            |  Chromatic Thread Spool & Bobbin Pairs    |
            +-------------------------------------------+
                                  |
            +-------------------------------------------+
            |  Wall-Mounted Keyhole Hanging Brackets    |
            +-------------------------------------------+
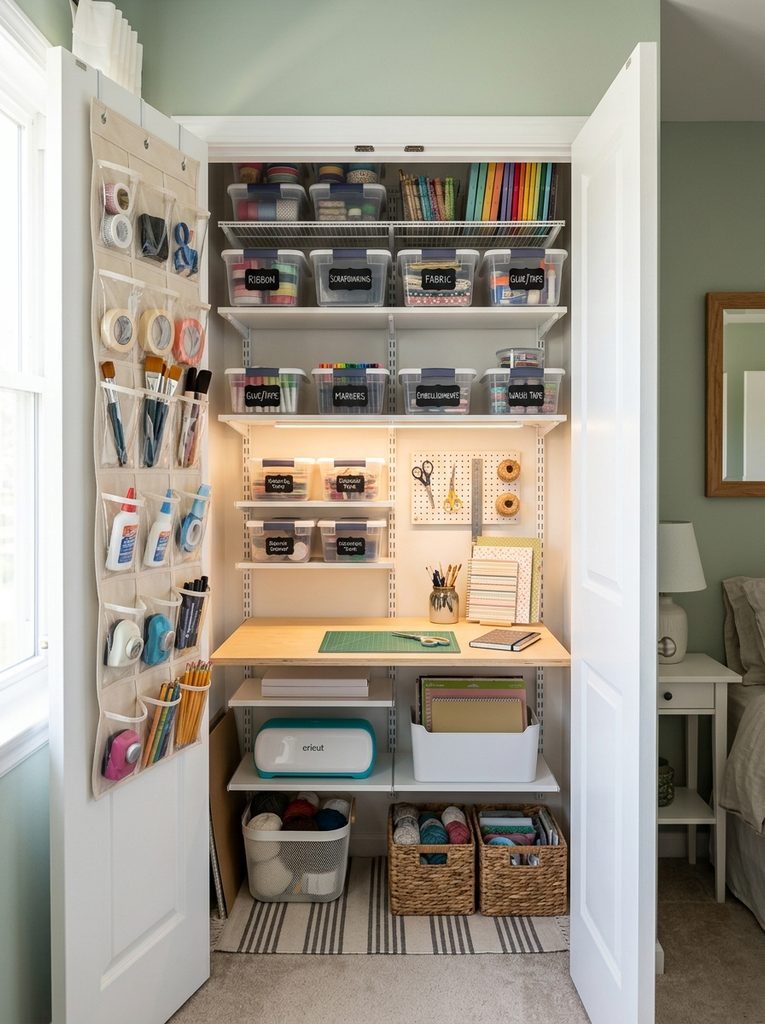
Dedicated Closet Conversion with Adjustable Track Shelves
Execution Process
The dedicated closet conversion transforms an underutilized reach-in bedroom or hallway closet into a self-contained craft station that can be concealed behind closed doors. By removing traditional closet clothes rods and installing adjustable wall-mounted vertical standards and shelf brackets, makers can customize shelf heights to match specific storage bins. The interior walls and door backs can be fitted with over-the-door pocket organizers, shallow metal wire baskets, and fold-down drop-leaf desks. This enclosed layout keeps delicate crafting supplies away from household dust, pets, and direct sunlight, providing a complete crafting nook for homes where a dedicated room is unavailable.
To execute this craft closet transformation, remove existing clothes rods and patch any drywall holes with spackling paste, finishing with a fresh coat of bright white semi-gloss paint. Mount three steel vertical track standards into the rear wall studs, using a four-foot level to ensure parallel alignment. Snap adjustable shelf brackets into the vertical tracks at customized intervals, laying sturdy melamine shelves across the brackets to support plastic storage bins and crafting machines. Install an over-the-door organizer with clear vinyl pockets on the inside of the closet door to hold markers, glues, scissors, and rotary blades. Place a slim rolling cart beneath the lowest shelf to house your active project bin, allowing the doors to close flush.
Common Beginner Mistakes and How to Avoid Them
When organizing a craft room, beginners frequently make several common layout and storage mistakes that compromise room functionality, material safety, and system longevity. A widespread error is purchasing decorative storage bins, baskets, and acrylic organizers before taking an accurate inventory of their supplies; this often leads to mismatched container sizes and wasted storage space. To prevent this, always sort, categorize, and measure your supply stash before buying storage fixtures. Another frequent mistake is using solid, opaque cardboard boxes without labels, which hides supplies and leads to forgotten materials and accidental duplicate purchases.
+-------------------------------------------------------------+
|              Common Error: Buying Bins Before Sorting Supplies|
|        (Leads to mismatched containers and wasted space)    |
+-------------------------------------------------------------+
                               |
                               v
+-------------------------------------------------------------+
|       Solution: Sort, Purge, and Measure Stash First        |
|         (Ensures exact container fit and streamlined layout)|
+-------------------------------------------------------------+
Beginners also frequently overload high wall-mounted shelves with heavy books, metal dies, and die-cutting machines without anchoring brackets into structural wall studs, creating serious wall damage and safety hazards. Always secure heavy storage shelving directly into wooden studs with heavy-duty lag screws, reserving upper shelves for lightweight materials like fiberfill and yarn skeins. Neglecting dust protection for open fabric and paper displays is another common issue; store delicate textiles and porous papers away from direct sunlight and forced-air vents. Finally, avoid creating complicated multi-step storage systems that make putting tools away tedious; simple, accessible bins encourage consistent tidiness after every crafting session.
Practical Tips for Better Results
Achieving professional, long-lasting organization in your craft room relies on consistent labeling practices, ergonomic zoning, and thoughtful supply protection. Always implement a unified label hierarchy across all bins and drawers using a thermal label maker with clear black-on-white text, adding sub-categories on container backs for detailed sorting. When designing your floor plan, apply ergonomic reach zones: keep your primary hand tools, cutting mats, and adhesive runners within arm’s reach of your main seating area, placing secondary supplies like extra cardstock packs and seasonal decor molds on perimeter shelves.
+-------------------------------------------------------------+
|          Apply Consistent Thermal Printed Labeling          |
|             (Identifies contents clearly for easy resets)   |
+-------------------------------------------------------------+
                               |
                               v
+-------------------------------------------------------------+
|         Establish Primary vs. Secondary Reach Zones         |
|           (Keeps daily tools near, bulk storage on perimeters)|
+-------------------------------------------------------------+
                               |
                               v
+-------------------------------------------------------------+
|         Install Task Lighting at Key Workstations           |
|            (Reduces eye strain during detailed crafting)    |
+-------------------------------------------------------------+
To preserve the lifespan of sensitive crafting materials, store liquid glues, acrylic paints, and fine-tip art markers in climate-controlled interior zones away from exterior walls and drafty windows that cause drying and freezing. Install daylight-balanced LED under-cabinet task lighting strips above primary cutting and assembly workbenches to reduce eye strain during precision crafting. Maintain an active project bin on a rolling cart to hold unfinished assemblies, keeping your main cutting table clear for fresh crafting sessions without misplacing components.
Styling, Presentation, or Organization Ideas
Integrating functional craft storage into a cohesive home decor scheme requires balancing utilitarian efficiency with visual warmth and harmonious color palettes. When setting up open shelving, group colorful supplies like embroidery threads, yarn skeins, and fabric bolts in smooth rainbow color gradients across display shelves, turning functional materials into an inspiring decorative gallery. Use matching natural canvas storage bins, matte white metal wire baskets, or warm woven rattan boxes across open shelf units to conceal less attractive packaging while maintaining a clean, cohesive visual style.
+-------------------------------------------------------------------+
|               CRAFT STUDIO ZONING & LAYOUT MAP                    |
+-------------------------------------------------------------------+
|   [ Wet-Craft Zone ]    [ Machine & Cutting ]   [ Dry Assembly ]  |
|   - Watercolor Paints   - Digital Vinyl Cutter  - Paper Trimmers  |
|   - Acrylic Mediums     - Rotary Cutting Mat    - Adhesive Runners|
|   - Washable Surfaces   - Heavy Die-Cut Press   - Precision Tools |
|                                                                   |
|   [================= Vertical Storage Perimeter ==================]|
|   - Wall pegboards, mini-bolt fabric shelving, and ribbon racks   |
+-------------------------------------------------------------------+
Enhance the presentation of your craft room by creating distinct functional zones—such as establishing a wet media painting table separate from a clean digital cutting and sewing station. Hang framed inspirational prints, color swatch reference charts, and pegboard display boards in coordinating white or light natural wood frames to tie the room together. Incorporating a comfortable, height-adjustable ergonomic swivel stool with a supportive backrest ensures comfortable posture while moving between standing cutting tables and seated sewing stations.
Budget or Time Planning
Organizing a functional craft room can be accomplished economically and efficiently by breaking the project into structured, manageable phases. Rather than buying expensive custom cabinetry, you can build a complete studio using modular cube organizers, unfinished wood pegboards, repurposed glass jars, and thrifted rolling utility carts. Spreading organizational tasks over three distinct phases—purging supplies on day one, installing wall hardware on day two, and sorting inventory into labeled bins on day three—prevents burnout and keeps your workspace functional throughout the process.
| Organization Phase | Implementation Window | Estimated Budget Window | Primary Materials Included |
|---|---|---|---|
| Purging & Categorizing | 3 – 5 Hours | $0 (No Cost) | Sorting boxes, trash bags, recycling bins |
| Vertical Hardware Setup | 4 – 6 Hours | $45 – $95 | Metal pegboards, furring strips, wall anchors |
| Containers & Dividers | 2 – 4 Hours | $35 – $75 | Acrylic drawer trays, clear shoebox bins, labels |
| Modular Island Assembly | 3 – 5 Hours | $80 – $180 | Cube storage units, butcher block top, brackets |
From an ongoing maintenance perspective, implementing a mandatory ten-minute workspace reset at the end of each crafting session keeps supplies in their assigned homes. Returning tools to wall pegboards and storing scraps in categorized bins prevents clutter from accumulating over time. By investing a modest weekend budget and maintaining consistent storage habits, you can create a productive, organized crafting studio that supports your creative projects for years to come.
Creative Expansion and Advanced Inspiration
Once you have established your core craft room storage systems, exploring advanced functional additions and interactive features offers exciting avenues for customizing your studio. Consider installing a fold-down wall-mounted drafting table or a hidden ironing center inside a cabinet to create dedicated work surfaces that tuck away when not in use. You can also build an integrated mobile photography and video recording station with overhead ring lights and flexible mounting arms for filming step-by-step crafting tutorials and photographing finished handmade goods.
Key Takeaway: Combining adaptable vertical pegboards, mobile storage carts, and clear, labeled containers transforms cluttered craft rooms into streamlined, functional studios that boost creativity.
Another creative avenue is installing a magnetic metal whiteboard accent wall to hold magnetic spice tins filled with micro-embellishments, display current project mood boards, and track project deadlines with dry-erase markers. You can also incorporate specialized pull-out drying racks inside lower cabinets to hold wet painted canvases, glued paper assemblies, and screen-printed textiles flat while they cure. These advanced studio upgrades ensure your craft room remains an inspiring, organized workspace that evolves alongside your creative passions.
Leave a Reply