Setting up a dedicated creative workspace does not require an expansive budget or professional renovation services. A well-planned craft room combines smart space planning, vertical storage methods, repurposed household items, and modular furniture to establish a functional creative studio. Crafting enthusiasts frequently handle diverse materials, ranging from paper goods and sewing fabrics to paints, brushes, vinyl rolls, and precision cutting tools. Without a clear storage strategy, craft rooms quickly become cluttered, leading to misplaced tools, damaged supplies, and lost working time. This comprehensive guide outlines ten practical craft room ideas designed specifically to maximize utility, streamline daily organization, and transform compact areas into productive creative spaces on an affordable budget. Readers will explore exact setup procedures, structural wall arrangements, upcycled container solutions, and adaptable workstation configurations tailored to various room dimensions. By establishing structured storage categories, ergonomic table layouts, and transparent supply systems, any spare bedroom, walk-in closet, or living room corner becomes an efficient creative hub. The following instructions provide actionable steps and reliable techniques to design, organize, and maintain a budget-friendly craft room with long-term utility and clean visual appeal.
+-------------------------------------------------------+
|  BUDGET CRAFT ROOM STRUCTURAL LAYOUT                  |
|                                                       |
|   Upper Wall: Mounted pegboards & floating shelving   |
|   Mid-Level: Clear jar rails, ribbon rods, task lamps |
|   Work Surface: Solid hollow-core door / twin drawer units|
|   Lower Zone: Rolling utility carts & labeled bins    |
+-------------------------------------------------------+
Why This Idea Is Trending or Useful
Budget-friendly craft room designs represent a dominant category across modern Pinterest ideas because they merge functional interior organization with creative personal projects. Many crafters work from apartments, small spare rooms, or shared multi-purpose zones where dedicated square footage remains limited. Affordable storage solutions allow makers to categorize extensive supply inventories without investing in expensive custom cabinetry or permanent millwork. Modern trending ideas prioritize modular storage units, visible supply arrangements, and minimalist style layouts that keep work surfaces clear of daily clutter. This approach holds high practical value because visible, organized tools reduce project setup time and prevent the accidental repurchase of duplicate materials. Furthermore, upcycling thrifted furnishings and everyday household containers brings distinct DIY appeal to the room while keeping total project costs strictly controlled. Beginners can execute these modular projects gradually, adding wall shelves or desktop organizers as their supply inventory expands. By combining practical storage mechanics with accessible materials, an affordable craft room layout delivers a balanced, comfortable, and productive creative environment suited for all crafting disciplines.
Materials and Preparation
Building a functional craft room on a modest budget requires structured preparation, accurate room measurements, and the acquisition of basic hardware tools. Essential materials include standard perforated pegboard panels, drywall mounting anchors, hollow-core wood doors, modular storage cubes, metal curtain rods, glass storage jars, and adhesive organizational labels. Required assembly tools include a power drill with driver bits, a bubble level, a steel measuring tape, a stud finder, and heavy-duty utility shears. Begin preparation by clearing the designated workspace entirely and sorting all crafting inventory into distinct categories, such as paper crafting, textiles, wet media, and dry adhesives. Measure wall spans, window clearances, and electrical outlet placements carefully to ensure prospective desks and wall units do not obstruct room access or natural light sources. Create a floor plan sketch on grid paper, marking dedicated zones for sitting tasks, standing cutting tasks, and vertical wall storage. Taking these deliberate preparation steps prevents structural alignment mistakes, ensures durable wall fastenings, and establishes a clear workflow for executing your budget craft room setup.
1. Modular Pegboard Wall for Tool Organization
Step-by-Step Guide
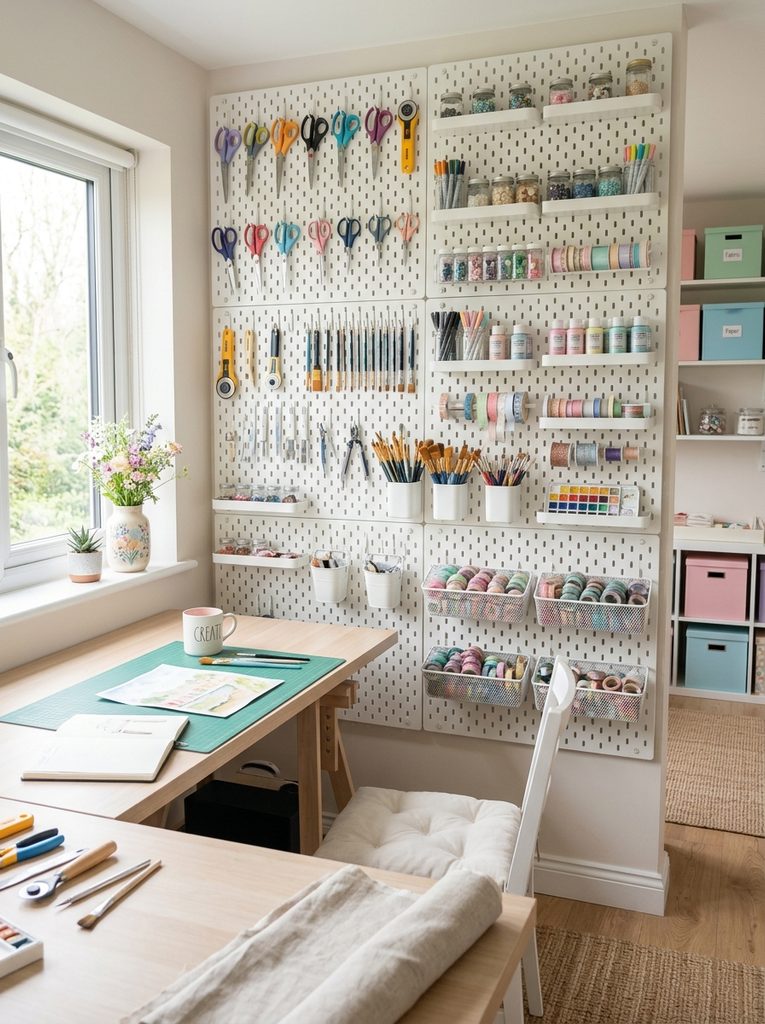
A full-scale pegboard wall serves as an adaptable vertical storage system that frees up essential desktop space by utilizing empty wall surfaces. Standard perforated hardboard or metal pegboard panels feature uniform grid holes that accept diverse metal hooks, hanging baskets, and dowel holders. This setup allows crafters to hang high-frequency tools, such as fabric shears, precision knives, rulers, rotary cutters, and rolls of masking tape, in plain sight. Keeping hand tools suspended vertically prevents dulling the cutting blades and ensures immediate access during active creative projects. The layout remains fully modular, meaning hooks and baskets can be repositioned whenever new supplies enter the workspace. Painting the panel in a neutral tone like crisp white, soft gray, or sage green integrates the board seamlessly with modern design aesthetics while providing a clean background for tool placement.
       .-''''-.
     .'  ....  '.      <- Standard Perforated Grid
    /   ......   \
   |   [Tool Hook]|    <- Suspended Scissor & Cutter Rack
   |   [Wire Tray]|    <- Hanging Tape & Adhesive Baskets
    \   `----'   /
     '. ====== .'      <- 1x2 Inch Spacer Furring Strips
       `'----'`        <- Anchored Drywall Frame Base
To install this pegboard system, cut two-inch wooden furring strips to match the perimeter dimensions of your pegboard panel. Secure the furring strips directly into wall studs using three-inch wood screws, creating an essential half-inch gap between the wall and the panel for hook insertion. Mount the perforated board onto the furring strips using wood screws and washers, checking horizontal level across the top edge. Arrange metal pegboard hooks starting with the largest items, such as large cutting mats and T-squares, positioned along the lower section. Install small metal wire baskets across the upper quadrant to hold glues, pens, and small hardware containers. Outline key tool positions using fine chalk or adhesive markers if a standardized placement system is preferred for maintaining ongoing room organization.
2. Repurposed Hollow-Core Door Workstation
How to Create
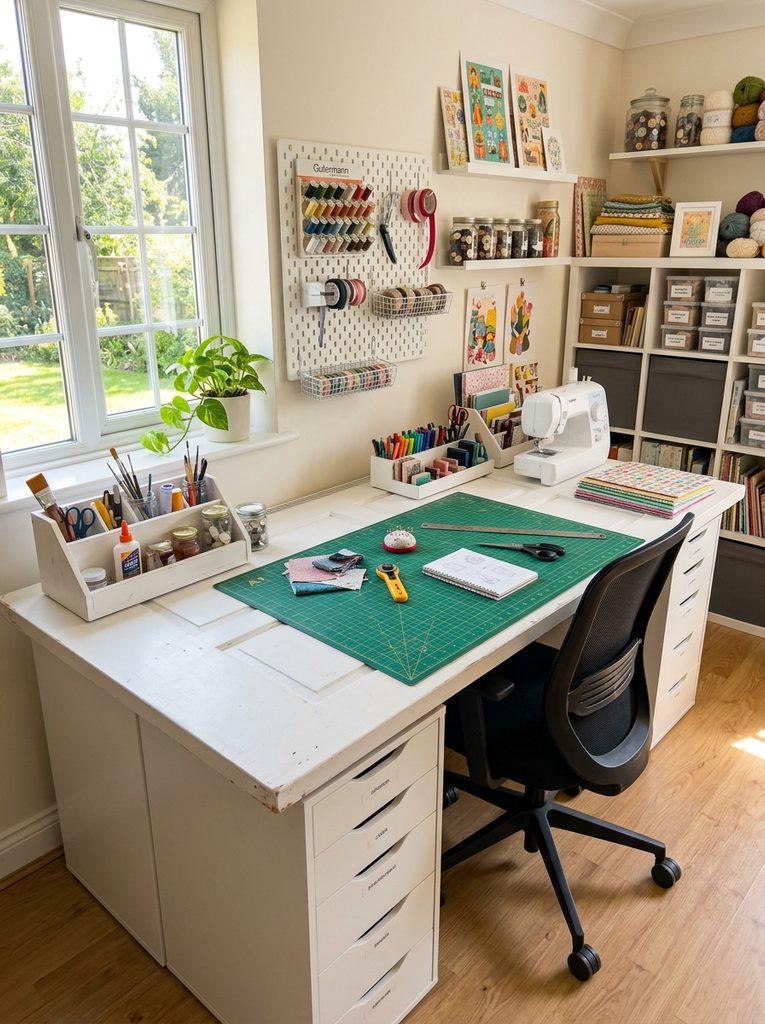
A hollow-core interior door positioned across two modular drawer units creates a spacious, durable, and budget-friendly crafting desk. Standard flat-panel utility doors measure thirty inches wide by eighty inches long, offering significantly more surface area than typical commercial student desks. This generous layout easily accommodates large self-healing cutting mats, sewing machines, laptop computers, and active project assembly simultaneously. The smooth birch or primed composite surface provides an even foundation for drafting, cutting, and gluing without dips or uneven seams. Supporting the door with affordable cube storage organizers or metal filing cabinets provides deep, accessible drawers on either side without consuming central legroom. This setup forms a strong foundation for minimalist style workspaces, delivering commercial-grade work capacity at a fraction of custom desk prices.
+-------------------------------------------------------+
|  DOOR WORKSTATION BLUEPRINT                           |
|                                                       |
|   Worktop: 30x80 inch smooth hollow-core door panel   |
|   Left Support: 4-tier modular drawer filing unit     |
|   Right Support: 4-tier modular drawer filing unit    |
|   Base Grip: Heavy-duty non-slip silicone pads        |
+-------------------------------------------------------+
To construct the desk, position two matching storage pedestals or modular drawer units fifty inches apart to create a comfortable central seating well. Place dense non-slip rubber gripping pads on the four top corners of each drawer unit to prevent desktop shifting without permanent drilling. Sand the hollow-core door lightly using 220-grit sandpaper, wiping away fine dust with a tack cloth before applying two coats of semi-gloss acrylic enamel paint. Once dry, rest the door panel evenly across both storage bases, checking with a measuring tape that overhangs are equal on all sides. Position your primary cutting mat in the center and route power cords neatly along the rear edge using self-adhesive cable clips for a clean, professional finish.
3. Hanging Mason Jar Supply Rails
Execution Process
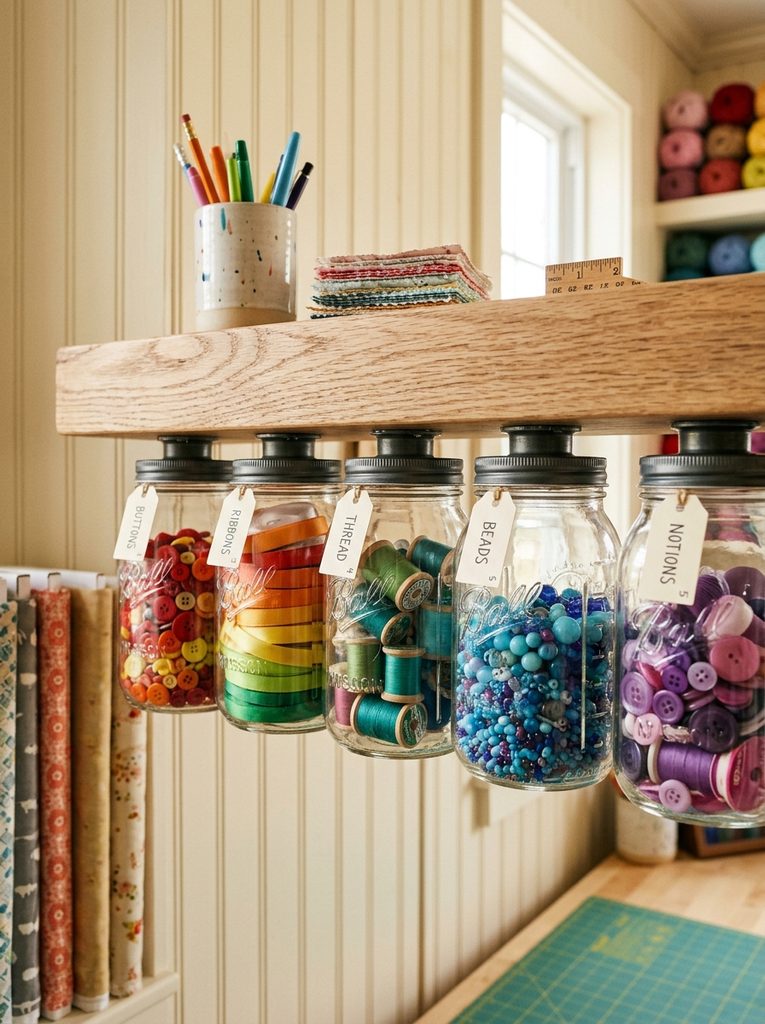
Hanging glass mason jar rails use under-shelf space to store small craft accessories, buttons, beads, fasteners, and embellishments. By attaching the metal lids of standard canning jars directly to the underside of floating shelves, the containers hang suspended above the desk, leaving the tabletop completely clear. The clear glass construction provides instant visibility, eliminating the need to open multiple boxes to locate specific notions, sequins, or safety pins. This storage approach prevents small items from spilling into drawer crevices and protects delicate supplies from dust and humidity. The linear glass design adds handmade charm to the room while using vertical space that typically remains unused in home studios.
      \  ||  /      <- Solid Wood Floating Shelf
    .--. || .--.
   /    \  /    \   <- Fixed Under-Shelf Metal Lids
  |  /\  \/  /\  |
  | /  \    /  \ |  <- Suspended Clear Glass Jars
  |/    \__/    \|  <- Visible Colored Buttons & Beads
To set up this jar rail system, remove the two-piece metal lids from eight to ten matching glass mason jars. Mark two drilling holes on each inner lid insert, spacing the jars four inches apart along the underside of a sturdy wooden shelf. Fasten each metal lid securely to the wood using half-inch pan-head wood screws, ensuring the screws remain flush against the inside of the lid. Mount the wooden shelf securely to the wall studs using heavy-duty L-brackets and a level. Fill each glass jar with categorized supplies, such as thread spools, metal eyelets, or colorful buttons, then twist the jars firmly onto their ceiling-mounted lids. This allows you to unscrew individual jars with one hand while working at the desk below.
4. Mobile Tiered Metal Utility Cart
Setup Method
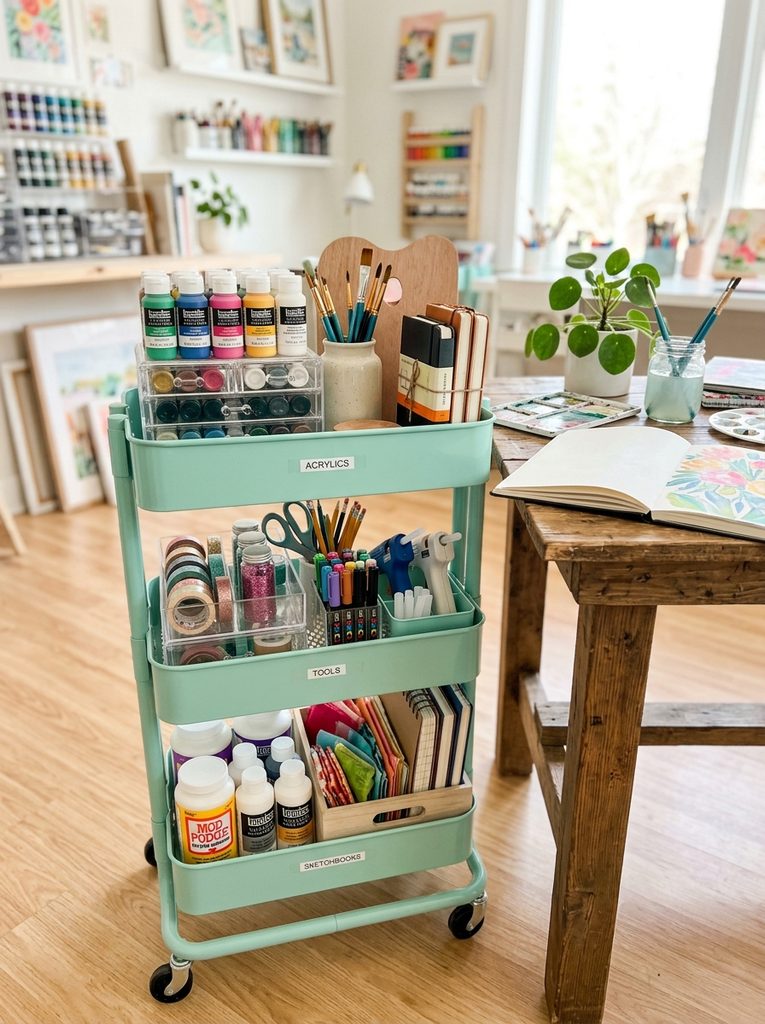
A three-tier rolling metal utility cart serves as a mobile supply hub that transports materials between storage corners and central worktables. These compact wheeled carts feature deep wire or solid metal trays capable of holding heavy paper stacks, paints, hot glue guns, and thermal laminators. Casters allow the cart to tuck into tight closet corners or slide beneath desks when not in use, making it an exceptional space-saving solution for small craft rooms. Organizing each shelf by crafting category streamlines workflow during multi-stage projects, keeping glues and cutting tools accessible without cluttering your main table. The open-frame design supports clip-on cups, side hooks, and magnetic strip attachments, expanding storage capacity along the exterior framework.
+-------------------------------------------------------+
|  TIERED ROLLING CART ALLOCATION                       |
|                                                       |
|   Top Tray: Precision tools, adhesives, hot glue gun  |
|   Middle Tray: Acrylic paint bottles, brushes, rulers |
|   Bottom Tray: Heavy paper cardstock, vinyl rolls     |
|   Outer Frame: Clip-on pencil cups & magnetic hooks   |
+-------------------------------------------------------+
Assemble the metal utility cart according to structural instructions, tightening all hex bolts securely to ensure the frame remains rigid under load. Place removable plastic tray liners on each level to prevent small pens and loose beads from slipping through wire bottoms. Designate the top tier for daily essentials, inserting segmented acrylic desk organizers to separate markers, craft knives, and tape dispensers. Utilize the middle shelf for medium-sized jars, ribbon dispensers, and paint palettes, while reserving the lower shelf for heavy cardstock packs and bulky heat tools. Attach small magnetic hooks to the outer steel tubing to hang scissors, rulers, and wiping cloths within arm’s reach during project assembly.
5. Wall-Mounted Wooden Dowel Ribbon Dispenser
Step-by-Step Guide
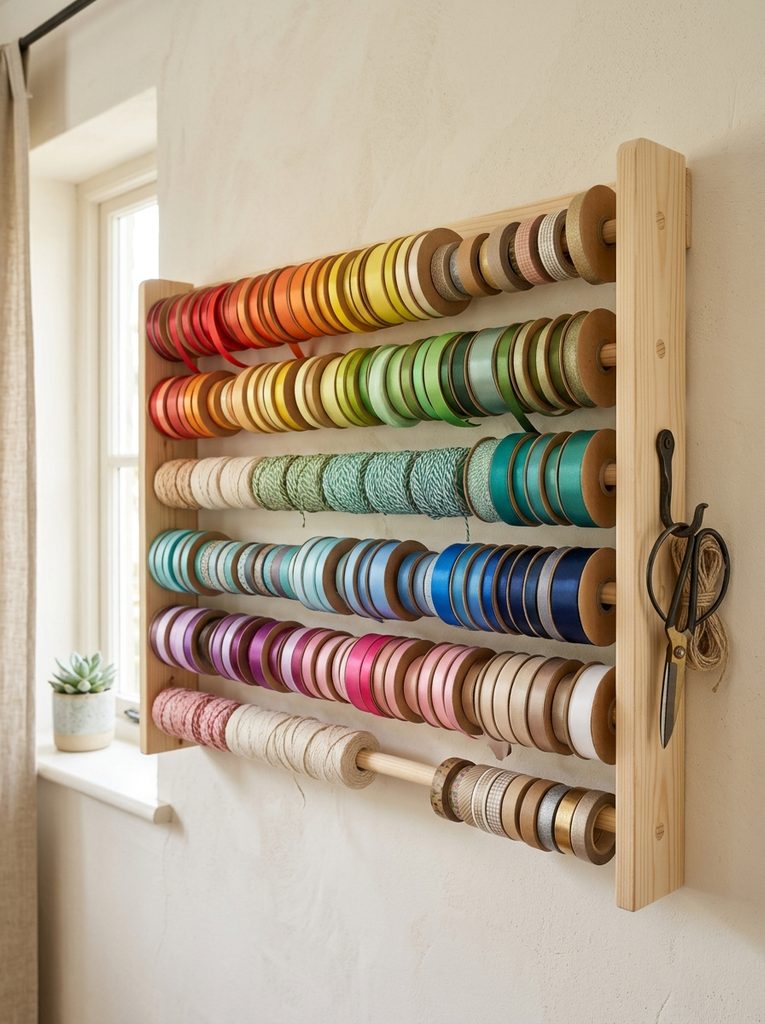
A wall-mounted dowel rack provides a tangle-free, organized storage system for ribbons, washi tape, baker’s twine, and decorative trims. Storing spools horizontally on slender wooden or metal rods prevents ribbons from unraveling, crushing, or gathering dust inside deep drawers. Crafters can measure and snip exact lengths of ribbon directly from the wall without removing the entire spool from its mount. This visual display showcases color palettes and pattern variations clearly, helping makers choose complementary materials for gift wrapping and textile projects. The low-profile structure projects only three inches from the wall, making it suitable for mounting behind doors or between wall shelving brackets.
        .---.
      .'     '.    <- Solid Pine Side Support Brackets
     /  |  \   \
    | [=====Dowel===] <- Removable Smooth Birch Dowel
    | (Spool)(Spool)| <- Spooled Satin & Grosgrain Ribbons
     \_______'-'   <- Clean Wall-Flush Profile
Begin by cutting two pieces of one-by-three-inch pine lumber to a length of eighteen inches to serve as vertical side brackets. Drill three evenly spaced, angled five-eighth-inch holes halfway through the inner face of each board to support the dowels. Mount the wooden side brackets securely to wall anchors, ensuring they are aligned horizontally and spaced twenty-four inches apart. Slide three-quarter-inch smooth birch dowel rods through the spools of ribbon, grouping spools by color or material type. Rest the loaded dowels securely into the angled holes on the wall brackets, allowing the spools to spin smoothly when pulled for measuring and cutting.
6. Upcycled Cardboard Magazine Box Storage
How to Make
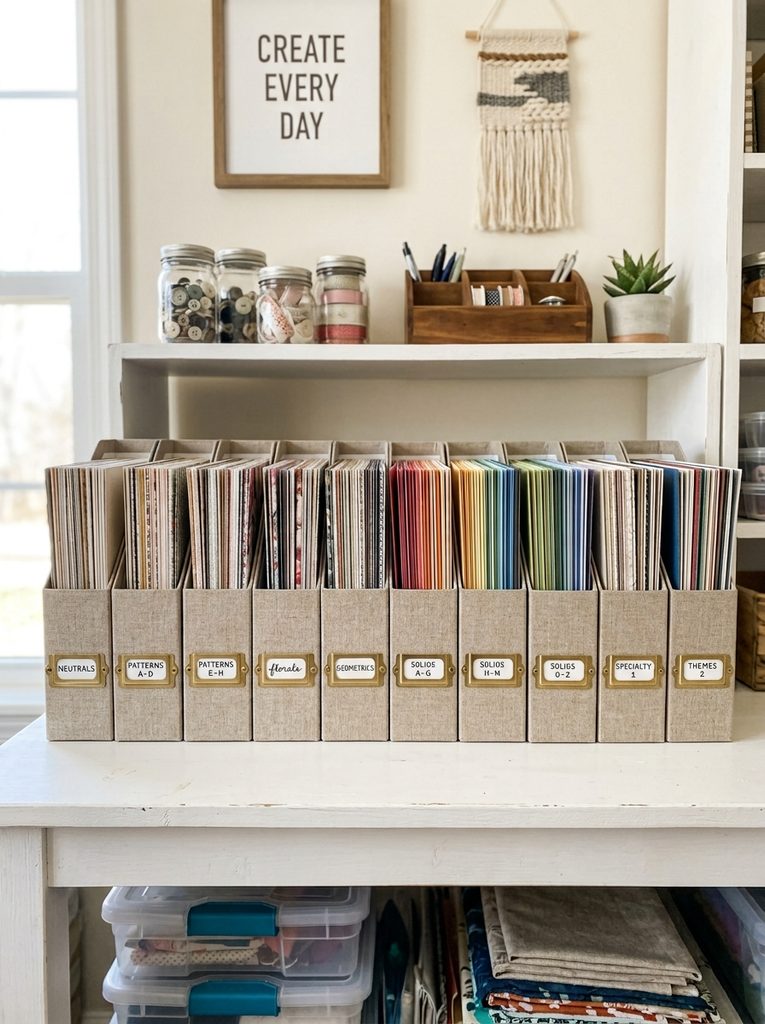
Upcycled cardboard magazine files provide an inexpensive, uniform method for storing twelve-by-twelve-inch scrapbook paper, cardstock pads, vinyl sheets, and sewing patterns. Large paper stacks tend to bend or tear when stored loosely on open shelves; storing them vertically in rigid holders preserves crisp edges. Gathering standard office magazine files or constructing them from sturdy shipping boxes creates consistent modular cubbies. Wrapping or painting the boxes in uniform neutral paper creates a cohesive, clean look across open shelving, concealing mismatched packaging while keeping materials accessible. The narrow footprint allows crafters to sort paper stock by color, weight, or project theme.
+-------------------------------------------------------+
|  VERTICAL PAPER HOLDER DIMENSIONS                     |
|                                                       |
|   Front Height: 5 inches (low lip for spine retrieval)|
|   Back Height: 12.5 inches (full paper back support)  |
|   Depth Span: 12.5 inches (houses 12x12 scrap sheets) |
|   Spine Width: 3.5 inches (holds 200 heavy sheets)    |
+-------------------------------------------------------+
Collect sturdy corrugated cardboard magazine holders or cut clean shipping boxes diagonally, leaving a five-inch front lip and a twelve-and-a-half-inch rear spine. Cover the exterior of each box using self-adhesive contact paper, patterned wallpaper remnants, or two coats of matte latex paint for a cohesive appearance. Attach metal bookplate label holders to the front spine of each file box using small brad fasteners or strong double-sided tape. Insert heavy cardstock, felt sheets, and specialty papers vertically into the holders, grouping sheets by color family. Align the completed magazine boxes side by side along an open bookshelf, creating an orderly, budget-friendly paper library that keeps sheets flat and organized.
7. Tension Rod and S-Hook Fabric Hanging Rack
Execution Process
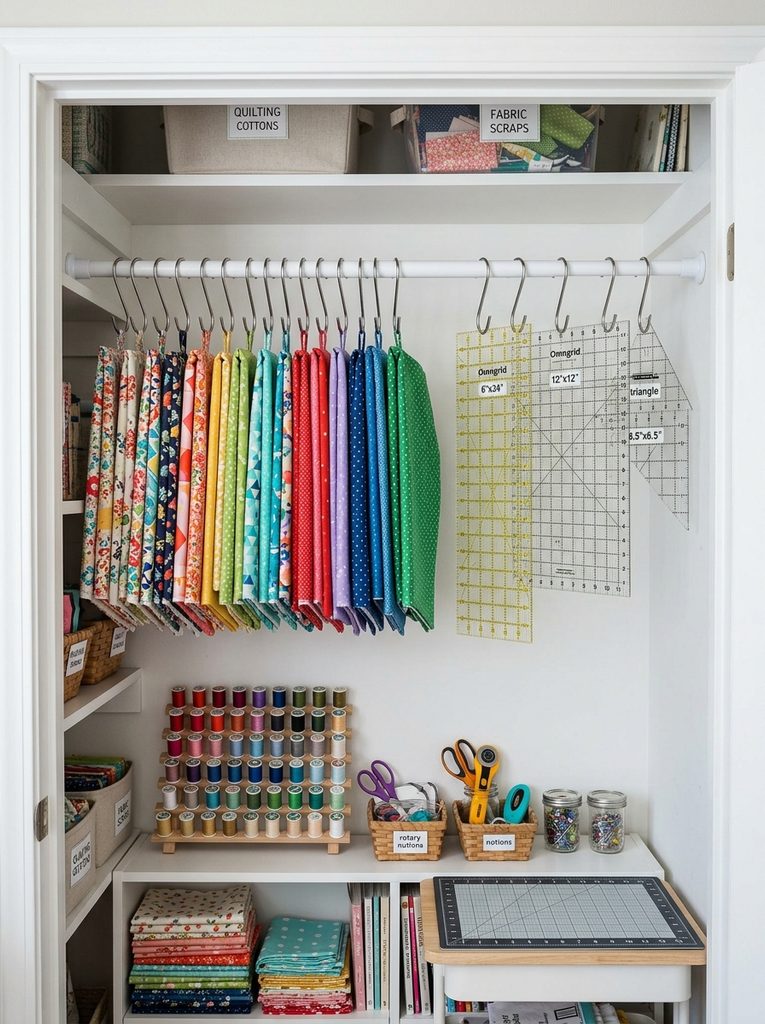
A heavy-duty tension rod fitted with metal S-hooks transforms shallow wall recesses, window frames, or open closet spaces into suspended fabric and supply storage. Storing fabric yardage, rotary rulers, and wrapped trims on hanging hooks prevents deep fold creases and eliminates the need for bulky storage tubs. The tension rod requires no wall drilling or permanent drywall anchors, making it an ideal choice for rental craft spaces and multi-use home offices. Crafters can slide fabrics and hanging baskets horizontally along the rod, organizing materials by texture, fiber weight, or seasonal color palette for efficient selection during sewing and quilting projects.
       .---.
     .'     '.     <- Tension Rubber End Caps
    /  Adjust \
   |  ==Rod==  |   <- Heavy-Gauge Spring Steel Rod
   |  (S) (S)  |   <- Metal S-Hooks with Fabric Clamps
    \  Drape  /    <- Suspended Folded Cotton Yardage
     '-------'
To install this hanging system, measure the interior width of a closet frame, alcove, or window frame to select an appropriately sized steel tension rod. Twist the tension rod counter-clockwise until its length exceeds the target opening by one inch, then compress the internal spring and seat it firmly against opposing walls. Slide twenty to thirty heavy-duty stainless steel S-hooks onto the bar before locking it in place. Fold fabric yardage into long, uniform strips and secure them onto plastic skirt hangers or metal trouser rings before hanging them from the S-hooks. Use additional hooks to suspend hole-punched acrylic quilting rulers and pattern templates directly from the rod.
8. Repurposed Picture Frame Dry-Erase Planning Board
How to Create
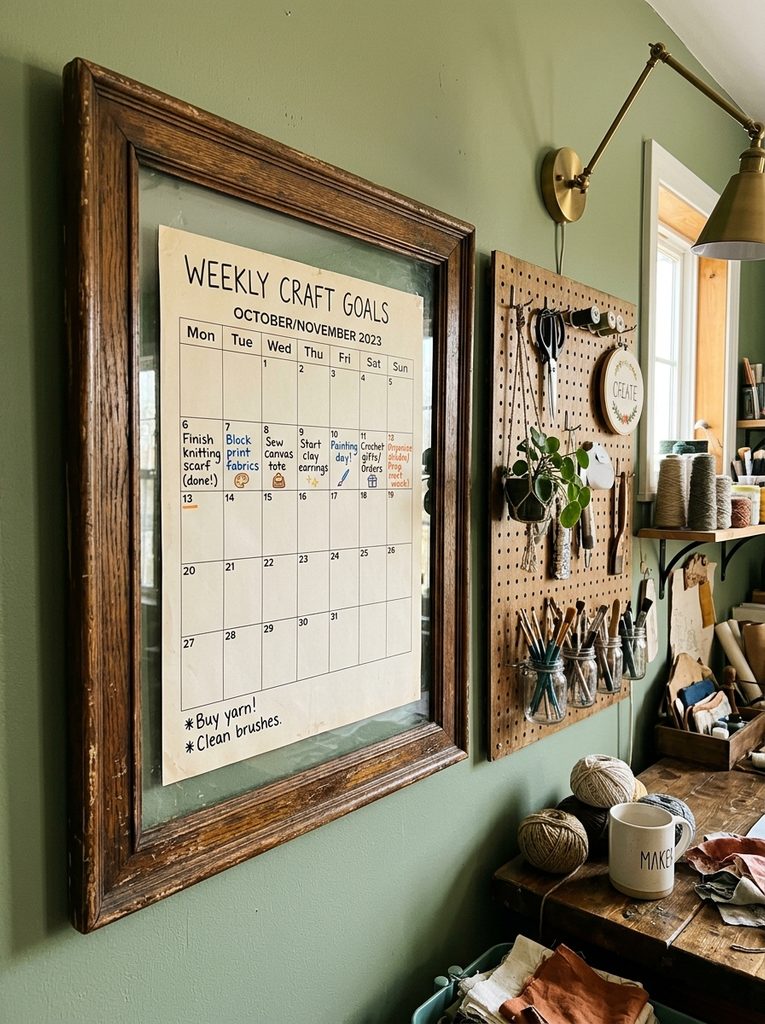
A large thrifted picture frame fitted with decorative paper behind glass creates an elegant, smooth dry-erase project calendar and notes board. The glass surface serves as a non-porous writing board that wipes clean without the ghosting or staining common on cheap whiteboards. Crafters can use dry-erase markers to map out weekly project schedules, list supply measurements, sketch design concepts, and track client orders. Backing the glass with a printed monthly grid, grid paper, or soft linen fabric turns the board into functional wall decor that matches the room’s design aesthetic. This low-cost project provides an organized planning station using simple, thrifted picture frames.
+-------------------------------------------------------+
|  FRAME PLANNING BOARD ASSEMBLY                        |
|                                                       |
|   Outer Frame: 18x24 inch upcycled thrifted frame     |
|   Surface Layer: High-clarity non-porous float glass  |
|   Backing Insert: Printed dry-erase perpetual grid    |
|   Anchor Base: Heavy D-ring wall mounting brackets    |
+-------------------------------------------------------+
Source a large 18×24 inch wooden picture frame from a thrift store, removing the backing board and cleaning the glass on both sides. Sand the wooden frame lightly and apply two coats of semi-gloss acrylic paint in a color that complements your workspace palette. Print a large monthly calendar grid or apply patterned cardstock directly to the cardboard backing sheet before reassembling the frame. Fasten heavy-duty D-ring picture hangers to the back of the frame, mounting it securely to the wall using drywall screws and a level. Mount a magnetic marker caddy alongside the frame to keep dry-erase markers and a felt eraser accessible for daily planning.
9. PVC Pipe Horizontal Vinyl and Marker Organizer
Step-by-Step Guide
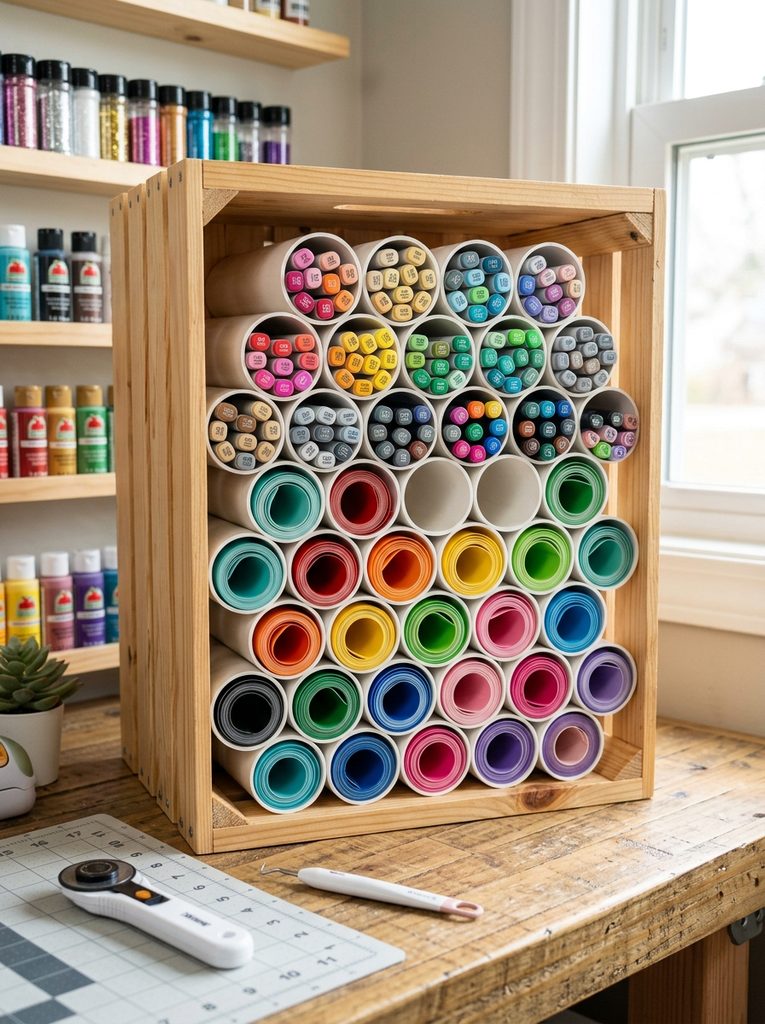
A stacked PVC pipe honeycomb rack provides horizontal cylindrical storage tailored for rolled vinyl, transfer paper, drawing markers, and delicate tools. Standard three-inch and four-inch diameter plumbing pipes can be cut into uniform lengths and joined horizontally inside an open shelf or wooden crate. This structure holds individual rolls in separate cubbies, preventing vinyl sheets from unraveling, denting, or flattening under their own weight. The open honeycomb layout allows crafters to read end labels and color codes easily without shifting adjacent rolls. The modular nature of PVC allows you to expand the organizer upward and outward as your tool collection grows over time.
      /\__/\      <- Uniform Stacked Cylinders
     /  ..  \
    (  <  >  )    <- 3-Inch Cut PVC Pipe Tubes
     \  --  /
      '----'      <- Wooden Base Crate Support Box
Purchase standard ten-foot lengths of three-inch diameter cellular core PVC drainage pipe from a local home improvement center. Using a hand saw or miter saw, cut the PVC pipe into thirty matching eight-inch lengths, smoothing any rough cut edges with 120-grit sandpaper. Place a sturdy wooden craft crate on its side to serve as an outer frame, laying down a thin layer of construction adhesive along the base. Stack the PVC cylinders horizontally inside the crate in a staggered honeycomb pattern, running a bead of clear silicone adhesive between adjacent pipes to bond the unit together. Allow the adhesive to cure for twenty-four hours before loading the tubes with rolls of heat transfer vinyl, adhesive sheets, and large marker sets.
10. Drawer Dividers from Recycled Cereal Boxes
Setup Method
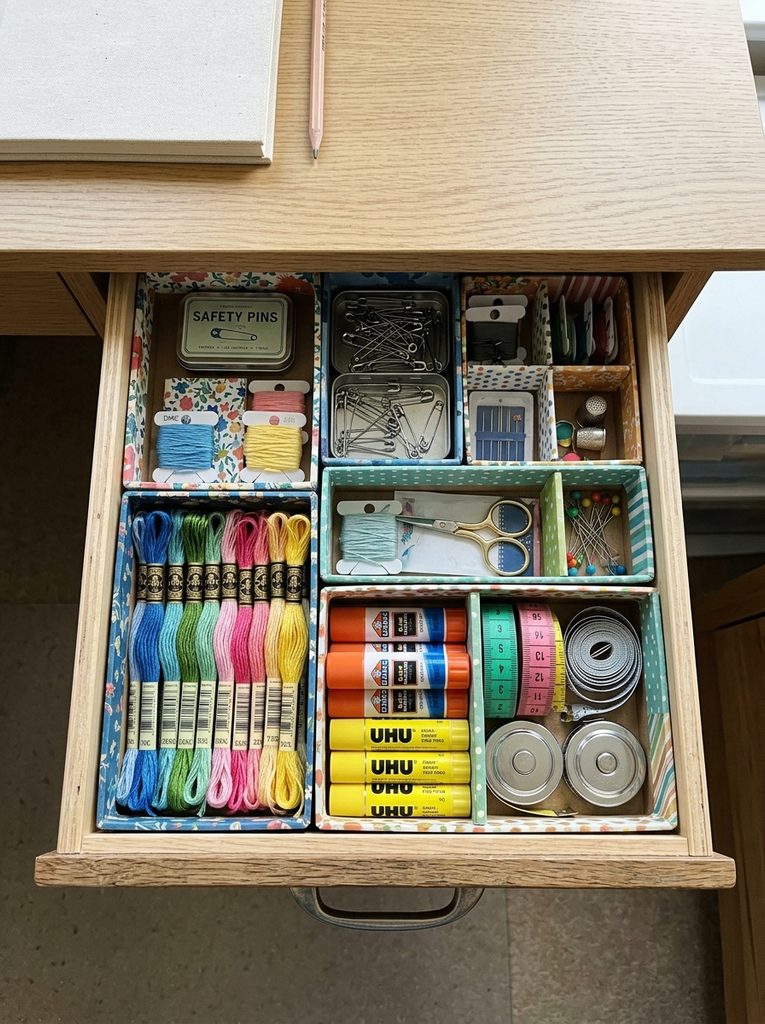
Custom drawer dividers constructed from upcycled cereal and dry food boxes provide tailored interior compartment storage for shallow desk drawers. Small crafting notions, such as glue sticks, safety pins, embroidery floss, and chalk pencils, often become disorganized in wide, shallow drawers. By cutting recycled chipboard boxes to match the exact depth of your desk drawers, you create a snug grid of compartments without purchasing expensive plastic drawer inserts. Wrapping the recycled boxes in patterned contact paper reinforces the thin cardboard walls and creates a unified, professional appearance. This organization method transforms messy desk drawers into tidy, compartmentalized storage trays using everyday household materials.
+-------------------------------------------------------+
|  RECYCLED DRAWER DIVIDER SYSTEM                       |
|                                                       |
|   Box Material: Rigid food-grade recycled chipboard   |
|   Trim Height: 2.25 inches (clears drawer glides)     |
|   Lining Wrap: Self-adhesive matte vinyl contact sheet|
|   Base Anchor: Removable double-sided adhesive dots   |
+-------------------------------------------------------+
Collect eight to twelve empty cereal, cracker, and snack boxes, measuring the interior height of your desk drawers to determine the maximum box depth. Mark a cutting line around each box two-and-a-quarter inches from the bottom base, cutting through the chipboard with a sharp utility knife and a straight edge. Wrap the exterior and folded top rim of each box tray using self-adhesive contact paper or patterned washi tape, pressing the vinyl flat to eliminate air bubbles. Arrange the wrapped cardboard trays inside the open drawer, testing different layout configurations until the interior space is completely filled without shifting gaps. Secure the bottom corners of each tray to the drawer base using removable double-sided adhesive dots to keep the dividers stable during daily use.
Common Beginner Mistakes and How to Avoid Them
Setting up a craft room on a budget often involves storage miscalculations that can hinder your creative workflow. The most common error is purchasing decorative storage bins before taking an accurate inventory of your supplies, which leads to mismatched containers that fail to hold specific tools. To avoid this, gather and categorize all your crafting supplies before buying or building storage units. Another frequent mistake is overloading drywall anchors with heavy paper stacks or power tools without securing brackets directly into wall studs. Always use a stud finder when mounting heavy shelving, pegboards, and hanging rods to prevent wall damage. Additionally, crafters often overlook proper workspace lighting, relying entirely on dim overhead room bulbs that cause eye strain during detail work. Incorporate focused, daylight-balanced LED desk lamps over cutting and sewing stations to ensure accurate color perception and clear visibility for detailed crafting tasks.
Practical Tips for Better Results
Achieving an efficient, durable craft room on a modest budget depends on establishing clear organization habits and maintaining your workspace regularly. Keep a label maker or a set of uniform hand-lettered adhesive labels on hand to identify opaque boxes, jar lids, and drawer faces clearly, helping you return tools to their designated spots. When designing your desk layout, place your most frequently used tools—such as scissors, rulers, and primary adhesives—within arm’s reach of your main chair to minimize unnecessary reaching. Clean and reset your primary work surfaces at the end of each creative session to ensure you always start with a clear, ready workspace. Keep a dedicated waste bin and a scrap paper recycling box next to your worktable to catch trimmings as you cut. Taking proactive care of your tools and work surfaces keeps your budget craft room functional, clean, and organized over time.
Styling, Presentation, or Organization Ideas
Organizing your crafting materials by color family transforms functional storage into an attractive, dynamic feature of your room decor. Arrange thread spools, acrylic paint bottles, yarn skeins, and paper stacks in rainbow order across open shelving and clear wall racks to create a clean, intentional look. Use a unified color palette for storage bins, magazine files, and desktop caddies—such as warm wood tones, matte white, or soft sage—to keep open shelving from looking visually overwhelming. Group similar containers together on deep shelves to maintain tidy vertical lines and balanced proportions throughout the room. Incorporate small personal touches, such as displaying completed handmade art pieces in simple thrifted frames, to personalize your workspace without adding clutter. Establishing an organized, visually calm studio helps you focus on creative projects while keeping all your supplies neatly arranged.
Budget or Time Planning
Creating an affordable craft room requires realistic financial planning and structured time management to avoid overspending during setup. Rather than purchasing entire furniture collections at retail prices, allocate your budget toward high-impact foundation pieces, such as a sturdy desk worktop and supportive ergonomic seating, while sourcing storage containers from thrift stores or recycling household goods. Spread your room makeover across distinct weekend phases: focus on sorting supplies during the first weekend, install wall shelving and pegboards during the second, and build your desk and drawer organizers during the third. This phased approach prevents burnout, distributes project expenses over time, and allows you to test your layout before adding more storage. Setting aside fifteen minutes at the end of each week to file loose supplies and clean tools ensures your workspace stays organized without requiring major, time-consuming cleanups later.
Creative Expansion and Advanced Inspiration
Expanding your craft room layout allows for ongoing functional customization as your creative skills and tool collection grow. Consider mounting a secondary drop-leaf wall table nearby to create a dedicated station for messy wet media, such as resin pouring, screen printing, or watercolor painting, while keeping your main desk clean for dry assembly. Install under-shelf LED strip lighting beneath overhead pegboards and floating shelves to provide shadow-free illumination across your cutting mats and sewing plates. As your material inventory expands, build a rolling floor-to-ceiling storage tower using stacked wooden crates mounted on heavy-duty locking casters for mobile material storage. These simple expansions ensure your craft room adapts to new hobbies, dynamic projects, and evolving organizational needs while remaining functional, comfortable, and budget-friendly.
Leave a Reply